vent JEEP LIBERTY 2002 KJ / 1.G Owner's Manual
[x] Cancel search | Manufacturer: JEEP, Model Year: 2002, Model line: LIBERTY, Model: JEEP LIBERTY 2002 KJ / 1.GPages: 1803, PDF Size: 62.3 MB
Page 136 of 1803
STANDARD DIFFERENTIAL
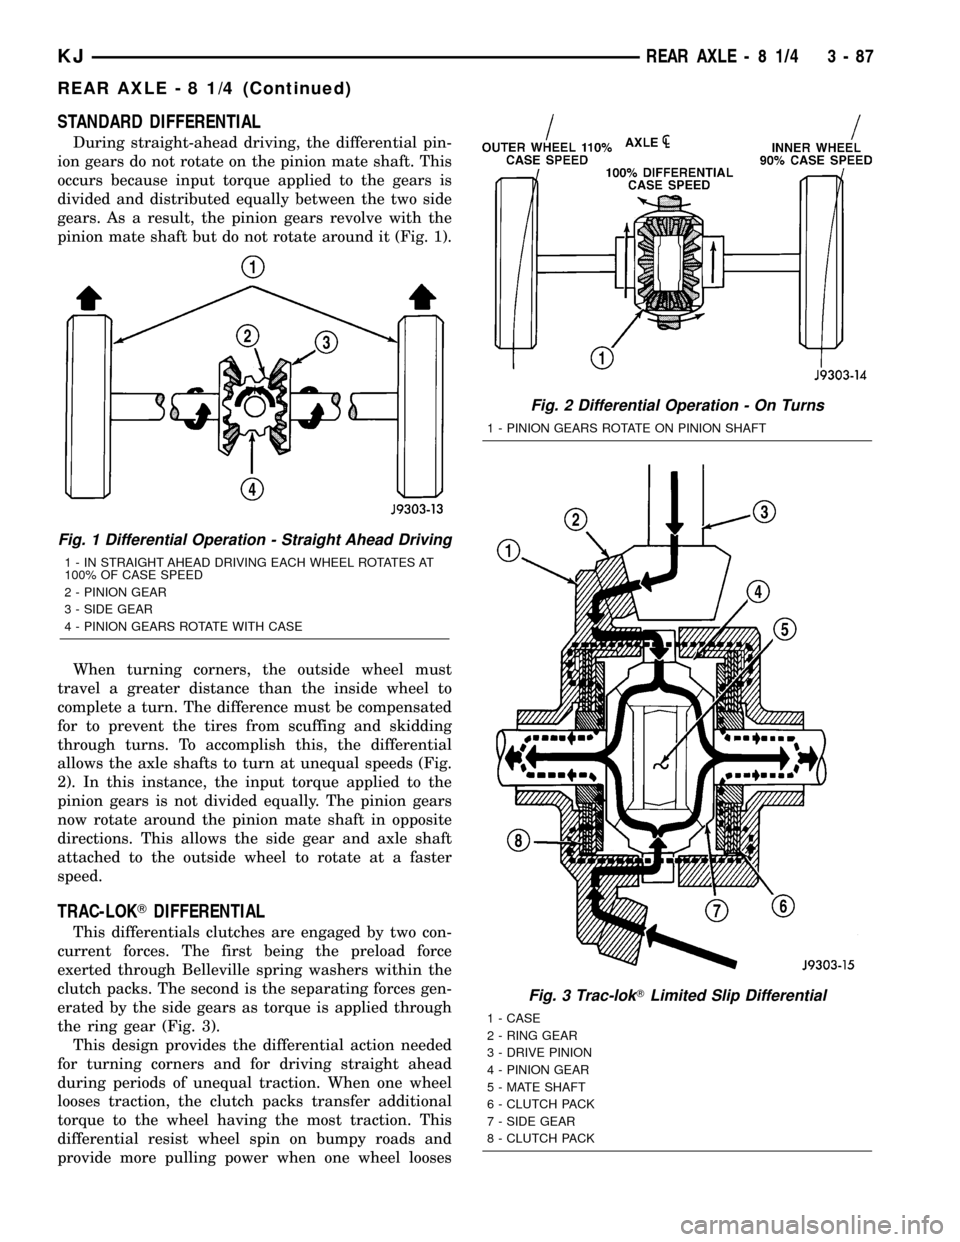
During straight-ahead driving, the differential pin-
ion gears do not rotate on the pinion mate shaft. This
occurs because input torque applied to the gears is
divided and distributed equally between the two side
gears. As a result, the pinion gears revolve with the
pinion mate shaft but do not rotate around it (Fig. 1).
When turning corners, the outside wheel must
travel a greater distance than the inside wheel to
complete a turn. The difference must be compensated
for to prevent the tires from scuffing and skidding
through turns. To accomplish this, the differential
allows the axle shafts to turn at unequal speeds (Fig.
2). In this instance, the input torque applied to the
pinion gears is not divided equally. The pinion gears
now rotate around the pinion mate shaft in opposite
directions. This allows the side gear and axle shaft
attached to the outside wheel to rotate at a faster
speed.
TRAC-LOKTDIFFERENTIAL
This differentials clutches are engaged by two con-
current forces. The first being the preload force
exerted through Belleville spring washers within the
clutch packs. The second is the separating forces gen-
erated by the side gears as torque is applied through
the ring gear (Fig. 3).
This design provides the differential action needed
for turning corners and for driving straight ahead
during periods of unequal traction. When one wheel
looses traction, the clutch packs transfer additional
torque to the wheel having the most traction. This
differential resist wheel spin on bumpy roads and
provide more pulling power when one wheel looses
Fig. 1 Differential Operation - Straight Ahead Driving
1 - IN STRAIGHT AHEAD DRIVING EACH WHEEL ROTATES AT
100% OF CASE SPEED
2 - PINION GEAR
3 - SIDE GEAR
4 - PINION GEARS ROTATE WITH CASE
Fig. 2 Differential Operation - On Turns
1 - PINION GEARS ROTATE ON PINION SHAFT
Fig. 3 Trac-lokTLimited Slip Differential
1 - CASE
2 - RING GEAR
3 - DRIVE PINION
4 - PINION GEAR
5 - MATE SHAFT
6 - CLUTCH PACK
7 - SIDE GEAR
8 - CLUTCH PACK
KJREAR AXLE - 8 1/4 3 - 87
REAR AXLE - 8 1/4 (Continued)
Page 140 of 1803
REMOVAL
(1) Raise and support the vehicle.
(2) Position a lift/jack under the axle and secure
axle to device.
(3) Remove wheels and tires.
(4) Mark propeller shaft and pinion yoke for
installation reference.
(5) Remove propeller shaft and suspend under the
vehicle.
(6) Remove brake drums, parking brake cables and
speed sensor from the axle.
(7) Disconnect the brake hose at the body junction
block.
(8) Remove brakes and backing plates.
(9) Remove vent hose from the axle shaft tube.
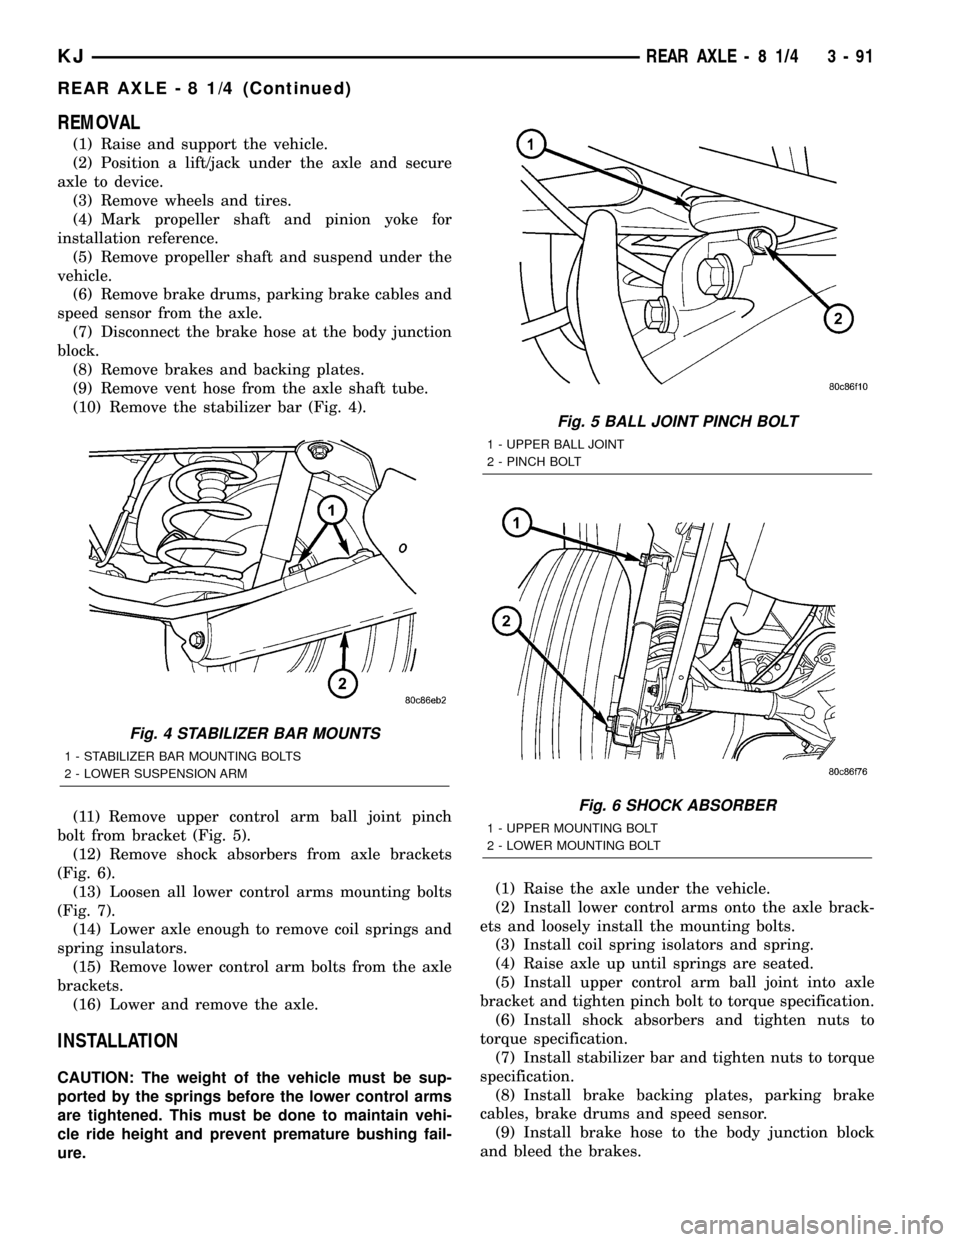
(10) Remove the stabilizer bar (Fig. 4).
(11) Remove upper control arm ball joint pinch
bolt from bracket (Fig. 5).
(12) Remove shock absorbers from axle brackets
(Fig. 6).
(13) Loosen all lower control arms mounting bolts
(Fig. 7).
(14) Lower axle enough to remove coil springs and
spring insulators.
(15) Remove lower control arm bolts from the axle
brackets.
(16) Lower and remove the axle.
INSTALLATION
CAUTION: The weight of the vehicle must be sup-
ported by the springs before the lower control arms
are tightened. This must be done to maintain vehi-
cle ride height and prevent premature bushing fail-
ure.(1) Raise the axle under the vehicle.
(2) Install lower control arms onto the axle brack-
ets and loosely install the mounting bolts.
(3) Install coil spring isolators and spring.
(4) Raise axle up until springs are seated.
(5) Install upper control arm ball joint into axle
bracket and tighten pinch bolt to torque specification.
(6) Install shock absorbers and tighten nuts to
torque specification.
(7) Install stabilizer bar and tighten nuts to torque
specification.
(8) Install brake backing plates, parking brake
cables, brake drums and speed sensor.
(9) Install brake hose to the body junction block
and bleed the brakes.
Fig. 4 STABILIZER BAR MOUNTS
1 - STABILIZER BAR MOUNTING BOLTS
2 - LOWER SUSPENSION ARM
Fig. 5 BALL JOINT PINCH BOLT
1 - UPPER BALL JOINT
2 - PINCH BOLT
Fig. 6 SHOCK ABSORBER
1 - UPPER MOUNTING BOLT
2 - LOWER MOUNTING BOLT
KJREAR AXLE - 8 1/4 3 - 91
REAR AXLE - 8 1/4 (Continued)
Page 141 of 1803
(10) Install axle vent hose.
(11) Install propeller shaft with reference marks.
(12) Install the wheels and tires.
(13) Add gear lubricant to specifications, if neces-
sary.
(14) Remove lifting device from axle and lower the
vehicle.
(15) Tighten the lower control arm bolts to torque
specification.
ADJUSTMENTS
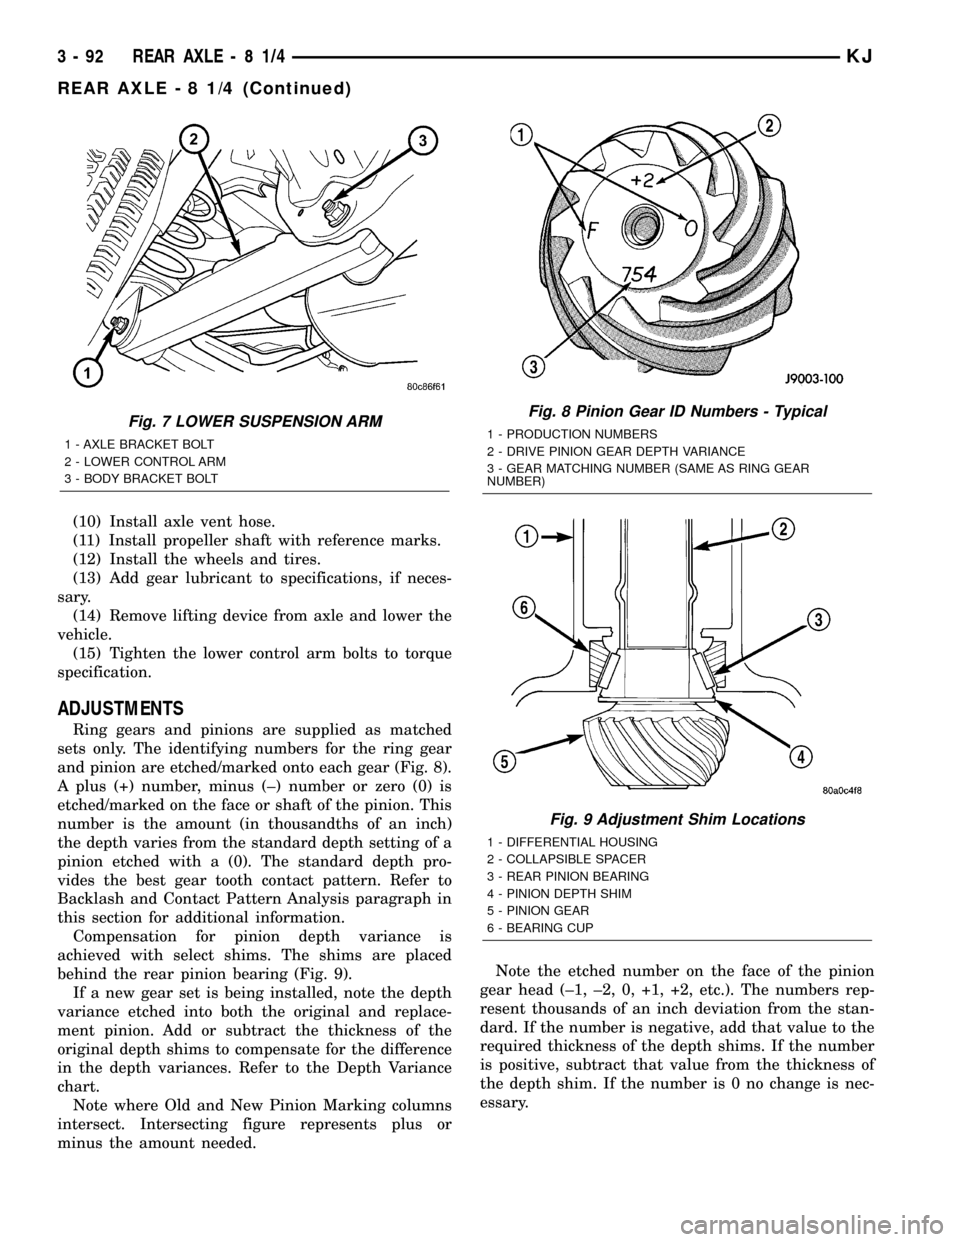
Ring gears and pinions are supplied as matched
sets only. The identifying numbers for the ring gear
and pinion are etched/marked onto each gear (Fig. 8).
A plus (+) number, minus (±) number or zero (0) is
etched/marked on the face or shaft of the pinion. This
number is the amount (in thousandths of an inch)
the depth varies from the standard depth setting of a
pinion etched with a (0). The standard depth pro-
vides the best gear tooth contact pattern. Refer to
Backlash and Contact Pattern Analysis paragraph in
this section for additional information.
Compensation for pinion depth variance is
achieved with select shims. The shims are placed
behind the rear pinion bearing (Fig. 9).
If a new gear set is being installed, note the depth
variance etched into both the original and replace-
ment pinion. Add or subtract the thickness of the
original depth shims to compensate for the difference
in the depth variances. Refer to the Depth Variance
chart.
Note where Old and New Pinion Marking columns
intersect. Intersecting figure represents plus or
minus the amount needed.Note the etched number on the face of the pinion
gear head (±1, ±2, 0, +1, +2, etc.). The numbers rep-
resent thousands of an inch deviation from the stan-
dard. If the number is negative, add that value to the
required thickness of the depth shims. If the number
is positive, subtract that value from the thickness of
the depth shim. If the number is 0 no change is nec-
essary.
Fig. 7 LOWER SUSPENSION ARM
1 - AXLE BRACKET BOLT
2 - LOWER CONTROL ARM
3 - BODY BRACKET BOLT
Fig. 8 Pinion Gear ID Numbers - Typical
1 - PRODUCTION NUMBERS
2 - DRIVE PINION GEAR DEPTH VARIANCE
3 - GEAR MATCHING NUMBER (SAME AS RING GEAR
NUMBER)
Fig. 9 Adjustment Shim Locations
1 - DIFFERENTIAL HOUSING
2 - COLLAPSIBLE SPACER
3 - REAR PINION BEARING
4 - PINION DEPTH SHIM
5 - PINION GEAR
6 - BEARING CUP
3 - 92 REAR AXLE-81/4KJ
REAR AXLE - 8 1/4 (Continued)
Page 146 of 1803
SIDE GEAR CLEARANCE
NOTE: When measuring side gear clearance, check
each gear independently. If it necessary to replace a
side gear, replace both gears as a matched set.
(1) Install the axle shafts, C-locks and pinion mate
shaft.
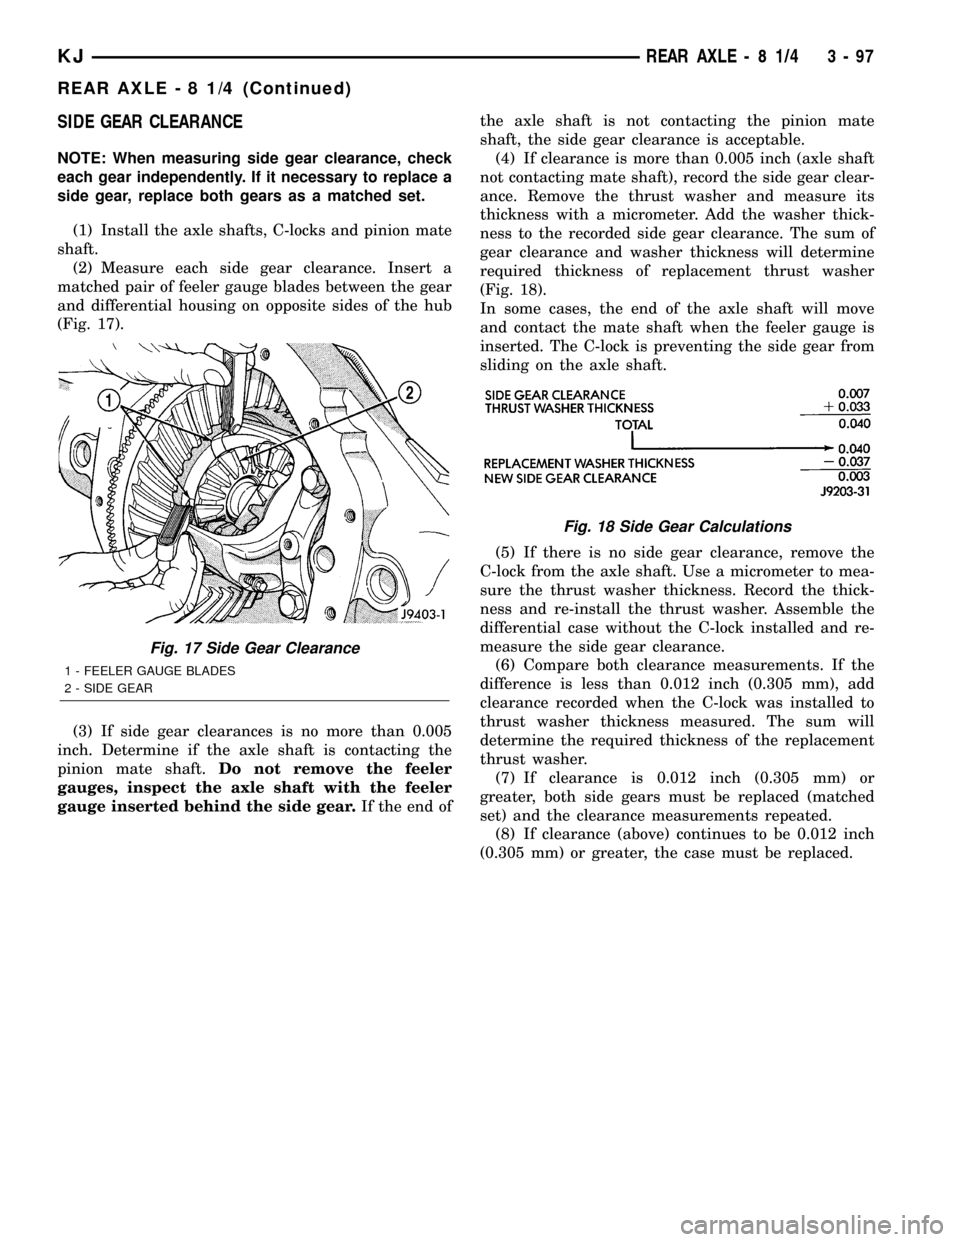
(2) Measure each side gear clearance. Insert a
matched pair of feeler gauge blades between the gear
and differential housing on opposite sides of the hub
(Fig. 17).
(3) If side gear clearances is no more than 0.005
inch. Determine if the axle shaft is contacting the
pinion mate shaft.Do not remove the feeler
gauges, inspect the axle shaft with the feeler
gauge inserted behind the side gear.If the end ofthe axle shaft is not contacting the pinion mate
shaft, the side gear clearance is acceptable.
(4) If clearance is more than 0.005 inch (axle shaft
not contacting mate shaft), record the side gear clear-
ance. Remove the thrust washer and measure its
thickness with a micrometer. Add the washer thick-
ness to the recorded side gear clearance. The sum of
gear clearance and washer thickness will determine
required thickness of replacement thrust washer
(Fig. 18).
In some cases, the end of the axle shaft will move
and contact the mate shaft when the feeler gauge is
inserted. The C-lock is preventing the side gear from
sliding on the axle shaft.
(5) If there is no side gear clearance, remove the
C-lock from the axle shaft. Use a micrometer to mea-
sure the thrust washer thickness. Record the thick-
ness and re-install the thrust washer. Assemble the
differential case without the C-lock installed and re-
measure the side gear clearance.
(6) Compare both clearance measurements. If the
difference is less than 0.012 inch (0.305 mm), add
clearance recorded when the C-lock was installed to
thrust washer thickness measured. The sum will
determine the required thickness of the replacement
thrust washer.
(7) If clearance is 0.012 inch (0.305 mm) or
greater, both side gears must be replaced (matched
set) and the clearance measurements repeated.
(8) If clearance (above) continues to be 0.012 inch
(0.305 mm) or greater, the case must be replaced.
Fig. 17 Side Gear Clearance
1 - FEELER GAUGE BLADES
2 - SIDE GEAR
Fig. 18 Side Gear Calculations
KJREAR AXLE - 8 1/4 3 - 97
REAR AXLE - 8 1/4 (Continued)
Page 150 of 1803
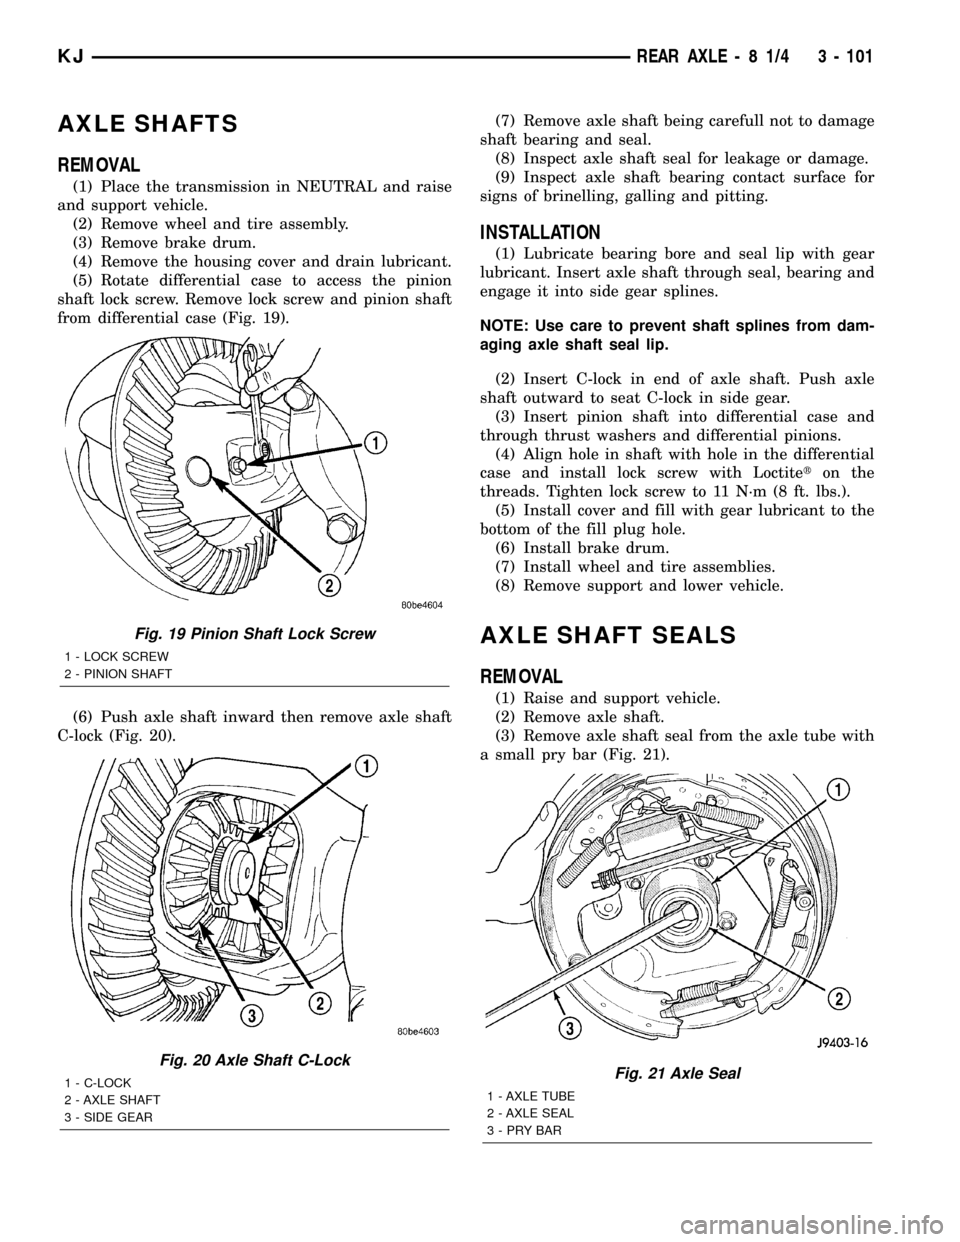
AXLE SHAFTS
REMOVAL
(1) Place the transmission in NEUTRAL and raise
and support vehicle.
(2) Remove wheel and tire assembly.
(3) Remove brake drum.
(4) Remove the housing cover and drain lubricant.
(5) Rotate differential case to access the pinion
shaft lock screw. Remove lock screw and pinion shaft
from differential case (Fig. 19).
(6) Push axle shaft inward then remove axle shaft
C-lock (Fig. 20).(7) Remove axle shaft being carefull not to damage
shaft bearing and seal.
(8) Inspect axle shaft seal for leakage or damage.
(9) Inspect axle shaft bearing contact surface for
signs of brinelling, galling and pitting.
INSTALLATION
(1) Lubricate bearing bore and seal lip with gear
lubricant. Insert axle shaft through seal, bearing and
engage it into side gear splines.
NOTE: Use care to prevent shaft splines from dam-
aging axle shaft seal lip.
(2) Insert C-lock in end of axle shaft. Push axle
shaft outward to seat C-lock in side gear.
(3) Insert pinion shaft into differential case and
through thrust washers and differential pinions.
(4) Align hole in shaft with hole in the differential
case and install lock screw with Loctiteton the
threads. Tighten lock screw to 11 N´m (8 ft. lbs.).
(5) Install cover and fill with gear lubricant to the
bottom of the fill plug hole.
(6) Install brake drum.
(7) Install wheel and tire assemblies.
(8) Remove support and lower vehicle.
AXLE SHAFT SEALS
REMOVAL
(1) Raise and support vehicle.
(2) Remove axle shaft.
(3) Remove axle shaft seal from the axle tube with
a small pry bar (Fig. 21).
Fig. 19 Pinion Shaft Lock Screw
1 - LOCK SCREW
2 - PINION SHAFT
Fig. 20 Axle Shaft C-Lock
1 - C-LOCK
2 - AXLE SHAFT
3 - SIDE GEARFig. 21 Axle Seal
1 - AXLE TUBE
2 - AXLE SEAL
3-PRYBAR
KJREAR AXLE - 8 1/4 3 - 101
Page 156 of 1803
DISASSEMBLY
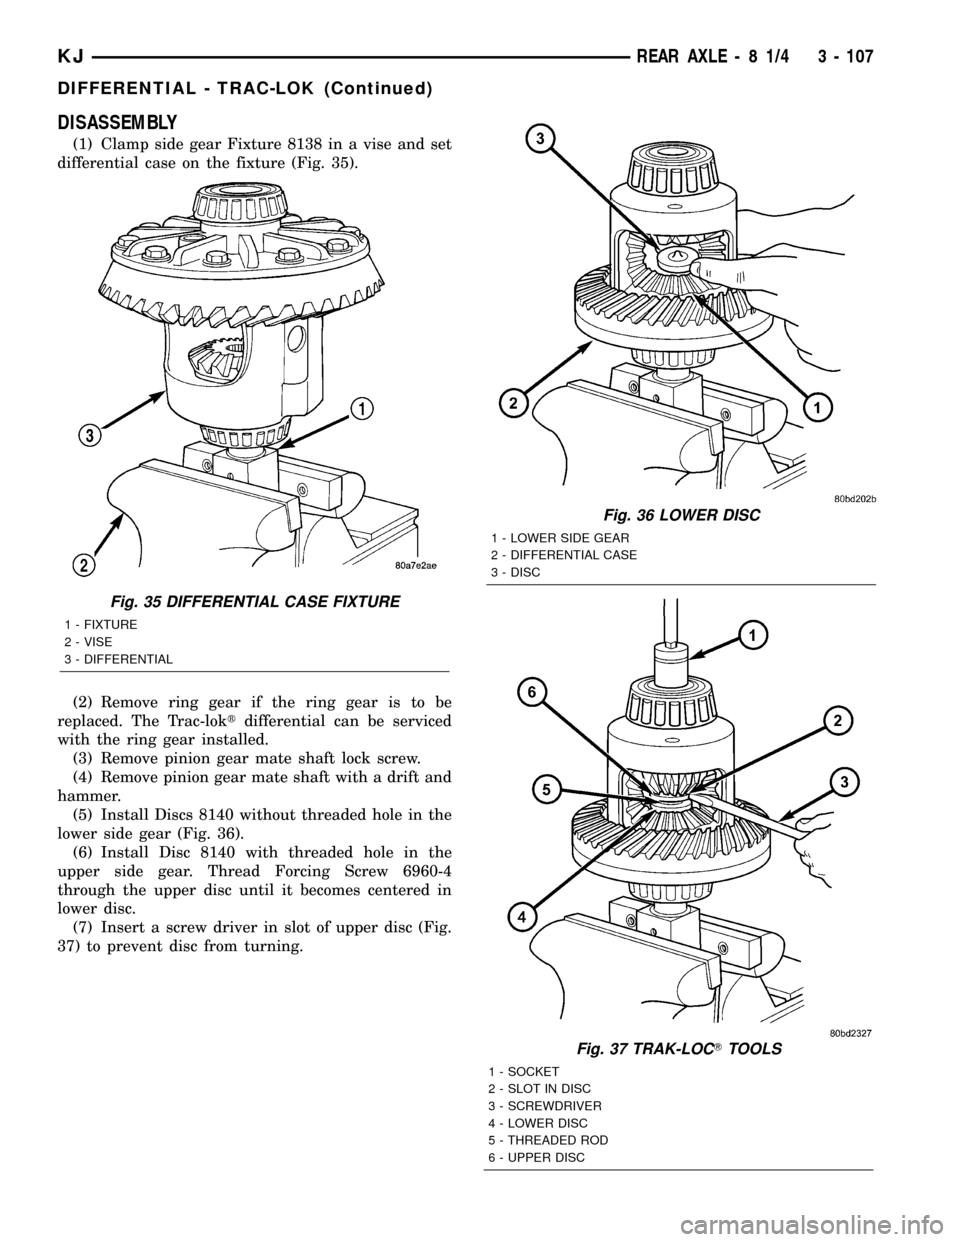
(1) Clamp side gear Fixture 8138 in a vise and set
differential case on the fixture (Fig. 35).
(2) Remove ring gear if the ring gear is to be
replaced. The Trac-loktdifferential can be serviced
with the ring gear installed.
(3) Remove pinion gear mate shaft lock screw.
(4) Remove pinion gear mate shaft with a drift and
hammer.
(5) Install Discs 8140 without threaded hole in the
lower side gear (Fig. 36).
(6) Install Disc 8140 with threaded hole in the
upper side gear. Thread Forcing Screw 6960-4
through the upper disc until it becomes centered in
lower disc.
(7) Insert a screw driver in slot of upper disc (Fig.
37) to prevent disc from turning.
Fig. 36 LOWER DISC
1 - LOWER SIDE GEAR
2 - DIFFERENTIAL CASE
3 - DISC
Fig. 37 TRAK-LOCTTOOLS
1 - SOCKET
2 - SLOT IN DISC
3 - SCREWDRIVER
4 - LOWER DISC
5 - THREADED ROD
6 - UPPER DISC
Fig. 35 DIFFERENTIAL CASE FIXTURE
1 - FIXTURE
2 - VISE
3 - DIFFERENTIAL
KJREAR AXLE - 8 1/4 3 - 107
DIFFERENTIAL - TRAC-LOK (Continued)
Page 158 of 1803
(16) Remove differential case from the fixture.
Remove side gear, clutch pack retainer and clutch
pack. Keep plates in order during removal.
CLEANING
Clean all components in cleaning solvent and dry
components with compressed air.
INSPECTION
Inspect clutch pack plates for wear, scoring or dam-
age. Replace both clutch packs if any one component
in either pack is damaged. Inspect side and pinion
gears for cracks chips or damage and replace as nec-
essary. Inspect differential case and pinion shaft and
replace if worn or damaged.
ASSEMBLY
Lubricate each component with gear lubricant
before assembly.
NOTE: New Plates and discs with fiber coating (no
grooves or lines) must be presoaked in Friction
Modifier before assembly. Soak plates and discs for
a minimum of 20 minutes.
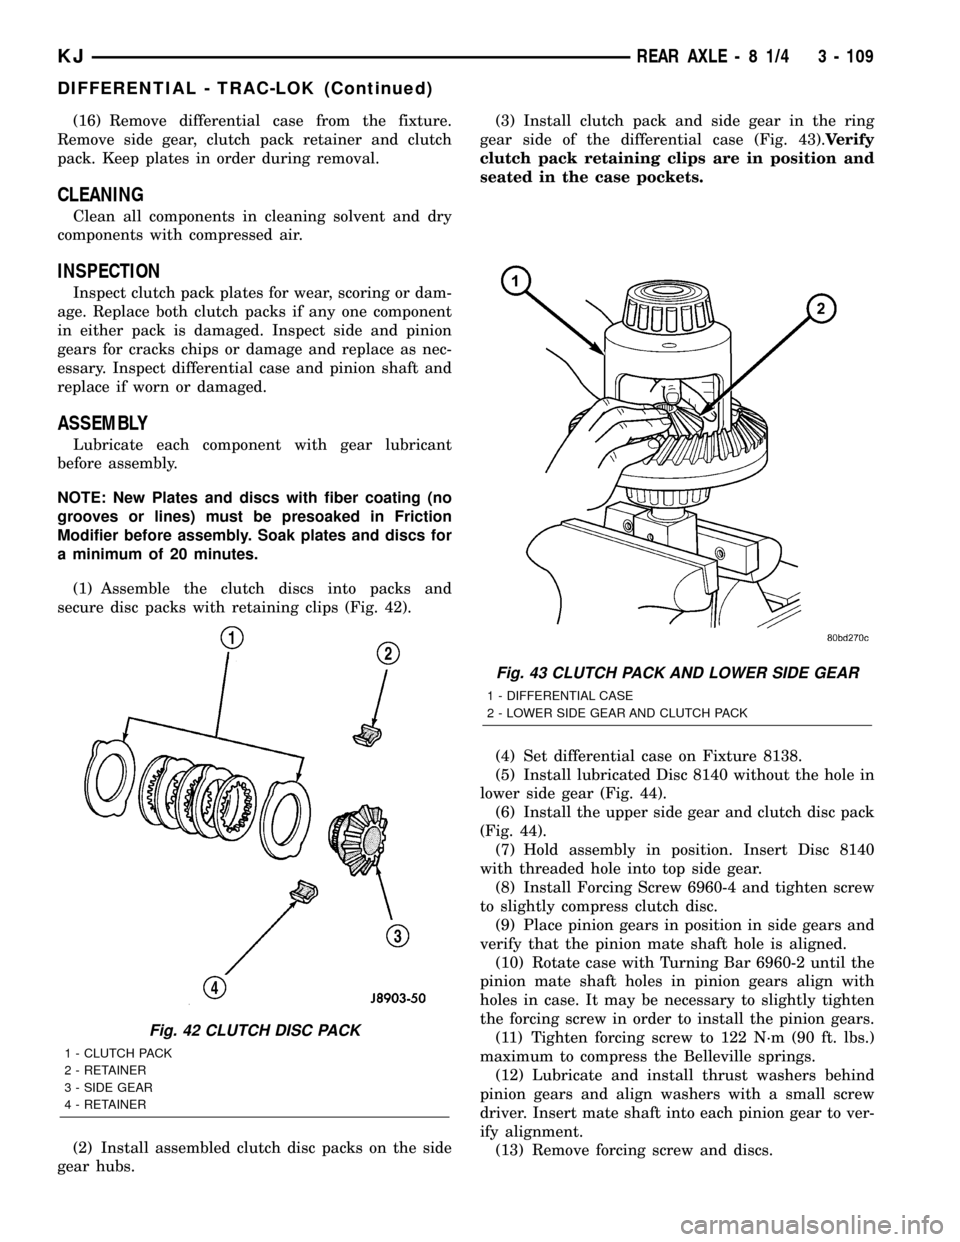
(1) Assemble the clutch discs into packs and
secure disc packs with retaining clips (Fig. 42).
(2) Install assembled clutch disc packs on the side
gear hubs.(3) Install clutch pack and side gear in the ring
gear side of the differential case (Fig. 43).Verify
clutch pack retaining clips are in position and
seated in the case pockets.
(4) Set differential case on Fixture 8138.
(5) Install lubricated Disc 8140 without the hole in
lower side gear (Fig. 44).
(6) Install the upper side gear and clutch disc pack
(Fig. 44).
(7) Hold assembly in position. Insert Disc 8140
with threaded hole into top side gear.
(8) Install Forcing Screw 6960-4 and tighten screw
to slightly compress clutch disc.
(9) Place pinion gears in position in side gears and
verify that the pinion mate shaft hole is aligned.
(10) Rotate case with Turning Bar 6960-2 until the
pinion mate shaft holes in pinion gears align with
holes in case. It may be necessary to slightly tighten
the forcing screw in order to install the pinion gears.
(11) Tighten forcing screw to 122 N´m (90 ft. lbs.)
maximum to compress the Belleville springs.
(12) Lubricate and install thrust washers behind
pinion gears and align washers with a small screw
driver. Insert mate shaft into each pinion gear to ver-
ify alignment.
(13) Remove forcing screw and discs.
Fig. 42 CLUTCH DISC PACK
1 - CLUTCH PACK
2 - RETAINER
3 - SIDE GEAR
4 - RETAINER
Fig. 43 CLUTCH PACK AND LOWER SIDE GEAR
1 - DIFFERENTIAL CASE
2 - LOWER SIDE GEAR AND CLUTCH PACK
KJREAR AXLE - 8 1/4 3 - 109
DIFFERENTIAL - TRAC-LOK (Continued)
Page 166 of 1803
DIAGNOSIS AND TESTING - MASTER
CYLINDER/POWER BOOSTER...........21
REMOVAL.............................22
INSTALLATION.........................23
MASTER CYLINDER
DESCRIPTION.........................24
OPERATION...........................24
DIAGNOSIS AND TESTING - MASTER
CYLINDER/POWER BOOSTER...........24
STANDARD PROCEDURE - MASTER
CYLINDER BLEEDING..................24
REMOVAL.............................25
INSTALLATION.........................25
FLUID RESERVOIR
REMOVAL.............................26
INSTALLATION.........................26
FLUID
DIAGNOSIS AND TESTING - BRAKE FLUID
CONTAMINATION.....................26
STANDARD PROCEDURES - MASTER
CYLINDER FLUID LEVEL................26
SPECIFICATIONS
BRAKE FLUID........................27
DRUM
DIAGNOSIS AND TESTING - BRAKE DRUM . . . 27
STANDARD PROCEDURES - BRAKE DRUM
MACHINING..........................27SUPPORT PLATE
REMOVAL
REMOVAL - 198 RBI AXLE..............27
REMOVAL - 8 1/4 AXLE.................27
INSTALLATION
INSTALLATION - 198 RBI AXLE...........28
INSTALLATION - 8 1/4 AXLE.............28
WHEEL CYLINDERS
REMOVAL.............................28
DISASSEMBLY.........................28
CLEANING............................28
INSPECTION..........................29
ASSEMBLY............................29
INSTALLATION.........................29
PARKING BRAKE
DESCRIPTION.........................29
OPERATION...........................29
ADJUSTMENTS
ADJUSTMENT - LOCK OUT.............30
CABLES
REMOVAL.............................30
INSTALLATION.........................30
LEVER
REMOVAL.............................31
INSTALLATION.........................31
BRAKES - BASE
DESCRIPTION
Power assist front disc and rear drum brakes are
standard equipment. Disc brake components consist
of single piston calipers and ventilated rotors. Rear
drum brakes are dual shoe units with cast brake
drums.
The parking brake mechanism is lever and cable
operated. The cables are attached to levers on the
rear drum brake secondary shoes. The parking
brakes are operated by a hand lever.
A dual diaphragm vacuum power brake booster is
used for all applications. All models have an alumi-
num master cylinder with plastic reservoir.
All models are equipped with a combination valve.
The valve contains a pressure differential valve and
switch and a fixed rate rear proportioning valve.
Factory brake lining on all models consists of an
organic base material combined with metallic parti-
cles. The original equipment linings do not contain
asbestos.
WARNING
WARNING: DUST AND DIRT ACCUMULATING ON
BRAKE PARTS DURING NORMAL USE MAY CON-
TAIN ASBESTOS FIBERS FROM AFTERMARKET
LININGS. BREATHING EXCESSIVE CONCENTRA-
TIONS OF ASBESTOS FIBERS CAN CAUSE SERI-
OUS BODILY HARM. EXERCISE CARE WHEN
SERVICING BRAKE PARTS. DO NOT CLEAN
BRAKE PARTS WITH COMPRESSED AIR OR BY
DRY BRUSHING. USE A VACUUM CLEANER SPE-
CIFICALLY DESIGNED FOR THE REMOVAL OF
ASBESTOS FIBERS FROM BRAKE COMPONENTS.
IF A SUITABLE VACUUM CLEANER IS NOT AVAIL-
ABLE, CLEANING SHOULD BE DONE WITH A
WATER DAMPENED CLOTH. DO NOT SAND, OR
GRIND BRAKE LINING UNLESS EQUIPMENT USED
IS DESIGNED TO CONTAIN THE DUST RESIDUE.
DISPOSE OF ALL RESIDUE CONTAINING ASBES-
TOS FIBERS IN SEALED BAGS OR CONTAINERS
TO MINIMIZE EXPOSURE TO YOURSELF AND OTH-
ERS. FOLLOW PRACTICES PRESCRIBED BY THE
OCCUPATIONAL SAFETY AND HEALTH ADMINIS-
TRATION AND THE ENVIRONMENTAL PROTECTION
AGENCY FOR THE HANDLING, PROCESSING, AND
DISPOSITION OF DUST OR DEBRIS THAT MAY
CONTAIN ASBESTOS FIBERS.
5 - 2 BRAKES - BASEKJ
Page 170 of 1803
STANDARD PROCEDURE - MANUAL BLEEDING
Use Mopar brake fluid, or an equivalent quality
fluid meeting SAE J1703-F and DOT 3 standards
only. Use fresh, clean fluid from a sealed container at
all times.
Do not pump the brake pedal at any time while
bleeding. Air in the system will be compressed into
small bubbles that are distributed throughout the
hydraulic system. This will make additional bleeding
operations necessary.
Do not allow the master cylinder to run out of fluid
during bleed operations. An empty cylinder will allow
additional air to be drawn into the system. Check the
cylinder fluid level frequently and add fluid as
needed.
Bleed only one brake component at a time in the
following sequence:
²Master Cylinder
²Combination Valve
²Right Rear Wheel
²Left Rear Wheel
²Right Front Wheel
²Left Front Wheel
(1) Remove reservoir filler caps and fill reservoir.
(2) If calipers, or wheel cylinders were overhauled,
open all caliper and wheel cylinder bleed screws.
Then close each bleed screw as fluid starts to drip
from it. Top off master cylinder reservoir once more
before proceeding.
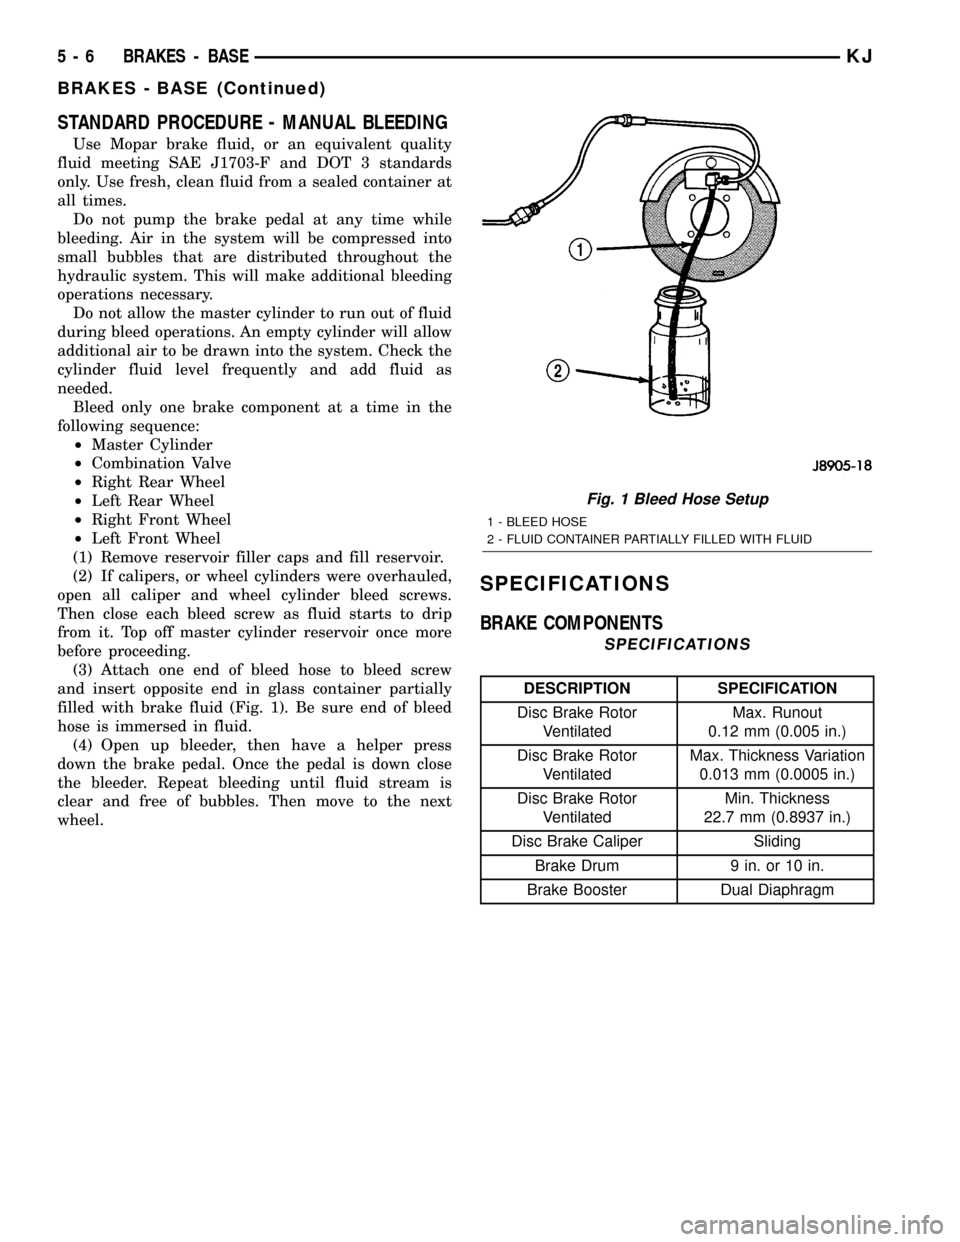
(3) Attach one end of bleed hose to bleed screw
and insert opposite end in glass container partially
filled with brake fluid (Fig. 1). Be sure end of bleed
hose is immersed in fluid.
(4) Open up bleeder, then have a helper press
down the brake pedal. Once the pedal is down close
the bleeder. Repeat bleeding until fluid stream is
clear and free of bubbles. Then move to the next
wheel.
SPECIFICATIONS
BRAKE COMPONENTS
SPECIFICATIONS
DESCRIPTION SPECIFICATION
Disc Brake Rotor
VentilatedMax. Runout
0.12 mm (0.005 in.)
Disc Brake Rotor
VentilatedMax. Thickness Variation
0.013 mm (0.0005 in.)
Disc Brake Rotor
VentilatedMin. Thickness
22.7 mm (0.8937 in.)
Disc Brake Caliper Sliding
Brake Drum 9 in. or 10 in.
Brake Booster Dual Diaphragm
Fig. 1 Bleed Hose Setup
1 - BLEED HOSE
2 - FLUID CONTAINER PARTIALLY FILLED WITH FLUID
5 - 6 BRAKES - BASEKJ
BRAKES - BASE (Continued)
Page 172 of 1803
BRAKE LINES
DESCRIPTION
Flexible rubber hose is used at both front brakes
and at the rear axle junction block. Double walled
steel tubing is used to connect the master cylinder to
the major hydraulic braking components and then to
the flexible rubber hoses. Double inverted style and
ISO style flares are used on the brake lines.
DIAGNOSIS AND TESTING - BRAKE LINE AND
HOSES
Flexible rubber hose is used at both front brakes
and at the rear axle junction block. Inspect the hoses
whenever the brake system is serviced, at every
engine oil change, or whenever the vehicle is in for
service.
Inspect the hoses for surface cracking, scuffing, or
worn spots. Replace any brake hose immediately if
the fabric casing of the hose is exposed due to cracks
or abrasions.
Also check brake hose installation. Faulty installa-
tion can result in kinked, twisted hoses, or contact
with the wheels and tires or other chassis compo-
nents. All of these conditions can lead to scuffing,
cracking and eventual failure.
The steel brake lines should be inspected periodi-
cally for evidence of corrosion, twists, kinks, leaks, or
other damage. Heavily corroded lines will eventually
rust through causing leaks. In any case, corroded or
damaged brake lines should be replaced.
Factory replacement brake lines and hoses are rec-
ommended to ensure quality, correct length and supe-
rior fatigue life. Care should be taken to make sure
that brake line and hose mating surfaces are clean
and free from nicks and burrs. Also remember that
right and left brake hoses are not interchangeable.
Use new copper seal washers at all caliper connec-
tions. Be sure brake line connections are properly
made (not cross threaded) and tightened to recom-
mended torque.
STANDARD PROCEDURE
STANDARD PROCEDURE - DOUBLE INVERTED
FLARING
A preformed metal brake tube is recommended and
preferred for all repairs. However, double-wall steel
tube can be used for emergency repair when factory
replacement parts are not readily available.
Special bending tools are needed to avoid kinking
or twisting of metal brake tubes. Special flaring tools
are needed to make a double inverted flare or ISO
flare.(1) Cut off damaged tube with Tubing Cutter.
(2) Ream cut edges of tubing to ensure proper
flare.
(3) Install replacement tube nut on the tube.
(4) Insert tube in flaring tool.
(5) Place gauge form over the end of the tube.
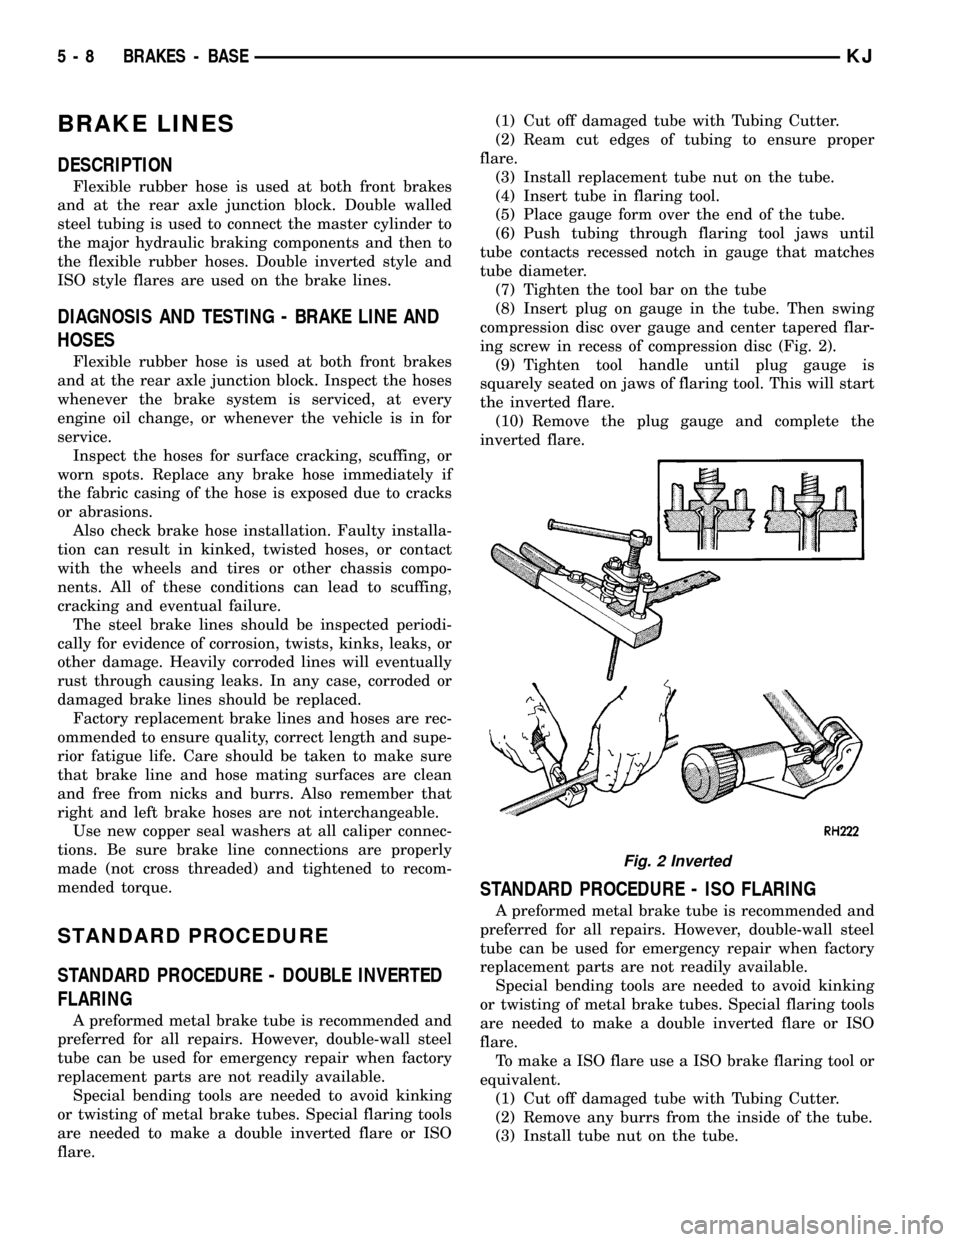
(6) Push tubing through flaring tool jaws until
tube contacts recessed notch in gauge that matches
tube diameter.
(7) Tighten the tool bar on the tube
(8) Insert plug on gauge in the tube. Then swing
compression disc over gauge and center tapered flar-
ing screw in recess of compression disc (Fig. 2).
(9) Tighten tool handle until plug gauge is
squarely seated on jaws of flaring tool. This will start
the inverted flare.
(10) Remove the plug gauge and complete the
inverted flare.
STANDARD PROCEDURE - ISO FLARING
A preformed metal brake tube is recommended and
preferred for all repairs. However, double-wall steel
tube can be used for emergency repair when factory
replacement parts are not readily available.
Special bending tools are needed to avoid kinking
or twisting of metal brake tubes. Special flaring tools
are needed to make a double inverted flare or ISO
flare.
To make a ISO flare use a ISO brake flaring tool or
equivalent.
(1) Cut off damaged tube with Tubing Cutter.
(2) Remove any burrs from the inside of the tube.
(3) Install tube nut on the tube.
Fig. 2 Inverted
5 - 8 BRAKES - BASEKJ