JEEP LIBERTY 2008 KK / 2.G Owners Manual
Manufacturer: JEEP, Model Year: 2008, Model line: LIBERTY, Model: JEEP LIBERTY 2008 KK / 2.GPages: 493
Page 431 of 493

Wheel and Wheel Trim Care
All wheels and wheel trim, especially aluminum and
chrome plated wheels should be cleaned regularly with a
mild soap and water to prevent corrosion. To remove
heavy soil and/or excessive brake dust, use Mopart
Wheel Cleaner (05066247AB) or equivalent or select a
nonabrasive, non-acidic cleaner. Do not use scouring
pads, steel wool, a bristle brush, or metal polishes. Only
Mopartor equivalent is recommended. Do not use oven
cleaner. Avoid automatic car washes that use acidic
solutions or harsh brushes that may damage the wheels'
protective finish.
Interior Care
Instrument Panel Cover
The instrument panel cover has a low glare surface,
which minimizes reflections in the windshield. Do notuse protectants or other products, which may cause
undesirable reflections. Use soap and warm water to
restore the low glare surface.
Cleaning Interior Trim
Clean interior trim with a damp cloth and Mopar Total
Clean, and if necessary, follow with Mopar Spot & Stain
Remover. Do not use harsh cleaners or Armorall. Use
Mopar Total Clean to clean vinyl upholstery.
Cleaning Leather Upholstery
MopartTotal Clean is specifically recommended for
leather upholstery.
Your leather upholstery can be best preserved by regular
cleaning with a damp soft cloth. Small particles of dirt
can act as an abrasive and damage the leather upholstery
and should be removed promptly with a damp cloth.
Stubborn soils can be removed easily with a soft cloth
and MopartTotal Clean. Care should be taken to avoid
soaking leather upholstery with any liquid. Please do not
MAINTAINING YOUR VEHICLE 431
7
Page 432 of 493

use polishes, oils, cleaning fluids, solvents, detergents, or
ammonia-based cleaners to clean leather upholstery. Ap-
plication of a leather conditioner is not required to
maintain the original condition.
WARNING!
Do not use volatile solvents for cleaning purposes.
Many are potentially flammable, and if used in
closed areas they may cause respiratory harm.
YES EssentialstFabric Cleaning Procedure ± If
Equipped
YES Essentialstseats may be cleaned in the following
manner:
²Remove as much of the stain as possible by blotting
with a clean, dry towel.
²Blot any remaining stain with a clean, damp towel.
²For tough stains, apply MopartTotal Clean or a mild
soap solution to a clean, damp cloth and remove the
stain. Use a fresh, damp towel to remove the soap
residue.
²For grease stains, apply MopartMulti-Purpose
Cleaner to a clean, damp cloth and remove the stain.
Use a fresh, damp towel to remove the soap residue.
²Do not use any solvents or protectants on Yes Essen-
tialstproducts.
Cleaning Headlights
Your vehicle has plastic headlights that are lighter and
less susceptible to stone breakage than glass headlights.
Plastic is not as scratch resistant as glass and therefore
different lens cleaning procedures must be followed.
432 MAINTAINING YOUR VEHICLE
Page 433 of 493

To minimize the possibility of scratching the lenses and
reducing light output, avoid wiping with a dry cloth. To
remove road dirt, wash with a mild soap solution fol-
lowed by rinsing.
Do not use abrasive cleaning components, solvents, steel
wool or other aggressive material to clean the lenses.
Glass Surfaces
All glass surfaces should be cleaned on a regular basis
with MopartGlass Cleaner or any commercial
household-type glass cleaner. Never use an abrasive type
cleaner. Use caution when cleaning the inside rear win-
dow equipped with electric defrosters or the right rear
quarter window equipped with the radio antenna. Do
not use scrapers or other sharp instruments, which may
scratch the elements.
When cleaning the rear view mirror, spray cleaner on the
towel or rag that you are using. Do not spray cleaner
directly on the mirror.
Cleaning Plastic Instrument Cluster Lenses
The lenses in front of the instruments in this vehicle are
molded in clear plastic. When cleaning the lenses, care
must be taken to avoid scratching the plastic.
1. Clean with a wet soft rag. A mild soap solution may be
used, but do not use high alcohol content or abrasive
cleaners. If soap is used, wipe clean with a clean damp
rag.
2. Dry with a soft tissue.
Seat Belt Maintenance
Do not bleach, dye, or clean the belts with chemical
solvents or abrasive cleaners. This will weaken the fabric.
Sun damage can also weaken the fabric.
If the belts need cleaning, use a mild soap solution or
lukewarm water. Dry with a soft tissue. Do not remove
the belts from the car to wash them.
MAINTAINING YOUR VEHICLE 433
7
Page 434 of 493

Replace the belts if they appear frayed or worn or if the
buckles do not work properly.
SKY SLIDERTTOP CARE
Immediate removal of any contaminant is recommended.
Regular washing of the top will enhance its life and
appearance, and make successive cleaning easier. Do not
subject the top to excessive heat. Frequently vacuum the
top and storage compartment.
Washing
Hand washing or an automatic car wash with a soft cloth
system is preferred.
CAUTION!
Avoid pointing a high-pressure hand held spay wand
directly at the sides of the top, as this can damage the
seal and force water past the weather strips.
General Cleaning
Careful vacuuming of the top before washing is helpful
in removing dust and other foreign particles.
If hand washing:
²Wash in partial shade instead of direct sun.
²Wet the entire vehicle before washing the top.
²Wash the top with a soft, natural bristle scrub brush,
and a mild soap solution such as liquid dishwashing
soap. Do not use detergent.
²Scrub in all directions, covering an area of about two
square feet at a time. Avoid heavy scrubbing.
²Rinse the entire vehicle with water to remove all soap
and dirt from the top fabric and to prevent streaking
on painted and chrome surfaces.
434 MAINTAINING YOUR VEHICLE
Page 435 of 493

²Allow the top to dry before opening. Vacuuming the
top with a wet/dry shop vacuum will decrease the
top's drying time, ensure removal of all dirt, and
delete streaks in the material.
²Multiple cleanings may be necessary to remove stub-
born stains. If stains persist, contact your local dealer-
ship for further suggestions.
CAUTION!
Never use an abrasive type cleaner or bleaches.
Cleaners should not contain silicones, organic sol-
vents, petroleum distillates, or plasticizers. Always
wait until the top is thoroughly dry before lowering
it into the storage area.
Additional Cleaning Procedure
For additional cleaning assistance in removing stubborn
stains, apply Mopar Convertible Cloth Top Cleaner #
4883061 to the complete stain, extending 2 inches (50
mm) beyond the stain. With a soft bristle brush, scrub in
all directions over the stain. Avoid heavy scrubbing.
Rinse the area with warm water. If the stain is still
apparent, repeat the cleaning procedure. When the stain
is no longer showing, rinse the complete top with warm
water. Let the top dry before lowering it.
Protection
For appearance purposes, you may wish to protect the
acrylic (cloth) top periodically. A fabric protectant such as
Scotchguardtis suggested. The top should be clean and
dry before application of the protectant.
MAINTAINING YOUR VEHICLE 435
7
Page 436 of 493
CAUTION!
Avoid getting Scotchguardton the surrounding
weather strips, moldings, paint, or glass. Damage to
these items might occur.
Weather Strip Care
Lubricate the weather strips periodically with Mopar
Weather Strip Lubricant (part number 4773427), to keep
them soft and pliable.
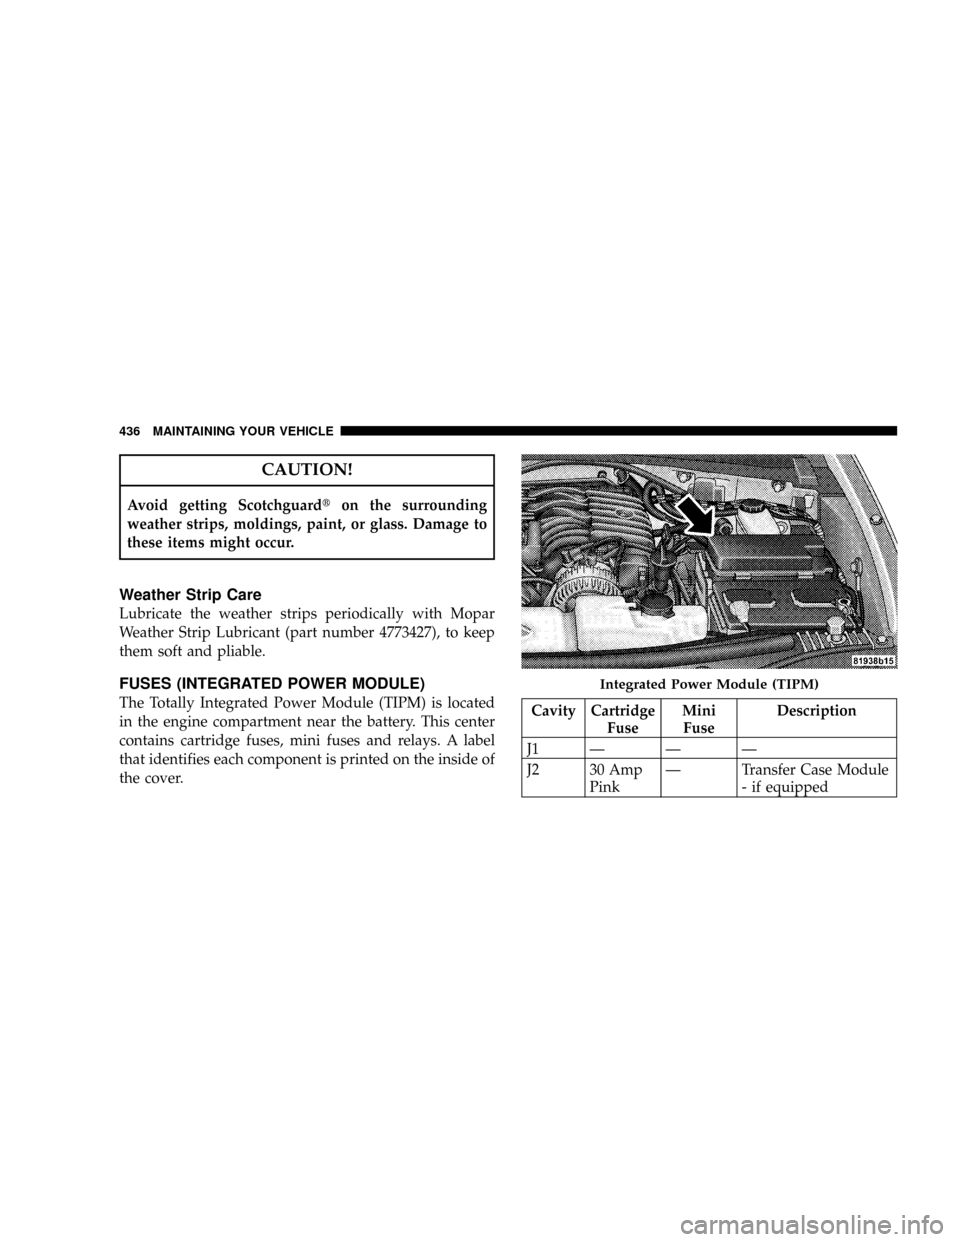
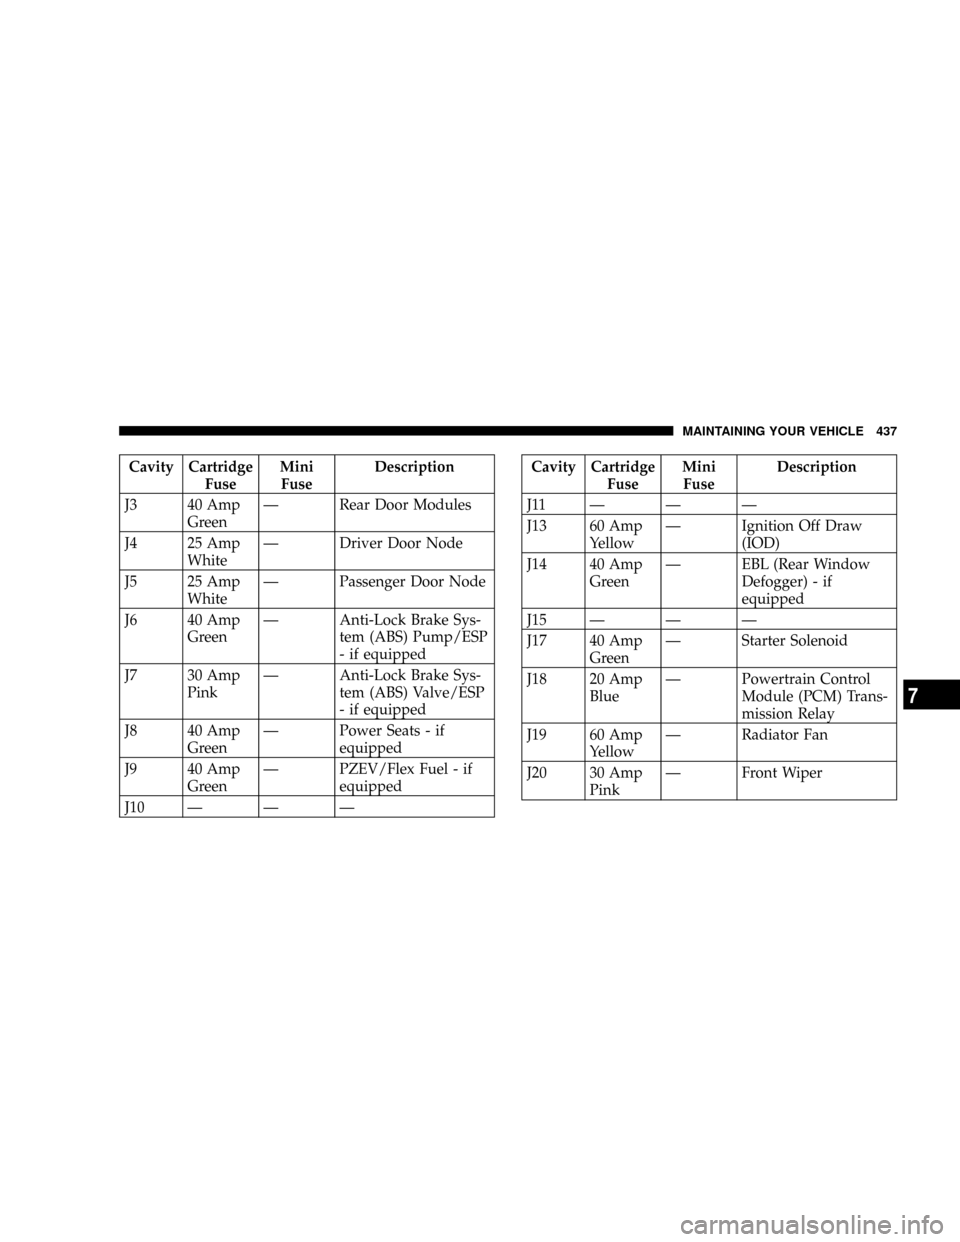
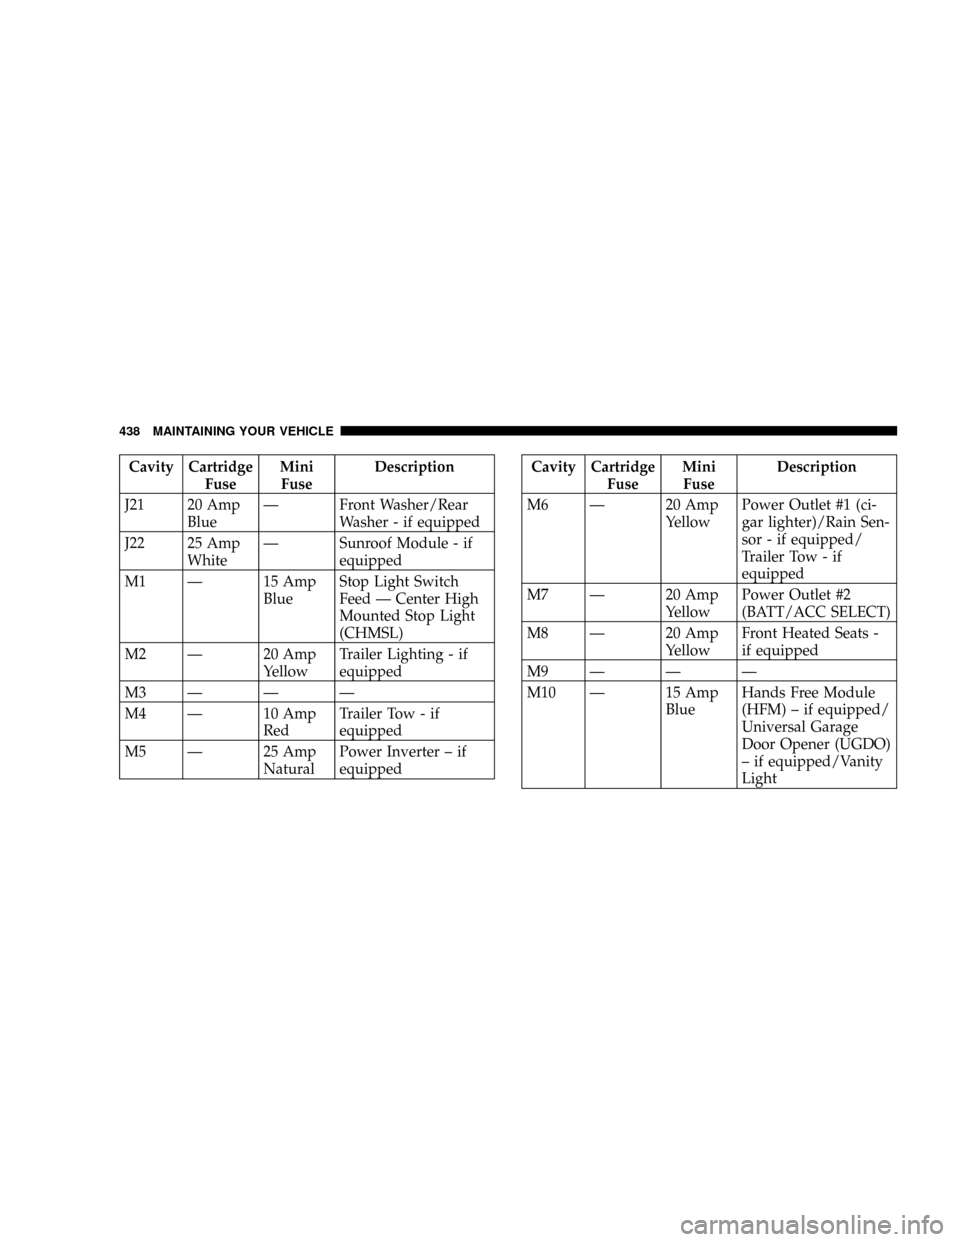
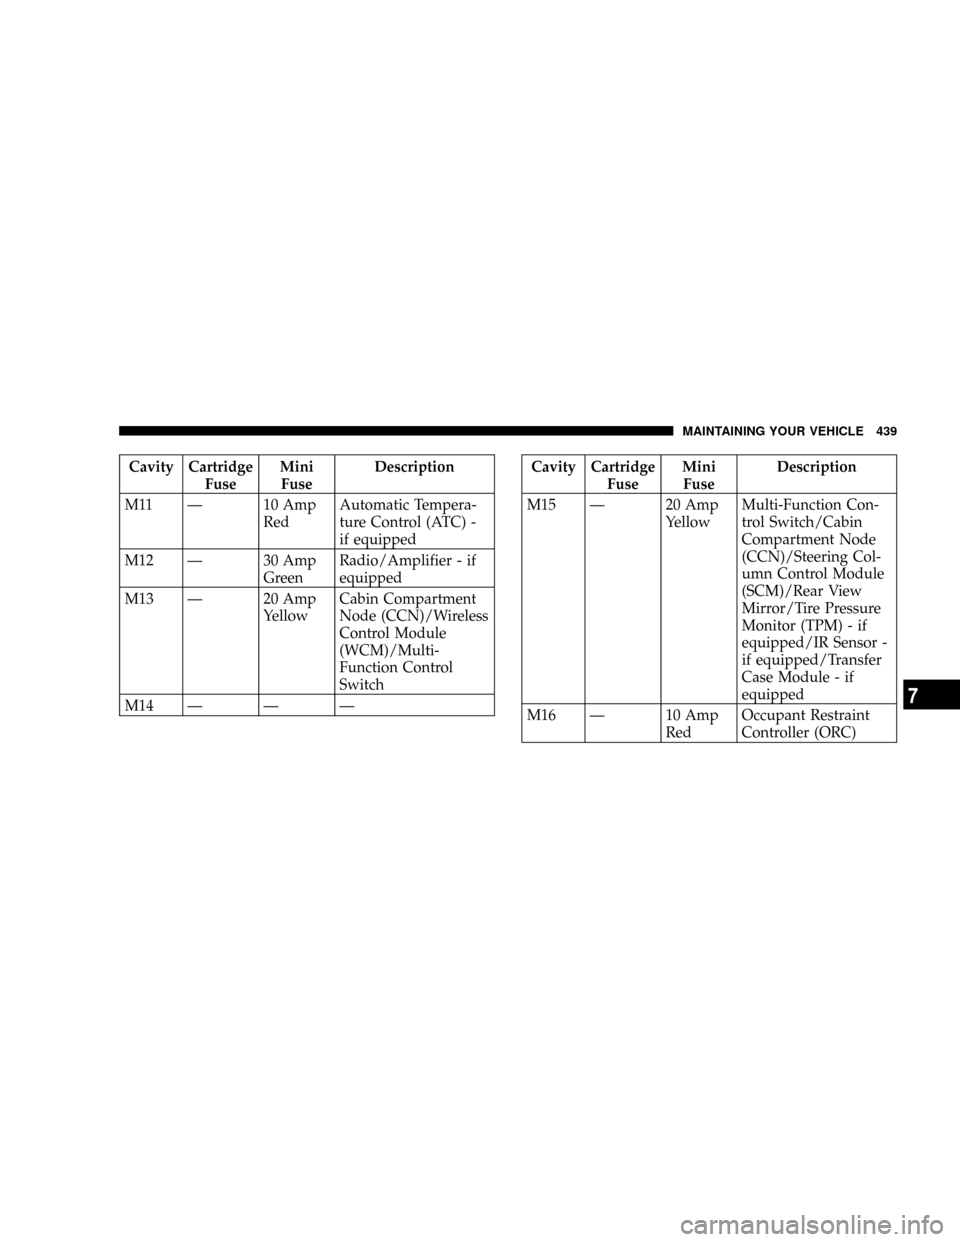
FUSES (INTEGRATED POWER MODULE)
The Totally Integrated Power Module (TIPM) is located
in the engine compartment near the battery. This center
contains cartridge fuses, mini fuses and relays. A label
that identifies each component is printed on the inside of
the cover.Cavity Cartridge
FuseMini
FuseDescription
J1ÐÐÐ
J2 30 Amp
PinkÐ Transfer Case Module
- if equipped
Integrated Power Module (TIPM)
436 MAINTAINING YOUR VEHICLE
Page 437 of 493
Cavity Cartridge
FuseMini
FuseDescription
J3 40 Amp
GreenÐ Rear Door Modules
J4 25 Amp
WhiteÐ Driver Door Node
J5 25 Amp
WhiteÐ Passenger Door Node
J6 40 Amp
GreenÐ Anti-Lock Brake Sys-
tem (ABS) Pump/ESP
- if equipped
J7 30 Amp
PinkÐ Anti-Lock Brake Sys-
tem (ABS) Valve/ESP
- if equipped
J8 40 Amp
GreenÐ Power Seats - if
equipped
J9 40 Amp
GreenÐ PZEV/Flex Fuel - if
equipped
J10 Ð Ð ÐCavity Cartridge
FuseMini
FuseDescription
J11ÐÐÐ
J13 60 Amp
YellowÐ Ignition Off Draw
(IOD)
J14 40 Amp
GreenÐ EBL (Rear Window
Defogger) - if
equipped
J15 Ð Ð Ð
J17 40 Amp
GreenÐ Starter Solenoid
J18 20 Amp
BlueÐ Powertrain Control
Module (PCM) Trans-
mission Relay
J19 60 Amp
YellowÐ Radiator Fan
J20 30 Amp
PinkÐ Front Wiper
MAINTAINING YOUR VEHICLE 437
7
Page 438 of 493
Cavity Cartridge
FuseMini
FuseDescription
J21 20 Amp
BlueÐ Front Washer/Rear
Washer - if equipped
J22 25 Amp
WhiteÐ Sunroof Module - if
equipped
M1 Ð 15 Amp
BlueStop Light Switch
Feed Ð Center High
Mounted Stop Light
(CHMSL)
M2 Ð 20 Amp
YellowTrailer Lighting - if
equipped
M3ÐÐÐ
M4 Ð 10 Amp
RedTrailer Tow - if
equipped
M5 Ð 25 Amp
NaturalPower Inverter ± if
equippedCavity Cartridge
FuseMini
FuseDescription
M6 Ð 20 Amp
YellowPower Outlet #1 (ci-
gar lighter)/Rain Sen-
sor - if equipped/
Trailer Tow - if
equipped
M7 Ð 20 Amp
YellowPower Outlet #2
(BATT/ACC SELECT)
M8 Ð 20 Amp
YellowFront Heated Seats -
if equipped
M9ÐÐÐ
M10 Ð 15 Amp
BlueHands Free Module
(HFM) ± if equipped/
Universal Garage
Door Opener (UGDO)
± if equipped/Vanity
Light
438 MAINTAINING YOUR VEHICLE
Page 439 of 493
Cavity Cartridge
FuseMini
FuseDescription
M11 Ð 10 Amp
RedAutomatic Tempera-
ture Control (ATC) -
if equipped
M12 Ð 30 Amp
GreenRadio/Amplifier - if
equipped
M13 Ð 20 Amp
YellowCabin Compartment
Node (CCN)/Wireless
Control Module
(WCM)/Multi-
Function Control
Switch
M14 Ð Ð ÐCavity Cartridge
FuseMini
FuseDescription
M15 Ð 20 Amp
YellowMulti-Function Con-
trol Switch/Cabin
Compartment Node
(CCN)/Steering Col-
umn Control Module
(SCM)/Rear View
Mirror/Tire Pressure
Monitor (TPM) - if
equipped/IR Sensor -
if equipped/Transfer
Case Module - if
equipped
M16 Ð 10 Amp
RedOccupant Restraint
Controller (ORC)
MAINTAINING YOUR VEHICLE 439
7
Page 440 of 493
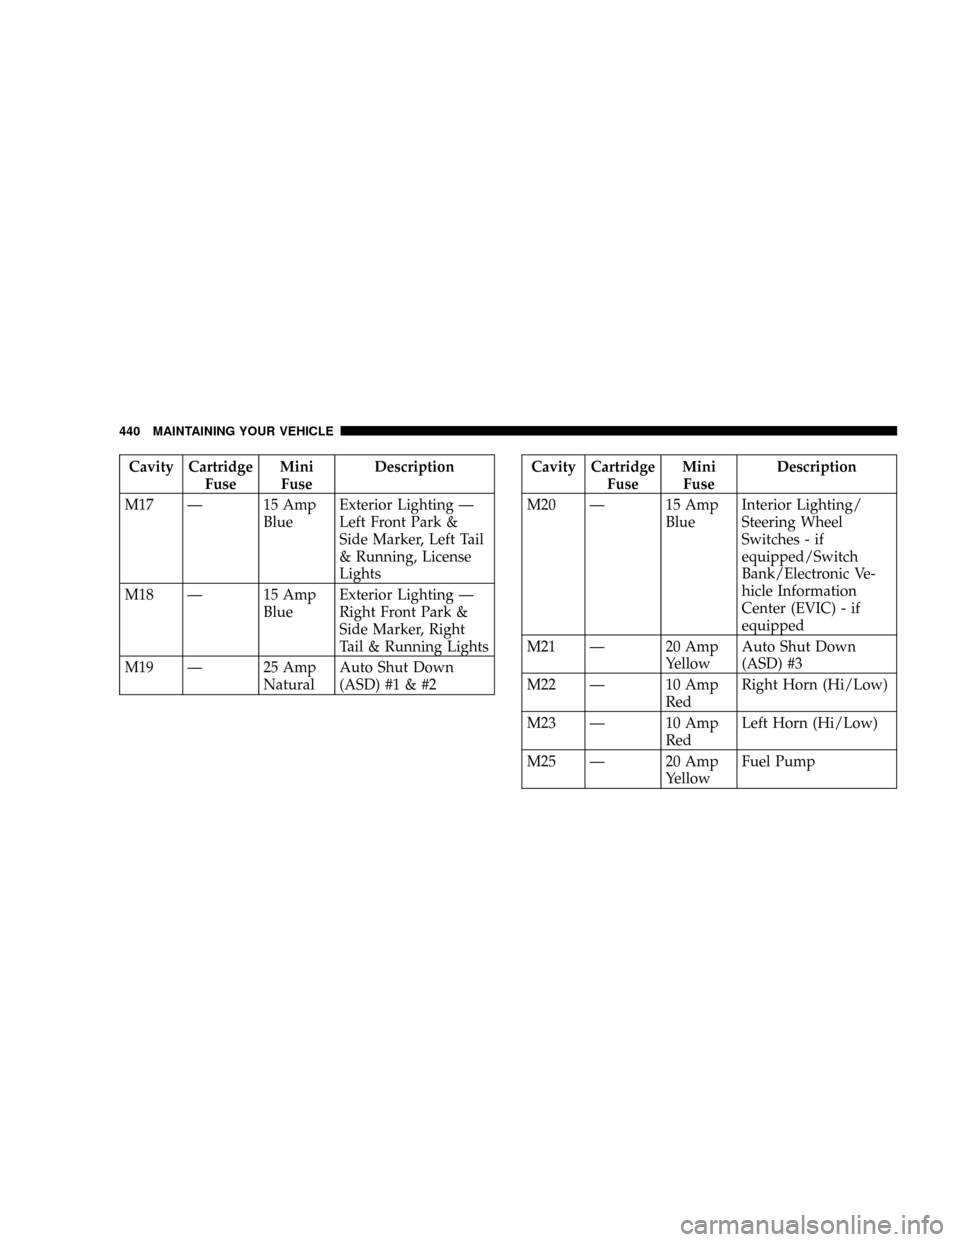
Cavity Cartridge
FuseMini
FuseDescription
M17 Ð 15 Amp
BlueExterior Lighting Ð
Left Front Park &
Side Marker, Left Tail
& Running, License
Lights
M18 Ð 15 Amp
BlueExterior Lighting Ð
Right Front Park &
Side Marker, Right
Tail & Running Lights
M19 Ð 25 Amp
NaturalAuto Shut Down
(ASD) #1 & #2Cavity Cartridge
FuseMini
FuseDescription
M20 Ð 15 Amp
BlueInterior Lighting/
Steering Wheel
Switches - if
equipped/Switch
Bank/Electronic Ve-
hicle Information
Center (EVIC) - if
equipped
M21 Ð 20 Amp
YellowAuto Shut Down
(ASD) #3
M22 Ð 10 Amp
RedRight Horn (Hi/Low)
M23 Ð 10 Amp
RedLeft Horn (Hi/Low)
M25 Ð 20 Amp
YellowFuel Pump
440 MAINTAINING YOUR VEHICLE