parking brake JEEP LIBERTY 2008 KK / 2.G Owners Manual
[x] Cancel search | Manufacturer: JEEP, Model Year: 2008, Model line: LIBERTY, Model: JEEP LIBERTY 2008 KK / 2.GPages: 493
Page 69 of 493
Data Parameters that May Be Recorded:
²Diagnostic trouble code(s) and warning light status for
electronically controlled safety systems, including the
airbag system
²Airbag disable light status (if equipped)
²9Time9of airbag deployment (in terms of ignition
cycles and vehicle mileage)
²Airbag deployment level (if applicable)
²Impact acceleration and angle
²Seat belt status
²Brake status (service and parking brakes)
²Accelerator status (including vehicle speed)
²Engine control status (including engine speed)
²Transmission gear selection
²Cruise control status
²Traction/stability control status
²Tire pressure monitoring system status
Child Restraint
Everyone in your vehicle needs to be buckled up all the
time Ð babies and children, too. Every state in the United
States and all Canadian provinces require that small
children ride in proper restraint systems. This is the law,
and you can be prosecuted for ignoring it.
Children 12 years and under should ride properly buck-
led up in a rear seat, if available. According to crash
statistics, children are safer when properly restrained in
the rear seats rather than in the front.
THINGS TO KNOW BEFORE STARTING YOUR VEHICLE 69
2
Page 82 of 493
Defroster
Check operation by selecting the defrost mode and place
the blower control on high speed. You should be able to
feel the air directed against the windshield. See your
authorized dealer for service if your defroster is inoper-
able.
Periodic Safety Checks You Should Make Outside
The Vehicle
Tires
Examine tires for excessive tread wear and uneven wear
patterns. Check for stones, nails, glass, or other objects
lodged in the tread. Inspect the tread and sidewall for
cuts and cracks. Check the wheel nuts for tightness.
Check the tires (including spare) for proper pressure.
Lights
Have someone observe the operation of exterior lights
while you work the controls. Check turn signal and high
beam indicator lights on the instrument panel.
Door Latches
Check for positive closing, latching, and locking.
Fluid Leaks
Check area under vehicle after overnight parking for fuel,
engine coolant, oil, or other fluid leaks. Also, if gasoline
fumes are detected or if fuel, power steering fluid, or
brake fluid leaks are suspected, the cause should be
located and corrected immediately.
82 THINGS TO KNOW BEFORE STARTING YOUR VEHICLE
Page 135 of 493
interval begins when you turn off the headlights. Only
the headlights will illuminate during this time.
If you turn the headlights, or parking lights, or ignition
switch on again, the system will cancel the delay.
If you turn the headlights off before the ignition, they will
turn off in the normal manner.
The Headlight delay time is programmable on vehicles
equipped with the Electronic Vehicle Information Center
(EVIC). For details, refer to ªDelay Turning Headlights
Off,º under ªPersonal Settings (Customer Programmable
Features),º under ªElectronic Vehicle Information Center
(EVIC)º in Section 4 of this manual.Daytime Running Lights (DRL) Ð If Equipped
The high beam headlights will turn on as Daytime
Running Lights (DRL) and operate at DRL (lower) inten-
sity, whenever the ignition is on, the engine is running,
the headlight switch is off, the parking brake is off, the
turn signal is off, and the selector lever is in any position
except ªPº (Park).
NOTE:The Daytime Running Lights will turn off
automatically when the turn signal is in operation and
turn on again when the turn signal is not operating.
Lights-On Reminder
If the headlights or parking lights are on after the ignition
is turned to the LOCK position, a chime will sound to
alert the driver when the driver's door is opened.
UNDERSTANDING THE FEATURES OF YOUR VEHICLE 135
3
Page 202 of 493
2. Fully depress the accelerator pedal slowly three
times within 10 seconds.
3. Turn the ignition switch to the LOCK position.
NOTE:If the indicator message illuminates when you
start the vehicle, the oil change indicator system did not
reset. If necessary, repeat this procedure.
28. Cruise Indicator Light Ð If Equipped
This indicator lights when the electronic speed
control system is turned on. (See page 147 for
more information.)
29. Transmission Range Indicator
This display indicator shows automatic transmission
gear selection. (See page 281 for more information.)
30. Seat Belt Reminder Light
This light will turn on for several seconds after the
ignition is turned ON as a reminder to ªbuckleup.º This light will remain on as long as the seat belt
remains unbuckled. (See page 48 for more information.)
31. Brake System Warning Light
This light monitors various brake functions,
including brake fluid level and parking brake
application. If the light turns on, it may indi-
cate that the parking brake is applied, that the
brake fluid level is low, or that there is a problem with the
anti-lock brake system (if equipped).
The dual brake system provides a reserve braking capac-
ity in the event of a failure to a portion of the hydraulic
system. Failure of either half of the dual brake system is
indicated by the Brake Warning Light, which will turn on
when the brake fluid level in the master cylinder has
dropped below a specified level.
The light will remain on until the cause is corrected.
202 INSTRUMENT PANEL AND CONTROLS
Page 203 of 493
NOTE:The light may flash momentarily during sharp
cornering maneuvers, which can change fluid level con-
ditions. The vehicle should have service performed, and
the brake fluid level checked.
If brake failure is indicated, immediate repair is neces-
sary.
WARNING!
Driving a vehicle with the brake light on is danger-
ous. Part of the brake system may have failed. It will
take longer to stop the vehicle. You could have an
accident. Have the vehicle checked immediately.
Vehicles equipped with Anti-Lock brakes (ABS), are also
equipped with Electronic Brake Force Distribution (EBD).In the event of an EBD failure, the Brake Warning Light
will turn on along with the ABS Light. Immediate repair
to the ABS system is required.
The operation of the Brake Warning Light can be checked
by turning the ignition switch from the LOCK or ACC
position to the ON position. The light should turn on for
approximately two seconds. The light should then turn
off unless the parking brake is applied or a brake fault is
detected. If the light does not turn on, have the light
inspected by an authorized dealer. (See page 310 for more
information.)
The light also will turn on when the parking brake is
applied with the ignition switch in the ON position.
NOTE:This light only shows that the parking brake is
applied. It does not show the degree of brake application.
INSTRUMENT PANEL AND CONTROLS 203
4
Page 274 of 493
NMP1522 Command-TractTransfer Case Ð
If Equipped.........................292
NMP3022 Selec-Trac IItTransfer Case Ð
If Equipped.........................298
mOn-Road Driving Tips...................303
mOff-Road Driving Tips...................304
NWhen To Use 4WD Low Range...........304
NDriving Through Water.................304
NDriving In Snow, Mud And Sand..........305
NHill Climbing........................306
NTraction Downhill.....................307
NAfter Driving Off-Road.................307
mParking Brake.........................308
mAnti-Lock Brake System..................310mPower Steering........................313
mElectronic Brake Control System............314
NABS (Anti-Lock Brake System)............315
NTCS (Traction Control System)............316
NBAS (Brake Assist System)...............316
NERM (Electronic Roll Mitigation)..........317
NTSC (Trailer Sway Control) ± If Equipped....318
NHSA (Hill Start Assist)..................319
NHDC (Hill Descent Control) ± If Equipped . . . 322
NESP (Electronic Stability Program).........324
NESP/BAS Warning Light & ESP/TCS
Indicator Light.......................328
mTire Safety Information...................329
274 STARTING AND OPERATING
Page 277 of 493
STARTING PROCEDURES
Before starting your vehicle, adjust your seat, adjust both
inside and outside mirrors, and fasten your seat belts.
WARNING!
Do not leave children or animals inside parked
vehicles in hot weather. Interior heat build up may
cause serious injury or death.
Automatic Transmission
Start the engine with the selector lever in the ªNº
(Neutral) or ªPº (Park) position. Apply the brake before
shifting to any driving range.
Manual Transmission Ð If Equipped
Apply the parking brake, place the gearshift control lever
in ªNº (Neutral) and depress the clutch pedal beforestarting vehicle. This vehicle is equipped with a clutch
interlocking ignition system. It will not start unless the
clutch pedal is pressed to the floor.
4WD Models Only
To enhance off-road performance, 4-wheel drive models
equipped with a manual transmission will start with or
without pressing the clutch pedal when in 4-wheel drive
low range. The 4 LOW indicator light will illuminate
when the transfer case is in 4-wheel drive low range.
Normal Starting
NOTE:Normal starting of either a cold or a warm
engine is obtained without pumping or depressing the
accelerator pedal.
For vehicles not equipped with Tip Start,turn the ignition
switch to the START position and release it when the
engine starts. If the engine fails to start within 10 seconds,
turn the ignition switch to the LOCK position, wait 10 to
15 seconds, then repeat the normal starting procedure.
STARTING AND OPERATING 277
5
Page 282 of 493
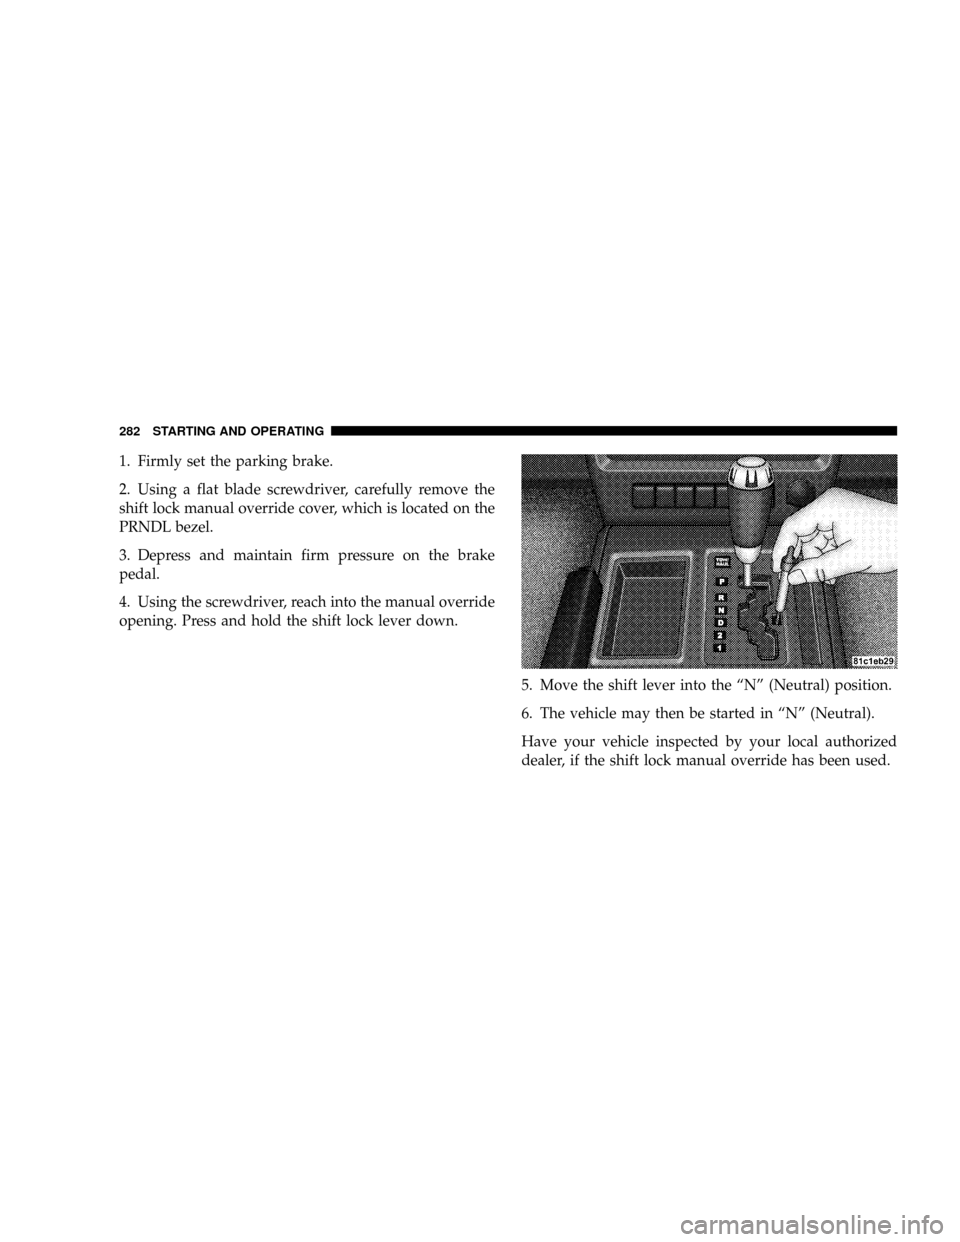
1. Firmly set the parking brake.
2. Using a flat blade screwdriver, carefully remove the
shift lock manual override cover, which is located on the
PRNDL bezel.
3. Depress and maintain firm pressure on the brake
pedal.
4. Using the screwdriver, reach into the manual override
opening. Press and hold the shift lock lever down.
5. Move the shift lever into the ªNº (Neutral) position.
6. The vehicle may then be started in ªNº (Neutral).
Have your vehicle inspected by your local authorized
dealer, if the shift lock manual override has been used.
282 STARTING AND OPERATING
Page 284 of 493
ªPº (Park)
This gear position supplements the parking brake by
locking the transmission. The engine can be started in
this range. Never use ªPº (Park) while the vehicle is in
motion. Apply the parking brake when leaving the
vehicle in this range. Always apply parking brake first,
and then place the selector in ªPº (Park) position.
WARNING!
Never use ªPº (Park) position as a substitute for the
parking brake. Always apply parking brake fully
when parked to guard against vehicle movement and
possible injury or damage.
WARNING!
It is dangerous to shift the selector lever out of ªPº
(Park) or ªNº (Neutral) if the engine speed is higher
than idle speed. If your foot is not firmly on the
brake pedal, the vehicle could accelerate quickly
forward or in ªRº (Reverse). You could lose control of
the vehicle and hit someone or something. Only shift
into gear when the engine is idling normally and
when your right foot is firmly on the brake pedal.
ªRº (Reverse)
Use this range only after the vehicle has come to a
complete stop.
284 STARTING AND OPERATING
Page 285 of 493
ªNº (Neutral)
Shift into ªNº (Neutral) when the vehicle is standing for
prolonged periods with the engine running. The engine
may be started in this range. Set the parking brake if you
must leave the vehicle.
NOTE:Towing the vehicle, coasting, or driving for any
other reason with selector lever in ªNº (Neutral) can
result in severe transmission damage. Refer to ªRecre-
ational Towingº in Section 5 and ªTowing a Disabled
Vehicleº in Section 6 of this manual.
ªDº (Drive)
For most city and highway driving.
ª2º (Second)
For moderate grades and to assist braking on dry pave-
ment or in mud and snow. Begins at a stop in low gear
with automatic upshift to 2nd gear. Will not shift to 3rd.ª1º (First)
For hard pulling at low speeds in mud, sand, snow, or on
steep grades. Begins and stays in low gear with no
upshift. Provides engine compression braking at low
speeds.
Overdrive Operation
The overdrive automatic transmission contains an elec-
tronically controlled fourth speed (Overdrive). The trans-
mission will automatically shift from 3rd gear to Over-
drive if the following conditions are present:
²The transmission selector is in ªDº (Drive).
²The vehicle speed is above approximately 30 mph (48
km/h).
²The ªTOW/HAULº button has not been activated.
STARTING AND OPERATING 285
5