ECO mode JEEP LIBERTY 2010 KK / 2.G User Guide
[x] Cancel search | Manufacturer: JEEP, Model Year: 2010, Model line: LIBERTY, Model: JEEP LIBERTY 2010 KK / 2.GPages: 80
Page 30 of 80
Auxiliary Mode
• The auxiliary (AUX) jack allows a portable device, such as an MP3 player or a cassetteplayer, to be plugged into the radio and utilize the vehicle’s audio system to amplify the
source and play through the vehicle speakers.
• Pressing the AUX button will change the mode to auxiliary device if the AUX jack is connected.
• The control of the external device cannot be provided by the radio; use the device controls instead.
Clock Setting
• Press and hold the TIME button until the hours blink; turn the TUNE/SCROLL controlknob to set the hours.
• Press the TUNE/SCROLL control knob until the minutes begin to blink; turn the TUNE/SCROLL control knob to set the minutes.
• Press the TUNE/SCROLL control knob to save the time change.
• To exit, press any button/knob or wait five seconds.
Station Presets
• Press the SET/RND button once and SET 1 will show in the display. Then select the button (1–6).
• A second station may be added to each push button. Press the SET/RND button twice and SET 2 will show in the display, then select button (1–6).
How To Load Multiple CDs/DVDs
REQ Radio Only
• Press the LOAD button and then press the button with the corresponding number (1–6)where the CD is being loaded. The radio will display PLEASE WAIT and prompt when to
INSERT DISC.
• After the radio displays INSERT DISC, insert the CD into the player. The radio display will show LOADING DISC when the disc is loading and “READING DISC” when the radio is
reading the disc.
• Press the eject button and then the corresponding number (1–6) to eject the desired disc.
ELECTRONICS
28
Page 34 of 80
Guide Me Home
• Press the NAV hard-key to access the Navigation Main Menu.
• Touch the GUIDE ME HOME soft-key to route you back to your home destination fromyour current location. Touch the GO soft-key to start your trip.
Map
• Press the NAV hard-key to access the Navigation Main Menu.
• Touch the MAP soft-key to display a map of your current position.
REMOTE AUDIO CONTROLS
• The remote audio controls are located on therear surface of the steering wheel.
Right Switch
• Press the switch up or down to increase ordecrease the volume.
• Press the button in the center to change modes AM/FM/CD/SAT.
Left Switch
• Press the switch up or down to search for thenext listenable station or select the next or
previous CD track.
• Press the button in the center to select the next preset station (radio) or to change CDs if equipped with a CD Changer.
ELECTRONIC VEHICLE INFORMATION CENTER (EVIC)
• The EVIC features a driver interactive displaythat is located in the instrument cluster.
Pressing the controls on the steering wheel
allows the driver to select vehicle information
and Personal Settings. For additional
information, refer to Programmable Features
in this guide.
• Press and release the MENU
button and
the mode displayed will change between
Compass/Temperature, Trip, System Status,
and Personal settings.
• Press the STEP
button to scroll through sub menus (i.e., Trip Functions, Avg. Fuel
Economy, DTE, Elapsed Time, and Units).
• Press and release the Compass/Temperature
button for instant access to the
Compass/Temperature screens.
• Press the RESET
button to RESET Trip Functions and change Personal Settings.
ELECTRONICS
32
Page 35 of 80
UNIVERSAL GARAGE DOOR OPENER (HomeLink®)
Programming HomeLink®
Begin Programming
• The HomeLink®buttons are located in the
overhead console.
• Erase all channels before you begin programming by holding the two outside
buttons for up to 20 seconds until the red
indicator flashes.
• Park your vehicle outside of the garage and turn the ignition switch to the ON/RUN position.
• Place the hand-held transmitter 1 to 3 in (3 to 8 cm) from the HomeLink
®buttons while
keeping the indicator light in view.
• Simultaneously, press and hold both the chosen HomeLink
®button and the hand-held
transmitter button until the HomeLink®indicator flash rate changes from a slow to a
rapidly blinking light, then release both the HomeLink®and the hand-held transmitter
buttons. This may take up to 30 seconds, or longer in rare cases.
• Press and hold the just-programmed HomeLink
®button; if the indicator light stays on
constantly, programming is complete and the garage door should open.
WARNING!
• Your motorized door or gate will open and close while you are programming the universal transceiver. Do not program the transceiver if people or pets are in the
path of the door or gate.
• Do not run your vehicle in a closed garage or confined area while programming the transceiver. Exhaust gas from your vehicle contains Carbon Monoxide (CO)
which is odorless and colorless. Carbon Monoxide is poisonous when inhaled and
can cause you and others to be severely injured or killed.
NOTE:
• Only use this transceiver with a garage door opener that has a “stop and reverse” feature as required by Federal safety standards. This includes most garage door opener models
manufactured after 1982. Do not use a garage door opener without these safety features.
Call toll-free 1–800–355–3515 or, on the Internet, at www.HomeLink.com for safety
information or assistance.
• If you are having difficulty programming your HomeLink
®and your garage door opener
was manufactured after 1995, you may have a rolling code. Follow the steps below for
Programming A Rolling Code System.
33
ELECTRONICS
Page 44 of 80
RECREATIONAL TOWING
(BEHIND MOTORHOME,
ETC.)
Towing – Two-Wheel Drive
Models
• Recreational towing is allowed ONLY ifthe driveshaft is removed. Towing with
the rear wheels on the ground while
the driveshaft is connected can result
in severe transmission damage.
WARNING!
If the driveshaft is removed, the
vehicle can roll even if the
transmission is in PARK, which could
cause serious injury or death.
• The parking brake must be firmly engaged and the wheels chocked
during driveshaft removal and
installation. The parking brake must
remain engaged unless the vehicle is
securely and properly connected to the
tow vehicle, or the driveshaft is
completely reinstalled. See your
authorized dealer for proper driveshaft
removal and reinstallation procedures,
including flange orientation/alignment,
use of thread-locking compound,
proper bolt torque specifications, etc.
Towing – Four-Wheel Drive
Models
• Depress the brake pedal and turn theignition switch to ON/RUN with the
engine shut off.
• Shift the transmission into NEUTRAL.
• Shift the transfer case into NEUTRAL by holding down the NEUTRAL Pin
switch for four seconds until the LED
starts to blink. The LED will stop
blinking and remain on when the shift
is complete.
• Start the engine and shift into DRIVE to ensure there is no vehicle movement.
• Shut the engine off and shift the transmission into PARK.
• Place the ignition switch in the OFF position and remove the key.
• Apply the parking brake, attach the vehicle to the tow vehicle with a tow
bar and release the parking brake.
• Refer to your Owner's Manual on the DVD for further details.
UTILITY
42
Page 50 of 80
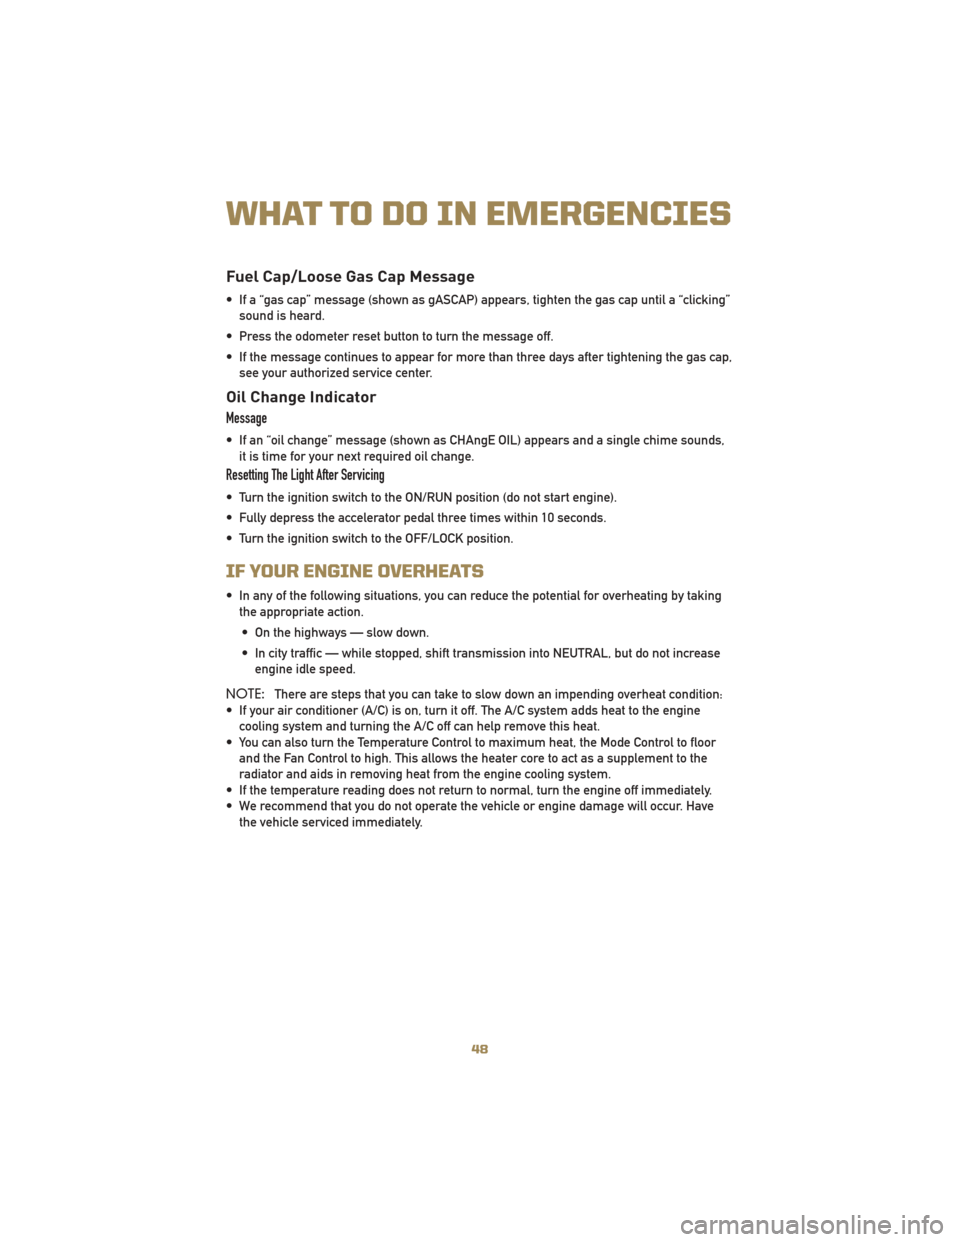
Fuel Cap/Loose Gas Cap Message
• If a “gas cap” message (shown as gASCAP) appears, tighten the gas cap until a “clicking”sound is heard.
• Press the odometer reset button to turn the message off.
• If the message continues to appear for more than three days after tightening the gas cap, see your authorized service center.
Oil Change Indicator
Message
• If an “oil change” message (shown as CHAngE OIL) appears and a single chime sounds,it is time for your next required oil change.
Resetting The Light After Servicing
• Turn the ignition switch to the ON/RUN position (do not start engine).
• Fully depress the accelerator pedal three times within 10 seconds.
• Turn the ignition switch to the OFF/LOCK position.
IF YOUR ENGINE OVERHEATS
• In any of the following situations, you can reduce the potential for overheating by takingthe appropriate action.
• On the highways — slow down.
• In city traffic — while stopped, shift transmission into NEUTRAL, but do not increase engine idle speed.
NOTE: There are steps that you can take to slow down an impending overheat condition:
• If your air conditioner (A/C) is on, turn it off. The A/C system adds heat to the engine cooling system and turning the A/C off can help remove this heat.
• You can also turn the Temperature Control to maximum heat, the Mode Control to floor and the Fan Control to high. This allows the heater core to act as a supplement to the
radiator and aids in removing heat from the engine cooling system.
• If the temperature reading does not return to normal, turn the engine off immediately.
• We recommend that you do not operate the vehicle or engine damage will occur. Have the vehicle serviced immediately.
WHAT TO DO IN EMERGENCIES
48
Page 58 of 80
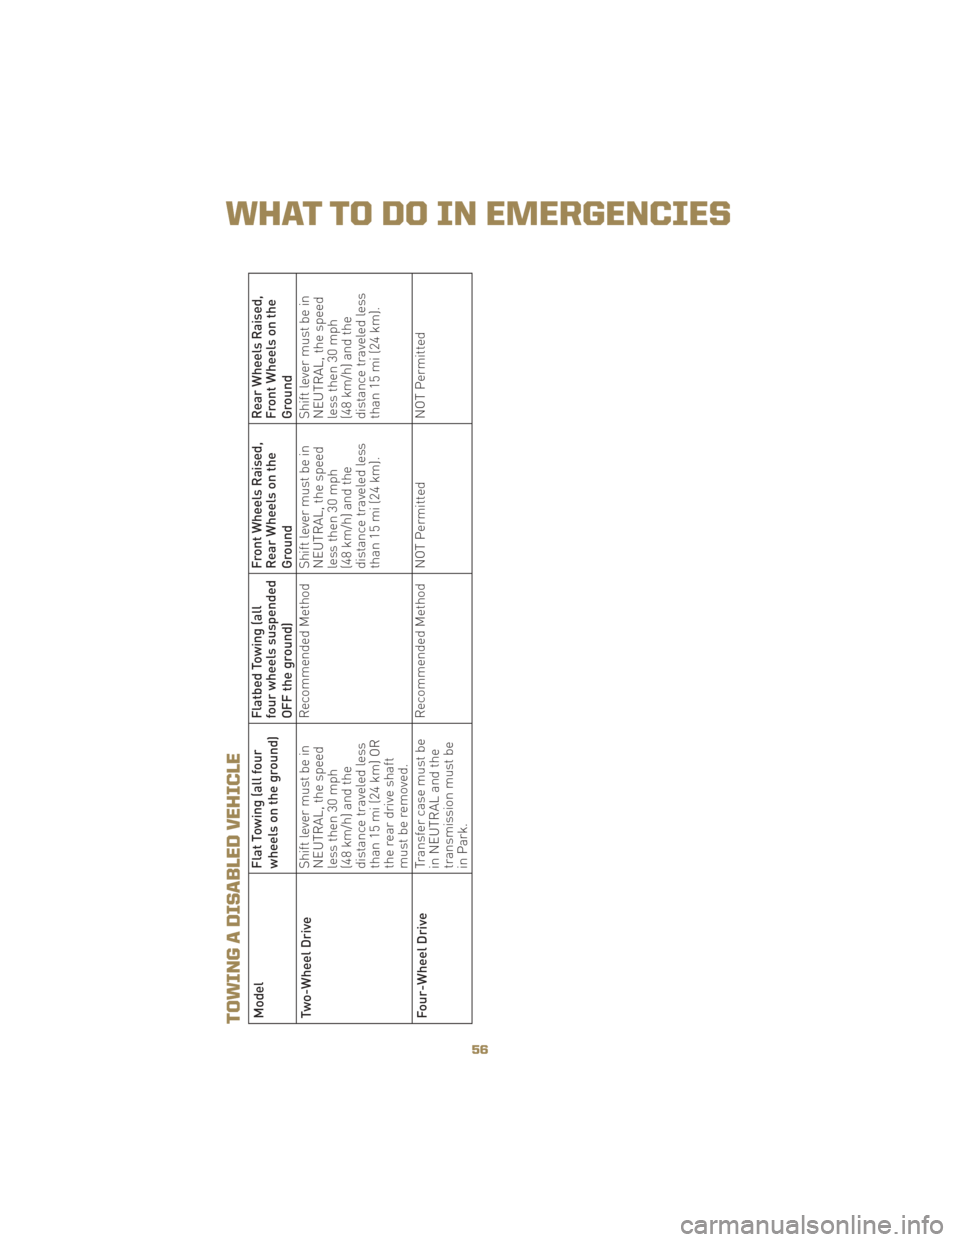
TOWING A DISABLED VEHICLEModelFlat Towing (all four
wheels on the ground)Flatbed Towing (all
four wheels suspended
OFF the ground)Front Wheels Raised,
Rear Wheels on the
GroundRear Wheels Raised,
Front Wheels on the
Ground
Two-Wheel Drive Shift lever must be in
NEUTRAL, the speed
less then 30 mph
(48 km/h) and the
distance traveled less
than 15 mi (24 km) OR
the rear drive shaft
must be removed.Recommended Method Shift lever must be in
NEUTRAL, the speed
less then 30 mph
(48 km/h) and the
distance traveled less
than 15 mi (24 km).Shift lever must be in
NEUTRAL, the speed
less then 30 mph
(48 km/h) and the
distance traveled less
than 15 mi (24 km).
Four-Wheel Drive Transfer case must be
in NEUTRAL and the
transmission must be
in Park.Recommended Method NOT Permitted NOT Permitted
56
WHAT TO DO IN EMERGENCIES
Page 73 of 80
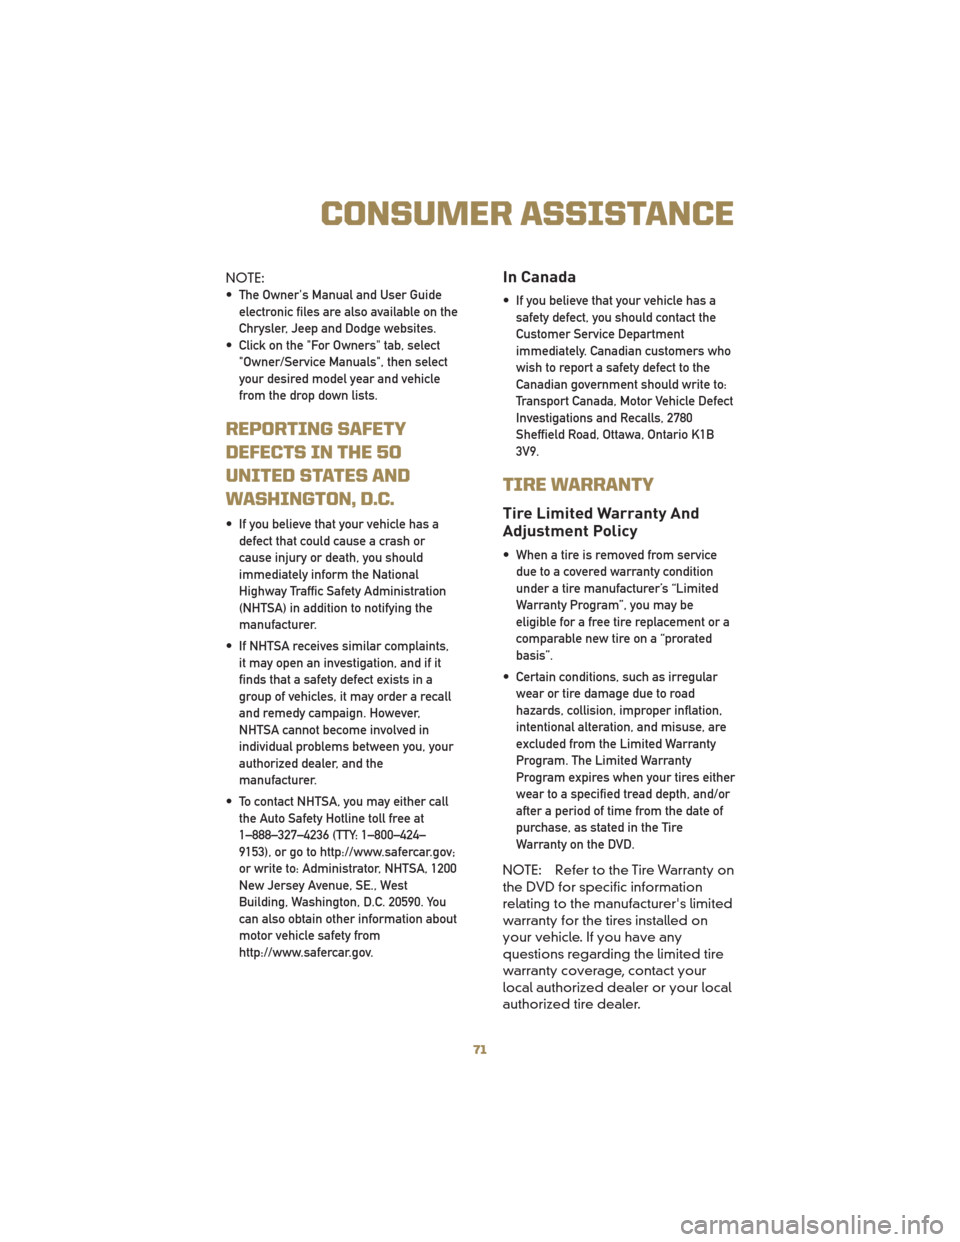
NOTE:
• The Owner's Manual and User Guideelectronic files are also available on the
Chrysler, Jeep and Dodge websites.
• Click on the "For Owners" tab, select "Owner/Service Manuals", then select
your desired model year and vehicle
from the drop down lists.
REPORTING SAFETY
DEFECTS IN THE 50
UNITED STATES AND
WASHINGTON, D.C.
• If you believe that your vehicle has adefect that could cause a crash or
cause injury or death, you should
immediately inform the National
Highway Traffic Safety Administration
(NHTSA) in addition to notifying the
manufacturer.
• If NHTSA receives similar complaints, it may open an investigation, and if it
finds that a safety defect exists in a
group of vehicles, it may order a recall
and remedy campaign. However,
NHTSA cannot become involved in
individual problems between you, your
authorized dealer, and the
manufacturer.
• To contact NHTSA, you may either call the Auto Safety Hotline toll free at
1–888–327–4236 (TTY: 1–800–424–
9153), or go to http://www.safercar.gov;
or write to: Administrator, NHTSA, 1200
New Jersey Avenue, SE., West
Building, Washington, D.C. 20590. You
can also obtain other information about
motor vehicle safety from
http://www.safercar.gov.
In Canada
• If you believe that your vehicle has asafety defect, you should contact the
Customer Service Department
immediately. Canadian customers who
wish to report a safety defect to the
Canadian government should write to:
Transport Canada, Motor Vehicle Defect
Investigations and Recalls, 2780
Sheffield Road, Ottawa, Ontario K1B
3V9.
TIRE WARRANTY
Tire Limited Warranty And
Adjustment Policy
• When a tire is removed from servicedue to a covered warranty condition
under a tire manufacturer’s “Limited
Warranty Program”, you may be
eligible for a free tire replacement or a
comparable new tire on a “prorated
basis”.
• Certain conditions, such as irregular wear or tire damage due to road
hazards, collision, improper inflation,
intentional alteration, and misuse, are
excluded from the Limited Warranty
Program. The Limited Warranty
Program expires when your tires either
wear to a specified tread depth, and/or
after a period of time from the date of
purchase, as stated in the Tire
Warranty on the DVD.
NOTE: Refer to the Tire Warranty on
the DVD for specific information
relating to the manufacturer's limited
warranty for the tires installed on
your vehicle. If you have any
questions regarding the limited tire
warranty coverage, contact your
local authorized dealer or your local
authorized tire dealer.
71
CONSUMER ASSISTANCE