heater JEEP LIBERTY 2011 KK / 2.G User Guide
[x] Cancel search | Manufacturer: JEEP, Model Year: 2011, Model line: LIBERTY, Model: JEEP LIBERTY 2011 KK / 2.GPages: 88, PDF Size: 3.24 MB
Page 18 of 88
WARNING!
Be certain that the seatback is securely locked into position. If the seatback is
not securely locked into position, the seat will not provide the proper stability for
child seats and/or passengers. An improperly latched seat could cause serious
injury.
HEATED SEATS
Front Heated Seats
• The controls for front heated seats arelocated near the bottom center of the
instrument panel (below the heater/air
conditioning controls).
• Press the switch once to select High-level heating. Press the switch a
second time to select Low-level
heating. Press the switch a third time to
shut the heating elements Off.
• If the High-level setting is selected, the system will automatically switch to Low-level after approximately 30 minutes. The Low-level setting will turn Off automatically after
approximately 30 minutes.
WARNING!
• Persons who are unable to feel pain to the skin because of advanced age,chronic illness, diabetes, spinal cord injury, medication, alcohol use, exhaustion
or other physical conditions must exercise care when using the seat heater. It
may cause burns even at low temperatures, especially if used for long periods
of time.
• Do not place anything on the seat that insulates against heat, such as a blanket or cushion. This may cause the seat heater to overheat. Sitting in a
seat that has been overheated could cause serious burns due to the increased
surface temperature of the seat.
GETTING STARTED
16
Page 39 of 88
• Touch theWhere To?soft-key, then touch Favorites.
• Touch the location you want to edit.
• Next, touch Press for More.
• Touch Edit.
• Follow the on-screen steps for editing the Home Location.
Go Home • Touch the NAV soft-key in the upper-right corner of your radio screen, to access the Navigation system.
• Touch Where To? , then touch Go Home.
SIRIUS Travel Link
• To access SIRIUS Travel Link, press the MENU hard-key, then touch the Travel Link
soft-key.
NOTE: SIRIUS Travel Link requires a subscription, sold separately after trial subscription
included with vehicle purchase.
• SIRIUS Travel Link brings a wealth of useful information into your vehicle and right toyour fingertips:
• Weather
• View detailed weather conditions at your current location.
• Ski Info
• View ski and snowboarding conditions at ski resorts.
• Fuel Prices
• Check detailed price information for fuel stations near your current location.
• Movie Listings
• Check which movies (includes start times, ratings, run lengths and summaries) are
playing at theaters near your current location.
• Sports Scores
• View scores and upcoming events for all major sports.
• Your favorite location, theater and sports teams can be stored for quick access.
• Refer to your Media Center 730N (RHR) User's Manual or Media Center 430/430N (RBZ/RHB) User's Manual for more details.
ELECTRONICS
37
Page 58 of 88
NOTE:There are steps that you can take to slow down an impending overheat
condition:
• If your air conditioner (A/C) is on, turn it off. The A/C system adds heat to the engine cooling system and turning the A/C off can help remove this heat.
• You can also turn the Temperature Control to maximum heat, the Mode Control to floor and the Fan Control to high. This allows the heater core to act as a supplement to the
radiator and aids in removing heat from the engine cooling system.
• If the temperature reading does not return to normal, turn the engine off immediately.
• We recommend that you do not operate the vehicle or engine damage will occur. Have the vehicle serviced immediately.
CAUTION!
Driving with a hot cooling system could damage your vehicle. If the temperature
gauge reads HOT (H), pull over and stop the vehicle. Idle the vehicle with the air
conditioner turned off until the pointer drops back into the normal range. If the
pointer remains on HOT (H), and you hear continuous chimes, turn the engine off
immediately and call for service.
WARNING!
You or others can be badly burned by hot engine coolant (antifreeze) or steam
from your radiator. If you see or hear steam coming from under the hood, do not
open the hood until the radiator has had time to cool. Never try to open a cooling
system pressure cap when the radiator or coolant bottle is hot.
JACKING AND TIRE CHANGING
Jack Location
• The scissor-type jack and tire changingtools are located in the left rear trim
panel behind the second row seat.
WHAT TO DO IN EMERGENCIES
56
Page 62 of 88
JUMP-STARTING
• If your vehicle has a discharged battery it can be jump-started using a set of jumpercables and a battery in another vehicle or by using a portable battery booster pack.
• Jump-starting can be dangerous if done improperly so please follow the procedures in this section carefully.
NOTE: When using a portable battery booster pack follow the manufacturer’s operating
instructions and precautions.
Preparations for Jump-Start
• The battery in your vehicle is located in the front of the engine compartment, behind the left headlight assembly.
NOTE: The positive battery post is covered with a protective cap. Lift up on the cap to
gain access to the positive battery post.
• Set the parking brake, shift the automatic transmission into PARK and turn theignition to LOCK.
• Turn off the heater, radio, and all unnecessary electrical accessories.
• If using another vehicle to jump-start the battery, park the vehicle within the jumper cables reach, set the parking brake and make sure the ignition is OFF.
Jump-Starting Procedure
• Connect the positive (+) end of the jumper cable to the positive (+) post of thedischarged vehicle.
• Connect the opposite end of the positive (+) jumper cable to the positive (+) post of the booster battery.
WHAT TO DO IN EMERGENCIES
60
Page 70 of 88
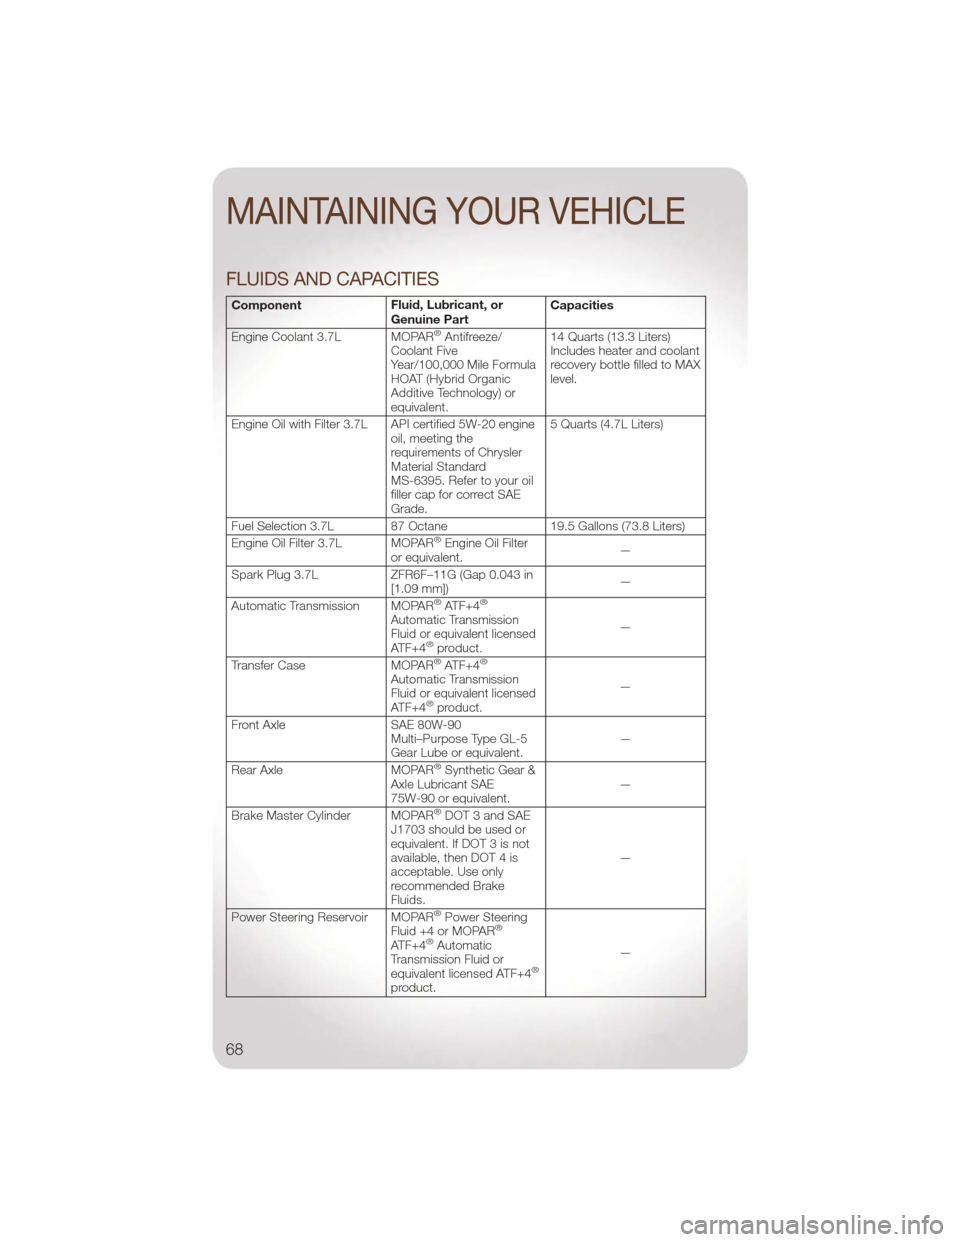
FLUIDS AND CAPACITIES
ComponentFluid, Lubricant, or
Genuine PartCapacities
Engine Coolant 3.7L MOPAR
®Antifreeze/
Coolant Five
Year/100,000 Mile Formula
HOAT (Hybrid Organic
Additive Technology) or
equivalent. 14 Quarts (13.3 Liters)
Includes heater and coolant
recovery bottle filled to MAX
level.
Engine Oil with Filter 3.7L API certified 5W-20 engine oil, meeting the
requirements of Chrysler
Material Standard
MS-6395. Refer to your oil
filler cap for correct SAE
Grade.5 Quarts (4.7L Liters)
Fuel Selection 3.7L 87 Octane 19.5 Gallons (73.8 Liters)
Engine Oil Filter 3.7L MOPAR
®Engine Oil Filter
or equivalent. —
Spark Plug 3.7L ZFR6F–11G (Gap 0.043 in
[1.09 mm]) —
Automatic Transmission MOPAR
®ATF+4®
Automatic Transmission
Fluid or equivalent licensed
ATF+4
®product. —
Transfer Case MOPAR®ATF+4®
Automatic Transmission
Fluid or equivalent licensed
ATF+4
®product. —
Front Axle SAE 80W-90
Multi–Purpose Type GL-5
Gear Lube or equivalent. —
Rear Axle MOPAR
®Synthetic Gear &
Axle Lubricant SAE
75W-90 or equivalent. —
Brake Master Cylinder MOPAR
®DOT 3 and SAE
J1703 should be used or
equivalent. If DOT 3 is not
available, then DOT 4 is
acceptable. Use only
recommended Brake
Fluids. —
Power Steering Reservoir MOPAR
®Power Steering
Fluid +4 or MOPAR®
ATF+4®Automatic
Transmission Fluid or
equivalent licensed ATF+4
®
product. —
MAINTAINING YOUR VEHICLE
68
Page 76 of 88
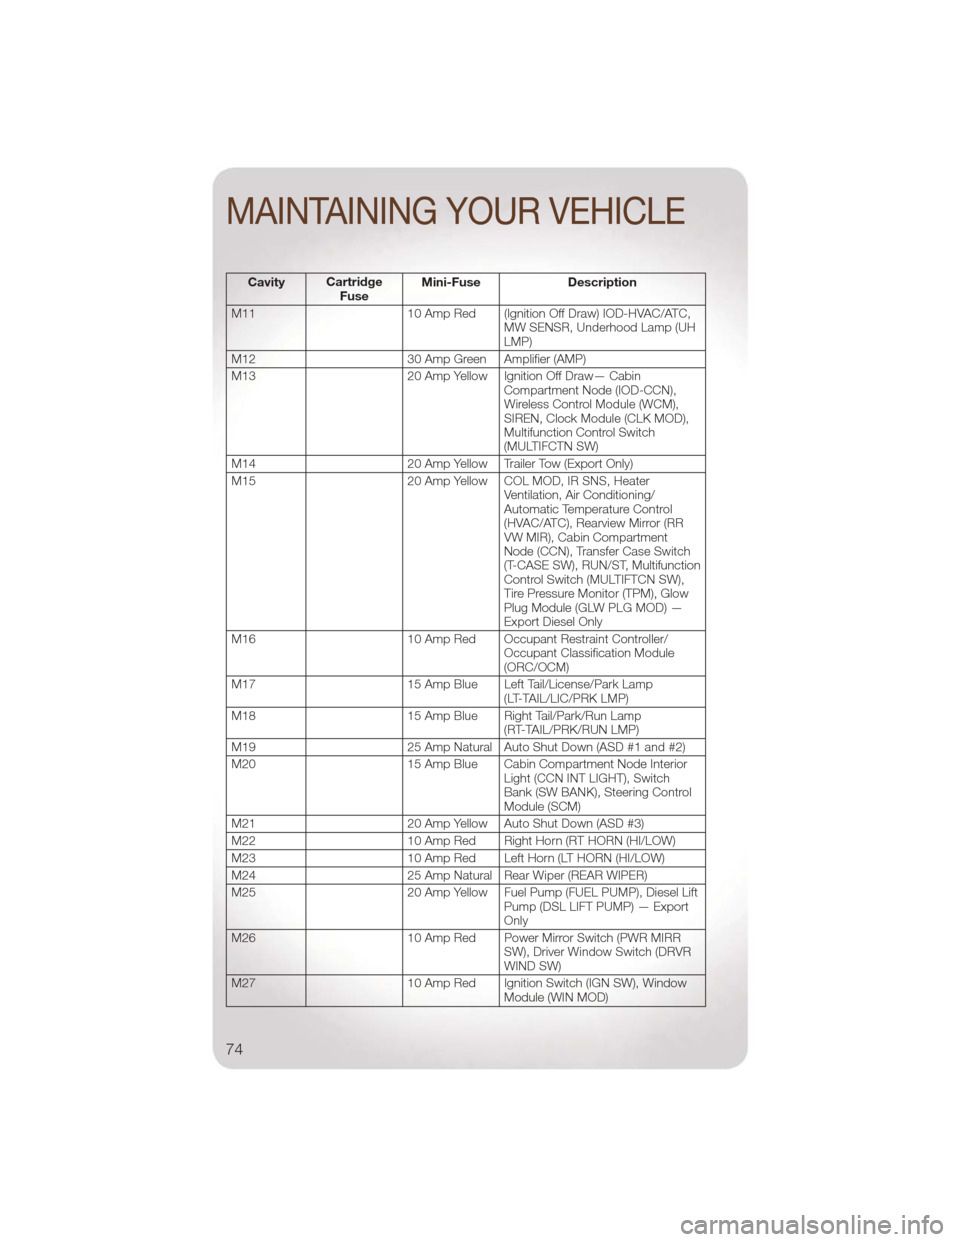
CavityCartridge
Fuse Mini-Fuse Description
M11 10 Amp Red (Ignition Off Draw) IOD-HVAC/ATC, MW SENSR, Underhood Lamp (UH
LMP)
M12 30 Amp Green Amplifier (AMP)
M13 20 Amp Yellow Ignition Off Draw— Cabin
Compartment Node (IOD-CCN),
Wireless Control Module (WCM),
SIREN, Clock Module (CLK MOD),
Multifunction Control Switch
(MULTIFCTN SW)
M14 20 Amp Yellow Trailer Tow (Export Only)
M15 20 Amp Yellow COL MOD, IR SNS, Heater
Ventilation, Air Conditioning/
Automatic Temperature Control
(HVAC/ATC), Rearview Mirror (RR
VW MIR), Cabin Compartment
Node (CCN), Transfer Case Switch
(T-CASE SW), RUN/ST, Multifunction
Control Switch (MULTIFTCN SW),
Tire Pressure Monitor (TPM), Glow
Plug Module (GLW PLG MOD) —
Export Diesel Only
M16 10 Amp Red Occupant Restraint Controller/
Occupant Classification Module
(ORC/OCM)
M17 15 Amp Blue Left Tail/License/Park Lamp
(LT-TAIL/LIC/PRK LMP)
M18 15 Amp Blue Right Tail/Park/Run Lamp
(RT-TAIL/PRK/RUN LMP)
M19 25 Amp Natural Auto Shut Down (ASD #1 and #2)
M20 15 Amp Blue Cabin Compartment Node Interior
Light (CCN INT LIGHT), Switch
Bank (SW BANK), Steering Control
Module (SCM)
M21 20 Amp Yellow Auto Shut Down (ASD #3)
M22 10 Amp Red Right Horn (RT HORN (HI/LOW)
M23 10 Amp Red Left Horn (LT HORN (HI/LOW)
M24 25 Amp Natural Rear Wiper (REAR WIPER)
M25 20 Amp Yellow Fuel Pump (FUEL PUMP), Diesel Lift
Pump (DSL LIFT PUMP) — Export
Only
M26 10 Amp Red Power Mirror Switch (PWR MIRR
SW), Driver Window Switch (DRVR
WIND SW)
M27 10 Amp Red Ignition Switch (IGN SW), Window
Module (WIN MOD)
MAINTAINING YOUR VEHICLE
74
Page 77 of 88
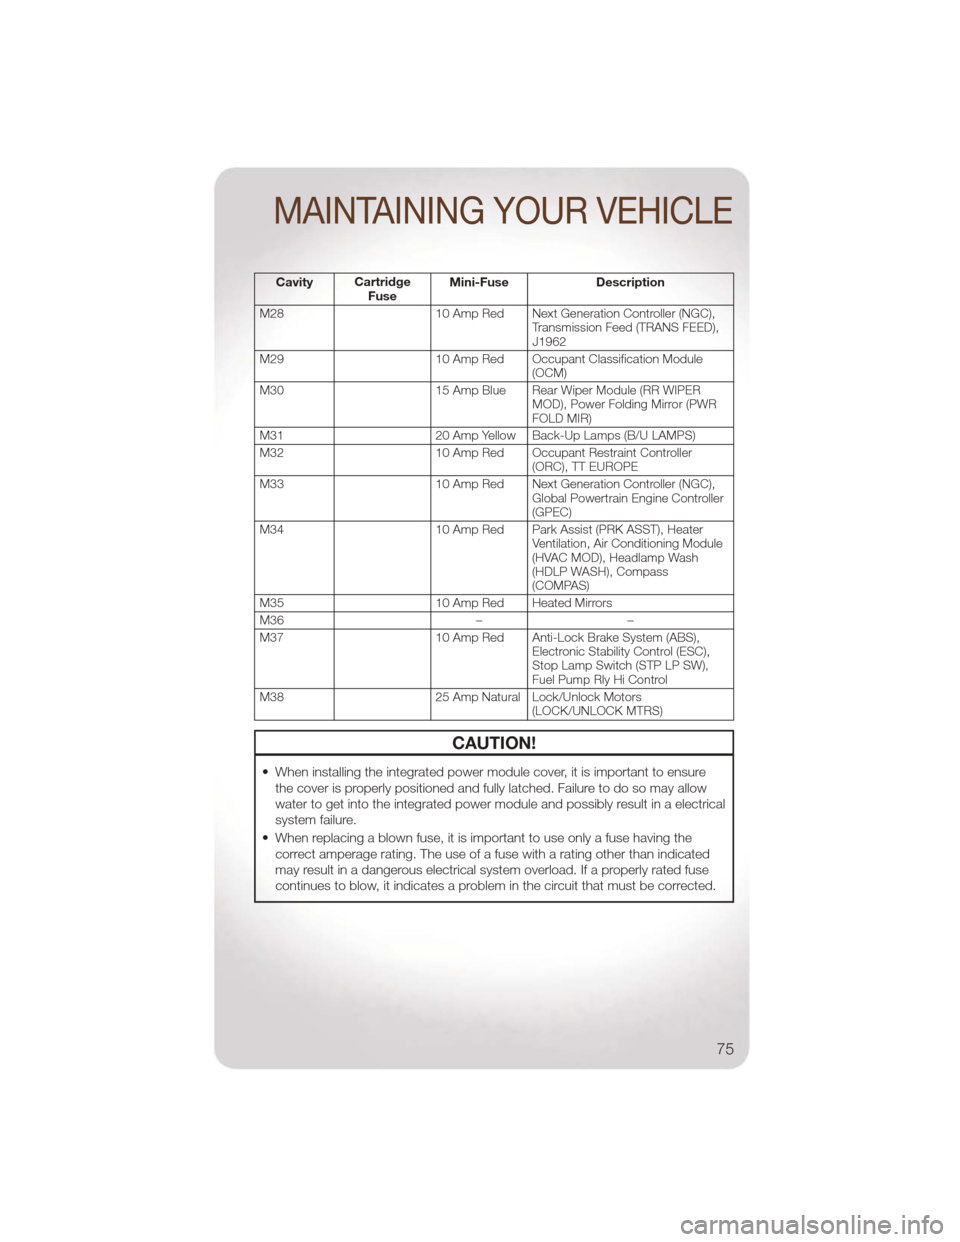
CavityCartridge
Fuse Mini-Fuse Description
M28 10 Amp Red Next Generation Controller (NGC), Transmission Feed (TRANS FEED),
J1962
M29 10 Amp Red Occupant Classification Module
(OCM)
M30 15 Amp Blue Rear Wiper Module (RR WIPER
MOD), Power Folding Mirror (PWR
FOLD MIR)
M31 20 Amp Yellow Back-Up Lamps (B/U LAMPS)
M32 10 Amp Red Occupant Restraint Controller
(ORC), TT EUROPE
M33 10 Amp Red Next Generation Controller (NGC),
Global Powertrain Engine Controller
(GPEC)
M34 10 Amp Red Park Assist (PRK ASST), Heater
Ventilation, Air Conditioning Module
(HVAC MOD), Headlamp Wash
(HDLP WASH), Compass
(COMPAS)
M35 10 Amp Red Heated Mirrors
M36 ––
M37 10 Amp Red Anti-Lock Brake System (ABS),
Electronic Stability Control (ESC),
Stop Lamp Switch (STP LP SW),
Fuel Pump Rly Hi Control
M38 25 Amp Natural Lock/Unlock Motors
(LOCK/UNLOCK MTRS)
CAUTION!
• When installing the integrated power module cover, it is important to ensure
the cover is properly positioned and fully latched. Failure to do so may allow
water to get into the integrated power module and possibly result in a electrical
system failure.
• When replacing a blown fuse, it is important to use only a fuse having the correct amperage rating. The use of a fuse with a rating other than indicated
may result in a dangerous electrical system overload. If a properly rated fuse
continues to blow, it indicates a problem in the circuit that must be corrected.
MAINTAINING YOUR VEHICLE
75