clock JEEP LIBERTY 2012 KK / 2.G User Guide
[x] Cancel search | Manufacturer: JEEP, Model Year: 2012, Model line: LIBERTY, Model: JEEP LIBERTY 2012 KK / 2.GPages: 124, PDF Size: 2.92 MB
Page 32 of 124
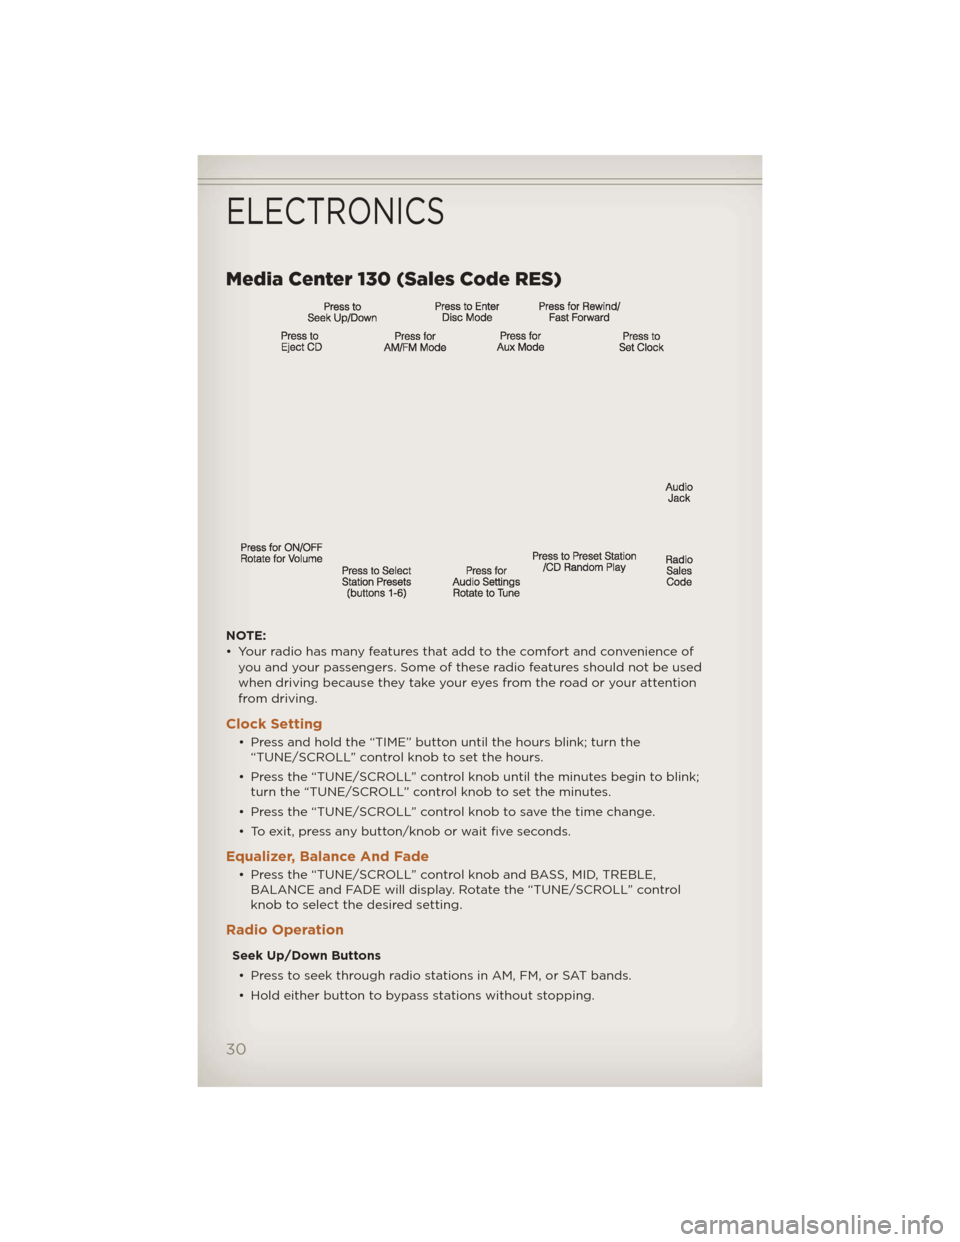
Media Center 130 (Sales Code RES)
NOTE:
• Your radio has many features that add to the comfort and convenience ofyou and your passengers. Some of these radio features should not be used
when driving because they take your eyes from the road or your attention
from driving.
Clock Setting
• Press and hold the “TIME” button until the hours blink; turn the“TUNE/SCROLL” control knob to set the hours.
• Press the “TUNE/SCROLL” control knob until the minutes begin to blink; turn the “TUNE/SCROLL” control knob to set the minutes.
• Press the “TUNE/SCROLL” control knob to save the time change.
• To exit, press any button/knob or wait five seconds.
Equalizer, Balance And Fade
• Press the “TUNE/SCROLL” control knob and BASS, MID, TREBLE, BALANCE and FADE will display. Rotate the “TUNE/SCROLL” control
knob to select the desired setting.
Radio Operation
Seek Up/Down Buttons
• Press to seek through radio stations in AM, FM, or SAT bands.
• Hold either button to bypass stations without stopping.
ELECTRONICS
30
Page 34 of 124
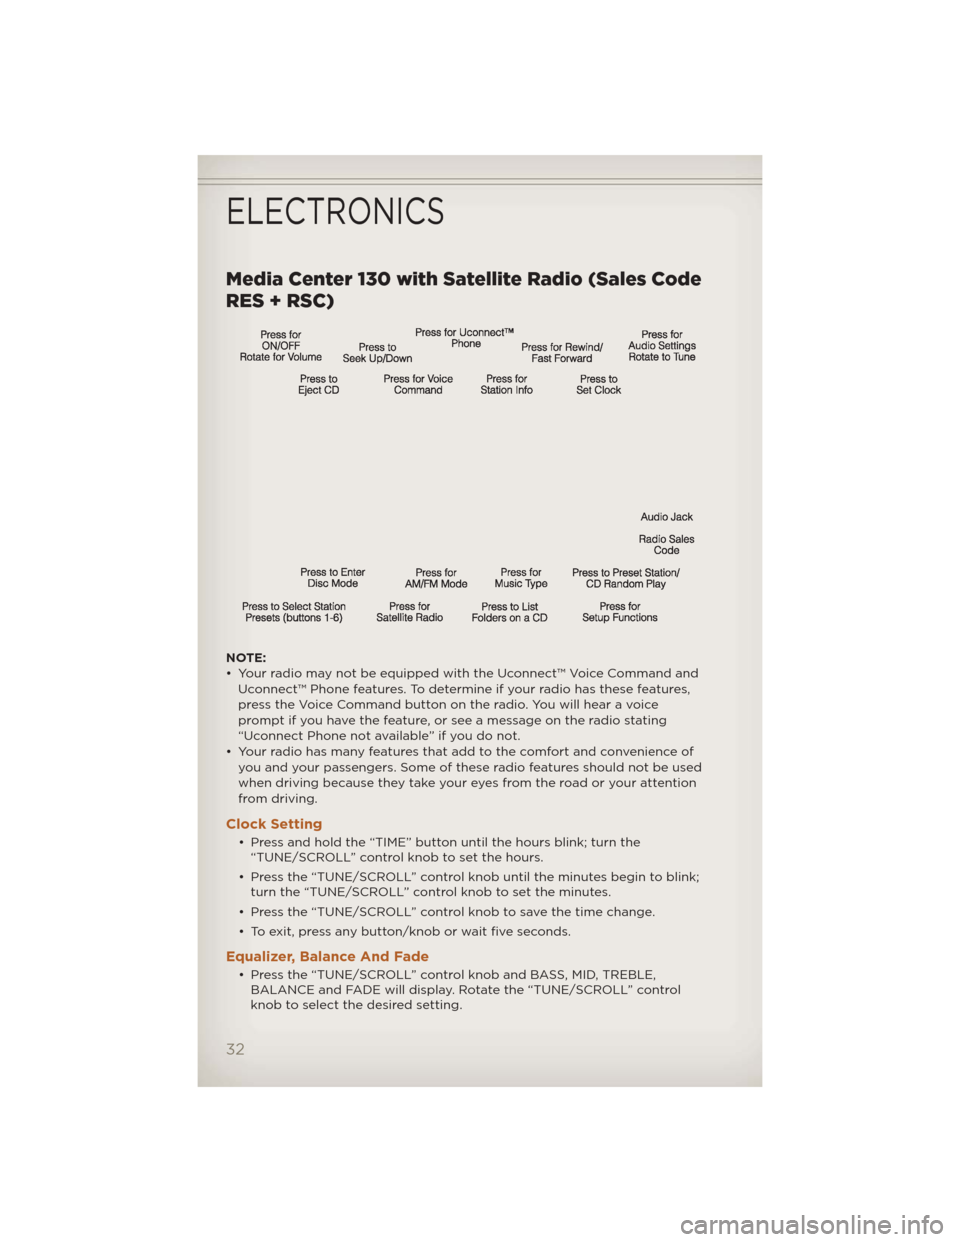
Media Center 130 with Satellite Radio (Sales Code
RES + RSC)
NOTE:
• Your radio may not be equipped with the Uconnect™ Voice Command andUconnect™ Phone features. To determine if your radio has these features,
press the Voice Command button on the radio. You will hear a voice
prompt if you have the feature, or see a message on the radio stating
“Uconnect Phone not available” if you do not.
• Your radio has many features that add to the comfort and convenience of you and your passengers. Some of these radio features should not be used
when driving because they take your eyes from the road or your attention
from driving.
Clock Setting
• Press and hold the “TIME” button until the hours blink; turn the“TUNE/SCROLL” control knob to set the hours.
• Press the “TUNE/SCROLL” control knob until the minutes begin to blink; turn the “TUNE/SCROLL” control knob to set the minutes.
• Press the “TUNE/SCROLL” control knob to save the time change.
• To exit, press any button/knob or wait five seconds.
Equalizer, Balance And Fade
• Press the “TUNE/SCROLL” control knob and BASS, MID, TREBLE, BALANCE and FADE will display. Rotate the “TUNE/SCROLL” control
knob to select the desired setting.
ELECTRONICS
32
Page 37 of 124
• Your radio has many features that add to the comfort and convenience ofyou and your passengers. Some of these radio features should not be used
when driving because they take your eyes from the road or your attention
from driving.
Clock Setting
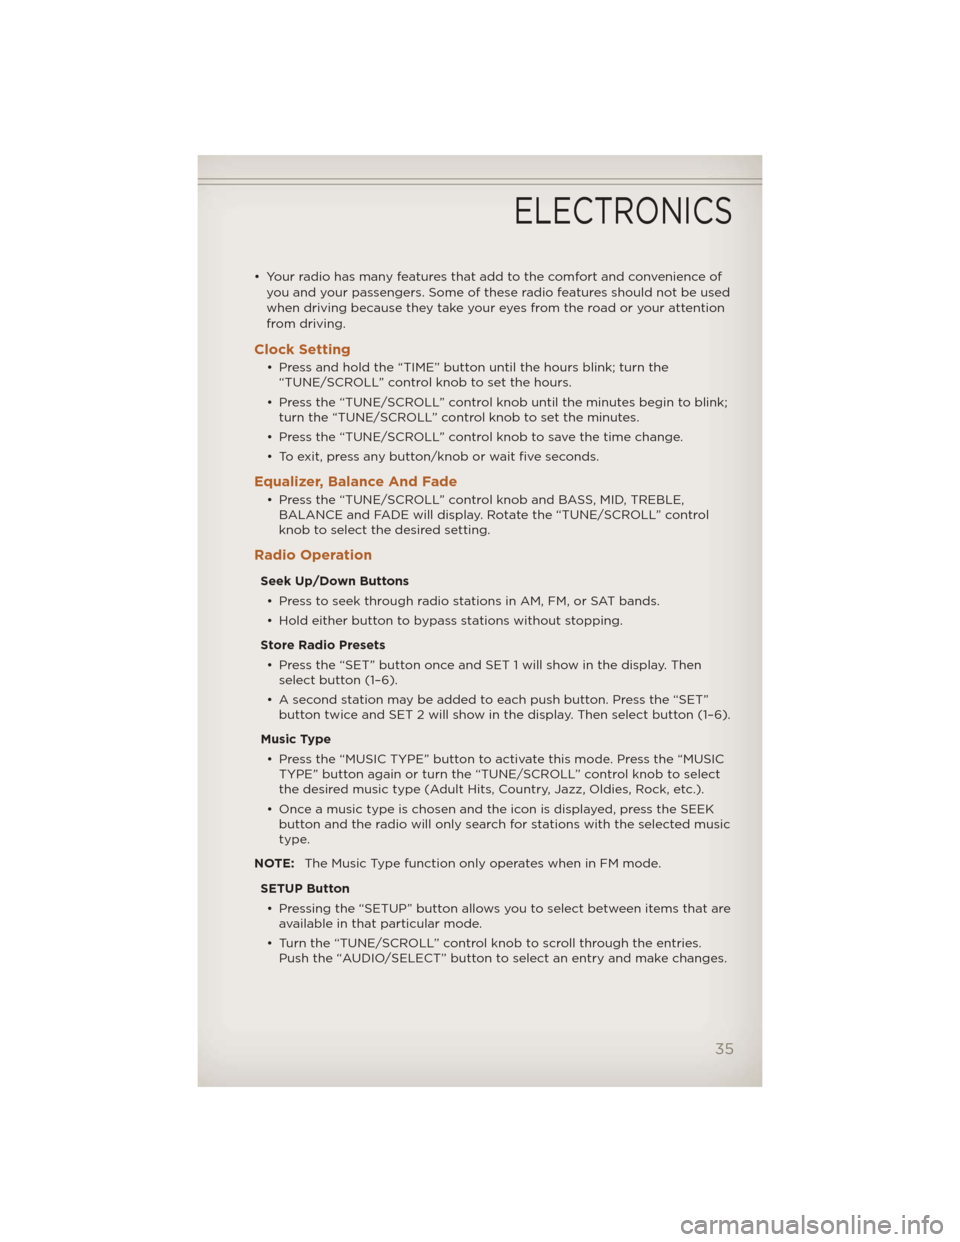
• Press and hold the “TIME” button until the hours blink; turn the“TUNE/SCROLL” control knob to set the hours.
• Press the “TUNE/SCROLL” control knob until the minutes begin to blink; turn the “TUNE/SCROLL” control knob to set the minutes.
• Press the “TUNE/SCROLL” control knob to save the time change.
• To exit, press any button/knob or wait five seconds.
Equalizer, Balance And Fade
• Press the “TUNE/SCROLL” control knob and BASS, MID, TREBLE, BALANCE and FADE will display. Rotate the “TUNE/SCROLL” control
knob to select the desired setting.
Radio Operation
Seek Up/Down Buttons
• Press to seek through radio stations in AM, FM, or SAT bands.
• Hold either button to bypass stations without stopping.
Store Radio Presets • Press the “SET” button once and SET 1 will show in the display. Then select button (1–6).
• A second station may be added to each push button. Press the “SET” button twice and SET 2 will show in the display. Then select button (1–6).
Music Type • Press the “MUSIC TYPE” button to activate this mode. Press the “MUSIC TYPE” button again or turn the “TUNE/SCROLL” control knob to select
the desired music type (Adult Hits, Country, Jazz, Oldies, Rock, etc.).
• Once a music type is chosen and the icon is displayed, press the SEEK button and the radio will only search for stations with the selected music
type.
NOTE: The Music Type function only operates when in FM mode.
SETUP Button • Pressing the “SETUP” button allows you to select between items that are available in that particular mode.
• Turn the “TUNE/SCROLL” control knob to scroll through the entries. Push the “AUDIO/SELECT” button to select an entry and make changes.
ELECTRONICS
35
Page 39 of 124
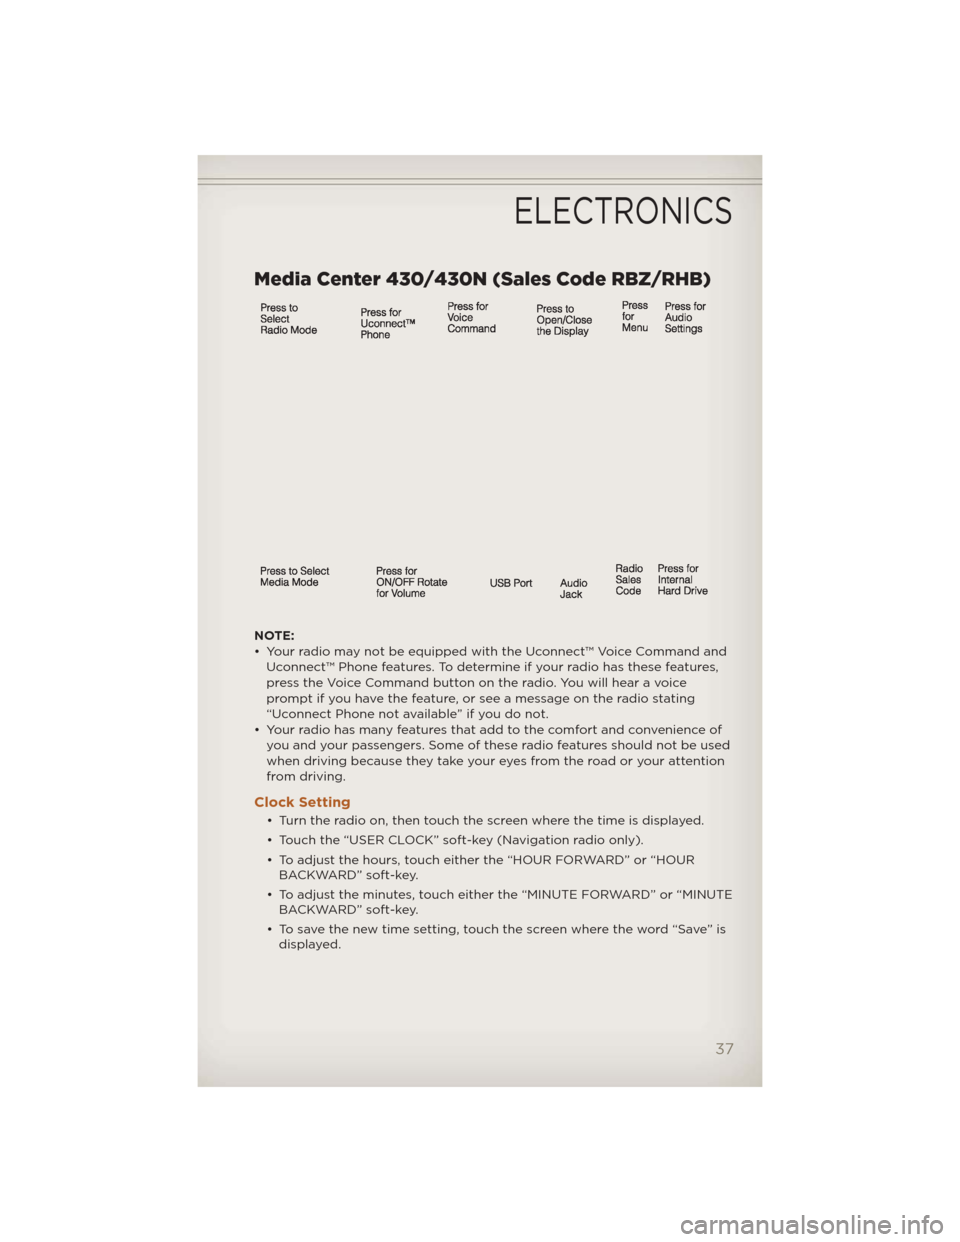
Media Center 430/430N (Sales Code RBZ/RHB)
NOTE:
• Your radio may not be equipped with the Uconnect™ Voice Command andUconnect™ Phone features. To determine if your radio has these features,
press the Voice Command button on the radio. You will hear a voice
prompt if you have the feature, or see a message on the radio stating
“Uconnect Phone not available” if you do not.
• Your radio has many features that add to the comfort and convenience of you and your passengers. Some of these radio features should not be used
when driving because they take your eyes from the road or your attention
from driving.
Clock Setting
• Turn the radio on, then touch the screen where the time is displayed.
• Touch the “USER CLOCK” soft-key (Navigation radio only).
• To adjust the hours, touch either the “HOUR FORWARD” or “HOURBACKWARD” soft-key.
• To adjust the minutes, touch either the “MINUTE FORWARD” or “MINUTE BACKWARD” soft-key.
• To save the new time setting, touch the screen where the word “Save” is displayed.
ELECTRONICS
37
Page 49 of 124
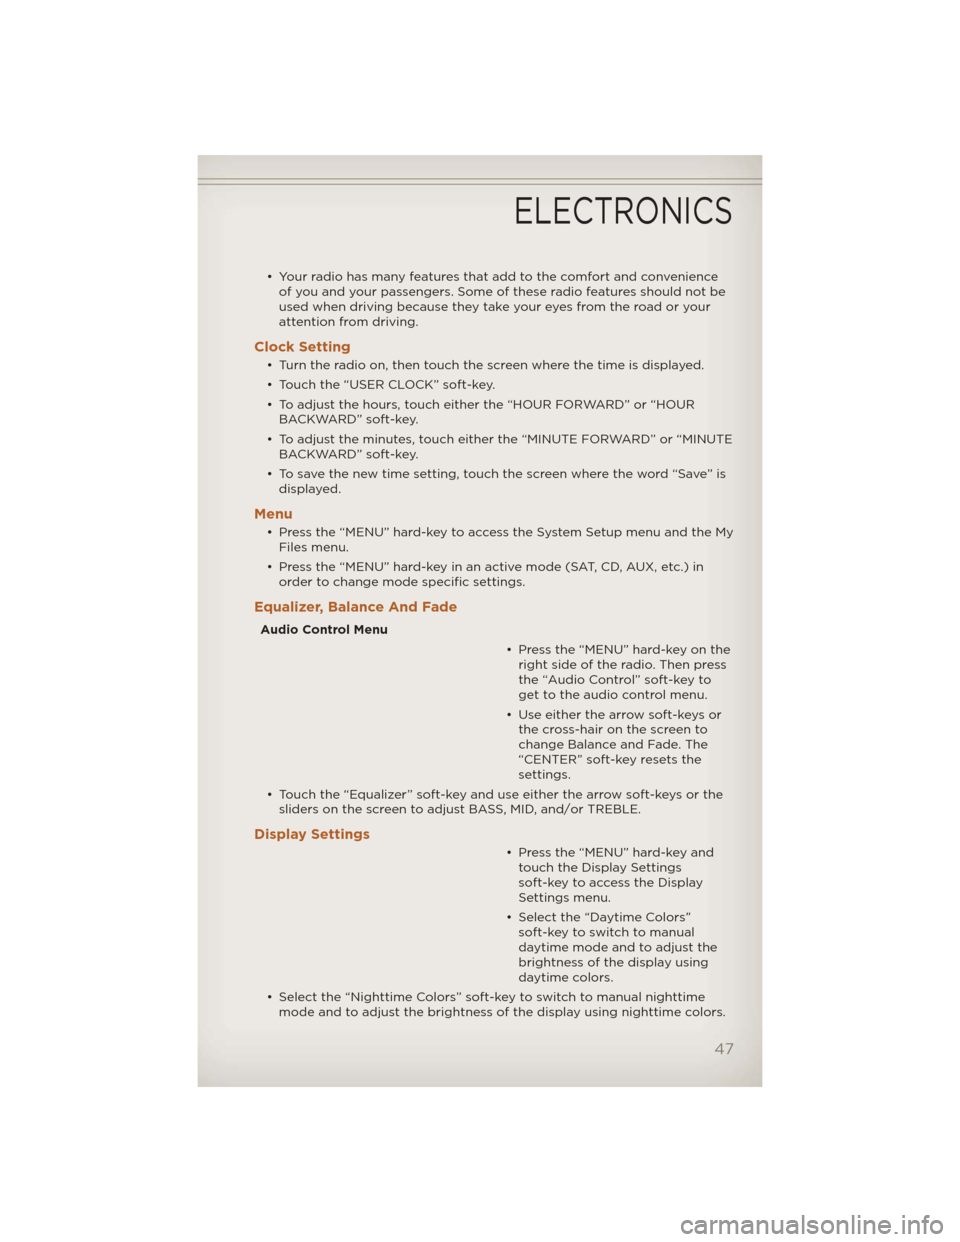
• Your radio has many features that add to the comfort and convenienceof you and your passengers. Some of these radio features should not be
used when driving because they take your eyes from the road or your
attention from driving.
Clock Setting
• Turn the radio on, then touch the screen where the time is displayed.
• Touch the “USER CLOCK” soft-key.
• To adjust the hours, touch either the “HOUR FORWARD” or “HOURBACKWARD” soft-key.
• To adjust the minutes, touch either the “MINUTE FORWARD” or “MINUTE BACKWARD” soft-key.
• To save the new time setting, touch the screen where the word “Save” is displayed.
Menu
• Press the “MENU” hard-key to access the System Setup menu and the MyFiles menu.
• Press the “MENU” hard-key in an active mode (SAT, CD, AUX, etc.) in order to change mode specific settings.
Equalizer, Balance And Fade
Audio Control Menu
• Press the “MENU” hard-key on theright side of the radio. Then press
the “Audio Control” soft-key to
get to the audio control menu.
• Use either the arrow soft-keys or the cross-hair on the screen to
change Balance and Fade. The
“CENTER” soft-key resets the
settings.
• Touch the “Equalizer” soft-key and use either the arrow soft-keys or the sliders on the screen to adjust BASS, MID, and/or TREBLE.
Display Settings
• Press the “MENU” hard-key andtouch the Display Settings
soft-key to access the Display
Settings menu.
• Select the “Daytime Colors” soft-key to switch to manual
daytime mode and to adjust the
brightness of the display using
daytime colors.
• Select the “Nighttime Colors” soft-key to switch to manual nighttime mode and to adjust the brightness of the display using nighttime colors.
ELECTRONICS
47
Page 86 of 124
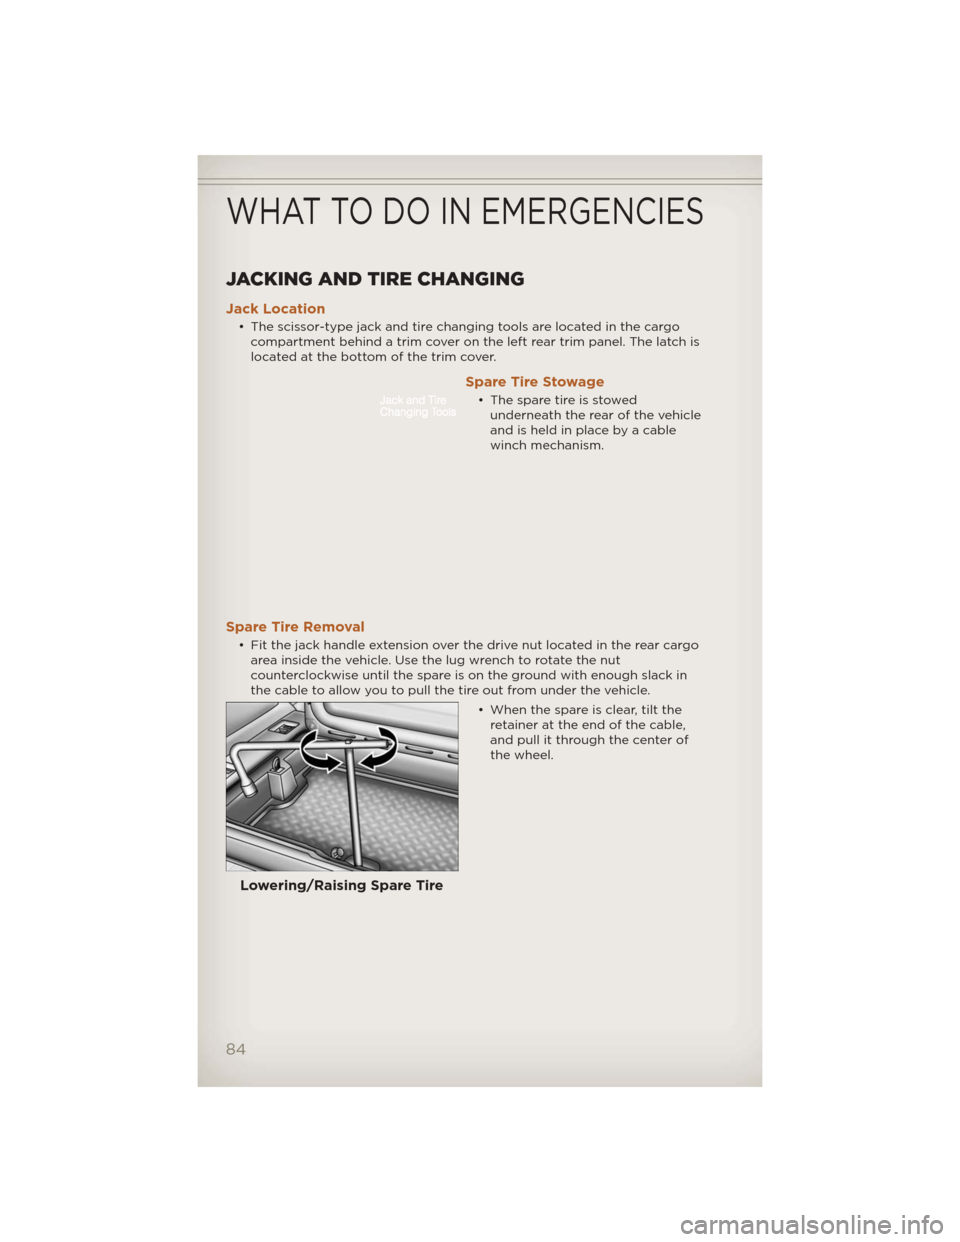
JACKING AND TIRE CHANGING
Jack Location
• The scissor-type jack and tire changing tools are located in the cargocompartment behind a trim cover on the left rear trim panel. The latch is
located at the bottom of the trim cover.
Spare Tire Stowage
• The spare tire is stowedunderneath the rear of the vehicle
and is held in place by a cable
winch mechanism.
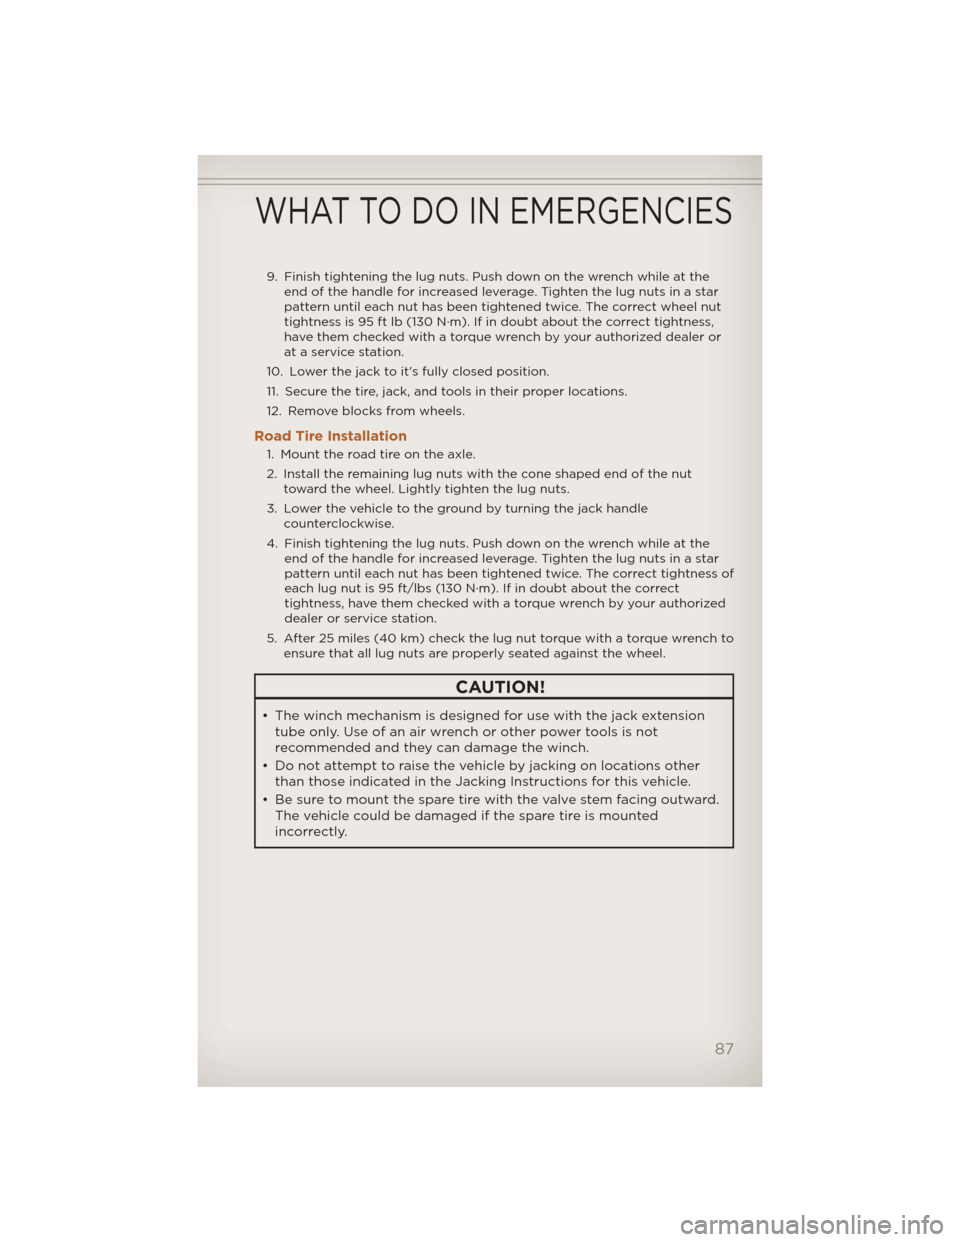
Spare Tire Removal
• Fit the jack handle extension over the drive nut located in the rear cargoarea inside the vehicle. Use the lug wrench to rotate the nut
counterclockwise until the spare is on the ground with enough slack in
the cable to allow you to pull the tire out from under the vehicle.
• When the spare is clear, tilt theretainer at the end of the cable,
and pull it through the center of
the wheel.
Lowering/Raising Spare Tire
WHAT TO DO IN EMERGENCIES
84
Page 89 of 124
9. Finish tightening the lug nuts. Push down on the wrench while at theend of the handle for increased leverage. Tighten the lug nuts in a star
pattern until each nut has been tightened twice. The correct wheel nut
tightness is 95 ft lb (130 N·m). If in doubt about the correct tightness,
have them checked with a torque wrench by your authorized dealer or
at a service station.
10. Lower the jack to it's fully closed position.
11. Secure the tire, jack, and tools in their proper locations.
12. Remove blocks from wheels.
Road Tire Installation
1. Mount the road tire on the axle.
2. Install the remaining lug nuts with the cone shaped end of the nut toward the wheel. Lightly tighten the lug nuts.
3. Lower the vehicle to the ground by turning the jack handle counterclockwise.
4. Finish tightening the lug nuts. Push down on the wrench while at the end of the handle for increased leverage. Tighten the lug nuts in a star
pattern until each nut has been tightened twice. The correct tightness of
each lug nut is 95 ft/lbs (130 N·m). If in doubt about the correct
tightness, have them checked with a torque wrench by your authorized
dealer or service station.
5. After 25 miles (40 km) check the lug nut torque with a torque wrench to ensure that all lug nuts are properly seated against the wheel.
CAUTION!
• The winch mechanism is designed for use with the jack extensiontube only. Use of an air wrench or other power tools is not
recommended and they can damage the winch.
• Do not attempt to raise the vehicle by jacking on locations other than those indicated in the Jacking Instructions for this vehicle.
• Be sure to mount the spare tire with the valve stem facing outward. The vehicle could be damaged if the spare tire is mounted
incorrectly.
WHAT TO DO IN EMERGENCIES
87
Page 106 of 124
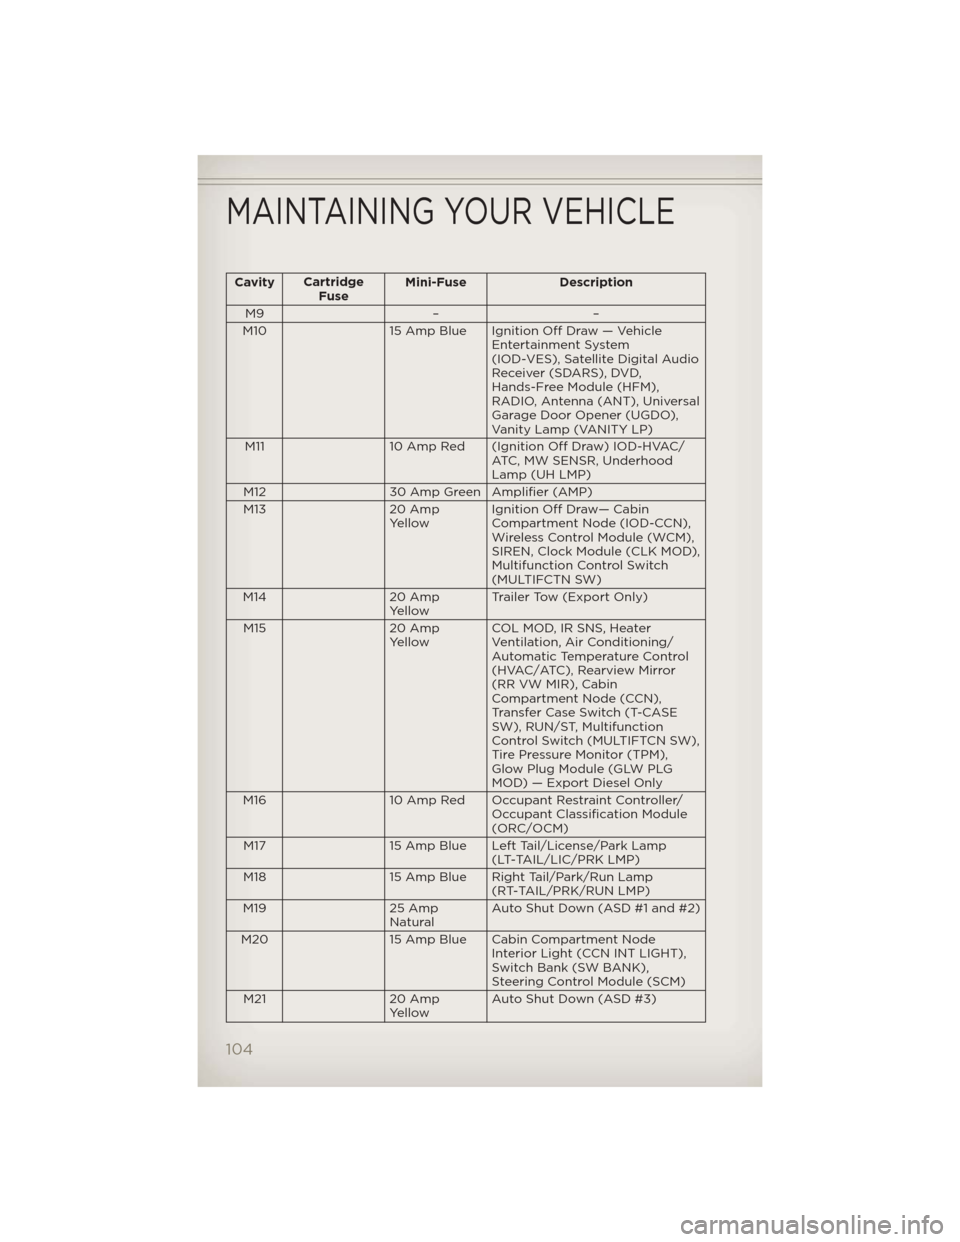
CavityCartridge
Fuse Mini-Fuse Description
M9 – –
M10 15 Amp Blue Ignition Off Draw — Vehicle Entertainment System
(IOD-VES), Satellite Digital Audio
Receiver (SDARS), DVD,
Hands-Free Module (HFM),
RADIO, Antenna (ANT), Universal
Garage Door Opener (UGDO),
Vanity Lamp (VANITY LP)
M11 10 Amp Red (Ignition Off Draw) IOD-HVAC/ ATC, MW SENSR, Underhood
Lamp (UH LMP)
M12 30 Amp Green Amplifier (AMP)
M13 20 Amp YellowIgnition Off Draw— Cabin
Compartment Node (IOD-CCN),
Wireless Control Module (WCM),
SIREN, Clock Module (CLK MOD),
Multifunction Control Switch
(MULTIFCTN SW)
M14 20 Amp
Yellow Trailer Tow (Export Only)
M15 20 Amp
Yellow COL MOD, IR SNS, Heater
Ventilation, Air Conditioning/
Automatic Temperature Control
(HVAC/ATC), Rearview Mirror
(RR VW MIR), Cabin
Compartment Node (CCN),
Transfer Case Switch (T-CASE
SW), RUN/ST, Multifunction
Control Switch (MULTIFTCN SW),
Tire Pressure Monitor (TPM),
Glow Plug Module (GLW PLG
MOD) — Export Diesel Only
M16 10 Amp Red Occupant Restraint Controller/
Occupant Classification Module
(ORC/OCM)
M17 15 Amp Blue Left Tail/License/Park Lamp
(LT-TAIL/LIC/PRK LMP)
M18 15 Amp Blue Right Tail/Park/Run Lamp
(RT-TAIL/PRK/RUN LMP)
M19 25 Amp
Natural Auto Shut Down (ASD #1 and #2)
M20 15 Amp Blue Cabin Compartment Node
Interior Light (CCN INT LIGHT),
Switch Bank (SW BANK),
Steering Control Module (SCM)
M21 20 Amp
Yellow Auto Shut Down (ASD #3)
MAINTAINING YOUR VEHICLE
104
Page 113 of 124
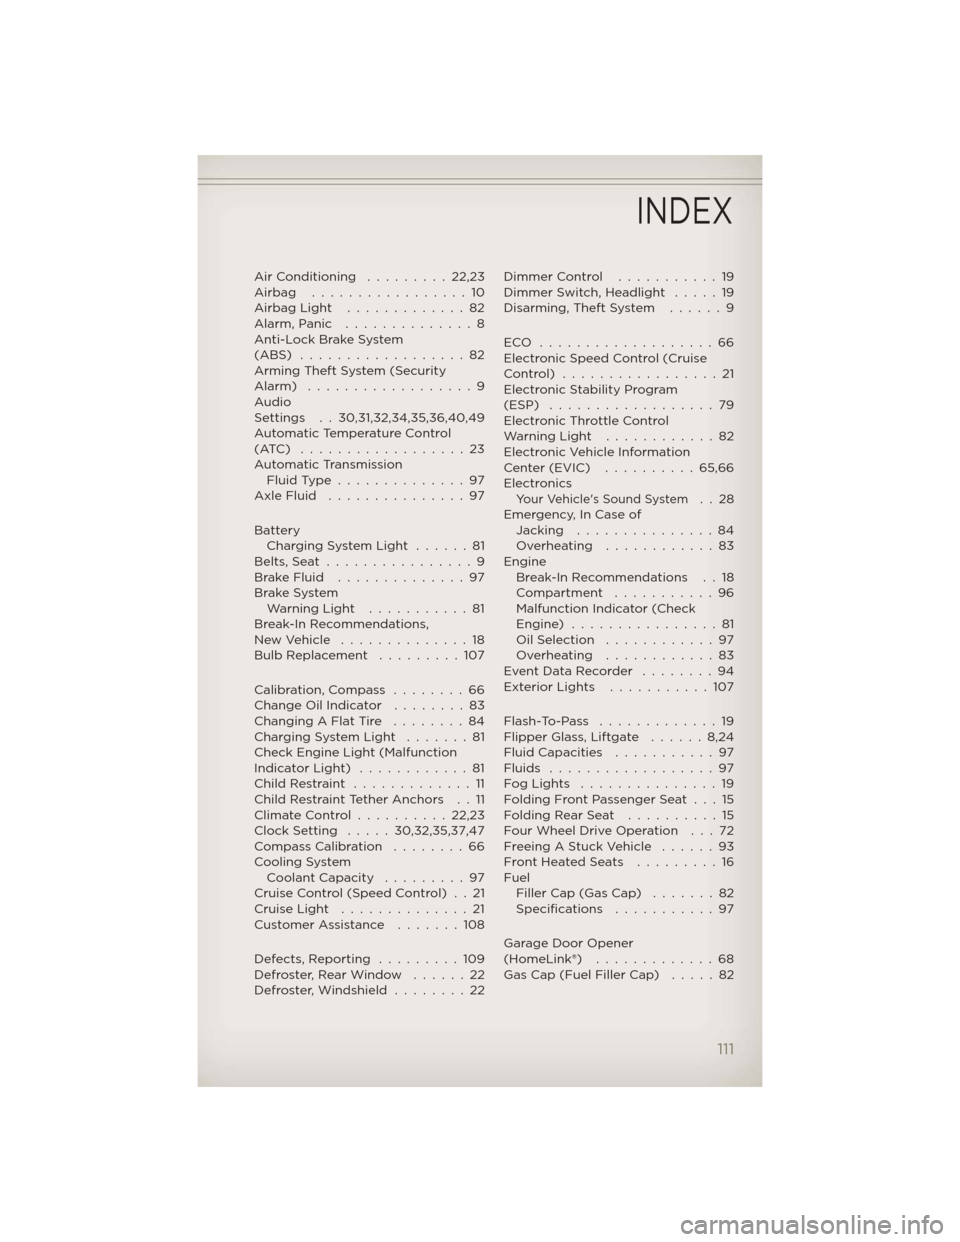
AirConditioning .........22,23
Airbag .................10
AirbagLight .............82
Alarm,Panic ..............8
Anti-Lock Brake System
(ABS)..................82
Arming Theft System (Security
Alarm) ..................9
Audio
Settings . . 30,31,32,34,35,36,40,49
Automatic Temperature Control
(ATC) ..................23
Automatic Transmission FluidType..............97
AxleFluid ...............97
Battery Charging System Light . . . . . . 81
Belts, Seat ................9
BrakeFluid ..............97
Brake System WarningLight ...........81
Break-In Recommendations,
NewVehicle ..............18
Bulb Replacement .........107
Calibration, Compass ........66
Change Oil Indicator ........83
Changing A Flat Tire . . ......84
Charging System Light . . . . . . . 81
Check Engine Light (Malfunction
IndicatorLight) ............81
ChildRestraint .............11
Child Restraint Tether Anchors . . 11
ClimateControl..........22,23
Clock Setting .....30,32,35,37,47
Compass Calibration . . . . . . . . 66
Cooling System Coolant Capacity .........97
Cruise Control (Speed Control) . . 21
CruiseLight ..............21
Customer Assistance . . . . . . . 108
Defects, Reporting .........109
Defroster, Rear Window . . . . . . 22
Defroster, Windshield . . . . . . . . 22 Dimmer Control . . . . . . . . . . . 19
Dimmer Switch, Headlight . . . . . 19
Disarming,TheftSystem ......9
ECO ...................66
Electronic Speed Control (Cruise
Control) .................21
Electronic Stability Program
(ESP) . . . . . .
............79
Electronic Throttle Control
WarningLight ............82
Electronic Vehicle Information
Center (EVIC) . . . . . . . . . . 65,66
Electronics
Your Vehicle's Sound System..28
Emergency, In Case of Jacking . . . . . . . . . . . . . . . 84
Overheating ............83
Engine Break-In Recommendations . . 18
Compartment . . . . . . . . . . . 96
Malfunction Indicator (Check
Engine) . . . . . . . . . . . . . . . . 81
OilSelection ............97
Overheating ............83
EventDataRecorder ........94
ExteriorLights ...........107
Flash-To-Pass .............19
Flipper Glass, Liftgate . . . . . . 8,24
Fluid Capacities . . . . . ......97
Fluids ..................97
FogLights ...............19
Folding Front Passenger Seat . . . 15
FoldingRearSeat ..........15
Four Wheel Drive Operation . . . 72
Freeing A Stuck Vehicle . . . . . . 93
Front Heated Seats . . . . . . . . . 16
Fuel Filler Cap (Gas Cap) . . . . . . . 82
Specifications . . . . . . . . . . . 97
Garage Door Opener
(HomeLink®) . . . . .........68
Gas Cap (Fuel Filler Cap) . . . . . 82
INDEX
111
Page 115 of 124
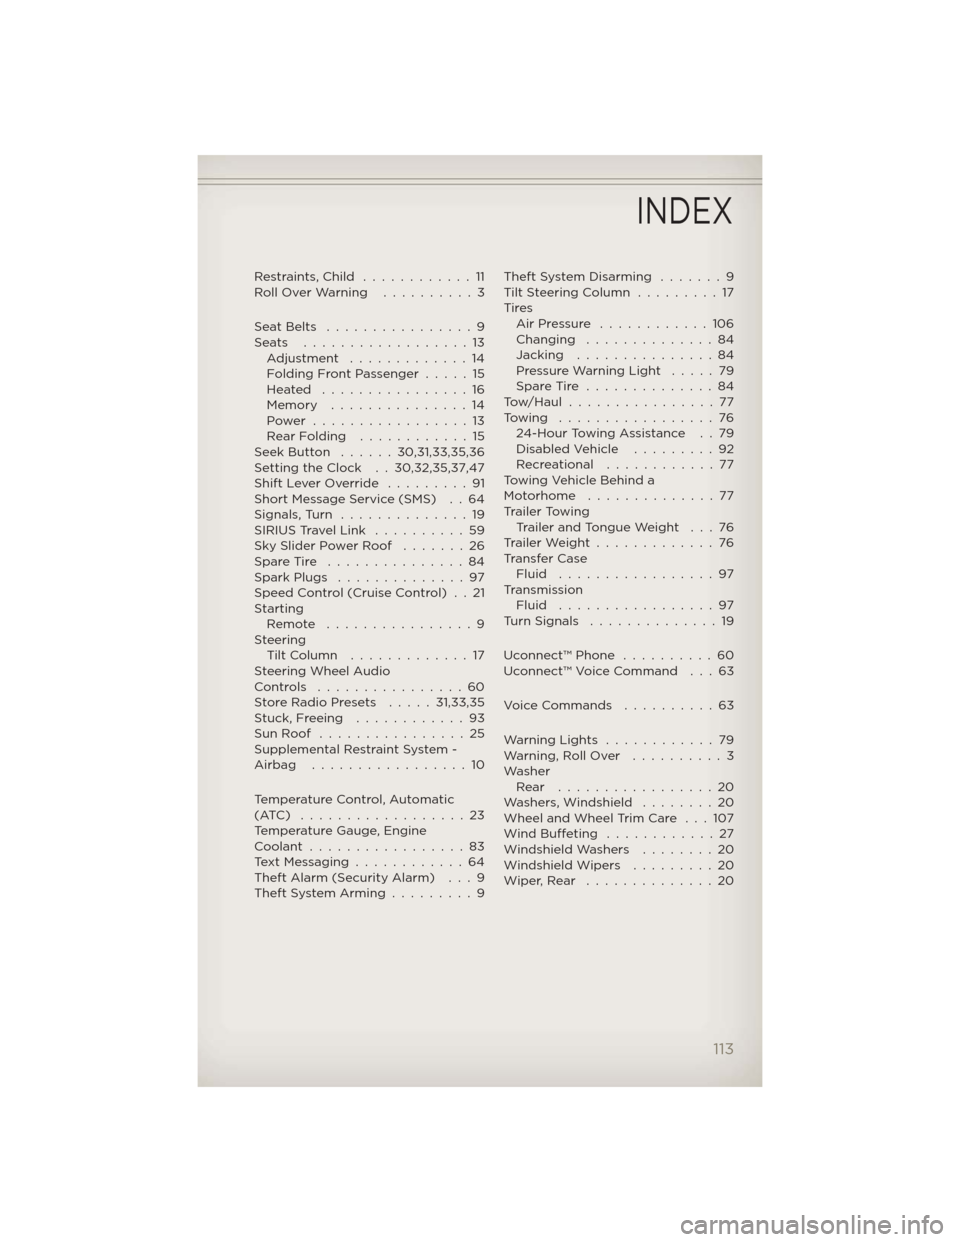
Restraints,Child ............11
RollOverWarning ..........3
SeatBelts ................9
Seats ..................13Adjustment .............14
Folding Front Passenger . . . . . 15
Heated ................16
Memory ...............14
Power .................13
RearFolding ............15
Seek Button ......30,31,33,35,36
Setting the Clock . . 30,32,35,37,47
Shift Lever Override .........91
Short Message Service (SMS) . . 64
Signals,Turn ..............19
SIRIUSTravelLink ..........59
Sky Slider Power Roof . . . . . . . 26
Spare Tire ...............84
Spark Plugs ..............97
Speed Control (Cruise Control) . . 21
Starting Remote ................9
Steering TiltColumn .............17
Steering Wheel Audio
Controls ................60
Store Radio Presets . . . . . 31,33,35
Stuck, Freeing ............93
SunRoof ................25
Supplemental Restraint System -
Airbag .................10
Temperature Control, Automatic
(ATC) ..................23
Temperature Gauge, Engine
Coolant.................83
TextMessaging............64
Theft Alarm (Security Alarm) . . . 9
TheftSystemArming.........9 TheftSystemDisarming .......9
TiltSteeringColumn .........17
Tires
AirPressure ............106
Changing ..............84
Jacking . . . . . . . . . . . . . . . 84
PressureWarningLight .....79
Spare Tire . . . . . . . . ......84
Tow/Haul . . . . . . . . . . . . . . . . 77
Towing .................76 24-Hour Towing Assistance . . 79
Disabled Vehicle . . . . . . . . . 92
Recreational . . . . . . . . . . . . 77
Towing Vehicle Behind a
Motorhome . . . . . . . . . . ....77
Trailer Towing Trailer and Tongue Weight . . . 76
TrailerWeight.............76
Transfer Case Fluid .................97
Transmission Fluid .................97
Turn Signals . . . . . . . . ......19
Uconnect™ Phone . . . .......60
Uconnect™ Voice Command . . . 63
Voice Commands . . . . . . . . . . 63
WarningLights ............79
Warning,RollOver ..........3
Washer Rear .................20
Washers, Windshield . . ......20
Wheel and Wheel Trim Care . . . 107
WindBuffeting ............27
Windshield Washers . . ......20
Windshield Wipers . . . . . . . . . 20
Wiper,Rear ..............20
INDEX
113