brake fluid JEEP PATRIOT 2007 1.G Owners Manual
[x] Cancel search | Manufacturer: JEEP, Model Year: 2007, Model line: PATRIOT, Model: JEEP PATRIOT 2007 1.GPages: 440, PDF Size: 7.26 MB
Page 72 of 440
Defroster
Check operation by selecting the defrost mode and place
the blower control on high speed. You should be able to
feel the air directed against the windshield.
Periodic Safety Checks You Should Make Outside
The Vehicle
Tires
Examine tires for excessive tread wear or uneven wear
patterns. Check for stones, nails, glass, or other objects
lodged in the tread. Inspect tread and sidewall for cuts or
cracks. Check wheel nuts for tightness, and tires (includ-
ing spare) for proper pressure.
Lights
Have someone observe the operation of exterior lights
while you work the controls. Check turn signal and high
beam indicator lights on the instrument panel.
Fluid Leaks
Check area under vehicle after overnight parking for fuel,
engine coolant, oil or other fluid leaks. Also, if gasoline
fumes are detected or fuel, power steering fluid, trans-
mission fluid or brake fluid leaks are suspected, the cause
should be located and corrected immediately.
THINGS TO KNOW BEFORE STARTING YOUR VEHICLE 71
2
Page 76 of 440
NWindshield Wiper Operation.............125
NIntermittent Wiper System...............125
NAdding Washer Fluid..................126
mTilt Steering Column....................126
mElectronic Speed Control Ð If Equipped......127
NTo Activate..........................127
NTo Set At A Desired Speed...............128
NTo Deactivate........................128
NTo Resume Speed.....................128
NTo Vary The Speed Setting...............128
NManual Transaxle.....................129
NTo Accelerate For Passing...............129
mGarage Door Opener Ð If Equipped.........130NProgramming The Universal Transceiver.....131
NªRolling Codeº Programming............133
NCanadian Programming/Gate Programming . . 135
NOperation...........................135
NReprogramming A Single Button..........135
NSecurity............................136
mAnti-Lock Brake System (ABS) ± If Equipped . . . 136
mElectronic Brake Control System ±
ABS/TCS/BAS/ERM/HDC/ESP...........137
NAnti-Lock Brake System ± ABS............137
NTraction Control System (TCS)............138
NBrake Assist System (BAS)...............138
NElectronic Roll Mitigation (ERM)..........139
UNDERSTANDING THE FEATURES OF YOUR VEHICLE 75
3
Page 173 of 440
will sound 10 times. After the chime turns off, the engine
will still be critically hot until the light goes out.
14. Brake System Warning Light
This light monitors various brake functions, in-
cluding brake fluid level and parking brake appli-
cation. If the brake light turns on, it may indicate that the
parking brake is applied, there is a low brake fluid level
or there is a problem with the anti-lock brake system.
The dual brake system provides a reserve braking capac-
ity in the event of a failure to a portion of the hydraulic
system. Failure of either half of the dual brake system is
indicated by the Brake Warning Light which will turn on
when the brake fluid level in the master cylinder has
dropped below a specified level.
The light will remain on until the cause is corrected.NOTE:The light may flash momentarily during sharp
cornering maneuvers which change fluid level condi-
tions. The vehicle should have service performed, and
the brake fluid level checked.
If brake failure is indicated, immediate repair is neces-
sary.
WARNING!
Driving a vehicle with the brake light on is danger-
ous. Part of the brake system may have failed. It will
take longer to stop the vehicle. You could have an
accident. Have the vehicle checked immediately.
Vehicles equipped with Anti-Lock brakes (ABS), are also
equipped with Electronic Brake Force Distribution (EBD).
172 UNDERSTANDING YOUR INSTRUMENT PANEL
Page 264 of 440
avoid damage to the environment. You should know
your vehicles abilities and be able to recover it if some-
thing goes wrong. You should never stop or shut a
vehicle off when crossing deep water unless you ingested
water into the engine air intake. If the engine stalls do not
attempt to restart it. Determine if it has ingested water
first. The key to any crossing is low and slow. You want
to use low (L Off-Road) with the 4WD Lock engaged and
proceed very slowly with a constant slow speed {3-5 mph
(5±8 km/h) maximum} and light throttle. Keep the ve-
hicle moving; do not try to accelerate through the cross-
ing. After crossing any water higher than the bottom of
the axle differentials, you should inspect all of the vehicle
fluids for signs of water ingestion.CAUTION!
Water ingestion into the axles, transmission, transfer
case, engine or vehicle interior can occur if you drive
too fast or through too deep of water. Water can cause
permanent damage to engine, driveline or other
vehicle components and your brakes will be less
effective once wet and/or muddy.
STARTING AND OPERATING 263
5
Page 273 of 440
BRAKE SYSTEM
Your vehicle is equipped with power assisted brakes as
standard equipment. In the event power assist is lost for
any reason (for example, repeated brake applications
with the engine off), the brakes will still function. How-
ever, the effort required to brake the vehicle will be much
greater than that required with the power system oper-
ating.
WARNING!
Riding the brakes can lead to brake failure and
possibly an accident. Driving with your foot resting
or riding on the brake pedal can result in abnormally
high brake temperatures, excessive lining wear, and
possible brake damage. You wouldn't have your full
braking capacity in an emergency.If either of the two hydraulic systems lose normal capa-
bility, the remaining system will still function with some
loss of overall braking effectiveness. This will be evident
by increased pedal travel during application and greater
pedal force required to slow or stop. In addition, if the
malfunction is caused by an internal leak, as the brake
fluid in the master cylinder drops, the brake warning
indicator will light.
WARNING!
Driving a vehicle with the brake light on is danger-
ous. A significant decrease in braking performance or
vehicle stability during braking may occur. It will
take you longer to stop the vehicle or will make your
vehicle harder to control. You could have an accident.
Have the vehicle checked immediately.
272 STARTING AND OPERATING
Page 367 of 440
Brake System
In order to assure brake system performance, all brake
system components should be inspected periodically.
Suggested service intervals can be found in the Mainte-
nance Section.
WARNING!
Riding the brakes can lead to brake failure and
possibly an accident. Driving with your foot resting
or riding on the brake pedal can result in abnormally
high brake temperatures, excessive lining wear, and
possible brake damage. You wouldn't have your full
braking capacity in an emergency.
Brake And Power Steering System Hoses
When servicing the vehicle for scheduled maintenance,
inspect the surface of the hoses and nylon tubing for
evidence of heat and mechanical damage. Hard andbrittle rubber, cracking, tears, cuts, abrasions, and exces-
sive swelling suggest deterioration of the rubber. Particu-
lar attention should be made to examining those hose
surfaces nearest to high heat sources, such as the exhaust
manifold.
Inspect all hose clamps and couplings to make sure they
are secure and no leaks are present.
Insure nylon tubing in these areas has not melted or
collapsed.
NOTE:Often, fluids such as oil, power steering fluid,
and brake fluid are used during assembly plant opera-
tions to ease the assembly of hoses to couplings. There-
fore, oil wetness at the hose-coupling area is not neces-
sarily an indication of leakage. Actual dripping of hot
fluid when systems are under pressure (during vehicle
operation) should be noted before a hose is replaced
based on leakage.
366 MAINTAINING YOUR VEHICLE
Page 368 of 440
NOTE:Inspection of brake hoses should be done when-
ever the brake system is serviced and at every engine oil
change.
WARNING!
Worn brake hoses can burst and cause brake failure.
You could have an accident. If you see any signs of
cracking, scuffing, or worn spots, have the brake
hoses replaced immediately.
Brake Master Cylinder
The fluid level in the master cylinder should be checked
when performing under hood services, or immediately if
the brake system warning lamp is on.
Be sure to clean the top of the master cylinder area before
removing the cap. If necessary, add fluid to bring the
fluid level up to the requirements described on the brakefluid reservoir. Fluid level can be expected to fall as the
brake pads wear. Brake fluid level should be checked
when pads are replaced. However, low fluid level may be
caused by a leak and a checkup may be needed.
NOTE:If your vehicle is equipped with aManual
Transaxle, the Brake Fluid Reservoir supplies fluid to
both the Brake System and the Clutch Release System.
The two systems are separated in the reservoir and a leak
in one system will not affect the other system. The
Manual TransaxleClutch Release System should not
require fluid replacement during the life of the vehicle. If
the Brake Fluid Reservoir is low, and the brake system
does not indicate any leaks or other problems, it may be
a result of a leak in the Hydraulic Clutch Release System.
See your local authorized dealer for service.
Use only manufacturers recommended brake fluid, refer
to Fluids, Lubricants and Genuine Parts for correct fluid
type.
MAINTAINING YOUR VEHICLE 367
7
Page 369 of 440
WARNING!
Use of a brake fluid that may have a lower initial
boiling point or unidentified as to specification, may
result in sudden brake failure during hard prolonged
braking. You could have an accident.
CAUTION!
Use of improper brake fluids will affect overall
clutch system performance. Improper brake fluids
may damage the clutch system resulting in loss of
clutch function and the ability to shift the transaxle.
WARNING!
Overfilling the brake fluid reservoir can result in
spilling brake fluid on hot engine parts and the
brake fluid catching fire.
Use only brake fluid that has been in a tightly closed
container to avoid contamination from foreign matter.
Do not allow petroleum based fluid to contaminate the
brake fluid as seal damage will result!
Automatic Transaxle (CVT)
Selection Of Lubricant
It is important that the proper lubricant is used in the
transaxle to assure optimum transaxle performance. Use
only the manufacturer's recommended transmission
fluid which has been formulated with special metal to
metal friction coefficient additives to provide the proper
368 MAINTAINING YOUR VEHICLE
Page 390 of 440
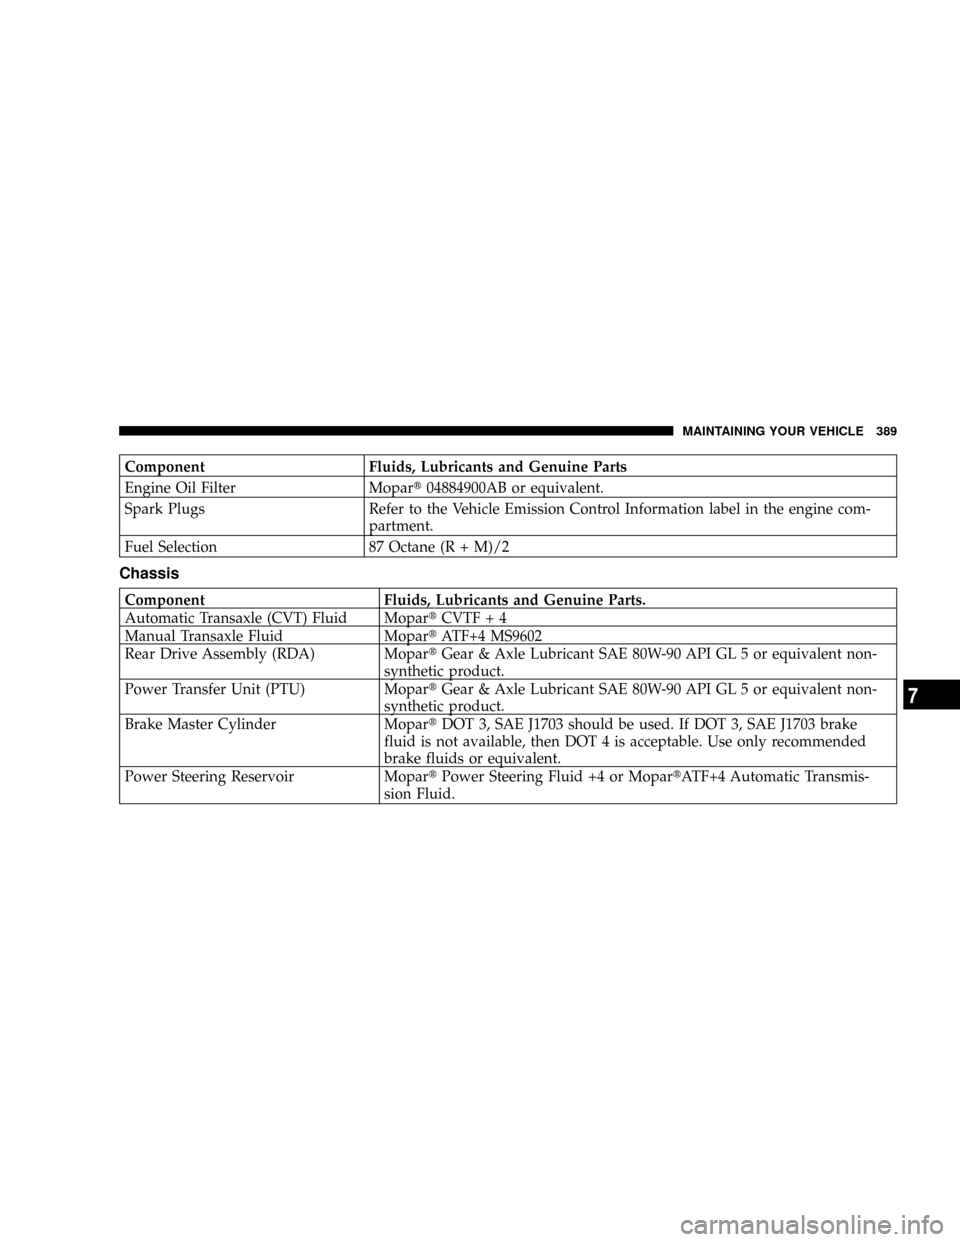
Component Fluids, Lubricants and Genuine Parts
Engine Oil Filter Mopart04884900AB or equivalent.
Spark Plugs Refer to the Vehicle Emission Control Information label in the engine com-
partment.
Fuel Selection 87 Octane (R + M)/2
Chassis
Component Fluids, Lubricants and Genuine Parts.
Automatic Transaxle (CVT) Fluid MopartCVTF + 4
Manual Transaxle Fluid MopartATF+4 MS9602
Rear Drive Assembly (RDA) MopartGear & Axle Lubricant SAE 80W-90 API GL 5 or equivalent non-
synthetic product.
Power Transfer Unit (PTU) MopartGear & Axle Lubricant SAE 80W-90 API GL 5 or equivalent non-
synthetic product.
Brake Master Cylinder MopartDOT 3, SAE J1703 should be used. If DOT 3, SAE J1703 brake
fluid is not available, then DOT 4 is acceptable. Use only recommended
brake fluids or equivalent.
Power Steering Reservoir MopartPower Steering Fluid +4 or MopartATF+4 Automatic Transmis-
sion Fluid.
MAINTAINING YOUR VEHICLE 389
7
Page 395 of 440
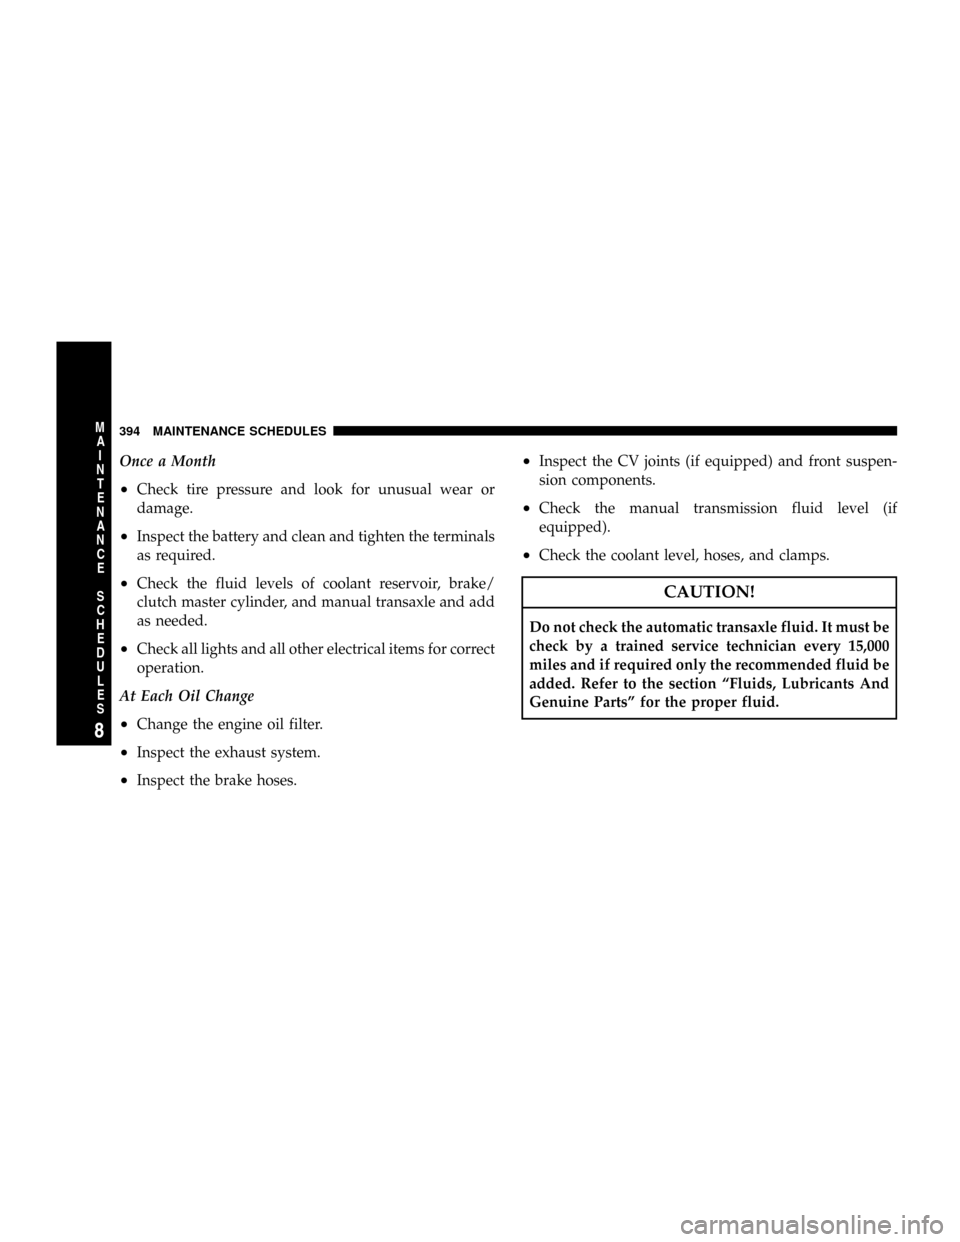
Once a Month
²Check tire pressure and look for unusual wear or
damage.
²Inspect the battery and clean and tighten the terminals
as required.
²Check the fluid levels of coolant reservoir, brake/
clutch master cylinder, and manual transaxle and add
as needed.
²Check all lights and all other electrical items for correct
operation.
At Each Oil Change
²Change the engine oil filter.
²Inspect the exhaust system.
²Inspect the brake hoses.
²Inspect the CV joints (if equipped) and front suspen-
sion components.
²Check the manual transmission fluid level (if
equipped).
²Check the coolant level, hoses, and clamps.
CAUTION!
Do not check the automatic transaxle fluid. It must be
check by a trained service technician every 15,000
miles and if required only the recommended fluid be
added. Refer to the section ªFluids, Lubricants And
Genuine Partsº for the proper fluid.
394 MAINTENANCE SCHEDULES
8
M
A
I
N
T
E
N
A
N
C
E
S
C
H
E
D
U
L
E
S