lock JEEP PATRIOT 2010 1.G User Guide
[x] Cancel search | Manufacturer: JEEP, Model Year: 2010, Model line: PATRIOT, Model: JEEP PATRIOT 2010 1.GPages: 72, PDF Size: 13.27 MB
Page 3 of 72
INTRODUCTION/WELCOME
WELCOME FROM CHRYSLER GROUP LLC.. 2
CONTROLS AT A GLANCE
DRIVER COCKPIT.............. 4
INSTRUMENT CLUSTER .......... 6
GETTING STARTED
KEYFOB .................. 8
THEFT ALARM............... 9
SEAT BELT ................. 9
CHILD RESTRAINTS ............ 9
FRONT SEATS ...............11
REAR SEATS ................14
TILT STEERING COLUMN .........14
PROGRAMMABLE FEATURES .......15
OPERATING YOUR VEHICLE
TURN SIGNAL/LIGHTS LEVER .......17
WIPER/WASHER LEVER ..........18
SPEED CONTROL LEVER .........19
CONTINUOUSLY VARIABLE AUTOMATIC
TRANSMISSION (CVT) ...........20
MANUAL CLIMATE CONTROLS ......20
AUTOMATIC TEMPERATURE CONTROLS
(ATC) ....................21
POWER SUNROOF .............21
WIND BUFFETING .............22
ELECTRONICS
NON-TOUCH-SCREEN RADIOS ......23
TOUCH-SCREEN RADIOS .........26
REMOTE AUDIO CONTROLS ........30
UNIVERSAL CONSUMER INTERFACE . . . 31
ELECTRONIC VEHICLE INFORMATION
CENTER (EVIC) ...............31
UNIVERSAL GARAGE DOOR OPENER . . . 32
POWER INVERTER .............33
POWER OUTLET ..............34
UCONNECT™ PHONE ...........34
VOICE COMMAND .............36
OFF-ROAD CAPABILITIES
FOUR-WHEEL DRIVE OPERATION .....37
UTILITY
TRAILER TOWING WEIGHTS (MAXIMUM
TRAILER WEIGHT RATINGS)........38
RECREATIONAL TOWING (BEHIND
MOTORHOME, ETC.) ............39
BRAKE/TRANSMISSION INTERLOCK
MANUAL OVERRIDE SYSTEM .......39
WHAT TO DO IN EMERGENCIES
24 HOUR TOWING ASSISTANCE -
U.S. ONLY..................40
INSTRUMENT CLUSTER WARNING
LIGHTS ...................40
IF YOUR ENGINE OVERHEATS .......43
AUTOMATIC TRANSAXLE OVERHEATING..44
JACKING AND TIRE CHANGING ......44
JUMP-STARTING ..............47
TOWING A DISABLED VEHICLE ......51
FREEING A STUCK VEHICLE ........52
EVENT DATA RECORDER (EDR) ......53
MAINTAINING YOUR VEHICLE
OPENING THE HOOD............54
ENGINE COMPARTMENT .........55
FLUIDS AND CAPACITIES .........57
MAINTENANCE CHART ..........58
FUSES ...................60
TIRE PRESSURES .............61
WHEEL AND WHEEL TRIM CARE .....62
EXTERIOR BULBS .............62
CONSUMER ASSISTANCE
CHRYSLER GROUP LLC CUSTOMER
CENTER...................63
CHRYSLER CANADA INC. CUSTOMER
CENTER ...................63
ASSISTANCE FOR THE HEARING
IMPAIRED ..................63
PUBLICATIONS ORDERING ........63
REPORTING SAFETY DEFECTS IN THE
50 UNITED STATES
AND WASHINGTON, D.C. .........64
TIRE WARRANTY ..............64
MOPAR ACCESSORIES
MOPAR® ACCESSORIES ..........67
TABLE OF CONTENTS
Page 8 of 72
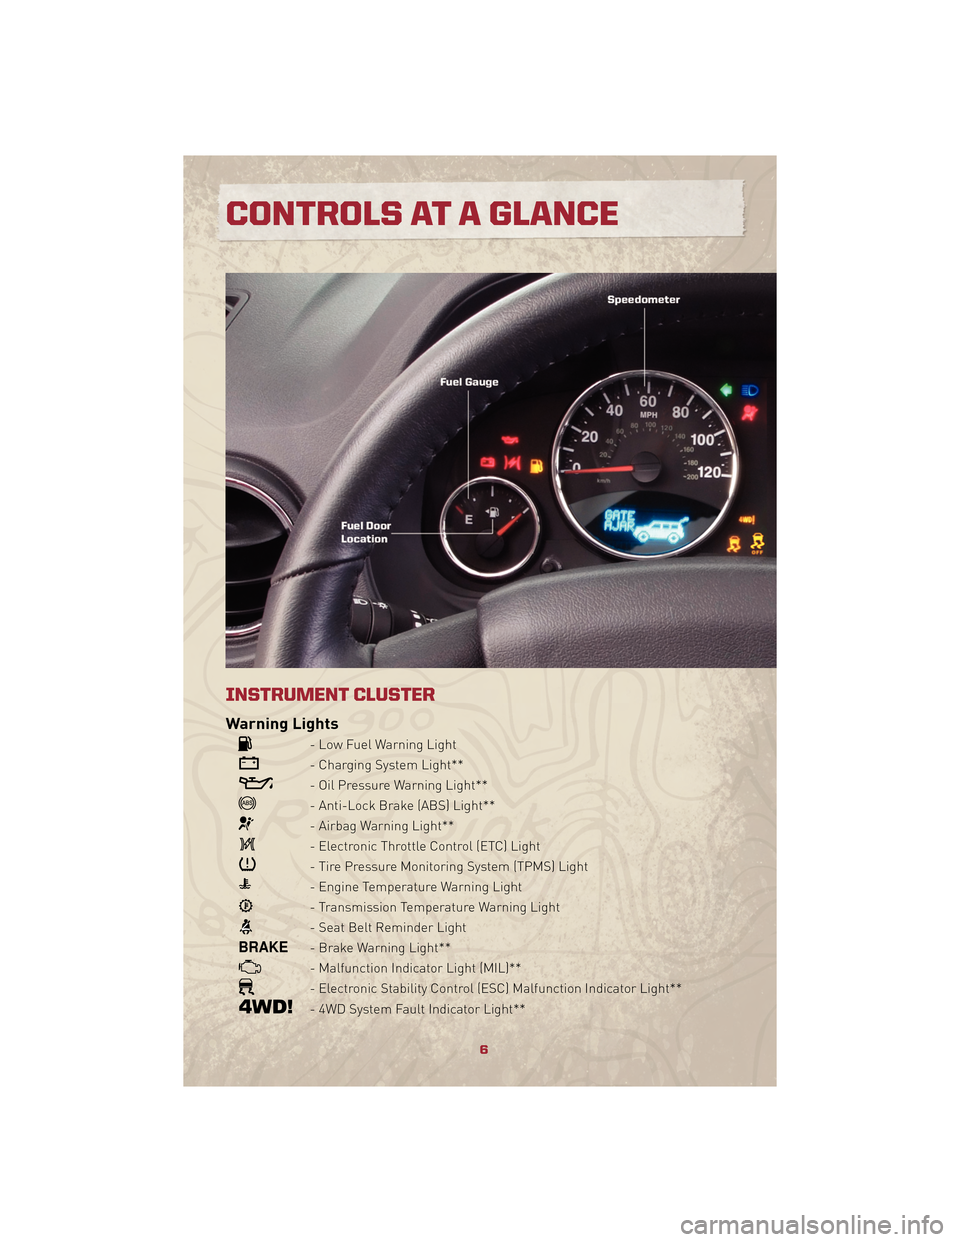
INSTRUMENT CLUSTER
Warning Lights
- Low Fuel Warning Light
- Charging System Light**
- Oil Pressure Warning Light**
- Anti-Lock Brake (ABS) Light**
- Airbag Warning Light**
- Electronic Throttle Control (ETC) Light
- Tire Pressure Monitoring System (TPMS) Light
- Engine Temperature Warning Light
- Transmission Temperature Warning Light
- Seat Belt Reminder Light
- Brake Warning Light**
- Malfunction Indicator Light (MIL)**
- Electronic Stability Control (ESC) Malfunction Indicator Light**
- 4WD System Fault Indicator Light**
6
CONTROLS AT A GLANCE
Page 10 of 72
KEY FOB
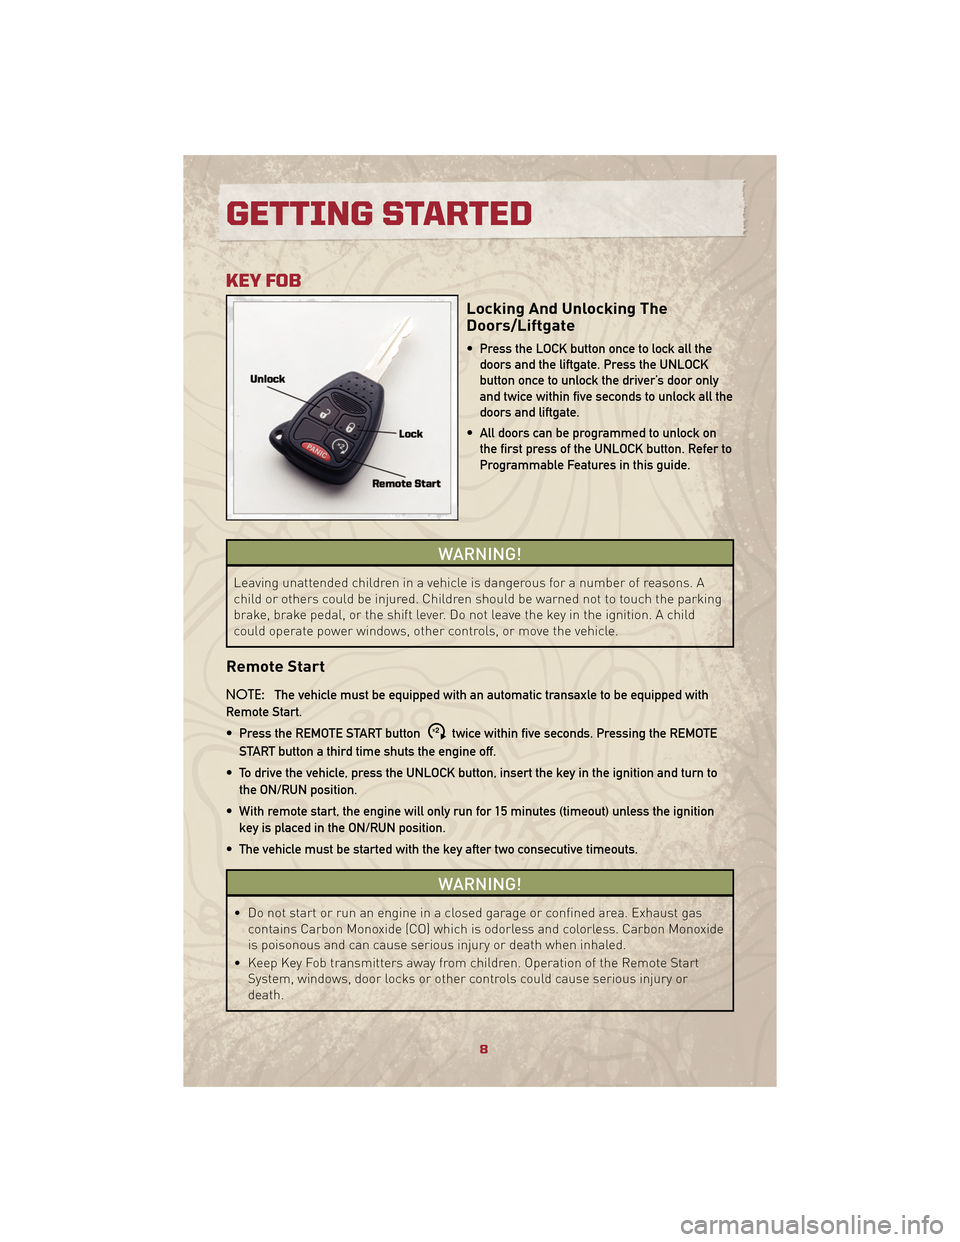
Locking And Unlocking The
Doors/Liftgate
• Press the LOCK button once to lock all thedoors and the liftgate. Press the UNLOCK
button once to unlock the driver’s door only
and twice within five seconds to unlock all the
doors and liftgate.
• All doors can be programmed to unlock on the first press of the UNLOCK button. Refer to
Programmable Features in this guide.
WARNING!
Leaving unattended children in a vehicle is dangerous for a number of reasons. A
child or others could be injured. Children should be warned not to touch the parking
brake, brake pedal, or the shift lever. Do not leave the key in the ignition. A child
could operate power windows, other controls, or move the vehicle.
Remote Start
NOTE: The vehicle must be equipped with an automatic transaxle to be equipped with
Remote Start.
• Press the REMOTE START button
x2twice within five seconds. Pressing the REMOTE
START button a third time shuts the engine off.
• To drive the vehicle, press the UNLOCK button, insert the key in the ignition and turn to the ON/RUN position.
• With remote start, the engine will only run for 15 minutes (timeout) unless the ignition key is placed in the ON/RUN position.
• The vehicle must be started with the key after two consecutive timeouts.
WARNING!
• Do not start or run an engine in a closed garage or confined area. Exhaust gas contains Carbon Monoxide (CO) which is odorless and colorless. Carbon Monoxide
is poisonous and can cause serious injury or death when inhaled.
• Keep Key Fob transmitters away from children. Operation of the Remote Start System, windows, door locks or other controls could cause serious injury or
death.
GETTING STARTED
8
Page 11 of 72
Panic Alarm
• Press the PANIC button once to turn the panic alarm on.
• Wait approximately three seconds and press the button a second time to turn the panicalarm off.
THEFT ALARM
To Arm
• Press the Key Fob LOCK button or the power door lock switch while the door is open.
To Disarm
• Press the Key Fob UNLOCK button and turn the ignition to the ON position.
SEAT BELT
• Be sure everyone in your vehicle is in a seat and using a seat belt properly.
WARNING!
In a collision, you and your passengers can suffer much greater injuries if you are
not properly buckled up. You can strike the interior of your vehicle or other
passengers, or you can be thrown out of the vehicle. Always be sure you and others
in your vehicle are buckled up properly.
CHILD RESTRAINTS
• Every state in the United States and all Canadian provinces require that small childrenride in proper restraint systems. This is the law, and you can be prosecuted for ignoring
it.
WARNING!
In a collision, an unrestrained child, even a tiny baby, can become a projectile inside
the vehicle. The force required to hold even an infant on your lap could become so
great that you could not hold the child, no matter how strong you are. The child and
others could be badly injured. Any child riding in your vehicle should be in a proper
restraint for the child’s size.
Installing The LATCH - Compatible Child Restraint System
• Your vehicle's second row passenger seats are equipped with the child restraintanchorage system called LATCH, which stands for Lower Anchors and Tether for
CHildren. LATCH child restraint anchorage systems are installed at all three rear seating
positions.
• The rear outboard seating positions have lower anchors and all three rear seating positions have top tether anchors.
9
GETTING STARTED
Page 16 of 72
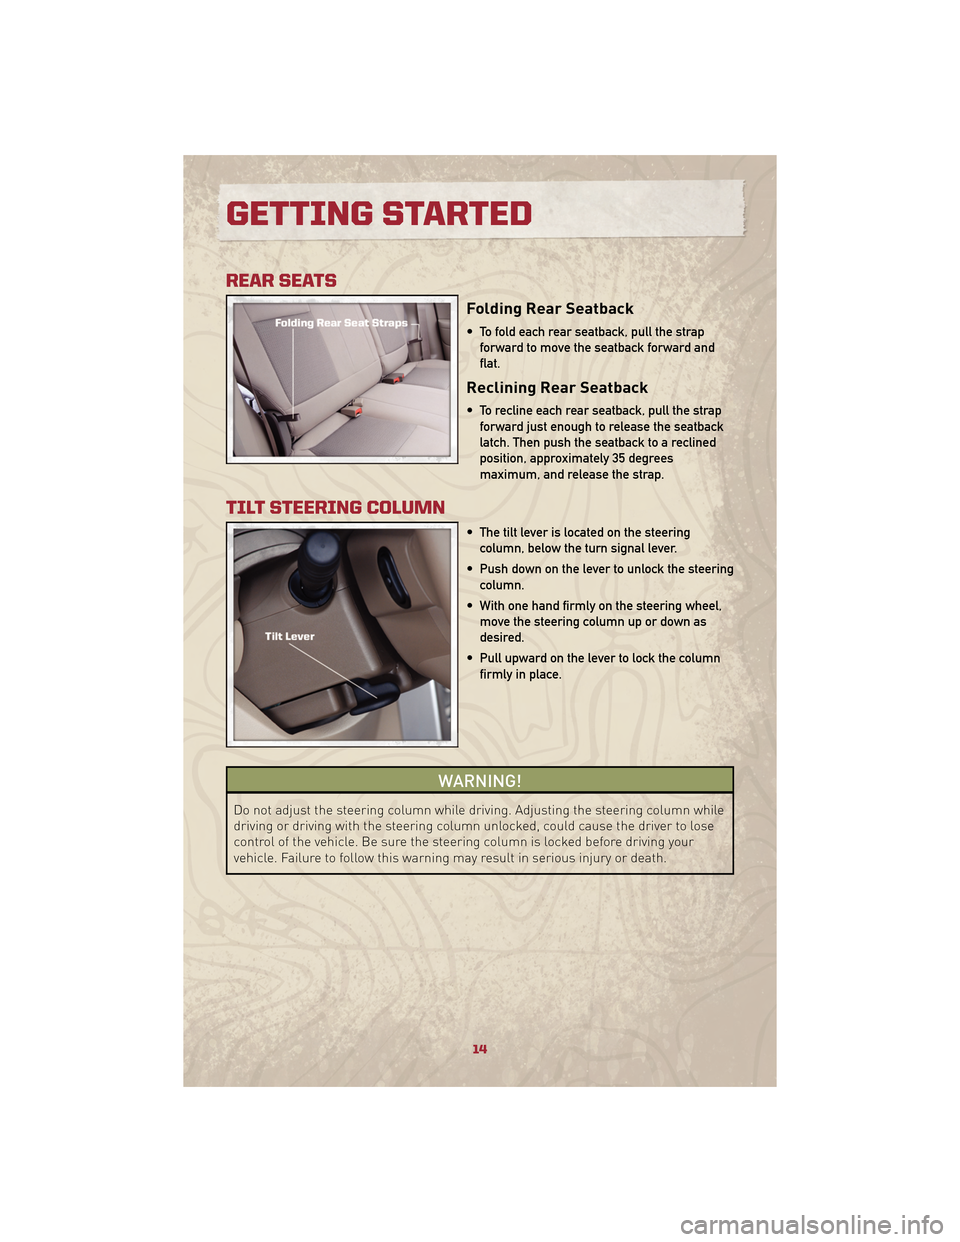
REAR SEATS
Folding Rear Seatback
• To fold each rear seatback, pull the strapforward to move the seatback forward and
flat.
Reclining Rear Seatback
• To recline each rear seatback, pull the strapforward just enough to release the seatback
latch. Then push the seatback to a reclined
position, approximately 35 degrees
maximum, and release the strap.
TILT STEERING COLUMN
• The tilt lever is located on the steeringcolumn, below the turn signal lever.
• Push down on the lever to unlock the steering column.
• With one hand firmly on the steering wheel, move the steering column up or down as
desired.
• Pull upward on the lever to lock the column firmly in place.
WARNING!
Do not adjust the steering column while driving. Adjusting the steering column while
driving or driving with the steering column unlocked, could cause the driver to lose
control of the vehicle. Be sure the steering column is locked before driving your
vehicle. Failure to follow this warning may result in serious injury or death.
GETTING STARTED
14
Page 17 of 72
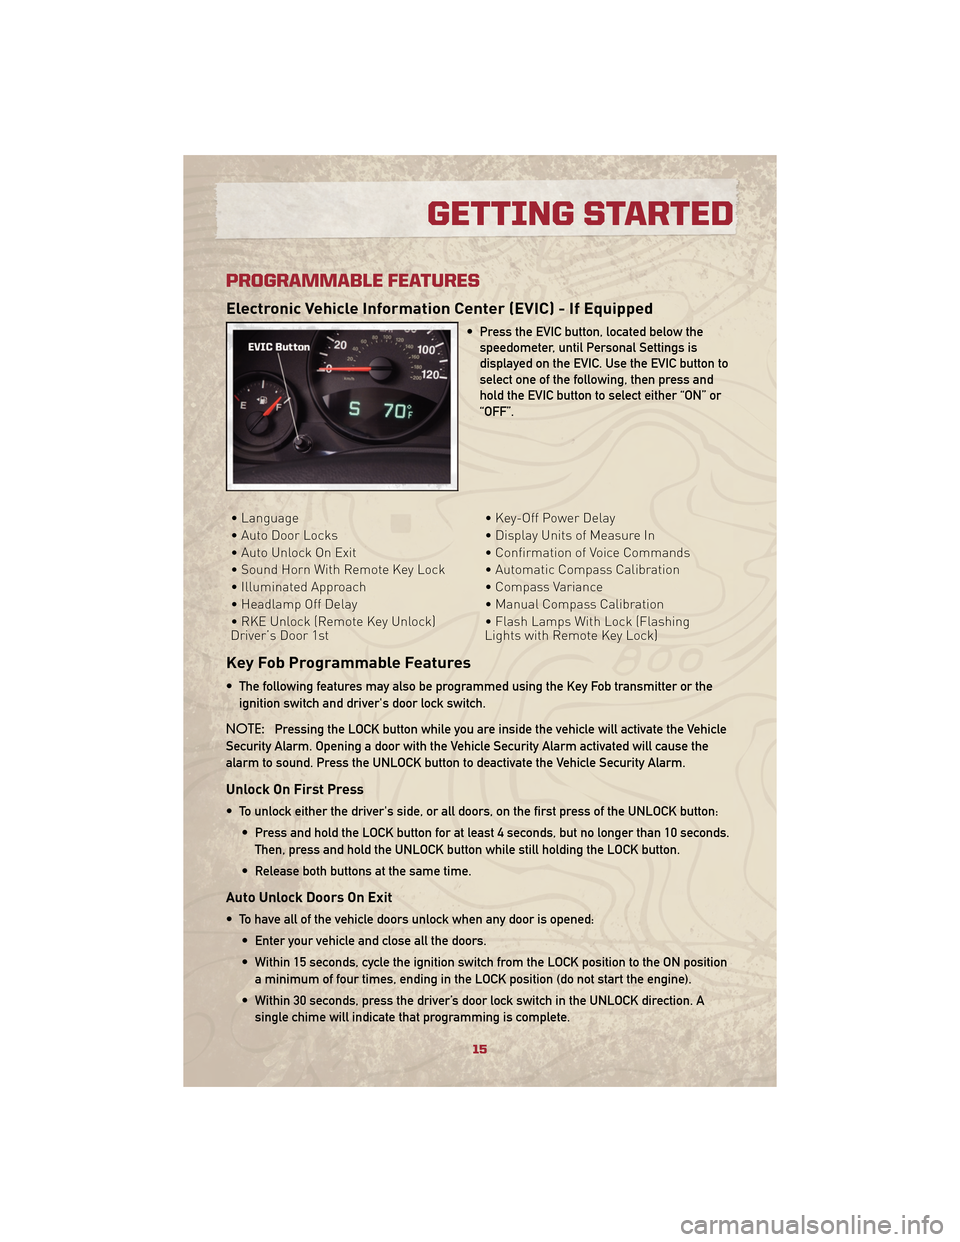
PROGRAMMABLE FEATURES
Electronic Vehicle Information Center (EVIC) - If Equipped
• Press the EVIC button, located below thespeedometer, until Personal Settings is
displayed on the EVIC. Use the EVIC button to
select one of the following, then press and
hold the EVIC button to select either “ON” or
“OFF”.
• Language • Key-Off Power Delay
• Auto Door Locks • Display Units of Measure In
• Auto Unlock On Exit • Confirmation of Voice Commands
• Sound Horn With Remote Key Lock • Automatic Compass Calibration
• Illuminated Approach • Compass Variance
• Headlamp Off Delay • Manual Compass Calibration
• RKE Unlock (Remote Key Unlock)
Driver’s Door 1st • Flash Lamps With Lock (Flashing
Lights with Remote Key Lock)
Key Fob Programmable Features
• The following features may also be programmed using the Key Fob transmitter or the
ignition switch and driver's door lock switch.
NOTE: Pressing the LOCK button while you are inside the vehicle will activate the Vehicle
Security Alarm. Opening a door with the Vehicle Security Alarm activated will cause the
alarm to sound. Press the UNLOCK button to deactivate the Vehicle Security Alarm.
Unlock On First Press
• To unlock either the driver's side, or all doors, on the first press of the UNLOCK button:
• Press and hold the LOCK button for at least 4 seconds, but no longer than 10 seconds.Then, press and hold the UNLOCK button while still holding the LOCK button.
• Release both buttons at the same time.
Auto Unlock Doors On Exit
• To have all of the vehicle doors unlock when any door is opened: • Enter your vehicle and close all the doors.
• Within 15 seconds, cycle the ignition switch from the LOCK position to the ON positiona minimum of four times, ending in the LOCK position (do not start the engine).
• Within 30 seconds, press the driver’s door lock switch in the UNLOCK direction. A single chime will indicate that programming is complete.
15
GETTING STARTED
Page 18 of 72
Auto Door Lock
• To have the doors lock automatically when the vehicle’s speed exceeds 15 mph(24 km/h):
• Enter your vehicle and close all the doors.
• Within 15 seconds, cycle the ignition switch from the LOCK position to the ON position a minimum of four times, ending in the LOCK position (do not start the engine).
• Within 30 seconds, press the driver’s door lock switch in the LOCK direction. A single chime will indicate that programming is complete.
Sound Horn With Lock
• To turn the horn chirp on or off when the doors are locked:
• Press the LOCK button for at least 4 seconds, but no longer than 10 seconds. Then,press the PANIC button while still holding the LOCK button.
• Release both buttons at the same time.
Flashing Lights With Lock
• The turn signal lights flashing, when the doors are locked or unlocked, feature can be turned on or off. To turn this feature on or off:
• Press and hold the UNLOCK button for at least 4 seconds, but no longer than 10 seconds. Then, press and hold the LOCK button while still holding the UNLOCK
button.
• Release both buttons at the same time.
GETTING STARTED
16
Page 27 of 72
• The control of the external device cannot be provided by the radio; use the device controlsinstead.
Clock Setting
• Press and hold the TIME button until the hours blink; turn the TUNE/SCROLL controlknob to set the hours.
• Press the TUNE/SCROLL control knob until the minutes begin to blink; turn the TUNE/SCROLL control knob to set the minutes.
• Press the TUNE/SCROLL control knob to save the time change.
• To exit, press any button/knob or wait five seconds.
Station Presets
• Press the SET/RND button once and SET 1 will show in the display. Then select the button (1–6).
• A second station may be added to each push button. Press the SET/RND button twice and SET 2 will show in the display, then select button (1–6).
How To Load Multiple CDs/DVDs
REQ Radio Only
• Press the LOAD button and then press the button with the corresponding number (1–6)where the CD is being loaded. The radio will display PLEASE WAIT and prompt when to
INSERT DISC.
• After the radio displays INSERT DISC, insert the CD into the player. The radio display will show LOADING DISC when the disc is loading and “READING DISC” when the radio is
reading the disc.
• Press the eject button and then the corresponding number (1–6) to eject the desired disc.
25
ELECTRONICS
Page 29 of 72
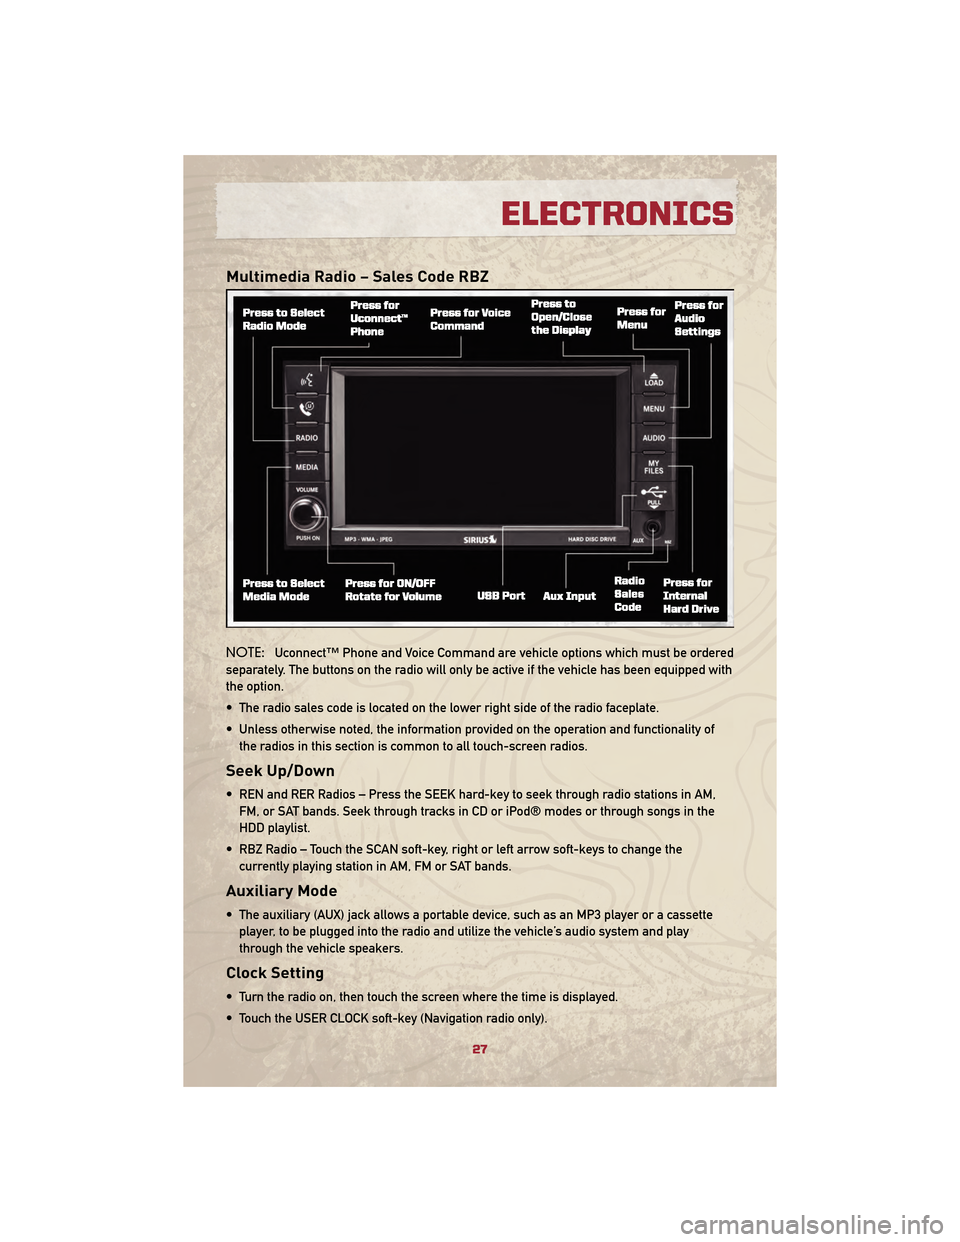
Multimedia Radio – Sales Code RBZ
NOTE:Uconnect™ Phone and Voice Command are vehicle options which must be ordered
separately. The buttons on the radio will only be active if the vehicle has been equipped with
the option.
• The radio sales code is located on the lower right side of the radio faceplate.
• Unless otherwise noted, the information provided on the operation and functionality of the radios in this section is common to all touch-screen radios.
Seek Up/Down
• REN and RER Radios – Press the SEEK hard-key to seek through radio stations in AM,FM, or SAT bands. Seek through tracks in CD or iPod® modes or through songs in the
HDD playlist.
• RBZ Radio – Touch the SCAN soft-key, right or left arrow soft-keys to change the currently playing station in AM, FM or SAT bands.
Auxiliary Mode
• The auxiliary (AUX) jack allows a portable device, such as an MP3 player or a cassetteplayer, to be plugged into the radio and utilize the vehicle’s audio system and play
through the vehicle speakers.
Clock Setting
• Turn the radio on, then touch the screen where the time is displayed.
• Touch the USER CLOCK soft-key (Navigation radio only).
27
ELECTRONICS
Page 41 of 72
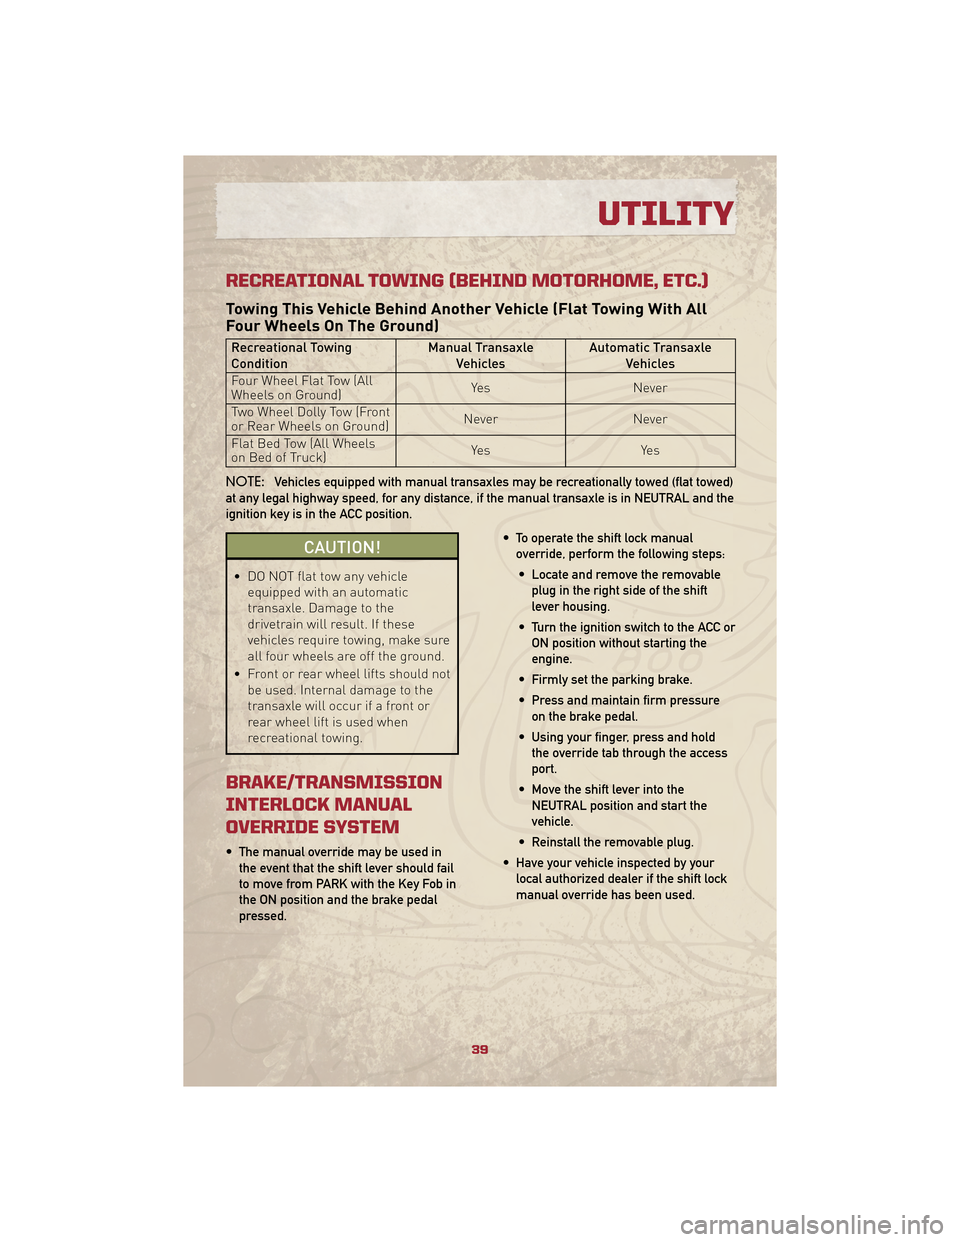
RECREATIONAL TOWING (BEHIND MOTORHOME, ETC.)
Towing This Vehicle Behind Another Vehicle (Flat Towing With All
Four Wheels On The Ground)
Recreational Towing
ConditionManual Transaxle
Vehicles Automatic Transaxle
Vehicles
Four Wheel Flat Tow (All
Wheels on Ground) Yes
Never
Two Wheel Dolly Tow (Front
or Rear Wheels on Ground) Never
Never
Flat Bed Tow (All Wheels
on Bed of Truck) Ye s
Ye s
NOTE: Vehicles equipped with manual transaxles may be recreationally towed (flat towed)
at any legal highway speed, for any distance, if the manual transaxle is in NEUTRAL and the
ignition key is in the ACC position.
CAUTION!
• DO NOT flat tow any vehicle equipped with an automatic
transaxle. Damage to the
drivetrain will result. If these
vehicles require towing, make sure
all four wheels are off the ground.
• Front or rear wheel lifts should not be used. Internal damage to the
transaxle will occur if a front or
rear wheel lift is used when
recreational towing.
BRAKE/TRANSMISSION
INTERLOCK MANUAL
OVERRIDE SYSTEM
• The manual override may be used inthe event that the shift lever should fail
to move from PARK with the Key Fob in
the ON position and the brake pedal
pressed. • To operate the shift lock manual
override, perform the following steps:
• Locate and remove the removable plug in the right side of the shift
lever housing.
• Turn the ignition switch to the ACC or ON position without starting the
engine.
• Firmly set the parking brake.
• Press and maintain firm pressure on the brake pedal.
• Using your finger, press and hold the override tab through the access
port.
• Move the shift lever into the NEUTRAL position and start the
vehicle.
• Reinstall the removable plug.
• Have your vehicle inspected by your local authorized dealer if the shift lock
manual override has been used.
39
UTILITY