change wheel JEEP PATRIOT 2011 1.G Owners Manual
[x] Cancel search | Manufacturer: JEEP, Model Year: 2011, Model line: PATRIOT, Model: JEEP PATRIOT 2011 1.GPages: 490, PDF Size: 4.52 MB
Page 211 of 490
RESET Button
To reset the display shown, turn the ignition switch to the
ON position, then press and hold the RESET button
located on the steering wheel.
The following displays can be reset or changed:
•Trip A
•Trip B
Trip Odometer (ODO)
This display shows the distance traveled since the last
reset. Press and release the STEP button on the instru-
ment cluster to switch from odometer, to Trip A or Trip B.
Trip A
Shows the total distance traveled for Trip A since the last
reset.
Trip B
Shows the total distance traveled for Trip B since the last
reset.
ELECTRONIC VEHICLE INFORMATION CENTER
(EVIC) — IF EQUIPPED
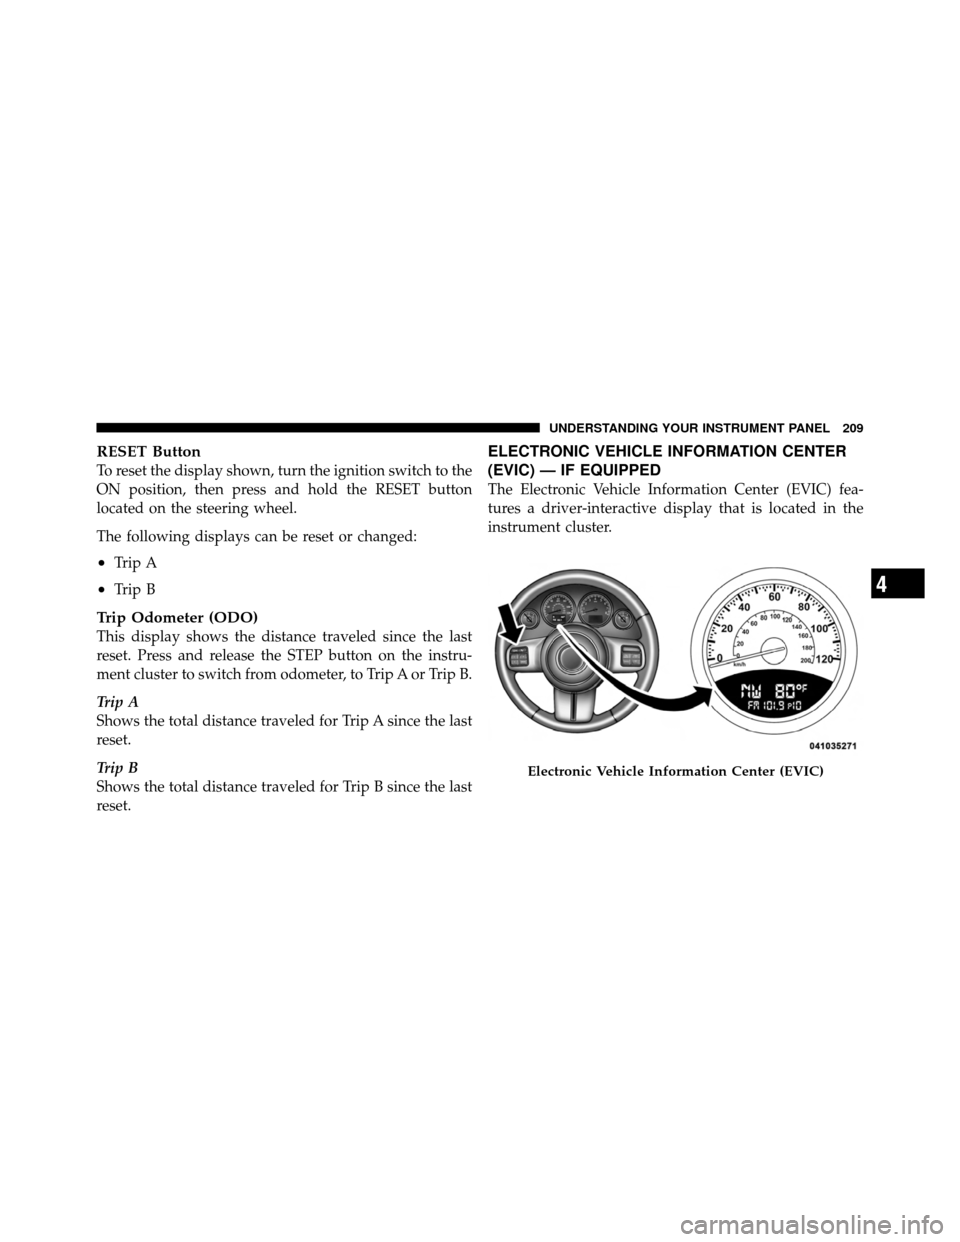
The Electronic Vehicle Information Center (EVIC) fea-
tures a driver-interactive display that is located in the
instrument cluster.
Electronic Vehicle Information Center (EVIC)
4
UNDERSTANDING YOUR INSTRUMENT PANEL 209
Page 305 of 490

They are not designed for cornering at the same speeds as
conventional two-wheel drive vehicles any more than
low-slung sports cars are designed to perform satisfacto-
rily in off-road conditions. If at all possible, avoid sharp
turns or abrupt maneuvers. As with other vehicles of this
type, failure to operate this vehicle correctly may result in
loss of control or vehicle rollover.
OFF-ROAD DRIVING TIPS
You will encounter many types of terrain driving off-
road. You should be familiar with the terrain and area
before proceeding. There are many types of surface
conditions: hard packed dirt, gravel, rocks, grass, sand,
mud, snow and ice. Every surface has a different effect on
your vehicle’s steering, handling and traction. Control-
ling your vehicle is one of the keys to successful off-road
driving, so always keep a firm grip on the steering wheel
and maintain a good driving posture. Avoid sudden
accelerations, turns or braking. In most cases there are no
road signs, posted speed limits or signal lights. Thereforeyou will need to use your own good judgment on what is
safe and what is not. When on a trail, you should always
be looking ahead for surface obstacles and changes in
terrain. The key is to plan your future driving route while
remembering what you are currently driving over.
CAUTION!
Never park your vehicle over dry grass or other
combustible materials. The heat from your vehicle
exhaust system could cause a fire.
WARNING!
Always wear your seat belt and firmly tie down
cargo. Unsecured cargo can become projectiles in an
off-road situation.
5
STARTING AND OPERATING 303
Page 323 of 490
Electronic Roll Mitigation (ERM)
This system anticipates the potential for wheel lift by
monitoring the driver ’s steering wheel input and the
speed of the vehicle. When ERM determines that the rate
of change of the steering wheel angle and vehicles speed
are sufficient to potentially cause wheel lift, it applies the
brake of the appropriate wheel and may also reduce
engine power to lessen the chance that wheel lift will
occur. ERM will only intervene during very severe or
evasive driving maneuvers.
ERM can only reduce the chance of wheel lift occurring
during severe or evasive driving maneuvers. It can not
prevent wheel lift due to other factors such as road
conditions, leaving the roadway or striking objects or
other vehicles.NOTE:
Anytime the ESC system is in the “Full Off”
mode, ERM is disabled. Refer to “Electronic Stability
Control (ESC)” in this section for a complete explanation
of the available ESC modes.
WARNING!
Many factors, such as vehicle loading, road condi-
tions and driving conditions, influence the chance
that wheel lift or roll over may occur. ERM cannot
prevent all wheel lift or roll overs, especially those
that involve leaving the roadway or striking objects
or other vehicles. The capabilities of an ERM-
equipped vehicle must never be exploited in a reck-
less or dangerous manner which could jeopardize the
user’s safety or the safety of others.
5
STARTING AND OPERATING 321
Page 348 of 490
Keep dismounted tires in a cool, dry place with as little
exposure to light as possible. Protect tires from contact
with oil, grease, and gasoline.
Replacement Tires
The tires on your new vehicle provide a balance of many
characteristics. They should be inspected regularly for
wear and correct cold tire inflation pressure. The manu-
facturer strongly recommends that you use tires equiva-
lent to the originals in size, quality and performance
when replacement is needed. (Refer to the paragraph on
“Tread Wear Indicators”). Refer to the “Tire and Loading
Information” placard for the size designation of your tire.
The service description and load identification will be
found on the original equipment tire. Failure to use
equivalent replacement tires may adversely affect the
safety, handling, and ride of your vehicle. We recommend
that you contact your original equipment or an autho-
rized tire dealer with any questions you may have on tire
specifications or capability.
WARNING!
•Do not use a tire, wheel size or rating other than
that specified for your vehicle. Some combinations
of unapproved tires and wheels may change sus-
pension dimensions and performance characteris-
tics, resulting in changes to steering, handling, and
braking of your vehicle. This can cause unpredict-
able handling and stress to steering and suspen-
sion components. You could lose control and have
a collision resulting in serious injury or death. Use
only the tire and wheel sizes with load ratings
approved for your vehicle.
•Never use a tire with a smaller load index or
capacity other than what was originally equipped
on your vehicle. Using a tire with a smaller load
index could result in tire overloading and failure.
You could lose control and have a collision.(Continued)
346 STARTING AND OPERATING
Page 353 of 490
NOTE:
•The TPMS is not intended to replace normal tire care
and maintenance or to provide warning of a tire failure
or condition.
•The TPMS should not be used as a tire pressure gauge
while adjusting your tire pressure.
•Driving on a significantly under-inflated tire causes
the tire to overheat and can lead to tire failure.
Under-inflation also reduces fuel efficiency and tire
tread life, and may affect the vehicle’s handling and
stopping ability.
•The TPMS is not a substitute for proper tire mainte-
nance, and it is the driver ’s responsibility to maintain
correct tire pressure using an accurate tire gauge, even
if under-inflation has not reached the level to trigger
illumination of the Tire Pressure Monitoring Telltale
Light.
•Seasonal temperature changes will affect tire pressure,
and the TPMS will monitor the actual tire pressure in
the tire.
Base System
This is the TPMS warning indicator located in the
instrument cluster.
The TPMS uses wireless technology with wheel rim
mounted electronic sensors to monitor tire pressure lev-
els. Sensors, mounted to each wheel as part of the valve
stem, transmit tire pressure readings to the Receiver
Module.
NOTE: It is particularly important for you to check the
tire pressure in all of the tires on your vehicle regularly
and to maintain the proper pressure.
The TPMS consists of the following components:
•Receiver Module
5
STARTING AND OPERATING 351
Page 384 of 490

JACKING AND TIRE CHANGING
WARNING!
•Do not attempt to change a tire on the side of the
vehicle close to moving traffic. Pull far enough off
the road to avoid the danger of being hit when
operating the jack or changing the wheel.
•Being under a jacked-up vehicle is dangerous. The
vehicle could slip off the jack and fall on you. You
could be crushed. Never put any part of your body
under a vehicle that is on a jack.
•Never start or run the engine while the vehicle is
on a jack. If you need to get under a raised vehicle,
take it to a service center where it can be raised on
a lift.(Continued)
WARNING! (Continued)
•The jack is designed to be used as a tool for
changing tires only. The jack should not be used to
lift the vehicle for service purposes. The vehicle
should be jacked on a firm level surface only.
Avoid ice or slippery areas.
Jack Location
The jack and jack-handle are stowed under the load floor
in the cargo area.
382 WHAT TO DO IN EMERGENCIES
Page 385 of 490

Spare Tire Stowage
The spare tire is stowed under the rear load floor in the
cargo area.
Spare Tire Removal
Lift up the load floor cover and remove the hold down.
Preparations For Jacking
1. Park the vehicle on a firm, level surface. Avoid ice or
slippery areas.
WARNING!
Do not attempt to change a tire on the side of the
vehicle close to moving traffic, pull far enough off
the road to avoid the danger of being hit when
operating the jack or changing the wheel.
2. Turn on the Hazard Warning flasher.
3. Set the parking brake.
4. Place the shift lever into PARK (automatic transmis-
sion) or REVERSE (manual transmission).
5. Turn OFF the ignition.
Spare Tire and Jack Stowage6
WHAT TO DO IN EMERGENCIES 383
Page 386 of 490

6. Block both the front and rear of the
wheel diagonally opposite the jacking
position. For example, if changing the
right front tire, block the left rear
wheel.
NOTE: Passengers should not remain in the vehicle
while the vehicle is being jacked.
Jacking Instructions
WARNING!
Carefully follow these tire changing warnings to
help prevent personal injury or damage to your
vehicle:
(Continued)
WARNING! (Continued)
•Always park on a firm, level surface as far from
the edge of the roadway as possible before raising
the vehicle.
•Turn on the Hazard Warning flasher.
•Block the wheel diagonally opposite the wheel to
be raised.
•Set the parking brake firmly and set an automatic
transmission in PARK; a manual transmission in
REVERSE.
•Never start or run the engine with the vehicle on a
jack.
•Do not let anyone sit in the vehicle when it is on a
jack.
•Do not get under the vehicle when it is on a jack.
•Only use the jack in the positions indicated and
for lifting this vehicle during a tire change.(Continued)
384 WHAT TO DO IN EMERGENCIES
Page 389 of 490
4. Turn the jack screw to the left until the jack can be
placed under the jacking location. Once the jack is
positioned, turn the jack screw to the right until the jack
head is properly engaged with the lift area closest to the
wheel to be changed. Do not raise the vehicle until you
are sure the jack is securely engaged.
WARNING!
Raising the vehicle higher than necessary can make
the vehicle less stable. It could slip off the jack and
hurt someone near it. Raise the vehicle only enough
to remove the tire.
5. Raise the vehicle by turning the jack screw to the right,
using the swivel wrench. Raise the vehicle only until the
tire just clears the surface and enough clearance is
obtained to install the spare tire. Minimum tire lift
provides maximum stability. 6. Remove the wheel nuts and pull the wheel (and
bolt-on center cap if equipped) off the hub. Install the
spare wheel and wheel nuts with the cone shaped end of
the nuts toward the wheel. Lightly tighten the nuts.
WARNING!
To avoid the risk of forcing the vehicle off the jack,
do not fully tighten the wheel nuts until the vehicle
has been lowered. Failure to follow this warning may
result in personal injury.
7. Lower the vehicle by turning the jack screw to the left.
8. Finish tightening the nuts. Push down on the wrench
while tightening the wheel nuts. Alternate nuts until each
nut has been tightened twice. The correct wheel nut
torque is 100 ft lbs (135 N·m). If you doubt that you have
tightened the nuts correctly, have them checked with a
torque wrench by your authorized dealer or at a service
station.
6
WHAT TO DO IN EMERGENCIES 387
Page 448 of 490

24,000 Miles (39,000 km) or
18 Months Maintenance
Service Schedule
❏Change the engine oil and engine oil
filter.
❏ Rotate the tires, rotate at the first sign of
irregular wear, even if it occurs before
24,000 miles (39 000 km).
❏ Inspect the CV joints.
❏ Inspect exhaust system.
Odometer Reading Date
Repair Order #Dealer Code
Signature, Authorized Service Center
32,000 Miles (52,000 km) or 24 Months Maintenance Service
Schedule
❏Change the engine oil and engine oil filter.
❏ Rotate the tires, rotate at the first sign of irregular wear, even if it occurs before
32,000 miles (52 000 km).
❏ Replace the engine air cleaner filter.
❏ Replace the spark plugs.
❏ Replace the air conditioning filter.
❏ Adjust parking brake on vehicles equipped with four-wheel disc brakes.
❏ Inspect the brake linings, replace if necessary.
❏ Inspect the front suspension, tie rod ends and boot seals for cracks or leaks and all parts for
damage, wear, improper looseness or end play; replace if necessary.
Odometer Reading Date
Repair Order #Dealer Code
Signature, Authorized Service Center
8
M
A I
N T
E
N A
N CE
S
C
H E
D
U L
E
S446 MAINTENANCE SCHEDULES