ECU JEEP PATRIOT 2016 1.G Owner's Manual
[x] Cancel search | Manufacturer: JEEP, Model Year: 2016, Model line: PATRIOT, Model: JEEP PATRIOT 2016 1.GPages: 148, PDF Size: 8.25 MB
Page 63 of 148
Copying Pictures To The HDD
• Insert either a CD or a USB device containing your pictures in JPEG format.
• Push the MY FILES button on the faceplate.
• Press the “My Pictures” button on the touchscreen to get an overview of thecurrently stored images, then press the “Add” button on the touchscreen.
• Press the “Disc” or “USB” button on the touchscreen, then select the folders or pictures you wish to copy to the HDD. Use the “PAGE” buttons on the touchscreen
to page through the list of pictures.
• Press the desired pictures or press the “All” button on the touchscreen for all pictures. Confirm your selections by pressing the “SAVE” button on the
touchscreen.
NOTE:
The copy progress is shown in the lower
left corner of the screen.
Display A Picture On The Radio Screen
• Once the import is complete, the pictures will then be available in the “MY PICTURES” screen.
• Push the MY FILES button on the faceplate, then press the “My Pictures” button on the touchscreen. Press the desired picture, then press the “Set as Picture View”
button on the touchscreen and then press the “Exit” button on the touchscreen.
Lastly push the MENU button on the faceplate and then press the “Picture View”
button on the touchscreen to display the chosen picture on the radio screen.
NOTE:
• A check mark in the My Pictures screen indicates the currently used picture.
• You can also delete pictures by pressing the “Delete” button on the touchscreen.
Copying Pictures To The HDD
ELECTRONICS
61
Page 68 of 148
Taking A Detour
To take a detour you must be navigating a route.
• Press the “back arrow” icon button on the touchscreen multiple times to return tothe Main Navigation menu.
• Press the “Detour” button on the touchscreen.
NOTE:
If the route you are currently taking is the only reasonable option, the device might
not calculate a detour.
Acquiring Satellites
The GPS Satellite strength bars indicate the strength of your satellite reception.
• Acquiring satellite signals can take a few minutes. When at least one of the bars is green, your device has acquired satellite signals.
• You may experience delays receiving satellite signals when in areas with an obstructed view to the sky, such as garages, tunnels, or large cities with tall
buildings.
SiriusXM SATELLITE RADIO/TRAVEL LINK
SiriusXM Travel Link requires a subscription, sold separately after the five year trial
subscription included with your vehicle purchase and is ONLY available in the United
States.
To access SiriusXM Satellite Radio, push the RADIO/MEDIA or RADIO button on the
faceplate, then press the “SAT” button on the touchscreen.
The following describes features that are available when in SiriusXM Satellite Radio
mode.
Info
• Press the “i” button on the touchscreen to view detailed information about thecurrent SiriusXM Satellite channel.
SiriusXM Parental Controls
• SiriusXM offers the option to permanently block selected channels. Call 1-888-539-7474 and request the Family Package.
• Uconnect 430/430N: Push the MENU button on the faceplate while in SiriusXM
Satellite Radio Mode, then press the “Channel Lock” to enable and/or disable
desired channels. The SEEK and SCAN function will then only display channels
without Channel lock.
ELECTRONICS
66
Page 81 of 148
PROGRAMMABLE FEATURES
Electronic Vehicle Information Center (EVIC)
The EVIC can be used to program the following Personal Settings. Push theMENU
button until Personal Settings displays, then push the DOWNArrow button
to
scroll through the settings. Push the RIGHTArrow button
to change the setting.
• Language • Illuminated Approach
• Auto Unlock On Exit • Hill Start Assist (HSA)
• RKE Unlock Driver's Door 1st Press • Display Units In
• Flash Lamps With Lock • Confirmation of Voice Commands
• Sound Horn With Lock • Automatic Compass Calibration
• Headlamp Off Delay • Compass Variance
• Key Off Power Delay
Key Fob Programmable Features
The following features may also be programmed by using the Key Fob transmitter or
the ignition and driver's door lock switch. Refer to “Uconnect Settings” in “Under-
standing Your Instrument Panel” in the Owner’s Manual on the DVD for further
information.
NOTE:
Pushing the LOCK button while you are inside the vehicle will activate the Vehicle
Security Alarm. Opening a door with the Vehicle Security Alarm activated will cause
the alarm to sound. Push the UNLOCK button to deactivate the Vehicle Security
Alarm.
Unlock On First Press
To unlock either the driver's side, or all doors, on the first press of the UNLOCK
button:
• Push and hold the LOCK button for at least four seconds, but no longer than 10 seconds. Then, push and hold the UNLOCK button while still holding the LOCK
button.
• Release both buttons at the same time.
ELECTRONICS
79
Page 83 of 148
UNIVERSAL GARAGE DOOR OPENER (HomeLink)
HomeLink replaces up to three hand-held transmitters that operate devices such as
garage door openers, motorized gates, lighting or home security systems. The
HomeLink unit is powered by your vehicles 12 Volt battery.
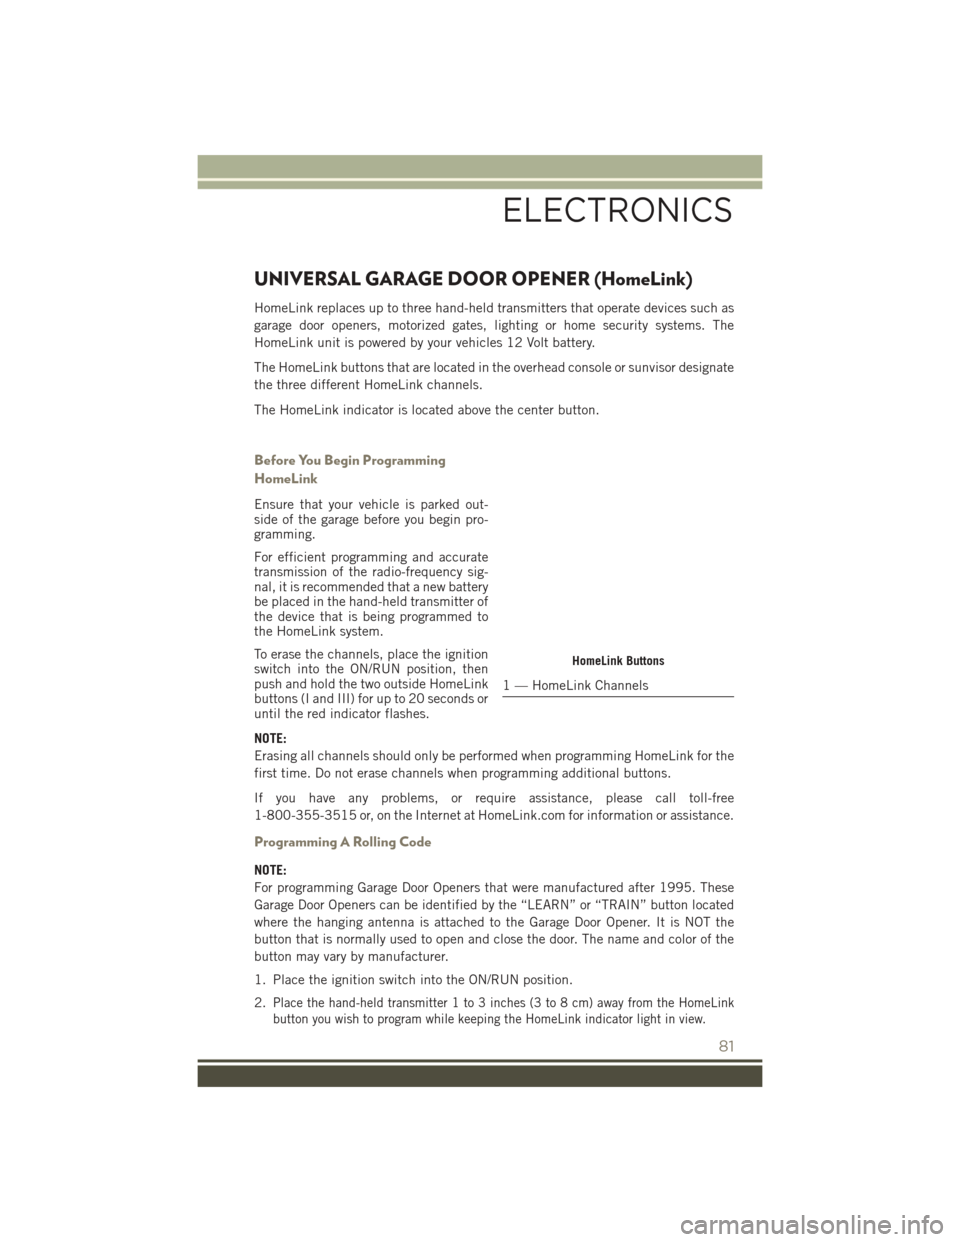
The HomeLink buttons that are located in the overhead console or sunvisor designate
the three different HomeLink channels.
The HomeLink indicator is located above the center button.
Before You Begin Programming
HomeLink
Ensure that your vehicle is parked out-
side of the garage before you begin pro-
gramming.
For efficient programming and accurate
transmission of the radio-frequency sig-
nal, it is recommended that a new battery
be placed in the hand-held transmitter of
the device that is being programmed to
the HomeLink system.
To erase the channels, place the ignition
switch into the ON/RUN position, then
push and hold the two outside HomeLink
buttons (I and III) for up to 20 seconds or
until the red indicator flashes.
NOTE:
Erasing all channels should only be performed when programming HomeLink for the
first time. Do not erase channels when programming additional buttons.
If you have any problems, or require assistance, please call toll-free
1-800-355-3515 or, on the Internet at HomeLink.com for information or assistance.
Programming A Rolling Code
NOTE:
For programming Garage Door Openers that were manufactured after 1995. These
Garage Door Openers can be identified by the “LEARN” or “TRAIN” button located
where the hanging antenna is attached to the Garage Door Opener. It is NOT the
button that is normally used to open and close the door. The name and color of the
button may vary by manufacturer.
1. Place the ignition switch into the ON/RUN position.
2.
Place the hand-held transmitter 1 to 3 inches (3 to 8 cm) away from the HomeLink
button you wish to program while keeping the HomeLink indicator light in view.
HomeLink Buttons
1 — HomeLink Channels
ELECTRONICS
81
Page 85 of 148
Using HomeLink
To operate, push and release the programmed HomeLink button. Activation will now
occur for the programmed device (e.g., garage door opener, gate operator, security
system, entry door lock, home/office lighting, etc.). The hand-held transmitter of the
device may also be used at any time.
WARNING!
• Your motorized door or gate will open and close while you are programming theuniversal transceiver. Do not program the transceiver if people or pets are in the
path of the door or gate.
• Do not run your vehicle in a closed garage or confined area while programming the transceiver. Exhaust gas from your vehicle contains Carbon Monoxide (CO)
which is odorless and colorless. Carbon Monoxide is poisonous when inhaled
and can cause you and others to be severely injured or killed.
POWER INVERTER
A 115 Volt, 150 Watt AC power inverter is located on the front of the center console.
This outlet can power cellular phones, electronics and other low power devices
requiring power up to 150 Watts.
NOTE:
The power inverter is designed with
built-in overload protection. If the power
rating of 150 Watts is exceeded, the
power inverter will automatically shut
down. Once the electrical device has
been removed from the outlet, the in-
verter should automatically reset. If the
power rating exceeds approximately 170
Watts, the power inverter may have to be
reset manually. To reset the inverter
manually, unplug the device and plug it
in again. To avoid overloading the circuit,
check the power ratings on electrical de-
vices prior to using the inverter.
WARNING!
To Avoid Serious Injury or Death DO NOT:
• use a three-prong adaptor
• insert any objects into the receptacles
• touch with wet hands
Close the lid when not in use. If this outlet is mishandled, it may cause an electric
shock and failure.
Power Inverter
ELECTRONICS
83
Page 87 of 148
FOUR-WHEEL DRIVE OPERATION
This vehicle has two full time, on-demand, four-wheel-drive (4WD) systems avail-
able, Freedom Drive I and Freedom-Drive II. They provide for all-weather, all-terrain
capability for added driving security in less-than-ideal road conditions.
Freedom-Drive I Four Wheel Drive System
• The vehicle will constantly monitor wheel slippage and transfer power to the axlethat can use it the most.
• For additional traction in sand, deep snow or loose traction surfaces, the “4WD Lock” sends equal amounts of the torque to the front and rear axles at low speeds.
• To activate, pull the T-handle, located in between the front driver and passenger seats, up once and release. The “4WD Indicator Light” will come on in the cluster.
Freedom-Drive I Components
1 — Rear Differential
2 — Electronically Controlled Coupling
3 — Driveshaft
4 — Power Transfer Unit
OFF-ROAD CAPABILITIES
85
Page 96 of 148
The “ESC Activation/Malfunction Indicator Light” starts to flash as soon as the tires
lose traction and the ESC system becomes active. If the light begins to flash during
acceleration, ease up on the accelerator and apply as little throttle as possible. Be
sure to adapt your speed and driving to the prevailing road conditions. The light also
flashes when Traction Control System (TCS) is active. To improve the vehicle's
traction when starting off in deep snow, sand or gravel, it may be desirable to switch
the ESC system to Partial Off mode by momentarily pushing the ESC Off
switch.
INSTRUMENT CLUSTER INDICATOR LIGHTS
– Turn Signal Indicator
The arrows will flash with the exterior turn signals when the turn signal lever is
operated. A tone will chime, and a EVIC message will appear if either turn signal is
left on for more than 1 mile (1.6 km).
NOTE:
If either indicator flashes at a rapid rate, check for a defective outside light bulb.
– High Beam Indicator
Indicates that headlights are on high beam.
– Front Fog Light Indicator
This indicator will illuminate when the front fog lights are on.
– Vehicle Security Light
This light will flash rapidly for approximately 15 seconds when the vehicle security
alarm is arming. The light will flash at a slower speed continuously after the alarm is
set. The security light will also come on for about three seconds when the ignition is
first turned on.
– 4WD Indicator
This light indicates the vehicle is in 4-wheel drive (4WD) mode.
– Electronic Stability Control (ESC) OFF Indicator Light
This light indicates the Electronic Stability Control (ESC) is off.
– Cruise Indicator
This indicator shows that the Electronic Speed Control System is ON.
– Hill Descent Control Indicator — If Equipped
This indicator will illuminate when Hill Descent Control (HDC) has been selected
using the Hill Descent Control Switch.
WHAT TO DO IN EMERGENCIES
94
Page 100 of 148
Jacking Instructions
WARNING!
Carefully follow these tire changing warnings to help prevent personal injury or
damage to your vehicle:
• Always park on a firm, level surface as far from the edge of the roadway aspossible before raising the vehicle.
• Turn on the Hazard Warning flasher.
• Block the wheel diagonally opposite the wheel to be raised.
• Set the parking brake firmly and set an automatic transmission in PARK; a
manual transmission in REVERSE.
• Never start or run the engine with the vehicle on a jack.
• Do not let anyone sit in the vehicle when it is on a jack.
• Do not get under the vehicle when it is on a jack. If you need to get under a
raised vehicle, take it to a service center where it can be raised on a lift.
• Only use the jack in the positions indicated and for lifting this vehicle during
a tire change.
• If working on or near a roadway, be extremely careful of motor traffic.
• To assure that spare tires, flat or inflated, are securely stowed, spares must be
stowed with the valve stem facing the ground.
NOTE:
Refer to “Tires — General Information” in
“Starting And Operating” in the Owner’s
Manual on the DVD for further informa-
tion about the spare tire, it's use, and
operation.
1. Remove the scissors jack and lug wrench from the spare wheel as an
assembly. Turn the jack screw to the
left to loosen the lug wrench and re-
move the wrench from the jack as-
sembly.
NOTE:
The jack handle attaches to the side of the jack with two attachment points. When
the jack is partially expanded, the tension between the two attachment points holds
the jack handle in place.
Warning Label
WHAT TO DO IN EMERGENCIES
98
Page 101 of 148
2. Loosen, but do not remove, the wheel nuts by turning them to the left one turnwhile the wheel is still on the ground.
NOTE:
There are front and rear jacking locations on each side of the body. The front locations
are outlined by two triangular cutouts on one of the flanges in the sill flange
assembly. The rear location is the same but with two rectangular cutouts. For vehicles
equipped with plastic trim, the plastic has been cut away to expose the jacking
locations in the body.
CAUTION!
Do not attempt to raise the vehicle by jacking on locations other than those
indicated in the Jacking Instructions for this vehicle.
Do not raise the vehicle until you are
sure the jack is securely engaged.
Front Jack Engaged
Rear Jack Engaged
WHAT TO DO IN EMERGENCIES
99
Page 103 of 148
WARNING!
To avoid possible personal injury, handle the wheel covers with care to avoid
contact with any sharp edges.
NOTE:
The wheel cover is held on the wheel by the wheel nuts. When reinstalling the original
wheel, properly align the wheel cover to the valve stem, place the wheel cover onto
the wheel, then install the wheel nuts.
6. Lower the vehicle by turning the jack screw to the left.
7. Finish tightening the nuts. Push down on the wrench while at the end of the handle for increased leverage. Tighten the lug nuts in a star pattern until each nut
has been tightened twice. The correct wheel nut torque is 100 ft/lbs (135 N·m).
If you doubt that you have tightened the nuts correctly, have them checked with
a torque wrench by your authorized dealer or service station.
8. Remove the wheel blocks and lower the jack until it is free. Release the parking brake. Reassemble the lug wrench to the jack assembly and stow it in the spare
tire area. Secure the assembly using the means provided.
WARNING!
A loose tire or jack thrown forward in a collision or hard stop could endanger the
occupants of the vehicle. Always stow the jack parts and the spare tire in the
places provided.
9. Place the deflated (flat) tire in the cargo area, have the tire repaired or replaced as
soon as possible.
WARNING!
A loose tire thrown forward in a collision or hard stop could injure the occupants
in the vehicle. Have the deflated (flat) tire repaired or replaced immediately.
10. Check the spare tire pressure as soon as possible. Correct the tire pressure as required.
WHAT TO DO IN EMERGENCIES
101