maintenance schedule JEEP PATRIOT 2019 Owner handbook (in English)
[x] Cancel search | Manufacturer: JEEP, Model Year: 2019, Model line: PATRIOT, Model: JEEP PATRIOT 2019Pages: 332, PDF Size: 1.99 MB
Page 267 of 332
NOTE:
Intentional tampering with emissions con-
trol systems can result in civil penalties
being assessed against you.
In unusual situations involving grossly malfunc-
tioning engine operation, a scorching odor may
suggest severe and abnormal catalyst over-
heating. If this occurs, stop the vehicle, turn off
the engine and allow it to cool. Service, includ-
ing a tune-up to manufacturer’s specifications,
should be obtained immediately.
To minimize the possibility of catalytic converter
damage:
•Do not shut off the engine or interrupt the
ignition, when the transmission is in gear and
the vehicle is in motion.
•Do not try to start the engine by pushing or
towing the vehicle.
•Do not idle the engine with any spark plug
wires disconnected or removed, such as
when diagnostic testing, or for prolonged
periods during very rough idle or malfunction-
ing operating conditions.Cooling System
WARNING!
•When working near the radiator cooling
fan, disconnect the fan motor lead or turn
the ignition switch to the OFF position. The
fan is temperature controlled and can start
at any time the ignition switch is in the ON
position.
•You or others can be badly burned by hot
engine coolant (antifreeze) or steam from
your radiator. If you see or hear steam
coming from under the hood, do not open
the hood until the radiator has had time to
cool. Never try to open a cooling system
pressure cap when the radiator is hot.
Coolant Checks
Check engine coolant (antifreeze) protection
every 12 months (before the onset of freezing
weather, where applicable). If the engine cool-
ant (antifreeze) is dirty or rusty in appearance,
the system should be drained, flushed, and
refilled with fresh engine coolant (antifreeze).Check the front of the A/C condenser for any
accumulation of bugs, leaves, etc. If dirty, clean
by gently spraying water from a garden hose
vertically down the face of the condenser.
Check the coolant recovery bottle tubing for
brittle rubber, cracking, tears, cuts, and tight-
ness of the connection at the bottle and radiator.
Inspect the entire system for leaks.
Cooling System – Drain, Flush, And Refill
Refer to the “Maintenance Schedule” for the
proper maintenance intervals.
If the engine coolant (antifreeze) is dirty or
contains a considerable amount of sediment,
clean and flush with a reliable cooling system
cleaner. Follow with a thorough rinsing to re-
move all deposits and chemicals. Properly dis-
pose of old engine coolant (antifreeze).
Selection Of Coolant
Refer to “Fluids, Lubricants, And Genuine
Parts” in “Maintaining Your Vehicle” for further
information.
263
Page 270 of 332
•If frequent engine coolant (antifreeze) addi-
tions are required, the cooling system should
be pressure tested for leaks.
•Maintain engine coolant (antifreeze) concen-
tration at a minimum of 50% OAT coolant
(conforming to MS.90032) and distilled water
for proper corrosion protection of your engine
which contains aluminum components.
•Make sure that the coolant expansion bottle
overflow hoses are not kinked or obstructed.
•Keep the front of the radiator clean. If your
vehicle is equipped with air conditioning,
keep the front of the condenser clean.
•Do not change the thermostat for Summer or
Winter operation. If replacement is ever nec-
essary, install ONLY the correct type thermo-
stat. Other designs may result in unsatisfac-
tory engine coolant (antifreeze) performance,
poor gas mileage, and increased emissions.
Brake SystemIn order to assure brake system performance,
all brake system components should be in-spected periodically. Refer to the “Maintenance
Schedule” for the proper maintenance intervals.
WARNING!
Riding the brakes can lead to brake failure
and possibly a collision. Driving with your
foot resting or riding on the brake pedal can
result in abnormally high brake tempera-
tures, excessive lining wear, and possible
brake damage. You would not have your full
braking capacity in an emergency.
Brake Master Cylinder
The fluid level in the master cylinder should be
checked when performing under hood services,
or immediately if the brake system warning light
is on.
Be sure to clean the top of the master cylinder
area before removing the cap. If necessary, add
fluid to bring the fluid level up to the require-
ments described on the brake fluid reservoir.
Fluid level can be expected to fall as the brake
pads wear. The brake fluid level should be
checked when the pads are replaced. However,low fluid level may be caused by a leak and a
checkup may be needed.
NOTE:
If your vehicle is equipped with a manual
transmission, the brake fluid reservoir sup-
plies fluid to both the brake system and the
clutch release system. The two systems are
separated in the reservoir, and a leak in one
system will not affect the other system. The
manual transmission clutch release system
should not require fluid replacement during
the life of the vehicle. If the brake fluid
reservoir is low and the brake system does
not indicate any leaks or other problems, it
may be a result of a leak in the hydraulic
clutch release system. See your local autho-
rized dealer for service.
Use only manufacturer’s recommended brake
fluid. Refer to “Fluids, Lubricants, And Genuine
Parts” in “Maintaining Your Vehicle” for further
information.
266
Page 272 of 332
Special Additives
The manufacturer strongly recommends
against using any special additives in the trans-
mission.
Automatic Transmission Fluid (ATF) is an engi-
neered product and its performance may be
impaired by supplemental additives. Therefore,
do not add any fluid additives to the transmis-
sion. The only exception to this policy is the use
of special dyes for diagnosing fluid leaks. Avoid
using transmission sealers as they may ad-
versely affect seals.
CAUTION!
Do not use chemical flushes in your trans-
mission as the chemicals can damage your
transmission components. Such damage is
not covered by the New Vehicle Limited
Warranty.
Fluid Level Check
The fluid level is preset at the factory and does
not require adjustment under normal operating
conditions.Routine fluid level checks are not required,
therefore the transmission filler tube is capped
and no dipstick is provided. Your authorized
dealer can check your transmission fluid level
using special service tools. If you notice fluid
leakage or transmission malfunction, visit your
authorized dealer immediately to have the
transmission fluid level checked. Operating the
vehicle with an improper fluid level can cause
severe transmission damage.
CAUTION!
If a transmission fluid leak occurs, visit your
authorized dealer immediately. Severe trans-
mission damage may occur. Your authorized
dealer has the proper tools to adjust the fluid
level accurately.
Fluid And Filter Changes
Under normal operating conditions, the fluid
installed at the factory will provide satisfactory
lubrication for the life of the vehicle. However, if
the vehicle is frequently driven on rough or
unpaved roads, on mountain roads, on short
trips, or in heavy city traffic during hot weather,or is used for frequent trailer towing, police,
fleet, taxi, etc., change the fluid as indicated in
the Maintenance Schedule. In addition, change
the fluid and filter if the fluid becomes contami-
nated (with water, etc.), or if the transmission is
disassembled for any reason.
Automatic Transmission (CVT) — If
Equipped
Selection Of Lubricant (CVT)
It is important to use the proper transmission
fluid to ensure optimum transmission perfor-
mance and life. Use only the manufacturer’s
specified transmission fluid which has the spe-
cial friction coefficient additives necessary for
proper steel belt traction on the drive and driven
pulleys. Refer to “Fluids, Lubricants, And Genu-
ine Parts” in this section for fluid specifications.
It is important to maintain the transmission fluid
at the correct level using the recommended
fluid.
No chemical flushes should be used in any
transmission; only the approved lubricant
should be used.
268
Page 273 of 332
CAUTION!
Using a transmission fluid other than the
manufacturer’s recommended fluid may
cause belt slip and result in a complete
transmission failure! Refer to “Fluids, Lubri-
cants, And Genuine Parts” in this section for
fluid specifications.
Special Additives
The manufacturer strongly recommends
against using any special additives in the trans-
mission.
Automatic Transmission Fluid (ATF) is an engi-
neered product and its performance may be
impaired by supplemental additives. Therefore,
do not add any fluid additives to the transmis-
sion. The only exception to this policy is the use
of special dyes for diagnosing fluid leaks. Avoid
using transmission sealers as they may ad-
versely affect seals.CAUTION!
Do not use chemical flushes in your trans-
mission as the chemicals can damage your
transmission components. Such damage is
not covered by the New Vehicle Limited
Warranty.
Fluid Level Check
The fluid level is preset at the factory and does
not require adjustment under normal operating
conditions.
Routine fluid level checks are not required,
therefore the transmission filler tube is capped
and no dipstick is provided. Your authorized
dealer can check your transmission fluid level
using special service tools. If you notice fluid
leakage or transmission malfunction, visit your
authorized dealer immediately to have the
transmission fluid level checked. Operating the
vehicle with an improper fluid level can cause
severe transmission damage.CAUTION!
If a transmission fluid leak occurs, visit your
authorized dealer immediately. Severe trans-
mission damage may occur. Your authorized
dealer has the proper tools to adjust the fluid
level accurately.
Fluid And Filter Changes
Refer to the"Maintenance Schedule"for the
proper maintenance intervals. In addition,
change the fluid and filter if the fluid becomes
contaminated (with water, etc.), or if the trans-
mission is disassembled for any reason.
Manual Transmission — If Equipped
Lubricant Selection
Use only the manufacturers recommended
transmission fluid. Refer to “Fluids, Lubricants,
And Genuine Parts” in “Maintaining Your Ve-
hicle” for further information.
269
Page 274 of 332
Fluid Level Check
Check the fluid level by removing the fill plug.
The fluid level should be between the bottom of
the fill hole and a point not more than 3/16 inch
(4.7 mm) below the bottom of the hole.
Add fluid, if necessary, to maintain the proper
level.
Please see your authorized dealer for service.
Frequency Of Fluid Change
Under normal operating conditions, the fluid
installed at the factory will give satisfactory
lubrication for the life of the vehicle. Fluid
changes are not necessary unless lubricant has
become contaminated with water.
NOTE:
If contaminated with water, the fluid should
be changed immediately.Rear Drive Assembly (RDA) —
AWD/4WD Models Only
Lubricant Selection
Use only the manufacturer’s recommended
fluid. Refer to “Fluids, Lubricants, And Genuine
Parts” in “Maintaining Your Vehicle” for further
information.
Fluid Level Check
Visually inspect the unit at each oil change for
leakage. If leakage is detected, check the fluid
level by removing the fill plug. The fluid level
should be maintained between the bottom of
the fill hole to 1/8 inch (4 mm) below the fill hole.
Add fluid, if necessary, to maintain the proper
level.
Frequency Of Fluid Change
Refer to the “Maintenance Schedule” for the
proper maintenance intervals.
Power Transfer Unit (PTU) —
AWD/4WD Models Only
Lubricant Selection
Use only the manufacturer’s recommended
fluid. Refer to “Fluids, Lubricants, And Genuine
Parts” in “Maintaining Your Vehicle” for further
information.
Fluid Level Check
Visually inspect the unit at each oil change for
leakage. If leakage is detected, Check the fluid
level by removing the fill plug. The fluid level
should be maintained between the bottom of
the fill hole to 1/8 inch (4 mm) below the fill hole.
Add fluid, if necessary, to maintain the proper
level.
Frequency Of Fluid Change
Refer to the “Maintenance Schedule” for the
proper maintenance intervals.
270
Page 287 of 332
8
MAINTENANCE SCHEDULES
•MAINTENANCE SCHEDULE . . . . . . . . . . . . ..........284•Maintenance Schedule — Gasoline Engine............284
283
Page 288 of 332
MAINTENANCE SCHEDULE
Maintenance Schedule — Gasoline
Engine
The Scheduled Maintenance services listed in
this manual must be done at the times or
mileages specified to protect your vehicle war-
ranty and ensure the best vehicle performance
and reliability. More frequent maintenance may
be needed for vehicles in severe operating
conditions, such as dusty areas and very short
trip driving. Inspection and service should also
be done anytime a malfunction is suspected.
The oil change indicator system will remind you
that it is time to take your vehicle in for sched-
uled maintenance.
On Non-EVIC equipped vehicles, “CHANgE
OIL” will flash in the instrument cluster odom-
eter and a single chime will sound, indicating
that an oil change is necessary.
The oil change indicator message will illuminate
approximately 7,000 miles (11,200 km) after the
most recent oil change was performed. Have
your vehicle serviced as soon as possible,
within 500 miles (800 km). However, an earlieroil change at 4,500 miles (7,500 km) may be
required if the vehicle is operated under “Se-
vere Duty Conditions” later in this section.
NOTE:
•The oil change indicator message will not
monitor the time since the last oil change.
Change your vehicle’s oil if it has been 12
months since your last oil change even if
the oil change indicator message is NOT
illuminated.
•Change your engine oil more often if you
drive your vehicle off-road for an ex-
tended period of time.
•Under no circumstances should oil
change intervals exceed 7,500 miles
(12,000 km) or 12 months, whichever
comes first.
Your dealer will reset the oil change indicator
message after completing the scheduled oil
change. If this scheduled oil change is per-
formed by someone other than your dealer, the
message can be reset by referring to the steps
described under “Instrument ClusterDescription/Odometer/Trip Odometer” in “Un-
derstanding Your Instrument Panel” for further
information.
Once A Month Or Before A Long Trip
•Check the engine oil level about five minutes
after a fully warmed engine is shut off.
Checking the oil level while the vehicle is on
level ground will improve the accuracy of the
oil level reading. Add oil only when the level
is at or below the ADD or MIN mark.
•Check the windshield washer solvent and
add if required.
•Check tire pressure and look for unusual
wear or damage. Rotate tires at the first sign
of irregular wear, even if it occurs before the
oil indicator system turns on.
•Inspect the battery and clean and tighten the
terminals as required.
•Check the fluid levels of coolant reservoir,
automatic transmission, brake master cylin-
der and power steering and fill as needed.
•Check all lights and other electrical items for
correct operation.
284
Page 289 of 332
At Each Oil Change
•Change the engine oil filter.
•Inspect the brake hoses and lines.CAUTION!
Failure to perform the required maintenance
items may result in damage to the vehicle.Required Maintenance Intervals
Refer to the Maintenance Schedules on the
following pages for the required maintenance
intervals.
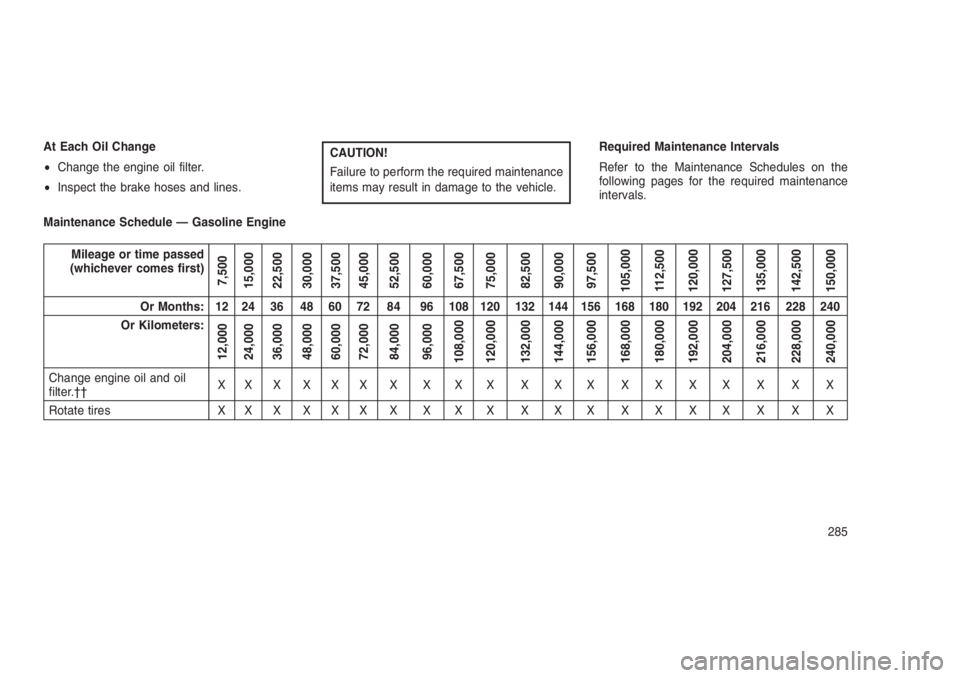
Maintenance Schedule — Gasoline Engine
Mileage or time passed
(whichever comes first)
7,500
15,000
22,500
30,000
37,500
45,000
52,500
60,000
67,500
75,000
82,500
90,000
97,500
105,000
112,500
120,000
127,500
135,000
142,500
150,000
Or Months: 12 24 36 48 60 72 84 96 108 120 132 144 156 168 180 192 204 216 228 240
Or Kilometers:
12,000
24,000
36,000
48,000
60,000
72,000
84,000
96,000
108,000
120,000
132,000
144,000
156,000
168,000
180,000
192,000
204,000
216,000
228,000
240,000
Change engine oil and oil
filter.††XXXXXXXXXX XXXXXXXX XX
Rotate tires X X X X X X X X X X X X X X X X X X X X
285
Page 326 of 332
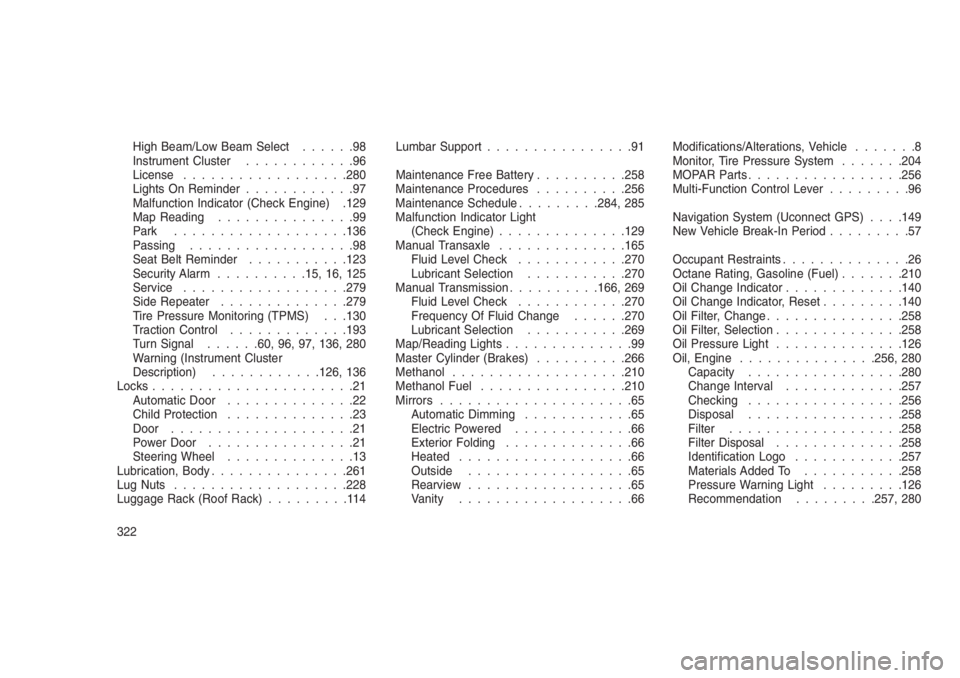
High Beam/Low Beam Select......98
Instrument Cluster............96
License..................280
Lights On Reminder............97
Malfunction Indicator (Check Engine) .129
Map Reading...............99
Park...................136
Passing..................98
Seat Belt Reminder...........123
Security Alarm..........15, 16, 125
Service..................279
Side Repeater..............279
Tire Pressure Monitoring (TPMS) . . .130
Traction Control.............193
Turn Signal......60, 96, 97, 136, 280
Warning (Instrument Cluster
Description)............126, 136
Locks......................21
Automatic Door..............22
Child Protection..............23
Door....................21
Power Door................21
Steering Wheel..............13
Lubrication, Body...............261
Lug Nuts...................228
Luggage Rack (Roof Rack).........114Lumbar Support................91
Maintenance Free Battery..........258
Maintenance Procedures..........256
Maintenance Schedule.........284, 285
Malfunction Indicator Light
(Check Engine)..............129
Manual Transaxle..............165
Fluid Level Check............270
Lubricant Selection...........270
Manual Transmission..........166, 269
Fluid Level Check............270
Frequency Of Fluid Change......270
Lubricant Selection...........269
Map/Reading Lights..............99
Master Cylinder (Brakes)..........266
Methanol..................
.210
Methanol Fuel................210
Mirrors.....................65
Automatic Dimming............65
Electric Powered.............66
Exterior Folding..............66
Heated...................66
Outside..................65
Rearview..................65
Vanity...................66Modifications/Alterations, Vehicle.......8
Monitor, Tire Pressure System.......204
MOPAR Parts.................256
Multi-Function Control Lever.........96
Navigation System (Uconnect GPS). . . .149
New Vehicle Break-In Period.........57
Occupant Restraints..............26
Octane Rating, Gasoline (Fuel).......210
Oil Change Indicator.............140
Oil Change Indicator, Reset.........140
Oil Filter, Change...............258
Oil Filter, Selection..............258
Oil Pressure Light..............126
Oil, Engine...............256, 280
Capacity.................280
Change Interval.............257
Checking.................256
Disposal.................258
Filter...................258
Filter Disposal..............258
Identification Logo............257
Materials Added To...........258
Pressure Warning Light.........126
Recommendation.........257, 280
322
Page 327 of 332
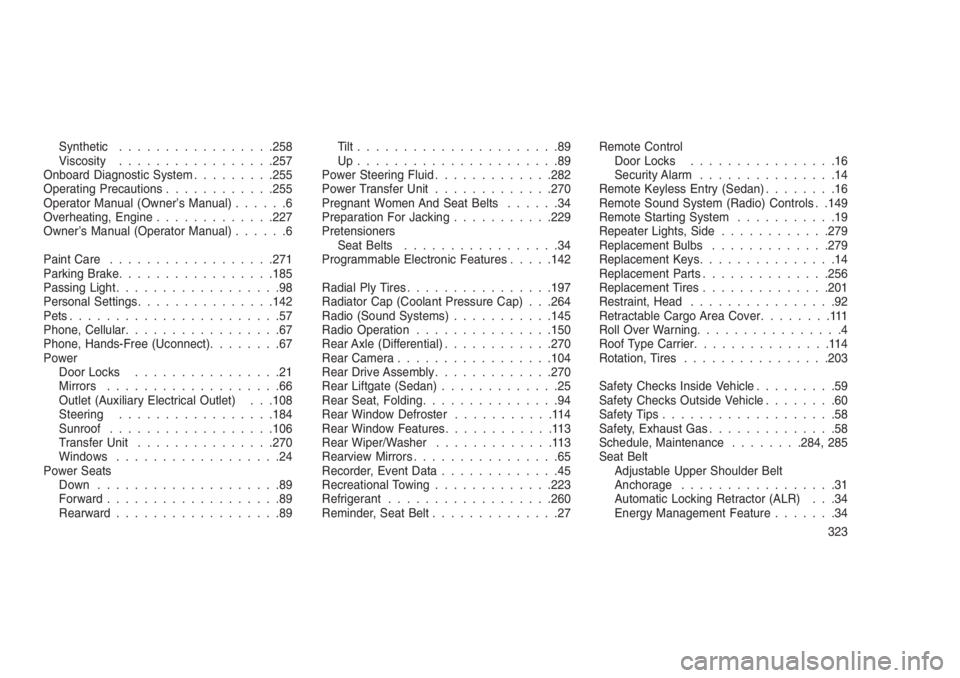
Synthetic.................258
Viscosity.................257
Onboard Diagnostic System.........255
Operating Precautions............255
Operator Manual (Owner’s Manual)......6
Overheating, Engine.............227
Owner’s Manual (Operator Manual)......6
Paint Care..................271
Parking Brake.................185
Passing Light..................98
Personal Settings...............142
Pets.......................57
Phone, Cellular.................67
Phone, Hands-Free (Uconnect)........67
Power
Door Locks................21
Mirrors...................66
Outlet (Auxiliary Electrical Outlet) . . .108
Steering.................184
Sunroof..................106
Transfer Unit...............270
Windows..................24
Power Seats
Down....................89
Forward...................89
Rearward..................89Tilt......................89
Up......................89
Power Steering Fluid.............282
Power Transfer Unit.............270
Pregnant Women And Seat Belts......34
Preparation For Jacking...........229
Pretensioners
Seat Belts.................34
Programmable Electronic Features.....142
Radial Ply Tires................197
Radiator Cap (Coolant Pressure Cap) . . .264
Radio (Sound Systems)...........145
Radio Operation...............150
Rear Axle (Differential)............270
Rear Camera.................104
Rear Drive Assembly.............270
Rear Liftgate (Sedan).............25
Rear Seat, Folding...............94
Rear Window Defroster...........114
Rear Window Features............113
Rear Wiper/Washer.............113
Rearview Mirrors................65
Recorder, Event Data.............45
Recreational Towing.............223
Refrigerant..................260
Reminder, Seat Belt..............27Remote Control
Door Locks................16
Security Alarm...............14
Remote Keyless Entry (Sedan)........16
Remote Sound System (Radio) Controls . .149
Remote Starting System...........19
Repeater Lights, Side............279
Replacement Bulbs.............279
Replacement Keys...............14
Replacement Parts..............256
Replacement Tires..............201
Restraint, Head................92
Retractable Cargo Area Cover........111
Roll Over Warning................4
Roof Type Carrier...............114
Rotation, Tires................203
Safety Checks Inside Vehicle.........59
Safety Checks Outside Vehicle........60
Safety Tips...................58
Safety, Exhaust Gas..............58
Schedule, Maintenance........284, 285
Seat Belt
Adjustable Upper Shoulder Belt
Anchorage.................31
Automatic Locking Retractor (ALR) . . .34
Energy Management Feature.......34
323