engine JEEP PATRIOT 2020 Owner handbook (in English)
[x] Cancel search | Manufacturer: JEEP, Model Year: 2020, Model line: PATRIOT, Model: JEEP PATRIOT 2020Pages: 332, PDF Size: 1.99 MB
Page 269 of 332
The cap should be inspected and cleaned if
there is any accumulation of foreign material on
the sealing surfaces.
WARNING!
•The warning words “DO NOT OPEN HOT”
on the cooling system pressure cap are a
safety precaution. Never add engine cool-
ant (antifreeze) when the engine is over-
heated. Do not loosen or remove the cap
to cool an overheated engine. Heat causes
pressure to build up in the cooling system.
To prevent scalding or injury, do not re-
move the pressure cap while the system is
hot or under pressure.
•Do not use a pressure cap other than the
one specified for your vehicle. Personal
injury or engine damage may result.
Disposal Of Used Engine Coolant
Used ethylene glycol-based engine coolant (an-
tifreeze) is a regulated substance requiring
proper disposal. Check with your local authori-
ties to determine the disposal rules for yourcommunity. To prevent ingestion by animals or
children, do not store ethylene glycol-based
engine coolant (antifreeze) in open containers
or allow it to remain in puddles on the ground. If
ingested by a child or pet, seek emergency
assistance immediately. Clean up any ground
spills immediately.
Coolant Level
The coolant bottle provides a quick visual
method for determining that the coolant level is
adequate. With the engine idling and warm to
normal operating temperature, the level of the
engine coolant (antifreeze) in the bottle should
be between the “ADD” and “FULL” lines shown
on the bottle.
The radiator normally remains completely full,
so there is no need to remove the radiator cap
unless checking for the coolant freeze point or
replacing the engine coolant (antifreeze). Ad-
vise your service attendant of this. As long as
the engine operating temperature is satisfac-
tory, the coolant bottle need only be checked
once a month.When additional engine coolant (antifreeze) is
needed to maintain the proper level, it should be
added to the coolant bottle. Do not overfill.
Points To Remember
NOTE:
When the vehicle is stopped after a few
miles/kilometers of operation, you may ob-
serve vapor coming from the front of the
engine compartment. This is normally a re-
sult of moisture from rain, snow, or high
humidity accumulating on the radiator and
being vaporized when the thermostat opens,
allowing hot engine coolant (antifreeze) to
enter the radiator.
If an examination of your engine compartment
shows no evidence of radiator or hose leaks,
the vehicle may be safely driven. The vapor will
soon dissipate.
•Do not overfill the coolant expansion bottle.
•Check the coolant freeze point in the radiator
and in the coolant expansion bottle. If engine
coolant (antifreeze) needs to be added, the
contents of the coolant expansion bottle must
also be protected against freezing.
265
Page 270 of 332
•If frequent engine coolant (antifreeze) addi-
tions are required, the cooling system should
be pressure tested for leaks.
•Maintain engine coolant (antifreeze) concen-
tration at a minimum of 50% OAT coolant
(conforming to MS.90032) and distilled water
for proper corrosion protection of your engine
which contains aluminum components.
•Make sure that the coolant expansion bottle
overflow hoses are not kinked or obstructed.
•Keep the front of the radiator clean. If your
vehicle is equipped with air conditioning,
keep the front of the condenser clean.
•Do not change the thermostat for Summer or
Winter operation. If replacement is ever nec-
essary, install ONLY the correct type thermo-
stat. Other designs may result in unsatisfac-
tory engine coolant (antifreeze) performance,
poor gas mileage, and increased emissions.
Brake SystemIn order to assure brake system performance,
all brake system components should be in-spected periodically. Refer to the “Maintenance
Schedule” for the proper maintenance intervals.
WARNING!
Riding the brakes can lead to brake failure
and possibly a collision. Driving with your
foot resting or riding on the brake pedal can
result in abnormally high brake tempera-
tures, excessive lining wear, and possible
brake damage. You would not have your full
braking capacity in an emergency.
Brake Master Cylinder
The fluid level in the master cylinder should be
checked when performing under hood services,
or immediately if the brake system warning light
is on.
Be sure to clean the top of the master cylinder
area before removing the cap. If necessary, add
fluid to bring the fluid level up to the require-
ments described on the brake fluid reservoir.
Fluid level can be expected to fall as the brake
pads wear. The brake fluid level should be
checked when the pads are replaced. However,low fluid level may be caused by a leak and a
checkup may be needed.
NOTE:
If your vehicle is equipped with a manual
transmission, the brake fluid reservoir sup-
plies fluid to both the brake system and the
clutch release system. The two systems are
separated in the reservoir, and a leak in one
system will not affect the other system. The
manual transmission clutch release system
should not require fluid replacement during
the life of the vehicle. If the brake fluid
reservoir is low and the brake system does
not indicate any leaks or other problems, it
may be a result of a leak in the hydraulic
clutch release system. See your local autho-
rized dealer for service.
Use only manufacturer’s recommended brake
fluid. Refer to “Fluids, Lubricants, And Genuine
Parts” in “Maintaining Your Vehicle” for further
information.
266
Page 271 of 332
WARNING!
•Use only manufacturer’s recommended
brake fluid. Refer to “Fluids, Lubricants,
And Genuine Parts” in “Maintaining Your
Vehicle” for further information. Using the
wrong type of brake fluid can severely
damage your brake system and/or impair
its performance. The proper type of brake
fluid for your vehicle is also identified on
the original factory installed hydraulic mas-
ter cylinder reservoir.
•To avoid contamination from foreign matter
or moisture, use only new brake fluid or
fluid that has been in a tightly closed
container. Keep the master cylinder reser-
voir cap secured at all times. Brake fluid in
a open container absorbs moisture from
the air resulting in a lower boiling point.
This may cause it to boil unexpectedly
during hard or prolonged braking, resulting
in sudden brake failure. This could result in
a collision.
(Continued)
WARNING!(Continued)
•Overfilling the brake fluid reservoir can
result in spilling brake fluid on hot engine
parts, causing the brake fluid to catch fire.
Brake fluid can also damage painted and
vinyl surfaces, care should be taken to
avoid its contact with these surfaces.
•Do not allow petroleum based fluid to
contaminate the brake fluid. Brake seal
components could be damaged, causing
partial or complete brake failure. This
could result in a collision.
CAUTION!
Use of improper brake fluids will affect over-
all clutch system performance. Improper
brake fluids may damage the clutch system
resulting in loss of clutch function and the
ability to shift the transmission.
Automatic Transmission (6-Speed)
— If Equipped
Selection Of Lubricant — 6-Speed
Transmission
It is important to use the proper transmission
fluid to ensure optimum transmission perfor-
mance and life. Use only the manufacturer’s
specified transmission fluid. Refer to “Fluids,
Lubricants, and Genuine Parts” in this section
for fluid specifications. It is important to maintain
the transmission fluid at the correct level using
the recommended fluid.
No chemical flushes should be used in any
transmission; only the approved lubricant
should be used.
CAUTION!
Using a transmission fluid other than the
manufacturer’s recommended fluid may
cause deterioration in transmission shift
quality and/or torque converter shudder. Re-
fer to “Fluids, Lubricants, And Genuine
Parts” in this section for fluid specifications.
267
Page 279 of 332
WARNING!(Continued)
•Before replacing a fuse, make sure that the
ignition is off and that all the other services
are switched off and/or disengaged.
•If the replaced fuse blows again, contact
an authorized dealer.
•If a general protection fuse for safety sys-
tems (air bag system, braking system),
power unit systems (engine system, gear-
box system) or steering system blows,
contact an authorized dealer.
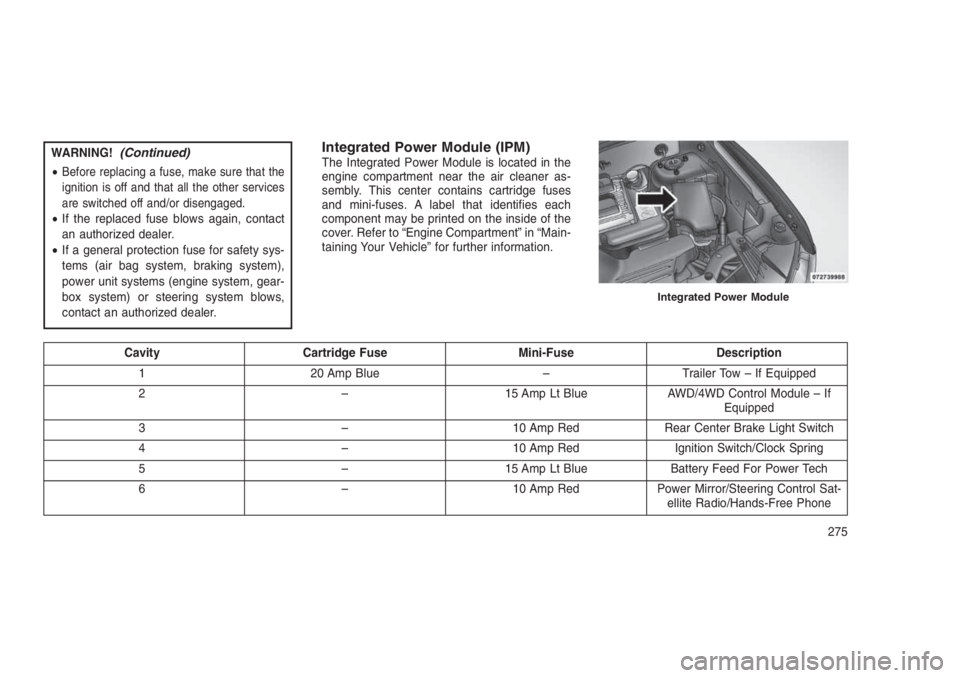
Integrated Power Module (IPM)The Integrated Power Module is located in the
engine compartment near the air cleaner as-
sembly. This center contains cartridge fuses
and mini-fuses. A label that identifies each
component may be printed on the inside of the
cover. Refer to “Engine Compartment” in “Main-
taining Your Vehicle” for further information.
Cavity Cartridge Fuse Mini-Fuse Description
1 20 Amp Blue – Trailer Tow – If Equipped
2 – 15 Amp Lt Blue AWD/4WD Control Module – If
Equipped
3 – 10 Amp Red Rear Center Brake Light Switch
4 – 10 Amp Red Ignition Switch/Clock Spring
5 – 15 Amp Lt Blue Battery Feed For Power Tech
6 – 10 Amp Red Power Mirror/Steering Control Sat-
ellite Radio/Hands-Free Phone
Integrated Power Module
275
Page 283 of 332
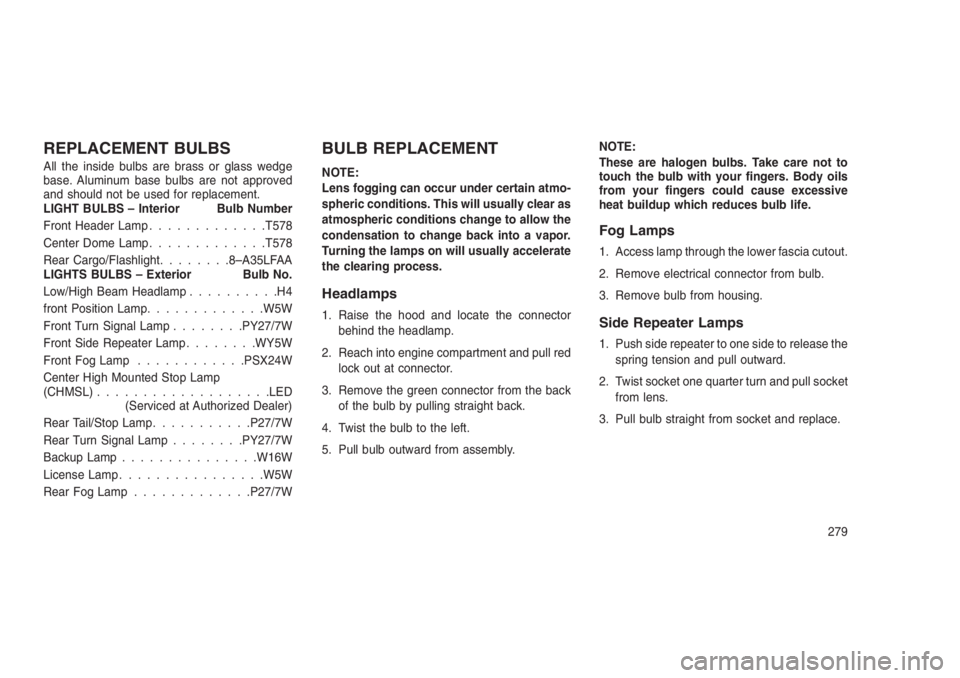
REPLACEMENT BULBS
All the inside bulbs are brass or glass wedge
base. Aluminum base bulbs are not approved
and should not be used for replacement.
LIGHT BULBS – Interior Bulb Number
Front Header Lamp.............T578
Center Dome Lamp.............T578
Rear Cargo/Flashlight........8–A35LFAA
LIGHTS BULBS – Exterior Bulb No.
Low/High Beam Headlamp..........H4
front Position Lamp.............W5W
Front Turn Signal Lamp........PY27/7W
Front Side Repeater Lamp........WY5W
Front Fog Lamp............PSX24W
Center High Mounted Stop Lamp
(CHMSL)...................LED
(Serviced at Authorized Dealer)
Rear Tail/Stop Lamp...........P27/7W
Rear Turn Signal Lamp........PY27/7W
Backup Lamp...............W16W
License Lamp................W5W
Rear Fog Lamp.............P27/7W
BULB REPLACEMENT
NOTE:
Lens fogging can occur under certain atmo-
spheric conditions. This will usually clear as
atmospheric conditions change to allow the
condensation to change back into a vapor.
Turning the lamps on will usually accelerate
the clearing process.
Headlamps
1. Raise the hood and locate the connector
behind the headlamp.
2. Reach into engine compartment and pull red
lock out at connector.
3. Remove the green connector from the back
of the bulb by pulling straight back.
4. Twist the bulb to the left.
5. Pull bulb outward from assembly.NOTE:
These are halogen bulbs. Take care not to
touch the bulb with your fingers. Body oils
from your fingers could cause excessive
heat buildup which reduces bulb life.
Fog Lamps
1. Access lamp through the lower fascia cutout.
2. Remove electrical connector from bulb.
3. Remove bulb from housing.
Side Repeater Lamps
1. Push side repeater to one side to release the
spring tension and pull outward.
2. Twist socket one quarter turn and pull socket
from lens.
3. Pull bulb straight from socket and replace.
279
Page 284 of 332
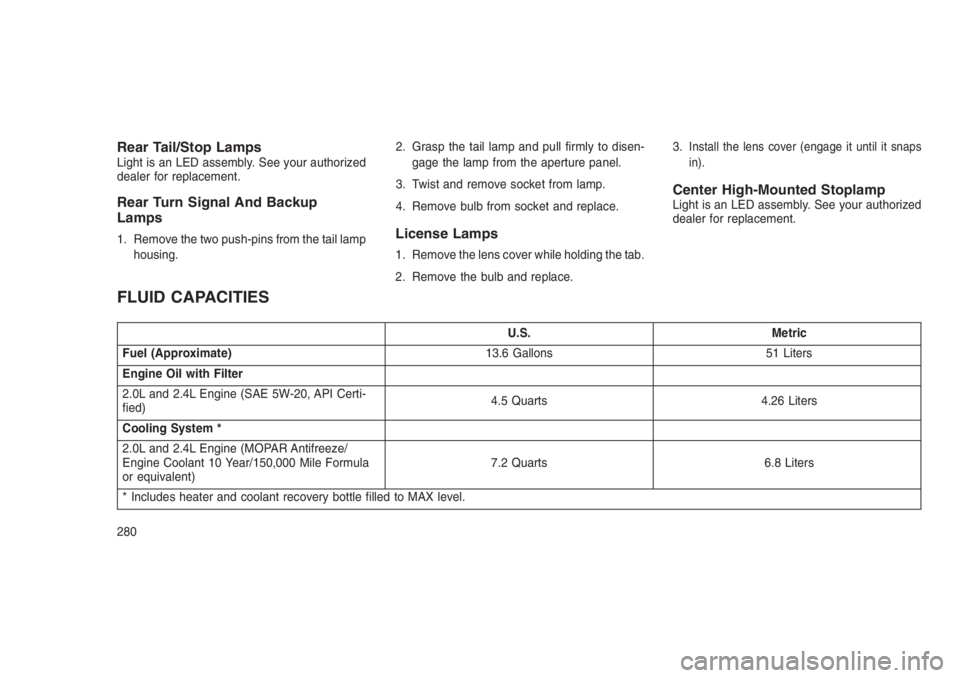
Rear Tail/Stop LampsLight is an LED assembly. See your authorized
dealer for replacement.
Rear Turn Signal And Backup
Lamps
1. Remove the two push-pins from the tail lamp
housing.2. Grasp the tail lamp and pull firmly to disen-
gage the lamp from the aperture panel.
3. Twist and remove socket from lamp.
4. Remove bulb from socket and replace.License Lamps
1. Remove the lens cover while holding the tab.
2. Remove the bulb and replace.3.
Install the lens cover (engage it until it snaps
in).
Center High-Mounted StoplampLight is an LED assembly. See your authorized
dealer for replacement.
FLUID CAPACITIES
U.S. Metric
Fuel (Approximate)13.6 Gallons 51 Liters
Engine Oil with Filter
2.0L and 2.4L Engine (SAE 5W-20, API Certi-
fied)4.5 Quarts 4.26 Liters
Cooling System *
2.0L and 2.4L Engine (MOPAR Antifreeze/
Engine Coolant 10 Year/150,000 Mile Formula
or equivalent)7.2 Quarts 6.8 Liters
* Includes heater and coolant recovery bottle filled to MAX level.
280
Page 285 of 332
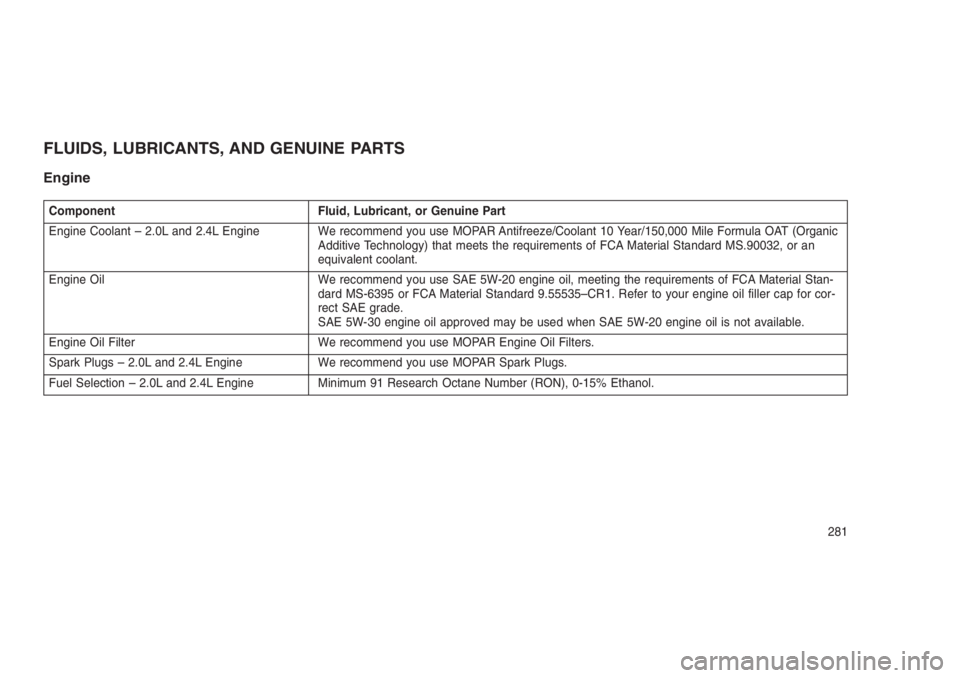
FLUIDS, LUBRICANTS, AND GENUINE PARTS
Engine
Component Fluid, Lubricant, or Genuine Part
Engine Coolant – 2.0L and 2.4L Engine We recommend you use MOPAR Antifreeze/Coolant 10 Year/150,000 Mile Formula OAT (Organic
Additive Technology) that meets the requirements of FCA Material Standard MS.90032, or an
equivalent coolant.
Engine Oil We recommend you use SAE 5W-20 engine oil, meeting the requirements of FCA Material Stan-
dard MS-6395 or FCA Material Standard 9.55535–CR1. Refer to your engine oil filler cap for cor-
rect SAE grade.
SAE 5W-30 engine oil approved may be used when SAE 5W-20 engine oil is not available.
Engine Oil Filter We recommend you use MOPAR Engine Oil Filters.
Spark Plugs – 2.0L and 2.4L Engine We recommend you use MOPAR Spark Plugs.
Fuel Selection – 2.0L and 2.4L Engine Minimum 91 Research Octane Number (RON), 0-15% Ethanol.
281
Page 287 of 332
8
MAINTENANCE SCHEDULES
•MAINTENANCE SCHEDULE . . . . . . . . . . . . ..........284•Maintenance Schedule — Gasoline Engine............284
283
Page 288 of 332
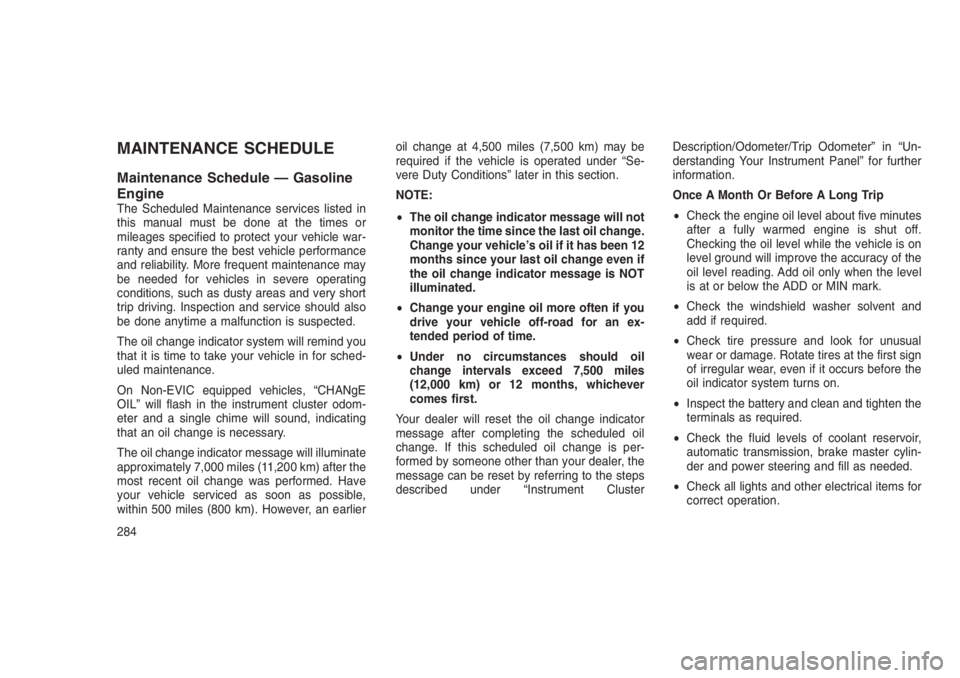
MAINTENANCE SCHEDULE
Maintenance Schedule — Gasoline
Engine
The Scheduled Maintenance services listed in
this manual must be done at the times or
mileages specified to protect your vehicle war-
ranty and ensure the best vehicle performance
and reliability. More frequent maintenance may
be needed for vehicles in severe operating
conditions, such as dusty areas and very short
trip driving. Inspection and service should also
be done anytime a malfunction is suspected.
The oil change indicator system will remind you
that it is time to take your vehicle in for sched-
uled maintenance.
On Non-EVIC equipped vehicles, “CHANgE
OIL” will flash in the instrument cluster odom-
eter and a single chime will sound, indicating
that an oil change is necessary.
The oil change indicator message will illuminate
approximately 7,000 miles (11,200 km) after the
most recent oil change was performed. Have
your vehicle serviced as soon as possible,
within 500 miles (800 km). However, an earlieroil change at 4,500 miles (7,500 km) may be
required if the vehicle is operated under “Se-
vere Duty Conditions” later in this section.
NOTE:
•The oil change indicator message will not
monitor the time since the last oil change.
Change your vehicle’s oil if it has been 12
months since your last oil change even if
the oil change indicator message is NOT
illuminated.
•Change your engine oil more often if you
drive your vehicle off-road for an ex-
tended period of time.
•Under no circumstances should oil
change intervals exceed 7,500 miles
(12,000 km) or 12 months, whichever
comes first.
Your dealer will reset the oil change indicator
message after completing the scheduled oil
change. If this scheduled oil change is per-
formed by someone other than your dealer, the
message can be reset by referring to the steps
described under “Instrument ClusterDescription/Odometer/Trip Odometer” in “Un-
derstanding Your Instrument Panel” for further
information.
Once A Month Or Before A Long Trip
•Check the engine oil level about five minutes
after a fully warmed engine is shut off.
Checking the oil level while the vehicle is on
level ground will improve the accuracy of the
oil level reading. Add oil only when the level
is at or below the ADD or MIN mark.
•Check the windshield washer solvent and
add if required.
•Check tire pressure and look for unusual
wear or damage. Rotate tires at the first sign
of irregular wear, even if it occurs before the
oil indicator system turns on.
•Inspect the battery and clean and tighten the
terminals as required.
•Check the fluid levels of coolant reservoir,
automatic transmission, brake master cylin-
der and power steering and fill as needed.
•Check all lights and other electrical items for
correct operation.
284
Page 289 of 332
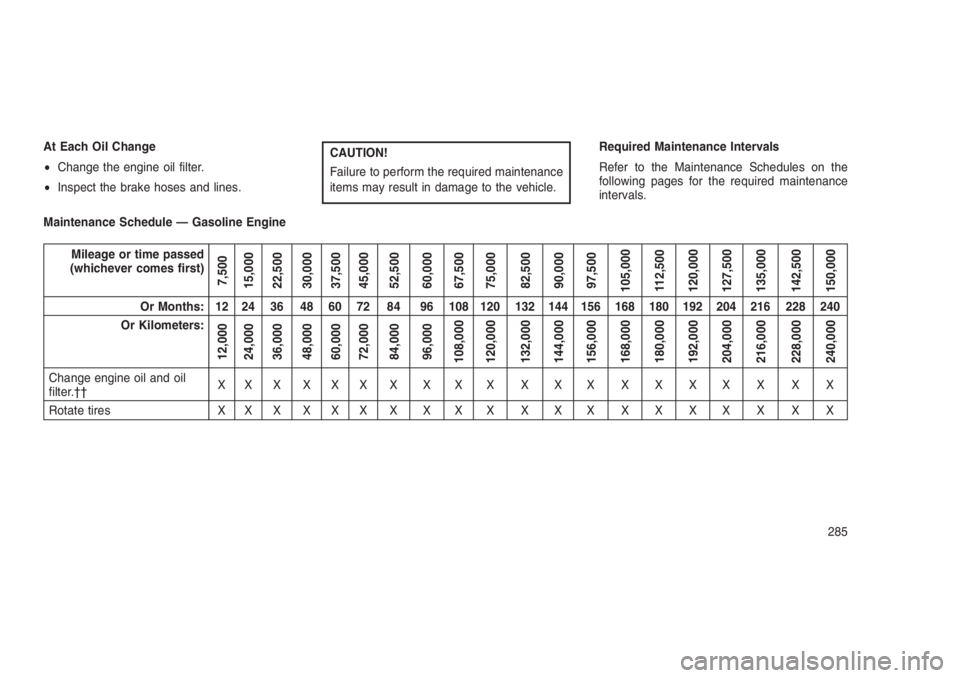
At Each Oil Change
•Change the engine oil filter.
•Inspect the brake hoses and lines.CAUTION!
Failure to perform the required maintenance
items may result in damage to the vehicle.Required Maintenance Intervals
Refer to the Maintenance Schedules on the
following pages for the required maintenance
intervals.
Maintenance Schedule — Gasoline Engine
Mileage or time passed
(whichever comes first)
7,500
15,000
22,500
30,000
37,500
45,000
52,500
60,000
67,500
75,000
82,500
90,000
97,500
105,000
112,500
120,000
127,500
135,000
142,500
150,000
Or Months: 12 24 36 48 60 72 84 96 108 120 132 144 156 168 180 192 204 216 228 240
Or Kilometers:
12,000
24,000
36,000
48,000
60,000
72,000
84,000
96,000
108,000
120,000
132,000
144,000
156,000
168,000
180,000
192,000
204,000
216,000
228,000
240,000
Change engine oil and oil
filter.††XXXXXXXXXX XXXXXXXX XX
Rotate tires X X X X X X X X X X X X X X X X X X X X
285