key JEEP PATRIOT 2020 Owner handbook (in English)
[x] Cancel search | Manufacturer: JEEP, Model Year: 2020, Model line: PATRIOT, Model: JEEP PATRIOT 2020Pages: 332, PDF Size: 1.99 MB
Page 24 of 332
•Remote Start Aborted — System Fault
The EVIC message stays active until the igni-
tion is placed in the ON/RUN position.
To Enter Remote StartPush and release the REMOTE STARTbut-
ton on the RKE Key Fob twice within five
seconds. The vehicle doors will lock, the park-
ing lights will flash, and the horn will chirp twice
(if programmed). Then, the engine will start and
the vehicle will remain in the Remote Start
mode for a 15-minute cycle.
NOTE:
•The park lamps will turn on and remain on
during Remote Start mode.
•For security, power window and power
sunroof operation (if equipped) are dis-
abled when the vehicle is in the Remote
Start mode.
•If your power door locks were unlocked,
Remote Start will automatically lock the
doors.•The engine can be started two consecu-
tive times (two 15-minute cycles) with the
RKE Key Fob. However, the ignition must
be placed in the ON/RUN position before
you can repeat the start sequence for a
third cycle.
Remote Start will also cancel if any of the
following occur:
•The engine stalls or RPM exceeds 2500.
•Any engine warning lamps come on.
•Low Fuel Light turns on.
•The hood is opened.
•The hazard switch is pushed.
•The transmission is moved out of PARK.
•The brake pedal is pushed.
To Exit Remote Start Mode Without
Driving The Vehicle
Push and release the REMOTE STARTbut-
ton one time or allow the engine to run for the
entire 15-minute cycle.NOTE:
To avoid unintentional shut downs, the sys-
tem will disable the one time push of the
REMOTE START
button for two seconds
after receiving a valid Remote Start request.
To Exit Remote Start Mode And
Drive The Vehicle
Before the end of the 15-minute cycle, push and
release the UNLOCKbutton on the RKE Key
Fob to unlock the doors and disarm the Vehicle
Security Alarm (if equipped). Then, insert the
RKE Key into the ignition and place the ignition
in the ON/RUN position.
NOTE:
The ignition must be placed in the ON/RUN
position in order to drive the vehicle.
20
Page 25 of 332
DOOR LOCKS
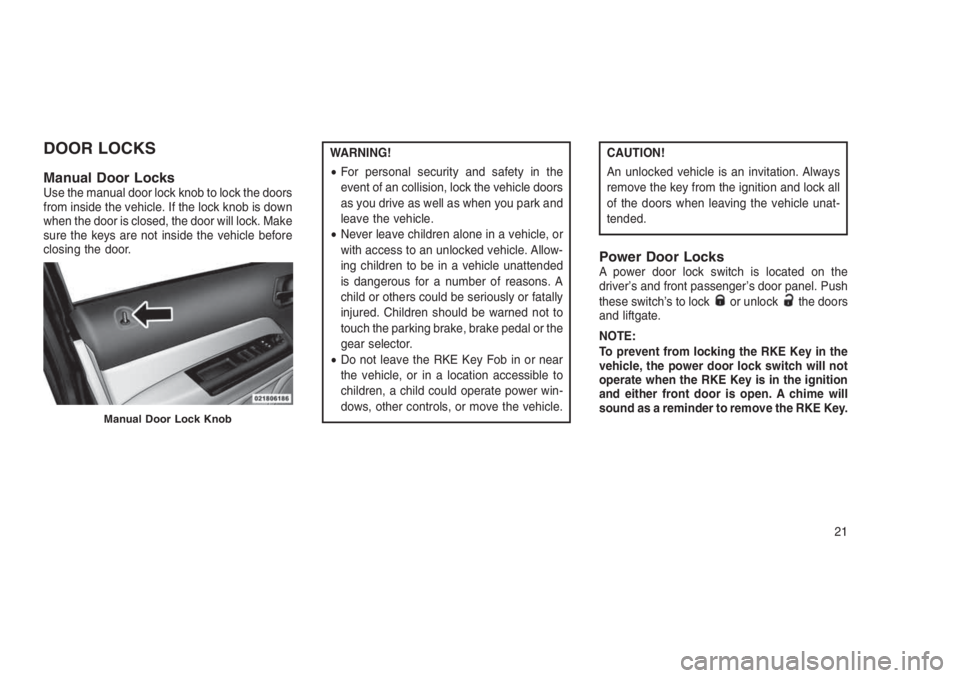
Manual Door LocksUse the manual door lock knob to lock the doors
from inside the vehicle. If the lock knob is down
when the door is closed, the door will lock. Make
sure the keys are not inside the vehicle before
closing the door.
WARNING!
•For personal security and safety in the
event of an collision, lock the vehicle doors
as you drive as well as when you park and
leave the vehicle.
•Never leave children alone in a vehicle, or
with access to an unlocked vehicle. Allow-
ing children to be in a vehicle unattended
is dangerous for a number of reasons. A
child or others could be seriously or fatally
injured. Children should be warned not to
touch the parking brake, brake pedal or the
gear selector.
•Do not leave the RKE Key Fob in or near
the vehicle, or in a location accessible to
children, a child could operate power win-
dows, other controls, or move the vehicle.CAUTION!
An unlocked vehicle is an invitation. Always
remove the key from the ignition and lock all
of the doors when leaving the vehicle unat-
tended.
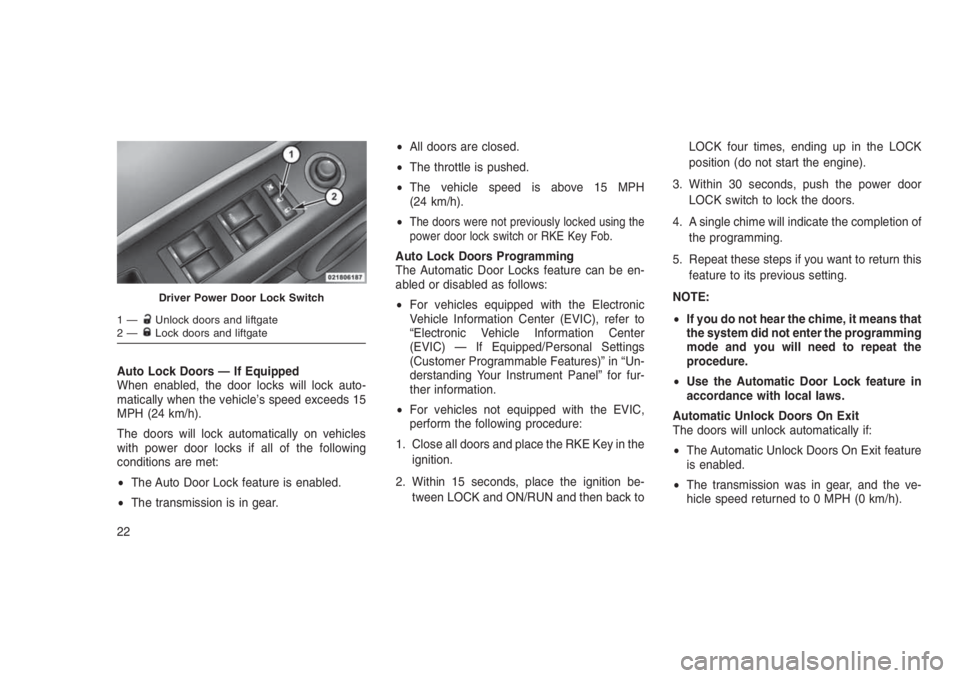
Power Door LocksA power door lock switch is located on the
driver’s and front passenger’s door panel. Push
these switch’s to lock
or unlockthe doors
and liftgate.
NOTE:
To prevent from locking the RKE Key in the
vehicle, the power door lock switch will not
operate when the RKE Key is in the ignition
and either front door is open. A chime will
sound as a reminder to remove the RKE Key.
Manual Door Lock Knob
21
Page 26 of 332
Auto Lock Doors — If Equipped
When enabled, the door locks will lock auto-
matically when the vehicle’s speed exceeds 15
MPH (24 km/h).
The doors will lock automatically on vehicles
with power door locks if all of the following
conditions are met:
•The Auto Door Lock feature is enabled.
•The transmission is in gear.•All doors are closed.
•The throttle is pushed.
•The vehicle speed is above 15 MPH
(24 km/h).
•
The doors were not previously locked using the
power door lock switch or RKE Key Fob.
Auto Lock Doors Programming
The Automatic Door Locks feature can be en-
abled or disabled as follows:
•For vehicles equipped with the Electronic
Vehicle Information Center (EVIC), refer to
“Electronic Vehicle Information Center
(EVIC) — If Equipped/Personal Settings
(Customer Programmable Features)” in “Un-
derstanding Your Instrument Panel” for fur-
ther information.
•For vehicles not equipped with the EVIC,
perform the following procedure:
1. Close all doors and place the RKE Key in the
ignition.
2. Within 15 seconds, place the ignition be-
tween LOCK and ON/RUN and then back toLOCK four times, ending up in the LOCK
position (do not start the engine).
3. Within 30 seconds, push the power door
LOCK switch to lock the doors.
4. A single chime will indicate the completion of
the programming.
5. Repeat these steps if you want to return this
feature to its previous setting.
NOTE:
•If you do not hear the chime, it means that
the system did not enter the programming
mode and you will need to repeat the
procedure.
•Use the Automatic Door Lock feature in
accordance with local laws.
Automatic Unlock Doors On Exit
The doors will unlock automatically if:
•The Automatic Unlock Doors On Exit feature
is enabled.
•The transmission was in gear, and the ve-
hicle speed returned to 0 MPH (0 km/h).
Driver Power Door Lock Switch
1—Unlock doors and liftgate
2—Lock doors and liftgate
22
Page 27 of 332
•The transmission is in NEUTRAL or PARK.
•The driver’s door is opened.
•The doors were not previously unlocked.
Automatic Unlock Doors On Exit
Programming
The Automatic Unlock Doors On Exit feature
can be enabled or disabled as follows:
•For vehicles equipped with the EVIC, refer to
“Electronic Vehicle Information Center
(EVIC) — If Equipped/Personal Settings
(Customer-Programmable Features)” in “Un-
derstanding Your Instrument Panel” for fur-
ther information.
•For vehicles not equipped with the EVIC,
perform the following procedure:
1. Close all doors and place the RKE Key in the
ignition.
2. Within 15 seconds, place the ignition be-
tween LOCK and ON/RUN and then back to
LOCK five times, ending up in the ON/RUN
position (do not start the engine).3. Within 30 seconds, push the power door
UNLOCK switch to unlock the doors.
4. A single chime will indicate the completion of
the programming.
5. Repeat these steps if you want to return this
feature to its previous setting.
NOTE:
•If you do not hear the chime, it means that
the system did not enter the programming
mode and you will need to repeat the
procedure.
•Use the Automatic Unlock Doors On Exit
feature in accordance with local laws.
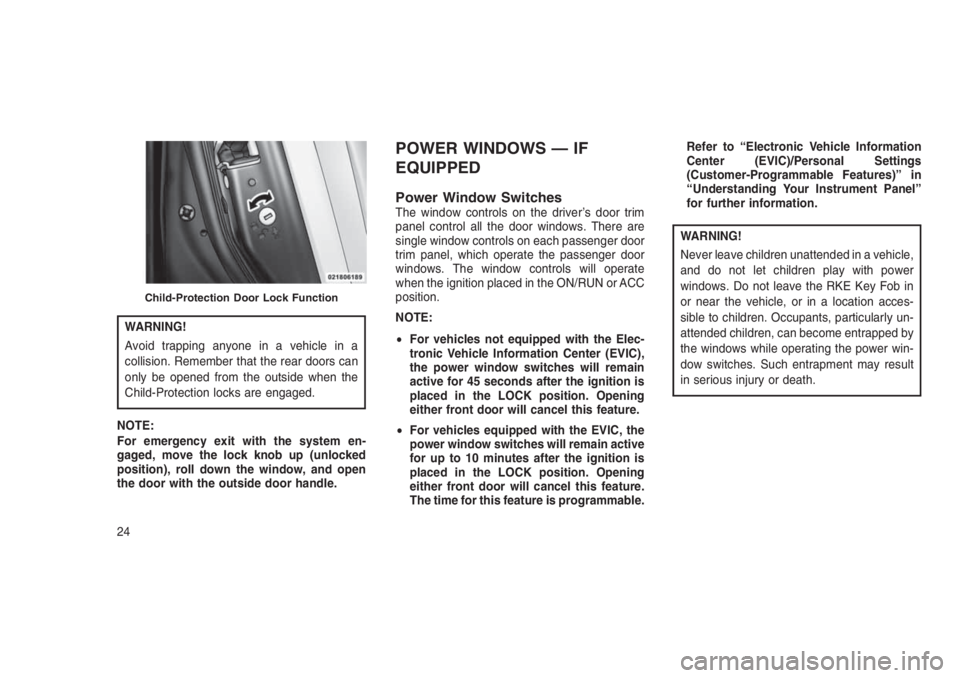
Child-Protection Door Lock System
— Rear Doors
To provide a safer environment for small chil-
dren riding in the rear seats, the rear doors are
equipped with Child-Protection Door Lock sys-
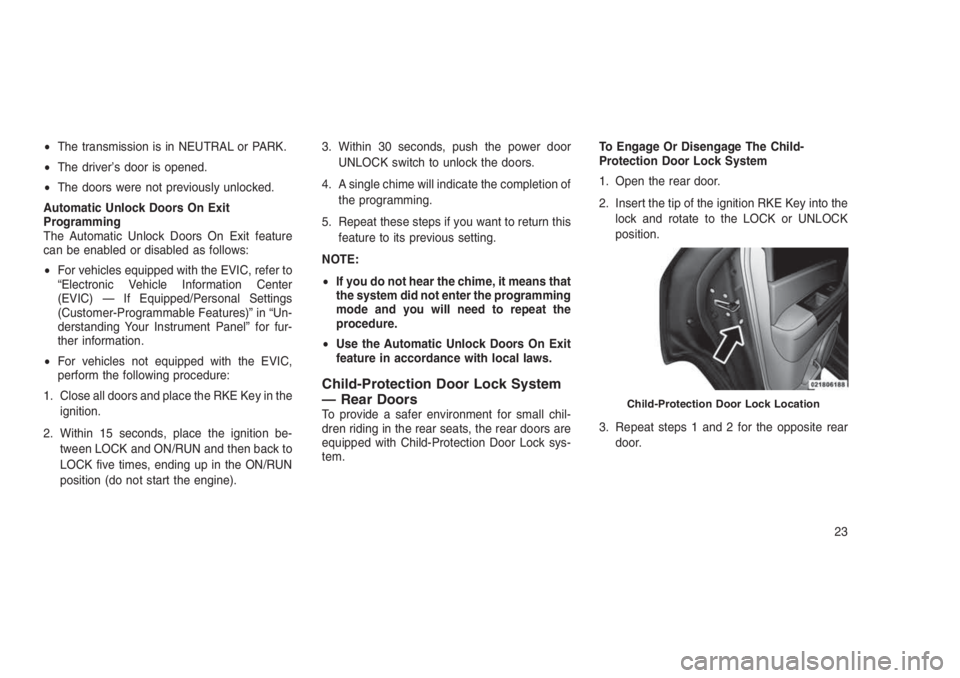
tem.To Engage Or Disengage The Child-
Protection Door Lock System
1. Open the rear door.
2. Insert the tip of the ignition RKE Key into the
lock and rotate to the LOCK or UNLOCK
position.
3. Repeat steps 1 and 2 for the opposite rear
door.Child-Protection Door Lock Location
23
Page 28 of 332
WARNING!
Avoid trapping anyone in a vehicle in a
collision. Remember that the rear doors can
only be opened from the outside when the
Child-Protection locks are engaged.
NOTE:
For emergency exit with the system en-
gaged, move the lock knob up (unlocked
position), roll down the window, and open
the door with the outside door handle.
POWER WINDOWS — IF
EQUIPPED
Power Window SwitchesThe window controls on the driver’s door trim
panel control all the door windows. There are
single window controls on each passenger door
trim panel, which operate the passenger door
windows. The window controls will operate
when the ignition placed in the ON/RUN or ACC
position.
NOTE:
•For vehicles not equipped with the Elec-
tronic Vehicle Information Center (EVIC),
the power window switches will remain
active for 45 seconds after the ignition is
placed in the LOCK position. Opening
either front door will cancel this feature.
•For vehicles equipped with the EVIC, the
power window switches will remain active
for up to 10 minutes after the ignition is
placed in the LOCK position. Opening
either front door will cancel this feature.
The time for this feature is programmable.Refer to “Electronic Vehicle Information
Center (EVIC)/Personal Settings
(Customer-Programmable Features)” in
“Understanding Your Instrument Panel”
for further information.
WARNING!
Never leave children unattended in a vehicle,
and do not let children play with power
windows. Do not leave the RKE Key Fob in
or near the vehicle, or in a location acces-
sible to children. Occupants, particularly un-
attended children, can become entrapped by
the windows while operating the power win-
dow switches. Such entrapment may result
in serious injury or death.
Child-Protection Door Lock Function
24
Page 29 of 332
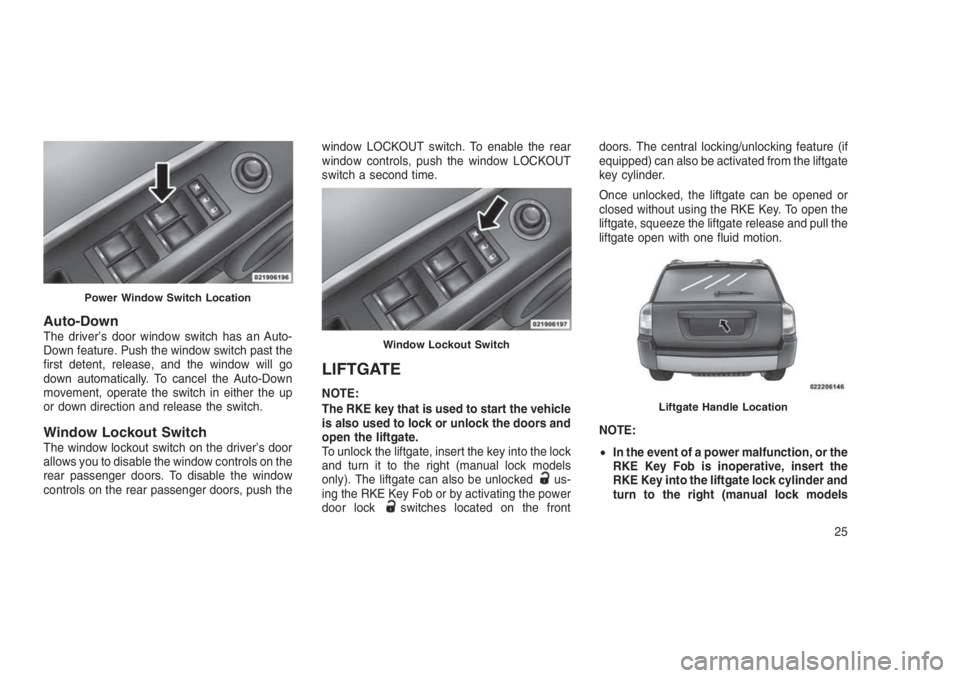
Auto-DownThe driver’s door window switch has an Auto-
Down feature. Push the window switch past the
first detent, release, and the window will go
down automatically. To cancel the Auto-Down
movement, operate the switch in either the up
or down direction and release the switch.
Window Lockout SwitchThe window lockout switch on the driver’s door
allows you to disable the window controls on the
rear passenger doors. To disable the window
controls on the rear passenger doors, push thewindow LOCKOUT switch. To enable the rear
window controls, push the window LOCKOUT
switch a second time.
LIFTGATE
NOTE:
The RKE key that is used to start the vehicle
is also used to lock or unlock the doors and
open the liftgate.
To unlock the liftgate, insert the key into the lock
and turn it to the right (manual lock models
only). The liftgate can also be unlocked
us-
ing the RKE Key Fob or by activating the power
door lock
switches located on the frontdoors. The central locking/unlocking feature (if
equipped) can also be activated from the liftgate
key cylinder.
Once unlocked, the liftgate can be opened or
closed without using the RKE Key. To open the
liftgate, squeeze the liftgate release and pull the
liftgate open with one fluid motion.
NOTE:
•In the event of a power malfunction, or the
RKE Key Fob is inoperative, insert the
RKE Key into the liftgate lock cylinder and
turn to the right (manual lock models
Power Window Switch Location
Window Lockout Switch
Liftgate Handle Location
25
Page 54 of 332
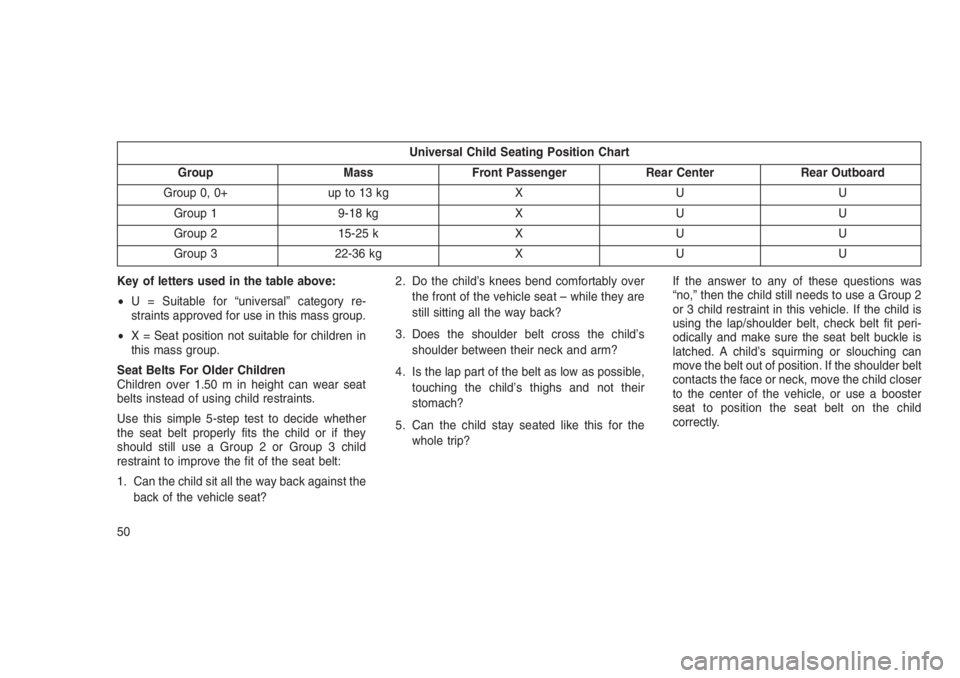
Universal Child Seating Position Chart
Group Mass Front Passenger Rear Center Rear Outboard
Group 0, 0+ up to 13 kg X U U
Group 1 9-18 kg X U U
Group 2 15-25 k X U U
Group 3 22-36 kg X U U
Key of letters used in the table above:
•U = Suitable for “universal” category re-
straints approved for use in this mass group.
•X = Seat position not suitable for children in
this mass group.
Seat Belts For Older Children
Children over 1.50 m in height can wear seat
belts instead of using child restraints.
Use this simple 5-step test to decide whether
the seat belt properly fits the child or if they
should still use a Group 2 or Group 3 child
restraint to improve the fit of the seat belt:
1. Can the child sit all the way back against the
back of the vehicle seat?2. Do the child’s knees bend comfortably over
the front of the vehicle seat – while they are
still sitting all the way back?
3. Does the shoulder belt cross the child’s
shoulder between their neck and arm?
4. Is the lap part of the belt as low as possible,
touching the child’s thighs and not their
stomach?
5. Can the child stay seated like this for the
whole trip?If the answer to any of these questions was
“no,” then the child still needs to use a Group 2
or 3 child restraint in this vehicle. If the child is
using the lap/shoulder belt, check belt fit peri-
odically and make sure the seat belt buckle is
latched. A child’s squirming or slouching can
move the belt out of position. If the shoulder belt
contacts the face or neck, move the child closer
to the center of the vehicle, or use a booster
seat to position the seat belt on the child
correctly.
50
Page 58 of 332
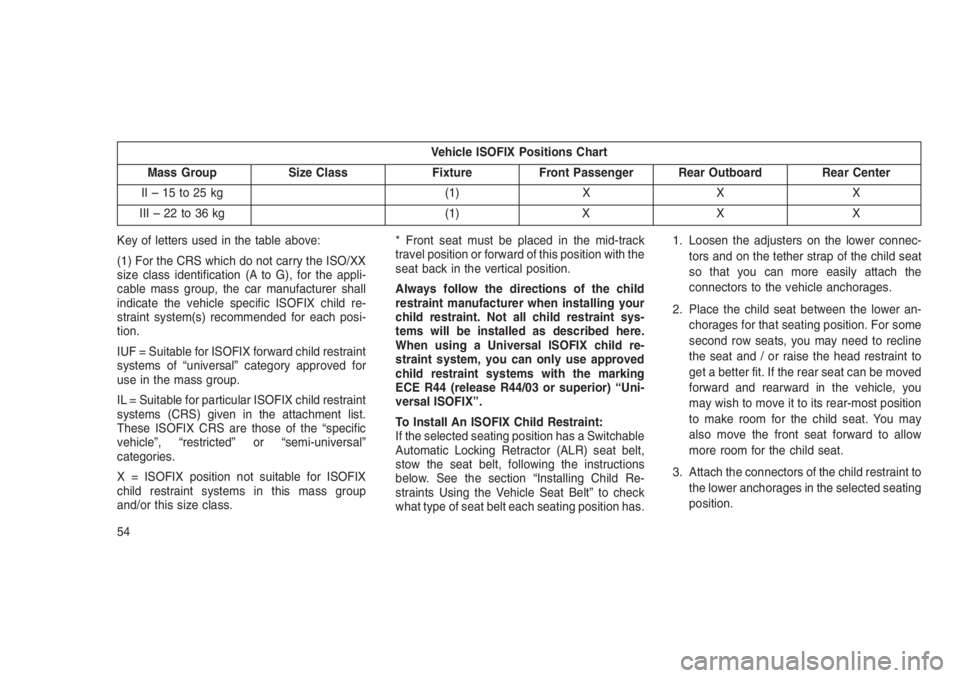
Vehicle ISOFIX Positions Chart
Mass Group Size Class Fixture Front Passenger Rear Outboard Rear Center
II–15to25kg (1) X X X
III–22to36kg (1) X X X
Key of letters used in the table above:
(1) For the CRS which do not carry the ISO/XX
size class identification (A to G), for the appli-
cable mass group, the car manufacturer shall
indicate the vehicle specific ISOFIX child re-
straint system(s) recommended for each posi-
tion.
IUF = Suitable for ISOFIX forward child restraint
systems of “universal” category approved for
use in the mass group.
IL = Suitable for particular ISOFIX child restraint
systems (CRS) given in the attachment list.
These ISOFIX CRS are those of the “specific
vehicle”, “restricted” or “semi-universal”
categories.
X = ISOFIX position not suitable for ISOFIX
child restraint systems in this mass group
and/or this size class.* Front seat must be placed in the mid-track
travel position or forward of this position with the
seat back in the vertical position.
Always follow the directions of the child
restraint manufacturer when installing your
child restraint. Not all child restraint sys-
tems will be installed as described here.
When using a Universal ISOFIX child re-
straint system, you can only use approved
child restraint systems with the marking
ECE R44 (release R44/03 or superior) “Uni-
versal ISOFIX”.
To Install An ISOFIX Child Restraint:
If the selected seating position has a Switchable
Automatic Locking Retractor (ALR) seat belt,
stow the seat belt, following the instructions
below. See the section “Installing Child Re-
straints Using the Vehicle Seat Belt” to check
what type of seat belt each seating position has.1. Loosen the adjusters on the lower connec-
tors and on the tether strap of the child seat
so that you can more easily attach the
connectors to the vehicle anchorages.
2. Place the child seat between the lower an-
chorages for that seating position. For some
second row seats, you may need to recline
the seat and / or raise the head restraint to
get a better fit. If the rear seat can be moved
forward and rearward in the vehicle, you
may wish to move it to its rear-most position
to make room for the child seat. You may
also move the front seat forward to allow
more room for the child seat.
3. Attach the connectors of the child restraint to
the lower anchorages in the selected seating
position.
54
Page 78 of 332
•After the “Ready” prompt and the following
beep, say the name of the language you wish
to switch to (English, Dutch, French, Ger-
man, Italian, or Spanish, if so equipped).
•Continue to follow the system prompts to
complete the language selection.
After selecting one of the languages, all
prompts and voice commands will be in that
language.
Emergency Assistance
If you are in an emergency and the mobile
phone is reachable:
•Pick up the phone and manually dial the
emergency number for your area.
If the phone is not reachable and the Uconnect
Phone is operational, you may reach the emer-
gency number as follows:
•Push the Phone
button to begin.
•After the “Ready” prompt and the following
beep, say “Emergency” and the Uconnect
Phone will instruct the paired mobile phone
to call the emergency number.NOTE:
•The default number is 112. The number
dialed may not be applicable with the
available mobile service and area.
•If supported, this number may be pro-
grammable on some systems. To do this,
push the Phone
button and say
“Setup,” followed by “Emergency.”
•The Uconnect Phone does slightly lower
your chances of successfully making a
phone call as to that for the mobile phone
directly.
WARNING!
To use your Uconnect Phone System in an
emergency, your mobile phone must be:
•Turned on.
•Paired to the Uconnect System.
•Have network coverage.
Breakdown Service — If Equipped
If you need Breakdown service:
1. Push the Phone
button to begin.2. After the “Ready” prompt and the following
beep, say “Breakdown service.”
NOTE:
The Breakdown service number has to be
setup before using. To setup, push the
Phone
button and say “Setup, Break-
down Service” and follow prompts.
Paging
To learn how to page, refer to “Working with
Automated Systems.” Paging works properly
except for pagers of certain companies, which
time out a little too soon to work properly with
the Uconnect Phone.
Voice Mail Calling
To learn how to access your voice mail, refer to
“Working with Automated Systems.”
Working With Automated Systems
This method is used in instances where one
generally has to push numbers on the mobile
phone keypad while navigating through an au-
tomated telephone system.
You can use your Uconnect Phone to access a
voice mail system or an automated service,
such as a paging service or automated cus-
74
Page 79 of 332
tomer service line. Some services require im-
mediate response selection. In some instances,
that may be too quick for use of the Uconnect
Phone.
When calling a number with your Uconnect
Phone that normally requires you to enter in a
touch-tone sequence on your mobile phone
keypad, you can push the Voice Command
button and say the sequence you wish to
enter, followed by the word “Send.” For ex-
ample, if required to enter your PIN followed
with a pound, (3746#),youcanpush the
Voice Command
button and say, “3746#
Send.” Saying a number, or sequence of num-
bers, followed by “Send,” is also to be used for
navigating through an automated customer ser-
vice center menu structure, and to leave a
number on a pager.
You can also send stored Uconnect phonebook
entries as tones for fast and easy access to
voice mail and pager entries. To use this fea-
ture, dial the number you wish to call and then
push the Voice Command
button and say
“Send.” The system will prompt you to enter the
name or number and say the name of the
phonebook entry you wish to send. TheUconnect Phone will then send the correspond-
ing phone number associated with the phone-
book entry, as tones over the phone.
NOTE:
•You may not hear all of the tones due to
mobile phone network configurations.
This is normal.
•Some paging and voice mail systems
have system time out settings that are too
short and may not allow the use of this
feature.
Barge In — Overriding Prompts
The “Voice Command” button can be used
when you wish to skip part of a prompt and
issue your voice command immediately. For
example, if a prompt is asking “Would you like to
pair a phone, clear a...,” you could push the
Voice Command
button and say, “Pair a
Phone” to select that option without having to
listen to the rest of the voice prompt.Turning Confirmation Prompts ON/OFF
Turning confirmation prompts off will stop the
system from confirming your choices (e.g., the
Uconnect Phone will not repeat a phone num-
ber before you dial it).
1. Push the Phone
button to begin.
2. After the “Ready” prompt and the following
beep, say one of the following:
•“Setup Confirmation Prompts On”
•“Setup Confirmation Prompts Off”
Phone And Network Status Indicators
If available on the radio and/or on a premium
display such as the instrument panel cluster,
and supported by your mobile phone, the
Uconnect Phone will provide notification to in-
form you of your phone and network status
when you are attempting to make a phone call
using Uconnect Phone. The status is given for
network signal strength, phone battery strength,
etc.
75