service JEEP PATRIOT 2021 Owner handbook (in English)
[x] Cancel search | Manufacturer: JEEP, Model Year: 2021, Model line: PATRIOT, Model: JEEP PATRIOT 2021Pages: 332, PDF Size: 1.99 MB
Page 8 of 332
INTRODUCTION
Congratulations on selecting your new FCA US
LLC vehicle. Be assured that it represents pre-
cision workmanship, distinctive styling, and high
quality - all essentials that are traditional to our
vehicles.
Before you start to drive this vehicle, read this
Owner’s Manual and all the supplements. Be
sure you are familiar with all vehicle controls,
particularly those used for braking, steering,
and transmission shifting. Learn how your ve-
hicle handles on different road surfaces. Your
driving skills will improve with experience, but
as in driving any vehicle, take it easy as you
begin. Always observe local laws wherever you
drive.
NOTE:
After reviewing the owner information, it
should be stored in the vehicle for conve-
nient referencing and remain with the ve-
hicle when sold.
Failure to operate this vehicle correctly may
result in loss of control or a collision.Operating this vehicle at excessive speeds or
while intoxicated may result in loss of control,
collision with other vehicles or objects, going off
the road, or overturning; any of which may lead
to serious injury or death. Also, failure to use
seat belts subjects the driver and passengers to
a greater risk of injury or death.
To keep your vehicle running at its best, have
your vehicle serviced at recommended intervals
by an authorized dealer who has the qualified
personnel, special tools, and equipment to per-
form all service.
The manufacturer and its distributors are vitally
interested in your complete satisfaction with this
vehicle. If you encounter a service or warranty
problem, which is not resolved to your satisfac-
tion, discuss the matter with your authorized
dealer’s management.
Your authorized dealer will be happy to assist
you with any questions about your vehicle.
ROLLOVER WARNING
Utility vehicles have a significantly higher roll-
over rate than other types of vehicles. This
vehicle has a higher ground clearance and a
higher center of gravity than many passenger
vehicles. It is capable of performing better in a
wide variety of off-road applications. Driven in
an unsafe manner, all vehicles can go out of
control. Because of the higher center of gravity,
if this vehicle is out of control it may roll over
when some other vehicles may not.
Do not attempt sharp turns, abrupt maneuvers,
or other unsafe driving actions that can cause
loss of vehicle control. Failure to operate this
vehicle safely may result in a collision, rollover
of the vehicle, and severe or fatal injury. Drive
carefully.
4
Page 9 of 332
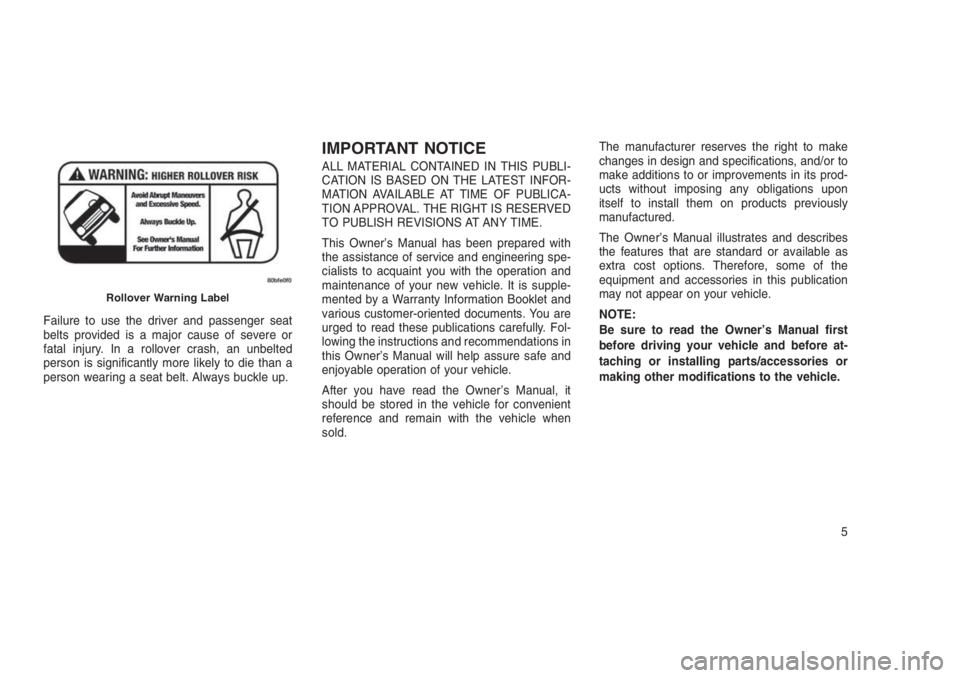
Failure to use the driver and passenger seat
belts provided is a major cause of severe or
fatal injury. In a rollover crash, an unbelted
person is significantly more likely to die than a
person wearing a seat belt. Always buckle up.
IMPORTANT NOTICE
ALL MATERIAL CONTAINED IN THIS PUBLI-
CATION IS BASED ON THE LATEST INFOR-
MATION AVAILABLE AT TIME OF PUBLICA-
TION APPROVAL. THE RIGHT IS RESERVED
TO PUBLISH REVISIONS AT ANY TIME.
This Owner’s Manual has been prepared with
the assistance of service and engineering spe-
cialists to acquaint you with the operation and
maintenance of your new vehicle. It is supple-
mented by a Warranty Information Booklet and
various customer-oriented documents. You are
urged to read these publications carefully. Fol-
lowing the instructions and recommendations in
this Owner’s Manual will help assure safe and
enjoyable operation of your vehicle.
After you have read the Owner’s Manual, it
should be stored in the vehicle for convenient
reference and remain with the vehicle when
sold.The manufacturer reserves the right to make
changes in design and specifications, and/or to
make additions to or improvements in its prod-
ucts without imposing any obligations upon
itself to install them on products previously
manufactured.
The Owner’s Manual illustrates and describes
the features that are standard or available as
extra cost options. Therefore, some of the
equipment and accessories in this publication
may not appear on your vehicle.
NOTE:
Be sure to read the Owner’s Manual first
before driving your vehicle and before at-
taching or installing parts/accessories or
making other modifications to the vehicle.
Rollover Warning Label
5
Page 16 of 332
A WORD ABOUT YOUR KEYS
The authorized dealer that sold you your new
vehicle has the key code numbers for your
vehicle locks. These numbers can be used to
order duplicate RKE Key Fobs. Ask your autho-
rized dealer for these numbers and keep them
in a safe place.
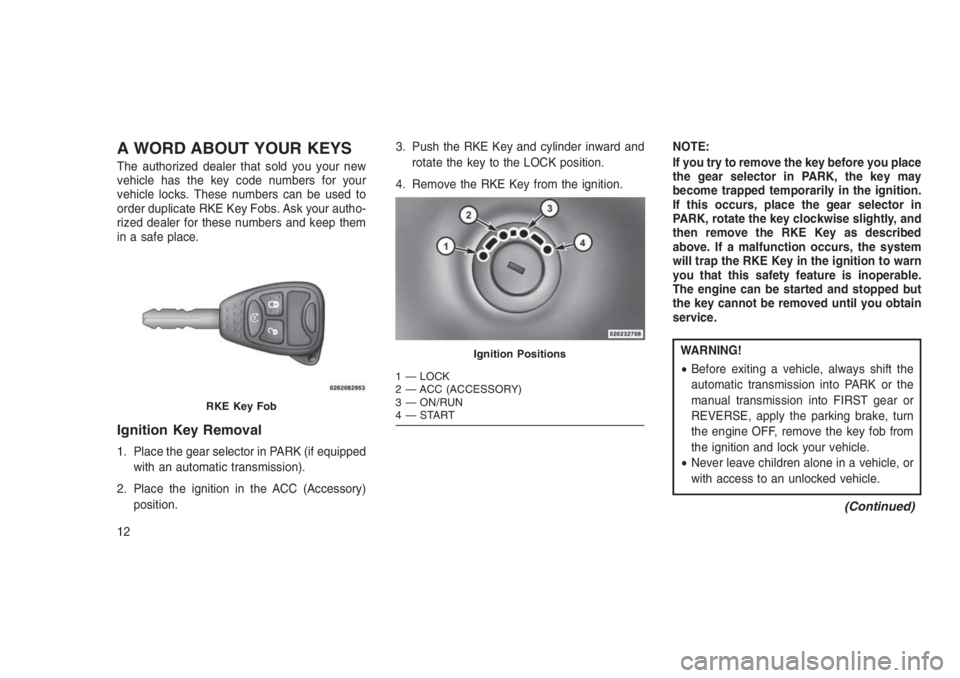
Ignition Key Removal
1. Place the gear selector in PARK (if equipped
with an automatic transmission).
2. Place the ignition in the ACC (Accessory)
position.3. Push the RKE Key and cylinder inward and
rotate the key to the LOCK position.
4. Remove the RKE Key from the ignition.NOTE:
If you try to remove the key before you place
the gear selector in PARK, the key may
become trapped temporarily in the ignition.
If this occurs, place the gear selector in
PARK, rotate the key clockwise slightly, and
then remove the RKE Key as described
above. If a malfunction occurs, the system
will trap the RKE Key in the ignition to warn
you that this safety feature is inoperable.
The engine can be started and stopped but
the key cannot be removed until you obtain
service.
WARNING!
•Before exiting a vehicle, always shift the
automatic transmission into PARK or the
manual transmission into FIRST gear or
REVERSE, apply the parking brake, turn
the engine OFF, remove the key fob from
the ignition and lock your vehicle.
•Never leave children alone in a vehicle, or
with access to an unlocked vehicle.
(Continued)
RKE Key Fob
Ignition Positions
1 — LOCK
2 — ACC (ACCESSORY)
3 — ON/RUN
4—START
12
Page 18 of 332
check. If the light remains on after the bulb
check, it indicates that there is a problem with
the electronics. In addition, if the light begins to
flash after the bulb check, it indicates that
someone used an invalid RKE Key Fob to start
the engine. Either of these conditions will result
in the engine being shut off after two seconds.
If the Vehicle Security Light turns on during
normal vehicle operation (vehicle running for
longer than 10 seconds), it indicates that there
is a fault in the electronics. Should this occur,
have the vehicle serviced as soon as possible
by an authorized dealer.
CAUTION!
The Sentry Key Immobilizer system is not
compatible with some aftermarket remote
starting systems. Use of these systems may
result in vehicle starting problems and loss of
security protection.
All of the RKE Key Fobs provided with your new
vehicle have been programmed to the vehicleelectronics. See your authorized dealer if you
require replacement or additional RKE Key
Fobs for your vehicle.
Replacement RKE Key Fobs
NOTE:
Only RKE Key Fobs that have been pro-
grammed to the vehicle electronics can be
used to start the vehicle. Once a Sentry Key
has been programmed to a vehicle, it cannot
be programmed to any other vehicle.
CAUTION!
Always remove the Sentry Keys from the
vehicle and lock all doors when leaving the
vehicle unattended.
Duplication of RKE Key Fobs consists of pro-
gramming a blank key to the vehicle electronics.
A blank RKE Key Fob is one which has never
been programmed. See your authorized dealer
if you require replacement or additional RKE
Key Fobs for your vehicle.NOTE:
When having the Sentry Key Immobilizer
System serviced, bring all vehicle keys with
you to an authorized dealer.
Customer RKE Key Fob
Programming
See your authorized dealer if you require re-
placement or additional RKE Key Fobs for your
vehicle.
VEHICLE SECURITY ALARM —
IF EQUIPPED
The Vehicle Security Alarm monitors the doors,
hood, liftgate, and ignition switch for unauthor-
ized operation.
If something triggers the Vehicle Security Alarm
the horn will sound for 29 seconds and turn off
all of the visual signals after an additional 31
seconds. If the triggering device is not deacti-
vated, the horn will sound again after a five
second delay for another 30 seconds. If the
trigger remains present, this cycle will repeat for
up to five minutes.
14
Page 39 of 332
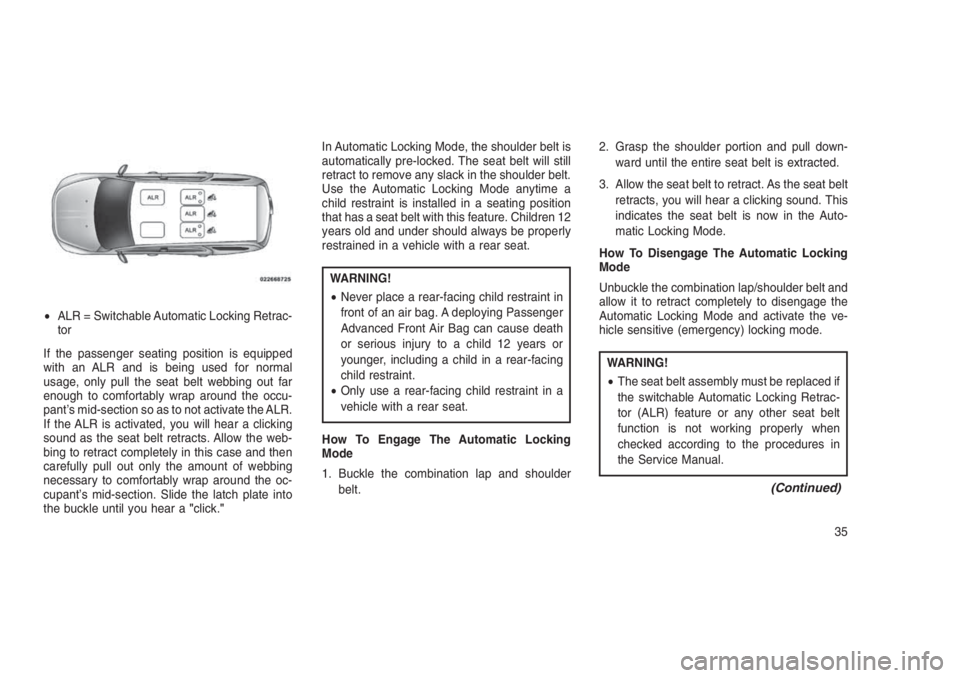
If the passenger seating position is equipped
with an ALR and is being used for normal
usage, only pull the seat belt webbing out far
enough to comfortably wrap around the occu-
pant’s mid-section so as to not activate the ALR.
If the ALR is activated, you will hear a clicking
sound as the seat belt retracts. Allow the web-
bing to retract completely in this case and then
carefully pull out only the amount of webbing
necessary to comfortably wrap around the oc-
cupant’s mid-section. Slide the latch plate into
the buckle until you hear a"click."In Automatic Locking Mode, the shoulder belt is
automatically pre-locked. The seat belt will still
retract to remove any slack in the shoulder belt.
Use the Automatic Locking Mode anytime a
child restraint is installed in a seating position
that has a seat belt with this feature. Children 12
years old and under should always be properly
restrained in a vehicle with a rear seat.
WARNING!
•Never place a rear-facing child restraint in
front of an air bag. A deploying Passenger
Advanced Front Air Bag can cause death
or serious injury to a child 12 years or
younger, including a child in a rear-facing
child restraint.
•Only use a rear-facing child restraint in a
vehicle with a rear seat.
How To Engage The Automatic Locking
Mode
1. Buckle the combination lap and shoulder
belt.2. Grasp the shoulder portion and pull down-
ward until the entire seat belt is extracted.
3. Allow the seat belt to retract. As the seat belt
retracts, you will hear a clicking sound. This
indicates the seat belt is now in the Auto-
matic Locking Mode.
How To Disengage The Automatic Locking
Mode
Unbuckle the combination lap/shoulder belt and
allow it to retract completely to disengage the
Automatic Locking Mode and activate the ve-
hicle sensitive (emergency) locking mode.
WARNING!
•The seat belt assembly must be replaced if
the switchable Automatic Locking Retrac-
tor (ALR) feature or any other seat belt
function is not working properly when
checked according to the procedures in
the Service Manual.
(Continued)
•ALR = Switchable Automatic Locking Retrac-
tor
35
Page 47 of 332
faster-developing event may deploy the seat
belt pretensioners as well as the Side Air Bags
on both sides of the vehicle. The rollover
sensing-system may also deploy the seat belt
pretensioners, with or without the Side Air Bags,
on both sides of the vehicle if the vehicle
experiences a near rollover event.
If A Deployment Occurs
The Advanced Front Air Bags are designed to
deflate immediately after deployment.
NOTE:
Front and/or side air bags will not deploy in
all collisions. This does not mean some-
thing is wrong with the air bag system.
If you do have a collision which deploys the air
bags, any or all of the following may occur:
•The air bag material may sometimes cause
abrasions and/or skin reddening to the occu-
pants as the air bags deploy and unfold. The
abrasions are similar to friction rope burns or
those you might get sliding along a carpet or
gymnasium floor. They are not caused by
contact with chemicals. They are not perma-
nent and normally heal quickly. However, ifyou haven’t healed significantly within a few
days, or if you have any blistering, see your
doctor immediately.
•As the air bags deflate, you may see some
smoke-like particles. The particles are a nor-
mal by-product of the process that generates
the non-toxic gas used for air bag inflation.
These airborne particles may irritate the skin,
eyes, nose, or throat. If you have skin or eye
irritation, rinse the area with cool water. For
nose or throat irritation, move to fresh air. If
the irritation continues, see your doctor. If
these particles settle on your clothing, follow
the garment manufacturer’s instructions for
cleaning.
Do not drive your vehicle after the air bags have
deployed. If you are involved in another colli-
sion, the air bags will not be in place to protect
you.
WARNING!
Deployed air bags and seat belt pretension-
ers cannot protect you in another collision.
(Continued)
WARNING!(Continued)
Have the air bags, seat belt pretensioners,
and the seat belt retractor assemblies re-
placed by an authorized dealer immediately.
Also, have the Occupant Restraint Controller
System serviced as well.
NOTE:
•Air bag covers may not be obvious in the
interior trim, but they will open during air
bag deployment.
•
After any collision, the vehicle should be
taken to an authorized dealer immediately.
Enhanced Accident Response System
In the event of an impact, if the communication
network remains intact, and the power remains
intact, depending on the nature of the event, the
ORC will determine whether to have the En-
hanced Accident Response System perform the
following functions:
•Cut off fuel to the engine.
43
Page 48 of 332
•Flash hazard lights as long as the battery has
power or until the hazard light button is
pressed. The hazard lights can be deacti-
vated by pressing the hazard light button.
•Turn on the interior lights, which remain on as
long as the battery has power.
•Unlock the power door locks.
Enhanced Accident Response System
Reset Procedure
In order to reset the Enhanced Accident Re-
sponse System functions after an event, the
ignition must be changed from the START or
ON/RUN position to the OFF position. Carefully
check the vehicle for fuel leaks in the engine
compartment and on the ground near the en-
gine compartment and fuel tank before resetting
the system and starting the engine.
Air Bag Warning Light
The air bags must be ready to
inflate for your protection in a colli-
sion. The Occupant Restraint Con-
troller (ORC) monitors the internal
circuits and interconnecting wiring
associated with air bag system electrical com-
ponents.The ORC monitors the readiness of the elec-
tronic parts of the air bag system whenever the
ignition is placed in the START or ON/RUN
position. If the ignition is in the OFF position or
in the ACC position, the air bag system is not on
and the air bags will not inflate.
The ORC contains a backup power supply
system that may deploy the air bags even if the
battery loses power or it becomes disconnected
prior to deployment.
The ORC turns on the Air Bag Warning Light in
the instrument panel for approximately four to
eight seconds for a self-check when the ignition
is first placed in the ON/RUN position. After the
self-check, the Air Bag Warning Light will turn
off. If the ORC detects a malfunction in any part
of the system, it turns on the Air Bag Warning
Light, either momentarily or continuously. A
single chime will sound to alert you if the light
comes on again after initial startup.
The ORC also includes diagnostics that will
illuminate the instrument panel Air Bag Warning
Light if a malfunction is detected that could
affect the air bag system. The diagnostics also
record the nature of the malfunction. While theair bag system is designed to be maintenance
free, if any of the following occurs, have an
authorized dealer service the air bag system
immediately.
•The Air Bag Warning Light does not come on
during the four to eight seconds when the
ignition is first placed in the ON/RUN posi-
tion.
•The Air Bag Warning Light remains on after
the four to eight-second interval.
•The Air Bag Warning Light comes on inter-
mittently or remains on while driving.
NOTE:
If the speedometer, tachometer, or any en-
gine related gauges are not working, the
Occupant Restraint Controller (ORC) may
also be disabled. In this condition the air
bags may not be ready to inflate for your
protection. Have an authorized dealer ser-
vice the air bag system immediately.
44
Page 49 of 332
WARNING!
Ignoring the Air Bag Warning Light in your
instrument panel could mean you won’t have
the air bags to protect you in a collision. If the
light does not come on as a bulb check when
the ignition is first turned on, stays on after
you start the vehicle, or if it comes on as you
drive, have an authorized dealer service the
air bag system immediately.
Maintaining Your Air Bag System
WARNING!
•Modifications to any part of the air bag
system could cause it to fail when you
need it. You could be injured if the air bag
system is not there to protect you. Do not
modify the components or wiring, including
adding any kind of badges or stickers to
the steering wheel hub trim cover or the
upper right side of the instrument panel.
(Continued)
WARNING!(Continued)
Do not modify the front bumper, vehicle
body structure, or add aftermarket side
steps or running boards.
•It is dangerous to try to repair any part of
the air bag system yourself. Be sure to tell
anyone who works on your vehicle that it
has an air bag system.
•
Do not attempt to modify any part of your air
bag system. The air bag may inflate acciden-
tally or may not function properly if modifica-
tions are made. Take your vehicle to an
authorized dealer for any air bag system
service. If your seat, including your trim
cover and cushion, needs to be serviced in
any way (including removal or loosening/
tightening of seat attachment bolts), take the
vehicle to your authorized dealer. Only
manufacturer approved seat accessories
may be used. If it is necessary to modify the
air bag system for persons with disabilities,
contact your authorized dealer.
Event Data Recorder (EDR)
This vehicle is equipped with an event data
recorder (EDR). The main purpose of an EDR is
to record, in certain crash or near crash-like
situations, such as an air bag deployment or
hitting a road obstacle, data that will assist in
understanding how a vehicle’s systems per-
formed. The EDR is designed to record data
related to vehicle dynamics and safety systems
for a short period of time, typically 30 seconds
or less. The EDR in this vehicle is designed to
record such data as:
•How various systems in your vehicle were
operating;
•Whether or not the driver and passenger
safety belts were buckled/fastened;
•How far (if at all) the driver was depressing
the accelerator and/or brake pedal; and,
•How fast the vehicle was traveling.
These data can help provide a better under-
standing of the circumstances in which crashes
and injuries occur.
45
Page 63 of 332
plete exhaust system and adjacent body areas
for broken, damaged, deteriorated, or misposi-
tioned parts. Open seams or loose connections
could permit exhaust fumes to seep into the
passenger compartment. In addition, inspect
the exhaust system each time the vehicle is
raised for lubrication or oil change. Replace as
required.
Safety Checks You Should Make
Inside The Vehicle
Seat Belts
Inspect the seat belt system periodically, check-
ing for cuts, frays, and loose parts. Damaged
parts must be replaced immediately. Do not
disassemble or modify the system.
Front seat belt assemblies must be replaced
after a collision. Rear seat belt assemblies must
be replaced after a collision if they have been
damaged (i.e., bent retractor, torn webbing,
etc.). If there is any question regarding seat belt
or retractor condition, replace the seat belt.
Air Bag Warning Light
The Air Bag warning light
will turn on for four
to eight seconds as a bulb check when theignition is first placed in the ON/RUN position. If
the light is either not on during starting, stays
on, or turns on while driving, have the system
inspected at an authorized dealer as soon as
possible. This light will illuminate with a single
chime when a fault with the Air Bag Warning
Light has been detected, it will stay on until the
fault is cleared. If the light comes on intermit-
tently or remains on while driving, have an
authorized dealer service the vehicle immedi-
ately. Refer to “Occupant Restraints” for further
information.
Defroster
Check operation by selecting the defrost mode
and place the blower control on high speed. You
should be able to feel the air directed against
the windshield. See your authorized dealer for
service if your defroster is inoperable.
Floor Mat Safety Information
Always use floor mats designed to fit the foot-
well of your vehicle. Use only floor mats that
leave the pedal area unobstructed and that are
firmly secured so that they cannot slip out of
position and interfere with the pedals or impair
safe operation of your vehicle in other ways.
WARNING!
Pedals that cannot move freely can cause
loss of vehicle control and increase the risk
of serious personal injury.
•Always make sure that floor mats are
properly attached to the floor mat fasten-
ers.
•Never place or install floor mats or other
floor coverings in the vehicle that cannot
be properly secured to prevent them from
moving and interfering with the pedals or
the ability to control the vehicle.
•Never put floor mats or other floor cover-
ings on top of already installed floor mats.
Additional floor mats and other coverings
will reduce the size of the pedal area and
interfere with the pedals.
•Check mounting of mats on a regular
basis. Always properly reinstall and secure
floor mats that have been removed for
cleaning.
(Continued)
59
Page 71 of 332
UCONNECT PHONE — IF
EQUIPPED
Uconnect Phone is a voice-activated, hands-
free, in-vehicle communications system.
Uconnect Phone allows you to dial a phone
number with your mobile phone using simple
voice commands (e.g., “Call”…“Mike”…
“Work” or “Dial”…“151-1234-5555”). Your mo-
bile phone’s audio is transmitted through your
vehicle’s audio system; the system will auto-
matically mute your radio when using the
Uconnect Phone.
NOTE:
The Uconnect Phone requires a mobile
phone equipped with the Bluetooth “Hands-
Free Profile”, Version 0.96 or higher. See the
Uconnect website for supported phones.
For Uconnect Customer Support visit
UconnectPhone.com.
Uconnect Phone allows you to transfer calls
between the system and your mobile phone as
you enter or exit your vehicle and enables you
to mute the system’s microphone for private
conversation.The Uconnect Phone is driven through your
Bluetooth “Hands-Free Profile” mobile phone.
Uconnect features Bluetooth technology - the
global standard that enables different electronic
devices to connect to each other without wires
or a docking station, so Uconnect Phone works
no matter where you stow your mobile phone
(be it your purse, pocket, or briefcase), as long
as your phone is turned on and has been paired
to the vehicle’s Uconnect Phone. The Uconnect
Phone allows up to seven mobile phones to be
linked to the system. Only one linked (or paired)
mobile phone can be used with the system at a
time. The system is available in many lan-
guages.
WARNING!
Any voice commanded system should be
used only in safe driving conditions following
all applicable laws, including laws regarding
phone use. Your attention should be focused
on safely operating the vehicle. Failure to do
so may result in a collision causing serious
injury or death.Uconnect Phone Button
The radio or steering wheel con-
trols (if equipped) will contain the
two control buttons (Uconnect
Phone
button and Voice Com-
mandbutton) that will enable
you to access the system. When you push the
button you will hear the word Uconnect followed
by a BEEP. The beep is your signal to give a
command.
Voice Command Button
Actual button location may vary
with the radio. The individual but-
tons are described in the “Opera-
tion” section.
The Uconnect Phone can be used with any
Hands-Free Profile certified Bluetooth mobile
phone. See the Uconnect website for supported
phones. Refer to your mobile service provider
or the phone manufacturer for details.
The Uconnect Phone is fully integrated with the
vehicle’s audio system. The volume of the
Uconnect Phone can be adjusted either from
67