engine JEEP RENEGADE 2014 1.G Workshop Manual
[x] Cancel search | Manufacturer: JEEP, Model Year: 2014, Model line: RENEGADE, Model: JEEP RENEGADE 2014 1.GPages: 212, PDF Size: 17.48 MB
Page 135 of 212
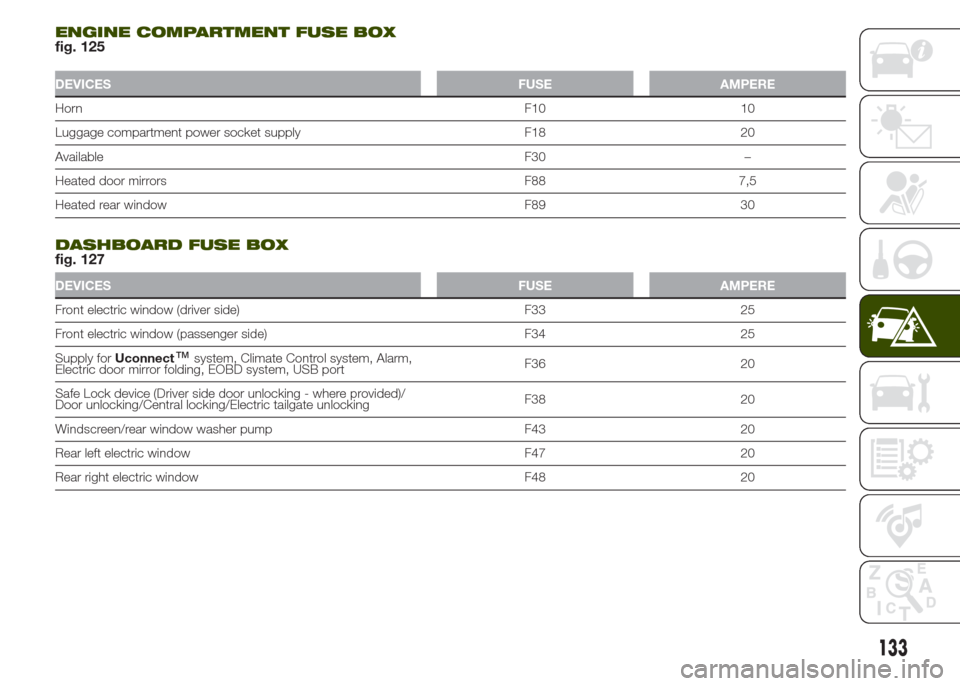
ENGINE COMPARTMENT FUSE BOXfig. 125
DEVICES FUSE AMPERE
HornF10 10
Luggage compartment power socket supply F18 20
AvailableF30 –
Heated door mirrors F88 7,5
Heated rear window F89 30
.
DASHBOARD FUSE BOXfig. 127
DEVICES FUSE AMPERE
Front electric window (driver side) F33 25
Front electric window (passenger side) F34 25
Supply forUconnect
™system, Climate Control system, Alarm,
Electric door mirror folding, EOBD system, USB portF36 20
Safe Lock device (Driver side door unlocking - where provided)/
Door unlocking/Central locking/Electric tailgate unlockingF38 20
Windscreen/rear window washer pump F43 20
Rear left electric window F47 20
Rear right electric window F48 20
133
Page 137 of 212
WARNING
136)If the fuse blows again contact a Jeep
Dealership.
137)Never replace a fuse with another with
a higher amp rating; DANGER OF FIRE.
138)If a general protection fuse (MAXI-
FUSE, MEGA-FUSE, MIDI-FUSE) blows,
contact a Jeep Dealership.
139)Before replacing a fuse, make sure
that the ignition device has been taken to
STOP, that the ignition key, if mechanical,
has been removed and that all the other
services are switched off and/or
deactivated.
140)Contact a Jeep Dealership if a safety
system (airbags, brakes), power unit
system (engine, gearbox) or steering
system general protection fuse blows.
WARNING
53)Never replace a fuse with metal wires
or anything else.
54)If it is necessary to wash the engine
compartment, take care not to directly hit
the junction unit and the window wiper
motors with the water jet.
CHANGING A WHEEL
141) 142) 143) 144) 145) 146) 147) 148)
CHANGING PROCEDURE
Proceed as follows:
❒stop the vehicle in a position that is
not dangerous for oncoming traffic
where you can change the wheel safely,
as far as possible from the side of the
road. The ground should be flat if
possible, and sufficiently firm;
❒engage the hazard warning lights and
the electric parking brake;
❒engage first gear or reverse or, for
versions with automatic transmission,
move the lever to position P (Park);
❒stop the engine and put on the
reflective safety jacket (for your own
safety and in compliance with national
laws) before getting out of the vehicle.
The engine must stay off while the
vehicle is raised from the ground.
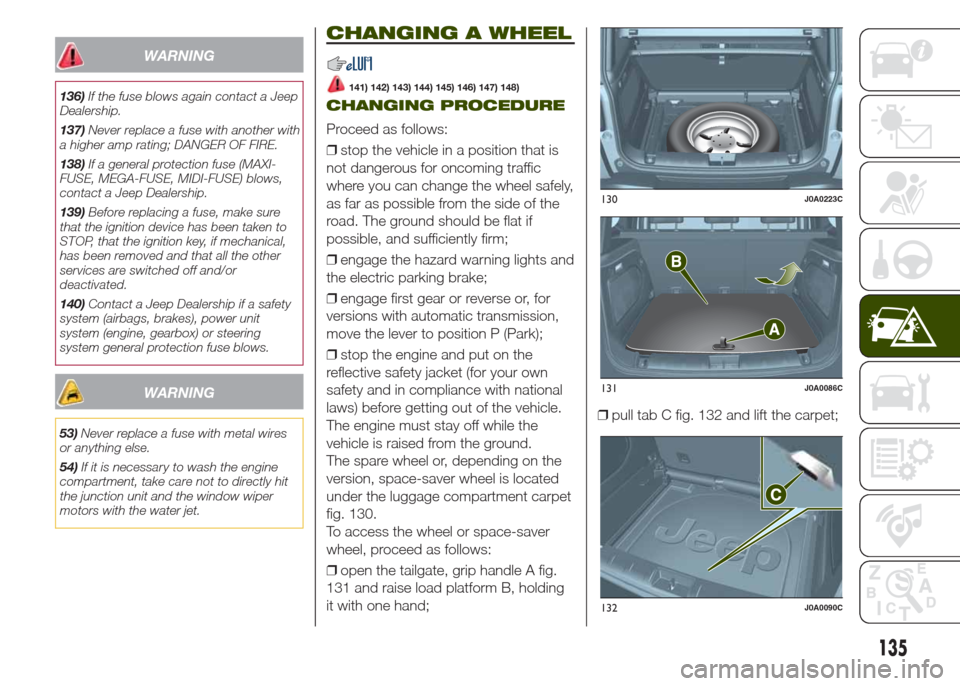
The spare wheel or, depending on the
version, space-saver wheel is located
under the luggage compartment carpet
fig. 130.
To access the wheel or space-saver
wheel, proceed as follows:
❒open the tailgate, grip handle A fig.
131 and raise load platform B, holding
it with one hand;❒pull tab C fig. 132 and lift the carpet;
130J0A0223C
131J0A0086C
132J0A0090C
135
Page 142 of 212
❒make sure that the switch for the
compressor is in position0(off), start
the engine, insert the plug into the
luggage compartment power socket or
on central tunnel and switch on the
compressor by bringing the switch to
positionI(on);
❒inflate the tyre to the pressure
indicated in the “Wheels” paragraph
(see “Technical data” chapter). In order
to obtain a more precise reading, check
the pressure value on pressure gauge
B with the compressor off;
❒if after five minutes it is still impossible
to reach at least 1.8 bar, disengage
the compressor from the valve and
power socket, then move the vehicle
forwards by approx. ten metres in order
to distribute the sealing fluid inside the
tyre evenly, then repeat the inflation
operation;
❒if after this operation you still cannot
reach at least 1.8 bar after 5 minutes
from switching on the compressor,
do not resume driving but contact a
Jeep Dealership;
❒after having driven for about 10
minutes, stop and re-check the tyre
pressure; remember to engage the
electric parking brake;❒if a pressure value of at least 1.8 bar
is detected, restore the correct
pressure (with engine running and
electric parking brake), resume driving
immediately and drive with great care to
a Jeep Dealership.
WARNING
149)Punctures on the sides of the tyre
may not be repaired. Do not use the TireKit
if the tyre is damaged due to travelling
when flat.
150)Wear the protective gloves provided
with the TireKit.
151)Apply the adhesive label where it can
be easily seen by the driver as a reminder
that the tyre has been treated with the
TireKit. Drive carefully, particularly on
bends. Do not exceed 80 km/h. Do not
accelerate or brake suddenly.
152)If the pressure has fallen below 1.8
bar, do not drive any further: the TireKit
cannot guarantee proper hold because the
tyre is too damaged. Contact a Jeep
Dealership.
153)You must always indicate that the tyre
was repaired using the TireKit. Give the
leaflet to the technicians who will be
handling the tyre that was treated using the
TireKit.
154)Repair is not possible if the wheel rim
is damaged (groove is deformed, causing
air to escape). Do not remove foreign
bodies (screws or nails) from the tyre.155)Do not operate the compressor for
longer than 20 minutes consecutively. Risk
of overheating. The TireKit is not suitable
for definitive repairs, so the repaired tyres
may only be used temporarily.
156)The bottle contains ethylene glycol
and latex: it may cause an allergic reaction.
It is harmful if swallowed. It is irritant for
the eyes. It may cause sensitisation if
inhaled or on contact. Avoid contact with
eyes, skin and clothes. In the case of
contact, wash immediately with plenty of
water. In the event that it is swallowed, do
not induce vomiting. Rinse out your mouth,
drink large quantities of water and seek
immediate medical attention. Keep out of
the reach of children. The product must
not be used by asthmatics. Do not inhale
the vapours during insertion and suction.
Call a doctor immediately if allergic
reactions are noted. Store the bottle in its
proper compartment, away from sources
of heat. The sealant fluid has an expiry
date. Replace the bottle containing
out-of-date sealant fluid.
WARNING
55)In the event of a puncture caused by
foreign bodies, the kit may be used to
repair tyres showing damages on the tread
or shoulder up to max. 4 mm diameter.
140
IN AN EMERGENCY
Page 144 of 212
❒connect the other end of the cable
used for positive (+) to the positive
terminal (+) of the auxiliary battery;
❒connect one end of the cable used
for negative (–) to the negative terminal
(–) of the auxiliary battery;
❒Connect the other end of the cable
used for negative (–) to an engine earth
(the visible metal part of the vehicle
engine with flat battery) away from the
battery and the fuel injection system;
❒start the vehicle engine with the
auxiliary battery, let it run for a
few minutes at idling. Start the engine
of the vehicle with flat battery.
Cable disconnection.
Once the engine has been started,
remove the cables proceeding as
follows:
❒disconnect the end of the cable used
for negative (–) from the engine earth
of the vehicle with flat battery;
❒disconnect the other end of the cable
used for negative (–) to the negative
terminal (–) of the auxiliary battery;
❒disconnect the end of the cable used
for positive (+) to the positive terminal
(+) of the auxiliary battery;
❒disconnect one end of the cable
used for positive (+) from the positive
terminal (+) of the vehicle with flat
battery;If it is often necessary to perform an
emergency starting, have the vehicle
battery and the recharging system
checked by a Jeep Dealership.
IMPORTANT Any accessories (e.g.
mobile phones, etc.) connected to the
vehicle current sockets, draw current
even if they are not used. These
devices, if left connected too much time
with engine off, may cause the battery
to drain with following reduction of
its life and/or failure to start the engine.
WARNING
157)Do not get too close to the radiator
cooling fan: the electric fan may start;
danger of injury. Pay attention to scarves,
ties and other loose clothing which might
be pulled by moving parts.
158)Remove any metal objects (e.g. rings,
watches, bracelets), that might cause an
accidental electrical contact and cause
serious injury.
159)Batteries contain acid which may burn
skin and eyes. Batteries produce
hydrogen, which is easily flammable and
explosive. Thus keep away flames or
devices which may cause sparks.
WARNING
56)Do not connect the cable to the
negative terminal (–) of the flat battery. The
following spark could lead to battery
explosion and cause serious harm. Only
use the specific earth point; do not use any
other exposed metallic part.
142
IN AN EMERGENCY
Page 145 of 212
FUEL CUT-OFF
SYSTEM
This intervenes in the case of an impact
causing:
❒the interruption of the fuel supply with
the engine consequently cutting out;
❒the automatic unlocking of the doors;
❒turning on of the lights inside the
vehicle;
❒deactivation of climate control system
ventilation;
❒switching on of the hazard warning
lights (to deactivate the lights press the
button on the dashboard).
On some versions, the intervention of
the system is indicated by a message
shown on the display. In the same way,
a dedicated message on the display
warns the driver if system operation is
compromised.
IMPORTANT Carefully check the vehicle
for fuel leaks, for instance in the engine
compartment, under the vehicle or
near the tank area. After a collision,
bring the ignition device to STOP to
prevent the battery from running down.
To restore correct operation of the
vehicle, carry out the following
procedure (this procedure must be
started and completed within less than
one minute):❒move the ignition device to MAR;
❒turn on the direction indicators on the
right, then on the left, then again on
the right and again on the left;
❒now deactivate the direction
indicators on the left;
❒bring the ignition device to STOP;
❒move the ignition device to MAR.
160)
WARNING
160)If, after an impact, you smell fuel or
notice leaks from the fuel system, do
not reactivate the system to avoid the risk
of fire.
AUTOMATIC
TRANSMISSION
GEAR LEVER
UNLOCKING
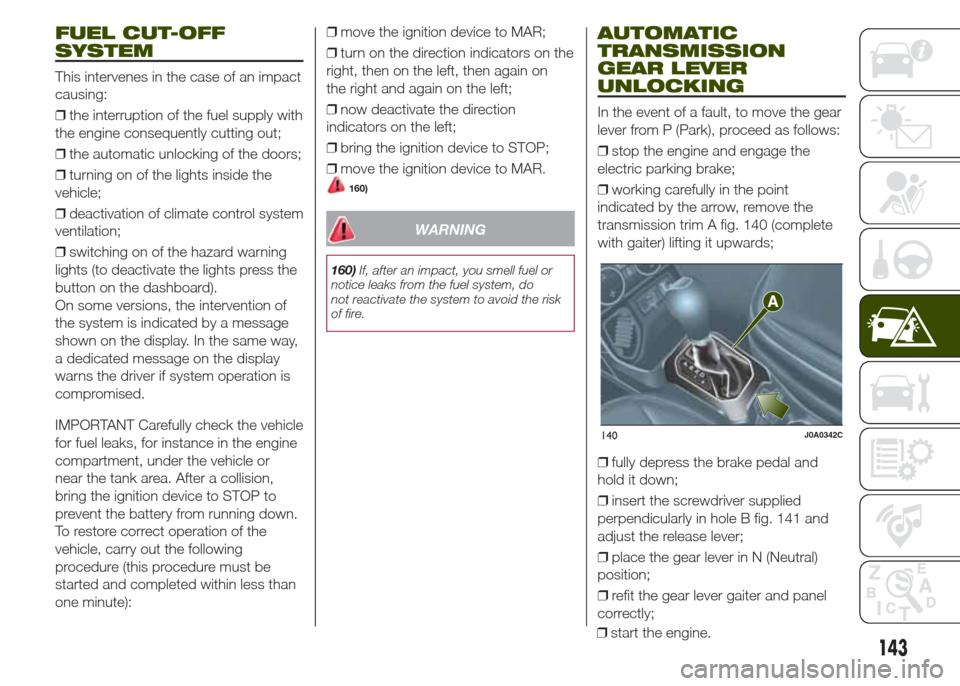
In the event of a fault, to move the gear
lever from P (Park), proceed as follows:
❒stop the engine and engage the
electric parking brake;
❒working carefully in the point
indicated by the arrow, remove the
transmission trim A fig. 140 (complete
with gaiter) lifting it upwards;
❒fully depress the brake pedal and
hold it down;
❒insert the screwdriver supplied
perpendicularly in hole B fig. 141 and
adjust the release lever;
❒place the gear lever in N (Neutral)
position;
❒refit the gear lever gaiter and panel
correctly;
140J0A0342C
143
❒start the engine.
Page 147 of 212
TOWING THE
VEHICLE
ATTACHING THE TOW
HOOK
161) 162) 163)
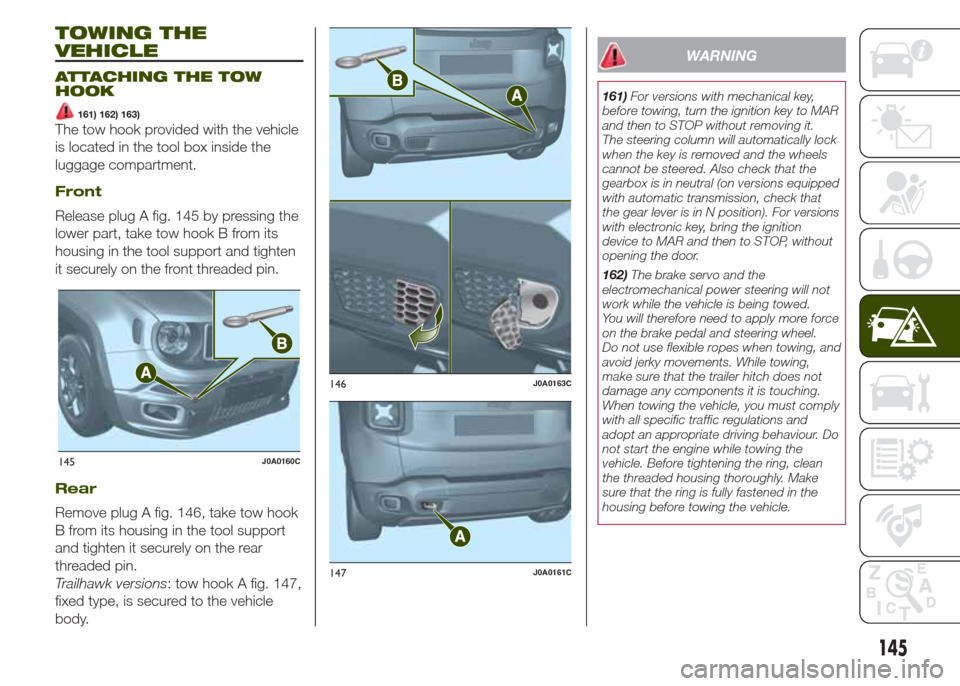
The tow hook provided with the vehicle
is located in the tool box inside the
luggage compartment.
Front
Release plug A fig. 145 by pressing the
lower part, take tow hook B from its
housing in the tool support and tighten
it securely on the front threaded pin.
Rear
Remove plug A fig. 146, take tow hook
B from its housing in the tool support
and tighten it securely on the rear
threaded pin.
Trailhawk versions: tow hook A fig. 147,
fixed type, is secured to the vehicle
body.
WARNING
161)For versions with mechanical key,
before towing, turn the ignition key to MAR
and then to STOP without removing it.
The steering column will automatically lock
when the key is removed and the wheels
cannot be steered. Also check that the
gearbox is in neutral (on versions equipped
with automatic transmission, check that
the gear lever is in N position). For versions
with electronic key, bring the ignition
device to MAR and then to STOP, without
opening the door.
162)The brake servo and the
electromechanical power steering will not
work while the vehicle is being towed.
You will therefore need to apply more force
on the brake pedal and steering wheel.
Do not use flexible ropes when towing, and
avoid jerky movements. While towing,
make sure that the trailer hitch does not
damage any components it is touching.
When towing the vehicle, you must comply
with all specific traffic regulations and
adopt an appropriate driving behaviour. Do
not start the engine while towing the
vehicle. Before tightening the ring, clean
the threaded housing thoroughly. Make
sure that the ring is fully fastened in the
housing before towing the vehicle.
145J0A0160C
146J0A0163C
147J0A0161C
145
Page 149 of 212
SERVICING AND MAINTENANCE
Correct maintenance permits the
performance of the vehicle to be
maintained over time, as well as limited
running costs and safeguarding the
efficiency of the safety systems.
This chapter explains how.SCHEDULED SERVICING ...............148
ENGINE COMPARTMENT ...............155
BATTERY RECHARGING ................160
SERVICING PROCEDURES ............161
LIFTING THE VEHICLE....................163
WHEELS AND TYRES.....................163
BODYWORK ...................................164
147
Page 150 of 212
SCHEDULED
SERVICING
Correct servicing is crucial for
guaranteeing a long life for the vehicle
under the best conditions. For this
reason, Jeep has planned a series of
checks and services at fixed distance
intervals and, where provided, at fixed
time intervals, as described in the
Scheduled Servicing Plan.
Before each service, it is always
necessary to carefully follow the
instructions in the Scheduled Servicing
Plan (e.g. periodically check level of
fluids, tyre pressure, etc.).
Scheduled Servicing is offered by all
Jeep Dealerships according to a set
time schedule. If, during each
operation, in addition to the ones
scheduled, the need arises for further
replacements or repairs, these may
be carried out with your explicit
agreement only. If your vehicle is used
frequently for towing, the interval
between one service operation and the
next should be reduced.IMPORTANT Scheduled Servicing
Coupons are required by the
Manufacturer. Failure to have them
carried out may invalidate the warranty.
It is advisable to inform a Jeep
Dealership of any small operating
irregularities without waiting for the next
service.
PERIODIC CHECKS
Every1,000km or before long
journeys, check and if necessary, top
up: engine coolant level; brake fluid
level; screen washer fluid level; tyre
inflation pressure and condition; lighting
system operation (headlights, direction
indicators, hazard warning lights, etc.);
screen washer/wiper system operation
and positioning/wear of windscreen/
rear window wiper blades.
Every3,000km, check and top up if
required: engine oil level.
HEAVY-DUTY USE OF THE
VEHICLE
If the vehicle is used under one of the
following conditions: towing a trailer
or caravan; dusty roads; short (less
than 7-8 km), repeated journeys with
sub-zero outside temperatures; engine
often idling or driving long distances
at low speed or long periods of
inactivity, the following checks must be
carried out more often than indicated
in the Scheduled Servicing Plan:❒check front disc brake pad condition
and wear;
❒check cleanliness of bonnet and
luggage compartment locks,
cleanliness and lubrication of linkage;
❒visually inspect condition of: engine,
gearbox, transmission, pipes and hoses
(exhaust/fuel system/brakes) and
rubber elements (boots/sleeves/
bushes, etc.);
❒check battery charge and battery
fluid level (electrolyte);
❒visually inspect condition of the
accessory drive belts;
❒check and, if necessary, change
engine oil and replace oil filter;
❒check and, if necessary, replace
pollen filter;
❒check and, if necessary, replace air
cleaner.
On versions with automatic
transmission, change transmission oil
and replace oil filter every 60,000 km
(40,000) or every 4 years.
148
SERVICING AND MAINTENANCE
Page 151 of 212
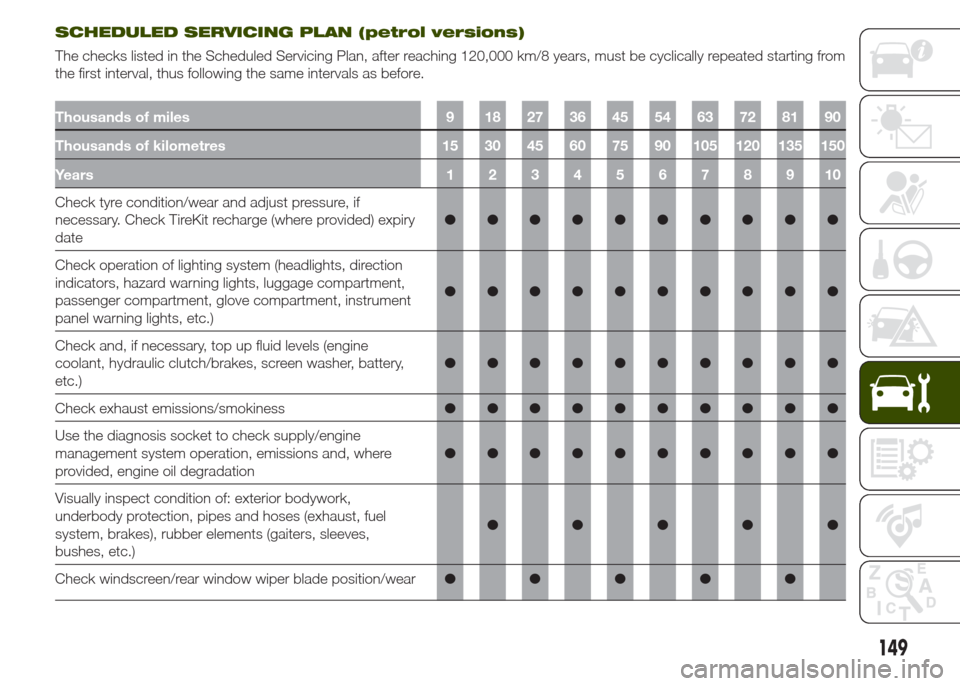
SCHEDULED SERVICING PLAN (petrol versions)
The checks listed in the Scheduled Servicing Plan, after reaching 120,000 km/8 years, must be cyclically repeated starting from
the first interval, thus following the same intervals as before.
Thousands of miles 9 18 27 36 45 54 63 72 81 90
Thousands of kilometres 15 30 45 60 75 90 105 120 135 150
Years12345678910
Check tyre condition/wear and adjust pressure, if
necessary. Check TireKit recharge (where provided) expiry
date●●●●●●●●●●
Check operation of lighting system (headlights, direction
indicators, hazard warning lights, luggage compartment,
passenger compartment, glove compartment, instrument
panel warning lights, etc.)●●●●●●●●●●
Check and, if necessary, top up fluid levels (engine
coolant, hydraulic clutch/brakes, screen washer, battery,
etc.)●●●●●●●●●●
Check exhaust emissions/smokiness●●●●●●●●●●
Use the diagnosis socket to check supply/engine
management system operation, emissions and, where
provided, engine oil degradation●●●●●●●●●●
Visually inspect condition of: exterior bodywork,
underbody protection, pipes and hoses (exhaust, fuel
system, brakes), rubber elements (gaiters, sleeves,
bushes, etc.)●●●●●
Check windscreen/rear window wiper blade position/wear●●●●●
149
Page 152 of 212
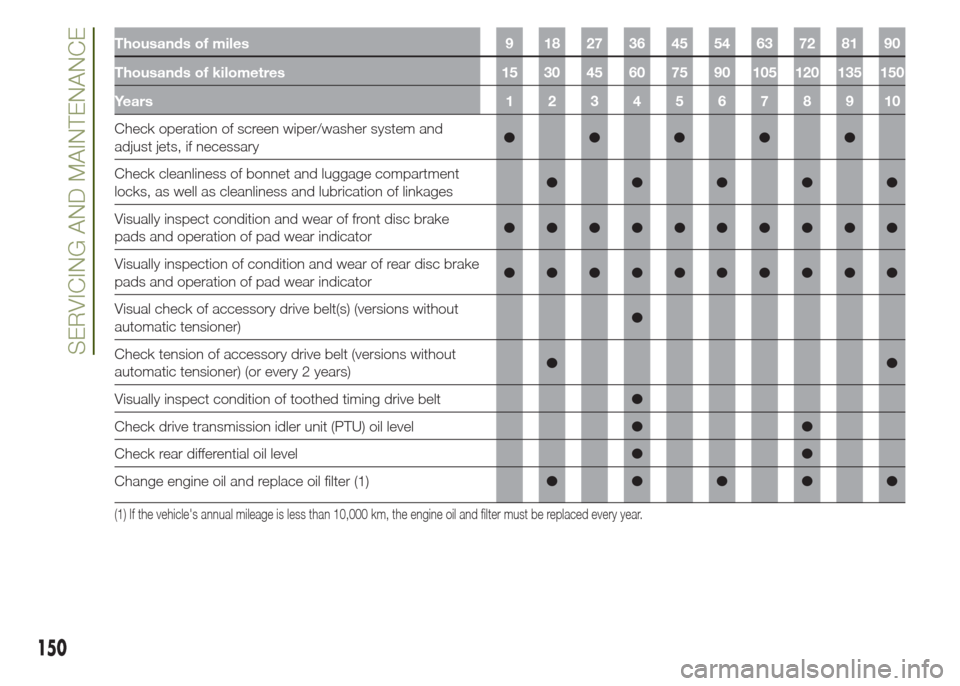
Thousands of miles 9 18 27 36 45 54 63 72 81 90
Thousands of kilometres 15 30 45 60 75 90 105 120 135 150
Years12345678910
Check operation of screen wiper/washer system and
adjust jets, if necessary●●●●●
Check cleanliness of bonnet and luggage compartment
locks, as well as cleanliness and lubrication of linkages●●●●●
Visually inspect condition and wear of front disc brake
pads and operation of pad wear indicator●●●●●●●●●●
Visually inspection of condition and wear of rear disc brake
pads and operation of pad wear indicator●●●●●●●●●●
Visual check of accessory drive belt(s) (versions without
automatic tensioner)●
Check tension of accessory drive belt (versions without
automatic tensioner) (or every 2 years)●●
Visually inspect condition of toothed timing drive belt●
Check drive transmission idler unit (PTU) oil level●●
Check rear differential oil level●●
Change engine oil and replace oil filter (1)●●●●●
(1) If the vehicle's annual mileage is less than 10,000 km, the engine oil and filter must be replaced every year.
150
SERVICING AND MAINTENANCE