engine JEEP RENEGADE 2015 1.G User Guide
[x] Cancel search | Manufacturer: JEEP, Model Year: 2015, Model line: RENEGADE, Model: JEEP RENEGADE 2015 1.GPages: 678, PDF Size: 29.84 MB
Page 49 of 678
•Ignition in OFF position for Keyless Enter-N-Go™
vehicle
•Fuel level meets minimum requirement
WARNING!
•Do not start or run an engine in a closed garage or
confined area. Exhaust gas contains Carbon Mon-
oxide (CO) which is odorless and colorless. Carbon
Monoxide is poisonous and can cause serious in-
jury or death when inhaled.
•Keep Remote Keyless Entry (RKE) transmitters
away from children. Operation of the Remote Start
System, windows, door locks or other controls
could cause serious injury or death.
To Enter Remote Start Mode
Push and release the REMOTE START button
on the RKE transmitter twice within five sec-
onds. The vehicle doors will lock, the parking
lights will flash, and the horn will chirp twice.
Then, the engine will start, and the vehicle will remain in
the Remote Start mode for a 15-minute cycle.
NOTE:
•If an engine fault is present or fuel level is low, the
vehicle will start and then shut down in 10 seconds.
•The park lamps will turn on and remain on during
Remote Start mode.
•For security, power window operation is disabled
when the vehicle is in the Remote Start mode.
4
GETTING TO KNOW YOUR VEHICLE 47
Page 50 of 678
To Exit Remote Start Mode Without Driving The
Vehicle
Push and release the REMOTE START button one time or
allow the engine to run for the entire 15-minute cycle.
NOTE:To avoid unintentional shutdowns, the system
will disable the one time push of the REMOTE START
button for two seconds after receiving a valid Remote
Start request.
To Exit Remote Start Mode And Drive The Vehicle
Before the end of 15-minute cycle, push and release the
UNLOCK button on the RKE transmitter to unlock the
doors and disarm the Vehicle Security Alarm (if
equipped). Then, prior to the end of the 15-minute cycle,
push and release the START/STOP button.
NOTE:For vehicles equipped with the Keyless Enter-N-
Go™ feature, the message “Remote Start Active — Push
Start Button” will display in the Electronic Vehicle Infor-
mation Center (EVIC) or the Driver Information Dispay
(DID) until you push the START button.
Remote Start Comfort Systems — If Equipped
When Remote Start is activated, the heated steering
wheel and driver heated seat features will automatically
turn on in cold weather. These features will stay on
through the duration of Remote Start or until the ignition
switch is cycled to the MAR/RUN position.
NOTE:The Remote Start Comfort System can be acti-
vated and deactivated through the Uconnect® Settings.
For more information on Remote Start Comfort System
operation, refer to “Uconnect® SETTINGS” in “Multime-
dia.”
48 GETTING TO KNOW YOUR VEHICLE
Page 51 of 678
Remote Start Windshield Wiper De–Icer
Activation — If Equipped
When Remote Start is active and the outside ambient
temperature is less than 33° F (.5° C), the Windshield
Wiper De-Icer will be enabled. Exiting Remote Start will
resume previous operation, except if the Windshield
Wiper De-Icer is active. The Windshield Wiper De-Icer
timer and operation will continue.
SENTRY KEY®
The Sentry Key® Immobilizer system prevents unauthor-
ized vehicle operation by disabling the engine. The
system does not need to be armed or activated. Operation
is automatic, regardless of whether the vehicle is locked
or unlocked.
The system uses a Key Fob with a factory-mated Remote
Keyless Entry (RKE) transmitter, a Keyless Ignition Node
(KIN), and a RF receiver to prevent unauthorized vehicle
operation. Therefore, only Key Fobs that are pro-
grammed to the vehicle can be used to start and operate
the vehicle. The system will not allow the engine to crank
if an invalid Key Fob tries to start the engine.
After placing the ignition to the ON/RUN position, if
there is a problem with the system, the Vehicle Security
Light will turn on. This condition will result in the engine
being shut off after two seconds.
Should this occur, have the vehicle serviced as soon as
possible by an authorized dealer.
CAUTION!
•Do not make modifications or alterations to the
immobilizer system. Modifications or alterations to
the immobilization system may result in a loss of
security protection.
(Continued)
4
GETTING TO KNOW YOUR VEHICLE 49
Page 53 of 678
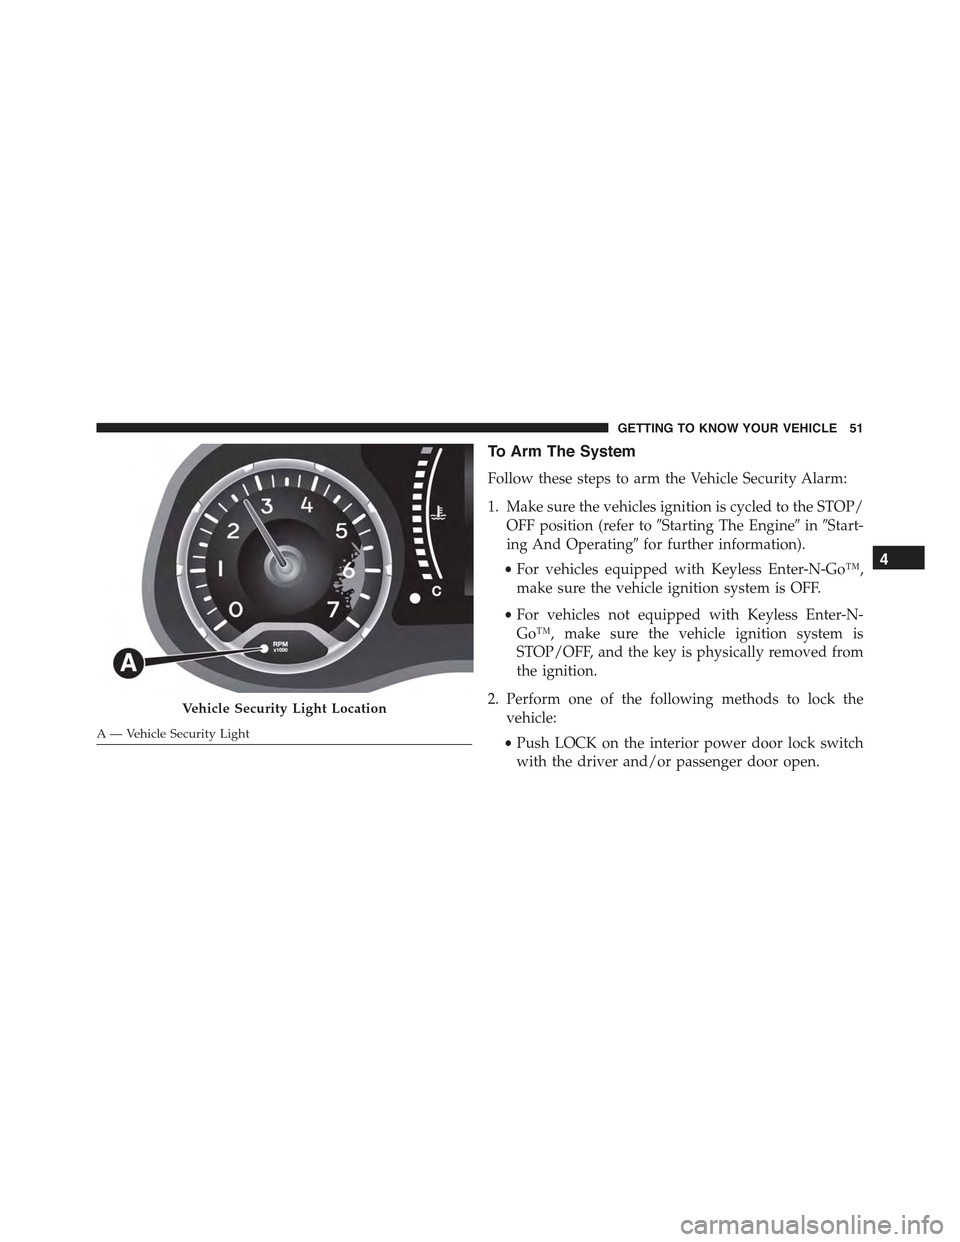
To Arm The System
Follow these steps to arm the Vehicle Security Alarm:
1. Make sure the vehicles ignition is cycled to the STOP/
OFF position (refer to#Starting The Engine#in#Start-
ing And Operating#for further information).
•For vehicles equipped with Keyless Enter-N-Go™,
make sure the vehicle ignition system is OFF.
•For vehicles not equipped with Keyless Enter-N-
Go™, make sure the vehicle ignition system is
STOP/OFF, and the key is physically removed from
the ignition.
2. Perform one of the following methods to lock the
vehicle:
•Push LOCK on the interior power door lock switch
with the driver and/or passenger door open.
Vehicle Security Light Location
A — Vehicle Security Light
4
GETTING TO KNOW YOUR VEHICLE 51
Page 72 of 678
minutes of continuous operation. At that time, the dis-
play will change from HI to LO, indicating the change.
The LO-level setting will turn OFF automatically after
approximately 60 minutes.
NOTE:The engine must be running for the heated seats
to operate.
Vehicles Equipped With Remote Start
Vehicles equipped with Remote Start, the heated seats
can be programed to come on during a Remote Start.
This feature can be programmed through the Uconnect®
system. Refer to “Uconnect® Settings” in “Multimedia”
for further information.
WARNING!
•Persons who are unable to feel pain to the skin
because of advanced age, chronic illness, diabetes,
spinal cord injury, medication, alcohol use, exhaus-
tion or other physical condition must exercise care
when using the seat heater. It may cause burns
even at low temperatures, especially if used for
long periods of time.
•Do not place anything on the seat or seatback that
insulates against heat, such as a blanket or cushion.
This may cause the seat heater to overheat. Sitting
in a seat that has been overheated could cause
serious burns due to the increased surface tempera-
ture of the seat.
70 GETTING TO KNOW YOUR VEHICLE
Page 99 of 678
The timing of the headlights is adjustable between 0, 30,
60 and 90 seconds. Refer to “Uconnect® Settings” in
“Multimedia” for further information.
NOTE:The engine must be running before the head-
lights will come on in the automatic mode.
Daytime Running Lights (DRL) — If Equipped
The Daytime Running Lights (DRLs) will turn on when
the engine is started and remain on unless the headlights
are turned on, the electronic parking brake is applied, or
the engine is shut off.
The DRLs will be disabled during turn signal operation
and resume operation when the turn signal operation has
ended.
Front Fog Lights — If Equipped
The front fog light switch is built into the headlight
switch.
To activate the front fog lights, turn on the parking
lights or the low beam headlights and push the
headlight switch. To turn off the front fog lights, push the
headlight switch a second time or turn off the headlight
switch.
An indicator light in the instrument cluster illuminates
when the fog lights are turned on.
NOTE:The fog lights will operate with the low beam
headlights or parking lights on. Selecting the high beam
headlights will turn off the fog lights.
4
GETTING TO KNOW YOUR VEHICLE 97
Page 131 of 678
In automatic operation, recirculation is managed auto-
matically by the system according to outside environ-
mental conditions.
NOTE:
•Use of the recirculation system makes it possible to
reach the required heating/cooling conditions faster. It
is not recommended to use it on rainy/cold days as it
would considerably increase the possibility of the
windows misting up inside (especially if the Climate
Control system is off). When the outside temperature
is low, recirculation is forced off (air drawn in from the
outside) to prevent the windows from misting up.
•It is not recommended to use internal air recirculation
when the outside temperature is low, since the win-
dows could mist up rapidly.
Climate Control System Compressor
Push the A/C Control button to activate/deactivate the
compressor (activation is indicated by the LED on the
button turning on).
The system remembers that the compressor has been
turned off, even after the engine has stopped.
When the compressor is turned off, the system deacti-
vates air recirculation to prevent the windows from
misting up.
Pushing the A/C button will stop AUTO MODE (AUTO
LED will turn off). To restore automatic control of com-
pressor, push the AUTO button again.
NOTE:With the compressor off, air cannot be introduced
to the passenger compartment with a temperature lower
than the outside temperature. Under certain environmen-
tal conditions, windows could mist rapidly since the air
is not dehumidified.
4
GETTING TO KNOW YOUR VEHICLE 129
Page 132 of 678
MAX A/C
MAX A/C sets the system for maximum cooling perfor-
mance.
Rotate the driver temperature control adjust knob
counter-clockwise for MAX A/C. Both driver and pas-
senger temperature displays will show MAX A/C LO.
In MAX A/C, the blower speed and mode position can be
adjusted to desired user settings. Pressing other settings
will cause the MAX A/C operation to switch to the
selected setting and MAX A/C to exit.
Rapid Window Demisting (MAX-Defrost function)
Push the MAX-defrost button to activate (LED on) the
windshield and side window demisting function.
The Climate Control system carries out the following
operations:
•Turns on the air conditioning compressor when envi-
ronmental conditions are suitable.
•Turns air recirculation off.
•Sets fan speed according to the engine coolant tem-
perature.
•Directs air flow to windshield and front side window
diffusers.
•Activates the heated rear window defrost.
•Activates the heated windshield (if equipped).
•Displays the fan speed (Blower Control Indicator LED
illuminated).
130 GETTING TO KNOW YOUR VEHICLE
Page 133 of 678
NOTE:The Front Defrost Control (MAX-DEF) function
remains on for approximately three minutes from when
the engine coolant reaches the appropriate temperature.
When the function is activated, the AUTO button LED
turns off. With the function activated, the only possible
manual adjustments are adjusting the fan speed and
turning the heated rear window off.
When the Recirculation Control, Rear Defrost Control , or
AUTO buttons are pushed, the Climate Control system
will deactivate the Front Defrost (MAX-DEF) function.
Selecting the footwell/windshield or only windshield
distribution activates the Climate Control system com-
pressor (LED on A/C button on) and the air recirculation
is set to#outside air#intake (LED on the recirculation
button off).
This logic guarantees optimum visibility at the windows.
It is, however, always possible to manage air recirculation
and the Climate Control system compressor manually.
Rear Window Defrosting
Push and release the rear window defrost button to turn
the function on/off.
Activation of this function is indicated by the rear defrost
indicator light on the instrument panel turning on. The
function is automatically deactivated after 20 minutes.
If equipped, push the rear defrost button to activate the
defrosting of door mirrors and heated rear window.
CAUTION!
To avoid causing damage to the rear window de-
froster heating filaments do not affix stickers or other
objects to the inside of the rear glass.
4
GETTING TO KNOW YOUR VEHICLE 131
Page 151 of 678
Closing
Hold up the hood with one hand and with the other hand
remove the support rod from its seat and reinsert it into
the locking tab.
Lower the hood to approximately 6 inches (15 cm) from
the engine compartment and drop it. Make sure that the
hood is completely closed.
CAUTION!
To prevent possible damage, do not slam the hood to
close it. Lower the hood until it is open approxi-
mately 6 inches (15 cm), and then drop it. This should
secure both latches. Never drive your vehicle unless
the hood is fully closed, with both latches engaged.
WARNING!
Be sure the hood is fully latched before driving your
vehicle. If the hood is not fully latched, it could open
when the vehicle is in motion and block your vision.
Failure to follow this warning could result in serious
injury or death.
LIFTGATE
Opening
To unlock the liftgate, use the Remote Keyless Entry
(RKE) transmitter or activate the power door lock
switches located on the driver door handle.
To open the liftgate, squeeze the electronic liftgate release
and pull the liftgate open with one fluid motion.
4
GETTING TO KNOW YOUR VEHICLE 149