JEEP RENEGADE 2015 1.G User Guide
Manufacturer: JEEP, Model Year: 2015, Model line: RENEGADE, Model: JEEP RENEGADE 2015 1.GPages: 220, PDF Size: 34.11 MB
Page 181 of 220
TOWING A DISABLED VEHICLE
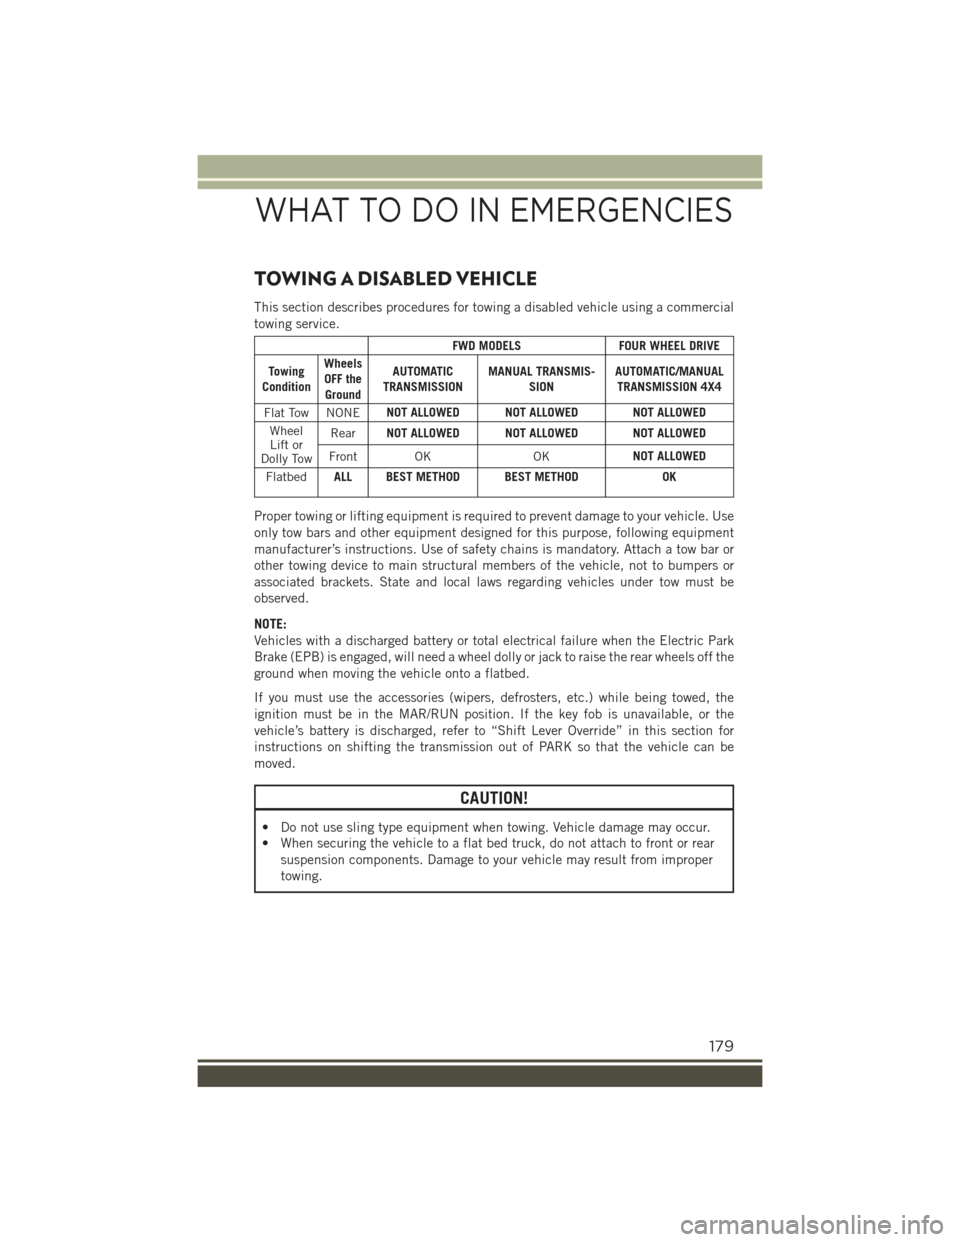
This section describes procedures for towing a disabled vehicle using a commercial
towing service.
FWD MODELSFOUR WHEEL DRIVE
TowingCondition
WheelsOFF theGround
AUTOMATICTRANSMISSIONMANUAL TRANSMIS-SIONAUTOMATIC/MANUALTRANSMISSION 4X4
Flat Tow NONENOT ALLOWED NOT ALLOWED NOT ALLOWED
WheelLift orDolly Tow
RearNOT ALLOWED NOT ALLOWED NOT ALLOWED
Front OKOKNOT ALLOWED
FlatbedALL BEST METHOD BEST METHODOK
Proper towing or lifting equipment is required to prevent damage to your vehicle. Use
only tow bars and other equipment designed for this purpose, following equipment
manufacturer’s instructions. Use of safety chains is mandatory. Attach a tow bar or
other towing device to main structural members of the vehicle, not to bumpers or
associated brackets. State and local laws regarding vehicles under tow must be
observed.
NOTE:
Vehicles with a discharged battery or total electrical failure when the Electric Park
Brake (EPB) is engaged, will need a wheel dolly or jack to raise the rear wheels off the
ground when moving the vehicle onto a flatbed.
If you must use the accessories (wipers, defrosters, etc.) while being towed, the
ignition must be in the MAR/RUN position. If the key fob is unavailable, or the
vehicle’s battery is discharged, refer to “Shift Lever Override” in this section for
instructions on shifting the transmission out of PARK so that the vehicle can be
moved.
CAUTION!
• Do not use sling type equipment when towing. Vehicle damage may occur.
• When securing the vehicle to a flat bed truck, do not attach to front or rear
suspension components. Damage to your vehicle may result from improper
towing.
WHAT TO DO IN EMERGENCIES
179
Page 182 of 220
Front Wheel Drive (FWD)
The manufacturer recommends towing your vehicle with all four wheels OFF the
ground on a flatbed.
If flatbed equipment is not available, this vehicle must towed with the front wheels
OFF the ground (using a towing dolly, or wheel lift equipment with the front wheels
raised).
CAUTION!
Towing this vehicle in violation of the above requirements can cause severe
transmission damage. Damage from improper towing is not covered under the New
Vehicle Limited Warranty.
Four-Wheel Drive (4WD)
The manufacturer requires towing with all four wheels OFF the ground. Acceptable
methods are to tow the vehicle on a flatbed, or with one end of the vehicle raised and
the opposite end on a towing dolly.
CAUTION!
• DO NOT tow this vehicle with ANY of its wheels on the ground. Damage to the
drivetrain will result.
• Front or rear wheel lifts must not be used. Internal damage to the transmission
or power transfer unit will occur if a front or rear wheel lift is used when towing.
• Towing this vehicle in violation of the above requirements can cause severe
transmission and/or power transfer unit damage. Damage from improper
towing is not covered under the New Vehicle Limited Warranty.
WHAT TO DO IN EMERGENCIES
180
Page 183 of 220
TO OPEN AND CLOSE THE HOOD
Opening
Two latches must be released to open the hood.
Pull the hood release lever located under the drivers side of the instrument panel.
Move to the outside of the vehicle and push the safety latch release lever toward the
passenger side of the vehicle. The hood release lever is located behind the center
front edge of the hood.
Remove the support rod from the locking tab and insert it into the seat located on the
underside of the hood.
Closing
Hold up the hood with one hand and with the other hand remove the support rod from
its seat and reinsert it into the locking tab.
Lower the hood to approximately 6 inches (15 cm) from the engine compartment and
drop it. Make sure that the hood is completely closed.
CAUTION!
To prevent possible damage, do not slam the hood to close it. Lower the hood until
it is open approximately 6 inches (15 cm), and then drop it. This should secure
both latches. Never drive your vehicle unless the hood is fully closed, with both
latches engaged.
WARNING!
Be sure the hood is fully latched before driving your vehicle. If the hood is not fully
latched, it could open when the vehicle is in motion and block your vision. Failure
to follow this warning could result in serious injury or death.
MAINTAINING YOUR VEHICLE
181
Page 184 of 220
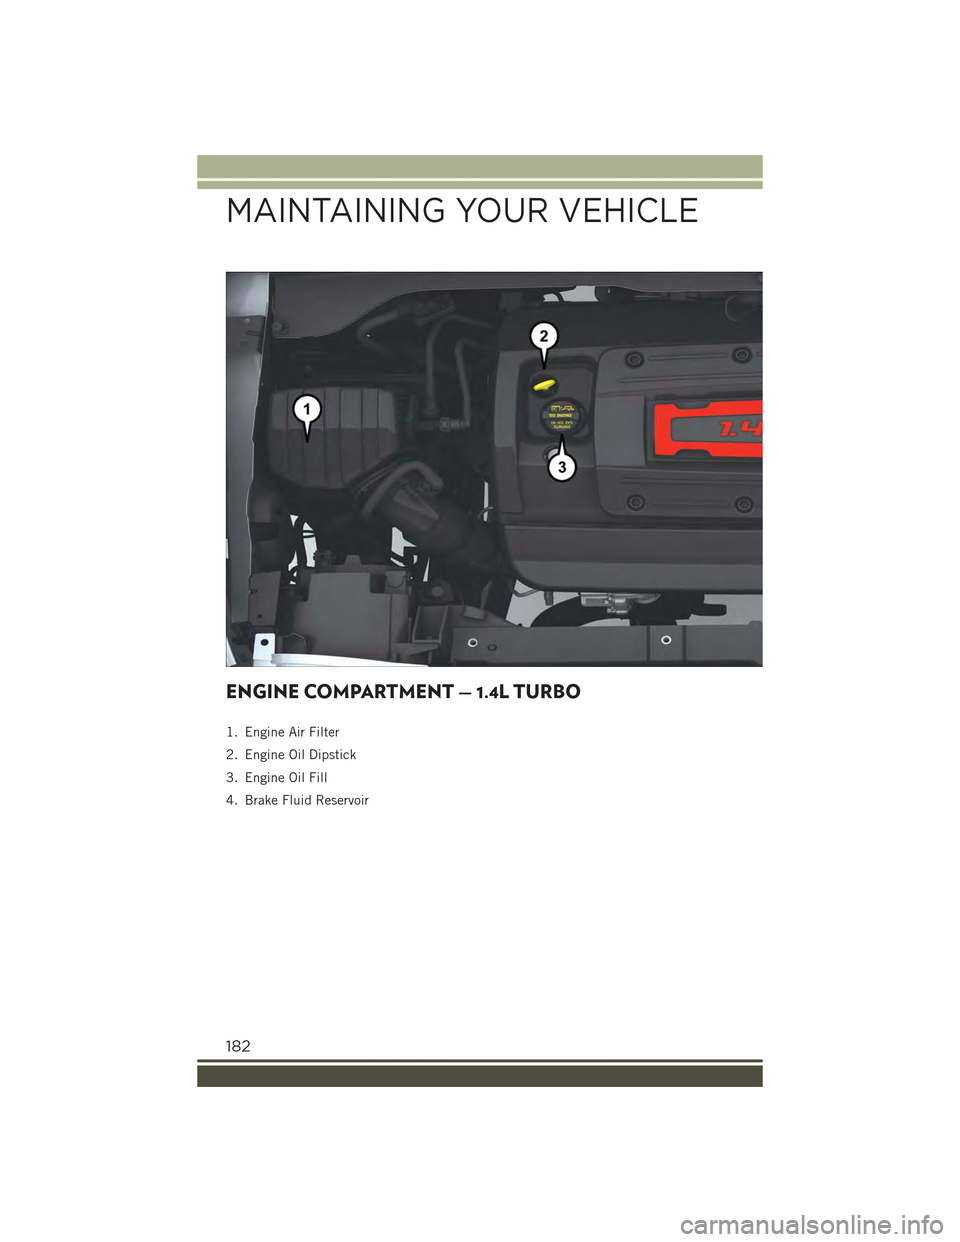
ENGINE COMPARTMENT — 1.4L TURBO
1. Engine Air Filter
2. Engine Oil Dipstick
3. Engine Oil Fill
4. Brake Fluid Reservoir
MAINTAINING YOUR VEHICLE
182
Page 185 of 220
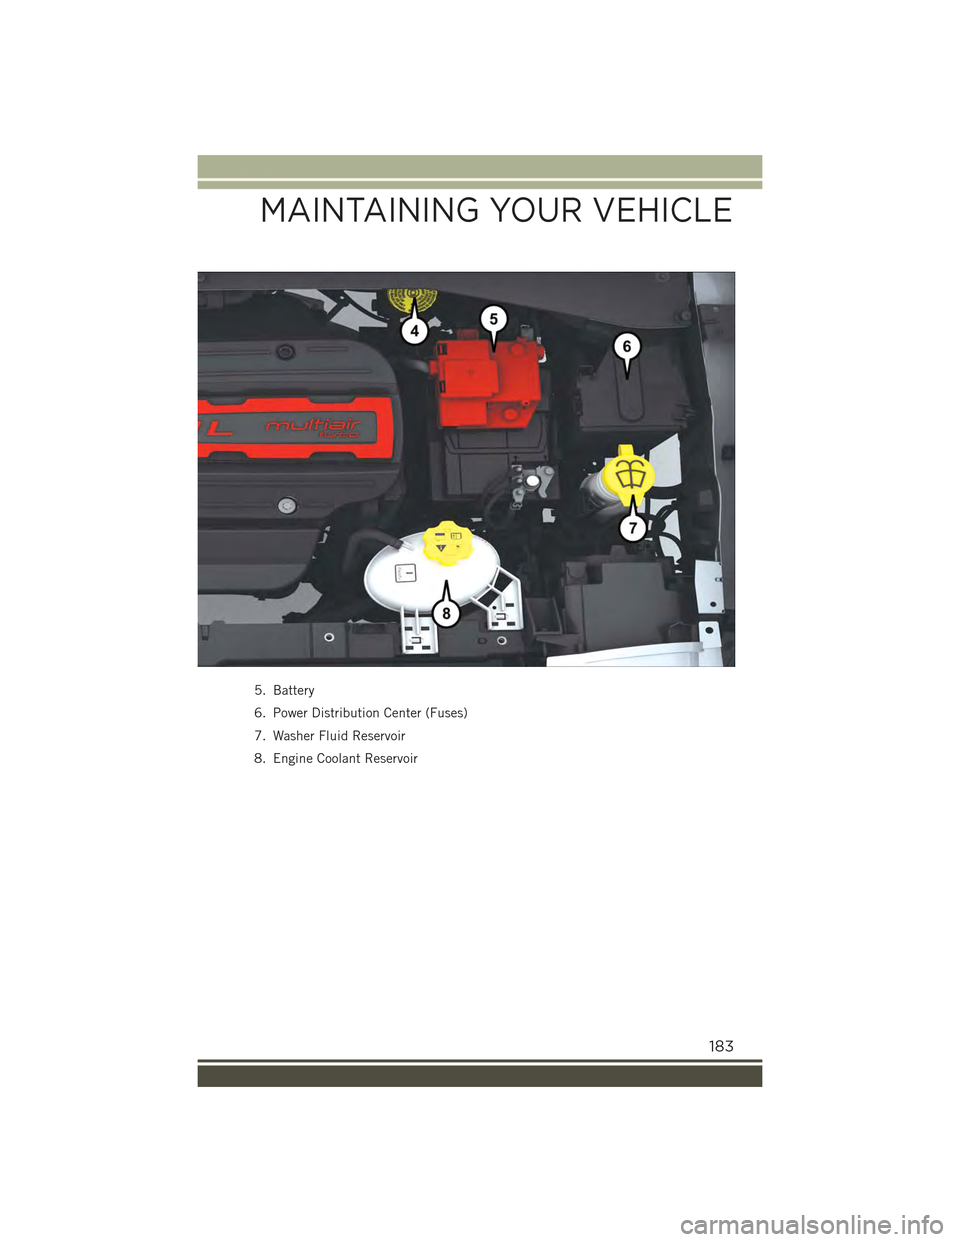
5. Battery
6. Power Distribution Center (Fuses)
7. Washer Fluid Reservoir
8. Engine Coolant Reservoir
MAINTAINING YOUR VEHICLE
183
Page 186 of 220
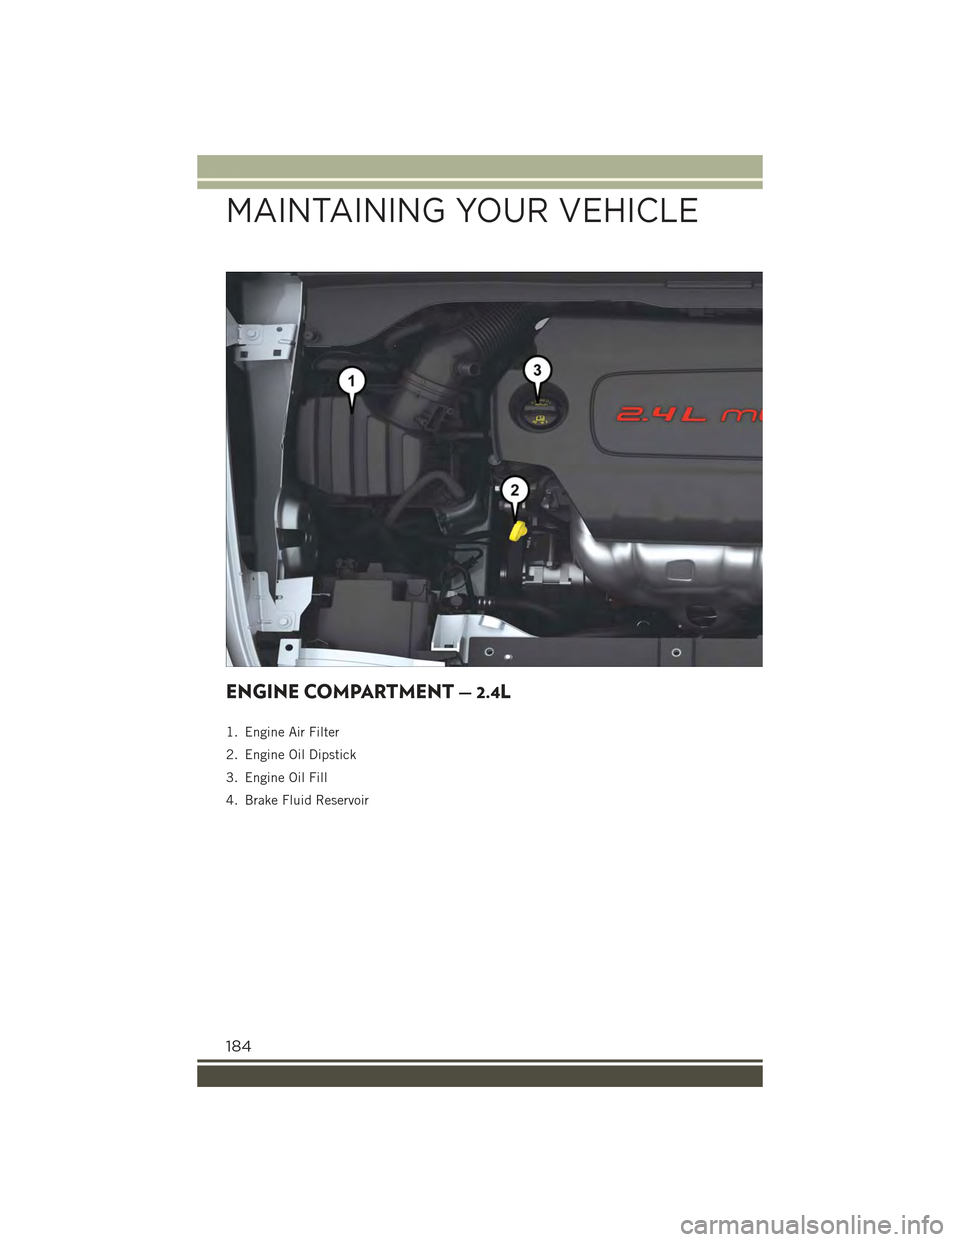
ENGINE COMPARTMENT — 2.4L
1. Engine Air Filter
2. Engine Oil Dipstick
3. Engine Oil Fill
4. Brake Fluid Reservoir
MAINTAINING YOUR VEHICLE
184
Page 187 of 220
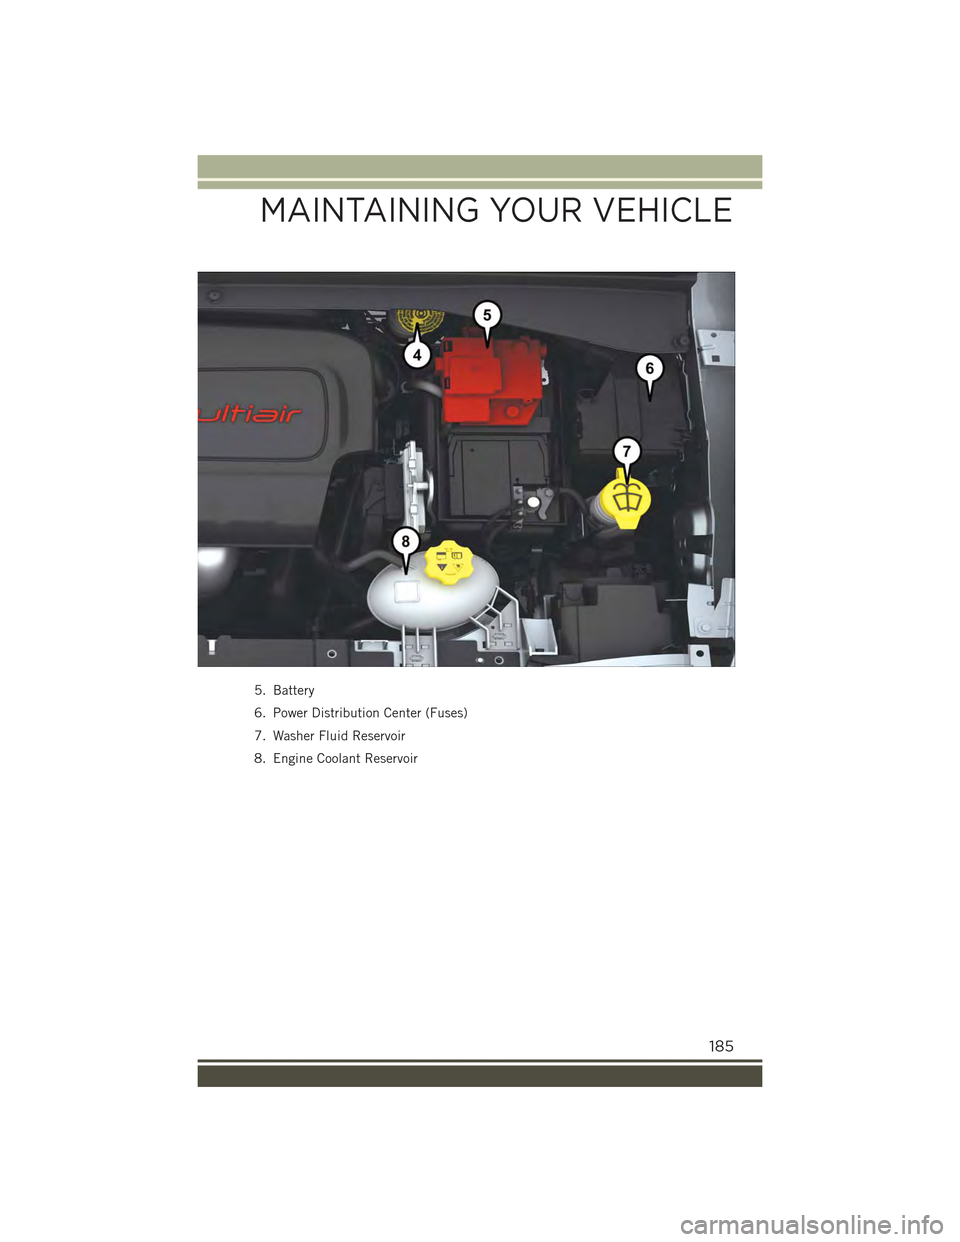
5. Battery
6. Power Distribution Center (Fuses)
7. Washer Fluid Reservoir
8. Engine Coolant Reservoir
MAINTAINING YOUR VEHICLE
185
Page 188 of 220
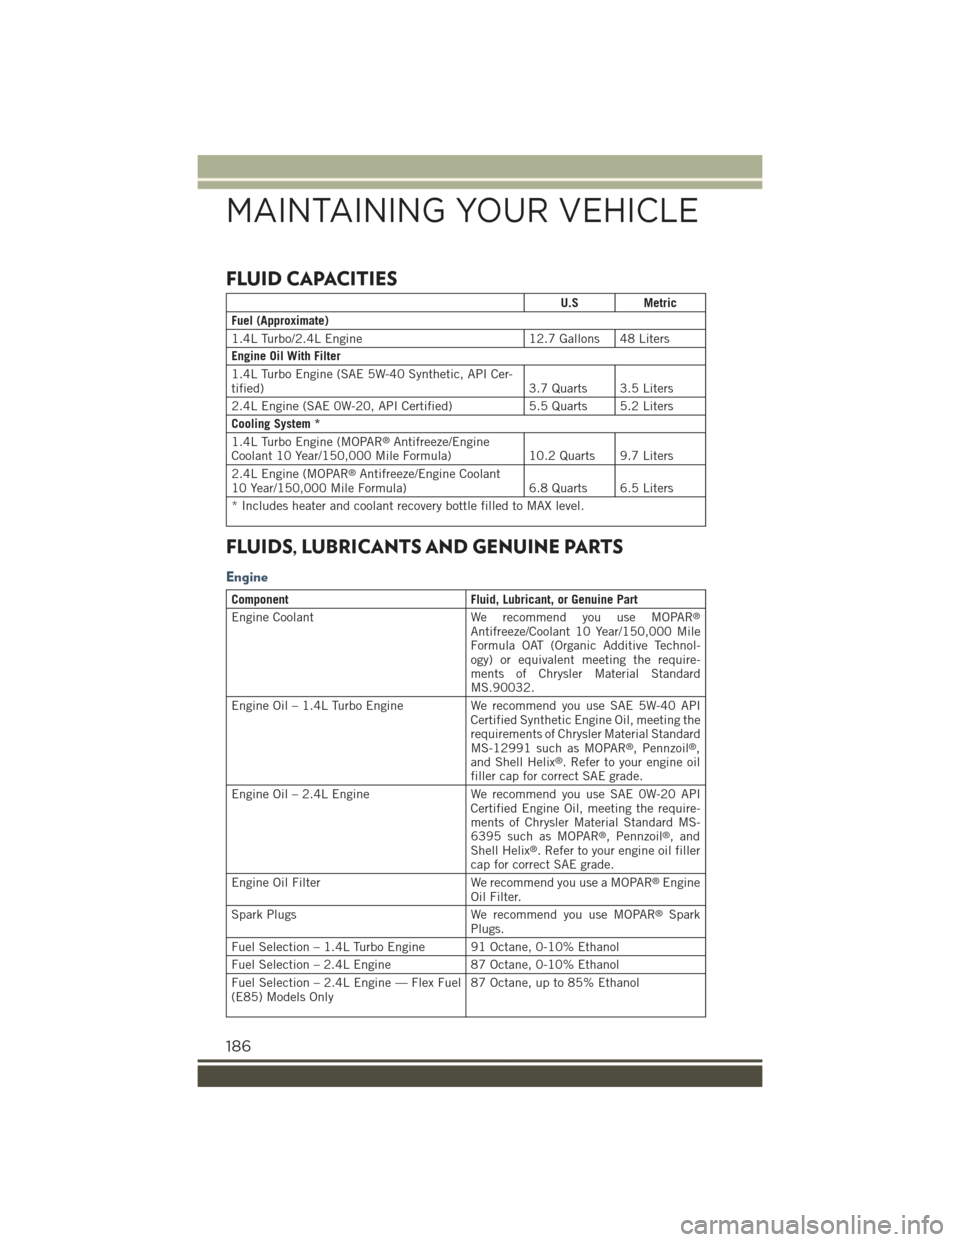
FLUID CAPACITIES
U.SMetric
Fuel (Approximate)
1.4L Turbo/2.4L Engine12.7 Gallons 48 Liters
Engine Oil With Filter
1.4L Turbo Engine (SAE 5W-40 Synthetic, API Cer-tified)3.7 Quarts 3.5 Liters
2.4L Engine (SAE 0W-20, API Certified)5.5 Quarts 5.2 Liters
Cooling System *
1.4L Turbo Engine (MOPAR®Antifreeze/EngineCoolant 10 Year/150,000 Mile Formula)10.2 Quarts 9.7 Liters
2.4L Engine (MOPAR®Antifreeze/Engine Coolant10 Year/150,000 Mile Formula) 6.8 Quarts 6.5 Liters
* Includes heater and coolant recovery bottle filled to MAX level.
FLUIDS, LUBRICANTS AND GENUINE PARTS
Engine
ComponentFluid, Lubricant, or Genuine Part
Engine CoolantWe recommend you use MOPAR®
Antifreeze/Coolant 10 Year/150,000 MileFormula OAT (Organic Additive Technol-ogy) or equivalent meeting the require-ments of Chrysler Material StandardMS.90032.
Engine Oil – 1.4L Turbo Engine We recommend you use SAE 5W-40 APICertified Synthetic Engine Oil, meeting therequirements of Chrysler Material StandardMS-12991 such as MOPAR®, Pennzoil®,and Shell Helix®. Refer to your engine oilfiller cap for correct SAE grade.
Engine Oil – 2.4L Engine We recommend you use SAE 0W-20 APICertified Engine Oil, meeting the require-ments of Chrysler Material Standard MS-6395 such as MOPAR®, Pennzoil®,andShell Helix®. Refer to your engine oil fillercap for correct SAE grade.
Engine Oil Filter We recommend you use a MOPAR®EngineOil Filter.
Spark Plugs We recommend you use MOPAR®SparkPlugs.
Fuel Selection – 1.4L Turbo Engine 91 Octane, 0-10% Ethanol
Fuel Selection – 2.4L Engine 87 Octane, 0-10% Ethanol
Fuel Selection – 2.4L Engine — Flex Fuel(E85) Models Only87 Octane, up to 85% Ethanol
MAINTAINING YOUR VEHICLE
186
Page 189 of 220
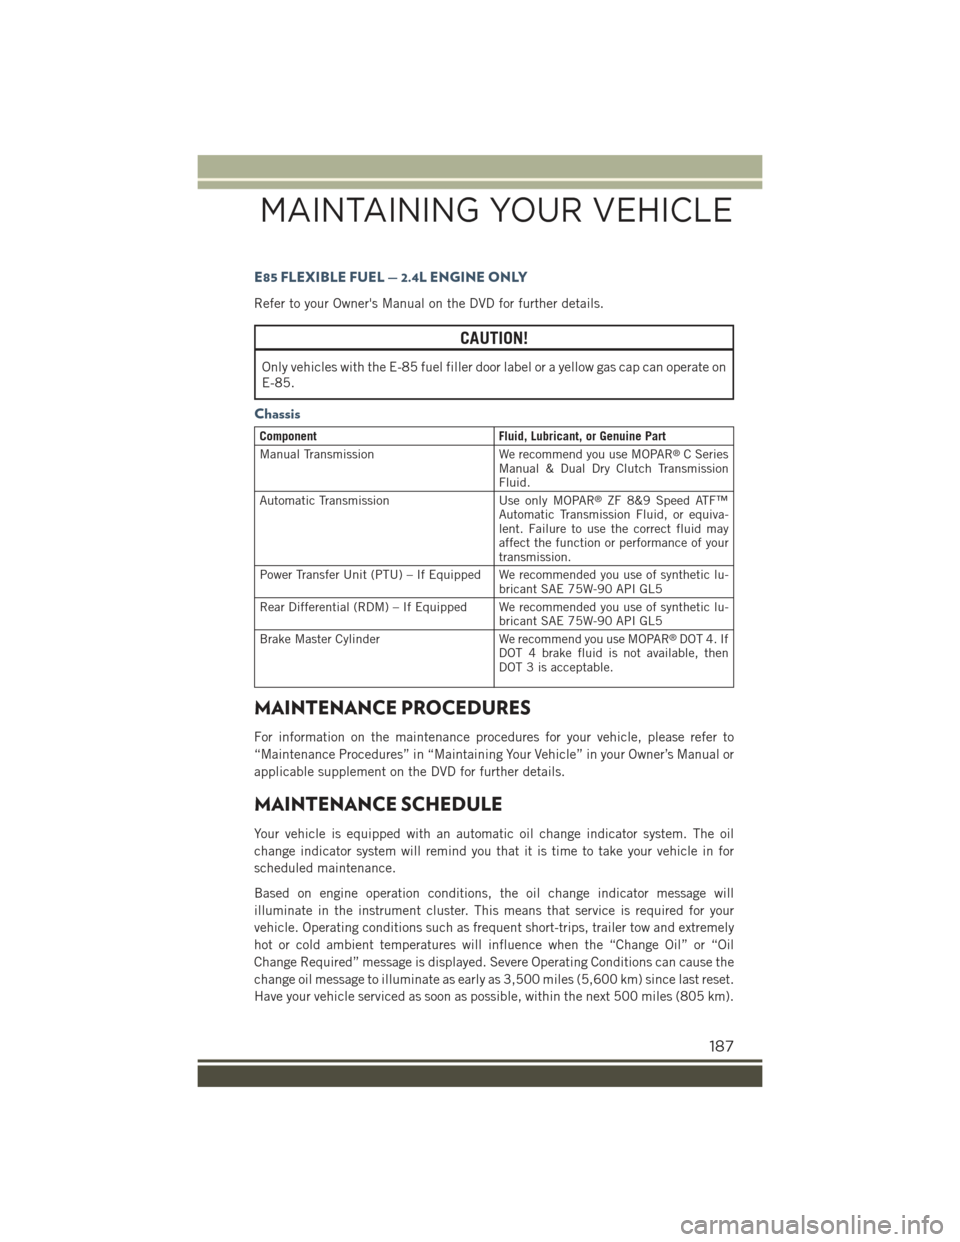
E85 FLEXIBLE FUEL — 2.4L ENGINE ONLY
Refer to your Owner's Manual on the DVD for further details.
CAUTION!
Only vehicles with the E-85 fuel filler door label or a yellow gas cap can operate on
E-85.
Chassis
ComponentFluid, Lubricant, or Genuine Part
Manual TransmissionWe recommend you use MOPAR®C SeriesManual & Dual Dry Clutch TransmissionFluid.
Automatic TransmissionUse only MOPAR®ZF 8&9 Speed ATF™Automatic Transmission Fluid, or equiva-lent. Failure to use the correct fluid mayaffect the function or performance of yourtransmission.
Power Transfer Unit (PTU) – If Equipped We recommended you use of synthetic lu-bricant SAE 75W-90 API GL5
Rear Differential (RDM) – If Equipped We recommended you use of synthetic lu-bricant SAE 75W-90 API GL5
Brake Master CylinderWe recommend you use MOPAR®DOT 4. IfDOT 4 brake fluid is not available, thenDOT 3 is acceptable.
MAINTENANCE PROCEDURES
For information on the maintenance procedures for your vehicle, please refer to
“Maintenance Procedures” in “Maintaining Your Vehicle” in your Owner’s Manual or
applicable supplement on the DVD for further details.
MAINTENANCE SCHEDULE
Your vehicle is equipped with an automatic oil change indicator system. The oil
change indicator system will remind you that it is time to take your vehicle in for
scheduled maintenance.
Based on engine operation conditions, the oil change indicator message will
illuminate in the instrument cluster. This means that service is required for your
vehicle. Operating conditions such as frequent short-trips, trailer tow and extremely
hot or cold ambient temperatures will influence when the “Change Oil” or “Oil
Change Required” message is displayed. Severe Operating Conditions can cause the
change oil message to illuminate as early as 3,500 miles (5,600 km) since last reset.
Have your vehicle serviced as soon as possible, within the next 500 miles (805 km).
MAINTAINING YOUR VEHICLE
187
Page 190 of 220
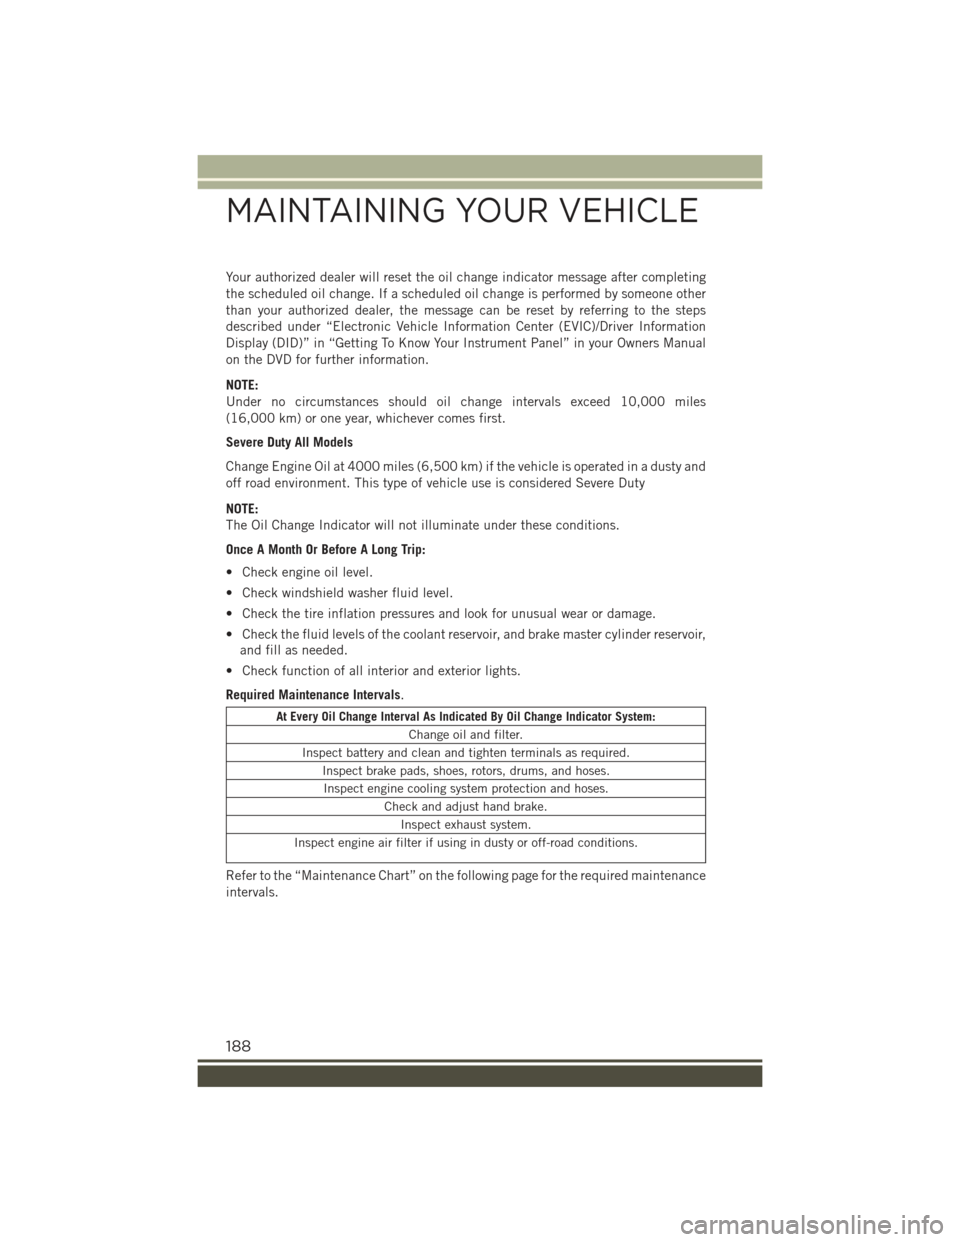
Your authorized dealer will reset the oil change indicator message after completing
the scheduled oil change. If a scheduled oil change is performed by someone other
than your authorized dealer, the message can be reset by referring to the steps
described under “Electronic Vehicle Information Center (EVIC)/Driver Information
Display (DID)” in “Getting To Know Your Instrument Panel” in your Owners Manual
on the DVD for further information.
NOTE:
Under no circumstances should oil change intervals exceed 10,000 miles
(16,000 km) or one year, whichever comes first.
Severe Duty All Models
Change Engine Oil at 4000 miles (6,500 km) if the vehicle is operated in a dusty and
off road environment. This type of vehicle use is considered Severe Duty
NOTE:
The Oil Change Indicator will not illuminate under these conditions.
Once A Month Or Before A Long Trip:
• Check engine oil level.
• Check windshield washer fluid level.
• Check the tire inflation pressures and look for unusual wear or damage.
• Check the fluid levels of the coolant reservoir, and brake master cylinder reservoir,
and fill as needed.
• Check function of all interior and exterior lights.
Required Maintenance Intervals.
At Every Oil Change Interval As Indicated By Oil Change Indicator System:
Change oil and filter.
Inspect battery and clean and tighten terminals as required.
Inspect brake pads, shoes, rotors, drums, and hoses.
Inspect engine cooling system protection and hoses.
Check and adjust hand brake.
Inspect exhaust system.
Inspect engine air filter if using in dusty or off-road conditions.
Refer to the “Maintenance Chart” on the following page for the required maintenance
intervals.
MAINTAINING YOUR VEHICLE
188