fuel JEEP RENEGADE 2015 1.G Owner's Manual
[x] Cancel search | Manufacturer: JEEP, Model Year: 2015, Model line: RENEGADE, Model: JEEP RENEGADE 2015 1.GPages: 220, PDF Size: 34.11 MB
Page 167 of 220
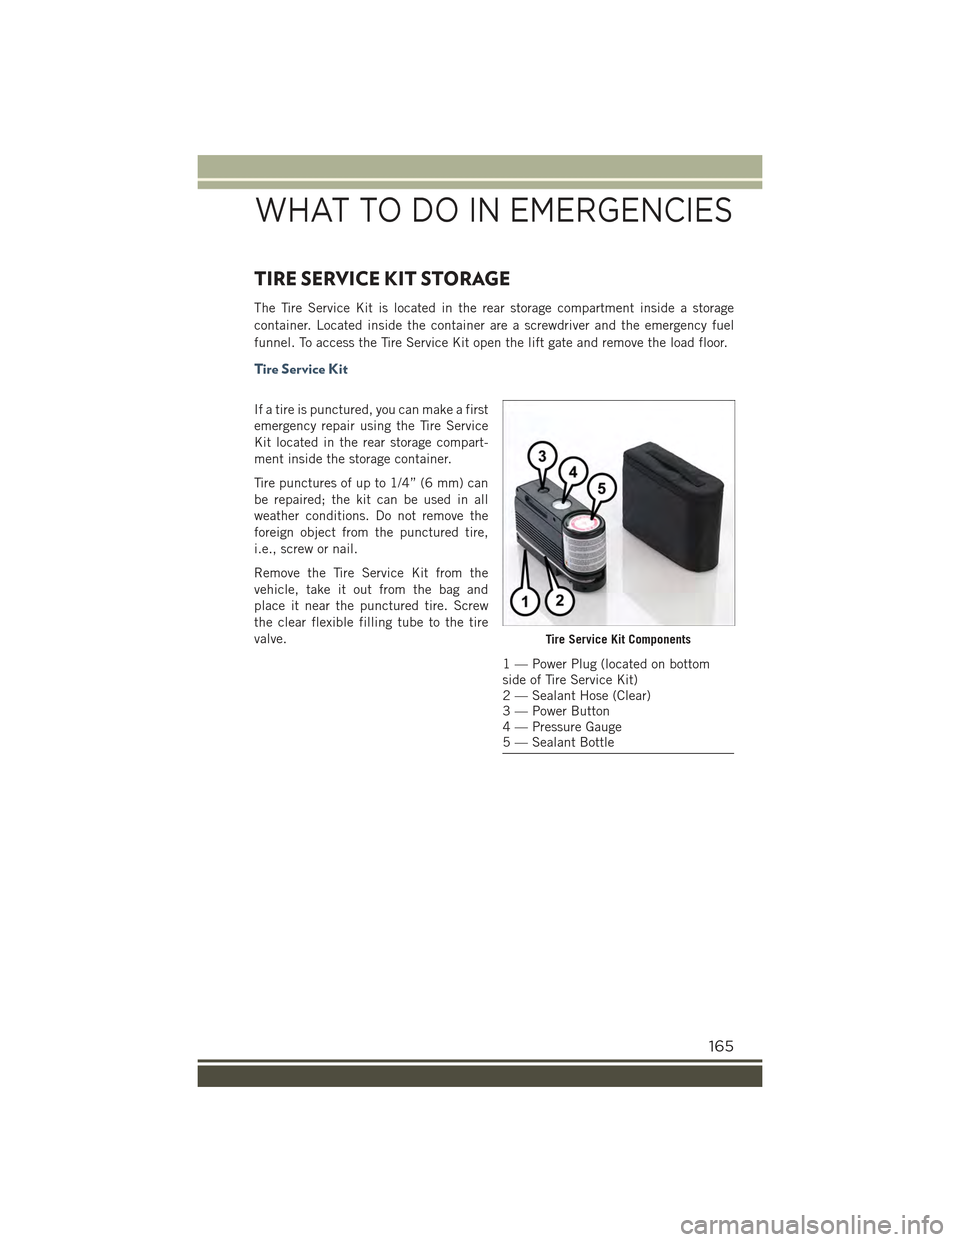
TIRE SERVICE KIT STORAGE
The Tire Service Kit is located in the rear storage compartment inside a storage
container. Located inside the container are a screwdriver and the emergency fuel
funnel. To access the Tire Service Kit open the lift gate and remove the load floor.
Tire Service Kit
If a tire is punctured, you can make a first
emergency repair using the Tire Service
Kit located in the rear storage compart-
ment inside the storage container.
Tire punctures of up to 1/4” (6 mm) can
be repaired; the kit can be used in all
weather conditions. Do not remove the
foreign object from the punctured tire,
i.e., screw or nail.
Remove the Tire Service Kit from the
vehicle, take it out from the bag and
place it near the punctured tire. Screw
the clear flexible filling tube to the tire
valve.Tire Service Kit Components
1 — Power Plug (located on bottomside of Tire Service Kit)2 — Sealant Hose (Clear)3 — Power Button4 — Pressure Gauge5 — Sealant Bottle
WHAT TO DO IN EMERGENCIES
165
Page 177 of 220
3. If using another vehicle to jump-start the battery, park the vehicle within the
jumper cables reach, set the parking brake and make sure the ignition is
STOP/OFF.
WARNING!
Do not allow vehicles to touch each other as this could establish a ground
connection and personal injury could result.
Jump-Starting Procedure
WARNING!
Failure to follow this jump-starting procedure could result in personal injury or
property damage due to battery explosion.
CAUTION!
Failure to follow these procedures could result in damage to the charging system
of the booster vehicle or the discharged vehicle.
Connecting The Jumper Cables
1. Connect the positive(+)end of the jumper cable to the positive(+)post of the
discharged vehicle.
2. Connect the opposite end of the positive(+)jumper cable to the positive(+)post
of the booster battery.
3. Connect the negative(-)end of the jumper cable to the negative(-)post of the
booster battery.
4. Connect the opposite end of the negative(-)jumper cable to a good engine ground
(exposed metal part of the discharged vehicle’s engine) away from the battery and
the fuel injection system.
WARNING!
Do not connect the jumper cable to the negative (-) post of the discharged battery.
The resulting electrical spark could cause the battery to explode and could result
in serious injury. Only use the specific ground point, do not use any other exposed
metal parts.
5. Start the engine in the vehicle that has the booster battery, let the engine idle a
few minutes, and then start the engine in the vehicle with the discharged battery.
WHAT TO DO IN EMERGENCIES
175
Page 188 of 220
FLUID CAPACITIES
U.SMetric
Fuel (Approximate)
1.4L Turbo/2.4L Engine12.7 Gallons 48 Liters
Engine Oil With Filter
1.4L Turbo Engine (SAE 5W-40 Synthetic, API Cer-tified)3.7 Quarts 3.5 Liters
2.4L Engine (SAE 0W-20, API Certified)5.5 Quarts 5.2 Liters
Cooling System *
1.4L Turbo Engine (MOPAR®Antifreeze/EngineCoolant 10 Year/150,000 Mile Formula)10.2 Quarts 9.7 Liters
2.4L Engine (MOPAR®Antifreeze/Engine Coolant10 Year/150,000 Mile Formula) 6.8 Quarts 6.5 Liters
* Includes heater and coolant recovery bottle filled to MAX level.
FLUIDS, LUBRICANTS AND GENUINE PARTS
Engine
ComponentFluid, Lubricant, or Genuine Part
Engine CoolantWe recommend you use MOPAR®
Antifreeze/Coolant 10 Year/150,000 MileFormula OAT (Organic Additive Technol-ogy) or equivalent meeting the require-ments of Chrysler Material StandardMS.90032.
Engine Oil – 1.4L Turbo Engine We recommend you use SAE 5W-40 APICertified Synthetic Engine Oil, meeting therequirements of Chrysler Material StandardMS-12991 such as MOPAR®, Pennzoil®,and Shell Helix®. Refer to your engine oilfiller cap for correct SAE grade.
Engine Oil – 2.4L Engine We recommend you use SAE 0W-20 APICertified Engine Oil, meeting the require-ments of Chrysler Material Standard MS-6395 such as MOPAR®, Pennzoil®,andShell Helix®. Refer to your engine oil fillercap for correct SAE grade.
Engine Oil Filter We recommend you use a MOPAR®EngineOil Filter.
Spark Plugs We recommend you use MOPAR®SparkPlugs.
Fuel Selection – 1.4L Turbo Engine 91 Octane, 0-10% Ethanol
Fuel Selection – 2.4L Engine 87 Octane, 0-10% Ethanol
Fuel Selection – 2.4L Engine — Flex Fuel(E85) Models Only87 Octane, up to 85% Ethanol
MAINTAINING YOUR VEHICLE
186
Page 189 of 220
E85 FLEXIBLE FUEL — 2.4L ENGINE ONLY
Refer to your Owner's Manual on the DVD for further details.
CAUTION!
Only vehicles with the E-85 fuel filler door label or a yellow gas cap can operate on
E-85.
Chassis
ComponentFluid, Lubricant, or Genuine Part
Manual TransmissionWe recommend you use MOPAR®C SeriesManual & Dual Dry Clutch TransmissionFluid.
Automatic TransmissionUse only MOPAR®ZF 8&9 Speed ATF™Automatic Transmission Fluid, or equiva-lent. Failure to use the correct fluid mayaffect the function or performance of yourtransmission.
Power Transfer Unit (PTU) – If Equipped We recommended you use of synthetic lu-bricant SAE 75W-90 API GL5
Rear Differential (RDM) – If Equipped We recommended you use of synthetic lu-bricant SAE 75W-90 API GL5
Brake Master CylinderWe recommend you use MOPAR®DOT 4. IfDOT 4 brake fluid is not available, thenDOT 3 is acceptable.
MAINTENANCE PROCEDURES
For information on the maintenance procedures for your vehicle, please refer to
“Maintenance Procedures” in “Maintaining Your Vehicle” in your Owner’s Manual or
applicable supplement on the DVD for further details.
MAINTENANCE SCHEDULE
Your vehicle is equipped with an automatic oil change indicator system. The oil
change indicator system will remind you that it is time to take your vehicle in for
scheduled maintenance.
Based on engine operation conditions, the oil change indicator message will
illuminate in the instrument cluster. This means that service is required for your
vehicle. Operating conditions such as frequent short-trips, trailer tow and extremely
hot or cold ambient temperatures will influence when the “Change Oil” or “Oil
Change Required” message is displayed. Severe Operating Conditions can cause the
change oil message to illuminate as early as 3,500 miles (5,600 km) since last reset.
Have your vehicle serviced as soon as possible, within the next 500 miles (805 km).
MAINTAINING YOUR VEHICLE
187
Page 191 of 220
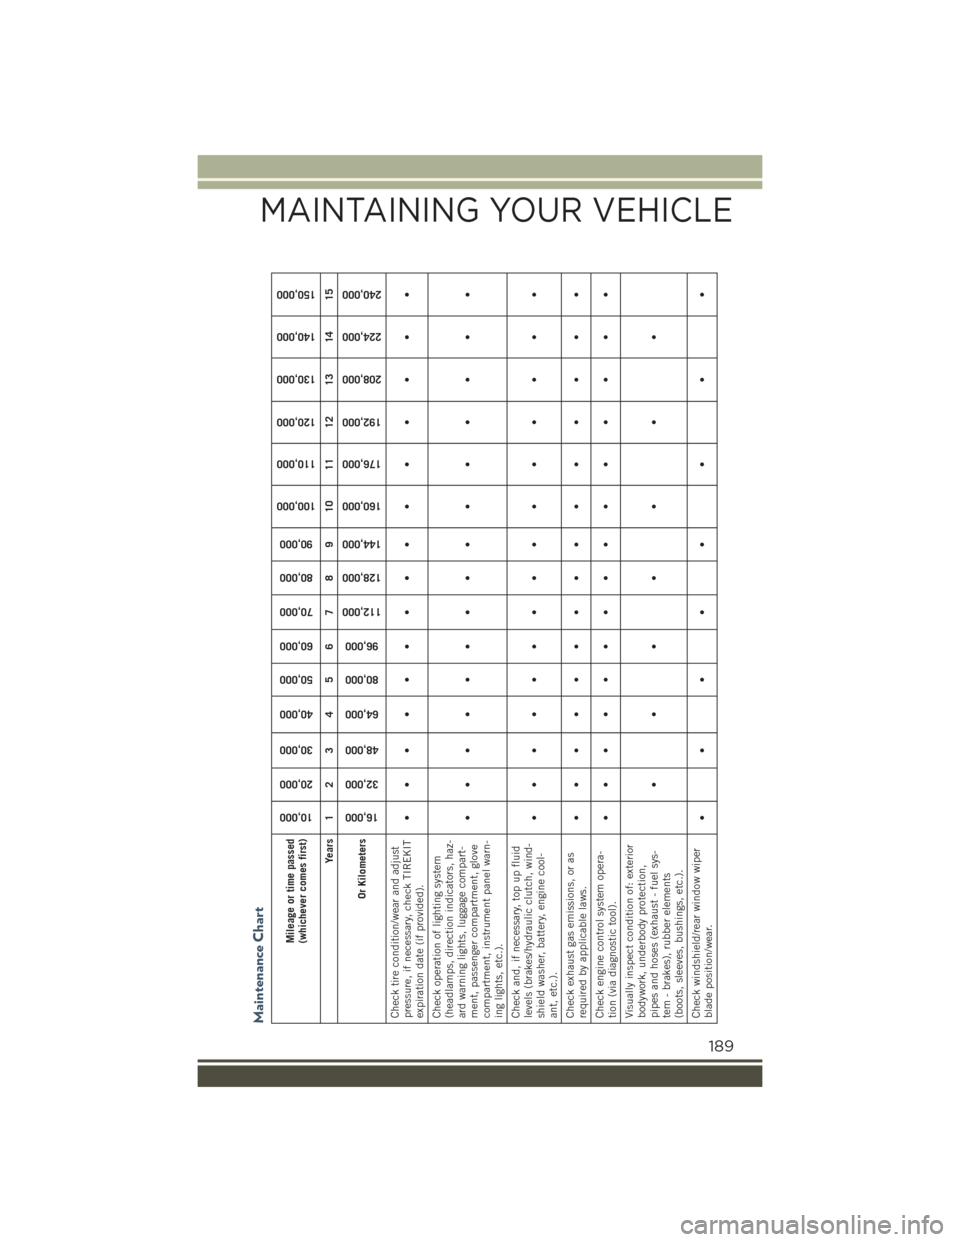
Maintenance Chart
Mileage or time passed(whichever comes first)
10,000
20,000
30,000
40,000
50,000
60,000
70,000
80,000
90,000
100,000
110,000
120,000
130,000
140,000
150,000
Years 1 2 3 4 5 6 7 8 9 10 11 12 13 14 15
Or Kilometers
16,000
32,000
48,000
64,000
80,000
96,000
112,000
128,000
144,000
160,000
176,000
192,000
208,000
224,000
240,000
Check tire condition/wear and adjustpressure, if necessary, check TIREKITexpiration date (if provided).
•• • • •• • •• • • • • • •
Check operation of lighting system(headlamps, direction indicators, haz-ard warning lights, luggage compart-ment, passenger compartment, glovecompartment, instrument panel warn-ing lights, etc.).
•• • • •• • •• • • • • • •
Check and, if necessary, top up fluidlevels (brakes/hydraulic clutch, wind-shield washer, battery, engine cool-ant, etc.).
•• • • •• • •• • • • • • •
Check exhaust gas emissions, or asrequired by applicable laws.
•• • • •• • •• • • • • • •
Check engine control system opera-tion (via diagnostic tool).
•• • • •• • •• • • • • • •
Visually inspect condition of: exteriorbodywork, underbody protection,pipes and hoses (exhaust - fuel sys-tem - brakes), rubber elements(boots, sleeves, bushings, etc.).
•••• • • •
Check windshield/rear window wiperblade position/wear.
•• ••• • • •
MAINTAINING YOUR VEHICLE
189
Page 198 of 220
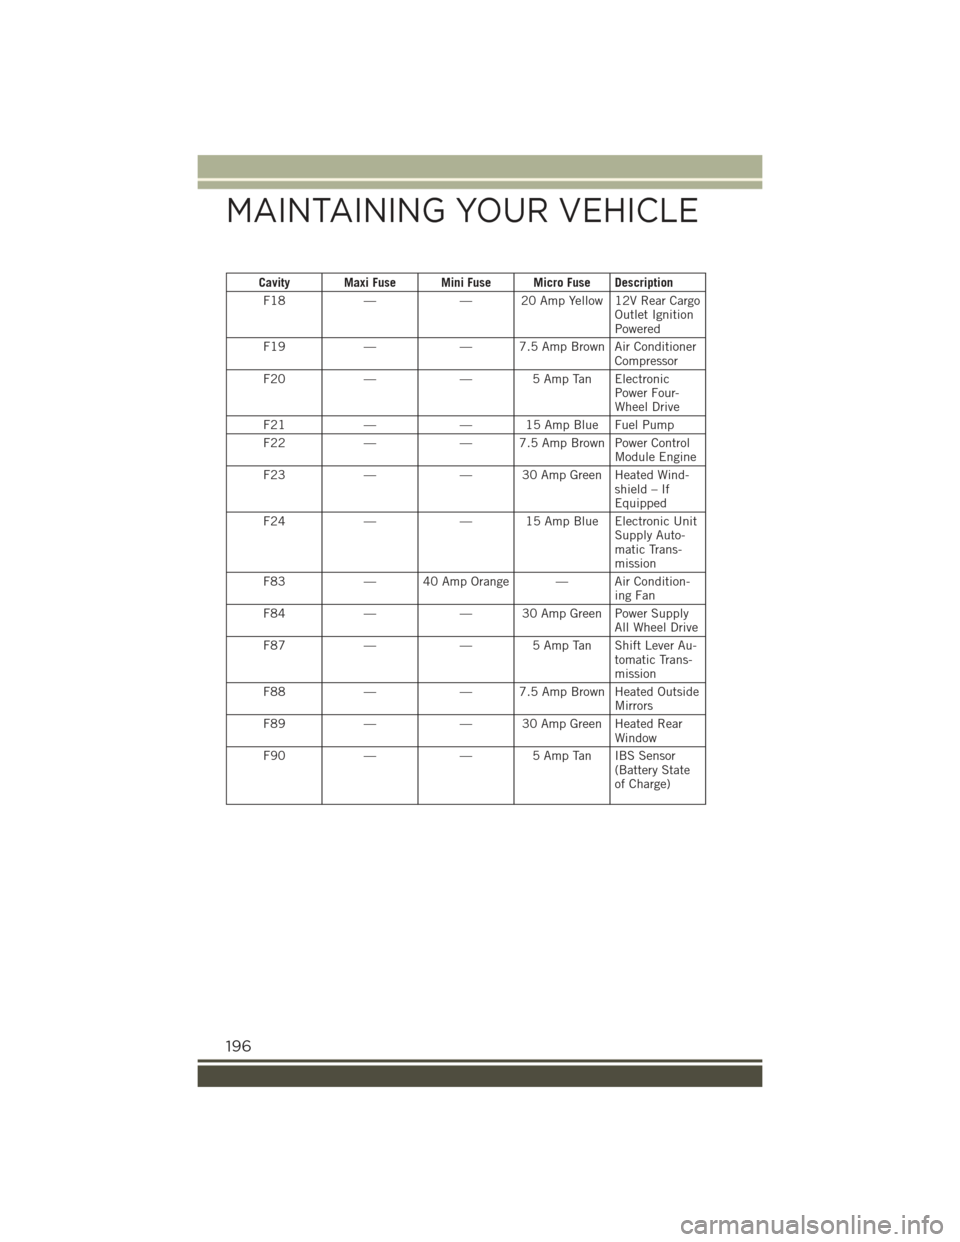
Cavity Maxi Fuse Mini Fuse Micro Fuse Description
F18——20AmpYellow12VRearCargoOutlet IgnitionPowered
F19——7.5AmpBrownAirConditionerCompressor
F20—— 5 Amp Tan ElectronicPower Four-Wheel Drive
F21——15AmpBlueFuelPump
F22——7.5AmpBrownPowerControlModule Engine
F23——30AmpGreenHeatedWind-shield – IfEquipped
F24——15AmpBlueElectronicUnitSupply Auto-matic Trans-mission
F83—40AmpOrange—AirCondition-ing Fan
F84——30AmpGreenPowerSupplyAll Wheel Drive
F87——5AmpTanShiftLeverAu-tomatic Trans-mission
F88——7.5AmpBrownHeatedOutsideMirrors
F89——30AmpGreenHeatedRearWindow
F90——5AmpTanIBSSensor(Battery Stateof Charge)
MAINTAINING YOUR VEHICLE
196
Page 201 of 220
ADDING FUEL
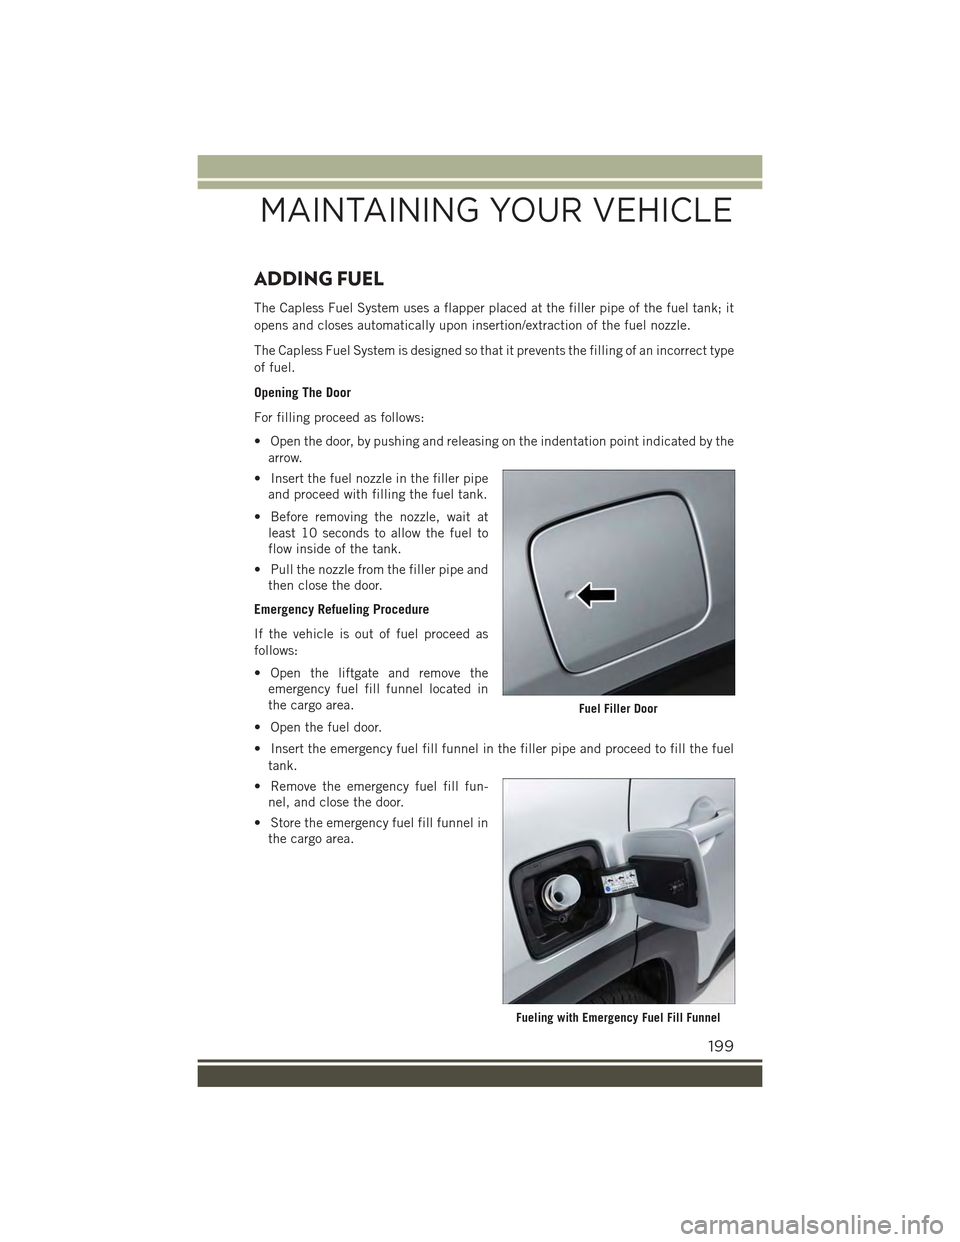
The Capless Fuel System uses a flapper placed at the filler pipe of the fuel tank; it
opens and closes automatically upon insertion/extraction of the fuel nozzle.
The Capless Fuel System is designed so that it prevents the filling of an incorrect type
of fuel.
Opening The Door
For filling proceed as follows:
• Open the door, by pushing and releasing on the indentation point indicated by the
arrow.
• Insert the fuel nozzle in the filler pipe
and proceed with filling the fuel tank.
• Before removing the nozzle, wait at
least 10 seconds to allow the fuel to
flow inside of the tank.
• Pull the nozzle from the filler pipe and
then close the door.
Emergency Refueling Procedure
If the vehicle is out of fuel proceed as
follows:
• Open the liftgate and remove the
emergency fuel fill funnel located in
the cargo area.
• Open the fuel door.
• Insert the emergency fuel fill funnel in the filler pipe and proceed to fill the fuel
tank.
• Remove the emergency fuel fill fun-
nel, and close the door.
• Store the emergency fuel fill funnel in
the cargo area.
Fuel Filler Door
Fueling with Emergency Fuel Fill Funnel
MAINTAINING YOUR VEHICLE
199
Page 202 of 220
WARNING!
• Do not to affix objects/plugs to the end of the filler neck other than is provided
on the car.
• The use of objects/plugs do not comply with the vehicle and may cause
pressure increases inside the tank, creating dangerous conditions.
• Do not approach the neck of the tank with open flames or lit cigarettes its an
extreme fire hazard. Also, avoid close contact with the filler pipe with your face,
do not inhale harmful vapors.
• Do not use your mobile phone in the vicinity of the pump fuel nozzle, it can be
a possible risk of fire.
TIRE PRESSURES
Check the inflation pressure of each tire, including the spare tire (if equipped), at
least monthly and inflate to the recommended pressure for your vehicle.
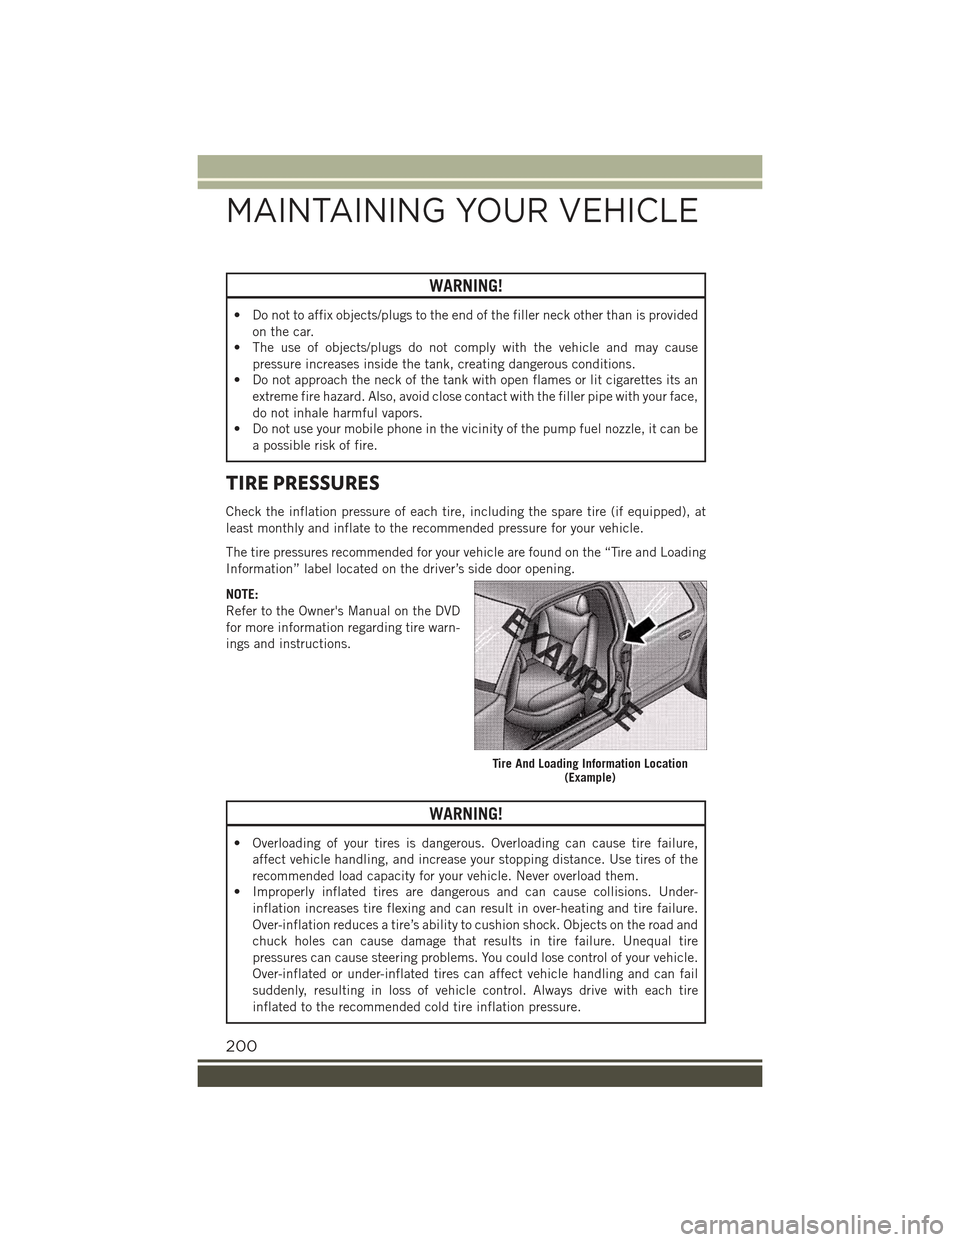
The tire pressures recommended for your vehicle are found on the “Tire and Loading
Information” label located on the driver’s side door opening.
NOTE:
Refer to the Owner's Manual on the DVD
for more information regarding tire warn-
ings and instructions.
WARNING!
• Overloading of your tires is dangerous. Overloading can cause tire failure,
affect vehicle handling, and increase your stopping distance. Use tires of the
recommended load capacity for your vehicle. Never overload them.
• Improperly inflated tires are dangerous and can cause collisions. Under-
inflation increases tire flexing and can result in over-heating and tire failure.
Over-inflation reduces a tire’s ability to cushion shock. Objects on the road and
chuck holes can cause damage that results in tire failure. Unequal tire
pressures can cause steering problems. You could lose control of your vehicle.
Over-inflated or under-inflated tires can affect vehicle handling and can fail
suddenly, resulting in loss of vehicle control. Always drive with each tire
inflated to the recommended cold tire inflation pressure.
Tire And Loading Information Location(Example)
MAINTAINING YOUR VEHICLE
200
Page 210 of 220
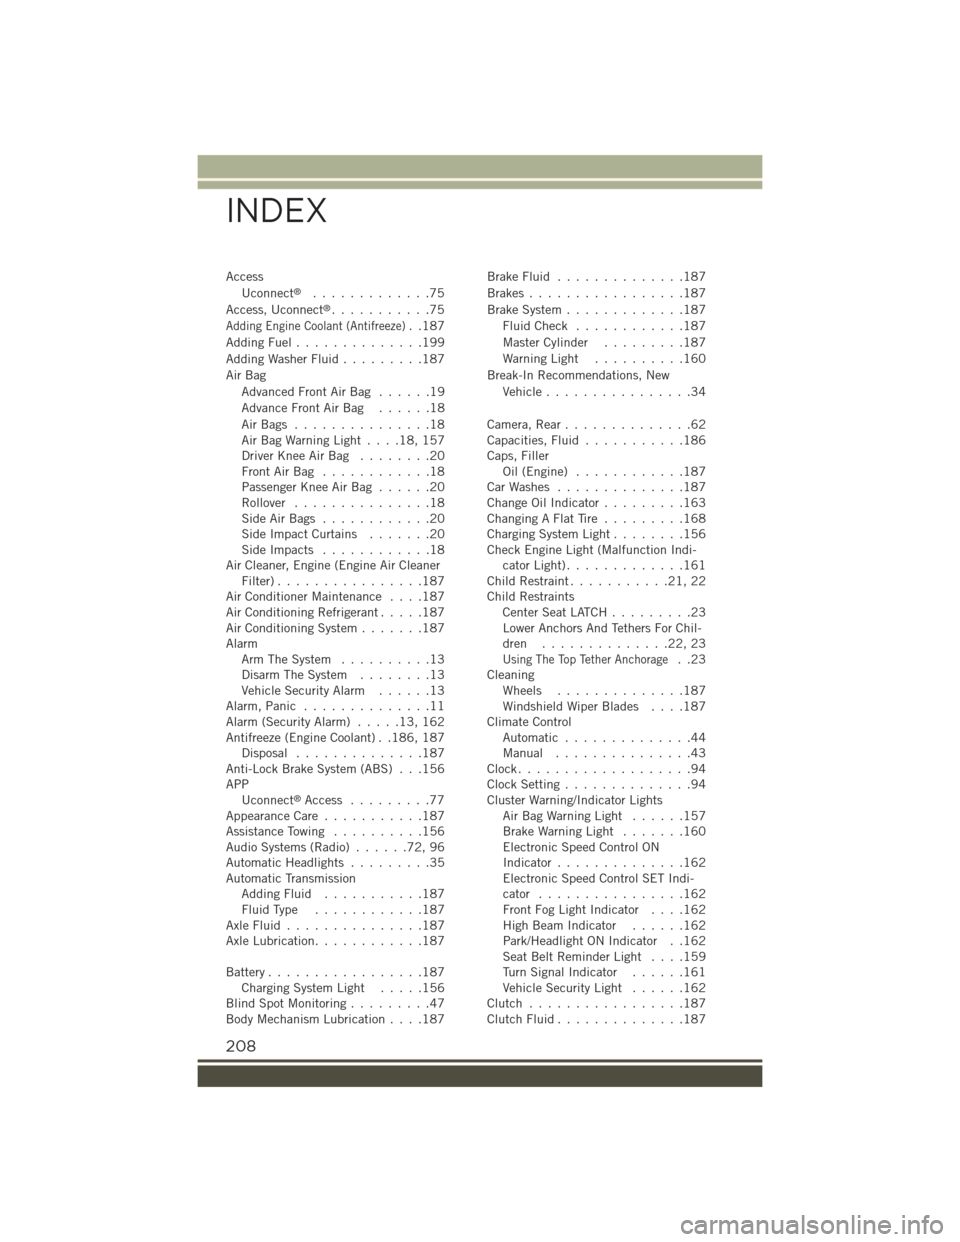
Access
Uconnect®.............75
Access, Uconnect®...........75
Adding Engine Coolant (Antifreeze)..187
Adding Fuel..............199
Adding Washer Fluid.........187
Air Bag
Advanced Front Air Bag . . . . . .19
Advance Front Air Bag . . . . . .18
Air Bags . . . . . . . . . . . . . . .18Air Bag Warning Light . . . .18, 157Driver Knee Air Bag........20Front Air Bag . . . . . . . . . . . .18Passenger Knee Air Bag......20Rollover...............18Side Air Bags . . . . . . . . . . . .20Side Impact Curtains.......20Side Impacts . . . . . . . . . . . .18Air Cleaner, Engine (Engine Air CleanerFilter)................187Air Conditioner Maintenance....187Air Conditioning Refrigerant.....187Air Conditioning System.......187AlarmArm The System..........13Disarm The System........13Vehicle Security Alarm......13Alarm, Panic..............11Alarm (Security Alarm).....13,162Antifreeze (Engine Coolant) . .186, 187Disposal . . . . . . . . . . . . . .187Anti-Lock Brake System (ABS) . . .156APPUconnect®Access . . . . . . . . .77Appearance Care...........187Assistance Towing..........156Audio Systems (Radio)......72,96Automatic Headlights.........35Automatic TransmissionAdding Fluid...........187Fluid Type . . . . . . . . . . . .187Axle Fluid . . . . . . . . . . . . . . .187Axle Lubrication............187
Battery.................187Charging System Light.....156Blind Spot Monitoring.........47Body Mechanism Lubrication....187
Brake Fluid . . . . . . . . . . . . . .187
Brakes . . . . . . . . . . . . . . . . .187
Brake System.............187
Fluid Check . . . . . . . . . . . .187
Master Cylinder.........187
Warning Light..........160
Break-In Recommendations, New
Vehicle................34
Camera, Rear..............62Capacities, Fluid...........186Caps, FillerOil (Engine)............187Car Washes . . . . . . . . . . . . . .187Change Oil Indicator.........163Changing A Flat Tire . . . . . . . . .168Charging System Light........156Check Engine Light (Malfunction Indi-cator Light).............161Child Restraint...........21,22Child RestraintsCenter Seat LATCH . . . . . . . . .23Lower Anchors And Tethers For Chil-dren . . . . . . . . . . . . . .22, 23
Using The Top Tether Anchorage..23CleaningWheels..............187Windshield Wiper Blades....187Climate ControlAutomatic..............44Manual . . . . . . . . . . . . . . .43Clock...................94Clock Setting..............94Cluster Warning/Indicator LightsAir Bag Warning Light . . . . . .157Brake Warning Light.......160Electronic Speed Control ONIndicator..............162Electronic Speed Control SET Indi-cator................162Front Fog Light Indicator....162High Beam Indicator......162Park/Headlight ON Indicator . .162Seat Belt Reminder Light . . . .159Turn Signal Indicator......161Vehicle Security Light......162Clutch . . . . . . . . . . . . . . . . .187Clutch Fluid . . . . . . . . . . . . . .187
INDEX
208
Page 211 of 220
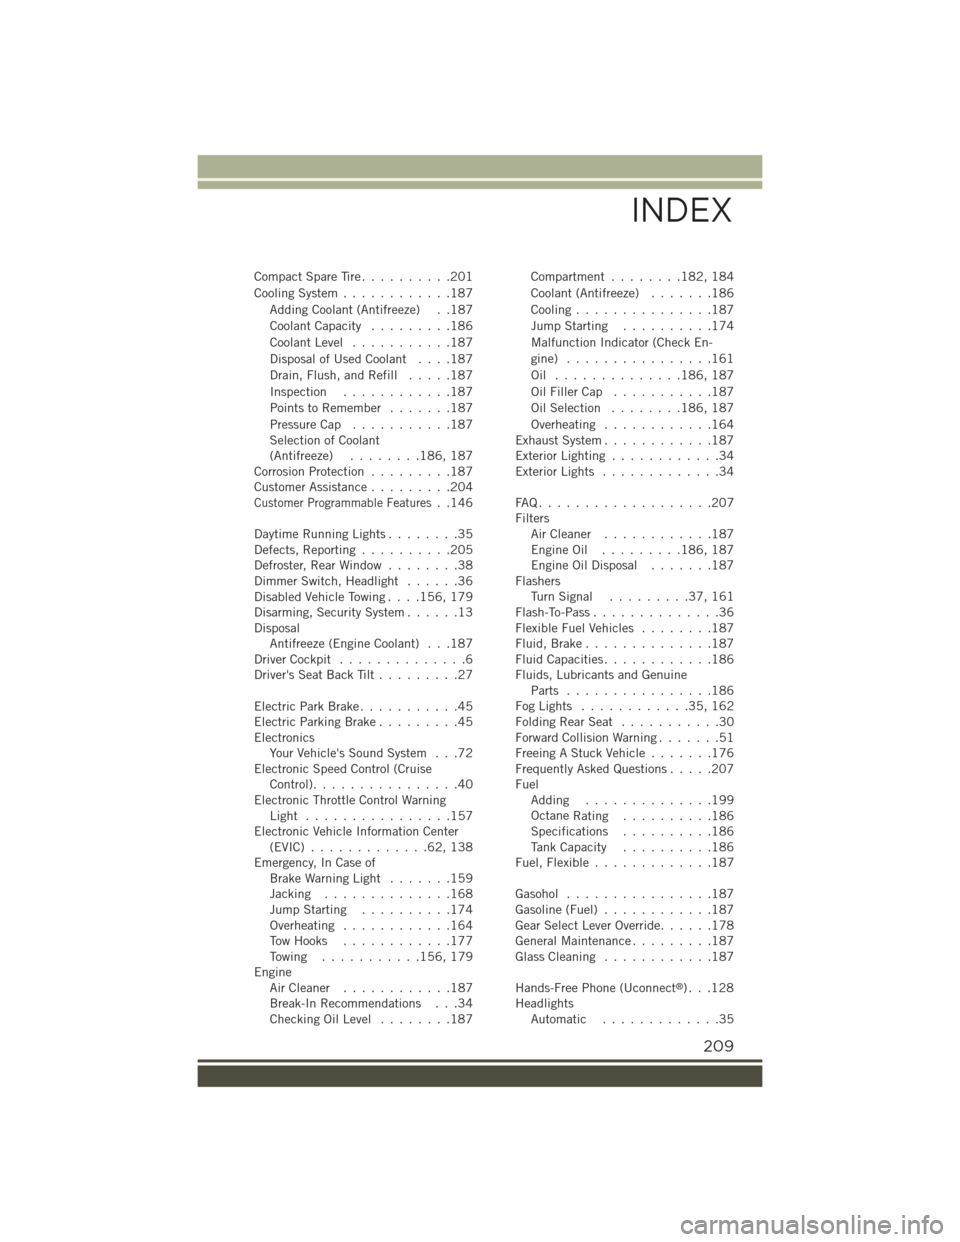
Compact Spare Tire..........201
Cooling System............187
Adding Coolant (Antifreeze) . .187
Coolant Capacity.........186
Coolant Level...........187
Disposal of Used Coolant....187
Drain, Flush, and Refill.....187
Inspection............187
Points to Remember . . . . . . .187
Pressure Cap...........187Selection of Coolant(Antifreeze)........186, 187Corrosion Protection.........187Customer Assistance.........204
Customer Programmable Features..146
Daytime Running Lights........35Defects, Reporting..........205Defroster, Rear Window........38Dimmer Switch, Headlight......36Disabled Vehicle Towing....156, 179Disarming, Security System......13DisposalAntifreeze (Engine Coolant) . . .187Driver Cockpit..............6Driver's Seat Back Tilt.........27
Electric Park Brake...........45Electric Parking Brake.........45ElectronicsYour Vehicle's Sound System . . .72Electronic Speed Control (CruiseControl)................40Electronic Throttle Control WarningLight . . . . . . . . . . . . . . . .157Electronic Vehicle Information Center(EVIC) . . . . . . . . . . . . .62, 138Emergency, In Case ofBrake Warning Light.......159Jacking..............168Jump Starting..........174Overheating............164Tow Hooks............177To w i n g . . . . . . . . . . .156, 179EngineAir Cleaner . . . . . . . . . . . .187Break-In Recommendations . . .34Checking Oil Level........187
Compartment........182, 184
Coolant (Antifreeze).......186
Cooling...............187
Jump Starting..........174
Malfunction Indicator (Check En-
gine) . . . . . . . . . . . . . . . .161
Oil . . . . . . . . . . . . . .186, 187
Oil Filler Cap...........187
Oil Selection........186, 187
Overheating............164Exhaust System............187Exterior Lighting............34Exterior Lights.............34
FA Q . . . . . . . . . . . . . . . . . . . 2 0 7FiltersAir Cleaner............187Engine Oil . . . . . . . . .186, 187Engine Oil Disposal.......187FlashersTu r n S i g n a l . . . . . . . . . 3 7 , 1 6 1Flash-To-Pass..............36Flexible Fuel Vehicles........187Fluid, Brake..............187Fluid Capacities............186Fluids, Lubricants and GenuineParts . . . . . . . . . . . . . . . .186Fog Lights . . . . . . . . . . . .35, 162Folding Rear Seat . . . . . . . . . . .30Forward Collision Warning.......51Freeing A Stuck Vehicle.......176Frequently Asked Questions.....207FuelAdding..............199OctaneRating..........186Specifications..........186Tank Capacity..........186Fuel, Flexible . . . . . . . . . . . . .187
Gasohol................187Gasoline (Fuel)............187Gear Select Lever Override......178General Maintenance.........187Glass Cleaning............187
Hands-Free Phone (Uconnect®). . .128HeadlightsAutomatic.............35
INDEX
209