light JEEP RENEGADE 2015 1.G Owner's Manual
[x] Cancel search | Manufacturer: JEEP, Model Year: 2015, Model line: RENEGADE, Model: JEEP RENEGADE 2015 1.GPages: 220, PDF Size: 34.11 MB
Page 39 of 220
Turn Signals
Move the multifunction lever up or down and the arrows on each side of the
instrument cluster flash to show proper operation of the front and rear turn signal
lights.
• A “Turn Signal On” message will appear in the instrument cluster and a
continuous chime will sound if the vehicle is driven more than 1 mile (1.6 km) with
either turn signal on.
• When the Daytime Running Lights are on and a turn signal is activated, the
Daytime Running Lamp will turn off on the side of the vehicle in which the turn
signal is flashing. The Daytime Running Lamp will turn back on when the turn
signal is turned off.
WINDSHIELD WIPER/WASHER
The windshield wiper/washer controls are located on the lever on the right side of the
steering column. The front wipers are operated by rotating a switch, located on the
end of the lever.
CAUTION!
Always remove any buildup of snow that prevents the windshield wiper blades
from returning to the “park” position. If the windshield wiper switch is turned off,
and the blades cannot return to the “park” position, damage to the wiper motor
may occur.
Windshield Wiper Operation
Rotate the windshield wiper knob to one of the two detent positions for intermittent
settings, the third detent for low wiper operation and the fourth for high wiper
operation.
Windshield Washer Operation
To use the washer, pull the lever toward you and hold while spray is desired. If the
lever is pulled while in the intermittent setting, the wipers will turn on and operate for
several wipe cycles after the lever is released, and then resume the intermittent
interval previously selected.
If the lever is pulled while the wipers are in the off position, the wipers will operate
for several wipe cycles, then turn off.
WARNING!
Sudden loss of visibility through the windshield could lead to a collision. You
might not see other vehicles or other obstacles. To avoid sudden icing of the
windshield during freezing weather, warm the windshield with the defroster before
and during windshield washer use.
OPERATING YOUR VEHICLE
37
Page 42 of 220
ELECTRONIC SPEED CONTROL
When engaged, the Electronic Speed Control takes over accelerator operations at
speeds greater than 25 mph (40 km/h).
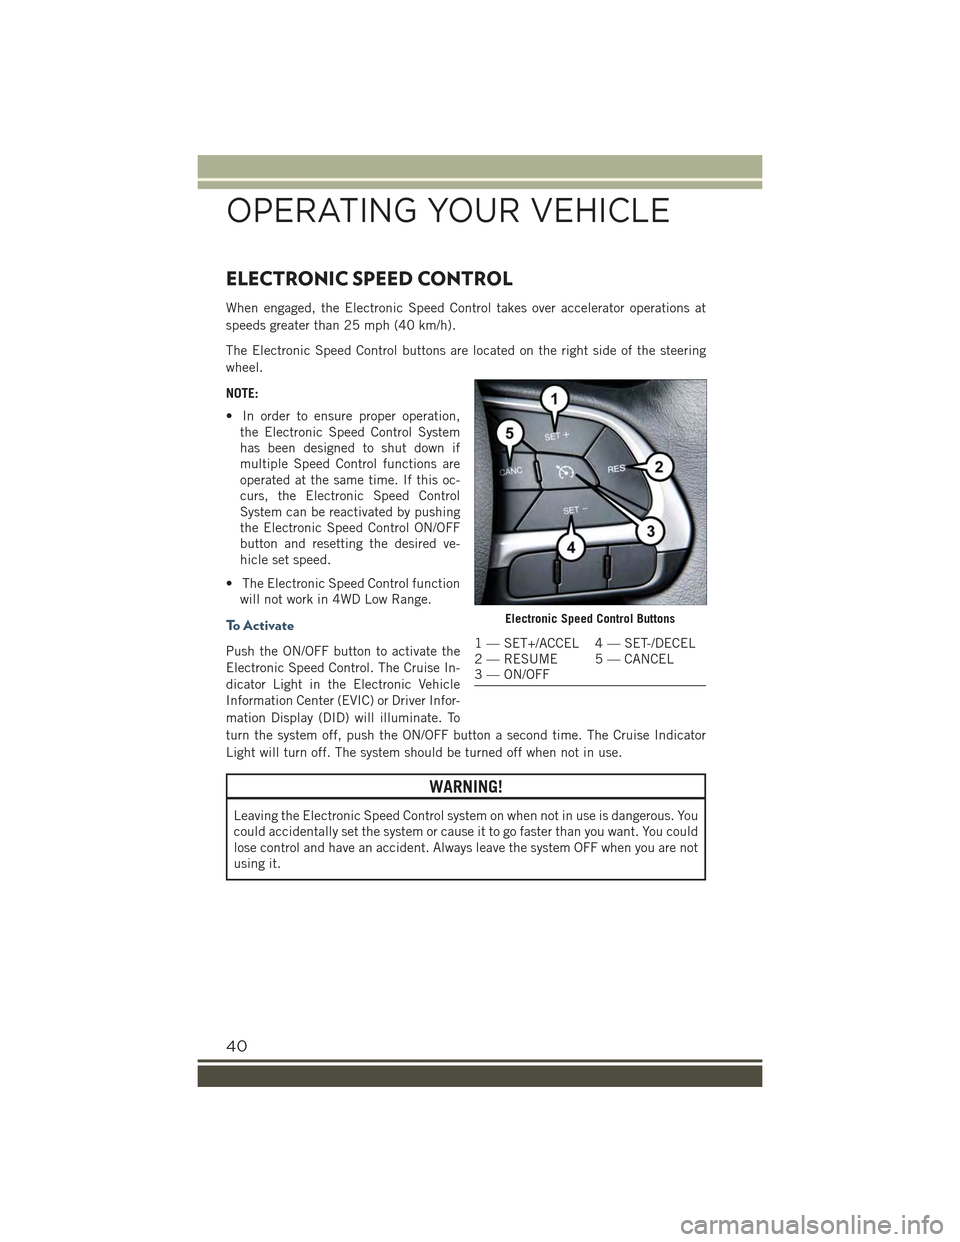
The Electronic Speed Control buttons are located on the right side of the steering
wheel.
NOTE:
• In order to ensure proper operation,
the Electronic Speed Control System
has been designed to shut down if
multiple Speed Control functions are
operated at the same time. If this oc-
curs, the Electronic Speed Control
System can be reactivated by pushing
the Electronic Speed Control ON/OFF
button and resetting the desired ve-
hicle set speed.
• The Electronic Speed Control function
will not work in 4WD Low Range.
To A c t i v a t e
Push the ON/OFF button to activate the
Electronic Speed Control. The Cruise In-
dicator Light in the Electronic Vehicle
Information Center (EVIC) or Driver Infor-
mation Display (DID) will illuminate. To
turn the system off, push the ON/OFF button a second time. The Cruise Indicator
Light will turn off. The system should be turned off when not in use.
WARNING!
Leaving the Electronic Speed Control system on when not in use is dangerous. You
could accidentally set the system or cause it to go faster than you want. You could
lose control and have an accident. Always leave the system OFF when you are not
using it.
Electronic Speed Control Buttons
1 — SET+/ACCEL 4 — SET-/DECEL2 — RESUME 5 — CANCEL3 — ON/OFF
OPERATING YOUR VEHICLE
40
Page 44 of 220
To Decrease Speed
When the Electronic Speed Control is set, you can decrease speed by pushing the
SET-button.
The drivers preferred units can be selected through the Uconnect®system if
equipped. The speed increment shown is dependant on the chosen speed unit of
U.S. (mph) or Metric (km/h):
U.S. Speed (mph)
• Pushing the SET-button once will result in a 1 mph decrease in set speed. Each
subsequent tap of the button results in a decrease of 1 mph.
• If the button is continually pushed, the set speed will continue to decrease until
the button is released, then the new set speed will be established.
Metric Speed (km/h)
• Pushing the SET-button once will result in a 1 km/h decrease in set speed. Each
subsequent tap of the button results in a decrease of 1 km/h.
• If the button is continually pushed, the set speed will continue to decrease until
the button is released, then the new set speed will be established.
To A c c e l e r a t e F o r P a s s i n g
Push the accelerator as you would normally. When the pedal is released, the vehicle
will return to the set speed.
Using Electronic Speed Control On Hills
The transmission may downshift on hills to maintain the vehicle set speed.
NOTE:
The Electronic Speed Control system maintains speed up and down hills. A slight
speed change on moderate hills is normal.
On steep hills, a greater speed loss or gain may occur so it may be preferable to drive
without Electronic Speed Control.
WARNING!
Electronic Speed Control can be dangerous where the system cannot maintain a
constant speed. Your vehicle could go too fast for the conditions, and you could
lose control and have an accident. Do not use Electronic Speed Control in heavy
traffic or on roads that are winding, icy, snow-covered or slippery.
OPERATING YOUR VEHICLE
42
Page 48 of 220
To apply the park brake manually, pull up on the switch momentarily. The BRAKE
warning lamp in the instrument cluster and an indicator on the switch will illuminate.
To release the park brake manually, the ignition switch must be in RUN. Then put
your foot on the brake pedal and push the park brake switch down momentarily. Once
the park brake is fully disengaged, the BRAKE warning lamp and the switch indicator
will extinguish.
The park brake can also be automatically released. With the engine running and the
transmission in gear, release the brake pedal and depress the throttle pedal. For
safety reasons, your seat belt must also be fastened.
NOTE:
• You may hear a slight whirring sound from the back of the vehicle while the parking
brake engages or disengages.
• If your foot is on the brake pedal while you are engaging or disengaging the parking
brake, you may notice a small amount of brake pedal movement.
• The new Auto Park Brake feature can be used to apply the park brake automati-
cally every time you park the vehicle. Auto Park Brake can be enabled and disabled
in the Settings menu in Uconnect®or in “Safe Hold” conditions.
• The parking brake can be engaged even when the ignition switch is OFF, however,
it can only be disengaged when the ignition switch is in the ON/RUN position.
• Safehold is a new feature that will automatically apply the park brake under
certain conditions. The EPB monitors the status of the driver’s seat belt, driver’s
door and pedal positions to determine if the driver may have exited while the
vehicle is still capable of moving and will then automatically apply the park brake
to prevent the vehicle from rolling.
• The EPB fault lamp will illuminate if the EPB switch is held for longer than 20
seconds in either the released or applied position. The light will extinguish upon
releasing the switch.
• Refer to the Starting and Operating section of your vehicle’s Owner’s Manual on
the DVD for further details.
CAUTION!
If the Brake System Warning Light remains on with the parking brake released, a
brake system malfunction is indicated. Have the brake system serviced by an
authorized dealer immediately.
OPERATING YOUR VEHICLE
46
Page 49 of 220
WARNING!
• Never use the PARK position as a substitute for the parking brake. Always apply
the parking brake fully when parked to guard against vehicle movement and
possible injury or damage.
• When leaving the vehicle, always make sure the keyless ignition node is in the
“STOP/OFF” mode, remove the Key Fob from the vehicle and lock the vehicle.
• Never leave children alone in a vehicle, or with access to an unlocked vehicle.
Allowing children to be in a vehicle unattended is dangerous for a number of
reasons. A child or others could be seriously or fatally injured. Children should
be warned not to touch the parking brake, brake pedal or the shift lever.
• Do not leave the Key Fob in or near the vehicle, or in a location accessible to
children, and do not leave a vehicle equipped with Keyless Enter-N-Go™in the
MAR/RUN mode. A child could operate power windows, other controls, or move
the vehicle.
• Be sure the parking brake is fully disengaged before driving; failure to do so can
lead to brake failure and a collision.
• Always fully apply the parking brake when leaving your vehicle, or it may roll
and cause damage or injury. Also be certain to leave the transmission in PARK.
Failure to do so may allow the vehicle to roll and cause damage or injury.
BLIND SPOT MONITORING (BSM)
The Blind Spot Monitoring (BSM) system uses two radar-based sensors, located
inside the rear bumper fascia, to detect highway licensable vehicles (automobiles,
trucks, motorcycles, etc.) that enter the blind spot zones from the rear/front/side of
the vehicle.
When the vehicle is started, the BSM warning light will momentarily illuminate in
both outside rear view mirrors to let the driver know that the system is operational.
The BSM system sensors operate when the vehicle is in any forward gear or REVERSE
and enters stand-by mode when the vehicle is in PARK.
The BSM detection zone covers approximately one lane width on both sides of the
vehicle, 10 ft (3 m). The zone length starts at the outside mirror and extends
approximately 20 ft (6 m) beyond the rear bumper of the vehicle. The BSM system
monitors the detection zones on both sides of the vehicle when the vehicle speed
reaches approximately 6 mph (10 km/h) or higher and will alert the driver of vehicles
in these areas.
OPERATING YOUR VEHICLE
47
Page 50 of 220
NOTE:
• The BSM system does NOT alert the driver about rapidly approaching vehicles that
are outside the detection zones.
• The BSM system detection zone DOES NOT change if your vehicle is towing a
trailer. Therefore, visually verify the adjacent lane is clear for both your vehicle and
trailer before making a lane change. If the trailer or other object (i.e., bicycle,
sports equipment) extends beyond the side of your vehicle, this may result in the
BSM warning light remaining illuminated the entire time the vehicle is in a forward
gear. It may be necessary to deactivate BSM system manually by related menu to
avoid a miss-detection.
The area on the rear fascia where the radar sensors are located must remain free of
snow, ice, and dirt/road contamination so that the BSM system can function properly.
Do not block the radar sensors located on the rear fascia with foreign objects (bumper
stickers, bicycle racks, etc.).
The BSM system notifies the driver of objects in the detection zones by illuminating
the BSM warning light located in the outside mirrors in addition to sounding an
audible (chime) alert and reducing the radio volume.
The BSM system monitors the detection zone from three different entry points (side,
rear, front) while driving to see if an alert is necessary. The BSM system will issue an
alert during these types of zone entries.
Entering From The Side
Vehicles that move into your adjacent lanes from either side of the vehicle.
Entering From The Rear
Vehicles that come up from behind your vehicle on either side and enter the rear
detection zone with a relative speed of less than 31 mph (50 km/h).
Overtaking Traffic
If you pass another vehicle slowly with a relative speed less than 15 mph (25 km/h)
and the vehicle remains in the blind spot for approximately 1.5 seconds, the warning
light will be illuminated. If the difference in speed between the two vehicles is
greater than 15 mph (25 km/h), the warning light will not illuminate.
The BSM system is designed not to issue an alert on stationary objects such as
guardrails, posts, walls, foliage, berms, etc. However, occasionally the system may
alert on such objects. This is normal operation and your vehicle does not require
service.
The BSM system will not alert you of objects that are traveling in the opposite
direction of the vehicle in adjacent lanes.
OPERATING YOUR VEHICLE
48
Page 52 of 220
Mode Of Operation
Three selectable modes of operation are available in the Uconnect®System. Refer to
“Uconnect®Settings” in “Multimedia” in your Owner’s Manual on the DVD for
further information.
Blind Spot Alert Lights Only
When operating in Blind Spot Alert mode, the BSM system will provide a visual alert
in the appropriate side view mirror based on a detected object. However, when the
system is operating in Rear Cross Path (RCP) mode, the system will respond with
both visual and audible alerts when a detected object is present. Whenever an
audible alert is requested, the radio is muted.
Blind Spot Alert Lights/Chime
When operating in Blind Spot Alert Lights/Chime mode, the BSM system will provide a
visual alert in the appropriate side view mirror based on a detected object. If the turn
signal is then activated, and it corresponds to an alert present on that side of the vehicle,
an audible chime will also be sounded. Whenever a turn signal and detected object are
present on the same side at the same time, both the visual and audible alerts will be
issued. In addition to the audible alert, the radio (if on) will also be muted.
NOTE:
Whenever an audible alert is requested by the BSM system, the radio is also muted.
When the system is in RCP, the system will respond with both visual and audiblealerts when a detected object is present. Whenever an audible alert is requested, theradio is also muted. Turn/hazard signal status is ignored; the RCP state alwaysrequests the chime.
Blind Spot Alert Off
When the BSM system is turned off, there will be no visual or audible alerts from
either the BSM or RCP systems.
NOTE:
The BSM system will store the current operating mode when the vehicle is shut off.
Each time the vehicle is started the previously stored mode will be recalled and used.
Blind Spot Monitoring Fault Warnings
Sensor Blinded
In the case of a sensor blinded:
• BSM Mirror Warning Lights are turned on continuously.
• A chime will turn on.
• A instrument cluster message will display“Blind Spot Monitoring Unavailable - Wipe
Rear Bumper Corners.”
NOTE:
The rear bumper must be clean and free of any obstructing debris.
OPERATING YOUR VEHICLE
50
Page 53 of 220
System Not Available
In the case of the system being temporary unavailable:
• BSM Mirror Warning Lights are turned on continuously.
• A chime will turn on.
• A instrument cluster message will display“Blind Spot Monitoring Temporary
Unavailable.”
In the case of the system being completely unavailable:
• A chime will turn on.
• A instrument cluster message will display“Blind Spot Monitoring Unavailable -
Service Required.”
NOTE:
Vehicle must be taken to the nearest authorized dealer for service.
FORWARD COLLISION WARNING (FCW) WITH
MITIGATION
Forward Collision Warning (FCW) With Mitigation Operation
The Forward Collision Warning (FCW) system with mitigation provides the driver with
audible warnings, visual warnings (within the EVIC/DID), and may apply a brake jerk
to warn the driver when it detects a potential frontal collision. The warnings and
limited braking are intended to provide the driver with enough time to react, avoid or
mitigate the potential collision.
NOTE:
FCW monitors the information from the forward looking sensors as well as the
Electronic Brake Controller (EBC), to calculate the probability of a forward colli-
sion. When the system determines that a forward collision is probable, the driver
will be provided with audible and visual warnings and may provide a brake jerk
warning.
If the driver does not take action based upon these progressive warnings, then the
system will provide a limited level of active braking to help slow the vehicle and
mitigate the potential forward collision. If the driver reacts to the warnings by braking
and the system determines that the driver intends to avoid the collision by braking
but has not applied sufficient brake force, the system will compensate and provide
additional brake force as required.
Vehicles With A Manual Transmission: After the end of the intervention of automatic
braking, the engine could stall, unless the driver can depress the clutch pedal.
Vehicles With Automatic Transmission: After the end of the intervention of automatic
braking, the transmission may remain in last gear stored: therefore the car could
lurch forward, once the brakes release a few seconds later.
OPERATING YOUR VEHICLE
51
Page 79 of 220
NOTE:
For security reasons, this link is valid for 72 hours from the time you’ve submitted
your email address into the radio touchscreen. If the link has expired, simply re-enter
your email address into the Uconnect®Registration App on the radio touchscreen to
receive another link. The secured registration link will take you through the
Uconnect®Access registration process step by step.
7. To unlock the full potential of Uconnect®Access in your vehicle, you will need to
create or validate an existing Mopar Owner Connect account previously (Owner
Center). Uconnect®along with Mopar Owner Connect have joined forces to create
one destination to manage all of your vehicle needs, from managing your
Uconnect®Access account, to tracking service history and finding recommended
accessories for your vehicle. If you already have a Mopar Owner Connect account,
log in to the website with your existing username/email and password. For
assistance with this web based registration process, call Uconnect®Care at
1-855-792-4241.
8. Once you are logged in to your Mopar Owner Connect account, you will create a
personal Uconnect®Security PIN. The Uconnect®Security PIN will be required
to authenticate you when accessing your account via Uconnect®Care or perform-
ing any remote services such as Remote Door Lock/Unlock, Remote Horn & Lights
or Starting and Stopping the engine.
9. If your vehicle qualifies for a trial package it will be presented. Simply agree to the
Uconnect®Terms of Service (checkbox) and then select the “Start Service”
button.
At this point your vehicle is registered with Uconnect®Access. Continue to set up Via
Mobile. Apps will be downloaded the next time you start your vehicle. If the Apps
have not appeared after 24 hours, please contact Uconnect®Care.
Download The Uconnect® Access App
The Uconnect®Access smartphone app allows you to remotely lock or unlock your
doors, start your engine (if equipped) and activate your horn and lights from virtually
anywhere. The smartphone app also features Via Mobile (if equipped) which uses
your smartphone’s data plan to access your personal Pandora®, iHeartRadio, Slacker
Radio and Aha™ by HARMAN accounts and control them using your vehicle
touchscreen.
The Uconnect®Access app is only compatible with select iPhone®and Android
smartphones. Visit UconnectPhone.com or call 1-877-855-8400 to confirm that
your smartphone is compatible with Uconnect®. Once you’ve confirmed your smart-
phone is compatible, Android and iPhone®users should visit their respective app
store and search for “Uconnect Access” to download the app.
ELECTRONICS
77
Page 84 of 220
Built-In Features (Uconnect® 6.5A/6.5AN)
CAUTION!
• Ignoring the light/LED on the 9-1-1 button in the overhead console could meanyou may not have 9-1-1 Call service if needed. If the light/LED on the 9-1-1button in the overhead console is illuminated, have an authorized dealerservice the 9-1-1 Call system immediately.
• The Occupant Restraint Controller (ORC) turns on the Air Bag Warning Light onthe instrument panel if a malfunction is detected in any part of the air bagsystem. If the Air Bag Warning Light is illuminated, the air bag system may notbe working properly and the 9-1-1 system may not be able to send a signal toa 9-1-1 operator. If the Air Bag Warning Light is illuminated, have anauthorized dealer service your vehicle immediately.
• If anyone in the vehicle could be in danger (e.g., fire or smoke is visible,dangerous road conditions or location), do not wait for voice contact from a9-1-1 operator. All occupants should exit the vehicle immediately and move toa safe location.
• Do not add any aftermarket electrical equipment to the vehicle’s electricalsystem. This may prevent your vehicle from sending a signal to initiate anemergency call. To avoid interference that can cause the 9-1-1 Call system tofail, never add aftermarket equipment (e.g., two-way mobile radio, CB radio,data recorder, etc.) to your vehicle’s electrical system or modify the antennason your vehicle. IF YOUR VEHICLE LOSES BATTERY POWER FOR ANYREASON (INCLUDING DURING OR AFTER AN ACCIDENT), THEUCONNECT®FEATURES, APPS AND SERVICES, AMONG OTHERS, WILLNOT OPERATE.
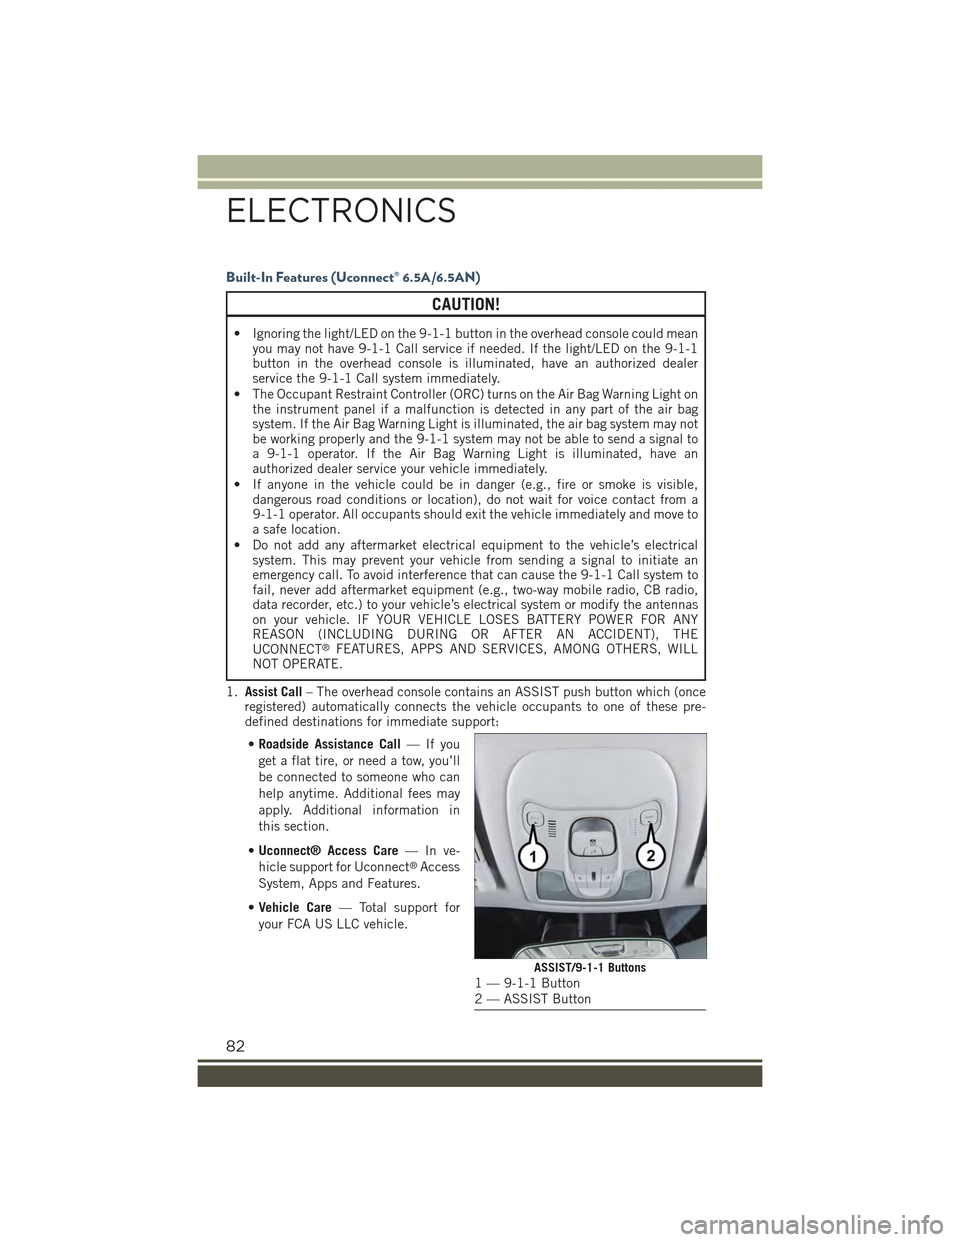
1.Assist Call– The overhead console contains an ASSIST push button which (onceregistered) automatically connects the vehicle occupants to one of these pre-defined destinations for immediate support:
•Roadside Assistance Call—Ifyou
get a flat tire, or need a tow, you’ll
be connected to someone who can
help anytime. Additional fees may
apply. Additional information in
this section.
•Uconnect® Access Care—Inve-
hicle support for Uconnect®Access
System, Apps and Features.
•Vehicle Care— Total support for
your FCA US LLC vehicle.
ASSIST/9-1-1 Buttons1 — 9-1-1 Button2 — ASSIST Button
ELECTRONICS
82