Windshield JEEP RENEGADE 2015 1.G User Guide
[x] Cancel search | Manufacturer: JEEP, Model Year: 2015, Model line: RENEGADE, Model: JEEP RENEGADE 2015 1.GPages: 220, PDF Size: 34.11 MB
Page 3 of 220
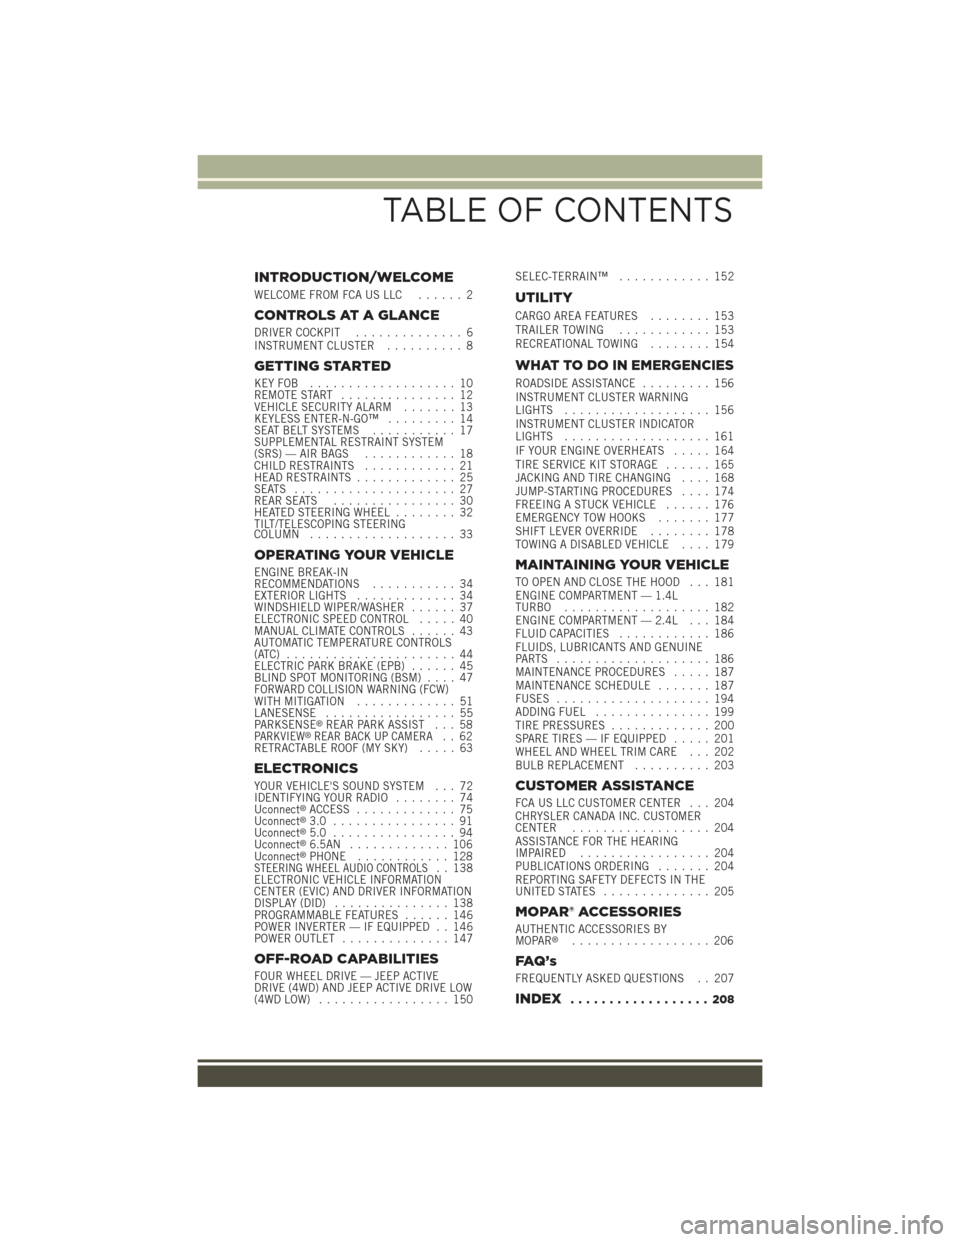
INTRODUCTION/WELCOME
WELCOME FROM FCA US LLC...... 2
CONTROLS AT A GLANCE
DRIVER COCKPIT.............. 6INSTRUMENT CLUSTER.......... 8
GETTING STARTED
KEY FOB . . . . . . . . . . . . . . . . . . . 10REMOTE START............... 12VEHICLE SECURITY ALARM....... 13KEYLESS ENTER-N-GO™......... 14SEAT BELT SYSTEMS........... 17SUPPLEMENTAL RESTRAINT SYSTEM(SRS) — AIR BAGS............ 18CHILD RESTRAINTS............ 21HEAD RESTRAINTS............. 25SEATS . . . . . . . . . . . . . . . . . . . . . 27REAR SEATS................ 30HEATED STEERING WHEEL........ 32TILT/TELESCOPING STEERINGCOLUMN................... 33
OPERATING YOUR VEHICLE
ENGINE BREAK-INRECOMMENDATIONS........... 34EXTERIOR LIGHTS............. 34WINDSHIELD WIPER/WASHER...... 37ELECTRONIC SPEED CONTROL..... 40MANUAL CLIMATE CONTROLS...... 43AUTOMATIC TEMPERATURE CONTROLS(ATC) . . . . . . . . . . . . . . . . . . . . . . 44ELECTRIC PARK BRAKE (EPB)...... 45BLIND SPOT MONITORING (BSM).... 47FORWARD COLLISION WARNING (FCW)WITH MITIGATION . . . . . . . . . . . . . 51LANESENSE................. 55PA R K S E N S E®REAR PARK ASSIST . . . 58PARKVIEW®REAR BACK UP CAMERA.. 62RETRACTABLE ROOF (MY SKY)..... 63
ELECTRONICS
YOUR VEHICLE'S SOUND SYSTEM . . . 72IDENTIFYING YOUR RADIO........ 74Uconnect®ACCESS............. 75Uconnect®3.0 . . . . . . . . . . . . . . . . 91Uconnect®5.0 . . . . . . . . . . . . . . . . 94Uconnect®6.5AN . . . . . . . . . . . . . 106Uconnect®PHONE............ 128STEERING WHEEL AUDIO CONTROLS.. 138ELECTRONIC VEHICLE INFORMATIONCENTER (EVIC) AND DRIVER INFORMATIONDISPLAY (DID)............... 138PROGRAMMABLE FEATURES...... 146POWER INVERTER — IF EQUIPPED . . 146POWER OUTLET.............. 147
OFF-ROAD CAPABILITIES
FOUR WHEEL DRIVE — JEEP ACTIVEDRIVE (4WD) AND JEEP ACTIVE DRIVE LOW(4WD LOW)................. 150
SELEC-TERRAIN™............ 152
UTILITY
CARGO AREA FEATURES........ 153TRAILER TOWING............ 153RECREATIONAL TOWING........ 154
WHAT TO DO IN EMERGENCIES
ROADSIDE ASSISTANCE......... 156INSTRUMENT CLUSTER WARNINGLIGHTS................... 156INSTRUMENT CLUSTER INDICATORLIGHTS................... 161IF YOUR ENGINE OVERHEATS..... 164TIRE SERVICE KIT STORAGE...... 165JACKING AND TIRE CHANGING.... 168JUMP-STARTING PROCEDURES.... 174FREEING A STUCK VEHICLE...... 176EMERGENCY TOW HOOKS....... 177SHIFT LEVER OVERRIDE........ 178TOWING A DISABLED VEHICLE.... 179
MAINTAINING YOUR VEHICLE
TO OPEN AND CLOSE THE HOOD . . . 181ENGINE COMPARTMENT — 1.4LTURBO................... 182ENGINE COMPARTMENT — 2.4L . . . 184FLUID CAPACITIES............ 186FLUIDS, LUBRICANTS AND GENUINEPA RT S . . . . . . . . . . . . . . . . . . . . 1 8 6MAINTENANCE PROCEDURES..... 187MAINTENANCE SCHEDULE....... 187FUSES.................... 194ADDING FUEL............... 199TIRE PRESSURES............. 200SPARE TIRES — IF EQUIPPED..... 201WHEEL AND WHEEL TRIM CARE . . . 202BULB REPLACEMENT.......... 203
CUSTOMER ASSISTANCE
FCA US LLC CUSTOMER CENTER . . . 204CHRYSLER CANADA INC. CUSTOMERCENTER.................. 204ASSISTANCE FOR THE HEARINGIMPAIRED . . . . . . . . . . . . . . . . . 204PUBLICATIONS ORDERING....... 204REPORTING SAFETY DEFECTS IN THEUNITED STATES . . . . . . . . . . . . . . 205
MOPAR® ACCESSORIES
AUTHENTIC ACCESSORIES BYMOPAR®.................. 206
FAQ ’ s
FREQUENTLY ASKED QUESTIONS . . 207
INDEX.................. 208
TABLE OF CONTENTS
Page 15 of 220
Remote Start Windshield Wiper De–icer Activation — If Equipped
When Remote Start is active and the outside ambient temperature is less than 41° F
(5° C), the wiper De-Icer will be enabled. On exiting Remote Start, resume the
previous operation except if the De-Icer is active; the De-Icer timer and operation will
continue.
VEHICLE SECURITY ALARM
The Vehicle Security Alarm monitors the vehicle doors for unauthorized entry and the
Keyless Enter-N-Go™ START/STOP button for unauthorized operation. While the
Vehicle Security Alarm is armed, interior switches for door locks and decklid release
are disabled. If something triggers the alarm, the Vehicle Security Alarm will provide
the following audible and visible signals: the horn will pulse, the park lamps and/or
turn signals will flash, and the Vehicle Security Light in the instrument cluster will
flash.
To A r m :
Lock the door using either the power door lock switch (one door must be open) or the
LOCK button on the Remote Keyless Entry (RKE) transmitter (doors can be open or
closed), and close all doors.
The Vehicle Security Light in the instrument cluster will flash for 16 seconds. This
shows that the Vehicle Security Alarm is arming. During this period, if a door is
opened, the ignition is cycled to MAR/RUN, or the power door locks are unlocked in
any manner, the Vehicle Security Alarm will automatically disarm.
NOTE:
• The Vehicle Security Alarm will not arm if you lock the doors with the manual door
lock plungers.
• Once armed, the Vehicle Security Alarm disables the unlock switch on the driver
door trim panel and passenger door trim panel.
To D i s a r m T h e S y s t e m :
Push the Key Fob UNLOCK button or cycle the ignition to the MAR/RUN position.
The Vehicle Security Alarm is designed to protect your vehicle. However, you can
create conditions where the Vehicle Security Alarm will give you a false alarm. If one
of the previously described arming sequences has occurred, the Vehicle Security
Alarm will arm regardless of whether you are in the vehicle or not. If you remain in the
vehicle and open a door, the alarm will sound. If this occurs, disarm the Vehicle
Security Alarm.
If the Vehicle Security Alarm is armed and the battery becomes disconnected, the
Vehicle Security Alarm will remain armed when the battery is reconnected. The
exterior lights will flash, and the horn will sound. If this occurs, disarm the Vehicle
Security Alarm.
GETTING STARTED
13
Page 37 of 220
Automatic Lighting — If Equipped
Light Sensor
The light sensor is equipped with an infrared LED, located on the windshield. It
detects changes in light intensity outside the vehicle, based on the sensitivity of light
set by using the Menu on the display or on the Uconnect®system.
The higher the sensitivity, the lesser the amount of external light required for
controlling the lighting.
Automatic Headlights
Turn the headlight switch to the AUTO position.
When the automatic headlights are enabled, the headlight time delay is active. After
the ignition switch is placed in the STOP/OFF position, the headlights will automati-
cally turn off after approximately 90 seconds depending on the settings of the
feature.
The timing of the headlights is adjustable between 0, 30, 60 and 90 seconds.
NOTE:
The engine must be running before the headlights will come on in the automatic
mode.
Daytime Running Lights (DRL) — If Equipped
The Daytime Running Lights (DRLs) will turn on when the engine is started and
remain on unless the headlights are turned on, the electronic parking brake is
applied, or the engine is shut off.
The DRLs will be disabled during turn signal operation and resume operation when
the turn signal operation has ended.
Front Fog Lights — If Equipped
The front fog light switch is built into the headlight switch.
To activate the front fog lights, turn on the parking lights or the low beam headlights
and push the headlight switch. To turn off the front fog lights, push the headlight
switch a second time or turn off the headlight switch.
An indicator light in the instrument cluster illuminates when the fog lights are turned
on.
NOTE:
The fog lights will operate with the low beam headlights or parking lights on.
Selecting the high beam headlights will turn off the fog lights.
Parking Lights
Rotate the headlight switch to the first position to turn on the parking lights. The
parking light indicator in the cluster will illuminate.
OPERATING YOUR VEHICLE
35
Page 39 of 220
Turn Signals
Move the multifunction lever up or down and the arrows on each side of the
instrument cluster flash to show proper operation of the front and rear turn signal
lights.
• A “Turn Signal On” message will appear in the instrument cluster and a
continuous chime will sound if the vehicle is driven more than 1 mile (1.6 km) with
either turn signal on.
• When the Daytime Running Lights are on and a turn signal is activated, the
Daytime Running Lamp will turn off on the side of the vehicle in which the turn
signal is flashing. The Daytime Running Lamp will turn back on when the turn
signal is turned off.
WINDSHIELD WIPER/WASHER
The windshield wiper/washer controls are located on the lever on the right side of the
steering column. The front wipers are operated by rotating a switch, located on the
end of the lever.
CAUTION!
Always remove any buildup of snow that prevents the windshield wiper blades
from returning to the “park” position. If the windshield wiper switch is turned off,
and the blades cannot return to the “park” position, damage to the wiper motor
may occur.
Windshield Wiper Operation
Rotate the windshield wiper knob to one of the two detent positions for intermittent
settings, the third detent for low wiper operation and the fourth for high wiper
operation.
Windshield Washer Operation
To use the washer, pull the lever toward you and hold while spray is desired. If the
lever is pulled while in the intermittent setting, the wipers will turn on and operate for
several wipe cycles after the lever is released, and then resume the intermittent
interval previously selected.
If the lever is pulled while the wipers are in the off position, the wipers will operate
for several wipe cycles, then turn off.
WARNING!
Sudden loss of visibility through the windshield could lead to a collision. You
might not see other vehicles or other obstacles. To avoid sudden icing of the
windshield during freezing weather, warm the windshield with the defroster before
and during windshield washer use.
OPERATING YOUR VEHICLE
37
Page 40 of 220
Mist
Use this feature when weather conditions make occasional usage of the wipers necessary.
Push the lever upward to the Mist position and release for a single wiping cycle.
NOTE:
The mist feature does not activate the washer pump; therefore, no washer fluid will
be sprayed on the windshield. The wash function must be used in order to spray the
windshield with washer fluid.
Rear Window Wiper/Washer
The rear wiper/washer controls are located on the lever on the right side of the
steering column. The rear wiper/washer is operated by rotating a switch, located at
the middle of the lever.
Rotate the center portion of the lever upward to the first detent for intermittent
operation and to the second detent for continuous rear wiper operation.
To use the washer, push the lever forward and hold while spray is desired. If the leveris pushed while in the intermittent setting, the wiper will turn on and operate forseveral wipe cycles after the end of the lever is released, and then resume theintermittent interval previously selected.
If the lever is pushed while the wiper is in the off position, the wiper will operate for
several wipe cycles, then turn off.
NOTE:
As a protective measure, the pump will stop if the switch is held for more than 30
seconds. Once the lever is released, the pump will resume normal operation.
If the rear wiper is operating when the ignition is turned to the STOP/OFF position,
the wiper will automatically return to the “park” position.
Rear Window Defroster
The rear window defroster button is located with the Climate Controls on the
instrument panel. Push this button to turn on the rear window defroster. An indicator
in the button will illuminate when the rear window defroster is on. The rear window
defroster automatically turns off after approximately 20 minutes. To manually shut
the defroster off, push the button a second time.
OPERATING YOUR VEHICLE
38
Page 41 of 220
CAUTION!
Failure to follow these cautions can cause damage to the heating elements:
• Use care when washing the inside of the rear window. Do not use abrasivewindow cleaners on the interior surface of the window. Use a soft cloth and amild washing solution, wiping parallel to the heating elements. Labels can bepeeled off after soaking with warm water.
• Do not use scrapers, sharp instruments, or abrasive window cleaners on theinterior surface of the window.
• Keep all objects a safe distance from the window.
Windshield Wiper De-Icer — If Equipped
Your vehicle may be equipped with a Windshield Wiper De-Icer feature that may be
activated under the following conditions:
•Activation By Front Defrost— The Windshield Wiper De-Icer will be activated
automatically in the case of a cold weather manual start with full front defrost, and
the ambient temperature is below 41° F (5° C).
•Activation By Rear Defrost— The Windshield Wiper De-Icer will be activated
automatically when the rear defrost is turned on and the ambient temperature is
below 41° F (5° C).
•Activation By Remote Start Operation— When Remote Start is active and the
outside ambient temperature is less than 41° F (5° C), the Windshield Wiper
De-Icer will be enabled. Upon exiting remote start mode the Windshield Wiper
De-Icer will remain on.
OPERATING YOUR VEHICLE
39
Page 55 of 220
• Changing the Active Braking to “Off” prevents the system from providing limited
active braking, or additional brake support if the driver is not braking adequately
in the event of a potential frontal collision, but maintains the audible and visual
warnings.
• Changing the status of the system is only possible with the vehicle at a complete
stop.
NOTE:
The FCW system state is not kept in memory from one key cycle to the next. If the
system is turned OFF, it will turn On when the vehicle is restarted.
Changing FCW And Active Braking Status
By changing the settings on the menu of the Uconnect®system, you can change the
sensitivity of the system by choosing one of the following three options: "Near",
"Medium" or "Far".
The default option is "Medium". This setting provides that the system notify the driver
of a possible accident with the vehicle ahead of it when the latter is at a standard
distance, intermediate between the other two possible settings.
By setting the sensitivity of the system to "Far", the system will warn the driver of a
possible accident with the vehicle in front when the latter is at a greater distance,
giving you the chance to act on the brakes in a more limited and gradual. This setting
gives the driver the maximum possible time of reaction to prevent a possible
accident.
By changing the option to "Near", the system will warn the driver of a possible
accident with the vehicle ahead of it when the latter is a reduced distance. This
setting offers a reaction time to the driver lower than the settings "Medium" and "Far",
in the case of a potential accident, while a more dynamic driving of the car.
The setting of the sensitivity of the system is maintained in memory when the engine
is switched off.
FCW Limited Warning
If the EVIC/DID displays “FCW Limited Functionality” or “FCW Limited Functionality
Clean Front Windshield” momentarily, there may be a condition that limits FCW
functionality. Although the vehicle is still drivable under normal conditions, the
active braking may not be fully available. Once the condition that limited the system
performance is no longer present, the system will return to its full performance state.
If the problem persists, see your authorized dealer.
Service FCW Warning
If the system turns off, and the EVIC/DID displays:
• FCW Unavailable Service Required
This indicates there is an internal system fault. Although the vehicle is still drivable
under normal conditions, have the system checked by an authorized dealer.
OPERATING YOUR VEHICLE
53
Page 164 of 220
- High Beam Indicator
Indicates that headlights are on high beam.
- Front Fog Light Indicator
This indicator will illuminate when the front fog lights are on.
- Vehicle Security Light
This light will flash rapidly for approximately 15 seconds when the vehicle security
alarm is arming. The light will flash at a slower speed continuously after the alarm is
set. The security light will also come on for about three seconds when the ignition is
first turned on.
- Electronic Speed Control ON Indicator
This indicator will illuminate when the electronic speed control has been activated to
the “ON” position.
- Electronic Speed Control SET Indicator
This indicator will illuminate when the cruising speed has been set.
- Hill Descent Control Indicator — If Equipped
This indicator will illuminate when Hill Descent Control (HDC) has been selected
using the Hill Descent Control Switch.
- Park/Headlight ON Indicator
This indicator will illuminate when the park lights or headlights are turned on.
- Electronic Stability Control (ESC) OFF Indicator Light
This light indicates the Electronic Stability Control (ESC) is off.
- Windshield Washer Fluid Low Indicator
This indicator will illuminate when the windshield washer fluid is low.
- Door Ajar Indicator
This indicator will illuminate when a door(s) is left ajar and not fully closed.
- Forward Collision Warning (FCW) OFF Indicator
NOTE:
• The default status of FCW is “On.” This allows the system to warn you of a possible
collision with the vehicle in front of you.
• The forward collision button is located on the switch panel below the Uconnect®
display.
WHAT TO DO IN EMERGENCIES
162
Page 190 of 220
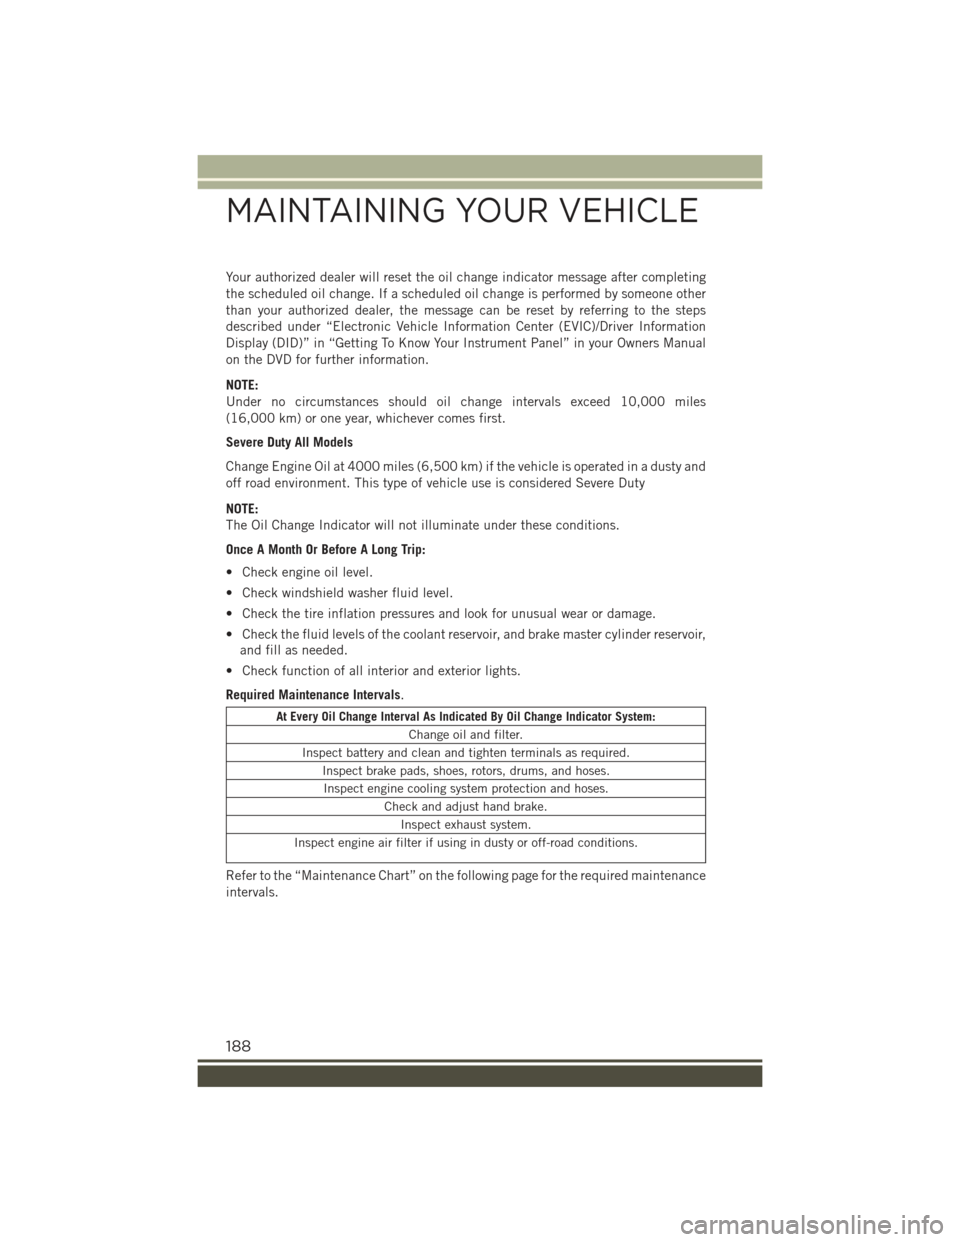
Your authorized dealer will reset the oil change indicator message after completing
the scheduled oil change. If a scheduled oil change is performed by someone other
than your authorized dealer, the message can be reset by referring to the steps
described under “Electronic Vehicle Information Center (EVIC)/Driver Information
Display (DID)” in “Getting To Know Your Instrument Panel” in your Owners Manual
on the DVD for further information.
NOTE:
Under no circumstances should oil change intervals exceed 10,000 miles
(16,000 km) or one year, whichever comes first.
Severe Duty All Models
Change Engine Oil at 4000 miles (6,500 km) if the vehicle is operated in a dusty and
off road environment. This type of vehicle use is considered Severe Duty
NOTE:
The Oil Change Indicator will not illuminate under these conditions.
Once A Month Or Before A Long Trip:
• Check engine oil level.
• Check windshield washer fluid level.
• Check the tire inflation pressures and look for unusual wear or damage.
• Check the fluid levels of the coolant reservoir, and brake master cylinder reservoir,
and fill as needed.
• Check function of all interior and exterior lights.
Required Maintenance Intervals.
At Every Oil Change Interval As Indicated By Oil Change Indicator System:
Change oil and filter.
Inspect battery and clean and tighten terminals as required.
Inspect brake pads, shoes, rotors, drums, and hoses.
Inspect engine cooling system protection and hoses.
Check and adjust hand brake.
Inspect exhaust system.
Inspect engine air filter if using in dusty or off-road conditions.
Refer to the “Maintenance Chart” on the following page for the required maintenance
intervals.
MAINTAINING YOUR VEHICLE
188
Page 191 of 220
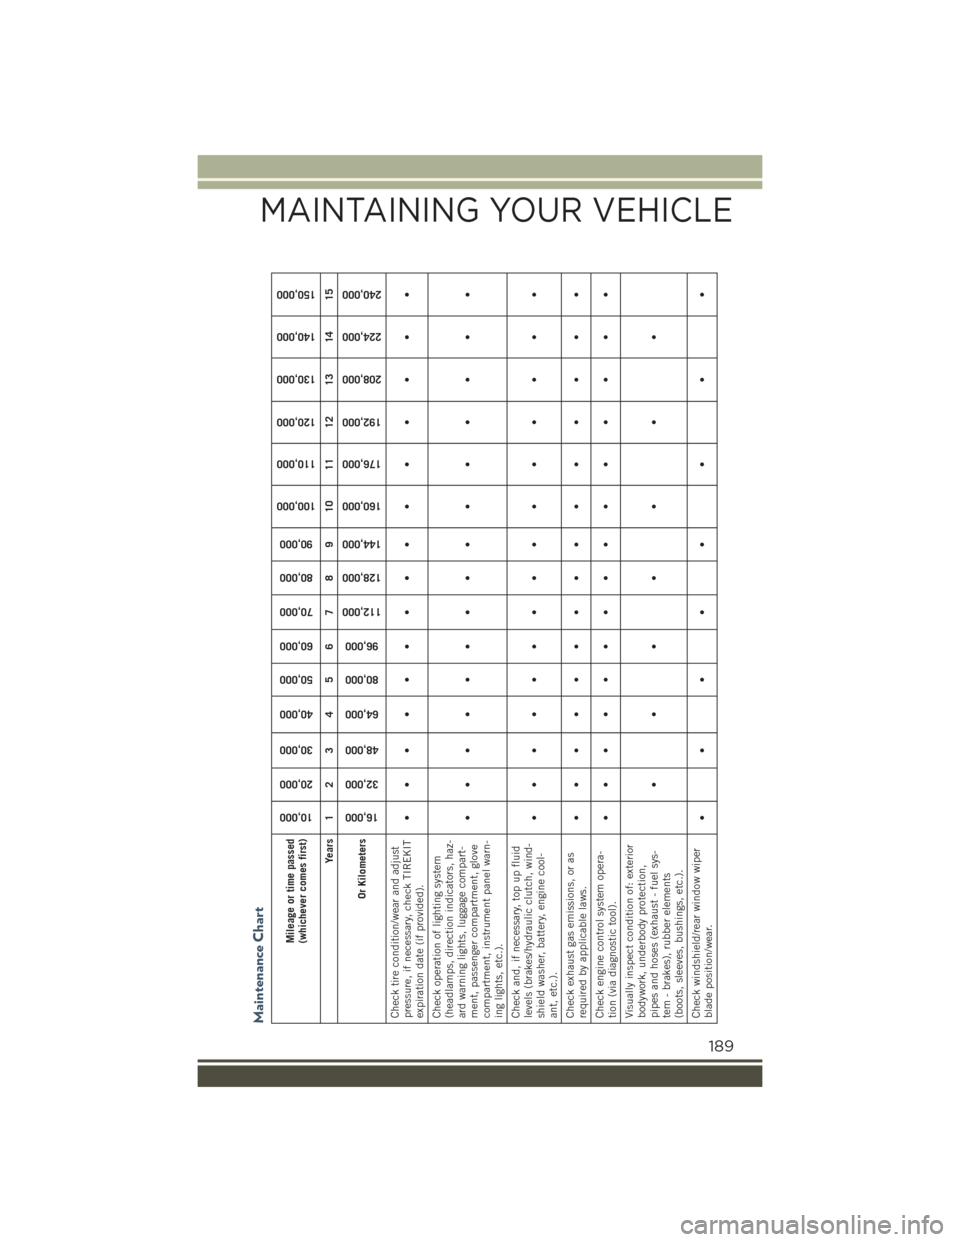
Maintenance Chart
Mileage or time passed(whichever comes first)
10,000
20,000
30,000
40,000
50,000
60,000
70,000
80,000
90,000
100,000
110,000
120,000
130,000
140,000
150,000
Years 1 2 3 4 5 6 7 8 9 10 11 12 13 14 15
Or Kilometers
16,000
32,000
48,000
64,000
80,000
96,000
112,000
128,000
144,000
160,000
176,000
192,000
208,000
224,000
240,000
Check tire condition/wear and adjustpressure, if necessary, check TIREKITexpiration date (if provided).
•• • • •• • •• • • • • • •
Check operation of lighting system(headlamps, direction indicators, haz-ard warning lights, luggage compart-ment, passenger compartment, glovecompartment, instrument panel warn-ing lights, etc.).
•• • • •• • •• • • • • • •
Check and, if necessary, top up fluidlevels (brakes/hydraulic clutch, wind-shield washer, battery, engine cool-ant, etc.).
•• • • •• • •• • • • • • •
Check exhaust gas emissions, or asrequired by applicable laws.
•• • • •• • •• • • • • • •
Check engine control system opera-tion (via diagnostic tool).
•• • • •• • •• • • • • • •
Visually inspect condition of: exteriorbodywork, underbody protection,pipes and hoses (exhaust - fuel sys-tem - brakes), rubber elements(boots, sleeves, bushings, etc.).
•••• • • •
Check windshield/rear window wiperblade position/wear.
•• ••• • • •
MAINTAINING YOUR VEHICLE
189