buttons JEEP RENEGADE 2015 1.G User Guide
[x] Cancel search | Manufacturer: JEEP, Model Year: 2015, Model line: RENEGADE, Model: JEEP RENEGADE 2015 1.GPages: 220, PDF Size: 34.11 MB
Page 16 of 220
KEYLESS ENTER-N-GO™
The Keyless Enter-N-Go™ system is an enhancement to the vehicle’s Remote
Keyless Entry (RKE) feature. This feature allows you to lock and unlock the vehicle's
door(s) and liftgate without having to push the Key Fob LOCK or UNLOCK buttons,
as well as starting and stopping the vehicle with the push of a button.
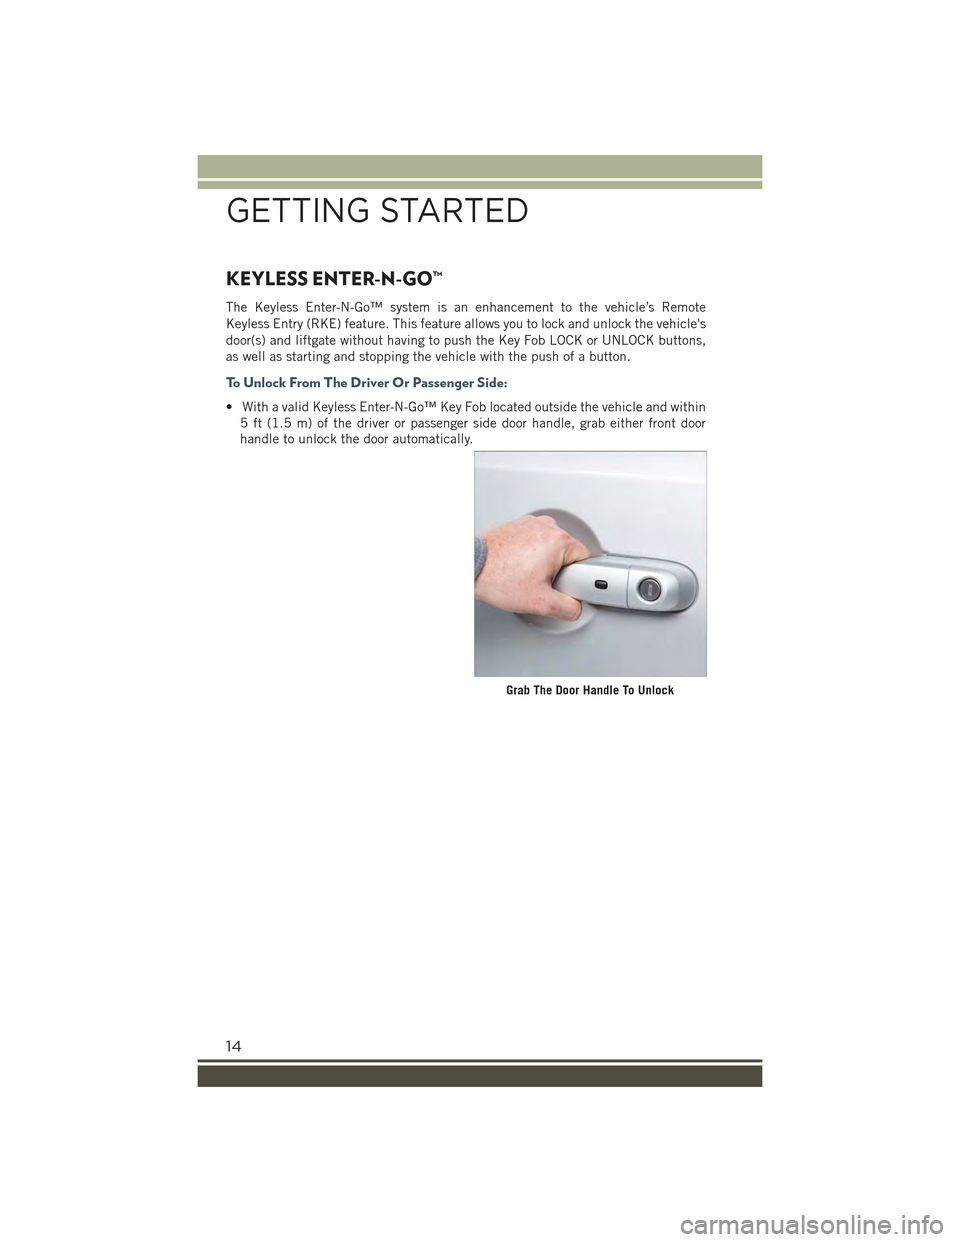
To U n l o c k F r o m T h e D r i v e r O r P a s s e n g e r S i d e :
• With a valid Keyless Enter-N-Go™ Key Fob located outside the vehicle and within
5 ft (1.5 m) of the driver or passenger side door handle, grab either front door
handle to unlock the door automatically.
Grab The Door Handle To Unlock
GETTING STARTED
14
Page 17 of 220
To Lock The Vehicle:
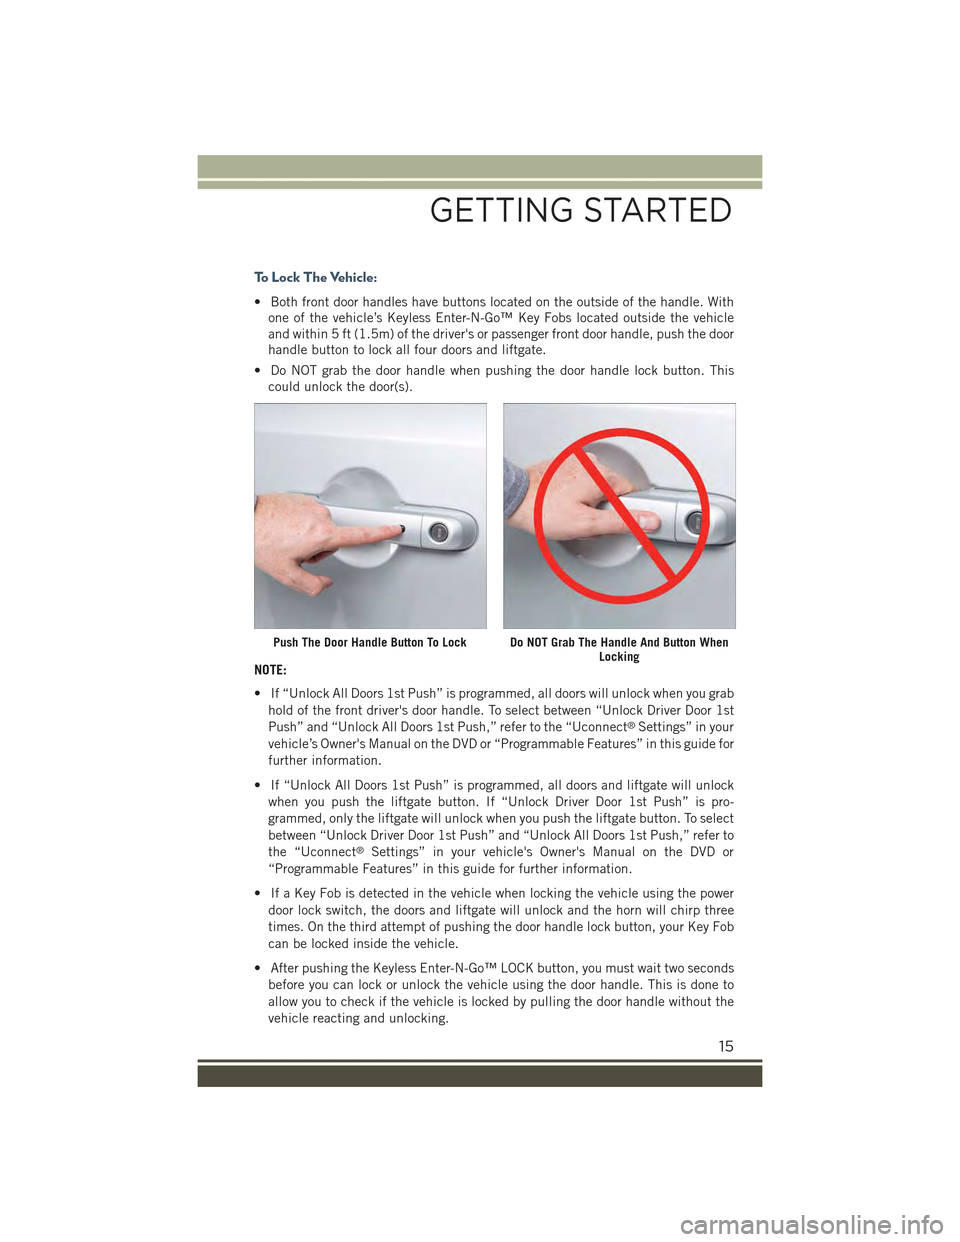
• Both front door handles have buttons located on the outside of the handle. With
one of the vehicle’s Keyless Enter-N-Go™ Key Fobs located outside the vehicle
and within 5 ft (1.5m) of the driver's or passenger front door handle, push the door
handle button to lock all four doors and liftgate.
• Do NOT grab the door handle when pushing the door handle lock button. This
could unlock the door(s).
NOTE:
• If “Unlock All Doors 1st Push” is programmed, all doors will unlock when you grab
hold of the front driver's door handle. To select between “Unlock Driver Door 1st
Push” and “Unlock All Doors 1st Push,” refer to the “Uconnect®Settings” in your
vehicle’s Owner's Manual on the DVD or “Programmable Features” in this guide for
further information.
• If “Unlock All Doors 1st Push” is programmed, all doors and liftgate will unlock
when you push the liftgate button. If “Unlock Driver Door 1st Push” is pro-
grammed, only the liftgate will unlock when you push the liftgate button. To select
between “Unlock Driver Door 1st Push” and “Unlock All Doors 1st Push,” refer to
the “Uconnect®Settings” in your vehicle's Owner's Manual on the DVD or
“Programmable Features” in this guide for further information.
• If a Key Fob is detected in the vehicle when locking the vehicle using the power
door lock switch, the doors and liftgate will unlock and the horn will chirp three
times. On the third attempt of pushing the door handle lock button, your Key Fob
can be locked inside the vehicle.
• After pushing the Keyless Enter-N-Go™ LOCK button, you must wait two seconds
before you can lock or unlock the vehicle using the door handle. This is done to
allow you to check if the vehicle is locked by pulling the door handle without the
vehicle reacting and unlocking.
Push The Door Handle Button To LockDo NOT Grab The Handle And Button WhenLocking
GETTING STARTED
15
Page 42 of 220
ELECTRONIC SPEED CONTROL
When engaged, the Electronic Speed Control takes over accelerator operations at
speeds greater than 25 mph (40 km/h).
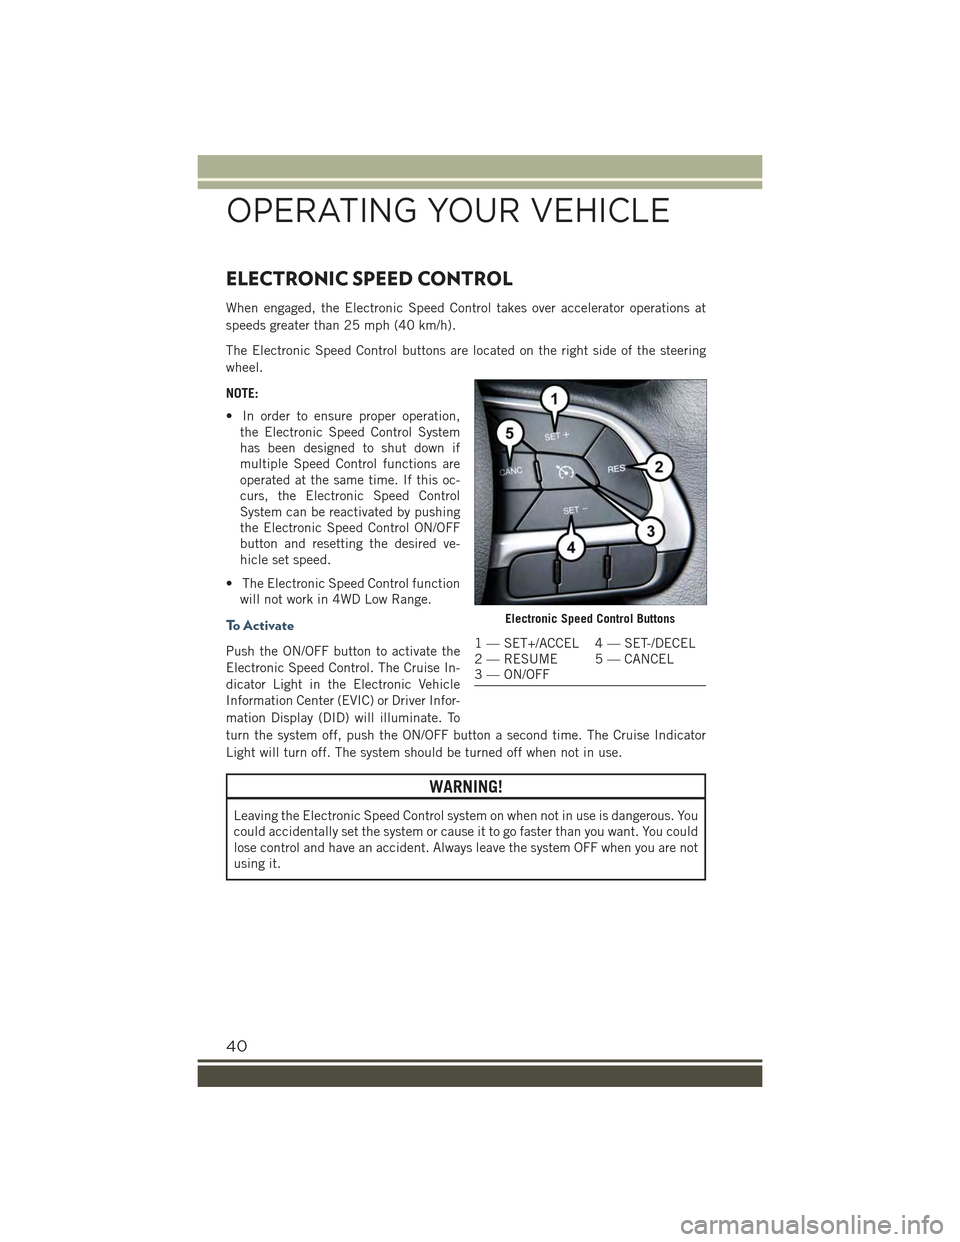
The Electronic Speed Control buttons are located on the right side of the steering
wheel.
NOTE:
• In order to ensure proper operation,
the Electronic Speed Control System
has been designed to shut down if
multiple Speed Control functions are
operated at the same time. If this oc-
curs, the Electronic Speed Control
System can be reactivated by pushing
the Electronic Speed Control ON/OFF
button and resetting the desired ve-
hicle set speed.
• The Electronic Speed Control function
will not work in 4WD Low Range.
To A c t i v a t e
Push the ON/OFF button to activate the
Electronic Speed Control. The Cruise In-
dicator Light in the Electronic Vehicle
Information Center (EVIC) or Driver Infor-
mation Display (DID) will illuminate. To
turn the system off, push the ON/OFF button a second time. The Cruise Indicator
Light will turn off. The system should be turned off when not in use.
WARNING!
Leaving the Electronic Speed Control system on when not in use is dangerous. You
could accidentally set the system or cause it to go faster than you want. You could
lose control and have an accident. Always leave the system OFF when you are not
using it.
Electronic Speed Control Buttons
1 — SET+/ACCEL 4 — SET-/DECEL2 — RESUME 5 — CANCEL3 — ON/OFF
OPERATING YOUR VEHICLE
40
Page 47 of 220
Max Defrost
• Push the MAX Defrost button to change the current airflow setting to Defrost
mode. Performing this function will cause the ATC to change to manual mode, the
blower speed will increase to full, the A/C compressor is turned ON, the tempera-
ture controls are set to (HI), defrost mode is selected, rear defroster is turned ON,
and the air recirculation is turned OFF.
• If the MAX Defrost mode is turned OFF, the climate system will return to the
previous setting.
SYNC
• Push the SYNC button to synchronize the passenger temperature setting with the
driver temperature setting.
• Changing the passenger temperature setting while in Sync will automatically exit
this feature.
Mode Buttons
• The airflow distribution modes can be adjusted so air comes from the instrument
panel, floor, de-mist, and defrost outlets. One, two or all modes may be selected at
any one time.
Heated Mirrors
• The mirrors are heated to melt frost or ice. This feature is activated whenever you
turn on the rear window defroster.
ELECTRIC PARK BRAKE (EPB)
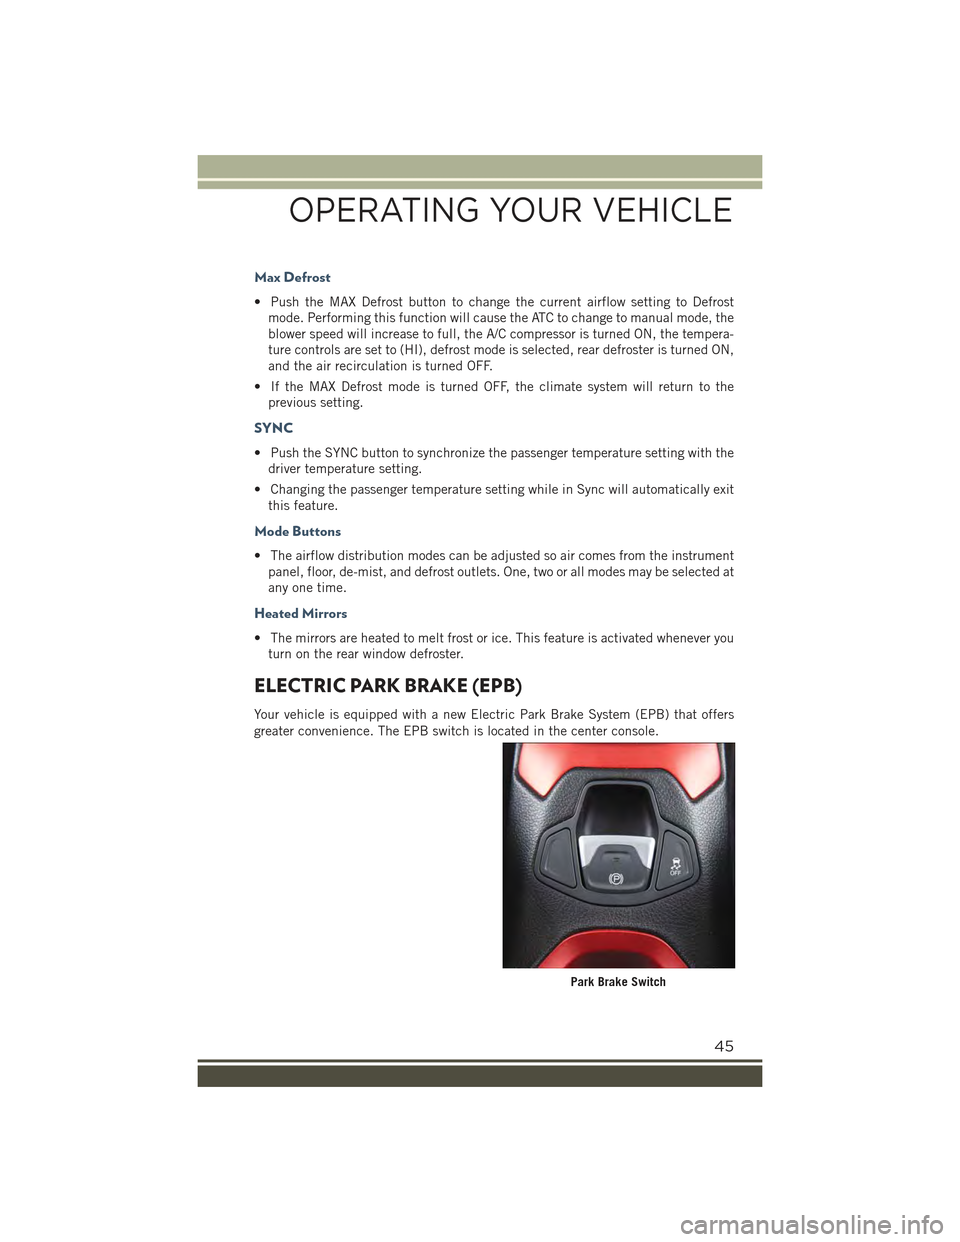
Your vehicle is equipped with a new Electric Park Brake System (EPB) that offers
greater convenience. The EPB switch is located in the center console.
Park Brake Switch
OPERATING YOUR VEHICLE
45
Page 76 of 220
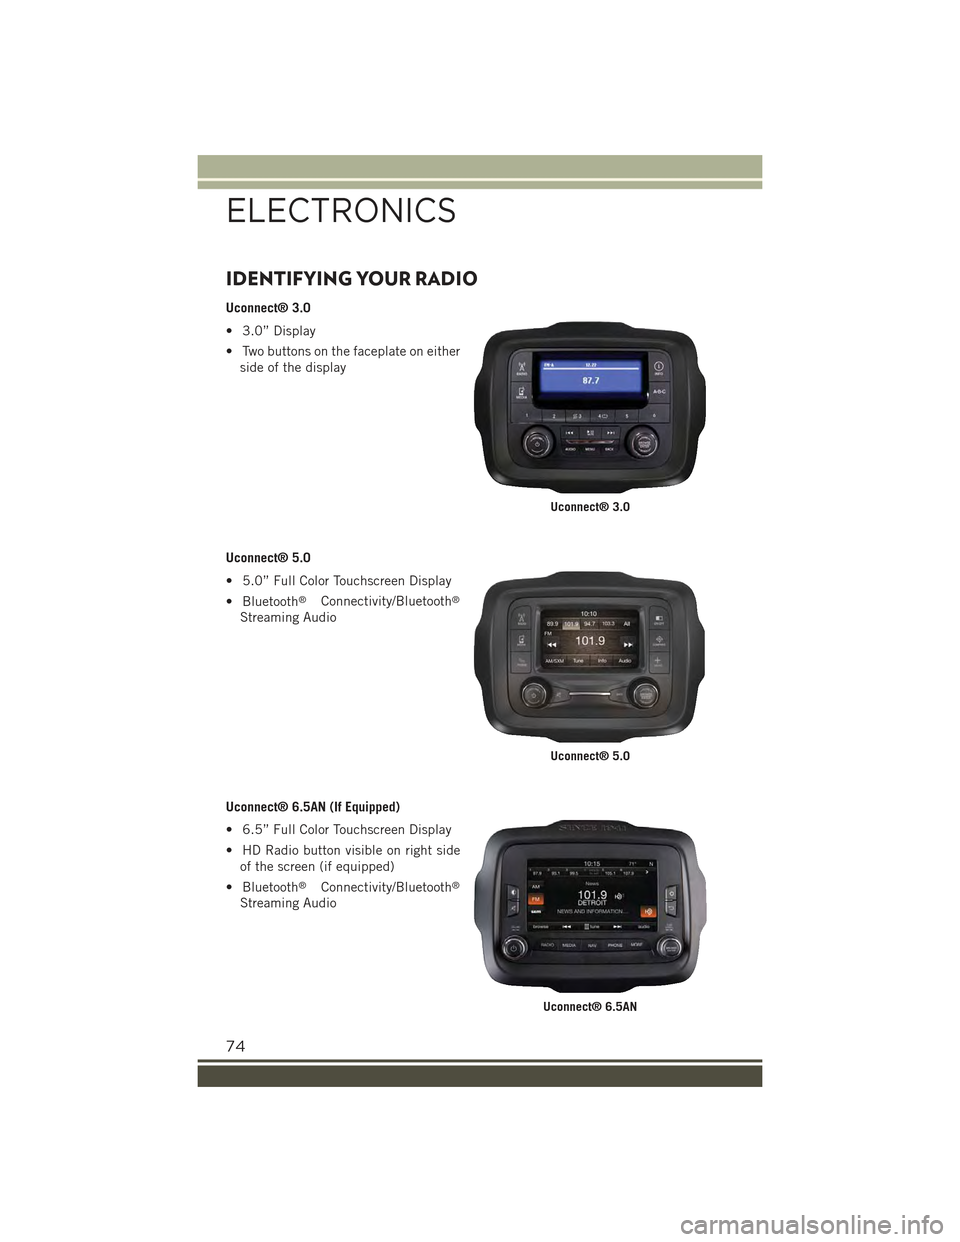
IDENTIFYING YOUR RADIO
Uconnect® 3.0
• 3.0” Display
• Two buttons on the faceplate on either
side of the display
Uconnect® 5.0
• 5.0” Full Color Touchscreen Display
• Bluetooth®Connectivity/Bluetooth®
Streaming Audio
Uconnect® 6.5AN (If Equipped)
• 6.5” Full Color Touchscreen Display
• HD Radio button visible on right side
of the screen (if equipped)
• Bluetooth®Connectivity/Bluetooth®
Streaming Audio
Uconnect® 3.0
Uconnect® 5.0
Uconnect® 6.5AN
ELECTRONICS
74
Page 77 of 220
Uconnect® ACCESS
Uconnect® Access — If Equipped (Available On Uconnect® 6.5AN — U.S.
Residents Only)
WARNING!
ALWAYS drive safely with your hands on the steering wheel. You have full
responsibility and assume all risks related to the use of the Uconnect®features
and applications in this vehicle. Only use Uconnect®when it is safe to do so.
Failure to do so may result in an accident involving serious injury or death.
Uconnect®Access enhances your ownership and driving experience by connecting
your vehicle with a built-in cellular connection. With Uconnect®Access, you can:
• Place a call to a local 9-1-1 Operator for emergency assistance.
• Remotely lock/unlock your doors and start your vehicle from virtually anywhere,
using the Uconnect®Access App from your smartphone. You can also do so by
logging into Mopar Owner Connect, or by calling Uconnect®Care. (Vehicle must be
within the United States and have network coverage).
• Turn your vehicle into a WiFi Hotspot and connect your devices to the internet.
• Receive text or email notifications if your vehicle's theft alarm goes off.
• Receive stolen vehicle assistance, using GPS technology to help authorities locate
your vehicle if it is stolen.
• Listen to your text messages or send free-form text messages with your voice while
keeping your hands on the wheel, using the Voice Texting feature. Requires a cell
phone that supports Bluetooth Message Access Profile (MAP).
• Search for places to eat, shop, relax and play with Yelp®, using your voice or
on-screen menu. Then navigate to them (navigation standard on Uconnect®
6.5AN).
• Get operator assistance using the ASSIST button on your Overhead Console.
Before you drive, familiarize yourself with the easy-to-use Uconnect® Access.
1. The ASSIST and 9-1-1 buttons are located in your Overhead Console. The ASSIST
button is used for contacting Roadside Assistance, Vehicle Care and Uconnect®
Care. The 9-1-1 button connects you to emergency services.
NOTE:
Vehicles sold in Canada and Mexico DO NOT have 9-1-1 Call system capabilities. 9-1-1
or other emergency line operators in Canada and Mexico may not answer or respond to
9-1-1 system calls.
2. The Uconnect®“Apps” button on the menu bar at the bottom right corner of the
radio touchscreen. This is where you can begin your registration process, manage
your Apps and purchase WiFi on demand.
ELECTRONICS
75
Page 78 of 220
3. The Uconnect®Voice Command and Uconnect®Phone buttons are located on the
left side of your steering wheel. These buttons let you use your voice to give
commands, make phone calls, send and receive text messages hands-free, enter
navigation destinations, and control your radio and media devices.
Included Trial Period For New Vehicles
Your new vehicle may come with an included trial period for use of the Uconnect®
Access Services starting at the date of vehicle purchase (date based on vehicle sales
notification from your dealer).To activate the trial, you must first register with
Uconnect® Access. After the trial period, if you wish to continue your Uconnect®
Access Services you can choose to purchase a subscription.
Features And Packages
• After the trial period, you can subscribe to continue your service by visiting the
Uconnect®Store located within the Mopar Owner Connect website
moparownerconnect.com. If you need assistance, U.S. residents can call
Uconnect®Care at 1-855-792-4241.
• For the latest information on packages and pricing information: U.S. residents
visit DriveUconnect.com.
Uconnect® Access Registration (Uconnect® 6.5AN, U.S. 48 Contiguous States,
Alaska And Hawaii)
To unlock the full potential of Uconnect®Access in your vehicle, you first need to
register with Uconnect®Access.
1. From the parked vehicle with the radio touchscreen powered on, select the
“More” button on the faceplate, then select the “Apps” button on the touch-
screen.
NOTE:
Should you require assistance anytime during the registration process, simply call
Uconnect®Care at 1-855-792-4241.
2. Press “Start” on the reminder screen or select “Uconnect Registration” under the
“All Apps” or “Favorites Apps” tab on the Apps list.
3. The Uconnect®Access Registration App will open and display step-by-step
instructions to start your registration.
4. Enter your email address into the radio touchscreen.
5. A message will display on the touchscreen indicating your email submission was
accepted. In a few minutes, you will receive an email which will allow you to
register your vehicle for Uconnect®Access. You should open this email and begin
your Uconnect®Access registration within 72 hours.
6. Check for an email from Uconnect®Access that contains your personalized
registration link. If you don't see it, check your spam or junk mail folder. Open the
email and click on the link to continue registering.
ELECTRONICS
76
Page 84 of 220
Built-In Features (Uconnect® 6.5A/6.5AN)
CAUTION!
• Ignoring the light/LED on the 9-1-1 button in the overhead console could meanyou may not have 9-1-1 Call service if needed. If the light/LED on the 9-1-1button in the overhead console is illuminated, have an authorized dealerservice the 9-1-1 Call system immediately.
• The Occupant Restraint Controller (ORC) turns on the Air Bag Warning Light onthe instrument panel if a malfunction is detected in any part of the air bagsystem. If the Air Bag Warning Light is illuminated, the air bag system may notbe working properly and the 9-1-1 system may not be able to send a signal toa 9-1-1 operator. If the Air Bag Warning Light is illuminated, have anauthorized dealer service your vehicle immediately.
• If anyone in the vehicle could be in danger (e.g., fire or smoke is visible,dangerous road conditions or location), do not wait for voice contact from a9-1-1 operator. All occupants should exit the vehicle immediately and move toa safe location.
• Do not add any aftermarket electrical equipment to the vehicle’s electricalsystem. This may prevent your vehicle from sending a signal to initiate anemergency call. To avoid interference that can cause the 9-1-1 Call system tofail, never add aftermarket equipment (e.g., two-way mobile radio, CB radio,data recorder, etc.) to your vehicle’s electrical system or modify the antennason your vehicle. IF YOUR VEHICLE LOSES BATTERY POWER FOR ANYREASON (INCLUDING DURING OR AFTER AN ACCIDENT), THEUCONNECT®FEATURES, APPS AND SERVICES, AMONG OTHERS, WILLNOT OPERATE.
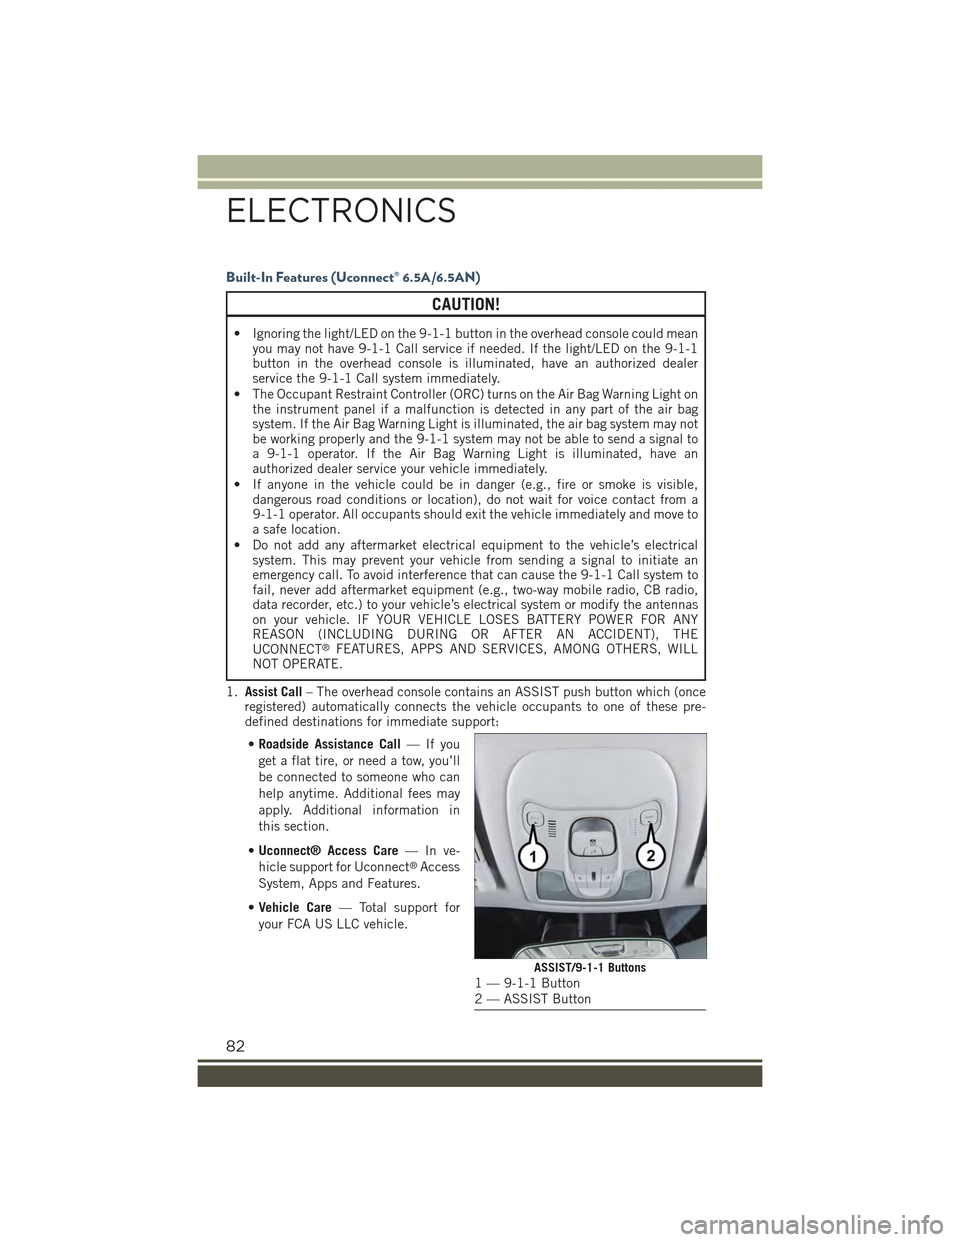
1.Assist Call– The overhead console contains an ASSIST push button which (onceregistered) automatically connects the vehicle occupants to one of these pre-defined destinations for immediate support:
•Roadside Assistance Call—Ifyou
get a flat tire, or need a tow, you’ll
be connected to someone who can
help anytime. Additional fees may
apply. Additional information in
this section.
•Uconnect® Access Care—Inve-
hicle support for Uconnect®Access
System, Apps and Features.
•Vehicle Care— Total support for
your FCA US LLC vehicle.
ASSIST/9-1-1 Buttons1 — 9-1-1 Button2 — ASSIST Button
ELECTRONICS
82
Page 93 of 220
•iHeartRadio— iHeartRadio provides instant access to more than 1,500 live radiostations from across the country and allows listeners to create custom musicstations inspired by their favorite artists or songs.
•Pandora®— Pandora®gives people the music and comedy they love anytime,anywhere. Personalized stations launch instantly, with the input of a favorite artist,track, comedian, or genre.
•Slacker Radio— Enjoy millions of songs and hundreds of handcrafted stations.
NOTE:
For detailed information on how to use Via Mobile apps visit the Mopar OwnerConnect website (moparownerconnect.com) and log in using the username and
password you set up when registering for Uconnect®Access.
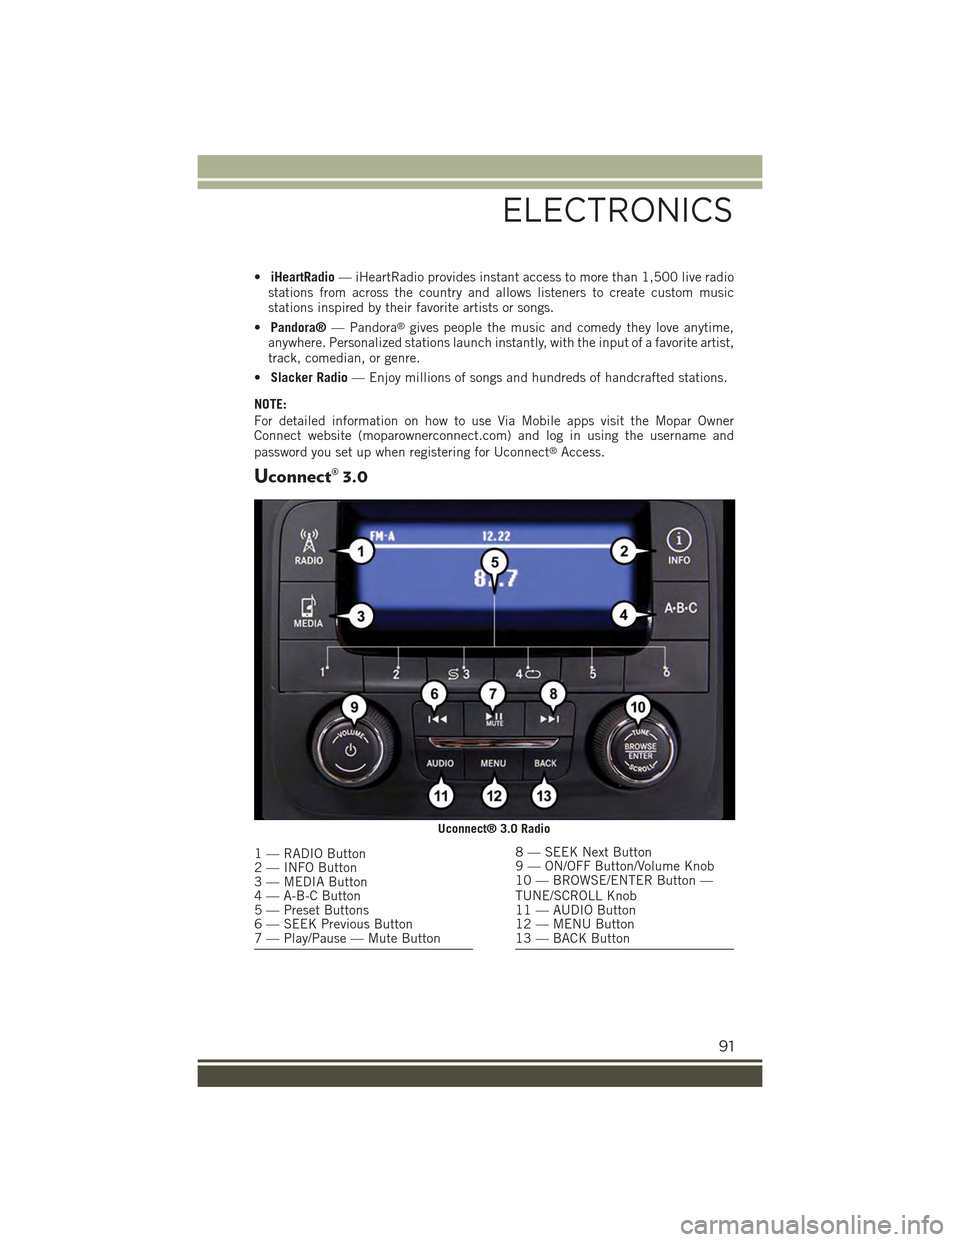
Uconnect® 3.0
Uconnect® 3.0 Radio
1 — RADIO Button2 — INFO Button3 — MEDIA Button4 — A-B-C Button5 — Preset Buttons6 — SEEK Previous Button7 — Play/Pause — Mute Button
8 — SEEK Next Button9 — ON/OFF Button/Volume Knob10 — BROWSE/ENTER Button —TUNE/SCROLL Knob11 — AUDIO Button12 — MENU Button13 — BACK Button
ELECTRONICS
91
Page 94 of 220
Clock Setting
1. Push the Menu button at the bottom of the radio, and push the Enter/Browse
button for System Settings. Next, select the Time and Format setting and then
select Set Time by pushing the Enter/Browse button.
2. Adjust the hours or minutes by turning the Tune/Scroll knob, then pushing the
Enter/Browse button to move to the next entry. You can also select 12hr or 24hr
format by turning the Tune/Scroll knob, then pushing the Enter/Browse button on
the desired selection.
3. Once the time is set push the “Back” button to exit the time screen.
Audio
• Push the AUDIO button on the radio faceplate.
The Audio Menu shows the following options for you to customize your audio settings.
Treble, Mid, Bass, Fade, Balance, Speed Adjusted Volume, Loudness
• Select the desired setting to adjust, then push the ENTER/BROWSE button. Turnthe TUNE/SCROLL knob to adjust the setting + or - 9. Push the “Back” buttonwhen done.
Radio Operation
Seek Previous/Next Buttons
• Push to seek through radio stations in AM, FM or SXM bands.
• Hold either button to bypass stations without stopping.
Store Radio Presets
• The Presets are available for all Radio Modes, and are activated by pushing any of
the six Preset buttons.
• When you are receiving a station that you wish to commit into memory, push and
hold the desired numbered button for more than two seconds, or until you hear a
confirmation beep.
• The Radio stores up to 18 presets in each of the Radio modes. Push the A-B-C
button on the faceplate to select the A, B or C preset list.
ELECTRONICS
92