jump cable JEEP RENEGADE 2015 1.G User Guide
[x] Cancel search | Manufacturer: JEEP, Model Year: 2015, Model line: RENEGADE, Model: JEEP RENEGADE 2015 1.GPages: 220, PDF Size: 34.11 MB
Page 95 of 220
USB/Audio Jack (AUX) Operation
USB/iPod®
• USB/iPod®Mode is entered by either inserting a USB Jump Drive or iPod®cable
into the USB port or by pushing the MEDIA button located left of the display. Once
in Media Mode, select “USB/iPod” for the source.
• Push the MEDIA button, then select “USB/iPod” to change the mode to the USB
device if the device is connected, allowing the music from your portable device to
play through the vehicle's speakers.
Audio Jack (AUX)
The AUX allows a portable device such as an MP3 player or an iPod®to be plugged
into the radio and utilize the vehicle’s audio system, using a 3.5 mm audio cable, to
amplify the source and play through the vehicle’s speakers.
• If the audio cable is connected to the AUX jack and portable device, push the
MEDIA button, then press the “Source” button on the touchscreen and select
“AUX” to change the mode to auxiliary device. This allows the music from your
portable device to play through the vehicle's speakers.
The functions of the portable device are controlled using the device buttons, not the
buttons on the radio. The volume may be controlled using the radio or portable
device.
Uconnect® 3.0 Available Media Hubs
Uconnect®
3.0Media Hub(USB, AUXPorts)
Media Hub(SD, USB,AUX Ports)
Remote USBPort (FullyFunctional)
Remote USBPort (Charg-ing Only)
Dual Charg-ing Ports
S- - OO
S = Standard Equipment
O = Optional Equipment
ELECTRONICS
93
Page 99 of 220
SiriusXM Premier Over 160 Channels
Get every channel available on your satellite radio, and enjoy all you want, all in one
place. Hear commercial-free music plus sports, news, talk and entertainment. Get all
the premium programming, including Howard Stern, every NFL game, Oprah Radio®,
every MLB®and NHL®game, every NASCAR®race and more. And get 20+ Xtra
channels, including SiriusXM Latino, a selection of channels dedicated to Spanish
language programming.
• To access SiriusXM Satellite Radio, push the RADIO Button on the faceplate and
then the “SXM” button on the touchscreen.
SiriusXM services require subscriptions, sold separately after the 12-month trial
included with the new vehicle purchase.If you decide to continue your service at the
end of your trial subscription, the plan you choose will automatically renew and bill at
then-current rates until you call SiriusXM at 1-866-635-2349 for U.S. residents and
1-888-539-7474 for Canadian residents to cancel. See SiriusXM Customer Agreement
for complete terms at www.siriusxm.com and www.siriusxm.ca for Canadian residents.
All fees and programming subject to change. Our satellite service is available only to
those at least 18 and older in the 48 contiguous USA and D.C. Our Sirius satellite
service is also available in PR (with coverage limitations). Our Internet radio service
is available throughout our satellite service area and in AK and HI. © 2014 Sirius XM
Radio Inc. Sirius, XM and all related marks and logos are trademarks of Sirius XM
Radio Inc.
USB/Audio Jack (AUX)/Bluetooth® Operation
USB/iPod®
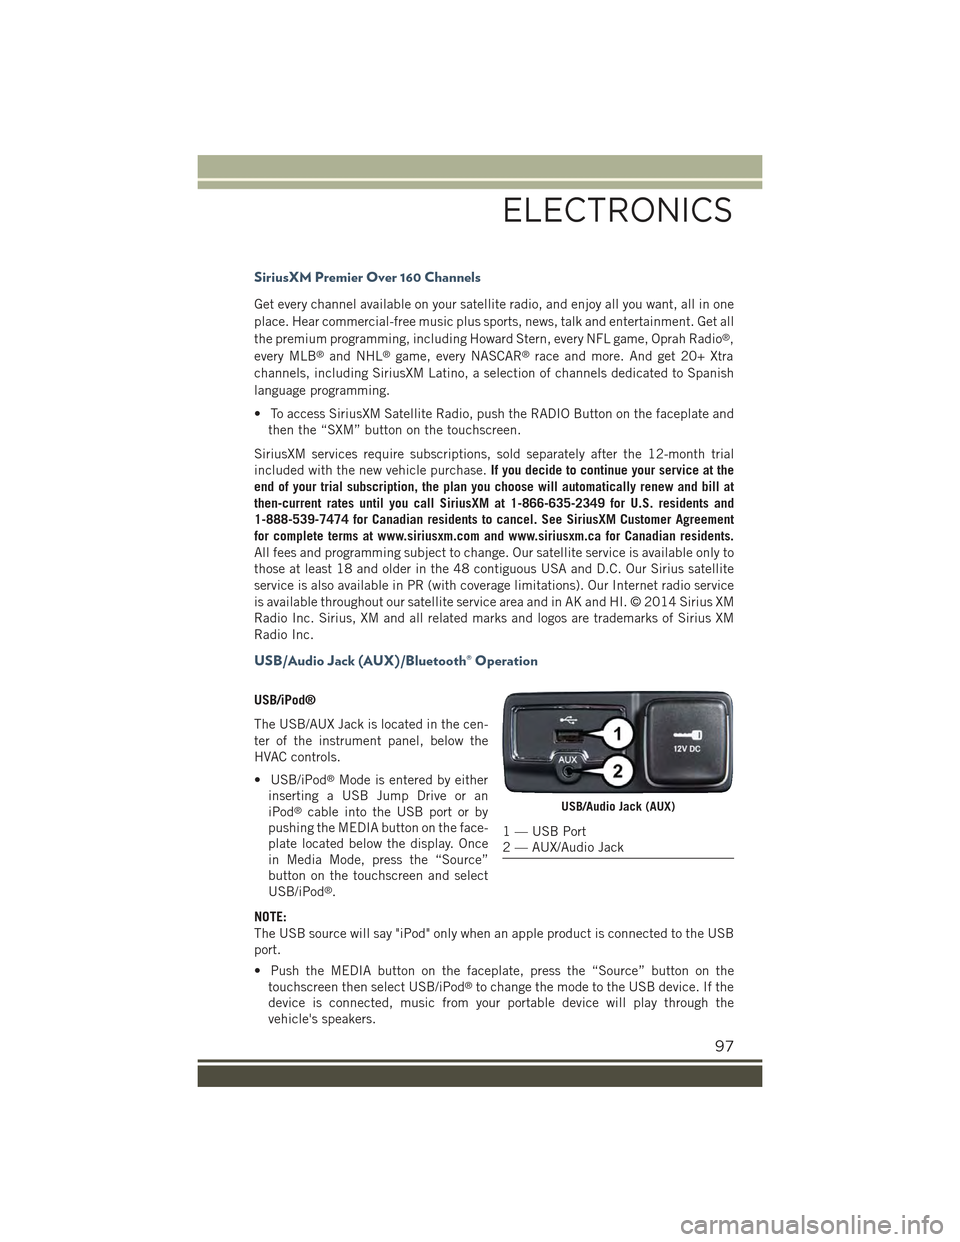
The USB/AUX Jack is located in the cen-
ter of the instrument panel, below the
HVAC controls.
• USB/iPod®Mode is entered by either
inserting a USB Jump Drive or an
iPod®cable into the USB port or by
pushing the MEDIA button on the face-
plate located below the display. Once
in Media Mode, press the “Source”
button on the touchscreen and select
USB/iPod®.
NOTE:
The USB source will say "iPod" only when an apple product is connected to the USB
port.
• Push the MEDIA button on the faceplate, press the “Source” button on the
touchscreen then select USB/iPod®to change the mode to the USB device. If the
device is connected, music from your portable device will play through the
vehicle's speakers.
USB/Audio Jack (AUX)
1 — USB Port2 — AUX/Audio Jack
ELECTRONICS
97
Page 176 of 220
JUMP-STARTING PROCEDURES
If your vehicle has a discharged battery it can be jump-started using a set of jumper
cables and a battery in another vehicle or by using a portable battery booster pack.
Jump-starting can be dangerous if done improperly so please follow the procedures
in this section carefully.
NOTE:
When using a portable battery booster pack follow the manufacturer’s operating
instructions and precautions.
CAUTION!
Do not use a portable battery booster pack or any other booster source with a
system voltage greater than 12 Volts or damage to the battery, starter motor,
alternator or electrical system may occur.
WARNING!
Do not attempt jump-starting if the battery is frozen. It could rupture or explode
and cause personal injury.
Preparations For Jump-Start
The battery in your vehicle is located in the front of the engine compartment, behind
the left headlight assembly.
NOTE:
The positive battery post is covered with a protective cap. Lift up on the cap to gain
access to the positive battery post.
WARNING!
• Take care to avoid the radiator cooling fan whenever the hood is raised. It can
start anytime the ignition switch is ON. You can be injured by moving fan
blades.
• Remove any metal jewelry such as rings, watch bands and bracelets that could
make an inadvertent electrical contact. You could be seriously injured.
• Batteries contain sulfuric acid that can burn your skin or eyes and generate
hydrogen gas which is flammable and explosive. Keep open flames or sparks
away from the battery.
Proceed as follows:
1. Set the Electric Park Brake, shift the automatic transmission into PARK (manual
transmission in NEUTRAL) and turn the ignition to STOP/OFF.
2. Turn off the heater, radio, and all unnecessary electrical accessories.
WHAT TO DO IN EMERGENCIES
174
Page 177 of 220
3. If using another vehicle to jump-start the battery, park the vehicle within the
jumper cables reach, set the parking brake and make sure the ignition is
STOP/OFF.
WARNING!
Do not allow vehicles to touch each other as this could establish a ground
connection and personal injury could result.
Jump-Starting Procedure
WARNING!
Failure to follow this jump-starting procedure could result in personal injury or
property damage due to battery explosion.
CAUTION!
Failure to follow these procedures could result in damage to the charging system
of the booster vehicle or the discharged vehicle.
Connecting The Jumper Cables
1. Connect the positive(+)end of the jumper cable to the positive(+)post of the
discharged vehicle.
2. Connect the opposite end of the positive(+)jumper cable to the positive(+)post
of the booster battery.
3. Connect the negative(-)end of the jumper cable to the negative(-)post of the
booster battery.
4. Connect the opposite end of the negative(-)jumper cable to a good engine ground
(exposed metal part of the discharged vehicle’s engine) away from the battery and
the fuel injection system.
WARNING!
Do not connect the jumper cable to the negative (-) post of the discharged battery.
The resulting electrical spark could cause the battery to explode and could result
in serious injury. Only use the specific ground point, do not use any other exposed
metal parts.
5. Start the engine in the vehicle that has the booster battery, let the engine idle a
few minutes, and then start the engine in the vehicle with the discharged battery.
WHAT TO DO IN EMERGENCIES
175
Page 178 of 220
6. Once the engine is started, remove the jumper cables in the reverse sequence:
Disconnecting The Jumper Cables
1. Disconnect the negative(-)end of the jumper cable from the engine ground of the
vehicle with the discharged battery.
2. Disconnect the opposite end of the negative(-)jumper cable from the negative(-)
post of the booster battery.
3. Disconnect the positive(+)end of the jumper cable from the positive(+)post of
the booster battery.
4. Disconnect the opposite end of the positive(+)jumper cable from the positive(+)
post of the vehicle with the discharged battery.
If frequent jump-starting is required to start your vehicle you should have the battery
and charging system inspected at your authorized dealer.
CAUTION!
Accessories plugged into the vehicle power outlets draw power from the vehicle’s
battery, even when not in use (i.e., cellular phones, etc.). Eventually, if plugged in
long enough without engine operation, the vehicle’s battery will discharge suffi-
ciently to degrade battery life and/or prevent the engine from starting.
FREEING A STUCK VEHICLE
If your vehicle becomes stuck in mud, sand or snow, it can often be moved using a
rocking motion. Turn the steering wheel right and left to clear the area around the
front wheels. For vehicles with automatic transmission, push and hold the lock
button on the shift lever. Then shift back and forth between DRIVE and REVERSE
(with automatic transmission) or 2ND GEAR and REVERSE (with manual transmis-
sion), while gently pushing the accelerator.
For Vehicles With Automatic Transmission:
Shifts between DRIVE and REVERSE can only be achieved at wheel speeds of 5 mph
(8 km/h) or less. Whenever the transmission remains in NEUTRAL for more than two
seconds, you must push the brake pedal to engage DRIVE or REVERSE.
Use the least amount of accelerator pedal pressure that will maintain the rocking
motion without spinning the wheels or racing the engine.
WHAT TO DO IN EMERGENCIES
176