JEEP RENEGADE 2016 1.G Owners Manual
RENEGADE 2016 1.G
JEEP
JEEP
https://www.carmanualsonline.info/img/16/7151/w960_7151-0.png
JEEP RENEGADE 2016 1.G Owners Manual
Trending: cruise control, keyless entry, stop start, interior lights, lug pattern, high beam, change language
Page 451 of 688
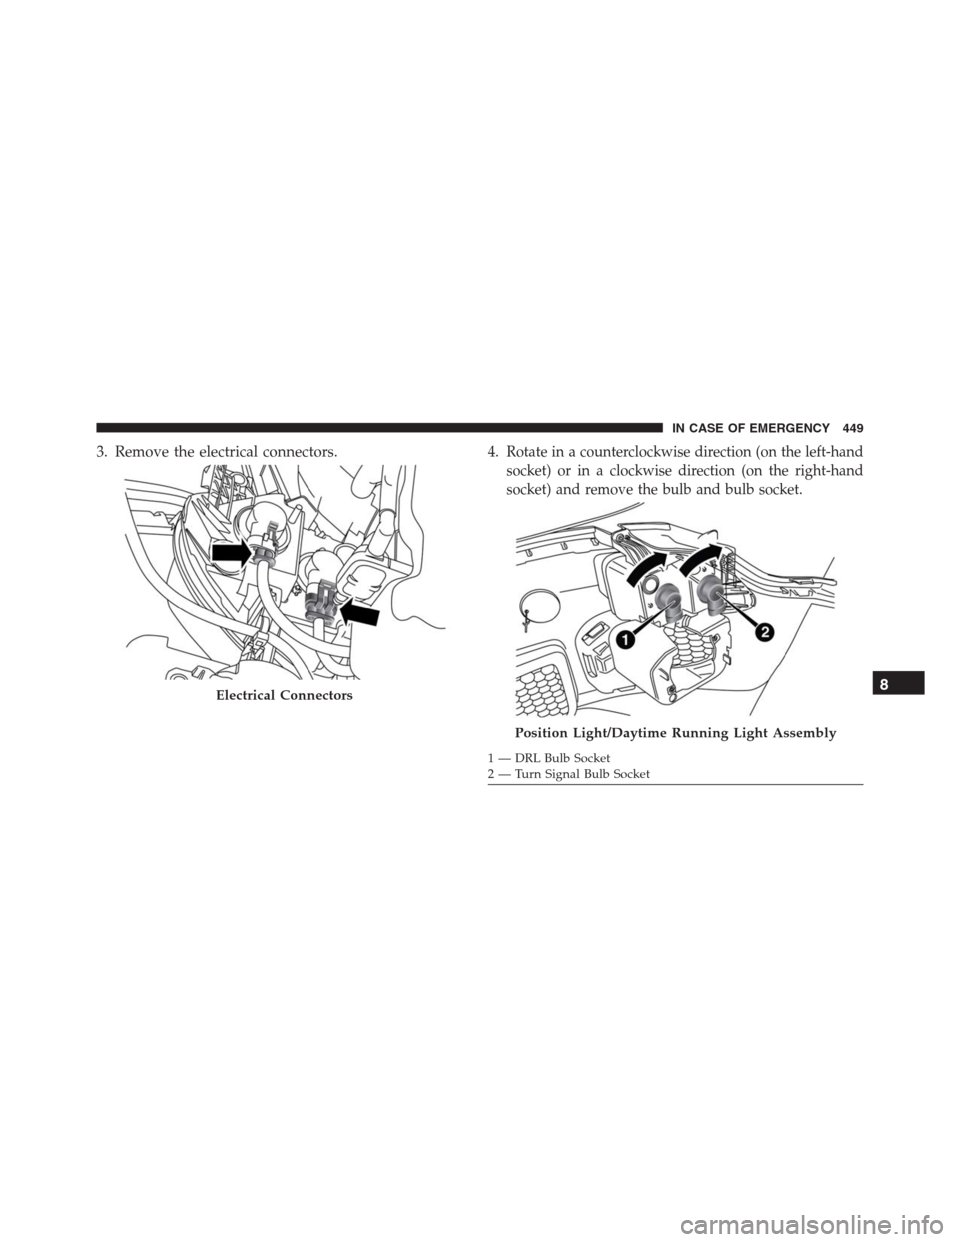
3. Remove the electrical connectors. 4.Rotate in a counterclockwise direction (on the left-hand
socket) or in a clockwise direction (on the right-hand
socket) and remove the bulb and bulb socket.
Electrical Connectors
Position Light/Daytime Running Light Assembly
1 — DRL Bulb Socket
2 — Turn Signal Bulb Socket
8
IN CASE OF EMERGENCY 449
Page 452 of 688
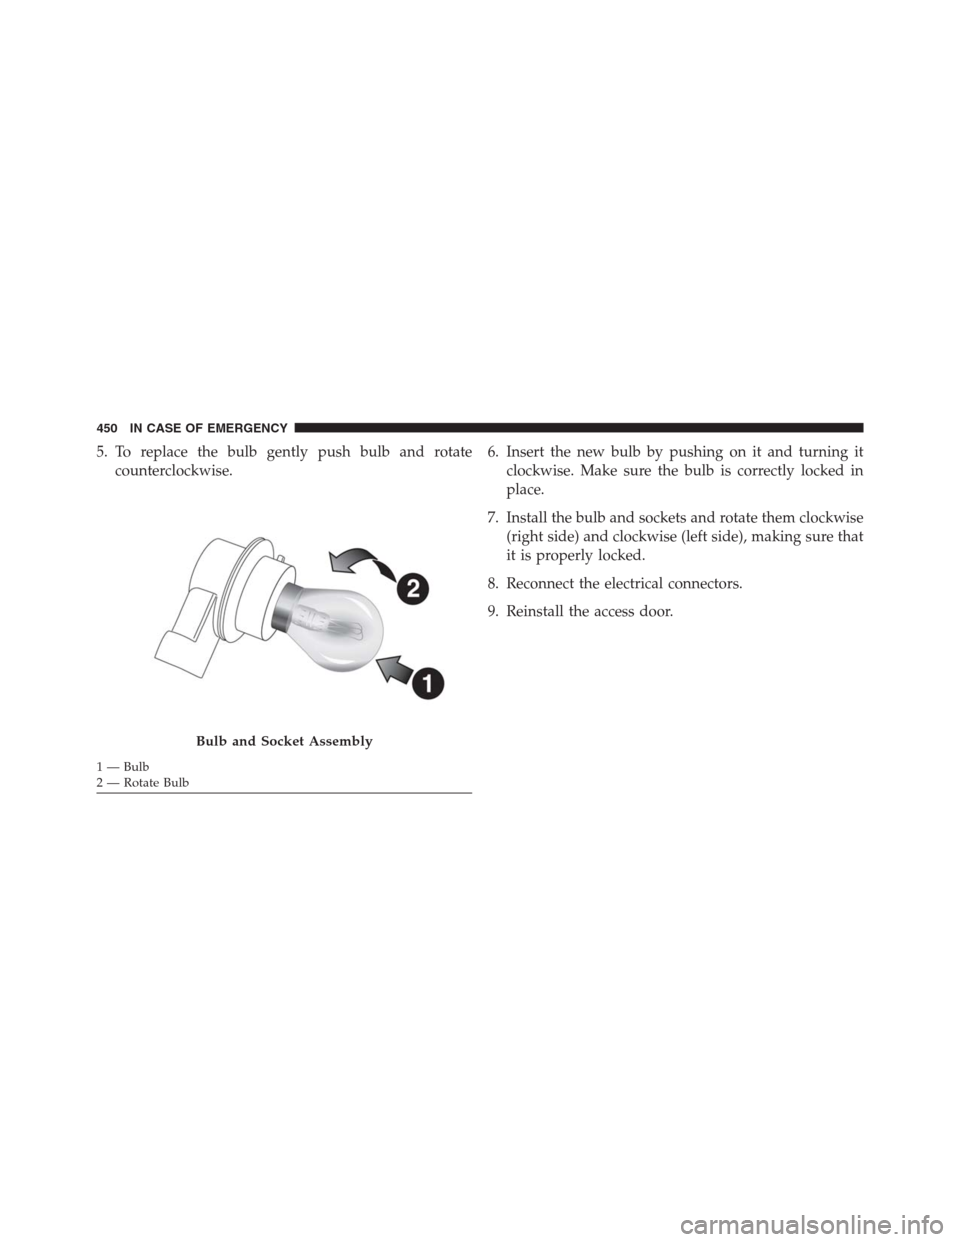
5. To replace the bulb gently push bulb and rotate
counterclockwise.6. Insert the new bulb by pushing on it and turning it
clockwise. Make sure the bulb is correctly locked in
place.
7. Install the bulb and sockets and rotate them clockwise
(right side) and clockwise (left side), making sure that
it is properly locked.
8. Reconnect the electrical connectors.
9. Reinstall the access door.
Bulb and Socket Assembly
1 — Bulb
2 — Rotate Bulb 450 IN CASE OF EMERGENCY
Page 453 of 688
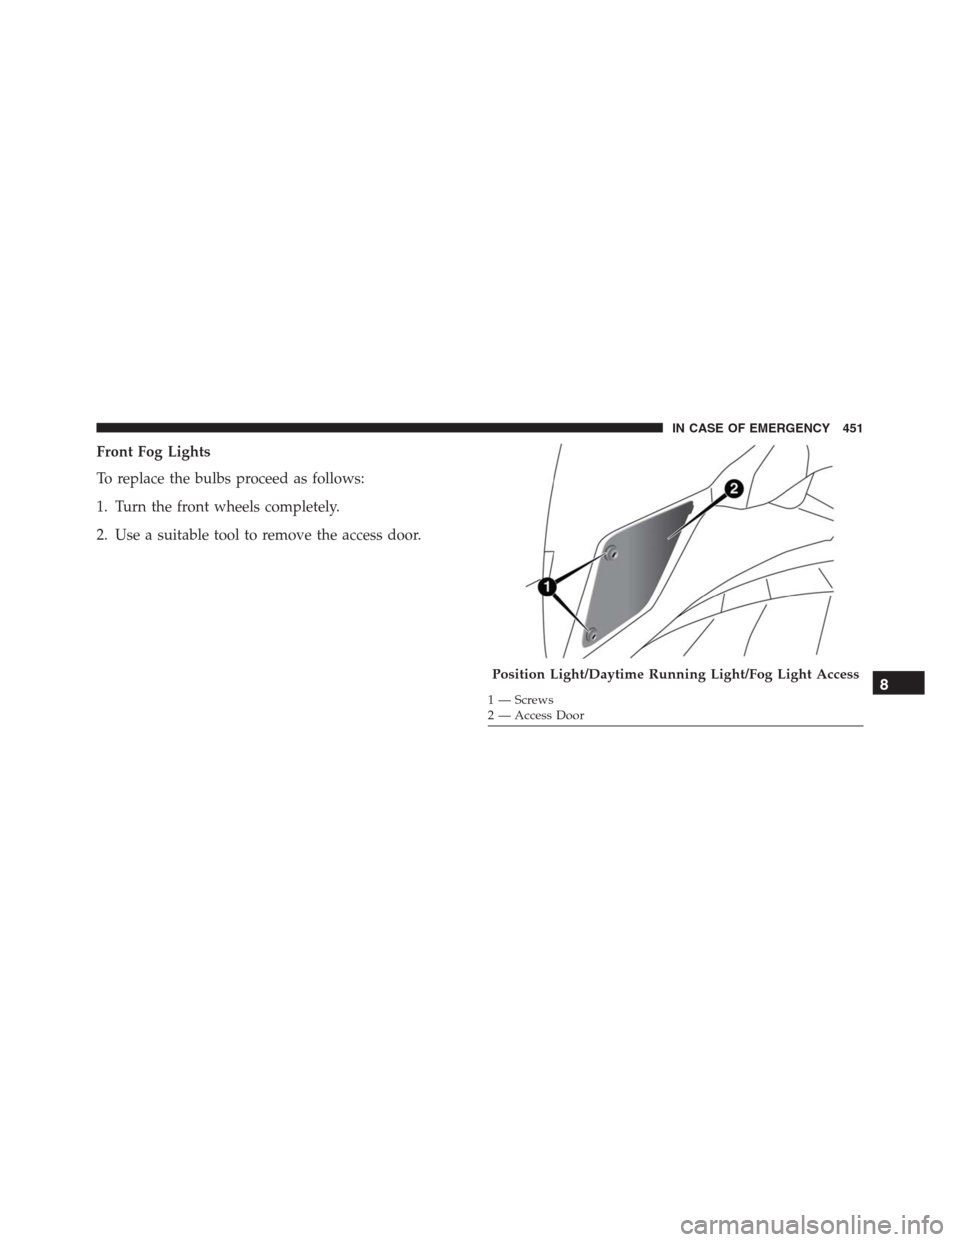
Front Fog Lights
To replace the bulbs proceed as follows:
1. Turn the front wheels completely.
2. Use a suitable tool to remove the access door.
Position Light/Daytime Running Light/Fog Light Access
1 — Screws
2 — Access Door8
IN CASE OF EMERGENCY 451
Page 454 of 688
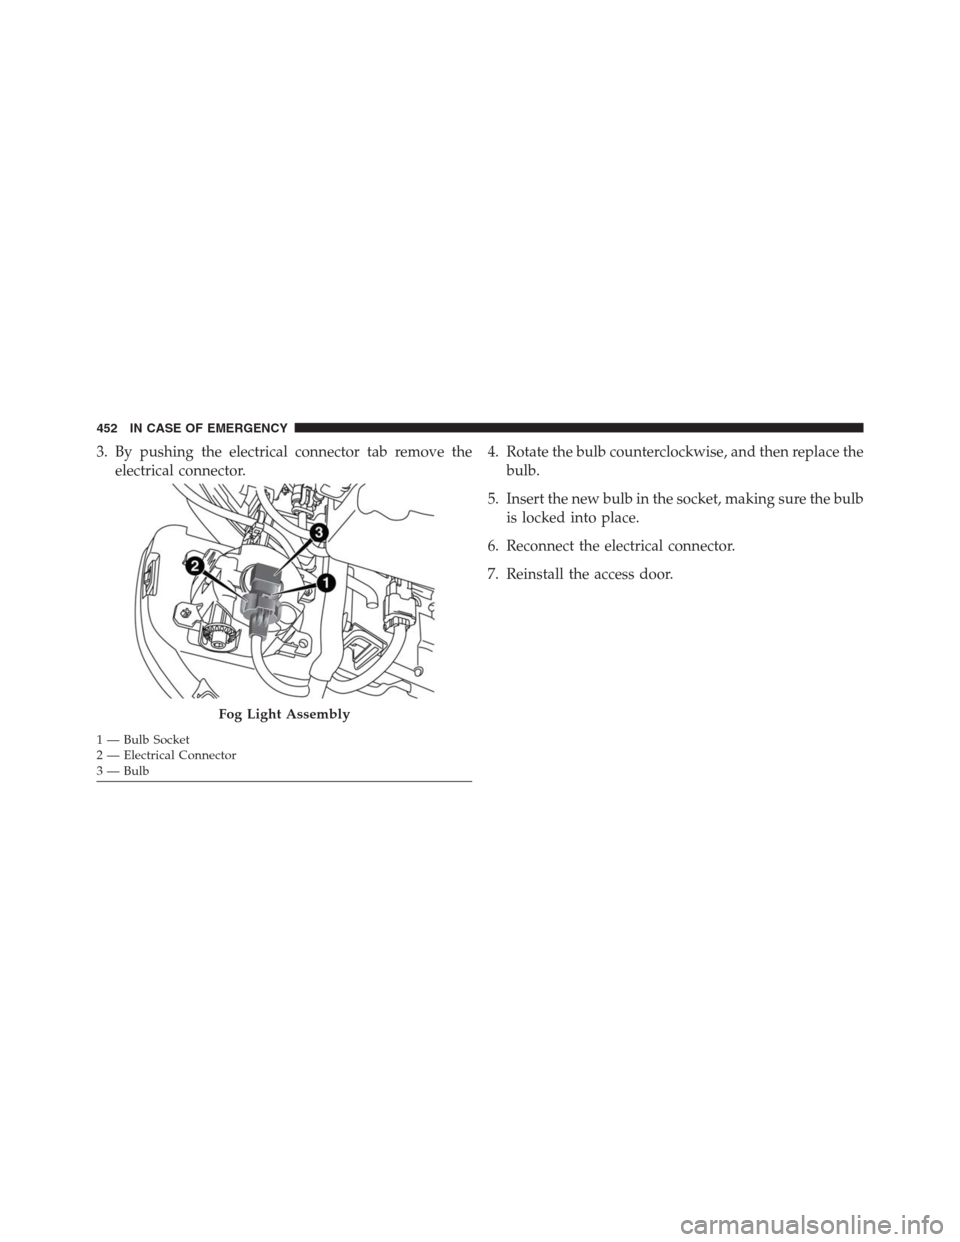
3. By pushing the electrical connector tab remove the
electrical connector.4. Rotate the bulb counterclockwise, and then replace the
bulb.
5. Insert the new bulb in the socket, making sure the bulb
is locked into place.
6. Reconnect the electrical connector.
7. Reinstall the access door.
Fog Light Assembly
1 — Bulb Socket
2 — Electrical Connector
3 — Bulb 452 IN CASE OF EMERGENCY
Page 455 of 688
Side Indicators
Front Side Indicators
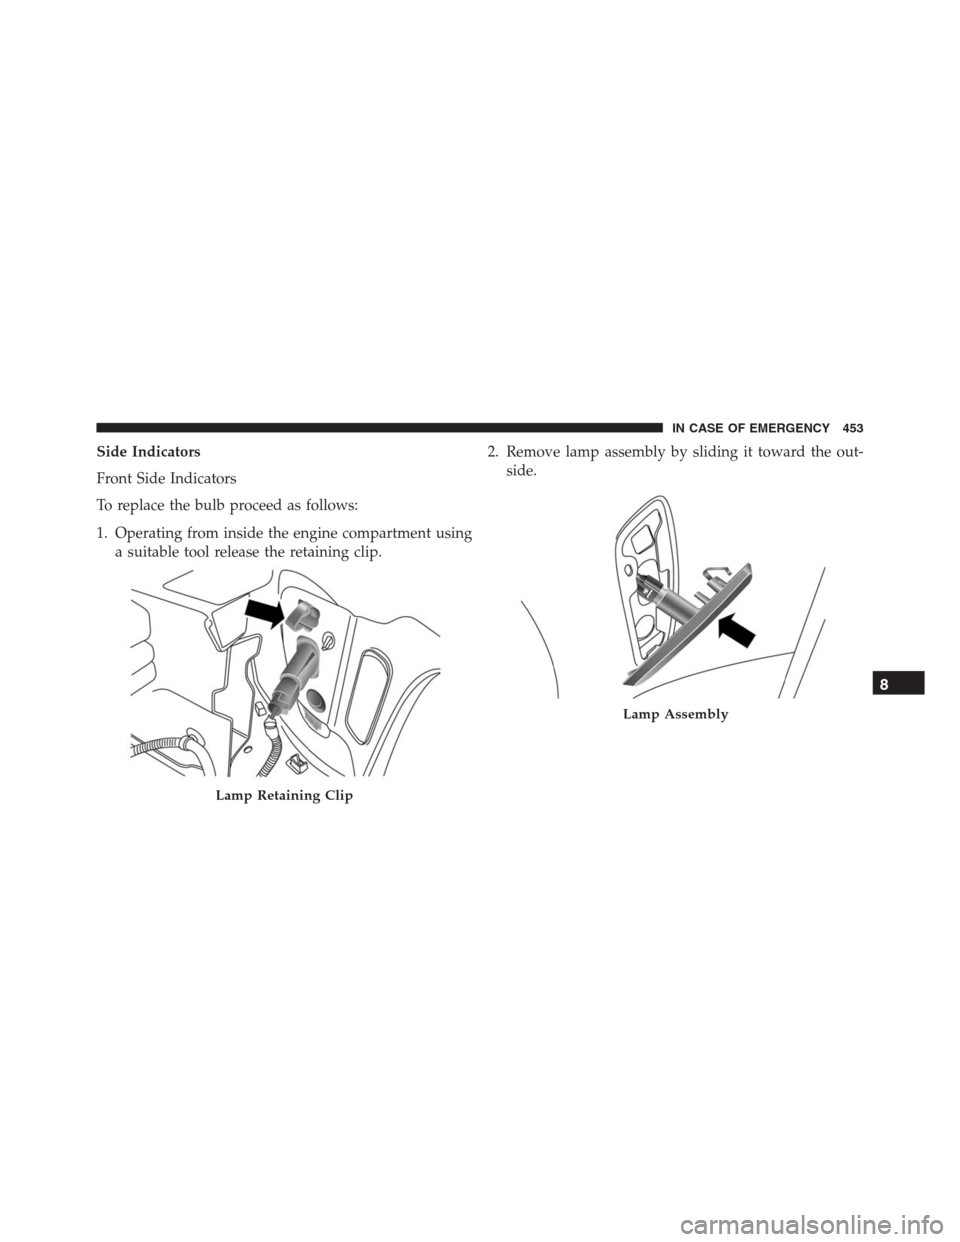
To replace the bulb proceed as follows:
1. Operating from inside the engine compartment using
a suitable tool release the retaining clip.2. Remove lamp assembly by sliding it toward the out-
side.
Lamp Retaining Clip
Lamp Assembly
8
IN CASE OF EMERGENCY 453
Page 456 of 688
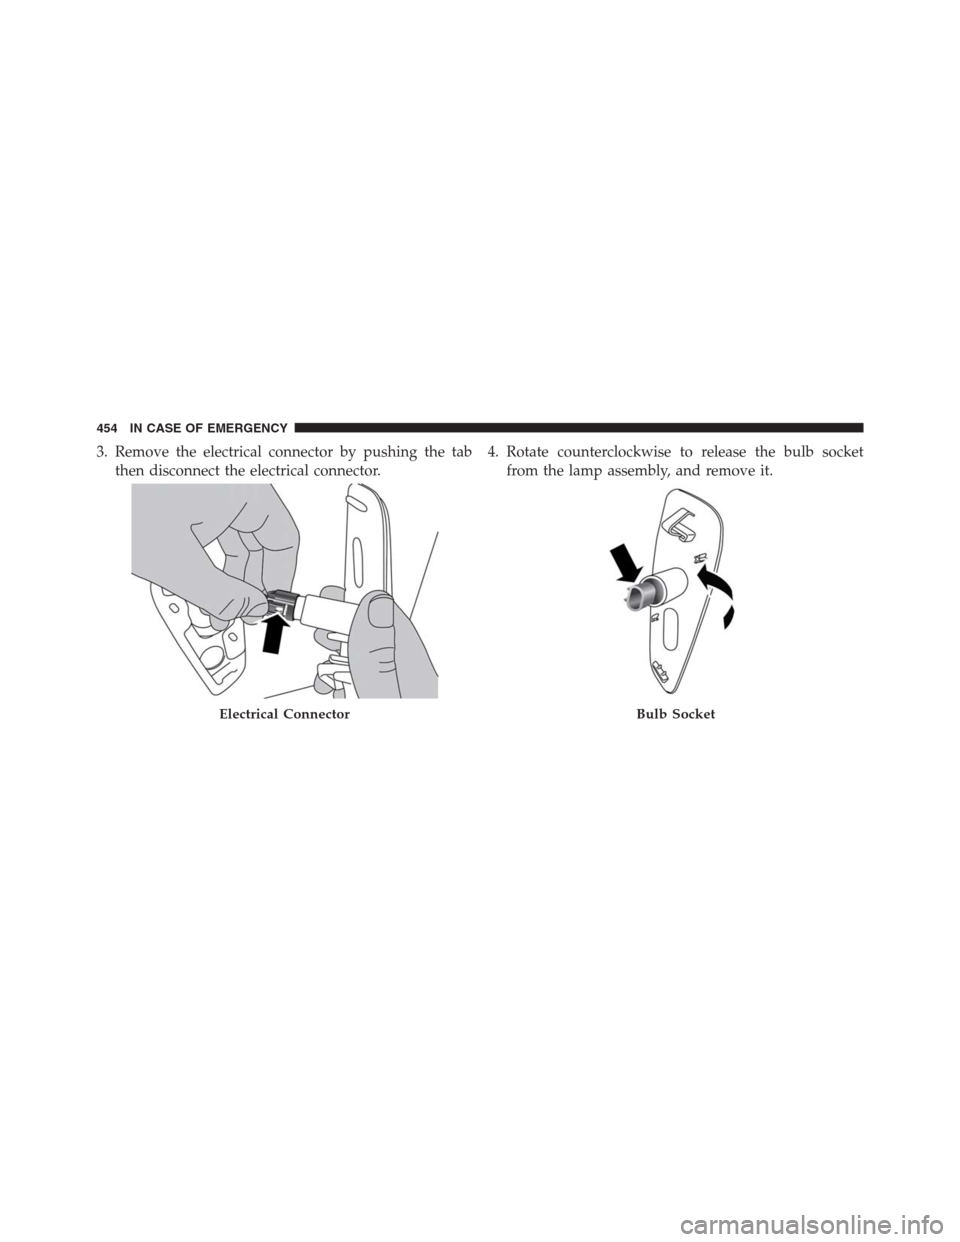
3. Remove the electrical connector by pushing the tab
then disconnect the electrical connector.4. Rotate counterclockwise to release the bulb socket
from the lamp assembly, and remove it.
Electrical ConnectorBulb Socket
454 IN CASE OF EMERGENCY
Page 457 of 688
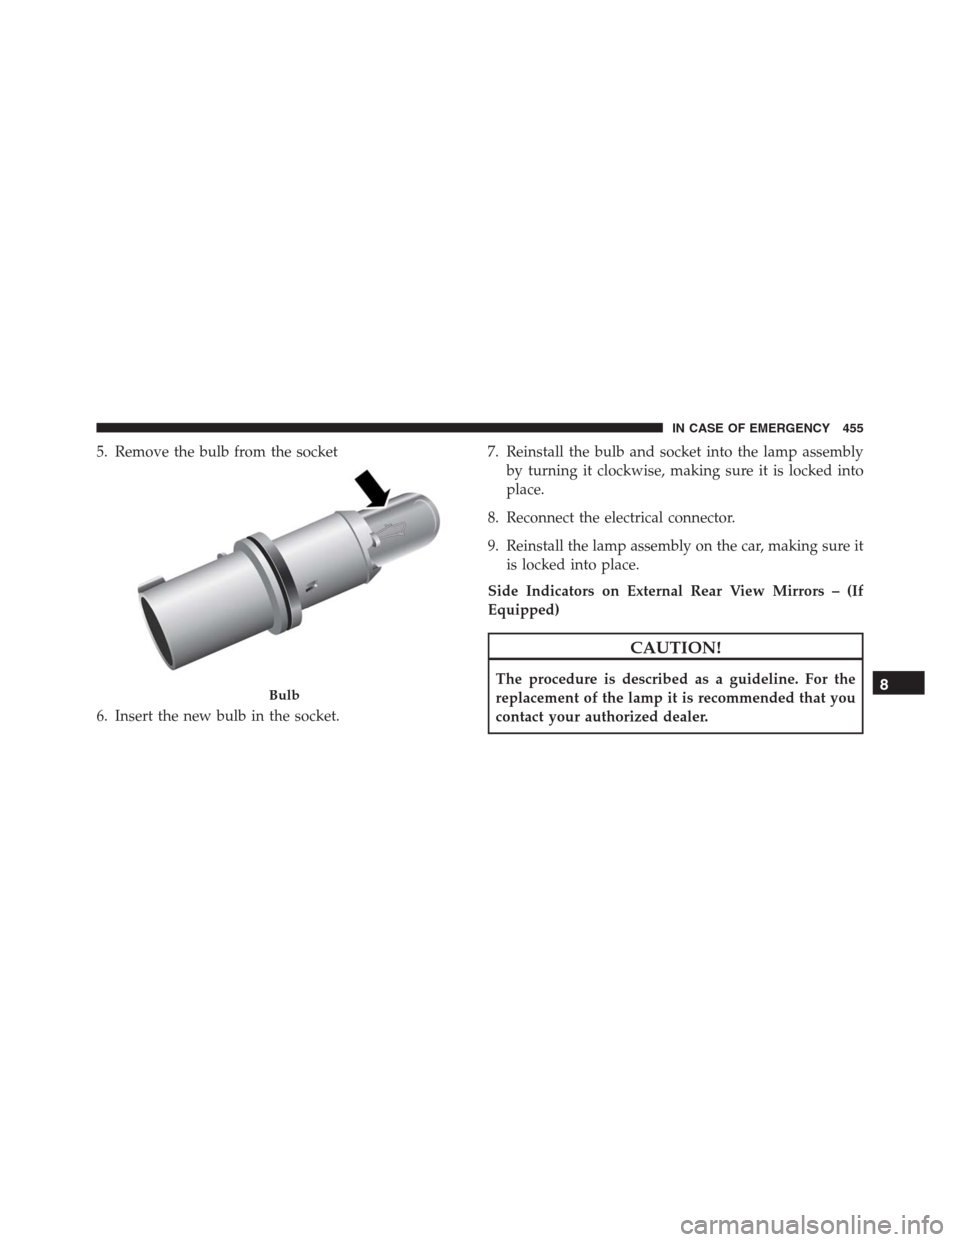
5. Remove the bulb from the socket
6. Insert the new bulb in the socket.7. Reinstall the bulb and socket into the lamp assembly
by turning it clockwise, making sure it is locked into
place.
8. Reconnect the electrical connector.
9. Reinstall the lamp assembly on the car, making sure it
is locked into place.
Side Indicators on External Rear View Mirrors – (If
Equipped)
CAUTION!
The procedure is described as a guideline. For the
replacement of the lamp it is recommended that you
contact your authorized dealer.
Bulb8
IN CASE OF EMERGENCY 455
Page 458 of 688
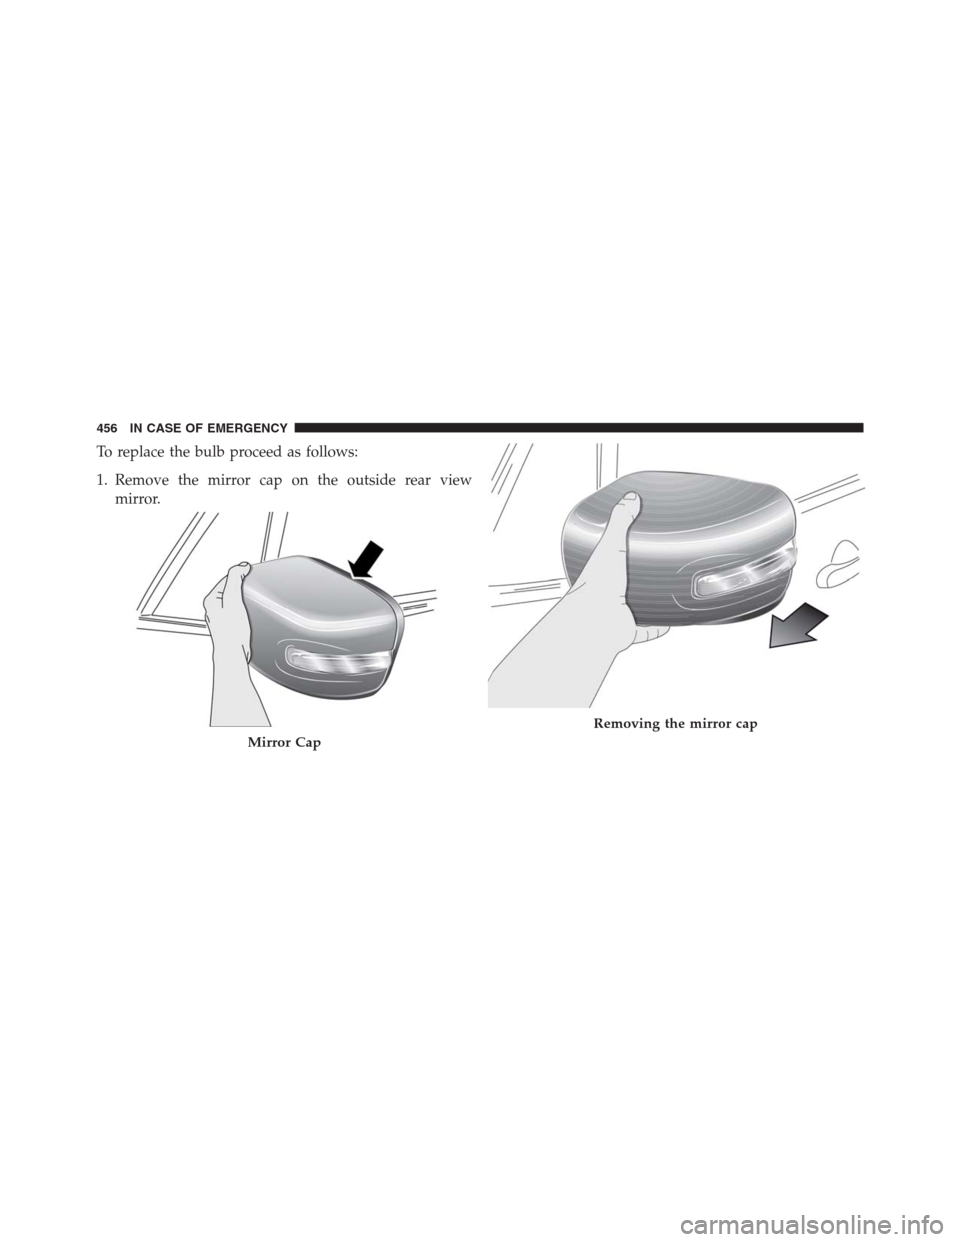
To replace the bulb proceed as follows:
1. Remove the mirror cap on the outside rear view
mirror.
Mirror Cap
Removing the mirror cap
456 IN CASE OF EMERGENCY
Page 459 of 688
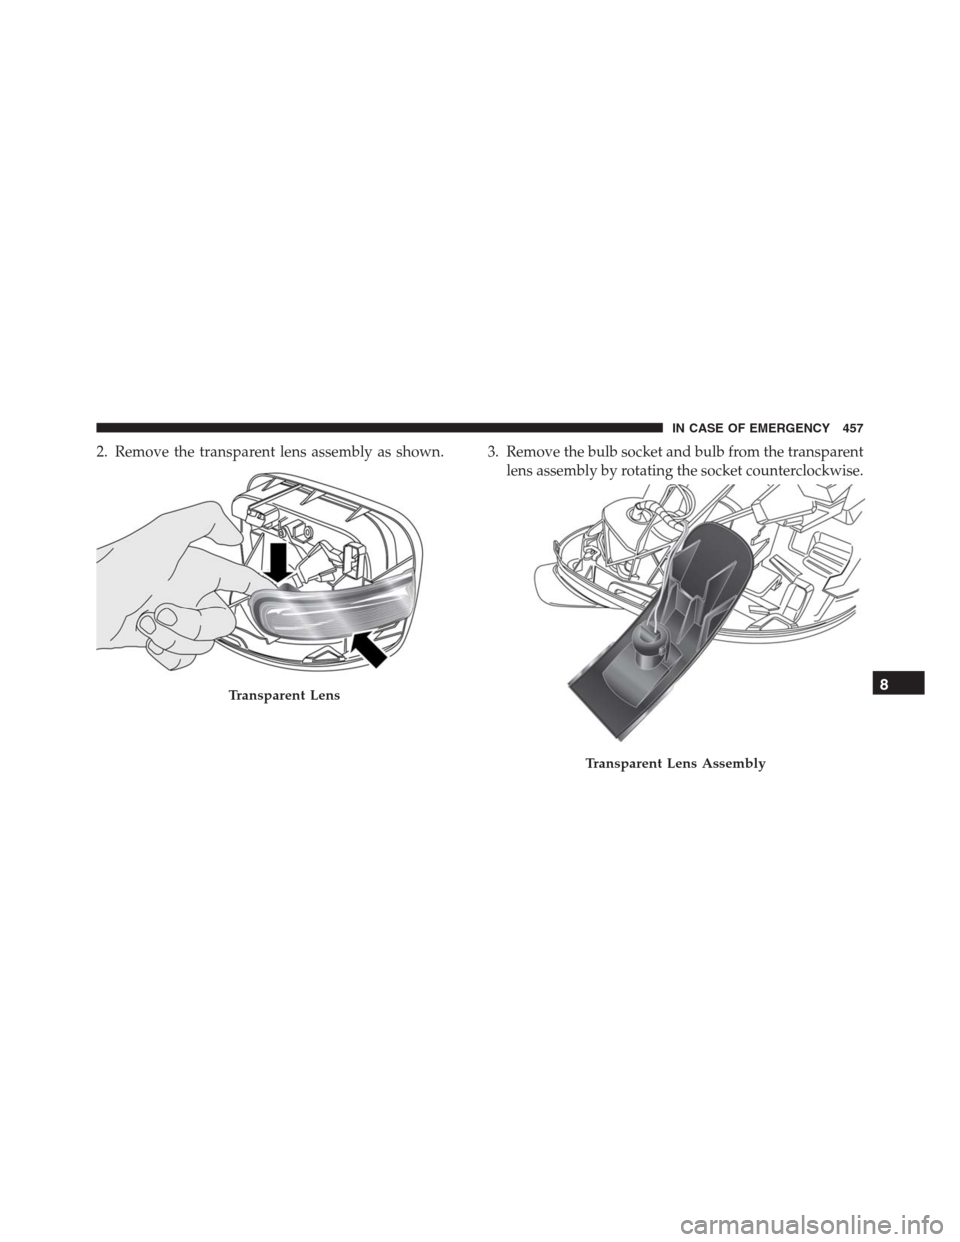
2. Remove the transparent lens assembly as shown. 3. Remove the bulb socket and bulb from the transparent
lens assembly by rotating the socket counterclockwise.
Transparent Lens
Transparent Lens Assembly
8
IN CASE OF EMERGENCY 457
Page 460 of 688
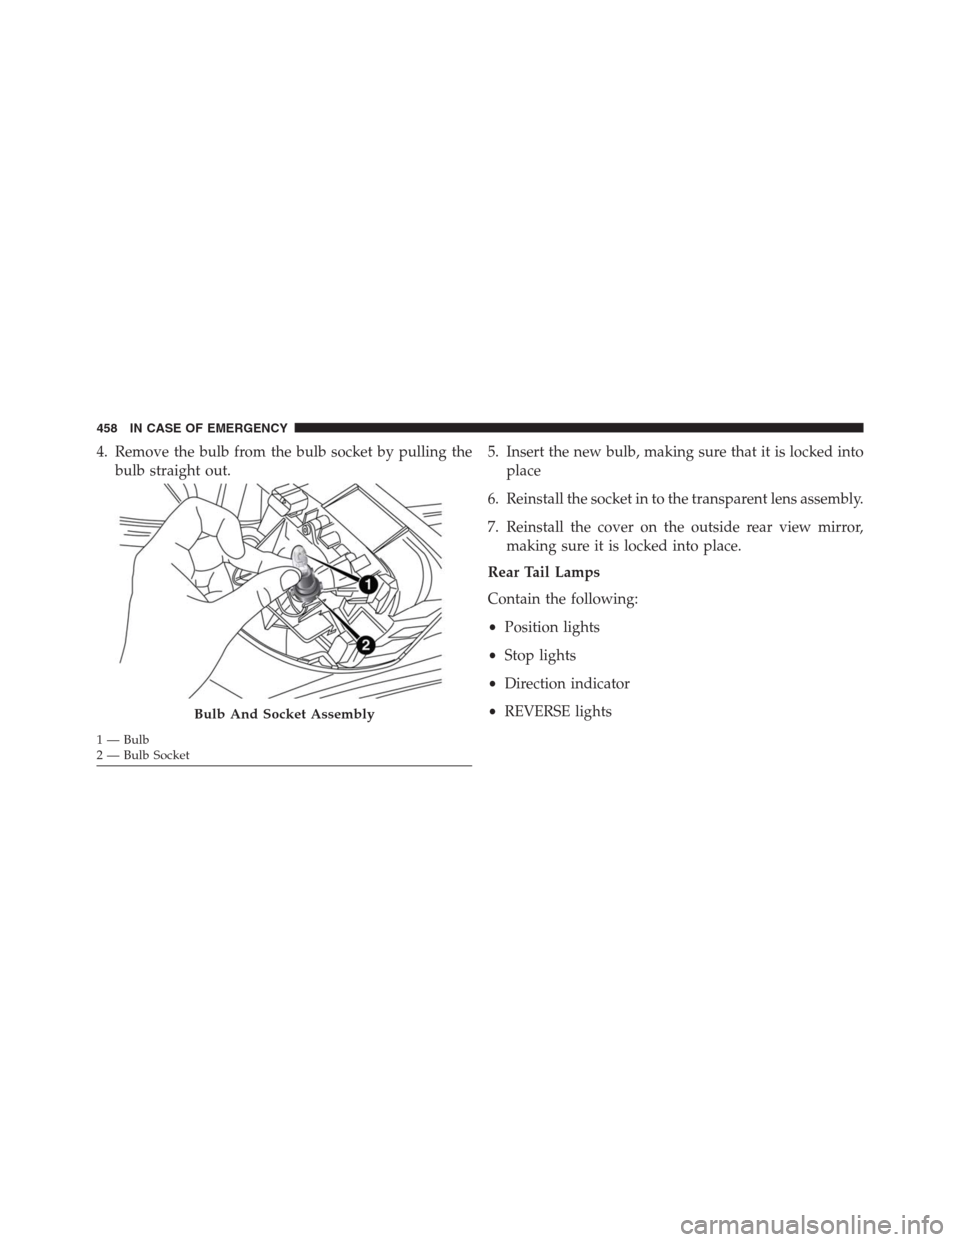
4. Remove the bulb from the bulb socket by pulling the
bulb straight out.5. Insert the new bulb, making sure that it is locked into
place
6. Reinstall the socket in to the transparent lens assembly.
7. Reinstall the cover on the outside rear view mirror,
making sure it is locked into place.
Rear Tail Lamps
Contain the following:
•Position lights
•Stop lights
•Direction indicator
•REVERSE lights
Bulb And Socket Assembly
1 — Bulb
2 — Bulb Socket 458 IN CASE OF EMERGENCY
Trending: driver seat adjustment, seats, high beam, battery replacement, jump cable, heating, fuel
