maintenance JEEP RENEGADE 2023 User Guide
[x] Cancel search | Manufacturer: JEEP, Model Year: 2023, Model line: RENEGADE, Model: JEEP RENEGADE 2023Pages: 364, PDF Size: 18.65 MB
Page 133 of 364

STARTING AND OPERATING 131
the depth and the bottom condition (and location
of any obstacles) prior to entering. Proceed with
caution and maintain a steady controlled speed
less than 5
mph (8 km/h) in deep water to
minim i
ze wave effects.
Flowing Water
If the water is swift flowing and rising (as in storm
run-of f
) avoid crossing until the water level recedes
and/or the flow rate is reduced. If you must cross
flowing-water, avoid depths in excess of 9 inches
(22 c m
). The flowing water can erode the
streambed causing your vehicle to sink into deeper
water. Determine exit point(s) that are downstream
of your entry point to allow for drifting.
Standing Water — Trailhawk Only
Avoid driving in standing water deeper than
1 9 inch
es (48 cm), and reduce speed
approp r
iately to minimize wave effects. Maximum
speed in 19 inches (48 cm) of water is less than
5 mph (8 km/h).
Maintenance
After driving through deep water, inspect your
v ehic l
e fluids and lubricants (engine, transmission,
Power Transfer Unit and Rear Drive Module) to
ensure they have not been contaminated.
Contaminated fluids and lubricants (milky, foamy
in appearance) should be flushed/changed as
soon as possible to prevent component damage.
Driving In Snow, Mud And Sand
In heavy snow, when pulling a load, or for
additional control at slower speeds, shift the
transmission to a low gear and shift the 4WD
system to the appropriate terrain mode, using
4WD Low if necessary Ú page 91. Do not shift to a
lower gear than necessary to maintain headway.
Over- r
evving the engine can spin the wheels and
traction will be lost.
Avoid abrupt downshifts on icy or slippery roads
becau s
e engine braking may cause skidding and
loss of control.
Hill Climbing
NOTE:
Before attempting to climb a hill, determine the
condit i
ons at the crest and/or on the other side.
Before climbing a steep hill, shift
the transmission
to a lower gear and shift the 4WD System to 4WD
Low. Use first gear and 4WD Low for very steep
hills.
If you stall or begin to lose headway while
climbing
a steep hill, allow your vehicle to come to a stop
and immediately apply the brakes. Restart the
engine and shift to REVERSE. Back slowly down the
hill allowing the compression braking of the engine
to help regulate your speed. If the brakes are
required to control vehicle speed, apply them
lightly and avoid locking or skidding the tires.
NOTE:
Remember, never drive diagonally across a hill -
drive
straight up or down.
If the wheels start to slip as you approach the crest
of a hi
ll, ease off the accelerator and maintain
headway by turning the front wheels slowly left and
right. This may provide a fresh “bite” into the
surface and will usually provide traction to
complete the climb.
Traction Downhill
Shift the transmission into a low gear and the 4WD
System to 4WD Low range or select Hill Descent
Control (if equipped) Ú page 222 . Let the vehicle
go slowly down the hill with all four wheels turning
again s
t engine compression drag. This will permit
you to control the vehicle speed and direction.
When descending mountains or hills, repeated
braki n
g can cause brake fade with loss of braking
control. Avoid repeated heavy braking by
downshifting the transmission whenever possible.
WARNING!
If the engine stalls or you lose headway or
cannot make it to the top of a steep hill or grade,
never attempt to turn around. To do so may
result in tipping and rolling the vehicle. Always
back straight down a hill in REVERSE gear
carefully. Never back down a hill in NEUTRAL
using only the brake.
4
Page 152 of 364
150 MULTIMEDIA
Safe Usage Of The Uconnect System
The Uconnect system is a sophisticated elec -
tronic device. Do not let young children use the
syste m
.
Permanent hearing loss may occur if you play
your music or sound system at loud volumes.
Exercise caution when setting the volume on the
system.
Keep drinks, rain and other sources of moisture
away from the system. Besides damage to the
system, moisture can cause electric shocks as
with any electronic device.
NOTE:
Many features of this system are speed
depen d
ent. For your own safety, it is not possible to
use some of the touchscreen features while the
vehicle is in motion.
Care And Maintenance
Do not press the touchscreen with any hard or
sharp objects (pen, USB stick, jewelry, etc.),
which could scratch the surface.
Do not spray any liquid or chemicals directly on
the screen! Use a clean and dry microfiber lens
cleaning cloth in order to clean the touchscreen.
If necessary, use a lint-free cloth dampened
with a cleaning solution, such as isopropyl
alcohol or an isopropyl alcohol and water solu -tion ratio of 50:50. Be sure to follow the solvent
manuf
a
cturer's precautions and directions
Ú page 349.
UCONNECT MODES
STEERING WHEEL AUDIO CONTROLS
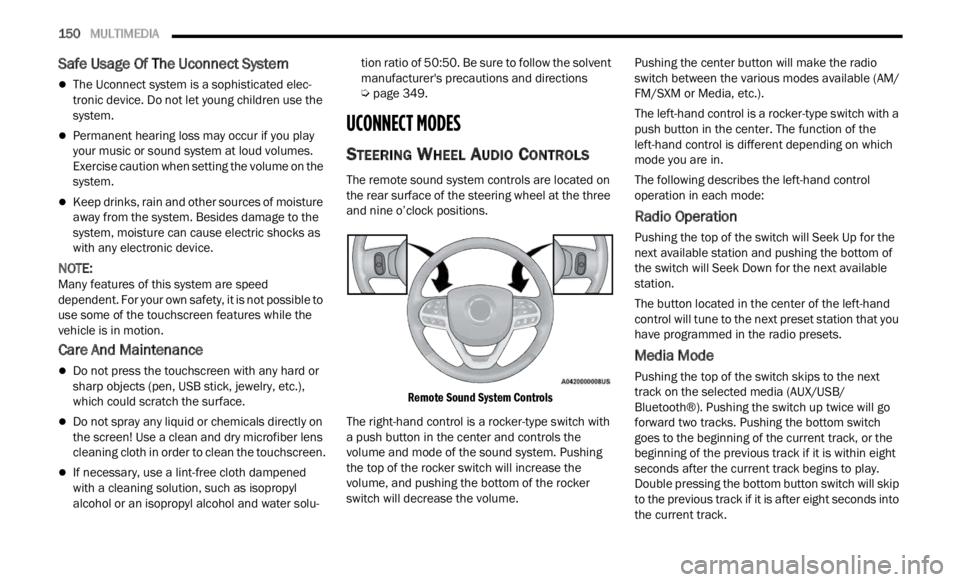
The remote sound system controls are located on
the rear surface of the steering wheel at the three
and nine o’clock positions.
Remote Sound System Controls
The right-hand control is a rocker-type switch with
a pus h
button in the center and controls the
volume and mode of the sound system. Pushing
the top of the rocker switch will increase the
volume, and pushing the bottom of the rocker
switch will decrease the volume. Pushing the center button will make the radio
switc
h
between the various modes available (AM/
FM/SXM or Media, etc.).
The left-hand control is a rocker-type switch with a
push b
utton in the center. The function of the
left-hand control is different depending on which
mode you are in.
The following describes the left-hand control
operati
on in each mode:
Radio Operation
Pushing the top of the switch will Seek Up for the
next available station and pushing the bottom of
the switch will Seek Down for the next available
station.
The button located in the center of the left-hand
control
will tune to the next preset station that you
have programmed in the radio presets.
Media Mode
Pushing the top of the switch skips to the next
track on the selected media (AUX/USB/
Bluetooth®). Pushing the switch up twice will go
forward two tracks. Pushing the bottom switch
goes to the beginning of the current track, or the
beginning of the previous track if it is within eight
seconds after the current track begins to play.
Double pressing the bottom button switch will skip
to the previous track if it is after eight seconds into
the current track.
Page 200 of 364

198 MULTIMEDIA
Highway Mode Press this button to activate Highway Mode. Selectable options are “On” and
“Off”
.
Having this setting on will allow you to select the setting “Highway
Services”.
Offered Services Press this button to display the available Offered Services types you would like
displa
yed while in route guidance. Press and release the desired selection
button until a check mark appears, showing the setting has been selected.
Available selections are “Gas Stations”, “Restaurants”, “Rest Area”, and “Auto
Services And Maintenance”.
Use Real Time Traffic Press this button to display Real Time Traffic Updates while in route guidance.
Press
and release the desired selection button until a check mark appears,
showing the setting has been selected.
Provide Detours on Traffic Events Press this button to display Detours On Traffic Events while in route guidance.
Press
and release the desired selection button until a check mark appears,
showing the setting has been selected.
Confirm Detours Manually Press this button to make it mandatory for you to have to Confirm Detours
M
anual
ly while in route guidance. Press and release the desired selection
button until a check mark appears, showing the setting has been selected.
Provide Detours That Save More Than X Min. Press this button to allow the Navigation system to display the available
detours
if they save you a predetermined amount of minutes, while in route
guidance. Press and release the desired plus or minus button until you have
selected the desired number of minutes saved, from five minutes to one hour
in increments of five minutes.
Page 209 of 364
MULTIMEDIA 207
Automatic SOS — If Equipped
Automatic SOS is a hands-free safety service that
can immediately connect you with help in the event
that your vehicle’s airbags deploy. After an
accident, a live agent will contact you through the
Uconnect system and alert emergency services.
NOTE:
An active SiriusXM Guardian™ subscription is
requi r
ed for this feature to function.
After a crash where the airbags deploy:
1. Automatic SOS will initiate a call with an agen t
.
2. An agent will receive the call and confirm the locati
on of the emergency.
3. If needed, the agent will request the assis
tance of emergency services.
4. First responders will arrive on scene. The agent
will remain on the call until emergency
services arrive.
NOTE:
Agents are available 24/7 to assist you in the
case of an emergency.
On your behalf, agents are able to notify family
members about the collision.
Agents can brief first responders of the situation
before they arrive on scene.
In the event vehicle occupants are unable to
speak, emergency services will be dispatched
based on the last known GPS coordinates.
SiriusXM Guardian™ connected services are
dependent upon an operative telematics
device, a cellular connection, navigation map
data, and GPS satellite reception, which can
limit the ability to reach the response center or
reach emergency support.
Terms of service of the Uconnect and the
SiriusXM Guardian™ subscriber agreement
apply. See terms of services for complete
service limitation.
Remote Commands
On the Remote Commands screen, you have
access to several vehicle features that can be
controlled remotely from your mobile device. These
features include locking/unlocking, remote
starting, and activating the horn and lights of the
vehicle.
The Occupant Restraint Controller (ORC) turns
on the Air Bag Warning Light on the instru -
ment panel if a malfunction in any part of the
a ir ba
g system is detected. If the Air Bag
Warning Light is illuminated, the air bag
system may not be working properly and the
SOS Call system may not be able to send a
signal to the SiriusXM Guardian™ Customer
Care center. If the Air Bag Warning Light is illu -
minated, have an authorized dealer service
your v e
hicle immediately.
Ignoring the Rearview Mirror Light could mean
you will not have SOS Call services if needed.
If the Rearview Mirror Light is illuminated,
have an authorized dealer service the SOS
Call system immediately.
If anyone in the vehicle could be in danger
(e.g., fire or smoke is visible, dangerous road
conditions or location), do not wait for voice
contact from a SiriusXM Guardian™ Customer
Care agent. All occupants should exit the
vehicle immediately and move to a safe loca -
tion.
Failure to perform scheduled maintenance
and regular inspection of your vehicle may
result in vehicle damage, accident or injury.
WARNING!
LockPress this button to lock your vehicle.
Vehicle Start Press this button to
start
your vehicle.
Horn & Lights Press this button to
s ound
t
he horn and
activate your lights.
5
Page 215 of 364

MULTIMEDIA 213
Monthly Vehicle Health Report —
If Equipped
Description
Monthly Vehicle Health Report is a Uconnect
s e r
v i
c
e through which a summary of the
performance of your vehicle’s key systems will be
sent to you every month so you can stay on top of
your vehicle’s maintenance needs. This is provided
as a convenience to you and does not substitute
for regular maintenance to your vehicle.
In order to provide the Monthly Vehicle Health
Report ,
the Uconnect system in your vehicle may
collect and transmit vehicle data to SiriusXM
Guardian™ and to FCA, such as your vehicle’s
health and performance, your vehicle’s location,
your utilization of the features in your vehicle, and
other data.
This data collection and transmission begins when
you en r
oll in SiriusXM Guardian™ and will continue
even if you cancel your SiriusXM Guardian™
subscription unless you call SiriusXM Guardian™
Customer Care and tell them to deactivate your
Uconnect Services.
Please see the Uconnect Privacy Policy for more
informa
tion, located at www.driveuconnect.com/
connectedservices/privacy.html (US Residents) or
www.driveuconnect.ca (Canadian Residents). For more information on SiriusXM Guardian™
p
riva t
e policy, see https://siriusxmcvs.com/
privacy-policy.
Vehicle Health Alert —If Equipped
Description
Your vehicle will send you an email alert if it senses
a p
rob
l
em with one of your vehicle’s key systems.
For further information, go to your Owner’s
website.
NOTE:
Vehicle Health Alert emails require you to register
and a c
tivate services. During this process you will
be asked to provide an email address to which the
reports will be sent.
In-Vehicle Notifications — If Equipped
Description
Your vehicle will send you notifications to remind
you wh e
n services are needed, or to alert you of
other important information, such as recall
notices. When you receive a notification through
your touchscreen, press OK to dismiss the
message, or press Call Care to speak with a
SiriusXM Guardian™ Customer Care agent.
NOTE:
Pressing “OK” or the X button on the pop-up screen
will d
ismiss or close the pop-up, and the In-Vehicle
Messages mailbox will display. In the Mailbox, you
can reopen messages or delete messages.
Amazon Alexa Skill — If Equipped
Enjoy the convenience of using your voice to
command your vehicle with Amazon Alexa!
With Amazon Alexa, you can connect to your
vehicl
e and remotely access key services and
features.
If your vehicle is equipped with Uconnect
Navig a
tion, you can send a destination directly to
your vehicle using Alexa.
If you need assistance, you can always ask Alexa
for he l
p, or complete a list of commands by saying:
“Alexa, ask
Here are a few of the many questions you can ask
Alexa :
“Alexa, ask
“Alexa, ask
“Alexa, ask
Chrysler Drive, Auburn Hills, Michigan to my
“Alexa, ask
level of my
An active subscription to SiriusXM Guardian™ is
requir
ed. To use Amazon Alexa, first, register for
SiriusXM Guardian™ Ú page 203.
Next, link the Uconnect system on your vehicle to
Amazon
Alexa:
5
Page 225 of 364
SAFETY 223
Electronic Stability Control (ESC)
ESC enhances directional control and stability of
the vehicle under various driving conditions. ESC
corrects for oversteering or understeering of the
vehicle by applying the brake of the appropriate
wheel(s) to counteract the above conditions.
Engine power may also be reduced to help the
vehicle maintain the desired path.
Oversteer — when the vehicle is turning more
than appropriate for the steering wheel position.
Understeer — when the vehicle is turning less
than appropriate for the steering wheel position.
ESC uses sensors in the vehicle to determine the
vehicl
e path intended by the driver and compares
it to the actual path of the vehicle. When the actual
path does not match the intended path, ESC
applies the brake of the appropriate wheel to
assist in counteracting the oversteer or understeer
condition.
The ESC Activation/Malfunction Indicator Light
locate d
in the instrument cluster will start to flash
as soon as the ESC system becomes active. The
ESC Activation/Malfunction Indicator Light also
flashes when the TCS is active. If the ESC
Activation/Malfunction Indicator Light begins to
flash during acceleration, ease up on the
accelerator and apply as little throttle as possible.
Be sure to adapt your speed and driving to the
prevailing road conditions.
WARNING!
Many factors, such as vehicle loading, road
conditions, and driving conditions, influence the
chance that wheel lift or rollover may occur.
Electronic Roll Mitigation (ERM) cannot prevent
all wheel lift or rollovers, especially those that
involve leaving the roadway or striking objects or
other vehicles. The capabilities of an
ERM-equipped vehicle must never be exploited
in a reckless or dangerous manner, which could
jeopardize the user's safety or the safety of
others.
WARNING!
Electronic Stability Control (ESC) cannot
prevent the natural laws of physics from acting
on the vehicle, nor can it increase the traction
afforded by prevailing road conditions. ESC
cannot prevent accidents, including those
resulting from excessive speed in turns, driving
on very slippery surfaces, or hydroplaning. ESC
also cannot prevent accidents resulting from
loss of vehicle control due to inappropriate
driver input for the conditions. Only a safe,
attentive, and skillful driver can prevent acci -
dents. The capabilities of an ESC equipped
vehic l
e must never be exploited in a reckless or
dangerous manner which could jeopardize the
user’s safety or the safety of others.
Vehicle modifications, or failure to properly
maintain your vehicle, may change the handling
characteristics of your vehicle, and may nega -
tively affect the performance of the ESC system.
Chang e
s to the steering system, suspension,
braking system, tire type and size or wheel size
may adversely affect ESC performance. Improp -
erly inflated and unevenly worn tires may also
d egrad
e ESC performance. Any vehicle modifi-
cation or poor vehicle maintenance that
r educe
s the effectiveness of the ESC system
can increase the risk of loss of vehicle control,
vehicle rollover, personal injury and death.
6
Page 238 of 364

236 SAFETY
The TPMS will continue to warn the driver of low
tire pressure as long as the condition exists, and
will not turn off until the tire pressure is at or above
the recommended cold placard pressure. Once the
low tire pressure warning (Tire Pressure Monitoring
System Light) illuminates, you must increase the
tire pressure to the recommended cold placard
pressure in order for the TPMS Warning Light to
turn off.
The system will automatically update and the Tire
Press u
re Monitoring System Light will turn off once
the system receives the updated tire pressures.
The vehicle may need to be driven for up to
20 minutes above 15 mph (24 km/h) in order for
the TP
MS to receive this information.
For example, your vehicle may have a recommended
cold (
parked for more than three hours) placard
pressure of 33 psi (227 kPa). If the ambient
temperature is 68°F (20°C) and the measured tire
pressure is 28 psi (193 kPa), a temperature drop to
20°F (-7°C) will decrease the tire pressure to
approximately 24 psi (165 kPa). This tire pressure is
low enough to turn on the Tire Pressure Monitoring
System Light. Driving the vehicle may cause the tire
pressure to rise to approximately 28 psi (193 kPa),
but the Tire Pressure Monitoring System Light will
still be on. In this situation, the Tire Pressure
Monitoring System Light will turn off only after the
tires are inflated to the vehicle’s recommended cold
placard pressure value.
NOTE:
When filling warm tires, the tire pressure may need
to be i
ncreased up to an additional 4 psi (28 kPa)
above the recommended cold placard pressure in
order to turn the Tire Pressure Monitoring System
Light off.NOTE:
The TPMS is not intended to replace normal tire
care and maintenance, or to provide warning of
a tire failure or condition.
The TPMS should not be used as a tire pressure
gauge while adjusting your tire pressure, unless
your vehicle is equipped with a Tire Fill Alert
(TFA) system.
Driving on a significantly underinflated tire
causes the tire to overheat and can lead to tire
failure. Underinflation also reduces fuel effi -
ciency and tire tread life, and may affect the
vehic l
e’s handling and stopping ability.
The TPMS is not a substitute for proper tire
maintenance, and it is the driver’s responsibility
to maintain correct tire pressure using an accu -
rate tire pressure gauge, even if underinflation
has n ot
reached the level to trigger illumination
of the Tire Pressure Monitoring System Light.
Seasonal temperature changes will affect TPMS
information on your instrument cluster
Ú page 349.
Base System
The Tire Pressure Monitoring System (TPMS) uses
wireless technology with wheel rim mounted
electronic sensors to monitor tire pressure levels.
Sensors, mounted to each wheel as part of the
valve stem, transmit tire pressure readings to the
receiver module.
CAUTION!
The TPMS has been optimized for the original
equipment tires and wheels. TPMS pressures
and warning have been established for the tire
size equipped on your vehicle. Undesirable
system operation or sensor damage may result
when using replacement equipment that is not
of the same size, type, and/or style. The TPMS
sensor is not designed for use on aftermarket
wheels, and may contribute to a poor overall
system performance. Customers are encour
-
aged to use OEM wheels to ensure TPMS feature
o pera t
ion.
Using aftermarket tire sealants may cause the
Tire Pressure Monitoring System (TPMS) sensor
to become inoperable. After using an after -
market tire sealant it is recommended that you
take y
our vehicle to an authorized dealer to have
your sensor function checked.
After inspecting or adjusting the tire pressure
always reinstall the valve stem cap. This will
prevent moisture and dirt from entering the valve
stem, which could damage the TPMS sensor.
Page 249 of 364
SAFETY 247
The ORC contains a backup power supply system
that may deploy the air bag system even if the
battery loses power or it becomes disconnected
prior to deployment.
The ORC turns on the Air Bag Warning Light in the
instru
ment panel for approximately four to eight
seconds for a self-check when the ignition switch is
in the MAR/ACC/ON/RUN position. After the
self-check, the Air Bag Warning Light will turn off. If
the ORC detects a malfunction in any part of the
system, it turns on the Air Bag Warning Light, either
momentarily or continuously. A single chime will
sound to alert you if the light comes on again after
initial startup.
The ORC also includes diagnostics that will
illum i
nate the instrument panel Air Bag Warning
Light if a malfunction is detected that could affect
the air bag system. The diagnostics also record the
nature of the malfunction. While the air bag system
is designed to be maintenance free, if any of the
following occurs, have an authorized dealer
service the air bag system immediately.
The Air Bag Warning Light does not come on
during the four to eight seconds when the igni -
tion switch is first in the MAR/ACC/ON/RUN
p osition
.
The Air Bag Warning Light remains on after the
four to eight-second interval.
The Air Bag Warning Light comes on intermit -
tently or remains on while driving.
NOTE:
If the speedometer, tachometer, or any engine
relat e
d gauges are not working, the Occupant
Restraint Controller (ORC) may also be disabled. In
this condition the air bags may not be ready to
inflate for your protection. Have an authorized
dealer service the air bag system immediately.
Redundant Air Bag Warning Light
If a fault with the Air Bag Warning Light is
detected, which could affect the
S up
p l
e
mental Restraint System (SRS),
the Redundant Air Bag Warning Light will
illuminate on the instrument panel. The
Redundant Air Bag Warning Light will stay on until
the fault is cleared. In addition, a single chime will
sound to alert you that the Redundant Air Bag
Warning Light has come on and a fault has been
detected. If the Redundant Air Bag Warning Light
comes on intermittently or remains on while driving have an authorized dealer service the vehicle
immediately
Ú page 69.
Front Air Bags
This vehicle has front air bags and lap/shoulder
belts for both the driver and front passenger. The
front air bags are a supplement to the seat belt
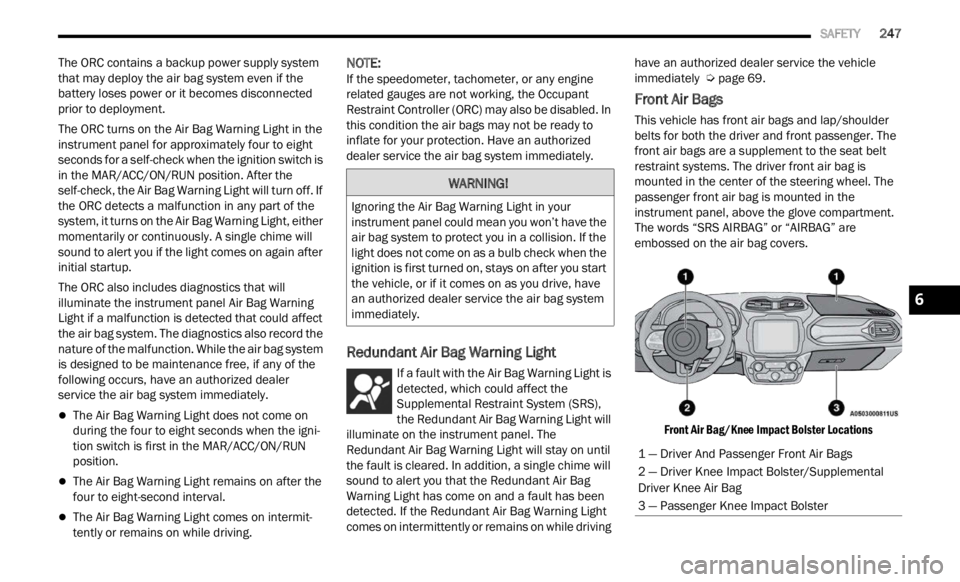
restraint systems. The driver front air bag is
mounted in the center of the steering wheel. The
passenger front air bag is mounted in the
instrument panel, above the glove compartment.
The words “SRS AIRBAG” or “AIRBAG” are
embossed on the air bag covers.
Front Air Bag/Knee Impact Bolster Locations
WARNING!
Ignoring the Air Bag Warning Light in your
instrument panel could mean you won’t have the
air bag system to protect you in a collision. If the
light does not come on as a bulb check when the
ignition is first turned on, stays on after you start
the vehicle, or if it comes on as you drive, have
an authorized dealer service the air bag system
immediately.
1 — Driver And Passenger Front Air Bags
2 — Driver Knee Impact Bolster/Supplemental
Driver Knee Air Bag
3 — Passenger Knee Impact Bolster
6
Page 269 of 364

SAFETY 267
PERIODIC SAFETY CHECKS YOU SHOULD
M
AKE OUTSIDE THE VEHICLE
Tires
Examine tires for excessive tread wear and uneven
wear patterns. Check for stones, nails, glass, or
other objects lodged in the tread or sidewall.
Inspect the tread for cuts and cracks. Inspect
sidewalls for cuts, cracks, and bulges. Check the
lug nuts/bolt torque for tightness. Check the tires
(including spare) for proper cold inflation pressure.
Lights
Have someone observe the operation of brake
lights and exterior lights while you work the
controls. Check turn signal and high beam
indicator lights on the instrument panel.
Door Latches
Check for proper closing, latching, and locking.
Fluid Leaks
Check area under the vehicle after overnight
parking for fuel, coolant, oil, or other fluid leaks.
Also, if gasoline fumes are detected or if fuel or
brake fluid leaks are suspected, the cause should
be located and corrected immediately.
EXHAUST GAS
The best protection against carbon monoxide entry
into the vehicle body is a properly maintained
engine exhaust system.
Whenever a change is noticed in the sound of the
exhau s
t system, when exhaust fumes can be
detected inside the vehicle, or when the underside
or rear of the vehicle is damaged, have an
authorized dealer inspect the complete exhaust system and adjacent body areas for broken,
damaged, deteriorated, or mispositioned parts.
Open seams or loose connections could permit
exhaust fumes to seep into the passenger
compartment. In addition, inspect the exhaust
system each time the vehicle is raised for
lubrication or oil change. Replace as required.
CARBON MONOXIDE WARNINGS
WARNING!
Exhaust gases can injure or kill. They contain
carbon monoxide (CO), which is colorless and
odorless. Breathing it can make you
unconscious and can eventually poison you. To
avoid breathing (CO), follow these safety tips:
Do not run the engine in a closed garage or in
confined areas any longer than needed to
move your vehicle in or out of the area.
If you are required to drive with the trunk/lift
-
gate/rear doors open, make sure that all
window s
are closed and the climate control
BLOWER switch is set at high speed. DO NOT
use the recirculation mode.
If it is necessary to sit in a parked vehicle with
the engine running, adjust your heating or
cooling controls to force outside air into the
vehicle. Set the blower at high speed.
WARNING!
Carbon monoxide (CO) in exhaust gases is
deadly. Follow the precautions below to prevent
carbon monoxide poisoning:
Do not inhale exhaust gases. They contain
carbon monoxide, a colorless and odorless gas,
which can kill. Never run the engine in a closed
area, such as a garage, and never sit in a
parked vehicle with the engine running for an
extended period. If the vehicle is stopped in an
open area with the engine running for more
than a short period, adjust the ventilation
system to force fresh, outside air into the
vehicle.
Guard against carbon monoxide with proper
maintenance. Have the exhaust system
inspected every time the vehicle is raised.
Have any abnormal conditions repaired
promptly. Until repaired, drive with all side
windows fully open.
6
Page 288 of 364
286
SERVICING AND MAINTENANCE
SCHEDULED SERVICING
Your vehicle is equipped with an automatic oil
change indicator system. The oil change indicator
system will remind you that it is time to take your
vehicle in for scheduled maintenance.
Based on engine operation conditions, the oil
change
indicator message will illuminate in the
instrument cluster. This means that service is
required for your vehicle. Operating conditions
such as frequent short-trips, trailer tow and
extremely hot or cold ambient temperatures will
influence when the “Change Oil” or “Oil Change
Required” message is displayed. Have your vehicle
serviced as soon as possible, within the next
500 miles (805 km). An authorized dealer will reset the oil change
indica
tor message after completing the scheduled
oil change.
NOTE:
Under no circumstances should oil change
inter v
als exceed 10,000 miles (16,000 km),
1 year or 350 hours of engine run time, whichever
c omes f
irst. The 350 hours of engine run or idle
time is generally only a concern for fleet
customers.
NOTE:
The Oil Change Indicator will not illuminate under
these
conditions. Once A Month Or Before A Long Trip:
Check engine oil level.
Check windshield washer fluid level.
Check the tire inflation pressures and look for
unusual wear or damage.
Check the fluid levels of the coolant reservoir,
and brake master cylinder reservoir, and fill as
needed.
Check function of all interior and exterior lights.