ESP JEEP RENEGADE 2023 Owner's Manual
[x] Cancel search | Manufacturer: JEEP, Model Year: 2023, Model line: RENEGADE, Model: JEEP RENEGADE 2023Pages: 364, PDF Size: 18.65 MB
Page 139 of 364

MULTIMEDIA 137
Voice
Clock & Date
When the Voice button is pressed on the touchscreen, the system displays the options related to the vehicle’s Voice Recognition feature.
NOTE:
Depending on the vehicle’s options, feature settings may vary.
Setting Name Description
Voice Response Length This setting will change the response length for the Voice Recognition system.
The “
B
rief” setting provides a shortened audio description from the system.
The “Detailed” setting provides the full audio description from the system.
Show Command List This setting will allow you to turn the Command List on or off. The “Always”
settin
g will always show the Command List. The “With Help” setting will show
the Command List and provide a brief description of what the command does.
The “Never” setting will turn the Command List off.
When the Clock & Date button is pressed on the touchscreen, the system displays the different options related to the vehicle’s internal clock.
NOTE:
Depending on the vehicle’s options, feature settings may vary.
Setting Name Description
Sync Time With GPS This setting will sync the time to the GPS receiver in the system. The system
will
c
ontrol the time via the GPS location.
Time Format This setting will allow you to set the time format (AM/PM). Sync Time With GPS
m
ust
b
e off for this setting to be available. The “12 hrs” setting will set the
time to a 12-hour format. The “24 hrs” setting will set the time to a 24-hour
format.
5
Page 151 of 364
MULTIMEDIA 149
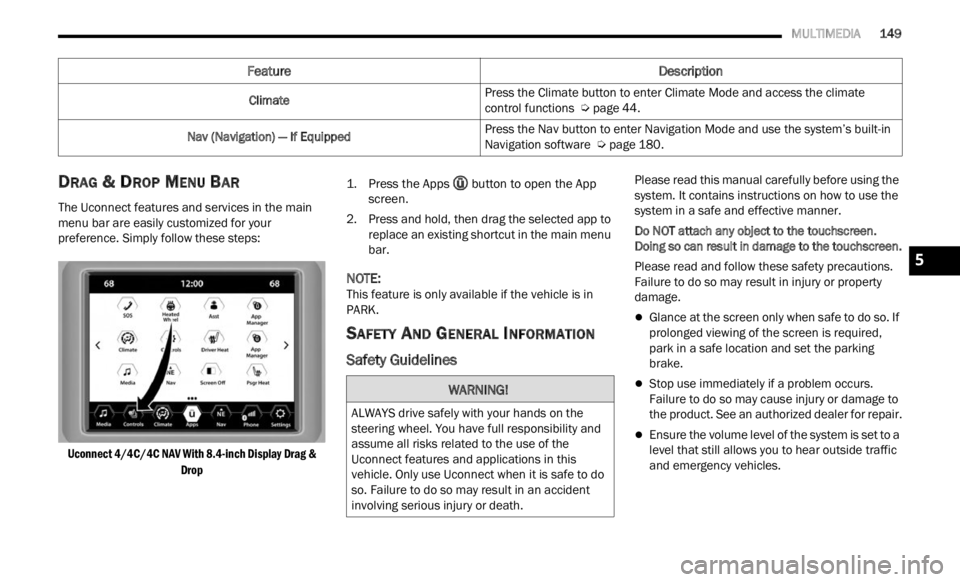
DRAG & DROP MENU BAR
The Uconnect features and services in the main
menu bar are easily customized for your
preference. Simply follow these steps:
Uconnect 4/4C/4C NAV With 8.4-inch Display Drag & Drop
1.
P
ress the Apps
butt
on to open the App
screen.
2. P ress and hold, then drag the selected app to
repla
ce an existing shortcut in the main menu
bar.
NOTE:
This feature is only available if the vehicle is in
PARK.
SAFETY AND GENERAL INFORMATION
Safety Guidelines
Please read this manual carefully before using the
system. It contains instructions on how to use the
system in a safe and effective manner.
Do NOT attach any object to the touchscreen.
Doing s
o can result in damage to the touchscreen.
Please read and follow these safety precautions.
Failur
e to do so may result in injury or property
damage.
Glance at the screen only when safe to do so. If
prolonged viewing of the screen is required,
park in a safe location and set the parking
brake.
Stop use immediately if a problem occurs.
Failure to do so may cause injury or damage to
the product. See an authorized dealer for repair.
Ensure the volume level of the system is set to a
level that still allows you to hear outside traffic
and emergency vehicles.
Climate
Press the Climate button to enter Climate Mode and access the climate
c
ontrol
functions Ú page 44.
Nav (Navigation) — If Equipped Press the Nav button to enter Navigation Mode and use the system’s built-in
Navig
a
tion software Ú page 180.
Feature Description
WARNING!
ALWAYS drive safely with your hands on the
steering wheel. You have full responsibility and
assume all risks related to the use of the
Uconnect features and applications in this
vehicle. Only use Uconnect when it is safe to do
so. Failure to do so may result in an accident
involving serious injury or death.
5
Page 153 of 364
MULTIMEDIA 151
RADIO MODE
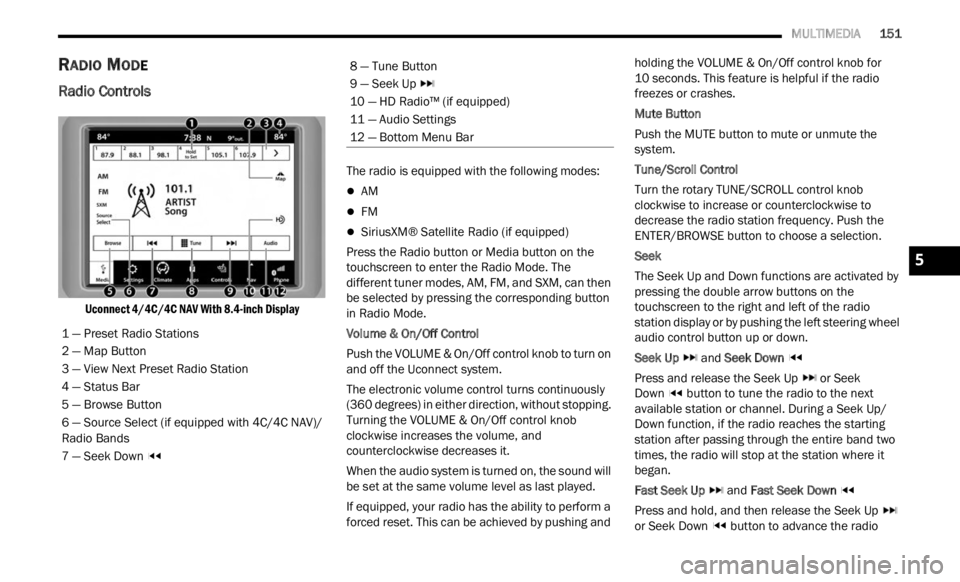
Radio Controls
Uconnect 4/4C/4C NAV With 8.4-inch Display
The radio is equipped with the following modes:
AM
FM
SiriusXM® Satellite Radio (if equipped)
Press the Radio button or M
ed
i
a button on the
touchscreen to enter the Radio Mode. The
different tuner modes, AM, FM, and SXM, can then
be selected by pressing the corresponding button
in Radio Mode.
Volume & On/Off Control
Push the VOLUME & On/Off control knob to turn on
a nd of f
the Uconnect system.
The electronic volume control turns continuously
(360 d
egrees) in either direction, without stopping.
Turning the VOLUME & On/Off control knob
clockwise increases the volume, and
counterclockwise decreases it.
When the audio system is turned on, the sound will
be se t
at the same volume level as last played.
If equipped, your radio has the ability to perform a
forced
reset. This can be achieved by pushing and holding the VOLUME & On/Off control knob for
10 seconds. This feature is helpful if the radio
freez e
s or crashes.
Mute Button
Push the MUTE button to mute or unmute the
syste m
.
Tune/Scroll Control
Turn the rotary TUNE/SCROLL control knob
clock w
ise to increase or counterclockwise to
decrease the radio station frequency. Push the
ENTER/BROWSE button to choose a selection.
Seek
The Seek Up and Down functions are activated by
press i
ng the double arrow buttons on the
touchscreen to the right and left of the radio
station display or by pushing the left steering wheel
audio control button up or down.
Seek Up and Seek Down
Pres s
and release the Seek Up or Seek
Down button to tune the radio to the next
available station or channel. During a Seek Up/
D own f u
nction, if the radio reaches the starting
station after passing through the entire band two
times, the radio will stop at the station where it
began.
Fast Seek Up and Fast Seek Down
Pres s
and hold, and then release the Seek Up
or Seek Down button to advance the radio
1 — Preset Radio Stations
2 — Map Button
3 — View Next Preset Radio Station
4 — Status Bar
5 — Browse Button
6 — Source Select (if equipped with 4C/4C NAV)/
R
adio B
ands
7 — Seek Down
8 — Tune Button
9 — Seek Up
10 — HD Radio™ (if equipped)
11 — Audio Settings
12 — Bottom Menu Bar
5
Page 155 of 364

MULTIMEDIA 153
When HD Radio™ broadcasts are active, you can
access the following functions:
Seek Up And Down: Press to seek to the next
strong radio station. If the current station has
multiple digital broadcasts, the multicast indi -
cator numbers will display. Press “Seek” repeat -
edly to advance through all available
b roadc
asts. If you are on the last multicast
channel, press “Seek Up” to advance to the next
strong station.
Saving A Multicast Station As A Preset: When
the channel is active on-screen, press and hold
a Preset button; it will save the station to the
available slot. When recalling an HD2, HD3, etc.
memory preset, there will be a momentary mute
before the digital audio is played as the system
acquires the digital signal. If you have turned
this feature off, this will automatically turn on
HD Radio™ broadcasts and will tune to the
selected frequency. As with any saved radio
station, you will not be able to access the saved
station if your vehicle is outside the station’s
reception area.
“LIVE” Ballgame Mode Broadcasts: If a station
has a live broadcast (such as a baseball game),
“LIVE” may appear on screen beside the multi -
cast numbers. These are analog broadcasts
with d
igital components (i.e. artist, title). If HD1
is in a live broadcast mode, the HD Radio™ logo
will be gray. You will hear analog audio; the user
will still be able to tune to the multicast chan -
nels.
Reception Area:
If y ou
are listening to a multicast
(HD2, HD3, etc.) station and you are on the fringe
of the reception area, the station may mute due to
weak signal strength. If you are listening to HD1,
the system will simply switch to the analog
broadcast until the digital broadcast is available
again.
However, if you are listening to any of the possible
multi c
ast (HD2, HD3, etc.) channels, the station
will mute and stay muted unless it is able to
connect to the digital signal again. While in this
state, the text “buffering” will appear for 30 sec-
onds. If it is not able to reconnect to the digital
signal, the screen will be cleared and “HD Radio™
Signal Unavailable” will appear in artist and title
field area. Station Blending:
When
an HD1 station is received,
the system will play the analog audio broadcast
from the station for a few seconds and then, if the
receiver verifies the station is an HD Radio™
station, it will transition to play the digital audio
broadcast. Depending on the station quality, you
may hear a slight sound change when the station
transitions from analog to the digital broadcast.
The shift from analog to digital or digital back to
analog sound is known as “blending”.
Station Issues: In ord
er to provide the best
possible experience, a contact form has been
developed to report any station issues found while
listening to a station broadcasting with HD Radio™
technology. Every station is independently owned
and operated. These stations are responsible for
ensuring all audio streams and data fields are
accurate. This form can be found at https://
hdradio.com/stations/feedback/ .
5
Page 161 of 364

MULTIMEDIA 159
button on the TUNE/SCROLL knob to select the
currently highlighted Preset. When selected, the
Radio tunes to the station stored in the Preset.
Deleting A Preset
A preset can be deleted in the Presets Browse
s
creen
by pressing the Trash Can icon for the
corresponding preset.
Favorites
Press the Favorites button on the Browse screen.
The Favorites menu provides a means to edit the
F avori t
es list and to configure the Alert Settings,
along with providing a list of Channels currently
airing any of the items in the Favorites list.
You can scroll the Favorites list by pressing the Up
and Do
wn arrows located at the right side of the
screen. Scrolling can also be done by operating the
TUNE/SCROLL knob as well.
Remove Favorites
Press the Remove Favorites tab at the top of the
scree n
. Press the Delete All button on the
touchscreen to delete all of the Favorites or press
the Trash Can icon next to the Favorite to be
deleted.
Alert Settings
Press the Alert Settings tab at the top of the
F avori t
es screen. The Alert Settings menu allows
you to choose from a visual alert or audible and visual alert when one of your favorites is airing on
any of the SiriusXM® channels.
Game Zone
Press the Game Zone button, located at the left of
t
he B r
owse screen. This feature provides you with
the ability to select teams, edit the selection, and
set alerts.
On-Air
Press the On-Air tab at the top of the screen. The
On-Ai r
list provides a list of Channels currently
airing any of the items in the Selections list, and
pressing any of the items in the list tunes the radio
to that channel.
Select Team — If
Equipped
Press the Select Team button on the touchscreen
to ac t
ivate the League Scroll list. Press the chosen
league and a scroll list of all teams within the
league will appear, then you can select a team by
pressing the corresponding box. A check mark
appears for all teams that are chosen.
Remove Selection/Trash Can Icon
Press the Remove Selection tab at the top of the
scree n
. Press the Delete All button on the
touchscreen to delete all of the selections or press
the Trash Can icon next to the selection to be
deleted. Alert Settings
Press the Alert Setting tab at the top of the screen.
The A
l
ert Settings menu allows you to choose from
“Alert me to on-air games upon start” or “Alert
upon score update” or both when one or more of
your selections is airing on any of the SiriusXM®
channels.
Tune Start
Tune Start begins playing the current song from
the b e
ginning when you tune to a music channel
using one of the 12 presets. This feature occurs
the first time the preset is selected during that
current song.
Saving Presets To A Driver Memory
Profile — If Equipped
After setting/changing the desired radio presets,
your updates will be saved under the current active
profile automatically. Seat alignment will not be
saved automatically. For more information, refer to
“Driver Memory Settings” in “Getting To Know Your
Vehicle” in the Owner’s Manual.
5
Page 162 of 364
160 MULTIMEDIA
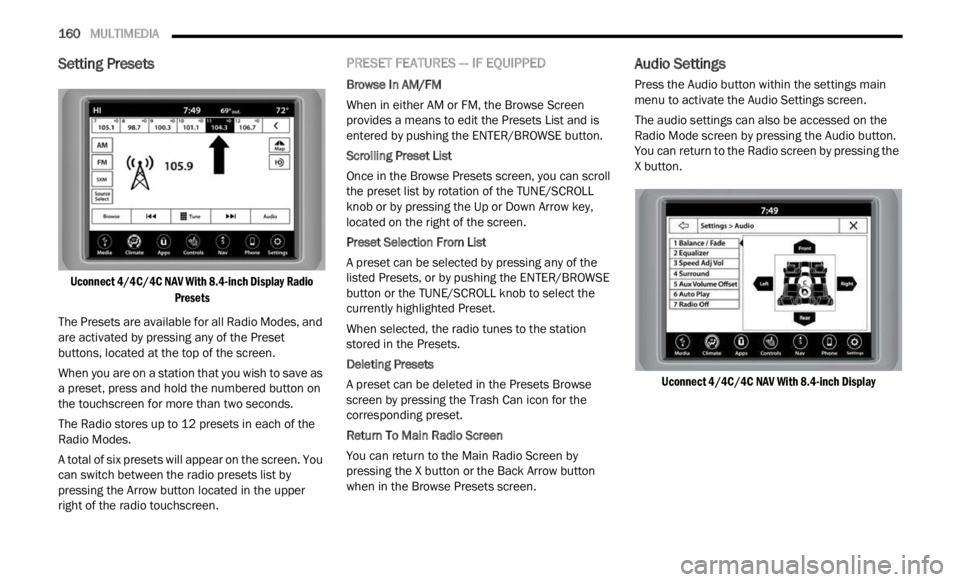
Setting Presets
Uconnect 4/4C/4C NAV With 8.4-inch Display Radio
Presets
The Presets are available for all Radio Modes, and
are ac
tivated by pressing any of the Preset
buttons, located at the top of the screen.
When you are on a station that you wish to save as
a pre s
et, press and hold the numbered button on
the touchscreen for more than two seconds.
The Radio stores up to 12 presets in each of the
Radio M
odes.
A total of six presets will appear on the screen. You
can sw
itch between the radio presets list by
pressing the Arrow button located in the upper
right of the radio touchscreen.
PRESET FEATURES — IF EQUIPPED
Browse In AM/FM
When in either AM or FM, the Browse Screen
provid e
s a means to edit the Presets List and is
entered by pushing the ENTER/BROWSE button.
Scrolling Preset List
Once in the Browse Presets screen, you can scroll
t he pr
eset list by rotation of the TUNE/SCROLL
knob or by pressing the Up or Down Arrow key,
located on the right of the screen.
Preset Selection From List
A preset can be selected by pressing any of the
liste d
Presets, or by pushing the ENTER/BROWSE
button or the TUNE/SCROLL knob to select the
currently highlighted Preset.
When selected, the radio tunes to the station
stored
in the Presets.
Deleting Presets
A preset can be deleted in the Presets Browse
scree n
by pressing the Trash Can icon for the
corresponding preset.
Return To Main Radio Screen
You can return to the Main Radio Screen by
p ressi
ng the X button or the Back Arrow button
when in the Browse Presets screen.
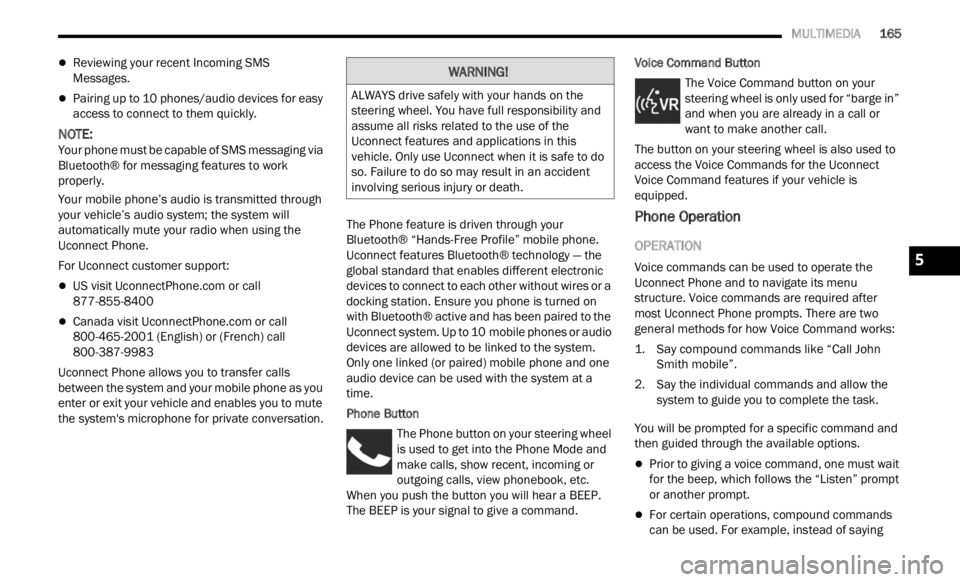
Audio Settings
Press the Audio button within the settings main
menu to activate the Audio Settings screen.
The audio settings can also be accessed on the
Radio M
ode screen by pressing the Audio button.
You can return to the Radio screen by pressing the
X button.
Uconnect 4/4C/4C NAV With 8.4-inch Display
Page 167 of 364
MULTIMEDIA 165
Reviewing your recent Incoming SMS
Messages.
Pairing up to 10 phones/audio devices for easy
access to connect to them quickly.
NOTE:
Your phone must be capable of SMS messaging via
Bluet oot
h® for messaging features to work
properly.
Your mobile phone’s audio is transmitted through
your v e
hicle’s audio system; the system will
automatically mute your radio when using the
Uconnect Phone.
For Uconnect customer support:
US visit UconnectPhone.com or call
877-855-8400
Canada visit UconnectPhone.com or call
800-465-2001 (English) or (French) call
800-3 8
7-9983
Uconnect Phone allows you to transfer calls
betwee
n the system and your mobile phone as you
enter or exit your vehicle and enables you to mute
the system's microphone for private conversation. The Phone feature is driven through your
Bluet
oot
h® “Hands-Free Profile” mobile phone.
Uconnect features Bluetooth® technology — the
global standard that enables different electronic
devices to connect to each other without wires or a
docking station. Ensure you phone is turned on
with Bluetooth® active and has been paired to the
Uconnect system. Up to 10 mobile phones or audio
devic e
s are allowed to be linked to the system.
Only one linked (or paired) mobile phone and one
audio device can be used with the system at a
time.
Phone Button
The Phone button on your steering wheel
is used to get into the Phone Mode and
make c
alls, show recent, incoming or
outgoing calls, view phonebook, etc.
When you push the button you will hear a BEEP.
The BEEP is your signal to give a command. Voice Command Button
The Voice Command button on your
steering wheel is only used for “barge in”
and w h
en you are already in a call or
want to make another call.
The button on your steering wheel is also used to
acces s
the Voice Commands for the Uconnect
Voice Command features if your vehicle is
equipped.
Phone Operation
OPERATION
Voice commands can be used to operate the
Uconnect Phone and to navigate its menu
structure. Voice commands are required after
most Uconnect Phone prompts. There are two
general methods for how Voice Command works:
1. Say compound commands like “Call John Smit h
mobile”.
2. Say the individual commands and allow the syste
m to guide you to complete the task.
You will be prompted for a specific command and
then g
uided through the available options.
Prior to giving a voice command, one must wait
for the beep, which follows the “Listen” prompt
or another prompt.
For certain operations, compound commands
can be used. For example, instead of saying
WARNING!
ALWAYS drive safely with your hands on the
steering wheel. You have full responsibility and
assume all risks related to the use of the
Uconnect features and applications in this
vehicle. Only use Uconnect when it is safe to do
so. Failure to do so may result in an accident
involving serious injury or death.
5
Page 168 of 364
166 MULTIMEDIA
“Call” and then “John Smith” and then “mobile”,
the following compound command can be said:
“Call John Smith mobile.”
For each feature explanation in this section,
only the compound command form of the voice
command is given. You can also break the
commands into parts and say each part of the
command when you are asked for it. For
example, you can use the compound command
form voice command “Search for John Smith,”
or you can break the compound command form
into two voice commands: “Search Contacts”
and when asked, “John Smith.” Please
remember, the Uconnect Phone works best
when you talk in a normal conversational tone,
as if speaking to someone sitting a few feet/
meters away from you.
NATURAL SPEECH
Your Uconnect Phone Voice system uses a Natural
Language Voice Recognition (VR) engine.
Natural speech allows the user to speak
command
s in phrases or complete sentences. The
system filters out certain non-word utterances and
sounds such as “ah” and “eh.” The system handles
fill-in words such as “I would like to”.
The system handles multiple inputs in the same
phras e
or sentence such as “make a phone call”
and “to Kelly Smith”. For multiple inputs in the
same phrase or sentence, the system identifies the topic or context and provides the associated
follow-up prompt such as “Who do you want to
call?” in the case where a phone call was
requested but the specific name was not
recognized.
The system utilizes continuous dialog. When the
syste
m
requires more information from the user, it
will ask a question to which the user can respond
without pushing the Voice Command button on the
steering wheel.
HELP COMMAND
If you need assistance at any prompt, or if you want
to know your options at any prompt, say “Help”
following the beep.
To activate the Uconnect Phone from idle, simply
push t
he Phone button (if active) on your steering
wheel and say a command or say “Help”. All Phone
sessions begin with a push of the VR button or the
Phone button.
CANCEL COMMAND
At any prompt, after the beep, you can say “Cancel”
and you will be returned to the main menu.
You can also push the VR button or Phone button
on your
steering wheel when the system is listening
for a command and be returned to the main or
previous menu.
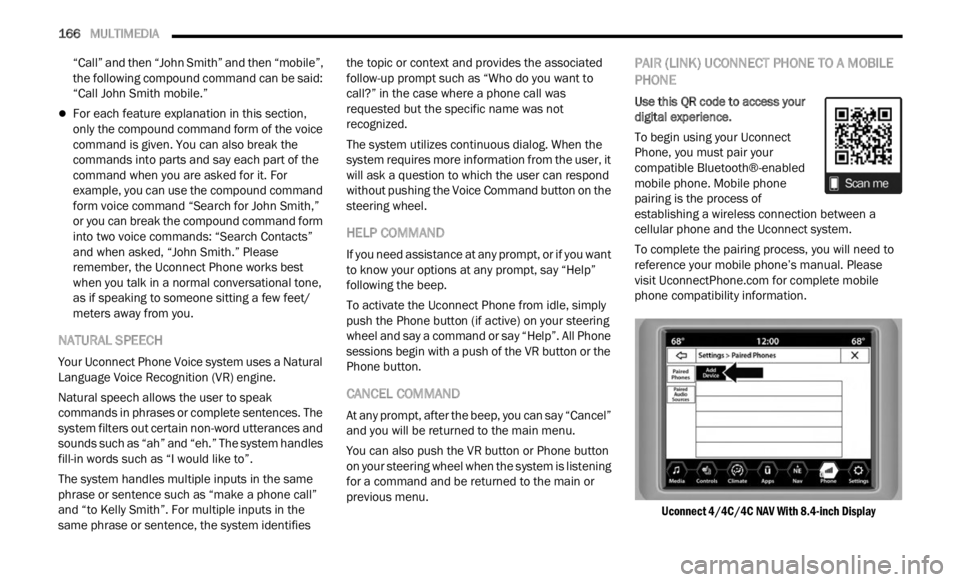
PAIR (LINK) UCONNECT PHONE TO A MOBILE
PHONE
Use this QR code to access your
digital experience.
To begin using your Uconnect
P hone,
you must pair your
compatible Bluetooth®-enabled
mobile phone. Mobile phone
pairing is the process of
establishing a wireless connection between a
cellular phone and the Uconnect system.
To complete the pairing process, you will need to
refer e
nce your mobile phone’s manual. Please
visit UconnectPhone.com for complete mobile
phone compatibility information.
Uconnect 4/4C/4C NAV With 8.4-inch Display
Page 175 of 364
MULTIMEDIA 173
Even though the system is designed for many
languages and accents, the system may not always
work for some.
NOTE:
It is recommended that you do not store names in
your F a
vorites phonebook while the vehicle is in
motion.
Number and name recognition rate is optimized
when t
he entries are not similar. You can say “O”
(letter “O”) for “0” (zero).
Even though international dialing for most number
combin a
tions is supported, some shortcut dialing
number combinations may not be supported.
Audio Performance
Audio quality is maximized under:
Low-To-Medium Blower Setting
Low-To-Medium Vehicle Speed
Low Road Noise
Smooth Road Surface
Fully Closed Windows
Dry Weather Conditions
Operation From The Driver's Seat
Performance such as audio clarity, echo, and
loudne s
s to a large degree rely on the phone and
network, and not the Uconnect Phone.
Echo at the far end can sometimes be reduced by
loweri n
g the in-vehicle audio volume.
PHONE VOICE COMMANDS
Making and answering hands-free phone calls is
easy with Uconnect. When the Phonebook button
is illuminated on your touchscreen, your system is
ready. Check UconnectPhone.com for mobile
phone compatibility and pairing instructions.
Push the Phone button and wait for the beep to
say a command. See the following examples:
“ Call John Smith”
“Dial 123 456 7890”
“Redial ” (call previous outgoing phone number)
“Call back ” (call previously answered incoming
phone number)
Did You Know: When
providing a Voice Command,
push the Phone button and say “Call”, th en
pronounce the name exactl y as it appears in your phonebook. When a contact has multiple phone
numbers, you can say “
Call John Smith work”.
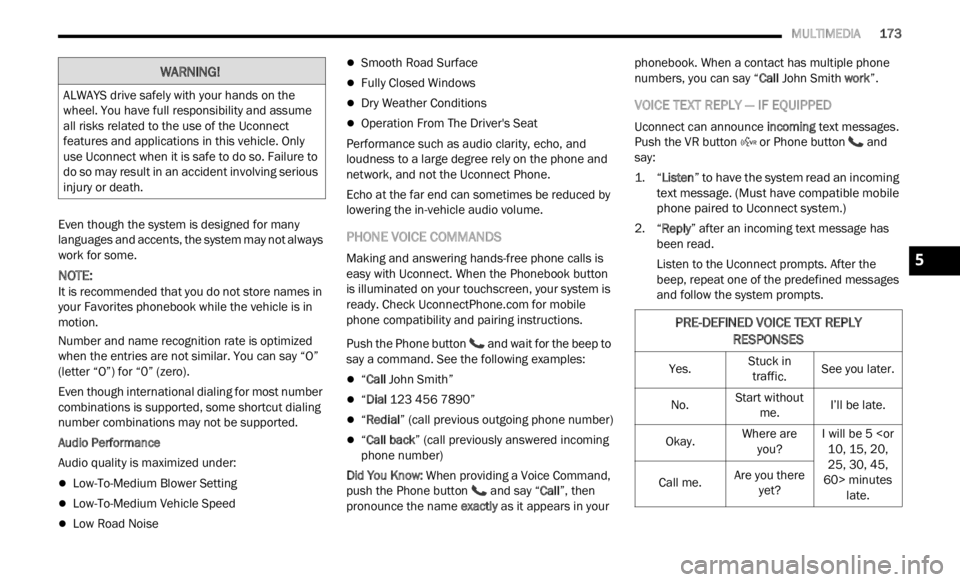
VOICE TEXT REPLY — IF EQUIPPED
Uconnect can announce incoming text messages.
Push the VR button or Phone button and
say:
1. “
Listen
” to have the system read an incoming
te x
t message. (Must have compatible mobile
phone paired to Uconnect system.)
2. “ Reply ” after an incoming text message has
bee n
read.
Listen to the Uconnect prompts. After the
beep,
repeat one of the predefined messages
and follow the system prompts.
WARNING!
ALWAYS drive safely with your hands on the
wheel. You have full responsibility and assume
all risks related to the use of the Uconnect
features and applications in this vehicle. Only
use Uconnect when it is safe to do so. Failure to
do so may result in an accident involving serious
injury or death.
PRE-DEFINED VOICE TEXT REPLY
RESPONSES
Yes. Stuck in
traff i
c. See you later.
No. Start without
me. I’l
l
be late.
Okay. Where are
you? I w
i
ll be 5
25, 30, 45,
60> minutes late.
Call me.
Are you there
yet?
5
Page 176 of 364
174 MULTIMEDIA
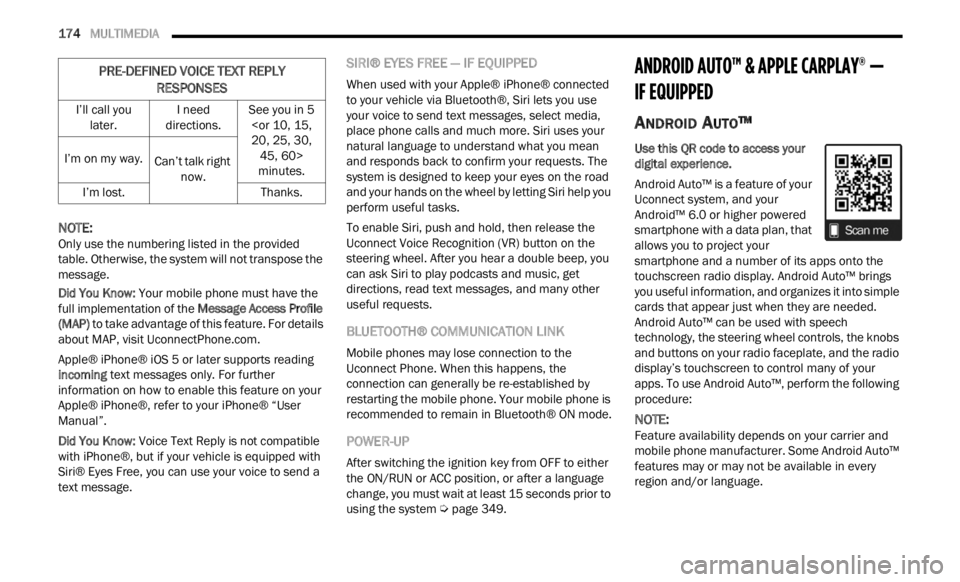
NOTE:
Only use the numbering listed in the provided
table .
Otherwise, the system will not transpose the
message.
Did You Know: Your m
obile phone must have the
full implementation of the Message Access Profile
(MAP) to take advantage of this feature. For details
about MAP, visit UconnectPhone.com .
Apple® iPhone® iOS 5 or later supports reading
i ncomin
g text messages only. For further
information on how to enable this feature on your
Apple® iPhone®, refer to your iPhone® “User
Manual”.
Did You Know: Voice
Text Reply is not compatible
with iPhone®, but if your vehicle is equipped with
Siri® Eyes Free, you can use your voice to send a
text message.
SIRI® EYES FREE — IF EQUIPPED
When used with your Apple® iPhone® connected
to your vehicle via Bluetooth®, Siri lets you use
your voice to send text messages, select media,
place phone calls and much more. Siri uses your
natural language to understand what you mean
and responds back to confirm your requests. The
system is designed to keep your eyes on the road
and your hands on the wheel by letting Siri help you
perform useful tasks.
To enable Siri, push and hold, then release the
Uconne c
t Voice Recognition (VR) button on the
steering wheel. After you hear a double beep, you
can ask Siri to play podcasts and music, get
directions, read text messages, and many other
useful requests.
BLUETOOTH® COMMUNICATION LINK
Mobile phones may lose connection to the
Uconnect Phone. When this happens, the
connection can generally be re-established by
restarting the mobile phone. Your mobile phone is
recommended to remain in Bluetooth® ON mode.
POWER-UP
After switching the ignition key from OFF to either
the ON/RUN or ACC position, or after a language
change, you must wait at least 15 seconds prior to
using the system Ú page 349.
ANDROID AUTO™ & APPLE CARPLAY® —
IF EQUIPPED
ANDROID AUTO™
Use this QR code to access your
digital experience.
Android Auto™ is a feature of your
U connec
t system, and your
Android™ 6.0 or higher powered
smartphone with a data plan, that
allows you to project your
smartphone and a number of its apps onto the
touchscreen radio display. Android Auto™ brings
you useful information, and organizes it into simple
cards that appear just when they are needed.
Android Auto™ can be used with speech
technology, the steering wheel controls, the knobs
and buttons on your radio faceplate, and the radio
display’s touchscreen to control many of your
apps. To use Android Auto™, perform the following
procedure:
NOTE:
Feature availability depends on your carrier and
mobile
phone manufacturer. Some Android Auto™
features may or may not be available in every
region and/or language.
I’ll call you
later . I
need
direct ions. See you in 5
minutes.
I’m on my way.
Can’t talk right
now.
I’m
lost. Thanks.
PRE-DEFINED VOICE TEXT REPLY
RESPONSES