Windshield JEEP RENEGADE 2023 Owner's Manual
[x] Cancel search | Manufacturer: JEEP, Model Year: 2023, Model line: RENEGADE, Model: JEEP RENEGADE 2023Pages: 364, PDF Size: 18.65 MB
Page 290 of 364

288 SERVICING AND MAINTENANCE
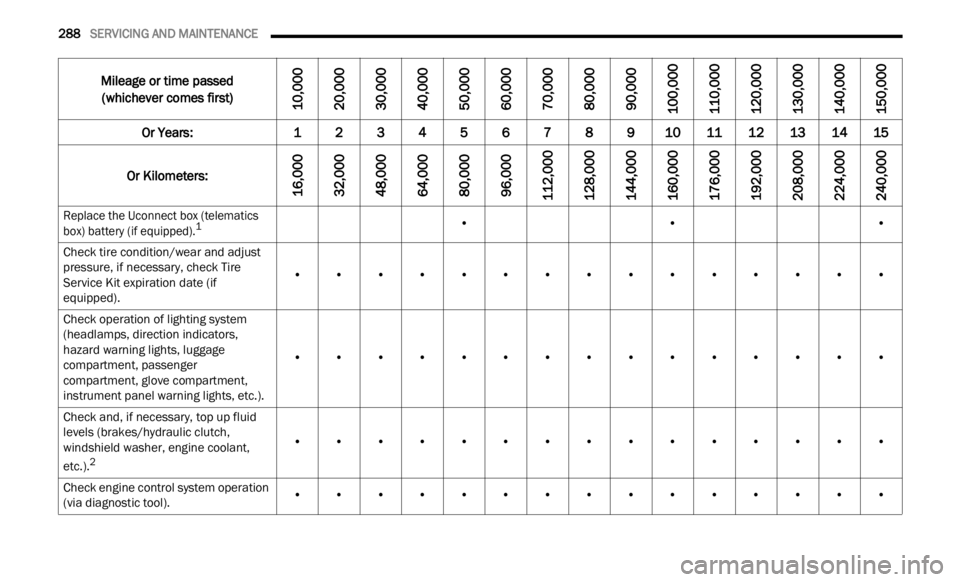
Mileage or time passed
(whichever comes first)
10,000
20,000
30,000
40,000
50,000
60,000
70,000
80,000
90,000
100,000
110,000
120,000
130,000
140,000
150,000
Or Years: 12345678910 1112131415
Or Kilometers:
16,000
32,000
48,000
64,000
80,000
96,000
112,000
128,000
144,000
160,000
176,000
192,000
208,000
224,000
240,000
Replace the Uconnect box (telematics
box) battery (if equipped).1
• ••
Check tire condition/wear and adjust
press u
re, if necessary, check Tire
Service Kit expiration date (if
equipped). •
••••••••••••••
Check operation of lighting system
(head l
amps, direction indicators,
hazard warning lights, luggage
compartment, passenger
compartment, glove compartment,
instrument panel warning lights, etc.). •
••••••••••••••
Check and, if necessary, top up fluid
l evel
s
(brakes/hydraulic clutch,
windshield washer, engine coolant,
etc.).
2
• ••••••••••••••
Check engine control system operation
(via d
iagnostic tool). •
••••••••••••••
Page 291 of 364

SERVICING AND MAINTENANCE 289
Visually inspect condition of: exterior
bodywork, underbody protection, pipes
and hoses (exhaust - fuel system -
brakes), rubber elements (boots,
sleeves, bushings, etc.). •
•••••••
Check windshield/rear window wiper
blade
position/wear. •
•••••••
Check operation of windshield washer
s yste
m
and adjust jets if necessary. •
•••••••
Check cleanliness of hood and tailgate
l ocks
a
nd cleanliness and lubrication
of linkages. •
••••••
Visually check the condition and wear
of the
front and rear brakes. •
••••••••••••••
Check the front suspension, tie rods,
C V/Un
i
versal joints and replace if
necessary. •
••••••••••••••
Visually inspect the condition of the
a ccess
ory drive belt.3• ••
Mileage or time passed
(whichever comes first)
10,000
20,000
30,000
40,000
50,000
60,000
70,000
80,000
90,000
100,000
110,000
120,000
130,000
140,000
150,000
Or Years: 1 2 3 4 5 6 7 8 9 10 11 12 13 14 15
Or Kilometers:
16,000
32,000
48,000
64,000
80,000
96,000
112,000
128,000
144,000
160,000
176,000
192,000
208,000
224,000
240,000
8
Page 296 of 364

294 SERVICING AND MAINTENANCE
CHECKING OIL LEVEL
To ensure proper engine lubrication, the engine oil
must be maintained at the correct level. Check the
oil level at regular intervals, such as every fuel
stop. The best time to check the engine oil level is
about five minutes after a fully warmed up engine
is shut off.
Checking the oil while the vehicle is on level ground
will i
mprove the accuracy of the oil level readings.
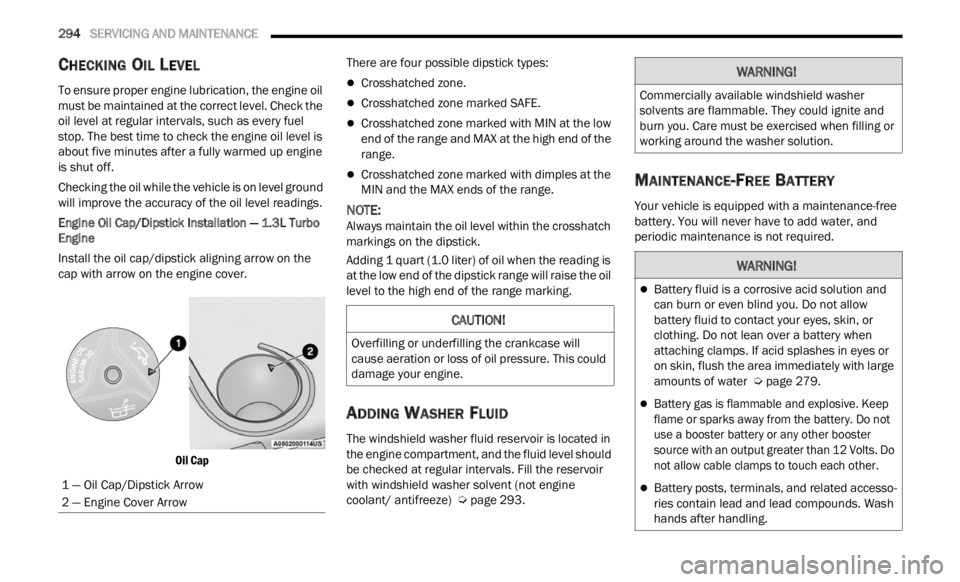
Engine Oil Cap/Dipstick Installation — 1.3L Turbo
Engine
I
nstall the oil cap/dipstick aligning arrow on the
cap wi
th arrow on the engine cover.
Oil Cap
There are four possible dipstick types:
Crosshatched zone.
Crosshatched zone marked SAFE.
Crosshatched zone marked with MIN at the low
end of the range and MAX at the high end of the
range.
Crosshatched zone marked with dimples at the
MIN and the MAX ends of the range.
NOTE:
Always maintain the oil level within the crosshatch
marki n
gs on the dipstick.
Adding 1 quart (1.0 liter) of oil when the reading is
at the
low end of the dipstick range will raise the oil
level to the high end of the range marking.
ADDING WASHER FLUID
The windshield washer fluid reservoir is located in
the engine compartment, and the fluid level should
be checked at regular intervals. Fill the reservoir
with windshield washer solvent (not engine
coolant/ antifreeze) Ú page 293.
MAINTENANCE-FREE BATTERY
Your vehicle is equipped with a maintenance-free
battery. You will never have to add water, and
periodic maintenance is not required.
1 — Oil Cap/Dipstick Arrow
2 — Engine Cover Arrow
CAUTION!
Overfilling or underfilling the crankcase will
cause aeration or loss of oil pressure. This could
damage your engine.
WARNING!
Commercially available windshield washer
solvents are flammable. They could ignite and
burn you. Care must be exercised when filling or
working around the washer solution.
WARNING!
Battery fluid is a corrosive acid solution and
can burn or even blind you. Do not allow
battery fluid to contact your eyes, skin, or
clothing. Do not lean over a battery when
attaching clamps. If acid splashes in eyes or
on skin, flush the area immediately with large
amounts of water Ú page 279.
Battery gas is flammable and explosive. Keep
flame or sparks away from the battery. Do not
use a booster battery or any other booster
source with an output greater than 12 Volts. Do
not allow cable clamps to touch each other.
Battery posts, terminals, and related accesso -
ries contain lead and lead compounds. Wash
h a n
d s
after handling.
Page 299 of 364

SERVICING AND MAINTENANCE 297
Refrigerant Recovery And Recycling —
R–1234yf
R–1234yf Air Conditioning Refrigerant is a
hydrofluoroolefin (HFO) that is endorsed by the
Environmental Protection Agency and is an
ozone-friendly substance with a low
global-warming potential. The manufacturer
recommends that air conditioning service be
performed by an authorized dealer using recovery
and recycling equipment.
NOTE:
Use only the manufacturer approved A/C system
PAG c om
pressor oil, and refrigerants.
Cabin Air Cleaner
See an authorized dealer for service.
BODY LUBRICATION
Locks and all body pivot points, including such
items as seat tracks, door hinge pivot points and
rollers, liftgate, tailgate, decklid, sliding doors and
hood hinges, should be lubricated periodically with
a lithium-based grease, such as Mopar® Spray
White Lube to ensure quiet, easy operation and to
protect against rust and wear. Prior to the
application of any lubricant, the parts concerned
should be wiped clean to remove dust and grit;
after lubricating, excess oil and grease should be
removed. Particular attention should also be given to hood latching components to ensure proper
function. When performing other underhood
services, the hood latch, release mechanism and
safety catch should be cleaned and lubricated.
The external lock cylinders should be lubricated
twice
a year, preferably in the Autumn and Spring.
Apply a small amount of a high quality lubricant,
such as Mopar® Lock Cylinder Lubricant directly
into the lock cylinder.
WINDSHIELD WIPER BLADES
Clean the rubber edges of the wiper blades and the
windshield periodically with a sponge or soft cloth
and a mild nonabrasive cleaner. This will remove
accumulations of salt or road film.
Operation of the wipers on dry glass for long
periods
may cause deterioration of the wiper
blades. Always use washer fluid when using the
wipers to remove salt or dirt from a dry windshield.
Avoid using the wiper blades to remove frost or ice
from th
e windshield. Keep the blade rubber out of
contact with petroleum products such as engine
oil, gasoline, etc.
NOTE:
Life expectancy of wiper blades varies depending
on geog r
aphical area and frequency of use. Poor
performance of blades may be present with chat -tering, marks, water lines or wet spots. If any of
these
conditions are present, clean the wiper
blades or replace as necessary.
Service Position Strategy
The service position allows the wiper blades to be
placed in a position that allows the wiper blades to
be easily changed.
To enable the Service Position Strategy, the wipers
must b
e in the Park position before placing the
ignition in the STOP/OFF position.
Service mode must be activated within two
minut e
s after the ignition is placed in the STOP/
OFF position.
To have a correct activation of strategy, the Service
Positi on
command (antipanic) must be active for at
least half a second.
At every valid activation of Service Position
comman d
, the wiper blades are activated for
250 ms.
The Service Position command can be repeated
sever a
l times to bring the blades into the desired
position, up to a maximum of three times.
After three subsequent activations the strategy is
disab l
ed.
8
Page 300 of 364

298 SERVICING AND MAINTENANCE
Function Deactivation:
The functionality is reset if:
The ignition is turned to the MAR/RUN position.
Number of subsequent activations is three.
Two minutes timer has expired after turning the
ignition OFF.
NOTE:
When turning the ignition ON, the blades will go
into t h
e parking position.
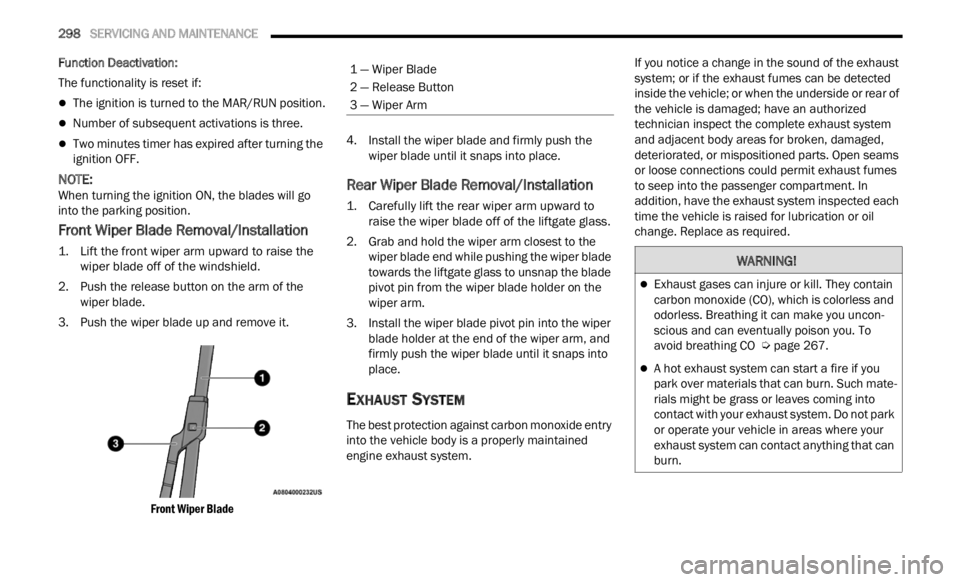
Front Wiper Blade Removal/Installation
1. Lift the front wiper arm upward to raise the wiper blade off of the windshield.
2. Push the release button on the arm of the wiper
blade.
3. Push the wiper blade up and remove it.
Front
Wiper Blade
4. Install the wiper blade and firmly push the
wipe r
blade until it snaps into place.
Rear Wiper Blade Removal/Installation
1. Carefully lift the rear wiper arm upward to raise the wiper blade off of the liftgate glass.
2. Grab and hold the wiper arm closest to the wiper
blade end while pushing the wiper blade
towards the liftgate glass to unsnap the blade
pivot pin from the wiper blade holder on the
wiper arm.
3. Install the wiper blade pivot pin into the wiper blad e
holder at the end of the wiper arm, and
firmly push the wiper blade until it snaps into
place.
EXHAUST SYSTEM
The best protection against carbon monoxide entry
into the vehicle body is a properly maintained
engine exhaust system. If you notice a change in the sound of the exhaust
syste
m
; or if the exhaust fumes can be detected
inside the vehicle; or when the underside or rear of
the vehicle is damaged; have an authorized
technician inspect the complete exhaust system
and adjacent body areas for broken, damaged,
deteriorated, or mispositioned parts. Open seams
or loose connections could permit exhaust fumes
to seep into the passenger compartment. In
addition, have the exhaust system inspected each
time the vehicle is raised for lubrication or oil
change. Replace as required.1 — Wiper Blade
2 — Release Button
3 — Wiper Arm
WARNING!
Exhaust gases can injure or kill. They contain
carbon monoxide (CO), which is colorless and
odorless. Breathing it can make you uncon -
scious and can eventually poison you. To
avoid b
reathing CO Ú page 267.
A hot exhaust system can start a fire if you
park over materials that can burn. Such mate -
rials might be grass or leaves coming into
c ontact
with your exhaust system. Do not park
or operate your vehicle in areas where your
exhaust system can contact anything that can
burn.
Page 309 of 364

SERVICING AND MAINTENANCE 307
F10 ––15 Amp Blue Horn
F11 ––5 Amp TanSupply Secondary Loads
F14 ––15 Amp Blue WCAC Pump/Active Grille Shutters
F15 40 Amp Orange ––Brake Control Module Pump
F16 ––5 Amp TanEngine Control Module Power, Automatic Transmission
F17 ––30 Amp Green Supply Primary Loads
F18 ––5 Amp TanIntelligent Battery Sensor
F19 ––7.5 Amp Brown Air Conditioner 1.3L Compressor
F20 ––5 Amp TanElectronic Power Four-Wheel Drive
F21 ––15 Amp Blue Fuel Pump
F22 ––10 Amp Red Power Control Module Engine
F23 ––30 Amp Green Heated Windshield *
F24 ––15 Amp Blue Electronic Unit Supply Automatic Transmission
F82 –20 Amp Yellow –Power Control Module Engine
F83 –40 Amp Green –Air Conditioning Fan
F84 ––30 Amp Green Power Supply All Wheel Drive
F87 ––5 Amp TanGear Selector Automatic Transmission
F88 ––7.5 Amp Brown Heated Outside Mirrors
F89 –30 Amp Green –Heated Rear Window
Cavity Maxi Fuse Cartridge Fuse Micro Fuse Description
* If Equipped
8
Page 343 of 364

341
TECHNICAL SPECIFICATIONS
VEHICLE IDENTIFICATION NUMBER (VIN)
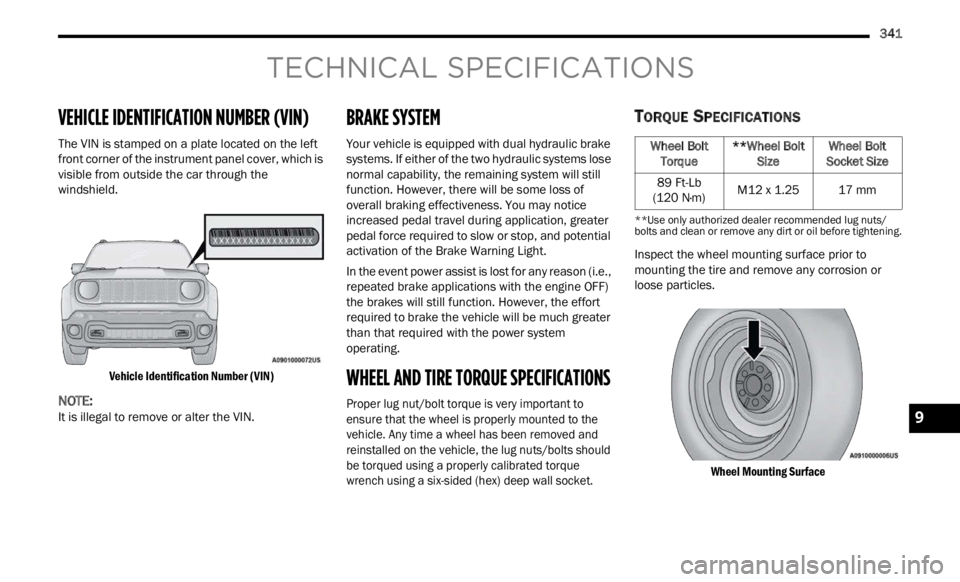
The VIN is stamped on a plate located on the left
front corner of the instrument panel cover, which is
visible from outside the car through the
windshield.
Vehicle Identification Number (VIN)
NOTE:
It is illegal to remove or alter the VIN.
BRAKE SYSTEM
Your vehicle is equipped with dual hydraulic brake
systems. If either of the two hydraulic systems lose
normal capability, the remaining system will still
function. However, there will be some loss of
overall braking effectiveness. You may notice
increased pedal travel during application, greater
pedal force required to slow or stop, and potential
activation of the Brake Warning Light.
In the event power assist is lost for any reason (i.e.,
repea t
ed brake applications with the engine OFF)
the brakes will still function. However, the effort
required to brake the vehicle will be much greater
than that required with the power system
operating.
WHEEL AND TIRE TORQUE SPECIFICATIONS
Proper lug nut/bolt torque is very important to
ensure that the wheel is properly mounted to the
vehicle. Any time a wheel has been removed and
reinstalled on the vehicle, the lug nuts/bolts should
be torqued using a properly calibrated torque
wrench using a six-sided (hex) deep wall socket.
TORQUE SPECIFICATIONS
**Use only authorized dealer recommended lug nuts/
bolts and clean or remove any dirt or oil before tightening.
Inspect the wheel mounting surface prior to
mounting the tire and remove any corrosion or
loose particles.
Wheel Mounting Surface
Wheel Bolt Torque**Wheel Bolt Size Wheel Bolt
Socket Size
89 Ft-Lb
(120 N·
m) M12 x 1.25
17 mm
9
Page 354 of 364

352
Body Mechanism Lubrication........................297Brake Assist System......................................222Brake Control System, Electronic..................222Brake Fluid....................................................345Brake System......................................302, 341Anti-Lock (ABS)..........................................341Fluid Check...............................................345Master Cylinder.........................................302Warning Light..............................................70Brakes...........................................................302Brightness, Interior Lights................................40Bulbs, Light....................................................267
C
Camera..........................................................121Camera, Rear................................................121Capacities, Fluid............................................344Caps, Filler
Oil (Engine)................................................293Radiator (Coolant Pressure)......................301Car Washes...................................................338Carbon Monoxide Warning............................267CD..................................................................162Cellular Phone...............................................220Certification Label.........................................123Changing A Flat Tire.......................................271Chart, Tire Sizing............................................323Check Engine Light (Malfunction Indicator
Light)...............................................................78
Checking Your Vehicle For Safety..................265
Checks, Safety..............................................265Child Restraint..............................................255Child Restraints Booster Seats...........................................258Child Seat Installation..............................263How To Stow An unused ALR Seat Belt....262Infant And Child Restraints.......................257LATCH Positions.......................................259Locating The LATCH Anchorages..............260Lower Anchors And Tethers For Children..259Older Children And Child Restraints.........257Seating Positions......................................258Child Safety Locks...........................................25Clean Air Gasoline.........................................342CleaningWheels.....................................................334Climate Control................................................44Clutch...........................................................302Fluid.........................................................302Coin Holder......................................................49Cold Weather Operation..................................81Compact Spare Tire......................................333Connected Services......................................202Connected Services FAQ...............................215Connected Services Features.......................205Connected Services, Getting Started............203Connected Services, Introduction.................202ConnectorUCI...............................................................50
Universal Consumer Interface (UCI).............50
Console............................................................49Floor............................................................49Contract, Service...........................................347Controls........................................................151Cooling Pressure Cap (Radiator Cap)............301Cooling System.............................................299Adding Coolant (Antifreeze)......................300Coolant Level...................................299, 301Cooling Capacity.......................................344Disposal Of Used Coolant.........................301Drain, Flush, And Refill.............................300Inspection.................................................301Points To Remember................................301Pressure Cap............................................301Radiator Cap.............................................301Selection Of Coolant
(Antifreeze).........................300, 344, 345Corrosion Protection.....................................338Cruise Control (Speed Control).........................95Cruise Light...............................................76, 77Customer Assistance....................................346Customer Programmable Features...............134Cybersecurity................................................133
D
Daytime Running Lights...................................37Dealer Service...............................................295Defroster, Rear Window...................................43Defroster, Windshield...................................265
De-Icer, Remote Start......................................20
Page 362 of 364

360
Phonebook Download...............................169Place/Retrieve A Call From Hold...............171Power-Up...................................................174Recent Calls..............................................170Redial........................................................172To Remove A Favorite...............................169Toggling Between Calls.............................172Touch-Tone Number Entry.........................170Transfer Call To And From Mobile Phone..172Voice Command........................................172Uconnect Settings
Customer Programmable
Features
..................................19, 24, 134Passive Entry Programming................24, 142Uconnect System...........................................147Uniform Tire Quality Grades...........................337Universal Consumer Interface (UCI)
Connector........................................................50Unleaded Gasoline........................................342Untwisting Procedure, Seat Belt....................244
V
Vanity Mirrors..................................................34Vehicle Finder......................................211, 216Vehicle Health Alert......................................213Vehicle Health Report...................................213Vehicle Loading...................................123, 326Vehicle Maintenance....................................295Vehicle Modifications/Alterations....................10Vehicle Notifications.....................................213Vehicle Storage................................................47Voice Command............................33, 176, 178Voice Recognition System (VR)........................33
W
Warning Flashers, Hazard.............................268Warning Lights (Instrument Cluster
Descriptions)....................................................76Warnings And Cautions....................................69Warnings, Roll Over...........................................9
Warranty Information....................................347Washer Adding Fluid..............................................294Washing Vehicle............................................338Wheel And Wheel Tire Care...........................334Wheel And Wheel Tire Trim...........................334Wi-Fi..............................................................211Wind Buffeting.................................................54Window Fogging...............................................47WindowsPower...........................................................52Windshield Defroster....................................265Windshield Wiper Blades..............................297Wipers Blade Replacement...........................297Wipers, Intermittent.........................................41Wipers, Rain Sensitive.....................................42Wrecker Towing.............................................283