Windshield JEEP RENEGADE 2023 User Guide
[x] Cancel search | Manufacturer: JEEP, Model Year: 2023, Model line: RENEGADE, Model: JEEP RENEGADE 2023Pages: 364, PDF Size: 18.65 MB
Page 46 of 364
44 GETTING TO KNOW YOUR VEHICLE
Activation By Rear Defrost — The Windshield
Wiper De-Icer will be activated automatically
when the rear defrost is turned on and the
ambient temperature is below 40°F (4.4°C).
Activation By Remote Start Operation — When
Remote Start is active and the outside ambient
temperature is less than 40°F (4.4°C), the
Windshield Wiper De-Icer will activate. Exiting
Remote Start will resume its previous operation.
If the Windshield Wiper De-Icer was active, the
timer and operation will continue Ú page 133.
Auto-On Rear Window Defroster/Windshield Wiper
De-Ic e
r — If Equipped
When placing the vehicle’s ignition in the ON/RUN
position
, the Rear Window Defroster and
Windshield Wiper De-Icer will automatically turn on
when the outside ambient temperature is less than
40°F (4.4°C).
The Rear Window Defroster and Windshield Wiper
De-Ic e
r automatically turn off after approximately
20 minutes. To manually shut the defroster/
windsh
ield off, push the Rear Defrost button.
Auto On can be enabled or disabled through the
Uconnec
t Settings Ú page 133.
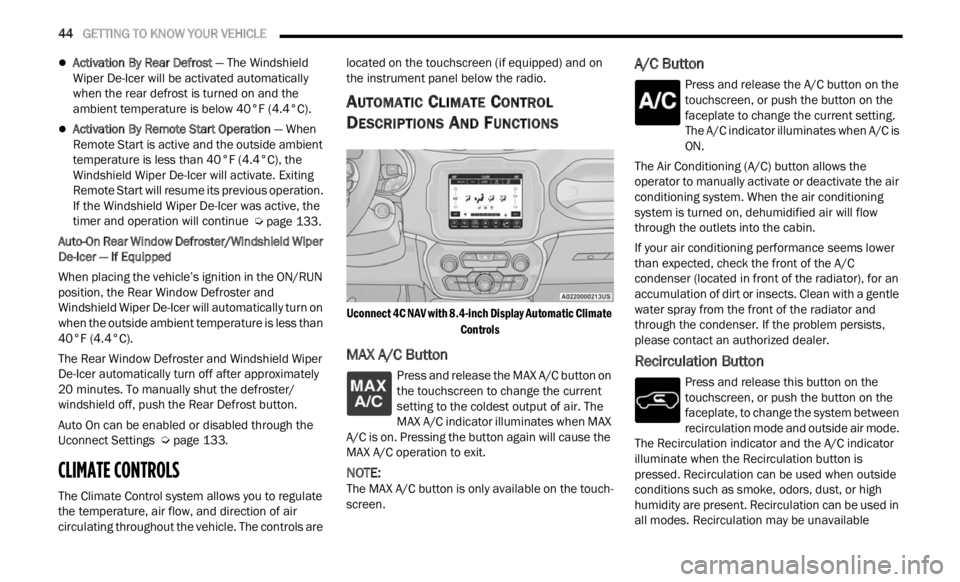
CLIMATE CONTROLS
The Climate Control system allows you to regulate
the temperature, air flow, and direction of air
circulating throughout the vehicle. The controls are located on the touchscreen (if equipped) and on
the instrument panel below the radio.
AUTOMATIC CLIMATE CONTROL
D
ESCRIPTIONS AND FUNCTIONS
Uconnect 4C NAV with 8.4-inch Display Automatic Climate
Controls
MAX A/C Button
Press and release the MAX A/C button on
the touchscreen to change the current
se t
ti
n
g to the coldest output of air. The
MAX A/C indicator illuminates when MAX
A/C is on. Pressing the button again will cause the
MAX A/C operation to exit.
NOTE:
The MAX A/C button is only available on the touch -
screen.
A/C Button
Press and release the A/C button on the
touchscreen, or push the button on the
facep l
ate to change the current setting.
The A/C indicator illuminates when A/C is
ON.
The Air Conditioning (A/C) button allows the
operator
to manually activate or deactivate the air
conditioning system. When the air conditioning
system is turned on, dehumidified air will flow
through the outlets into the cabin.
If your air conditioning performance seems lower
than e
xpected, check the front of the A/C
condenser (located in front of the radiator), for an
accumulation of dirt or insects. Clean with a gentle
water spray from the front of the radiator and
through the condenser. If the problem persists,
please contact an authorized dealer.
Recirculation Button
Press and release this button on the
touchscreen, or push the button on the
f a c
e p
l
ate, to change the system between
recirculation mode and outside air mode.
The Recirculation indicator and the A/C indicator
illuminate when the Recirculation button is
pressed. Recirculation can be used when outside
conditions such as smoke, odors, dust, or high
humidity are present. Recirculation can be used in
all modes. Recirculation may be unavailable
Page 47 of 364
GETTING TO KNOW YOUR VEHICLE 45
(button on the touchscreen grayed out) if
conditions exist that could create fogging on the
inside of the windshield. The A/C can be
deselected manually without disturbing the mode
control selection. Continuous use of the
Recirculation mode may make the inside air stuffy
and window fogging may occur. Extended use of
this mode is not recommended. Recirculation
mode may automatically adjust to optimize
customer experience for warming, cooling,
dehumidification, etc.
In cold weather, use of Recirculation mode may
lead t
o excessive window fogging. The
Recirculation feature may be unavailable if
conditions exist that could create fogging on the
inside of the windshield.
AUTO Button
Press and release this button on the
touchscreen, or push the button on the
facep l
ate, to change the current setting.
The AUTO indicator illuminates when
AUTO is on. This feature automatically controls the
interior cabin temperature by adjusting distribution
and amount of airflow. Air Conditioning (A/C) may
be active during AUTO operation to improve
performance. Toggling this function will cause the
system to switch between manual override mode
and automatic modes Ú page 47.
Front Defrost Button
Press and release the touchscreen
button, or push and release the button
on the
faceplate, to change the current
airflow setting to Defrost mode. The Front
Defrost indicator illuminates when Front Defrost is
on. Air comes from the windshield and side window
demist outlets. When the defrost button is
selected, the blower level may increase. Use
Defrost mode with maximum temperature settings
for best windshield and side window defrosting
and defogging. When toggling the front defrost
mode button, the Climate Control system will
return to the previous setting.
Rear Defrost Button
Press and release the button on the
touchscreen, or push and release the
button
on the faceplate, to turn on the
rear window defroster and the heated
outside mirrors (if equipped). The Rear Defrost
indicator illuminates when the rear window
defroster is on. The rear window defroster
automatically turns off after 20 minutes.Driver And Passenger Up And Down
Buttons
These buttons provide the driver and passenger
with independent temperature control.
Push the red button on the faceplate or
touchscreen or press and slide the
temper
ature bar towards the red arrow
button on the touchscreen for warmer
temperature settings.
CAUTION!
Failure to follow these cautions can cause
damage to the heating elements:
Use care when washing the inside of the rear
window. Do not use abrasive window cleaners
on the interior surface of the window. Use a
soft cloth and a mild washing solution, wiping
parallel to the heating elements. Labels can
be peeled off after soaking with warm water.
Do not use scrapers, sharp instruments, or
abrasive window cleaners on the interior
surface of the window.
Keep all objects a safe distance from the
window.
2
Page 48 of 364
46 GETTING TO KNOW YOUR VEHICLE
Push the blue button on the faceplate or
touchscreen or press and slide the
tempe r
ature bar towards the blue arrow
button on the touchscreen for cooler
temperature settings.
SYNC Button
Press the SYNC button on the
touchscreen to toggle the Sync feature
on/off.
The SYNC indicator is illuminated
when SYNC is on. SYNC is used to
synchronize the passenger temperature setting
with the driver temperature setting. Changing the
passenger temperature setting while in SYNC will
automatically exit this feature.
NOTE:
The SYNC button is only available on the touch-
screen.
Blower Control
Blower Control is used to regulate the
amount of air forced through the Climate
Control
system. There are seven blower
speeds available. Adjusting the blower
will cause automatic mode to switch to manual
operation. The speeds can be selected using either
the blower control knob on the faceplate or the
buttons on the touchscreen. Faceplate
The blower speed increases as you turn the blower
c
ontrol
knob clockwise from the lowest blower
setting. The blower speed decreases as you turn
the blower control knob counterclockwise.
Touchscreen
Use the small blower icon to reduce the blower
setti n
g and the large blower icon to increase the
blower setting. Blower can also be selected by
pressing the blower bar area between the icons.
Mode Control
Select Mode by pressing one of the Mode
buttons on the touchscreen to change
the a i
rflow distribution mode. The airflow
distribution outlets are: instrument panel
outlets, floor outlets, defrost outlets, and demist
outlets.
Panel Mode
Air comes from the outlets in the
instrument panel. Each of these outlets
can b e
individually adjusted to direct the
flow of air. The air vanes of the center
outlets and outboard outlets can be moved up and
down or side to side to regulate airflow direction.
There is a shut-off wheel located below the air
vanes to shut off or adjust the amount of airflow
from these outlets.
Bi-Level Mode
Air comes from the instrument panel
outlets and floor outlets. A slight amount
of ai r
is directed through the defrost and
side window demister outlets.
NOTE:
Bi-Level mode is designed under comfort condi -
tions to provide cooler air out of the panel outlets
a nd w a
rmer air from the floor outlets.
Floor Mode
Air comes from the floor outlets. A slight
amount of air is directed through the
defrost
, side window demister outlets,
and panel outboard outlets.
Mix Mode
Air is directed through the floor, defrost,
and side window demister outlets. This
setti n
g works best in cold or snowy
conditions that require extra heat to the
windshield. This setting is good for maintaining
comfort while reducing moisture on the
windshield. A slight amount of air is also directed
through the panel outboard outlets.
Climate Control OFF Button
Press and release this button to turn the
Climate Control ON/OFF.
Page 49 of 364

GETTING TO KNOW YOUR VEHICLE 47
AUTOMATIC TEMPERATURE CONTROL
(ATC)
Automatic Operation
1. Push the AUTO button on the faceplate, or the
AUTO button on the touchscreen on the
Automatic Temperature Control (ATC) Panel.
2. Adjust the temperature you would like the syste
m to maintain, by adjusting the driver,
and passenger temperatures. Once the
desired temperature is displayed, the system
will achieve and automatically maintain that
comfort level.
3. When the system is set up for your comfort level
, it is not necessary to change the
settings. You will experience the greatest
efficiency by simply allowing the system to
function automatically.
NOTE:
It is not necessary to move the temperature
settings. The system automatically adjusts the
temperature, mode, and fan speed to provide
comfort as quickly as possible.
The temperature can be displayed in U.S. or
Metric units by selecting the U.S./Metric
customer programmable feature within
Uconnect Settings. To provide you with maximum comfort in the
automa
t
ic mode, during cold start-ups, the blower
fan will remain on low until the engine warms up.
The fan will engage immediately if the Defrost
mode is selected, or by changing the front blower
knob setting.
Manual Operation Override
This system offers a full complement of manual
override features. The AUTO symbol in the front
ATC display will be turned off when the system is
being used in the manual mode.
CLIMATE VOICE COMMANDS
Adjust vehicle temperatures hands-free and keep
everyone comfortable while you keep moving
ahead.
Push the VR button on the steering wheel. After the
beep,
say one of the following commands:
“Set the driver temperature to 70 degrees ”
“Set the passenger temperature to 70 degrees ”
Did You Know:
V oi
ce
Command for Climate may
only be used to adjust the interior temperature of
your vehicle. Voice Command will not adjust the
heated seats or steering wheel if equipped.
OPERATING TIPS
Refer to the chart at the end of this section for
suggested control settings for various weather
conditions.
Summer Operation
The engine cooling system must be protected with
a high-quality antifreeze coolant to provide proper
corrosion protection and to protect against engine
overheating. OAT coolant (conforming to
MS.90032) is recommended.
Winter Operation
To ensure the best possible heater and defroster
performance, make sure the engine cooling
system is functioning properly and the proper
amount, type, and concentration of coolant is
used. Use of the Air Recirculation mode during
Winter months is not recommended, because it
may cause window fogging.
Vacation/Storage
For information on maintaining the Climate Control
system when the vehicle is being stored for an
extended period of time, see Ú page 338.
Window Fogging
Vehicle windows tend to fog on the inside in mild,
rainy, and/or humid weather. To clear the
windows, select Defrost or Mix mode and increase
the front blower speed. Do not use the
Recirculation mode without A/C for long periods,
as fogging may occur.
Outside Air Intake
Make sure the air intake, located directly in front of
the windshield, is free of obstructions, such as
2
Page 50 of 364

48 GETTING TO KNOW YOUR VEHICLE
leaves. Leaves collected in the air intake may
reduce airflow, and if they enter the air distribution
box, they could plug the water drains. In Winter
months, make sure the air intake is clear of ice,
slush, and snow.
Cabin Air Filter
The Climate Control system filters out dust and
pollen from the air. Contact an authorized dealer to
service your cabin air filter, and to have it replaced
when needed.
NOTE:
In the Red Special Series models, the cabin air
filte r
was treated with a biocide substance having
antibacterial and antiviral properties based on the
active ingredient, citric acid.
Stop/Start System — If Equipped
While in an Autostop, the Climate Control system
may automatically adjust airflow to maintain cabin
comfort. Customer settings will be maintained
upon return to an engine running condition.
Windshield Wiper De-Icer — If Equipped
The windshield wiper de-icer is a heating element
located at the base of the windshield.
It operates automatically once the following
conditi
ons are met:
Activation By Front Defrost
The wiper de-icer activates automatically during
a cold
weather manual start with full defrost,
and when the ambient temperature is below
40°F (4.4°C) .
Activation By Rear Defrost
The wiper de-icer activates automatically when
the R e
ar Defrost is operating and the ambient
temperature is below 40°F (4.4°C) .
Activation By Remote Start Operation
When Remote Start is active and the outside
ambient temperature is less than 40°F (4.4°C),
the Windshield Wiper De-Icer will activate.
Exiting Remote Start will resume its previous
operation. If the Windshield Wiper De-Icer was
active, the timer and operation will continue.
Operating Tips Chart
NOTE:
The following chart is for Manual Override Oper -
ation, otherwise run in AUTO.INTERIOR STORAGE AND EQUIPMENT
STORAGE
Glove Compartment
The glove compartment is located on the
passenger’s side of the instrument panel.
To open the glove compartment proceed as
follows:
1
. Unlock the compartment using the vehicle emerge
ncy key.
WEATHER CONTROL SETTINGS
Hot Weather And
Vehicle Interior Is Very Hot Set the mode control to
(Panel Mode), (A/C) on,
and blower on high. Roll
d own th
e windows for a
minute to flush out the hot
air. Adjust the controls as
needed to achieve comfort.
Warm WeatherTurn (A/C) on and set
the mode control to
(Panel Mode).
Cool Sunny Operate in
(Bi-Level
Mode).
Cool & Humid Condit i
ons Set the mode control to
(Floor Mode) and turn
(A/C) on to keep windows
c le
ar
.
C
old Weather Set the mode control to
(Floor Mode). If windshield
f ogging
starts to occur,
move the control to (Mix
Mode).
WEATHER CONTROL SETTINGS
Page 63 of 364
GETTING TO KNOW YOUR VEHICLE 61
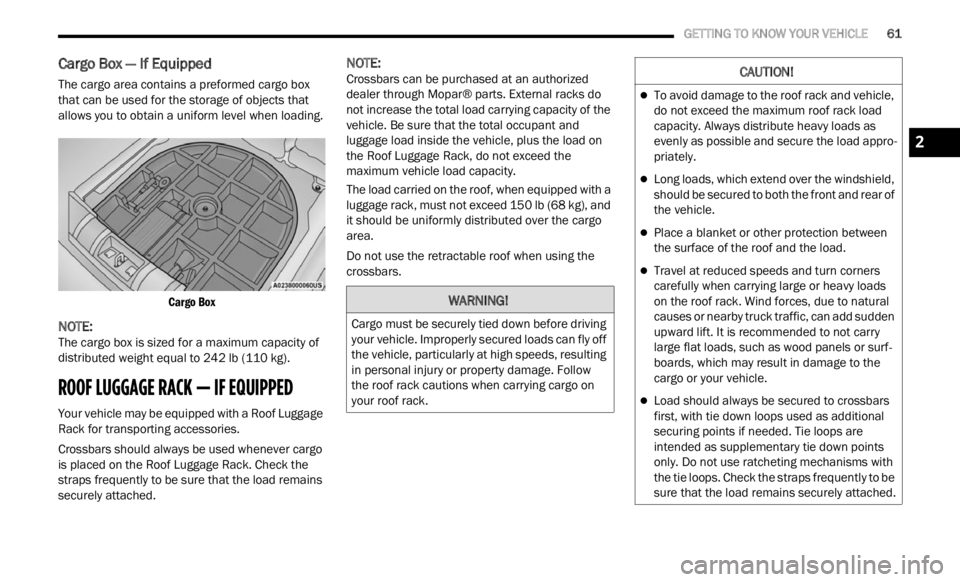
Cargo Box — If Equipped
The cargo area contains a preformed cargo box
that can be used for the storage of objects that
allows you to obtain a uniform level when loading.
Cargo Box
NOTE:
The cargo box is sized for a maximum capacity of
distr i
buted weight equal to 242 lb (110 kg).
ROOF LUGGAGE RACK — IF EQUIPPED
Your vehicle may be equipped with a Roof Luggage
Rack for transporting accessories.
Crossbars should always be used whenever cargo
is pla
ced on the Roof Luggage Rack. Check the
straps frequently to be sure that the load remains
securely attached.
NOTE:
Crossbars can be purchased at an authorized
deale r
through Mopar® parts. External racks do
not increase the total load carrying capacity of the
vehicle. Be sure that the total occupant and
luggage load inside the vehicle, plus the load on
the Roof Luggage Rack, do not exceed the
maximum vehicle load capacity.
The load carried on the roof, when equipped with a
lugga g
e rack, must not exceed 150 lb (68 kg), and
it should be uniformly distributed over the cargo
area.
Do not use the retractable roof when using the
crossba
rs.
WARNING!
Cargo must be securely tied down before driving
your vehicle. Improperly secured loads can fly off
the vehicle, particularly at high speeds, resulting
in personal injury or property damage. Follow
the roof rack cautions when carrying cargo on
your roof rack.
CAUTION!
To avoid damage to the roof rack and vehicle,
do not exceed the maximum roof rack load
capacity. Always distribute heavy loads as
evenly as possible and secure the load appro -
priately.
Long loads, which extend over the windshield,
should be secured to both the front and rear of
the vehicle.
Place a blanket or other protection between
the surface of the roof and the load.
Travel at reduced speeds and turn corners
carefully when carrying large or heavy loads
on the roof rack. Wind forces, due to natural
causes or nearby truck traffic, can add sudden
upward lift. It is recommended to not carry
large flat loads, such as wood panels or surf -
boards, which may result in damage to the
c argo or
your vehicle.
Load should always be secured to crossbars
first, with tie down loops used as additional
securing points if needed. Tie loops are
intended as supplementary tie down points
only. Do not use ratcheting mechanisms with
the tie loops. Check the straps frequently to be
sure that the load remains securely attached.
2
Page 104 of 364
102 STARTING AND OPERATING
areas. Under rare conditions, when the radar is not
tracking any vehicles or objects in its path this
warning may temporarily occur.
NOTE:
If the “ACC Front Radar Sensor Temporarily
Blocke d
” warning is active, Fixed Speed Cruise
Control is still available.
If weather conditions are not a factor, the driver
shoul d
examine the sensor. It may require cleaning
or removal of an obstruction. The sensor is located
in the center of the fascia/bumper.
To keep the ACC System operating properly, it is
importa
nt to note the following maintenance
items:
Always keep the sensor clean. Carefully wipe the
sensor lens with a soft cloth. Be cautious not to
damage the sensor lens.
Do not use solvents or abrasive pastes. The
radar is equipped with a defrost system, so in
some climatic conditions it could reach high
temperatures. Wait at least 30 seconds after
the engine has been placed in the OFF mode
before touching the sensor.
Do not remove any screws from the sensor.
Doing so could cause an ACC system malfunc -
tion or failure and require a sensor realignment.
If the sensor or front end of the vehicle is
damaged due to a collision, see your authorized
dealer for service.
Do not attach or install any accessories near the
sensor, including transparent material. Doing so
could cause an ACC system failure or malfunc -
tion.
When the condition that deactivated the system is
n o longe
r present, the system will return to the
“Adaptive Cruise Control Off” state and will resume
function when reactivated.
NOTE:
If the “ACC Front Radar Sensor Temporarily
Blocked” message occurs frequently (e.g. more
than once on every trip) without any snow, rain,
mud, or other obstruction, have the radar
sensor realigned at your authorized dealer.
Installing a snow plow or front-end protector is
not recommended. Doing so may block the
sensor and inhibit ACC/FCW operation.
“CLEAN FRONT WINDSHIELD” WARNING
The “ACC/FCW Limited Functionality Wipe Front
Windshield” warning will display to indicate when
conditions temporarily limit system performance.
This most often occurs at times of poor visibility,
such as in snow or heavy rain and fog. The ACC
system may also become temporarily blinded due
to obstructions, such as mud, dirt, or ice on
windshield and fog on the inside of glass. In these
cases, the instrument cluster display will read “ACC/FCW Limited Functionality Wipe Front
Windshield” and the system will have degraded
performance.
The “ACC/FCW Limited Functionality Wipe Front
Winds
h
ield” message can sometimes be displayed
while driving in adverse weather conditions. The
ACC/FCW system will recover after the vehicle has
left these areas. Under rare conditions, when the
camera is not tracking any vehicles or objects in its
path this warning may temporarily occur.
If weather conditions are not a factor, the driver
should
examine the windshield and the camera
located on the back side of the inside rearview
mirror. They may require cleaning or removal of an
obstruction.
When the condition that created limited
funct i
onality is no longer present, the system will
return to full functionality.
NOTE:
If the “ACC/FCW Limited Functionality Wipe Front
Winds h
ield” message occurs frequently (e.g. more
than once on every trip) without any snow, rain,
mud, or other obstruction, have the windshield and
forward facing camera inspected at an authorized
dealer.
Page 235 of 364

SAFETY 233
If the vehicle enters 4WD Low, the FCW system
will be automatically deactivated.
The active braking is disabled when a trailer is
connected with a Mopar® Trailer Towing
system. If the vehicle is equipped with an after
-
market system, it is recommended that the
Activ e
Braking is turned off manually
Ú page 349.
Turning FCW On Or Off
The Forward Collision menu setting is located in
the Uconnect settings.
NOTE:
The default status of FCW is “Warning + Active
Braki n
g,” this allows the system to warn you of a
possible collision with the vehicle in front of you
and enable the active braking.
Changing the FCW status to “Off” deactivates
the system, so no warning or active braking will
be available in case of a possible collision.
Changing the FCW status to “Only warning”
prevents the system from providing limited
active braking, or additional brake support if the
driver is not braking adequately in the event of
a potential frontal collision, but maintains the
audible and visual warnings.
Changing the status of the system can be done at
any t i
me in the vehicle's head unit.
NOTE:
When the system is turned off, the FCW system
state
will reset.
Changing FCW Sensitivity
By changing the settings on the menu of the
Uconnect system, you can change the sensitivity of
the system by choosing one of the following three
options: "Near", "Medium" or "Far" Ú page 133.
The default option is "Medium". This setting allows
t he sy
stem to warn the driver of a possible collision
with the vehicle in front when it is at a standard
distance, intermediate between the “Near” and
“Far” settings.
By setting the sensitivity of the system to "Far", the
syste m
will warn the driver of a possible accident
with the vehicle in front when the latter is at a
greater distance, giving you the chance to act on
the brakes in a more limited and gradual way. This
setting gives the driver the maximum possible time
of reaction to prevent a possible accident.
NOTE:
The “Far” setting may result in a greater number of
FCW p os
sible collision warnings experienced.
By changing the option to "Near", the system will
warn t
he driver of a possible accident with the
vehicle ahead of it when the latter is a reduced
distance. This setting offers a reaction time to the
driver lower than the settings "Medium" and "Far",
in the case of a potential accident, providing a
more dynamic driving of the vehicle.
NOTE:
The “Near” setting may result in a lesser number of
FCW p os
sible collision warnings experienced.
The setting of the sensitivity of the system is
mainta
ined in memory when the engine is
switched off.
FCW Limited Warning
If the instrument cluster display reads “FCW
Limited Functionality” or “FCW Limited
Functionality Wipe Front Windshield” momentarily,
there may be a condition that limits FCW
functionality. Although the vehicle is still drivable
under normal conditions, the active braking may
not be fully available. Once the condition that
limited the system performance is no longer
present, the system will return to its full
performance state. If the problem persists, see an
authorized dealer.
WARNING!
Forward Collision Warning (FCW) is not intended
to avoid a collision on its own, nor can FCW
detect every type of potential collision. The driver
has the responsibility to avoid a collision by
controlling the vehicle via braking and steering.
Failure to follow this warning could lead to
serious injury or death.
6
Page 267 of 364
SAFETY 265
SAFETY TIPS
TRANSPORTING PASSENGERS
NEVER TRANSPORT PASSENGERS IN THE CARGO
AREA.
TRANSPORTING PETS
Air Bags deploying in the front seat could harm
your pet. An unrestrained pet will be thrown about
and possibly injured, or injure a passenger during
panic braking or in a collision. Pets should be restrained in the rear seat (if
equip
p
ed) in pet harnesses or pet carriers that are
secured by seat belts.
CONNECTED VEHICLES
Privacy of any wireless and wired communications
cannot be assured. Third parties may unlawfully
intercept information and private communications
without your consent. For further information, refer
to “Data Collection & Privacy” in your Uconnect
Owner’s Manual Supplement or “Onboard
Diagnostic System (OBD II) Cybersecurity”
Ú page 78.
SAFETY CHECKS YOU SHOULD MAKE
I
NSIDE THE VEHICLE
Seat Belts
Inspect the seat belt system periodically, checking
for cuts, frays, and loose parts. Damaged parts must be replaced immediately. Do not
disassemble or modify the system.
If your vehicle is involved in a collision, or if you
have
q
uestions regarding the seat belt or retractor
conditions, take your vehicle to an authorized FCA
dealer or authorized FCA Certified Collision Care
Program facility for inspection.
Air Bag Warning Light
The Air Bag Warning Light will turn on for
four to eight seconds as a bulb check
when t
he ignition switch is first placed in
the ON/RUN mode. If the light is either
not on during starting, stays on, or turns on while
driving, have the system inspected at an
authorized dealer as soon as possible. After the
bulb check, this light will illuminate with a single
chime when a fault with the Air Bag System has
been detected. It will stay on until the fault is
removed. If the light comes on intermittently or
remains on while driving, have an authorized
dealer service the vehicle immediately
Ú page 240.
Defroster
Check operation by selecting the defrost mode and
place the blower control on high speed. You should
be able to feel the air directed against the
windshield. See an authorized dealer for service if
your defroster is inoperable.
WARNING!
Do not leave children or animals inside parked
vehicles in hot weather. Interior heat buildup
may cause serious injury or death.
It is extremely dangerous to ride in a cargo
area, inside or outside of a vehicle. In a colli -
sion, people riding in these areas are more
l ikely
to be seriously injured or killed.
Do not allow people to ride in any area of your
vehicle that is not equipped with seats and
seat belts.
Be sure everyone in your vehicle is in a seat
and using a seat belt properly.
WARNING!
It is not possible to know or to predict all of the
possible outcomes if your vehicle’s systems are
breached. It may be possible that vehicle
systems, including safety related systems, could
be impaired or a loss of vehicle control could
occur that may result in an accident involving
serious injury or death.6
Page 288 of 364
286
SERVICING AND MAINTENANCE
SCHEDULED SERVICING
Your vehicle is equipped with an automatic oil
change indicator system. The oil change indicator
system will remind you that it is time to take your
vehicle in for scheduled maintenance.
Based on engine operation conditions, the oil
change
indicator message will illuminate in the
instrument cluster. This means that service is
required for your vehicle. Operating conditions
such as frequent short-trips, trailer tow and
extremely hot or cold ambient temperatures will
influence when the “Change Oil” or “Oil Change
Required” message is displayed. Have your vehicle
serviced as soon as possible, within the next
500 miles (805 km). An authorized dealer will reset the oil change
indica
tor message after completing the scheduled
oil change.
NOTE:
Under no circumstances should oil change
inter v
als exceed 10,000 miles (16,000 km),
1 year or 350 hours of engine run time, whichever
c omes f
irst. The 350 hours of engine run or idle
time is generally only a concern for fleet
customers.
NOTE:
The Oil Change Indicator will not illuminate under
these
conditions. Once A Month Or Before A Long Trip:
Check engine oil level.
Check windshield washer fluid level.
Check the tire inflation pressures and look for
unusual wear or damage.
Check the fluid levels of the coolant reservoir,
and brake master cylinder reservoir, and fill as
needed.
Check function of all interior and exterior lights.