keyless JEEP RENEGADE 2023 Owners Manual
[x] Cancel search | Manufacturer: JEEP, Model Year: 2023, Model line: RENEGADE, Model: JEEP RENEGADE 2023Pages: 364, PDF Size: 18.65 MB
Page 4 of 364

2
INTRODUCTION
SYMBOLS KEY ...........................................................9
ROLLOVER WARNING ...... ....................................... 9
VEHICLE MODIFICATIONS/ALTERATIONS ...... .... 10
SYMBOL GLOSSARY...... ........................................ 10
GETTING TO KNOW YOUR VEHICLE
KEYS ....................................................................... 14
Key Fob .............................................................14
SENTRY KEY ..... . ..................................................... 16
IGNITION SWITCH ...... ............................................ 17
Keyless Enter ‘n Go™ Ignition ...... ...................17
REMOTE START — IF EQUIPPED ..... . .................... 18
How To Use Remote Start ...... ..........................18
To Exit Remote Start Mode ..... . ........................19
Remote Start Front Defrost Activation —
If Equipped. .....
..................................................19
Remote Start Comfort Systems —
If Equipped . .....
.................................................19
Remote Start Windshield Wiper
De–Icer Activation — If Equipped . .....
..............20
Remote Start Cancel Message —
If Equipped. .....
..................................................20
VEHICLE SECURITY SYSTEM — IF EQUIPPED ..... 2 0
To Arm The System ...... ...................................20
To Disarm The System . ..
..
. ..............................21DOORS .....................................................................21
Manu a
l Door Locks ...... ....................................21
Power Door Locks ..... . .....................................22
Keyless Enter ‘n Go™ — Passive Entry
(If Equipped) . .....
...............................................22
Automatic Unlock On Exit Feature —
If Equipped. .....
..................................................24
Dead Lock Device — If Equipped. ..
..
. ...............25
Child Locks ..... . ................................................25
STEERING WHEEL ..... . ............................................26
Tilt/Telescoping Steering Column ...... .............26
Heated Steering Wheel — If Equipped ..... . .....26
SEATS . ....................................................................26
M a
n u
a
l Front Seats...... ....................................27
Manual Rear Seat Adjustment ..... . ..................27
Power Adjustment (Front) — If Equipped . ..
..
. ..29
Heated Seats — If Equipped . ..
..
. .....................30
Unfolding The Rear Armrest
40/20/40 . ........................................................31
Head R
estraints . ..
..
. .........................................31
UCONNECT VOICE RECOGNITION ..... . ..................33
Introducing Voice Recognition...... ...................33
Basic Voice Commands . ..
..
. .............................33
Get Started ..... . .................................................33
Additional Information . ..
..
. ...............................33MIRRORS ................................................................ 34
Insi d
e Rearview Mirror...... ............................... 34
Illuminated Vanity Mirrors — If Equipped ..... . 34
Outside Mirrors . ..
..
. .......................................... 35
Heated Mirrors — If Equipped ..... . ................... 36
EXTERIOR LIGHTS. ..
..
. ............................................ 36
Headlight Switch ...... ....................................... 36
Daytime Running Lights (DRLs) —
If Equipped . .....
................................................ 37
High Beams ..... . ............................................... 37
Automatic High Beam Headlamp Control —
If Equipped . .....
................................................ 37
Flash-To-Pass . ..
..
. ............................................. 37
Automatic Headlights — If Equipped ..... . ........ 38
Parking Lights ..... . ............................................. 38
Headlight Time Delay . ..
..
. ................................ 38
Front Fog Lights — If Equipped ..... . .................38
Turn Signals. ..
..
. ................................................ 39
Lane Change Assist..... . ....................................39
Courtesy Lights. ..
..
. ...........................................39
INTERIOR LIGHTS ..... . ........................................... 39
Front Map/Reading Lights ...... ........................ 39
Dimmer Controls ..... . ....................................... 40
Rear Lights . ..
..
. .................................................40
Dome Light Timing ..... . ..................................... 41
Page 5 of 364
3
WINDSHIELD WIPERS AND WASHERS ............. 41
Windshield Wiper Operation ...... ......................42
Rain Sensing Wipers — If Equipped ..... . .........42
Rear Window Wiper/Washer . ..
..
. .....................43
Windshield Wiper De-Icer — If Equipped ..... . ...43
CLIMATE CONTROLS . ..
. .
. ...................................... 44
Automatic Climate Control Descriptions And
Functions ..........................................................44
Autom a
tic Temperature Control (ATC) ..... . .....47
Climate Voice Commands..... . ..........................47
Operating Tips . ..
..
. ...........................................47
INTERIOR STORAGE AND EQUIPMENT ..... . ......... 48
Storage..............................................................48
USB/A UX Control ..... . ........................................50
Power Outlets ..... . .............................................50
Power Inverter — If Equipped. ..
..
. .....................51
Cigar Lighter — If Equipped. ..
..
. ........................52
Ashtray — If Equipped ..... . ................................52
WINDOWS............................................................... 52
Power
Window Controls ...... .............................52
Automatic Window Features ..... . .....................53
Reset Auto-Up ..... . .............................................53
Window Lockout Switch . ..
..
. .............................54
Wind Buffeting ..... . ...........................................54
DUAL PANE PANORAMIC POWER SUNROOF
WITH POWER SHADE — IF EQUIPPED ..... .
.......... 54
Opening And Closing The Sunroof...... .............55
Venting Sunroof . ..
..
. ..........................................55
Opening And Closing The Power Sunshade....5 5
P inch Protect Feature . ..
. .
. ................................55
Sunroof Maintenance ..... . ................................56 HOOD ......................................................................56
To Op e
n The Hood...... ......................................56
To Close The Hood ..... . .....................................57
LIFTGATE . ................................................................ 57
U n
loc
k
/Open The Liftgate...... ..........................57
Lock/Close The Liftgate . ..
..
. .............................58
Cargo Area Features ..... . ..................................58
ROOF LUGGAGE RACK — IF EQUIPPED . ..
..
. ........61
GETTING TO KNOW YOUR
INSTRUMENT PANEL
INSTRUMENT CLUSTER .........................................62
Instrument Cluster Descriptions ...... ...............64
INSTRUMENT CLUSTER DISPLAY ..... . .................64
Instrument Cluster Display Location And
Controls.............................................................64
Oil C
hange Reset..... . ........................................65
Instrument Cluster Display Menu Items . ..
..
. ..66
TRIP COMPUTER ..... . ..............................................69
WARNING/INDICATOR LIGHTS AND
MESSAGES ......
........................................................69
Red Warning Lights ...... ....................................70
Yellow Warning Lights ..... . ................................72
Yellow Indicator Lights . ..
..
. ...............................75
Green Indicator Lights . ..
..
. ...............................76
White Indicator Lights ..... . ................................77
Blue Indicator Lights ..... . ..................................77
Gray Indicator Lights . ..
..
. ..................................77 ONBOARD DIAGNOSTIC SYSTEM (OBD II) .....
.
... 77
Onboard Diagnostic System
(OBD II) Cybersecurity ..... .
................................ 78
EMISSIONS INSPECTION AND MAINTENANCE
PROGRAMS ..... .
...................................................... 78
STARTING AND OPERATING
STARTING THE ENGINE ......................................... 80
Tip Start Feature ...... ....................................... 80
If Engine Fails To Start ..... . ..............................80
Cold Weather Operation ..... . ............................ 81
Extended Park Starting . ..
..
. ..............................81
After Starting — Warming Up The Engine ..... . . 81
Stopping The Engine . ..
..
. .................................. 81
Turbocharger “Cool Down” — If Equipped ..... . 82
ENGINE BREAK-IN RECOMMENDATIONS . ..
..
. .... 82
ELECTRIC PARK BRAKE (EPB) ...... ....................... 82
Auto Park Brake ...... ......................................... 84
SafeHold . .......................................................... 84
B r
a k
e
Service Mode..... . ................................... 84
9-SPEED AUTOMATIC TRANSMISSION . ..
..
. ........ 85
Gear Selector...... .............................................. 86
Gear Ranges ..... . ............................................... 87
Transmission Limp Home Mode . ..
..
. ............... 90
Ignition Park Interlock
(Keyless Vehicle) . .....
........................................ 90
Brake Transmission Shift Interlock (BTSI)
System . .............................................................90
Page 16 of 364
14
GETTING TO KNOW YOUR VEHICLE
KEYS
KEY FOB
Your vehicle is equipped with a key fob which
supports Passive Entry, Remote Keyless Entry
(RKE), Keyless Enter ‘n Go™ (if equipped), Remote
Start (if equipped), and Panic button operation.
The key fob allows you to lock or unlock the doors
and liftgate from distances up to approximately
66
ft (20 m). The key fob does not need to be
pointed
at the vehicle to activate the system. The
key fob also contains an emergency key, which is
stored in the rear of the key fob.
NOTE:
The key fob’s wireless signal may be blocked if the
key f ob
is located next to a mobile phone, laptop,
or other electronic device. This may result in poor
performance.
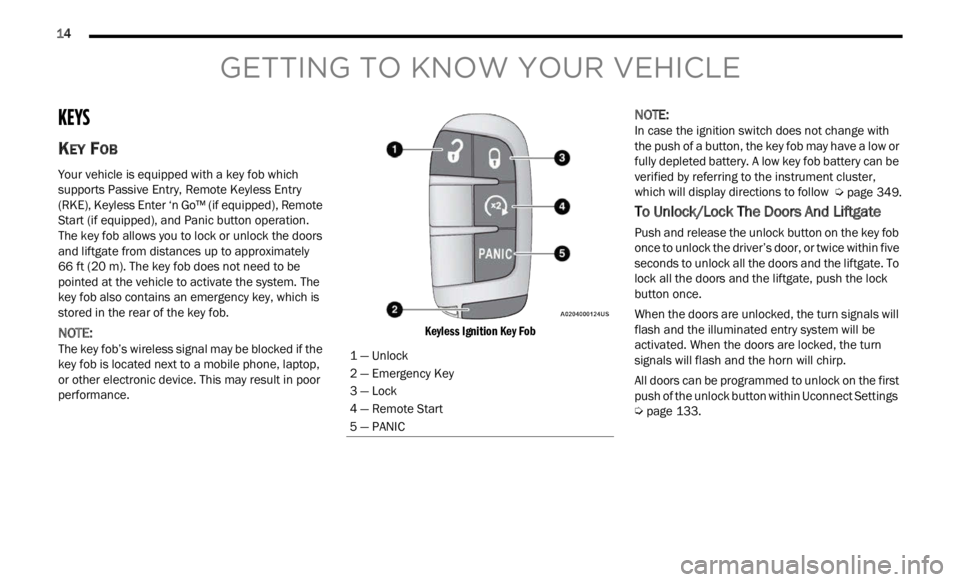
Keyless Ignition Key Fob
NOTE:
In case the ignition switch does not change with
the p u
sh of a button, the key fob may have a low or
fully depleted battery. A low key fob battery can be
verified by referring to the instrument cluster,
which will display directions to follow Ú page 349.
To Unlock/Lock The Doors And Liftgate
Push and release the unlock button on the key fob
once to unlock the driver’s door, or twice within five
seconds to unlock all the doors and the liftgate. To
lock all the doors and the liftgate, push the lock
button once.
When the doors are unlocked, the turn signals will
flash
and the illuminated entry system will be
activated. When the doors are locked, the turn
signals will flash and the horn will chirp.
All doors can be programmed to unlock on the first
push of
the unlock button within Uconnect Settings
Ú page 133.
1 — Unlock
2 — Emergency Key
3 — Lock
4 — Remote Start
5 — PANIC
Page 18 of 364
16 GETTING TO KNOW YOUR VEHICLE
3. Remove the back cover to access and replace
the battery. When replacing the battery, match
the (+) sign on the battery to the (+) sign on the
inside of the battery clip, located on the back
cover. Avoid touching the new battery with your
fingers. Skin oils may cause battery deterio -
ration. If you touch a battery, clean it with
r ubbi n
g alcohol.
4. To assemble the key fob case, snap the two halve
s together.
Programming And Requesting Additional
Key Fobs
Programming the key fob may be performed by an
authorized dealer.
NOTE:
Once a key fob is programmed to a vehicle, it
cannot be repurposed and reprogrammed to
another vehicle.
Only key fobs that are programmed to the
vehicle electronics can be used to start and
operate the vehicle. Once a key fob is
programmed to a vehicle, it cannot be
programmed to any other vehicle.
Duplication of key fobs may be performed at an
author i
zed dealer. This procedure consists of
programming a blank key fob to the vehicle
electronics. A blank key fob is one that has never
been programmed.
NOTE:
When having the Sentry Key Immobilizer system
serviced, bring all vehicle keys with you to an
authorized dealer.
Keys must be ordered to the correct key cut to
match the vehicle locks.
SENTRY KEY
The Sentry Key Immobilizer system prevents
unauthorized vehicle operation by disabling the
engine. The system does not need to be armed or
activated. Operation is automatic, regardless of
whether the vehicle is locked or unlocked.
The system uses a key fob, keyless push button
ignit i
on and a Radio Frequency (RF) receiver to
prevent unauthorized vehicle operation. Therefore,
only key fobs that are programmed to the vehicle
can be used to start and operate the vehicle. The
system will shut the engine off in two seconds if an
incorrect key fob is used to start the engine.
After placing the ignition switch in the ON/RUN
positi on
, the Vehicle Security Light will turn on for
three seconds for a bulb check. If the light remains
on after the bulb check, it indicates that there is a
problem with the electronics. In addition, if the light
begins to flash after the bulb check, it indicates
that someone used an invalid key fob to start the
engine. Either of these conditions will result in the
engine being shut off after two seconds.
WARNING!
The integrated key fob contains a coin cell
battery. Do not ingest the battery; there is a
chemical burn hazard. If the coin cell battery is
swallowed, it can cause severe internal burns
in just two hours and can lead to death.
If you think a battery may have been swal-
lowed or placed inside any part of the body,
seek i
mmediate medical attention.
Keep new and used batteries away from chil -
dren. If the battery compartment does not
close s
ecurely, stop using the product and
keep it away from children.
WARNING!
Always remove the key fobs from the vehicle
and lock all doors when leaving the vehicle
unattended.
For vehicles equipped with Keyless Enter ‘n
Go™ Ignition, always remember to place the
ignition in the OFF position.
Page 19 of 364
GETTING TO KNOW YOUR VEHICLE 17
(Continued)
If the Vehicle Security Light turns on during normal
vehicle operation (vehicle running for longer than
10 seconds), it indicates that there is a fault in the
electronics. Should this occur, have the vehicle
serviced as soon as possible by an authorized
dealer.
All of the key fobs provided with your new vehicle
have b
een programmed to the vehicle electronics.
NOTE:
A key fob that has not been programmed is also
consid e
red an invalid key Ú page 349.
IGNITION SWITCH
KEYLESS ENTER ‘N GO™ IGNITION
This feature allows the driver to operate the
ignition with the push of a button as long as the key
fob is in the passenger compartment.
The START/STOP ignition button has three
operat i
ng modes: OFF, ON, and RUN.
NOTE:
The vehicle will not start if the key fob is located
insid e
the cargo area and the liftgate is opened.
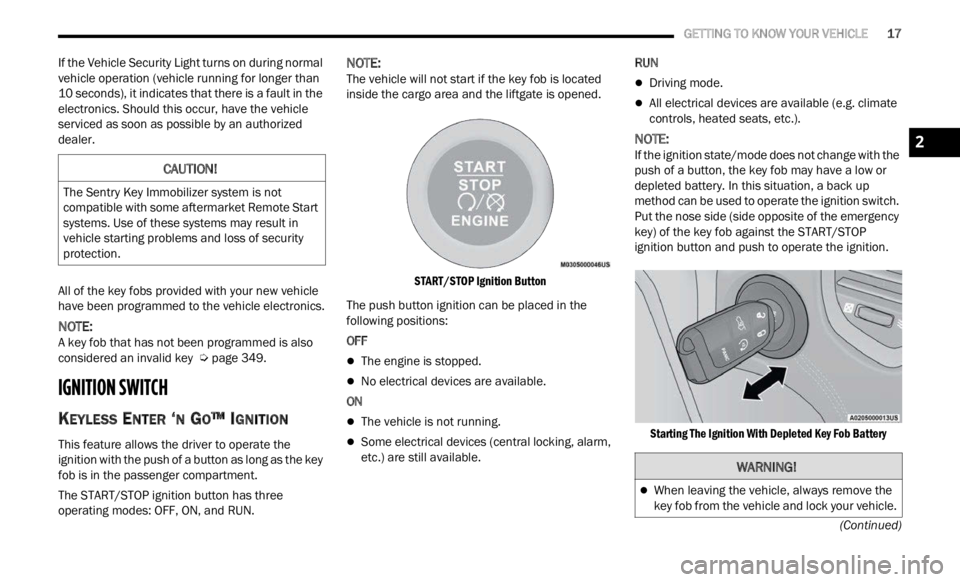
START/STOP Ignition Button
The push button ignition can be placed in the
follow i
ng positions:
OFF
The engine is stopped.
No electrical devices are available.
ON
The vehicle is not running.
Some electrical devices (central locking, alarm,
etc.) are still available. RUN
Driving mode.
All electrical devices are available (e.g. climate
controls, heated seats, etc.).
NOTE:
If the ignition state/mode does not change with the
push of
a button, the key fob may have a low or
depleted battery. In this situation, a back up
method can be used to operate the ignition switch.
Put the nose side (side opposite of the emergency
key) of the key fob against the START/STOP
ignition button and push to operate the ignition.
Starting The Ignition With Depleted Key Fob Battery
CAUTION!
The Sentry Key Immobilizer system is not
compatible with some aftermarket Remote Start
systems. Use of these systems may result in
vehicle starting problems and loss of security
protection.
WARNING!
When leaving the vehicle, always remove the
key fob from the vehicle and lock your vehicle.
2
Page 22 of 364

20 GETTING TO KNOW YOUR VEHICLE
Manual Temperature Control (MTC) — If Equipped
In ambient temperatures at 40°F (4.4°C) or
below, the climate settings will default to
maximum heat, with fresh air entering the
cabin. If the front defrost timer expires, the
vehicle will enter Mix Mode.
In ambient temperatures from 40°F (4.4°C) to
78°F (26°C), the climate settings will be based
on the last settings selected by the driver.
In ambient temperatures at 78°F (26°C) or
above, the climate settings will default to MAX
A/C, Bi-Level Mode, with Recirculation on.
For more information on ATC, MTC, and climate
control
settings, see Ú page 44.
NOTE:
These features will stay on through the duration of
Remote
Start until the ignition is placed in the ON/
RUN position. The climate control settings will
change if manually adjusted by the driver while the
vehicle is in Remote Start mode, and exit auto -
matic override. This includes the OFF button on the
clima t
e controls, which will turn the system off.
REMOTE START WINDSHIELD WIPER
D
E–ICER ACTIVATION — IF EQUIPPED
When Remote Start Is active and the outside
ambient temperature is less than 40°F (4.4°C),
the Windshield Wiper De-Icer will activate. Exiting
Remote Start will resume its previous operation. If the Windshield Wiper De-Icer was active, the timer
and operation will continue
Ú page 349.
REMOTE START CANCEL MESSAGE —
I
F EQUIPPED
The following messages will display in the
instrument cluster display if the vehicle fails to
remote start or exits Remote Start prematurely:
Remote Start Cancelled — Door Open
Remote Start Cancelled — Hood Open
Remote Start Cancelled — Fuel Low
Remote Start Cancelled — Liftgate Open
Remote Start Cancelled — Too Cold
Remote Start Cancelled — Time Expired
Remote Start Disabled — Start Vehicle To Reset
The message will stay active until the ignition is
p la
ce
d
in the ON/RUN position.
VEHICLE SECURITY SYSTEM — IF EQUIPPED
The Vehicle Security system monitors the vehicle
doors, hood, liftgate, and the Keyless Enter ‘n Go™
Ignition for unauthorized operation. While the
Vehicle Security system is armed, interior switches
for door locks and liftgate release are disabled. If
something triggers the system, the Vehicle Security
system will provide the following audible and
visible signals:
The horn will pulse
The turn signals will flash
The Vehicle Security Light in the instrument
cluster will flash
NOTE:
The Vehicle Security system is factory adjusted
to standards from different countries.
The Vehicle Security system is a complementary
security system developed to hinder the occur -
rence of vehicle theft and prevent vandalism. It
does not
prevent the theft of your vehicle; the
system is a deterrent.
The Vehicle Security system does not monitor
glass breakage or the movement of objects or
people inside the vehicle. The alarm does not
intervene in the case of vehicle tilt variations
when it is parked.
TO ARM THE SYSTEM
Follow these steps to arm the Vehicle Security
system:
1. Make sure the vehicle’s ignition is placed in the OF
F position.
2. Perform one of the following methods to lock the v
ehicle:
Push the lock button on the interior power
door lock switch with the driver and/or
passenger door open.
Page 24 of 364
22 GETTING TO KNOW YOUR VEHICLE
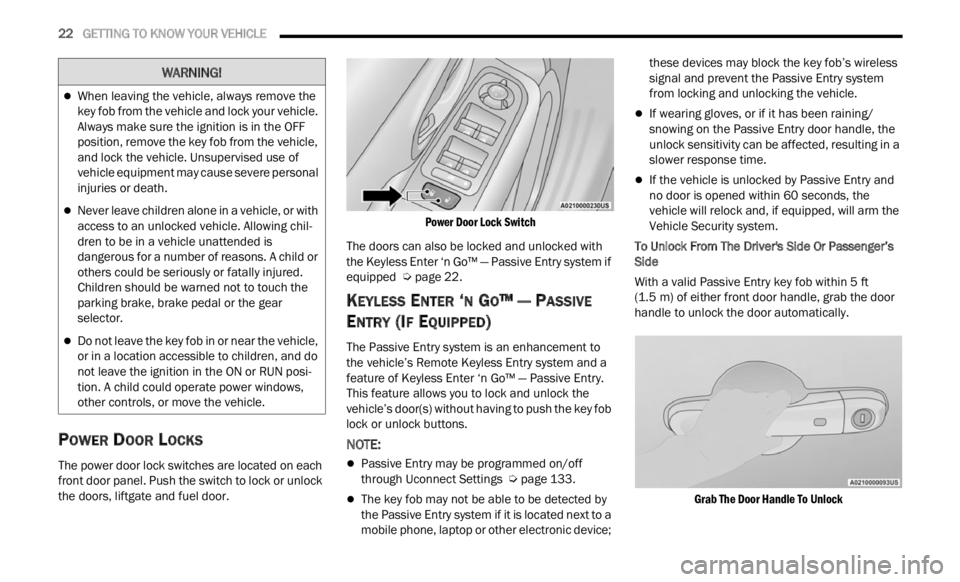
POWER DOOR LOCKS
The power door lock switches are located on each
front door panel. Push the switch to lock or unlock
the doors, liftgate and fuel door.
Power Door Lock Switch
The doors can also be locked and unlocked with
the K e
yless Enter ‘n Go™ — Passive Entry system if
equipped Ú page 22.
KEYLESS ENTER ‘N GO™ — PASSIVE
E
NTRY (IF EQUIPPED)
The Passive Entry system is an enhancement to
the vehicle’s Remote Keyless Entry system and a
feature of Keyless Enter ‘n Go™ — Passive Entry.
This feature allows you to lock and unlock the
vehicle’s door(s) without having to push the key fob
lock or unlock buttons.
NOTE:
Passive Entry may be programmed on/off
through Uconnect Settings Ú page 133.
The key fob may not be able to be detected by
the Passive Entry system if it is located next to a
mobile phone, laptop or other electronic device; these devices may block the key fob’s wireless
signal and prevent the Passive Entry system
from locking and unlocking the vehicle.
If wearing gloves, or if it has been raining/
snowing on the Passive Entry door handle, the
unlock sensitivity can be affected, resulting in a
slower response time.
If the vehicle is unlocked by Passive Entry and
no door is opened within 60 seconds, the
vehicle will relock and, if equipped, will arm the
Vehicle Security system.
To Unlock From The Driver's Side Or Passenger’s
Side
Wit
h a valid Passive Entry key fob within 5 ft
(1.5 m)
of either front door handle, grab the door
handl e
to unlock the door automatically.
Grab The Door Handle To Unlock
When leaving the vehicle, always remove the
key fob from the vehicle and lock your vehicle.
Always make sure the ignition is in the OFF
position, remove the key fob from the vehicle,
and lock the vehicle. Unsupervised use of
vehicle equipment may cause severe personal
injuries or death.
Never leave children alone in a vehicle, or with
access to an unlocked vehicle. Allowing chil -
dren to be in a vehicle unattended is
d anger
ous for a number of reasons. A child or
others could be seriously or fatally injured.
Children should be warned not to touch the
parking brake, brake pedal or the gear
selector.
Do not leave the key fob in or near the vehicle,
or in a location accessible to children, and do
not leave the ignition in the ON or RUN posi -
tion. A child could operate power windows,
other c
ontrols, or move the vehicle.
WARNING!
Page 56 of 364
54 GETTING TO KNOW YOUR VEHICLE
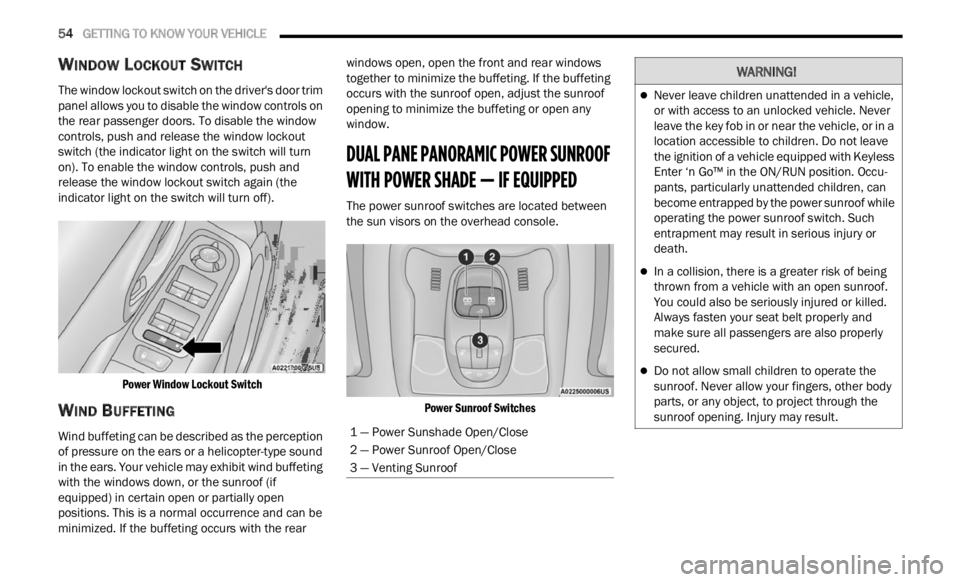
WINDOW LOCKOUT SWITCH
The window lockout switch on the driver's door trim
panel allows you to disable the window controls on
the rear passenger doors. To disable the window
controls, push and release the window lockout
switch (the indicator light on the switch will turn
on). To enable the window controls, push and
release the window lockout switch again (the
indicator light on the switch will turn off).
Power Window Lockout Switch
WIND BUFFETING
Wind buffeting can be described as the perception
of pressure on the ears or a helicopter-type sound
in the ears. Your vehicle may exhibit wind buffeting
with the windows down, or the sunroof (if
equipped) in certain open or partially open
positions. This is a normal occurrence and can be
minimized. If the buffeting occurs with the rear windows open, open the front and rear windows
together to minimize the buffeting. If the buffeting
occurs with the sunroof open, adjust the sunroof
opening to minimize the buffeting or open any
window.
DUAL PANE PANORAMIC POWER SUNROOF
WITH POWER SHADE — IF EQUIPPED
The power sunroof switches are located between
the sun visors on the overhead console.
Power Sunroof Switches
1 — Power Sunshade Open/Close
2 — Power Sunroof Open/Close
3 — Venting Sunroof
WARNING!
Never leave children unattended in a vehicle,
or with access to an unlocked vehicle. Never
leave the key fob in or near the vehicle, or in a
location accessible to children. Do not leave
the ignition of a vehicle equipped with Keyless
Enter ‘n Go™ in the ON/RUN position. Occu -
pants, particularly unattended children, can
b ecom e
entrapped by the power sunroof while
operating the power sunroof switch. Such
entrapment may result in serious injury or
death.
In a collision, there is a greater risk of being
thrown from a vehicle with an open sunroof.
You could also be seriously injured or killed.
Always fasten your seat belt properly and
make sure all passengers are also properly
secured.
Do not allow small children to operate the
sunroof. Never allow your fingers, other body
parts, or any object, to project through the
sunroof opening. Injury may result.
Page 57 of 364

GETTING TO KNOW YOUR VEHICLE 55
OPENING AND CLOSING THE SUNROOF
To retract the sunroof to the open position, push
the Open/Close switch and the sunroof will fully
open. The sunroof can be stopped in any position
by pushing/pulling the switch a second time while
opening.
To close the sunroof completely, pull the Open/
Close s
witch and the sunroof will fully close. The
sunroof can be stopped in any position by pushing/
pulling the switch a second time while it is closing.
VENTING SUNROOF
To vent the sunroof push the vent switch.
NOTE:
The vent switch has the automatic function only at
the op e
ning of the sunroof. During the closing of
the sunroof, the switch must be held until closed.
OPENING AND CLOSING THE POWER
S
UNSHADE
Express Open/Close
Push the shade switch for about one-half second
and t h
e shade will automatically open. During the
automatic open operation, any movement of the
shade switch will stop the shade. Pull the shade switch for about one-half second
and t
h
e shade will automatically close. During the
automatic close operation, any movement of the
shade switch will stop the shade.
Manual Open/Close
To open the shade part way, push the shade switch
brief l
y and release.
To close the shade part way, pull the shade switch
briefl
y and release.
NOTE:
The sunroof and the shade controls will operate
only when the ignition is in the ON/RUN posi -
tion.
If the Remote Start functionality is active, it is
not possible to move the sunroof.
PINCH PROTECT FEATURE
This feature will detect an obstruction in the
opening of the sunroof during Express Close
operation. If an obstruction in the path of the
sunroof is detected, the sunroof will automatically
retract. Remove the obstruction if this occurs.
WARNING!
Do not let children play with the sunroof.
Never leave children unattended in a vehicle,
or with access to an unlocked vehicle. Do not
leave the key fob in or near the vehicle, and do
not leave the ignition of a vehicle equipped
with Keyless Enter ‘n Go™ in the ACC or ON/
RUN position. Occupants, particularly unat -
tended children, can become entrapped by
the p ow
er sunroof while operating the power
sunroof switch. Such entrapment may result
in serious injury or death.
In a collision, there is a greater risk of being
thrown from a vehicle with an open sunroof.
You could also be severely injured or killed.
Always fasten your seat belt properly and
make sure all passengers are properly
secured.
Do not allow small children to operate the
sunroof. Never allow your fingers, other body
parts, or any object to project through the
sunroof opening. Injury may result.
2
Page 60 of 364
58 GETTING TO KNOW YOUR VEHICLE
LOCK/CLOSE THE LIFTGATE
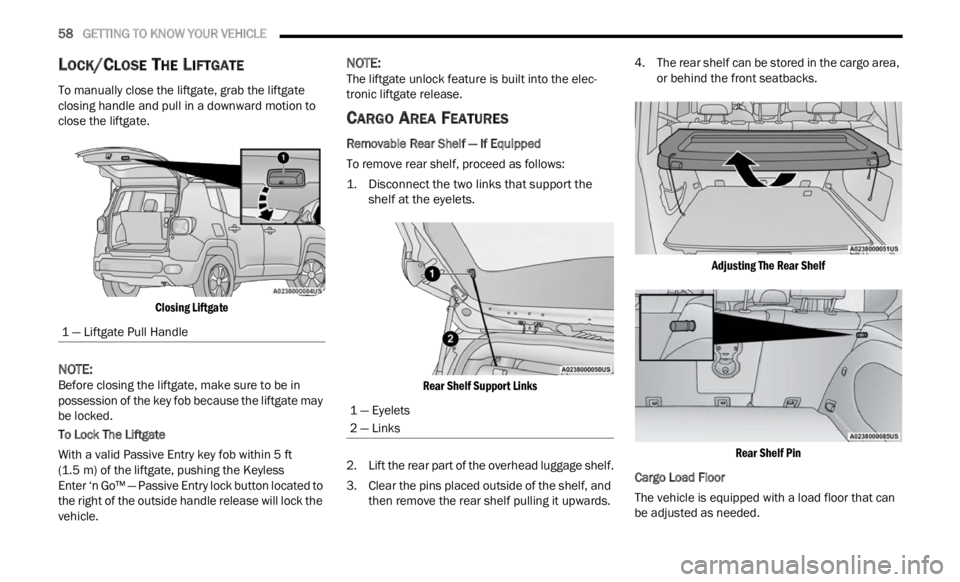
To manually close the liftgate, grab the liftgate
closing handle and pull in a downward motion to
close the liftgate.
Closing Liftgate
NOTE:
Before closing the liftgate, make sure to be in
posses s
ion of the key fob because the liftgate may
be locked.
To Lock The Liftgate
With a valid Passive Entry key fob within 5 ft
( 1.5 m)
of the liftgate, pushing the Keyless
Enter ‘n Go™ — Passive Entry lock button located to
t he ri
ght of the outside handle release will lock the
vehicle.
NOTE:
The liftgate unlock feature is built into the elec -
tronic liftgate release.
CARGO AREA FEATURES
Removable Rear Shelf — If Equipped
To remove rear shelf, proceed as follows:
1. D isconnect the two links that support the
shelf a
t the eyelets.
Rear Shelf Support Links
2. Li ft the rear part of the overhead luggage shelf.
3 . C
le
ar the pins placed outside of the shelf, and
then
remove the rear shelf pulling it upwards. 4. The rear shelf can be stored in the cargo area,
or be h
ind the front seatbacks.
Adjusting The Rear Shelf Rear Shelf Pin
Cargo Load Floor
The vehicle is equipped with a load floor that can
b e ad j
usted as needed.
1 — Liftgate Pull Handle
1 — Eyelets
2 — Links