windshield wipers JEEP RENEGADE 2023 Owners Manual
[x] Cancel search | Manufacturer: JEEP, Model Year: 2023, Model line: RENEGADE, Model: JEEP RENEGADE 2023Pages: 364, PDF Size: 18.65 MB
Page 5 of 364

3
WINDSHIELD WIPERS AND WASHERS ............. 41
Windshield Wiper Operation ...... ......................42
Rain Sensing Wipers — If Equipped ..... . .........42
Rear Window Wiper/Washer . ..
..
. .....................43
Windshield Wiper De-Icer — If Equipped ..... . ...43
CLIMATE CONTROLS . ..
. .
. ...................................... 44
Automatic Climate Control Descriptions And
Functions ..........................................................44
Autom a
tic Temperature Control (ATC) ..... . .....47
Climate Voice Commands..... . ..........................47
Operating Tips . ..
..
. ...........................................47
INTERIOR STORAGE AND EQUIPMENT ..... . ......... 48
Storage..............................................................48
USB/A UX Control ..... . ........................................50
Power Outlets ..... . .............................................50
Power Inverter — If Equipped. ..
..
. .....................51
Cigar Lighter — If Equipped. ..
..
. ........................52
Ashtray — If Equipped ..... . ................................52
WINDOWS............................................................... 52
Power
Window Controls ...... .............................52
Automatic Window Features ..... . .....................53
Reset Auto-Up ..... . .............................................53
Window Lockout Switch . ..
..
. .............................54
Wind Buffeting ..... . ...........................................54
DUAL PANE PANORAMIC POWER SUNROOF
WITH POWER SHADE — IF EQUIPPED ..... .
.......... 54
Opening And Closing The Sunroof...... .............55
Venting Sunroof . ..
..
. ..........................................55
Opening And Closing The Power Sunshade....5 5
P inch Protect Feature . ..
. .
. ................................55
Sunroof Maintenance ..... . ................................56 HOOD ......................................................................56
To Op e
n The Hood...... ......................................56
To Close The Hood ..... . .....................................57
LIFTGATE . ................................................................ 57
U n
loc
k
/Open The Liftgate...... ..........................57
Lock/Close The Liftgate . ..
..
. .............................58
Cargo Area Features ..... . ..................................58
ROOF LUGGAGE RACK — IF EQUIPPED . ..
..
. ........61
GETTING TO KNOW YOUR
INSTRUMENT PANEL
INSTRUMENT CLUSTER .........................................62
Instrument Cluster Descriptions ...... ...............64
INSTRUMENT CLUSTER DISPLAY ..... . .................64
Instrument Cluster Display Location And
Controls.............................................................64
Oil C
hange Reset..... . ........................................65
Instrument Cluster Display Menu Items . ..
..
. ..66
TRIP COMPUTER ..... . ..............................................69
WARNING/INDICATOR LIGHTS AND
MESSAGES ......
........................................................69
Red Warning Lights ...... ....................................70
Yellow Warning Lights ..... . ................................72
Yellow Indicator Lights . ..
..
. ...............................75
Green Indicator Lights . ..
..
. ...............................76
White Indicator Lights ..... . ................................77
Blue Indicator Lights ..... . ..................................77
Gray Indicator Lights . ..
..
. ..................................77 ONBOARD DIAGNOSTIC SYSTEM (OBD II) .....
.
... 77
Onboard Diagnostic System
(OBD II) Cybersecurity ..... .
................................ 78
EMISSIONS INSPECTION AND MAINTENANCE
PROGRAMS ..... .
...................................................... 78
STARTING AND OPERATING
STARTING THE ENGINE ......................................... 80
Tip Start Feature ...... ....................................... 80
If Engine Fails To Start ..... . ..............................80
Cold Weather Operation ..... . ............................ 81
Extended Park Starting . ..
..
. ..............................81
After Starting — Warming Up The Engine ..... . . 81
Stopping The Engine . ..
..
. .................................. 81
Turbocharger “Cool Down” — If Equipped ..... . 82
ENGINE BREAK-IN RECOMMENDATIONS . ..
..
. .... 82
ELECTRIC PARK BRAKE (EPB) ...... ....................... 82
Auto Park Brake ...... ......................................... 84
SafeHold . .......................................................... 84
B r
a k
e
Service Mode..... . ................................... 84
9-SPEED AUTOMATIC TRANSMISSION . ..
..
. ........ 85
Gear Selector...... .............................................. 86
Gear Ranges ..... . ............................................... 87
Transmission Limp Home Mode . ..
..
. ............... 90
Ignition Park Interlock
(Keyless Vehicle) . .....
........................................ 90
Brake Transmission Shift Interlock (BTSI)
System . .............................................................90
Page 43 of 364

GETTING TO KNOW YOUR VEHICLE 41
To operate the rear dome light, proceed as follows:
Push the switch to the on/right position from its
center position and the lights are always on.
Push the switch to the off/left position from its
center position and the lights are always off.
Leave the switch in the center position, and the
lights are turned on and off when the doors are
opened or closed.
DOME LIGHT TIMING
The dome light will automatically illuminate when
the doors are unlocked, the doors are opened or
after the doors are closed.
Timing Entering The Vehicle
The dome lights illuminate in the following ways:
When the doors are unlocked, the dome light
will illuminate for approximately 27 seconds.
When one of the doors is opened, the dome light
will illuminate for approximately three minutes.
When the doors are closed, the dome light will
automatically shut off after approximately 27
seconds.
The timing stops once the ignition is placed in the
ON/RU N
position. The dome light will turn off under any of the
follow
i
ng conditions:
The dome light is disabled when the ignition is
placed in the ON/RUN position.
The dome lights will turn off automatically when
the doors are locked.
The dome lights will automatically turn off after
approximately 15 minutes of inactivity to
prese r
ve the battery.
Timing Exiting The Vehicle
The dome light will illuminate under the following
condit i
ons when the ignition is placed to the OFF
position and the key is removed:
The dome light will illuminate for 27 seconds
after the ignition is placed in the OFF position.
The opening of one of the doors (approximately
three minutes).
After closing a door (approximately 27 seconds).
The dome light timing is disabled when the doors
a re
l
oc
ked.
WINDSHIELD WIPERS AND WASHERS
The windshield wiper/washer controls are located
on the windshield wiper/washer lever on the right
side of the steering column. The front wipers are
operated by rotating a switch, located on the end of
the lever.
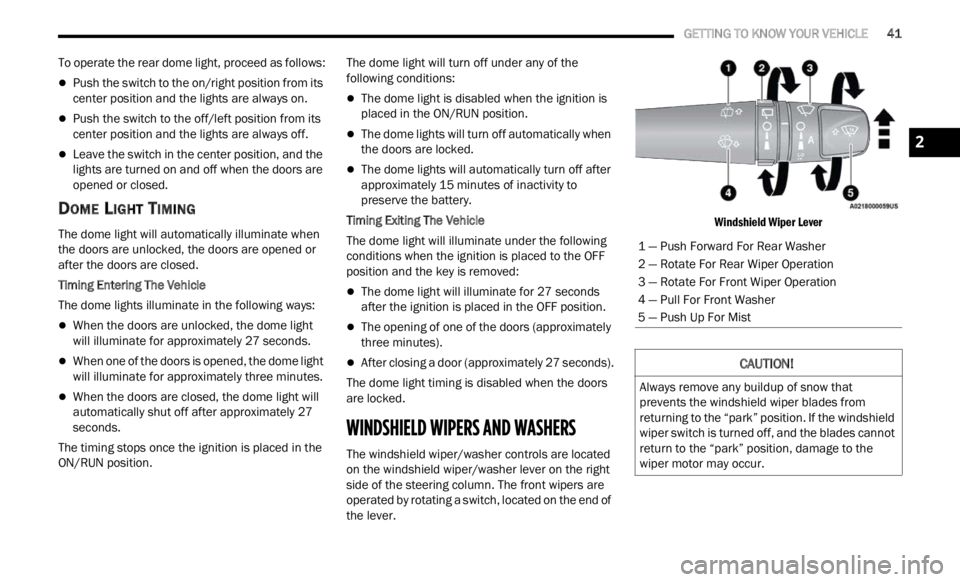
Windshield Wiper Lever
1 — Push Forward For Rear Washer
2 — Rotate For Rear Wiper Operation
3 — Rotate For Front Wiper Operation
4 — Pull For Front Washer
5 — Push Up For Mist
CAUTION!
Always remove any buildup of snow that
prevents the windshield wiper blades from
returning to the “park” position. If the windshield
wiper switch is turned off, and the blades cannot
return to the “park” position, damage to the
wiper motor may occur.
2
Page 44 of 364

42 GETTING TO KNOW YOUR VEHICLE
WINDSHIELD WIPER OPERATION
Rotate the windshield wiper knob to one of the two
detent positions for intermittent settings, the third
detent for low wiper operation and the fourth for
high wiper operation.
Windshield Washer Operation
To use the washer, pull the lever toward you and
hold w h
ile spray is desired. If the lever is pulled
while in the intermittent setting, the wipers will turn
on and operate for several wipe cycles after the
lever is released, and then resume the intermittent
interval previously selected.
If the lever is pulled while the wipers are in the off
positi on
, the wipers will operate for several wipe
cycles, then turn off. Mist
Use this feature when weather conditions make
occasi
on
al usage of the wipers necessary. Push
the lever upward to the MIST position and release
for a single wiping cycle.
NOTE:
The Mist feature does not activate the washer
pump;
therefore, no washer fluid will be sprayed on
the windshield. The wash function must be used in
order to spray the windshield with washer fluid.
For information on wiper care and replacement,
see Ú p
age 297 .
RAIN SENSING WIPERS — IF EQUIPPED
This feature senses rain or snow fall on the
windshield and automatically activates the wipers.
Rotate the end of the multifunction lever to one of
two detent positions to activate this feature.
The sensitivity of the system can be adjusted with
the mu
ltifunction lever. Wiper delay position one is
the least sensitive, and wiper delay position two is
the most sensitive. Place the wiper switch in the O
(off) position when not using the system.
NOTE:
If the end of the multifunction lever rotates from off
to the
first intermittent setting or from the first
intermittent setting to the second intermittent
setting, the wipers will perform a round up to clean
the windshield.
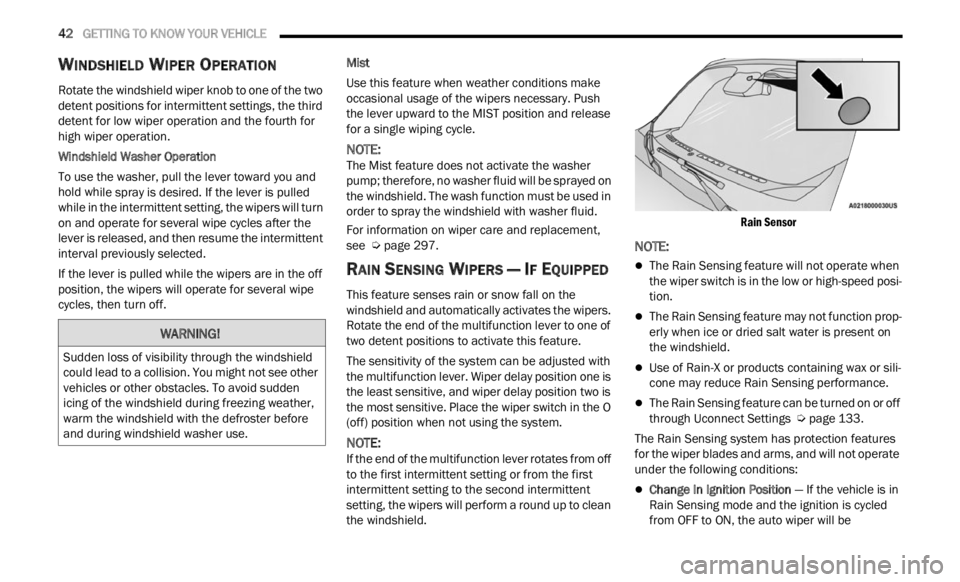
Rain Sensor
NOTE:
The Rain Sensing feature will not operate when
the wiper switch is in the low or high-speed posi
-
tion.
The Rain Sensing feature may not function prop -
erly when ice or dried salt water is present on
t h e
w
i
ndshield.
Use of Rain-X or products containing wax or sili-
cone may reduce Rain Sensing performance.
The Rain Sensing feature can be turned on or off
through Uconnect Settings Ú page 133.
The Rain Sensing system has protection features
f or the
wiper blades and arms, and will not operate
under the following conditions:
Change In Ignition Position — If the vehicle is in
Rain Sensing mode and the ignition is cycled
from OFF to ON, the auto wiper will be
WARNING!
Sudden loss of visibility through the windshield
could lead to a collision. You might not see other
vehicles or other obstacles. To avoid sudden
icing of the windshield during freezing weather,
warm the windshield with the defroster before
and during windshield washer use.
Page 45 of 364

GETTING TO KNOW YOUR VEHICLE 43
suppressed until vehicle speed is greater than
3 mph (5 km/h), or the wiper switch is moved
out of a
nd back into the Intermittent wipe posi -
tion.
Transmission In NEUTRAL Position — The Rain
Sensing system will not operate if the NEUTRAL
gear is selected at speeds of 3 mph (5 km/h) or
less u
nless the wiper switch is moved or the
gear selector is moved out of NEUTRAL.
Remote Start Mode Inhibit — On vehicles
equipped with the Remote Start system, Rain
Sensing wipers are not operational when the
vehicle is in the Remote Start mode. Once the
operator is in the vehicle and has placed the
ignition switch in the ON/RUN position, Rain
Sensing wiper operation can resume, if it has
been selected, and no other inhibit conditions
(mentioned previously) exist.
REAR WINDOW WIPER/WASHER
The rear wiper/washer controls are located on the
windshield wiper/washer lever on the right side of
the steering column. The rear wiper/washer is
operated by rotating a switch, located at the
middle of the lever.
NOTE:
If the front wiper is moving and the vehicle is
shift e
d in REVERSE, the rear wiper will perform one
round up to clean the rear window. Rotate the center portion of the lever
upward to the first detent for intermittent
operat
i
on and to the second detent for
continuous rear wiper operation. If the
front wiper is set to Automatic mode (on the wiper
lever as well as enabled through Uconnect
Settings), placing the rear wiper in an intermittent
position will cause the front and rear wipers to sync
up. Turning the front wipers off will cause the rear
wipers to also stop.
To use the washer, push the lever
forward and hold while spray is desired. If
the l e
ver is pushed while the wiper is in
the off position, the wiper will operate for
several wipe cycles, then turn off.
If the lever is pushed while in the intermittent
settin
g, the wiper will turn on and operate for
several wipe cycles after the end of the lever is
released, and then resume the intermittent
interval previously selected.
NOTE:
As a protective measure, the pump will stop if the
switc h
is held for more than 30 seconds. Once the
lever is released, the pump will resume normal
operation.
WINDSHIELD WIPER DE-ICER —
I
F EQUIPPED
Your vehicle may be equipped with a Windshield
Wiper De-Icer feature that may be activated under
the following conditions:
Activation By Front Defrost — The Windshield
Wiper De-Icer will be activated automatically in
the case of a cold weather manual start with full
front defrost, and the ambient temperature is
below 40°F (4.4°C).
CAUTION!
Failure to follow these cautions can cause
damage to the heating elements:
Use care when washing the inside of the rear
window. Do not use abrasive window cleaners
on the interior surface of the window. Use a
soft cloth and a mild washing solution, wiping
parallel to the heating elements. Labels can
be peeled off after soaking with warm water.
Do not use scrapers, sharp instruments, or
abrasive window cleaners on the interior
surface of the window.
Keep all objects a safe distance from the
window.
2
Page 299 of 364

SERVICING AND MAINTENANCE 297
Refrigerant Recovery And Recycling —
R–1234yf
R–1234yf Air Conditioning Refrigerant is a
hydrofluoroolefin (HFO) that is endorsed by the
Environmental Protection Agency and is an
ozone-friendly substance with a low
global-warming potential. The manufacturer
recommends that air conditioning service be
performed by an authorized dealer using recovery
and recycling equipment.
NOTE:
Use only the manufacturer approved A/C system
PAG c om
pressor oil, and refrigerants.
Cabin Air Cleaner
See an authorized dealer for service.
BODY LUBRICATION
Locks and all body pivot points, including such
items as seat tracks, door hinge pivot points and
rollers, liftgate, tailgate, decklid, sliding doors and
hood hinges, should be lubricated periodically with
a lithium-based grease, such as Mopar® Spray
White Lube to ensure quiet, easy operation and to
protect against rust and wear. Prior to the
application of any lubricant, the parts concerned
should be wiped clean to remove dust and grit;
after lubricating, excess oil and grease should be
removed. Particular attention should also be given to hood latching components to ensure proper
function. When performing other underhood
services, the hood latch, release mechanism and
safety catch should be cleaned and lubricated.
The external lock cylinders should be lubricated
twice
a year, preferably in the Autumn and Spring.
Apply a small amount of a high quality lubricant,
such as Mopar® Lock Cylinder Lubricant directly
into the lock cylinder.
WINDSHIELD WIPER BLADES
Clean the rubber edges of the wiper blades and the
windshield periodically with a sponge or soft cloth
and a mild nonabrasive cleaner. This will remove
accumulations of salt or road film.
Operation of the wipers on dry glass for long
periods
may cause deterioration of the wiper
blades. Always use washer fluid when using the
wipers to remove salt or dirt from a dry windshield.
Avoid using the wiper blades to remove frost or ice
from th
e windshield. Keep the blade rubber out of
contact with petroleum products such as engine
oil, gasoline, etc.
NOTE:
Life expectancy of wiper blades varies depending
on geog r
aphical area and frequency of use. Poor
performance of blades may be present with chat -tering, marks, water lines or wet spots. If any of
these
conditions are present, clean the wiper
blades or replace as necessary.
Service Position Strategy
The service position allows the wiper blades to be
placed in a position that allows the wiper blades to
be easily changed.
To enable the Service Position Strategy, the wipers
must b
e in the Park position before placing the
ignition in the STOP/OFF position.
Service mode must be activated within two
minut e
s after the ignition is placed in the STOP/
OFF position.
To have a correct activation of strategy, the Service
Positi on
command (antipanic) must be active for at
least half a second.
At every valid activation of Service Position
comman d
, the wiper blades are activated for
250 ms.
The Service Position command can be repeated
sever a
l times to bring the blades into the desired
position, up to a maximum of three times.
After three subsequent activations the strategy is
disab l
ed.
8
Page 362 of 364

360
Phonebook Download...............................169Place/Retrieve A Call From Hold...............171Power-Up...................................................174Recent Calls..............................................170Redial........................................................172To Remove A Favorite...............................169Toggling Between Calls.............................172Touch-Tone Number Entry.........................170Transfer Call To And From Mobile Phone..172Voice Command........................................172Uconnect Settings
Customer Programmable
Features
..................................19, 24, 134Passive Entry Programming................24, 142Uconnect System...........................................147Uniform Tire Quality Grades...........................337Universal Consumer Interface (UCI)
Connector........................................................50Unleaded Gasoline........................................342Untwisting Procedure, Seat Belt....................244
V
Vanity Mirrors..................................................34Vehicle Finder......................................211, 216Vehicle Health Alert......................................213Vehicle Health Report...................................213Vehicle Loading...................................123, 326Vehicle Maintenance....................................295Vehicle Modifications/Alterations....................10Vehicle Notifications.....................................213Vehicle Storage................................................47Voice Command............................33, 176, 178Voice Recognition System (VR)........................33
W
Warning Flashers, Hazard.............................268Warning Lights (Instrument Cluster
Descriptions)....................................................76Warnings And Cautions....................................69Warnings, Roll Over...........................................9
Warranty Information....................................347Washer Adding Fluid..............................................294Washing Vehicle............................................338Wheel And Wheel Tire Care...........................334Wheel And Wheel Tire Trim...........................334Wi-Fi..............................................................211Wind Buffeting.................................................54Window Fogging...............................................47WindowsPower...........................................................52Windshield Defroster....................................265Windshield Wiper Blades..............................297Wipers Blade Replacement...........................297Wipers, Intermittent.........................................41Wipers, Rain Sensitive.....................................42Wrecker Towing.............................................283