Emergency key JEEP WAGONEER 2023 Owners Manual
[x] Cancel search | Manufacturer: JEEP, Model Year: 2023, Model line: WAGONEER, Model: JEEP WAGONEER 2023Pages: 396, PDF Size: 15.17 MB
Page 18 of 396
16
GETTING TO KNOW YOUR VEHICLE
KEYS
KEY FOB
Your vehicle is equipped with a key fob which supports
Passive Entry, Remote Keyless Entry (RKE), Keyless
Enter ‘n Go™, Remote Air Suspension Lowering, and
Remote Start. The key fob allows you to lock or unlock all
doors and liftgate, as well as activate the Panic Alarm from
distances up to approximately 66 ft (20 m). The key fob does not need to be pointed at the vehicle to activate the
system. The key fob also contains an emergency key,
which is stored in the rear of the key fob.
NOTE:In vehicles equipped with Remote Start, the key fob will
operate at distances up to 328 ft (100 m).
NOTE:
The key fob’s wireless signal may be blocked if the key
fob is located next to a mobile phone, laptop, or other
electronic device. This may result in poor performance.
If your vehicle is equipped with a Wireless Charging
Pad, the key fob may not be detected if it is placed
within 6 inches (15 cm) of the pad
Úpage 81.
With the ignition in the ON position and the vehicle
moving at 2 mph (4 km/h), all RKE commands are
disabled.
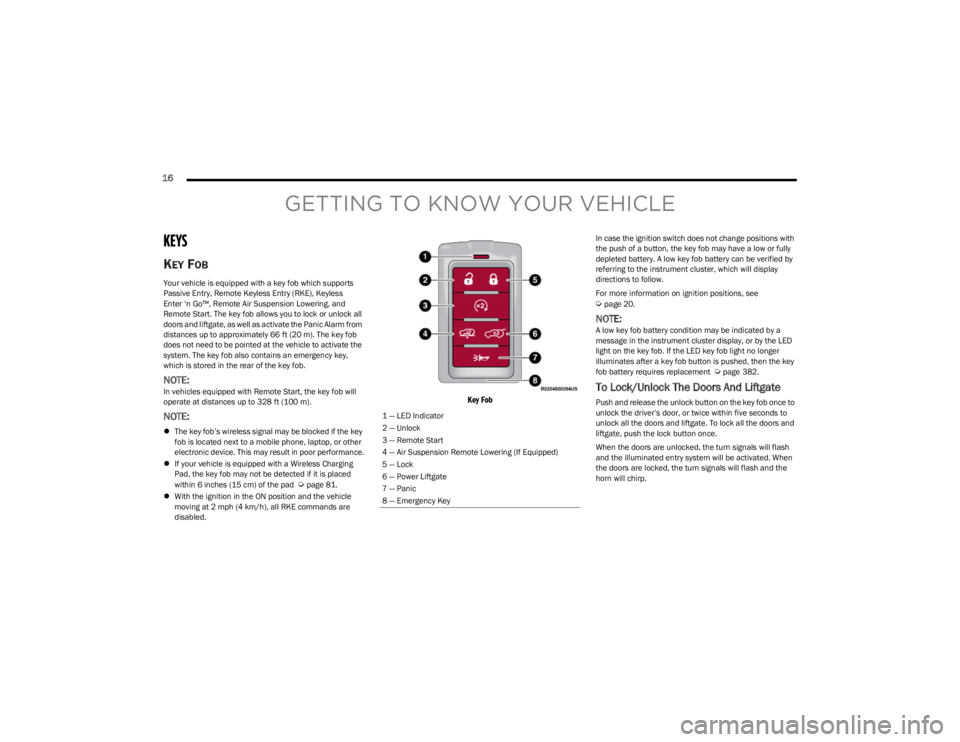
Key Fob
In case the ignition switch does not change positions with
the push of a button, the key fob may have a low or fully
depleted battery. A low key fob battery can be verified by
referring to the instrument cluster, which will display
directions to follow.
For more information on ignition positions, see
Úpage 20.
NOTE:A low key fob battery condition may be indicated by a
message in the instrument cluster display, or by the LED
light on the key fob. If the LED key fob light no longer
illuminates after a key fob button is pushed, then the key
fob battery requires replacement
Úpage 382.
To Lock/Unlock The Doors And Liftgate
Push and release the unlock button on the key fob once to
unlock the driver’s door, or twice within five seconds to
unlock all the doors and liftgate. To lock all the doors and
liftgate, push the lock button once.
When the doors are unlocked, the turn signals will flash
and the illuminated entry system will be activated. When
the doors are locked, the turn signals will flash and the
horn will chirp.
1 — LED Indicator
2 — Unlock
3 — Remote Start
4 — Air Suspension Remote Lowering (If Equipped)
5 — Lock
6 — Power Liftgate
7 — Panic
8 — Emergency Key
23_WS_OM_EN_USC_t.book Page 16
Page 20 of 396
18GETTING TO KNOW YOUR VEHICLE
Replacing The Battery In The Key Fob
The replacement battery model is one CR2450 battery.
NOTE:
Customers are recommended to use a battery
obtained from Mopar®. Aftermarket coin battery
dimensions may not meet the original OEM coin battery
dimensions.
Perchlorate Material — special handling may apply.
See www.dtsc.ca.gov/hazardouswaste/perchlorate for
further information.
Do not touch the battery terminals that are on the back
housing or the printed circuit board.
Do not replace the coin battery if the LED on the key fob
above the top row buttons blinks when a button is
pressed. The coin battery should last a minimum of
three years with normal vehicle usage.
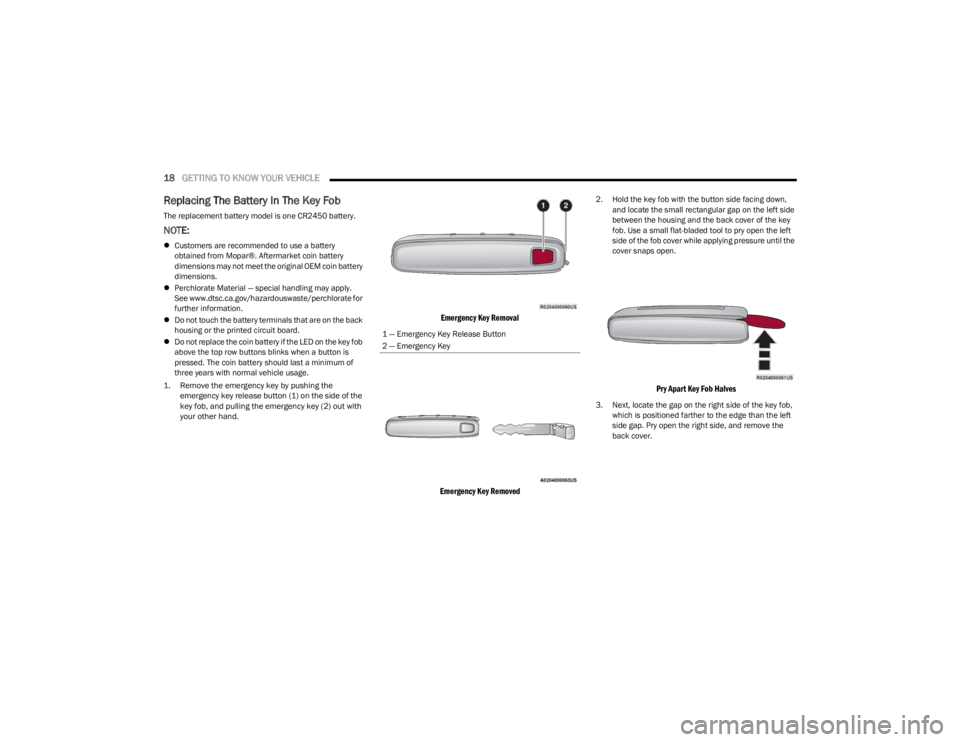
1. Remove the emergency key by pushing the emergency key release button (1) on the side of the
key fob, and pulling the emergency key (2) out with
your other hand.
Emergency Key Removal
Emergency Key Removed
2. Hold the key fob with the button side facing down, and locate the small rectangular gap on the left side
between the housing and the back cover of the key
fob. Use a small flat-bladed tool to pry open the left
side of the fob cover while applying pressure until the
cover snaps open.
Pry Apart Key Fob Halves
3. Next, locate the gap on the right side of the key fob, which is positioned farther to the edge than the left
side gap. Pry open the right side, and remove the
back cover.
1 — Emergency Key Release Button
2 — Emergency Key
23_WS_OM_EN_USC_t.book Page 18
Page 21 of 396
GETTING TO KNOW YOUR VEHICLE19
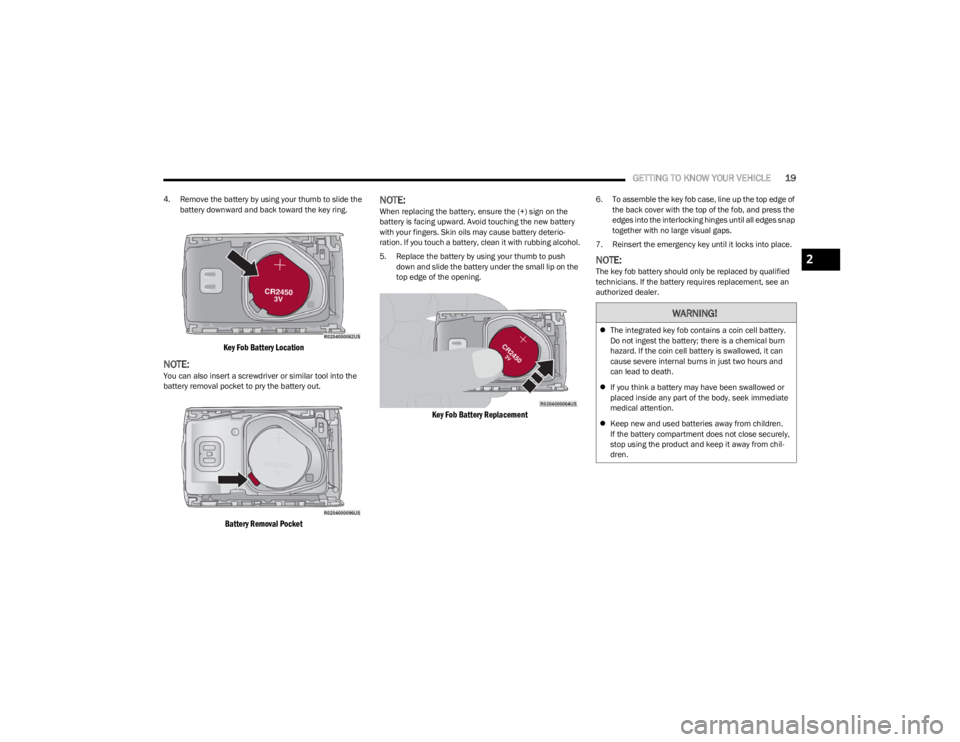
4. Remove the battery by using your thumb to slide the
battery downward and back toward the key ring.
Key Fob Battery Location
NOTE:You can also insert a screwdriver or similar tool into the
battery removal pocket to pry the battery out.
Battery Removal Pocket
NOTE:When replacing the battery, ensure the (+) sign on the
battery is facing upward. Avoid touching the new battery
with your fingers. Skin oils may cause battery deterio -
ration. If you touch a battery, clean it with rubbing alcohol.
5. Replace the battery by using your thumb to push down and slide the battery under the small lip on the
top edge of the opening.
Key Fob Battery Replacement
6. To assemble the key fob case, line up the top edge of the back cover with the top of the fob, and press the
edges into the interlocking hinges until all edges snap
together with no large visual gaps.
7. Reinsert the emergency key until it locks into place.
NOTE:The key fob battery should only be replaced by qualified
technicians. If the battery requires replacement, see an
authorized dealer.
WARNING!
The integrated key fob contains a coin cell battery.
Do not ingest the battery; there is a chemical burn
hazard. If the coin cell battery is swallowed, it can
cause severe internal burns in just two hours and
can lead to death.
If you think a battery may have been swallowed or
placed inside any part of the body, seek immediate
medical attention.
Keep new and used batteries away from children.
If the battery compartment does not close securely,
stop using the product and keep it away from chil -
dren.
2
23_WS_OM_EN_USC_t.book Page 19
Page 23 of 396
GETTING TO KNOW YOUR VEHICLE21
(Continued)
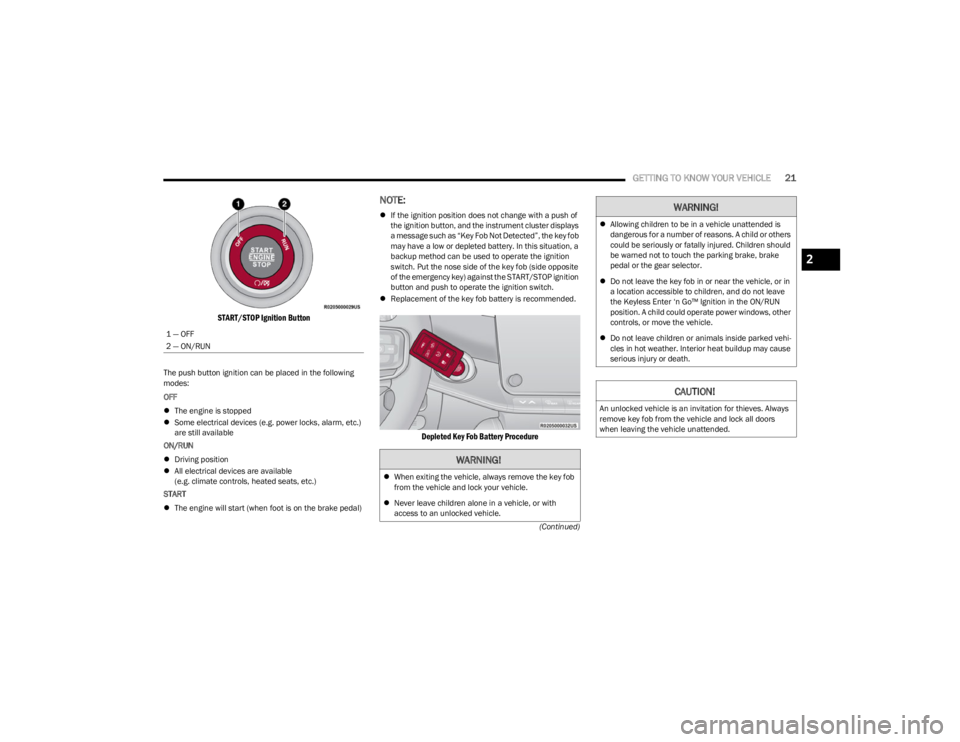
START/STOP Ignition Button
The push button ignition can be placed in the following
modes:
OFF
The engine is stopped
Some electrical devices (e.g. power locks, alarm, etc.)
are still available
ON/RUN
Driving position
All electrical devices are available
(e.g. climate controls, heated seats, etc.)
START
The engine will start (when foot is on the brake pedal)
NOTE:
If the ignition position does not change with a push of
the ignition button, and the instrument cluster displays
a message such as “Key Fob Not Detected”, the key fob
may have a low or depleted battery. In this situation, a
backup method can be used to operate the ignition
switch. Put the nose side of the key fob (side opposite
of the emergency key) against the START/STOP ignition
button and push to operate the ignition switch.
Replacement of the key fob battery is recommended.
Depleted Key Fob Battery Procedure
1 — OFF
2 — ON/RUN
WARNING!
When exiting the vehicle, always remove the key fob
from the vehicle and lock your vehicle.
Never leave children alone in a vehicle, or with
access to an unlocked vehicle.
Allowing children to be in a vehicle unattended is
dangerous for a number of reasons. A child or others
could be seriously or fatally injured. Children should
be warned not to touch the parking brake, brake
pedal or the gear selector.
Do not leave the key fob in or near the vehicle, or in
a location accessible to children, and do not leave
the Keyless Enter ‘n Go™ Ignition in the ON/RUN
position. A child could operate power windows, other
controls, or move the vehicle.
Do not leave children or animals inside parked vehi -
cles in hot weather. Interior heat buildup may cause
serious injury or death.
CAUTION!
An unlocked vehicle is an invitation for thieves. Always
remove key fob from the vehicle and lock all doors
when leaving the vehicle unattended.
WARNING!
2
23_WS_OM_EN_USC_t.book Page 21
Page 27 of 396

GETTING TO KNOW YOUR VEHICLE25
The Vehicle Security system is designed to protect your
vehicle. However, you can create conditions where the
system will give you a false alarm. If one of the previously
described arming sequences has occurred, the Vehicle
Security system will arm regardless of whether you are in
the vehicle or not. If you remain in the vehicle and open a
door, the alarm will sound. If this occurs, disarm the
Vehicle Security system.
If the Vehicle Security system is armed and the battery
becomes disconnected, the Vehicle Security system will
remain armed when the battery is reconnected; the
exterior lights will flash, and the horn will sound. If this
occurs, disarm the Vehicle Security system.
REARMING OF THE SYSTEM
If something triggers the alarm and no action is taken to
disarm it, the Vehicle Security system will turn the horn off
after a 29 second cycle (with five seconds between cycles
and up to eight cycles if the trigger remains active) and
then rearm itself.
SECURITY SYSTEM MANUAL OVERRIDE
The Vehicle Security system will not arm if you lock the
doors using the manual door lock, or an emergency lock
lever
Úpage 26.
TAMPER ALERT
If something has triggered the Vehicle Security system in
your absence, the horn will sound three times and the
exterior lights will blink three times when you disarm the
Vehicle Security system.
DELUXE VEHICLE SECURITY SYSTEM —
IF EQUIPPED
The Deluxe Vehicle Security system monitors the doors,
hood latch, and liftgate for unauthorized entry and the
ignition switch for unauthorized operation. The system
also includes a dual function intrusion sensor and vehicle
tilt sensor. The intrusion sensor monitors the vehicle
interior for motion. The vehicle tilt sensor monitors the
vehicle for any tilting actions (tow away, tire removal, ferry
transport, etc.).
If a perimeter violation triggers the security system, the
horn will sound for 29 seconds and the exterior lights will
flash followed by approximately five seconds of no activity.
This will continue for eight cycles if no action is taken to
disarm the system.
TO ARM THE SYSTEM
Follow these steps to arm the security system:
1. If any doors, windows, or the sunroof (if equipped)
are open, close them.
2. Make sure the vehicle ignition system is OFF.
3. Perform one of the following methods to lock the vehicle:
Push lock on the interior power door lock switch
with the driver and/or passenger door open.
Touch the lock button on the exterior Passive Entry
door handle with a key fob available in the same
exterior zone
Úpage 167.
Push the lock button on the key fob.
NOTE:
When armed, the interior motion sensor detects move -
ment within the vehicle's interior, including moving
objects (i.e. people and pets) and air currents through
open windows or the sunroof. The windows and
sunroof should be closed, and moving objects should
not be left in the vehicle when the intrusion detection
is armed, otherwise false alarms can occur.
Once the security system is armed, it remains in that
state until you disarm it by following either of the
disarming procedures described. If a power loss occurs
after arming the system, you must disarm the system
after restoring power to prevent alarm activation.
The ultrasonic intrusion sensor (motion detector)
actively monitors your vehicle every time you arm the
Vehicle Security system. If you prefer, you can turn off
the ultrasonic intrusion sensor when arming the
Vehicle Security system. To do so, push the lock button
on the key fob three times within 15 seconds of arming
the system (while the Vehicle Security Light is flashing
rapidly). The vehicle will remain locked but will disable
the alarm in the case of repeated false alarms due to
ambient conditions.
TO DISARM THE SYSTEM
The Vehicle Security system can be disarmed using any of
the following methods:
Push the unlock button on the key fob.
Grab the Passive Entry door handle to unlock the door
Úpage 167.
Cycle the vehicle ignition system out of the OFF position
by pushing the START/STOP ignition button (requires at
least one valid key fob in the vehicle).
2
23_WS_OM_EN_USC_t.book Page 25
Page 28 of 396
26GETTING TO KNOW YOUR VEHICLE
NOTE:
The driver's door key cylinder and the liftgate button on
the key fob cannot arm or disarm the Vehicle Security
system.
The Vehicle Security system remains armed during
power liftgate entry. If a valid key fob or the Passive
Entry liftgate button is used to open the liftgate, the
motion sensing will be suppressed until after the lift -
gate is closed. If someone enters the vehicle through
the opened liftgate, then opens any door, the alarm will
sound.
When the Vehicle Security system is armed, the interior
power door lock switches will not unlock the doors.
The ultrasonic intrusion sensor (motion detector)
actively monitors your vehicle every time you arm the
Vehicle Security system. If you prefer, you can turn off
the ultrasonic intrusion sensor when arming the
Vehicle Security system. To do so, push the lock button
on the key fob three times within 15 seconds of arming
the system (while the Vehicle Security Light is flashing
rapidly). The vehicle will remain locked but will disable
the alarm in the case of repeated false alarms due to
ambient conditions. The Vehicle Security system is designed to protect your
vehicle; however, you can create conditions where the
system will give you a false alarm. If one of the previously
described arming sequences has occurred, the Vehicle
Security system will arm regardless of whether you are in
the vehicle or not. If you remain in the vehicle and open a
door, the alarm will sound. If this occurs, disarm the
Vehicle Security system.
If the Vehicle Security system is armed and the battery
becomes disconnected, the Vehicle Security system will
remain armed when the battery is reconnected; the
exterior lights will flash and the horn will sound. If this
occurs, disarm the Vehicle Security system.
SECURITY SYSTEM MANUAL OVERRIDE
The Vehicle Security system will not arm if you lock the
doors using the manual door lock, or an emergency lock
lever
Úpage 26.
DOORS
MANUAL DOOR LOCKS
The front doors can be manually unlocked with a single
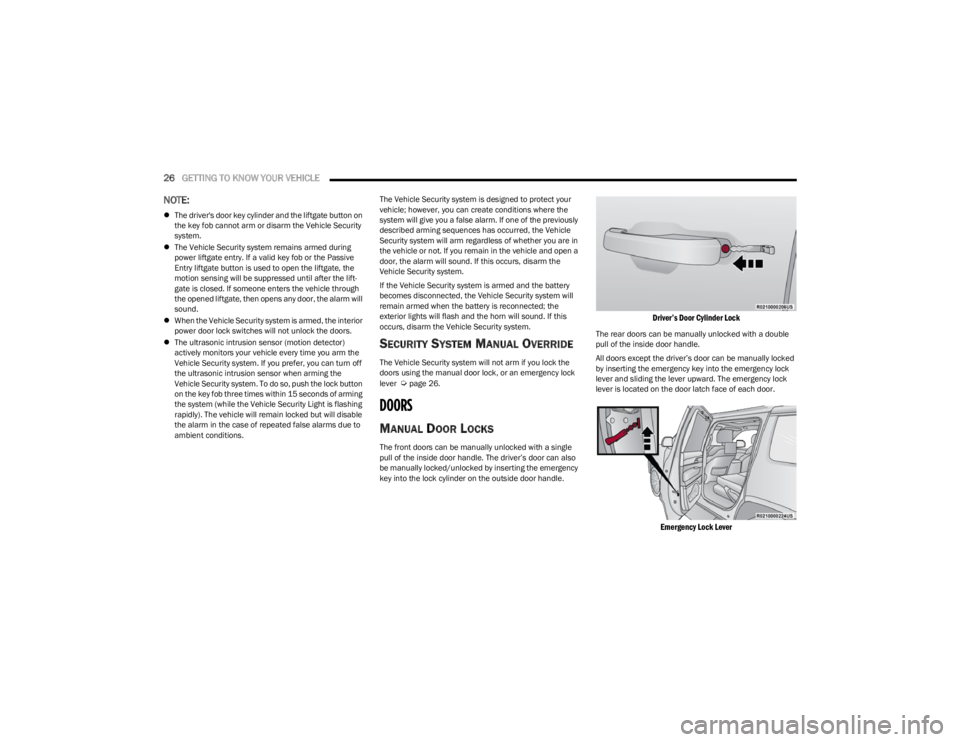
pull of the inside door handle. The driver’s door can also
be manually locked/unlocked by inserting the emergency
key into the lock cylinder on the outside door handle.
Driver’s Door Cylinder Lock
The rear doors can be manually unlocked with a double
pull of the inside door handle.
All doors except the driver’s door can be manually locked
by inserting the emergency key into the emergency lock
lever and sliding the lever upward. The emergency lock
lever is located on the door latch face of each door.
Emergency Lock Lever
23_WS_OM_EN_USC_t.book Page 26
Page 29 of 396
GETTING TO KNOW YOUR VEHICLE27
NOTE:
The emergency lock lever is only accessible when the
door is open.
Manually locking the vehicle will not arm the Vehicle
Security system.
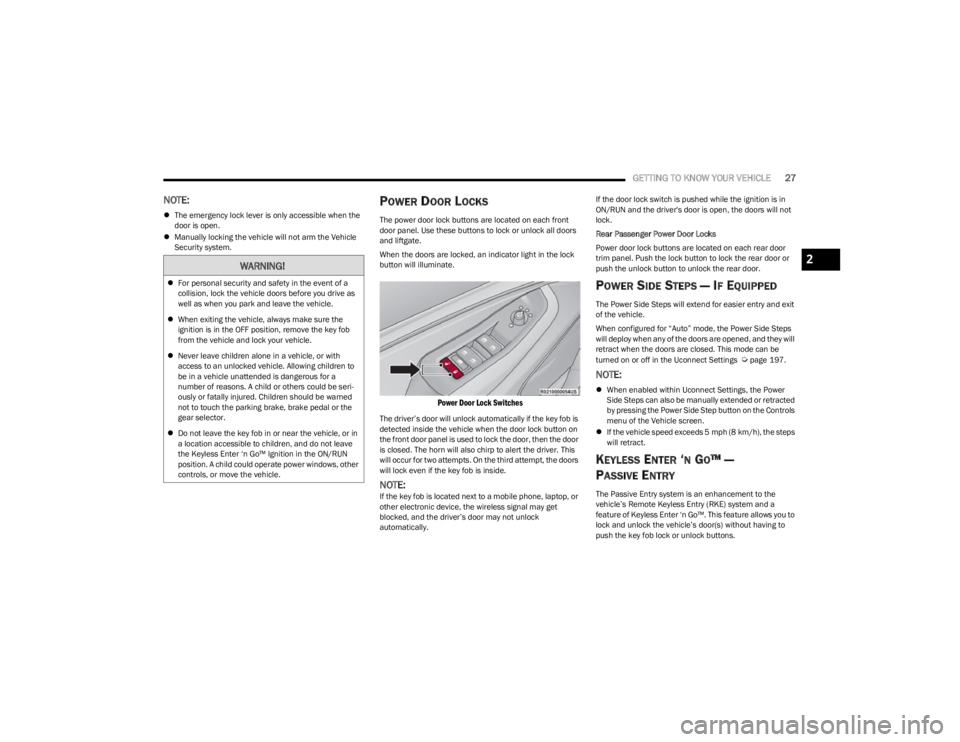
POWER DOOR LOCKS
The power door lock buttons are located on each front
door panel. Use these buttons to lock or unlock all doors
and liftgate.
When the doors are locked, an indicator light in the lock
button will illuminate.
Power Door Lock Switches
The driver’s door will unlock automatically if the key fob is
detected inside the vehicle when the door lock button on
the front door panel is used to lock the door, then the door
is closed. The horn will also chirp to alert the driver. This
will occur for two attempts. On the third attempt, the doors
will lock even if the key fob is inside.
NOTE:If the key fob is located next to a mobile phone, laptop, or
other electronic device, the wireless signal may get
blocked, and the driver’s door may not unlock
automatically. If the door lock switch is pushed while the ignition is in
ON/RUN and the driver's door is open, the doors will not
lock.
Rear Passenger Power Door Locks
Power door lock buttons are located on each rear door
trim panel. Push the lock button to lock the rear door or
push the unlock button to unlock the rear door.
POWER SIDE STEPS — IF EQUIPPED
The Power Side Steps will extend for easier entry and exit
of the vehicle.
When configured for “Auto” mode, the Power Side Steps
will deploy when any of the doors are opened, and they will
retract when the doors are closed. This mode can be
turned on or off in the Uconnect Settings
Úpage 197.
NOTE:
When enabled within Uconnect Settings, the Power
Side Steps can also be manually extended or retracted
by pressing the Power Side Step button on the Controls
menu of the Vehicle screen.
If the vehicle speed exceeds 5 mph (8 km/h), the steps
will retract.
KEYLESS ENTER ‘N GO™ —
P
ASSIVE ENTRY
The Passive Entry system is an enhancement to the
vehicle’s Remote Keyless Entry (RKE) system and a
feature of Keyless Enter ‘n Go™. This feature allows you to
lock and unlock the vehicle’s door(s) without having to
push the key fob lock or unlock buttons.
WARNING!
For personal security and safety in the event of a
collision, lock the vehicle doors before you drive as
well as when you park and leave the vehicle.
When exiting the vehicle, always make sure the
ignition is in the OFF position, remove the key fob
from the vehicle and lock your vehicle.
Never leave children alone in a vehicle, or with
access to an unlocked vehicle. Allowing children to
be in a vehicle unattended is dangerous for a
number of reasons. A child or others could be seri -
ously or fatally injured. Children should be warned
not to touch the parking brake, brake pedal or the
gear selector.
Do not leave the key fob in or near the vehicle, or in
a location accessible to children, and do not leave
the Keyless Enter ‘n Go™ Ignition in the ON/RUN
position. A child could operate power windows, other
controls, or move the vehicle.
2
23_WS_OM_EN_USC_t.book Page 27
Page 31 of 396
GETTING TO KNOW YOUR VEHICLE29
NOTE:The vehicle will only unlock the doors when a valid Passive
Entry key fob is detected inside the vehicle. The vehicle will
not unlock the doors when any of the following conditions
are true:
The doors are manually locked using the emergency
lock lever.
Three attempts are made to lock the doors using the
door panel switch and then the doors are closed.
There is a valid Passive Entry key fob outside the
vehicle within 5 ft (1.5 m) of a Passive Entry door
handle.
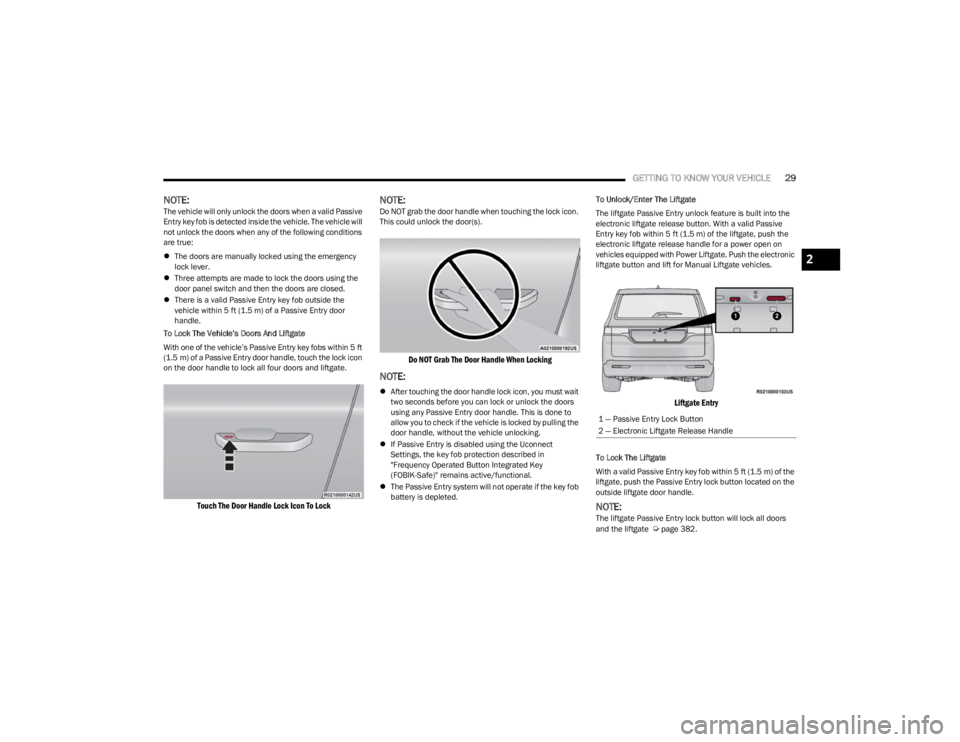
To Lock The Vehicle’s Doors And Liftgate
With one of the vehicle’s Passive Entry key fobs within 5 ft
(1.5 m) of a Passive Entry door handle, touch the lock icon
on the door handle to lock all four doors and liftgate.
Touch The Door Handle Lock Icon To Lock
NOTE:Do NOT grab the door handle when touching the lock icon.
This could unlock the door(s).
Do NOT Grab The Door Handle When Locking
NOTE:
After touching the door handle lock icon, you must wait
two seconds before you can lock or unlock the doors
using any Passive Entry door handle. This is done to
allow you to check if the vehicle is locked by pulling the
door handle, without the vehicle unlocking.
If Passive Entry is disabled using the Uconnect
Settings, the key fob protection described in
"Frequency Operated Button Integrated Key
(FOBIK-Safe)" remains active/functional.
The Passive Entry system will not operate if the key fob
battery is depleted. To Unlock/Enter The Liftgate
The liftgate Passive Entry unlock feature is built into the
electronic liftgate release button. With a valid Passive
Entry key fob within 5 ft (1.5 m) of the liftgate, push the
electronic liftgate release handle for a power open on
vehicles equipped with Power Liftgate. Push the electronic
liftgate button and lift for Manual Liftgate vehicles.
Liftgate Entry
To Lock The Liftgate
With a valid Passive Entry key fob within 5 ft (1.5 m) of the
liftgate, push the Passive Entry lock button located on the
outside liftgate door handle.
NOTE:The liftgate Passive Entry lock button will lock all doors
and the liftgate Úpage 382.
1 — Passive Entry Lock Button
2 — Electronic Liftgate Release Handle
2
23_WS_OM_EN_USC_t.book Page 29
Page 32 of 396
30GETTING TO KNOW YOUR VEHICLE
AUTOMATIC UNLOCK DOORS ON EXIT
The doors will unlock automatically on vehicles with power
door locks after the following sequence of actions:
1. The Automatic Unlock Doors On Exit feature is
enabled within Uconnect Settings
Ú
page 197.
2. All doors are closed.
3. The gear selector was not in PARK, then is placed in PARK.
4. Any door is opened.
AUTOMATIC DOOR LOCKS —
I
F EQUIPPED
The auto door lock feature default condition is enabled.
When enabled, the door locks will lock automatically when
the vehicle's speed exceeds 15 mph (24 km/h). The auto
door lock feature is enabled or disabled by an authorized
dealer per written request of the customer. Please see an
authorized dealer for service.
CHILD-PROTECTION DOOR LOCK
S
YSTEM — REAR DOORS
To provide a safer environment for small children riding in
the rear seats, the rear doors are equipped with a
Child-Protection Door Lock system.
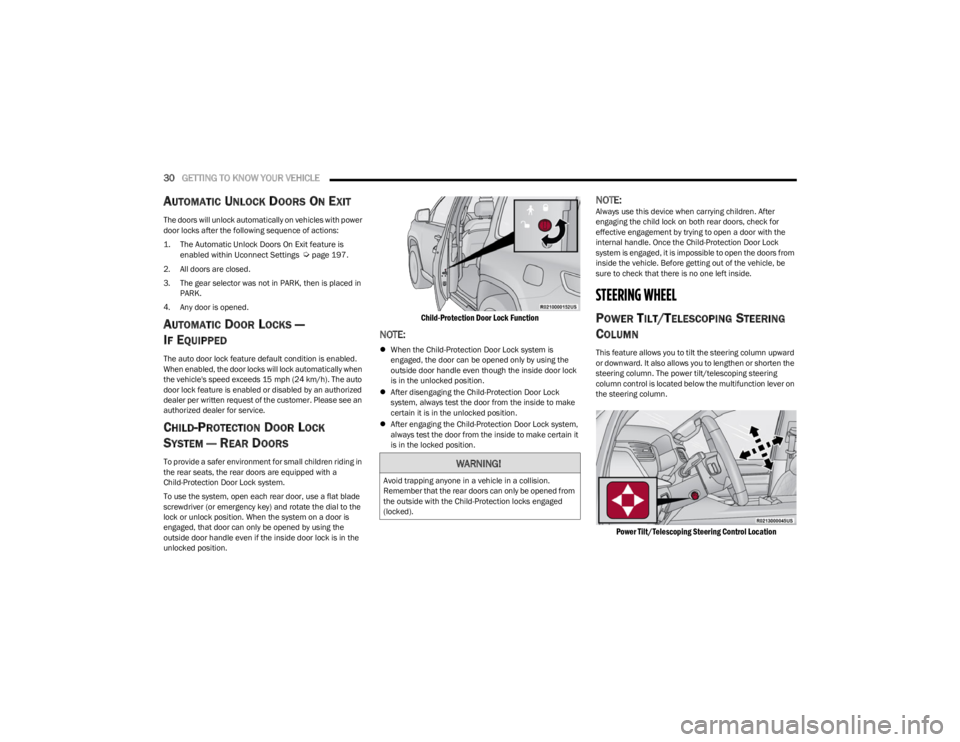
To use the system, open each rear door, use a flat blade
screwdriver (or emergency key) and rotate the dial to the
lock or unlock position. When the system on a door is
engaged, that door can only be opened by using the
outside door handle even if the inside door lock is in the
unlocked position.
Child-Protection Door Lock Function
NOTE:
When the Child-Protection Door Lock system is
engaged, the door can be opened only by using the
outside door handle even though the inside door lock
is in the unlocked position.
After disengaging the Child-Protection Door Lock
system, always test the door from the inside to make
certain it is in the unlocked position.
After engaging the Child-Protection Door Lock system,
always test the door from the inside to make certain it
is in the locked position.
NOTE:Always use this device when carrying children. After
engaging the child lock on both rear doors, check for
effective engagement by trying to open a door with the
internal handle. Once the Child-Protection Door Lock
system is engaged, it is impossible to open the doors from
inside the vehicle. Before getting out of the vehicle, be
sure to check that there is no one left inside.
STEERING WHEEL
POWER TILT/TELESCOPING STEERING
C
OLUMN
This feature allows you to tilt the steering column upward
or downward. It also allows you to lengthen or shorten the
steering column. The power tilt/telescoping steering
column control is located below the multifunction lever on
the steering column.
Power Tilt/Telescoping Steering Control Location
WARNING!
Avoid trapping anyone in a vehicle in a collision.
Remember that the rear doors can only be opened from
the outside with the Child-Protection locks engaged
(locked).
23_WS_OM_EN_USC_t.book Page 30
Page 75 of 396
GETTING TO KNOW YOUR VEHICLE73
INTERIOR STORAGE AND EQUIPMENT
STORAGE
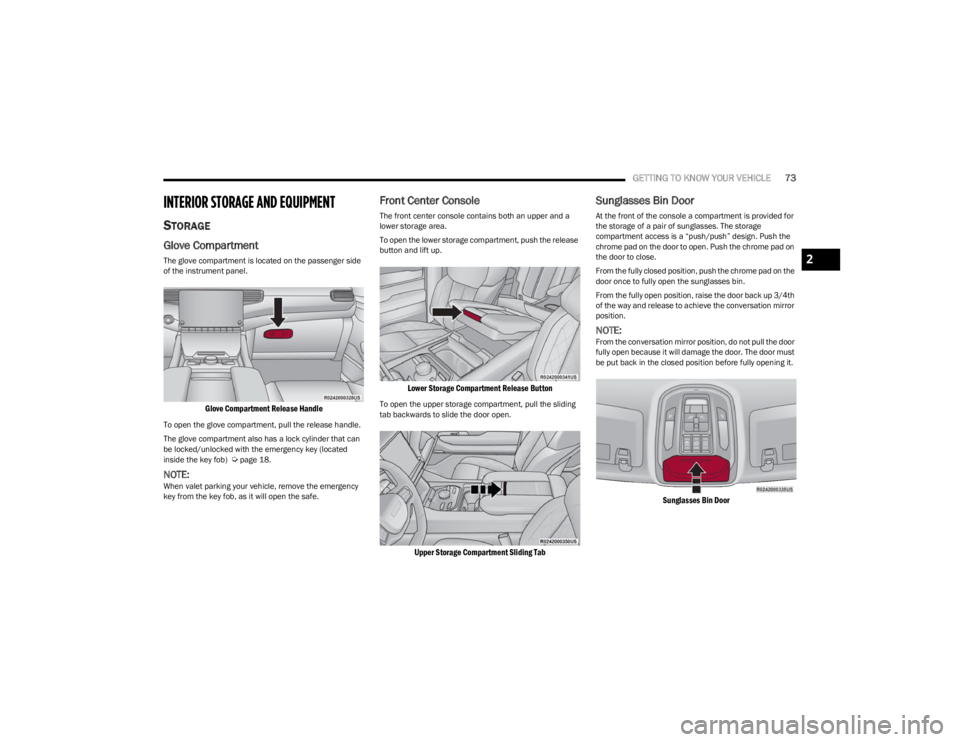
Glove Compartment
The glove compartment is located on the passenger side
of the instrument panel.
Glove Compartment Release Handle
To open the glove compartment, pull the release handle.
The glove compartment also has a lock cylinder that can
be locked/unlocked with the emergency key (located
inside the key fob)
Úpage 18.
NOTE:When valet parking your vehicle, remove the emergency
key from the key fob, as it will open the safe.
Front Center Console
The front center console contains both an upper and a
lower storage area.
To open the lower storage compartment, push the release
button and lift up.
Lower Storage Compartment Release Button
To open the upper storage compartment, pull the sliding
tab backwards to slide the door open.
Upper Storage Compartment Sliding Tab
Sunglasses Bin Door
At the front of the console a compartment is provided for
the storage of a pair of sunglasses. The storage
compartment access is a “push/push” design. Push the
chrome pad on the door to open. Push the chrome pad on
the door to close.
From the fully closed position, push the chrome pad on the
door once to fully open the sunglasses bin.
From the fully open position, raise the door back up 3/4th
of the way and release to achieve the conversation mirror
position.
NOTE:From the conversation mirror position, do not pull the door
fully open because it will damage the door. The door must
be put back in the closed position before fully opening it.
Sunglasses Bin Door
2
23_WS_OM_EN_USC_t.book Page 73