buttons JEEP WAGONEER 2023 Owners Manual
[x] Cancel search | Manufacturer: JEEP, Model Year: 2023, Model line: WAGONEER, Model: JEEP WAGONEER 2023Pages: 396, PDF Size: 15.17 MB
Page 20 of 396
18GETTING TO KNOW YOUR VEHICLE
Replacing The Battery In The Key Fob
The replacement battery model is one CR2450 battery.
NOTE:
Customers are recommended to use a battery
obtained from Mopar®. Aftermarket coin battery
dimensions may not meet the original OEM coin battery
dimensions.
Perchlorate Material — special handling may apply.
See www.dtsc.ca.gov/hazardouswaste/perchlorate for
further information.
Do not touch the battery terminals that are on the back
housing or the printed circuit board.
Do not replace the coin battery if the LED on the key fob
above the top row buttons blinks when a button is
pressed. The coin battery should last a minimum of
three years with normal vehicle usage.
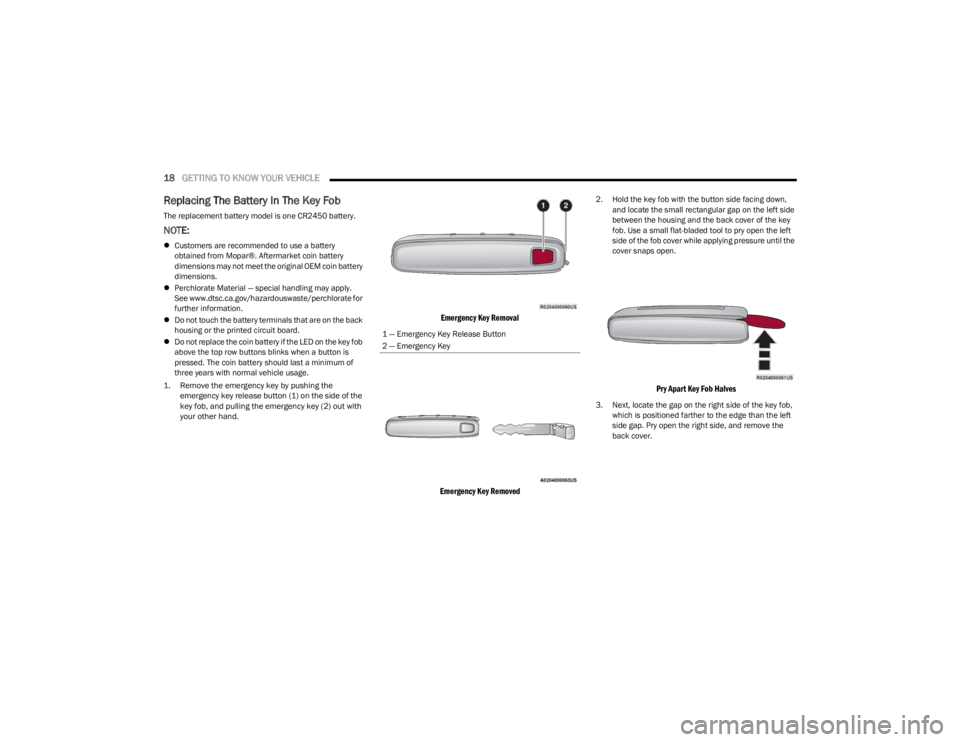
1. Remove the emergency key by pushing the emergency key release button (1) on the side of the
key fob, and pulling the emergency key (2) out with
your other hand.
Emergency Key Removal
Emergency Key Removed
2. Hold the key fob with the button side facing down, and locate the small rectangular gap on the left side
between the housing and the back cover of the key
fob. Use a small flat-bladed tool to pry open the left
side of the fob cover while applying pressure until the
cover snaps open.
Pry Apart Key Fob Halves
3. Next, locate the gap on the right side of the key fob, which is positioned farther to the edge than the left
side gap. Pry open the right side, and remove the
back cover.
1 — Emergency Key Release Button
2 — Emergency Key
23_WS_OM_EN_USC_t.book Page 18
Page 29 of 396
GETTING TO KNOW YOUR VEHICLE27
NOTE:
The emergency lock lever is only accessible when the
door is open.
Manually locking the vehicle will not arm the Vehicle
Security system.
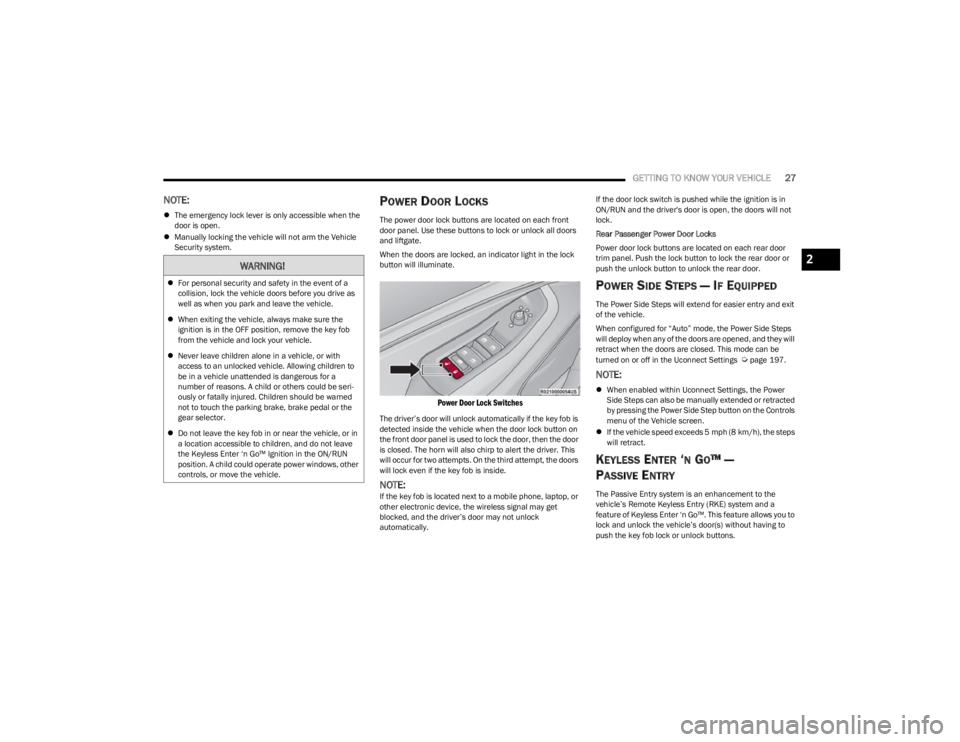
POWER DOOR LOCKS
The power door lock buttons are located on each front
door panel. Use these buttons to lock or unlock all doors
and liftgate.
When the doors are locked, an indicator light in the lock
button will illuminate.
Power Door Lock Switches
The driver’s door will unlock automatically if the key fob is
detected inside the vehicle when the door lock button on
the front door panel is used to lock the door, then the door
is closed. The horn will also chirp to alert the driver. This
will occur for two attempts. On the third attempt, the doors
will lock even if the key fob is inside.
NOTE:If the key fob is located next to a mobile phone, laptop, or
other electronic device, the wireless signal may get
blocked, and the driver’s door may not unlock
automatically. If the door lock switch is pushed while the ignition is in
ON/RUN and the driver's door is open, the doors will not
lock.
Rear Passenger Power Door Locks
Power door lock buttons are located on each rear door
trim panel. Push the lock button to lock the rear door or
push the unlock button to unlock the rear door.
POWER SIDE STEPS — IF EQUIPPED
The Power Side Steps will extend for easier entry and exit
of the vehicle.
When configured for “Auto” mode, the Power Side Steps
will deploy when any of the doors are opened, and they will
retract when the doors are closed. This mode can be
turned on or off in the Uconnect Settings
Úpage 197.
NOTE:
When enabled within Uconnect Settings, the Power
Side Steps can also be manually extended or retracted
by pressing the Power Side Step button on the Controls
menu of the Vehicle screen.
If the vehicle speed exceeds 5 mph (8 km/h), the steps
will retract.
KEYLESS ENTER ‘N GO™ —
P
ASSIVE ENTRY
The Passive Entry system is an enhancement to the
vehicle’s Remote Keyless Entry (RKE) system and a
feature of Keyless Enter ‘n Go™. This feature allows you to
lock and unlock the vehicle’s door(s) without having to
push the key fob lock or unlock buttons.
WARNING!
For personal security and safety in the event of a
collision, lock the vehicle doors before you drive as
well as when you park and leave the vehicle.
When exiting the vehicle, always make sure the
ignition is in the OFF position, remove the key fob
from the vehicle and lock your vehicle.
Never leave children alone in a vehicle, or with
access to an unlocked vehicle. Allowing children to
be in a vehicle unattended is dangerous for a
number of reasons. A child or others could be seri -
ously or fatally injured. Children should be warned
not to touch the parking brake, brake pedal or the
gear selector.
Do not leave the key fob in or near the vehicle, or in
a location accessible to children, and do not leave
the Keyless Enter ‘n Go™ Ignition in the ON/RUN
position. A child could operate power windows, other
controls, or move the vehicle.
2
23_WS_OM_EN_USC_t.book Page 27
Page 34 of 396
32GETTING TO KNOW YOUR VEHICLE
Passenger’s Side (If Equipped)
Seat position
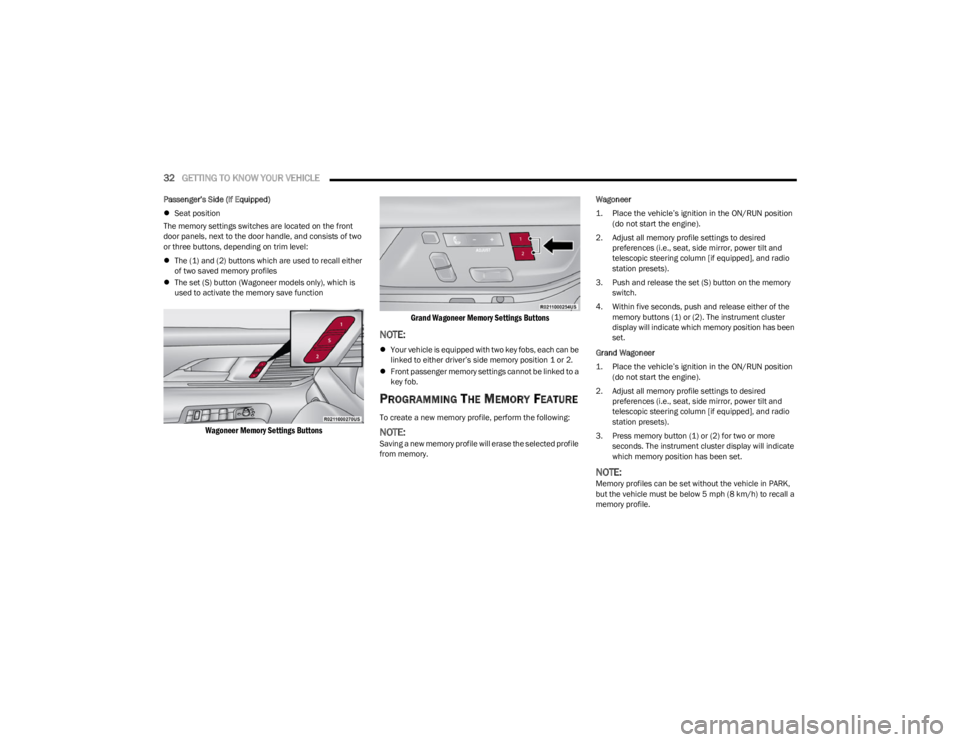
The memory settings switches are located on the front
door panels, next to the door handle, and consists of two
or three buttons, depending on trim level:
The (1) and (2) buttons which are used to recall either
of two saved memory profiles
The set (S) button (Wagoneer models only), which is
used to activate the memory save function
Wagoneer Memory Settings Buttons Grand Wagoneer Memory Settings Buttons
NOTE:
Your vehicle is equipped with two key fobs, each can be
linked to either driver’s side memory position 1 or 2.
Front passenger memory settings cannot be linked to a
key fob.
PROGRAMMING THE MEMORY FEATURE
To create a new memory profile, perform the following:
NOTE:Saving a new memory profile will erase the selected profile
from memory. Wagoneer
1. Place the vehicle’s ignition in the ON/RUN position
(do not start the engine).
2. Adjust all memory profile settings to desired preferences (i.e., seat, side mirror, power tilt and
telescopic steering column [if equipped], and radio
station presets).
3. Push and release the set (S) button on the memory switch.
4. Within five seconds, push and release either of the memory buttons (1) or (2). The instrument cluster
display will indicate which memory position has been
set.
Grand Wagoneer
1. Place the vehicle’s ignition in the ON/RUN position (do not start the engine).
2. Adjust all memory profile settings to desired preferences (i.e., seat, side mirror, power tilt and
telescopic steering column [if equipped], and radio
station presets).
3. Press memory button (1) or (2) for two or more seconds. The instrument cluster display will indicate
which memory position has been set.
NOTE:Memory profiles can be set without the vehicle in PARK,
but the vehicle must be below 5 mph (8 km/h) to recall a
memory profile.
23_WS_OM_EN_USC_t.book Page 32
Page 35 of 396
GETTING TO KNOW YOUR VEHICLE33
LINKING AND UNLINKING THE KEY FOB
T
O MEMORY
Your key fobs can be programmed to recall one of two
saved driver’s side memory profiles.
NOTE:Before programming your key fobs you must select the
“Personal Settings Linked To Key Fob” feature through the
Uconnect Settings
Úpage 197.
To program your key fobs, perform the following:
Wagoneer
1. Place the vehicle’s ignition in the OFF position.
2. Select a desired driver’s side memory profile, 1 or 2.
3. Once the profile has been recalled, push and release the set (S) button on the memory switch.
4. Within five seconds, push and release button (1) or (2) accordingly. “Memory Profile Set” (1 or 2) will
display in the instrument cluster.
5. Push and release the lock button on the key fob within 10 seconds.
NOTE:Your key fobs can be unlinked from your driver’s side
memory settings by pushing the set (S) button, and within
10 seconds, pushing the unlock button on the key fob.
Grand Wagoneer
1. Place the vehicle’s ignition in the OFF position.
2. Recall the desired memory profile (1 or 2). 3. Press the memory button (1) or (2) (according to the
previous selection) for two seconds or more, and
release.
4. Push and hold the lock button on the key fob within 10 seconds.
NOTE:Your key fobs can be unlinked from your driver’s side
memory settings by pushing the memory button (1) or (2)
for two seconds or more and releasing, and then within 10
seconds, pushing and holding the unlock button on the
key fob.
MEMORY POSITION RECALL
NOTE:Memory Recall is available when not in PARK, if the
vehicle speed is below 5 mph (8 km/h).
To recall a memory settings using the memory
switches, push memory button (1) or (2) on the
memory switch.
To recall the driver’s side memory settings using the
key fob, push the unlock button on the key fob linked
to memory position 1 or 2.
A recall can be canceled by pushing any of the memory
buttons during a recall, or by pushing any of the seat
adjustment switches. When a recall is canceled, the seat
and power tilt/telescopic steering column will stop
moving. A delay of one second will occur before another
recall can be selected.
SEATS
Seats are a part of the Occupant Restraint system of the
vehicle.
MANUAL ADJUSTMENT (REAR SEATS)
NOTE:You may experience deformation in the seat cushion from
the seat belt buckles if the seats are left folded for an
extended period of time. This is normal and by simply
unfolding the seats to the open position, over time the
seat cushion will return to its normal shape.
WARNING!
It is dangerous to ride in a cargo area, inside or
outside of a vehicle. In a collision, people riding in
these areas are more likely to be seriously injured or
killed.
Do not allow people to ride in any area of your vehicle
that is not equipped with seats and seat belts. In a
collision, people riding in these areas are more likely
to be seriously injured or killed.
Be sure everyone in your vehicle is in a seat and
using a seat belt properly.
WARNING!
Do not pile luggage or cargo higher than the top of the
seatback. This could impair visibility or become a
dangerous projectile in a sudden stop or collision.
2
23_WS_OM_EN_USC_t.book Page 33
Page 37 of 396
GETTING TO KNOW YOUR VEHICLE35
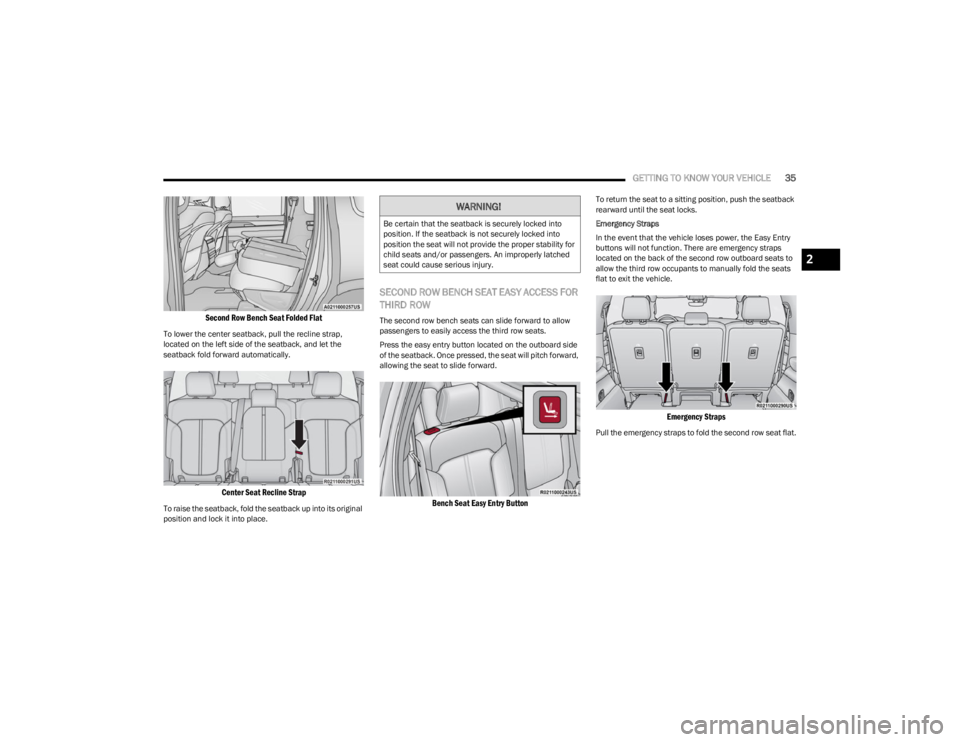
Second Row Bench Seat Folded Flat
To lower the center seatback, pull the recline strap,
located on the left side of the seatback, and let the
seatback fold forward automatically.
Center Seat Recline Strap
To raise the seatback, fold the seatback up into its original
position and lock it into place.
SECOND ROW BENCH SEAT EASY ACCESS FOR
THIRD ROW
The second row bench seats can slide forward to allow
passengers to easily access the third row seats.
Press the easy entry button located on the outboard side
of the seatback. Once pressed, the seat will pitch forward,
allowing the seat to slide forward.
Bench Seat Easy Entry Button
To return the seat to a sitting position, push the seatback
rearward until the seat locks.
Emergency Straps
In the event that the vehicle loses power, the Easy Entry
buttons will not function. There are emergency straps
located on the back of the second row outboard seats to
allow the third row occupants to manually fold the seats
flat to exit the vehicle.
Emergency Straps
Pull the emergency straps to fold the second row seat flat.
WARNING!
Be certain that the seatback is securely locked into
position. If the seatback is not securely locked into
position the seat will not provide the proper stability for
child seats and/or passengers. An improperly latched
seat could cause serious injury.
2
23_WS_OM_EN_USC_t.book Page 35
Page 39 of 396
GETTING TO KNOW YOUR VEHICLE37
SECOND ROW CAPTAIN’S CHAIR EASY ACCESS
FOR THIRD ROW
The second row captain’s chairs can slide forward to allow
passengers to easily access the third row seats.
Press the easy entry button located on the outboard side
of the seatback. Once pressed, the entire seat will pitch
forward, allowing the seat to slide forward.
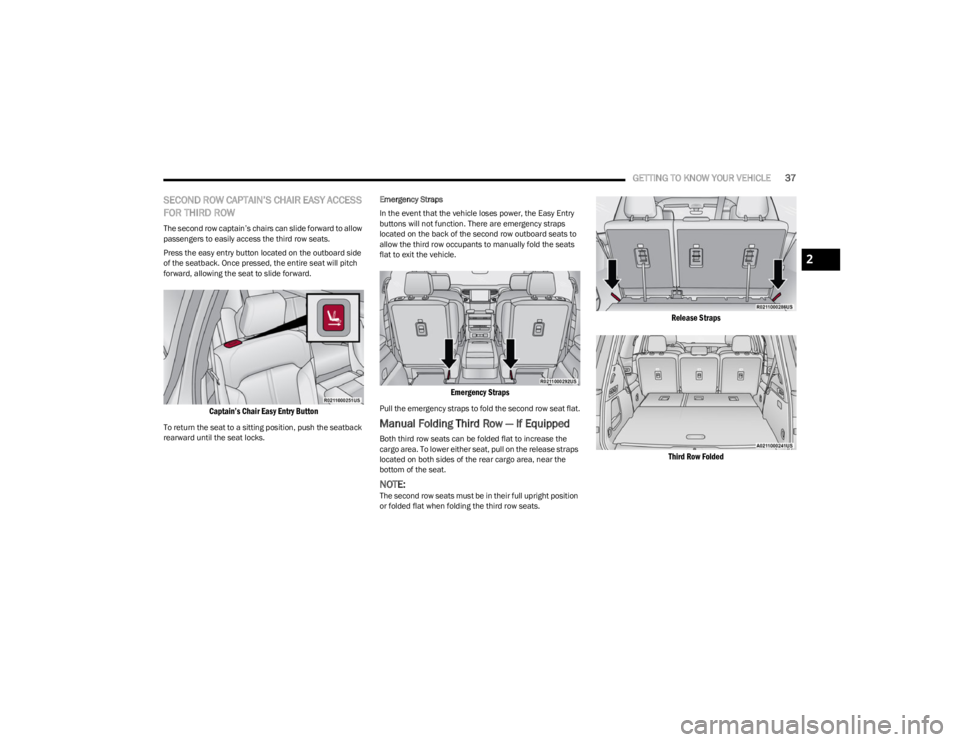
Captain’s Chair Easy Entry Button
To return the seat to a sitting position, push the seatback
rearward until the seat locks. Emergency Straps
In the event that the vehicle loses power, the Easy Entry
buttons will not function. There are emergency straps
located on the back of the second row outboard seats to
allow the third row occupants to manually fold the seats
flat to exit the vehicle.
Emergency Straps
Pull the emergency straps to fold the second row seat flat.
Manual Folding Third Row — If Equipped
Both third row seats can be folded flat to increase the
cargo area. To lower either seat, pull on the release straps
located on both sides of the rear cargo area, near the
bottom of the seat.
NOTE:The second row seats must be in their full upright position
or folded flat when folding the third row seats.
Release Straps
Third Row Folded
2
23_WS_OM_EN_USC_t.book Page 37
Page 45 of 396
GETTING TO KNOW YOUR VEHICLE43
(Continued)
The massage type and intensity level status will be
synchronized between the main Uconnect display and the
Front Comfort and Convenience Display.
The selected settings will save in the system’s memory
when turned off, and will resume the next time the system
is turned on.
NOTE:
For vehicles equipped with a selectable back/cushion
feature for massage seats, the massage feature can
be deselected for either the seatback or seat cushion.
If both options are deselected, massage will turn off.
The engine must be running for the power seatback
massage to operate.
The massage feature will turn off after 20 minutes of
use. However, if the massage type or intensity level is
changed, the timer then resets.
HEATED SEATS — IF EQUIPPED
Front Heated Seats
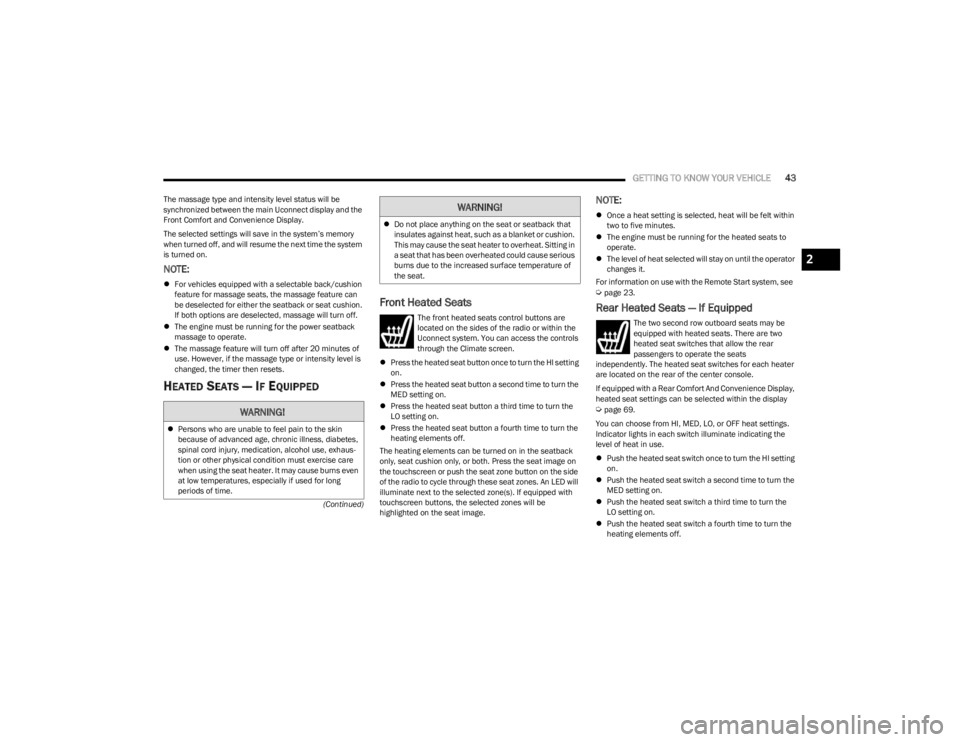
The front heated seats control buttons are
located on the sides of the radio or within the
Uconnect system. You can access the controls
through the Climate screen.
Press the heated seat button once to turn the HI setting
on.
Press the heated seat button a second time to turn the
MED setting on.
Press the heated seat button a third time to turn the
LO setting on.
Press the heated seat button a fourth time to turn the
heating elements off.
The heating elements can be turned on in the seatback
only, seat cushion only, or both. Press the seat image on
the touchscreen or push the seat zone button on the side
of the radio to cycle through these seat zones. An LED will
illuminate next to the selected zone(s). If equipped with
touchscreen buttons, the selected zones will be
highlighted on the seat image.
NOTE:
Once a heat setting is selected, heat will be felt within
two to five minutes.
The engine must be running for the heated seats to
operate.
The level of heat selected will stay on until the operator
changes it.
For information on use with the Remote Start system, see
Úpage 23.
Rear Heated Seats — If Equipped
The two second row outboard seats may be
equipped with heated seats. There are two
heated seat switches that allow the rear
passengers to operate the seats
independently. The heated seat switches for each heater
are located on the rear of the center console.
If equipped with a Rear Comfort And Convenience Display,
heated seat settings can be selected within the display
Úpage 69.
You can choose from HI, MED, LO, or OFF heat settings.
Indicator lights in each switch illuminate indicating the
level of heat in use.
Push the heated seat switch once to turn the HI setting
on.
Push the heated seat switch a second time to turn the
MED setting on.
Push the heated seat switch a third time to turn the
LO setting on.
Push the heated seat switch a fourth time to turn the
heating elements off.WARNING!
Persons who are unable to feel pain to the skin
because of advanced age, chronic illness, diabetes,
spinal cord injury, medication, alcohol use, exhaus -
tion or other physical condition must exercise care
when using the seat heater. It may cause burns even
at low temperatures, especially if used for long
periods of time.
Do not place anything on the seat or seatback that
insulates against heat, such as a blanket or cushion.
This may cause the seat heater to overheat. Sitting in
a seat that has been overheated could cause serious
burns due to the increased surface temperature of
the seat.
WARNING!
2
23_WS_OM_EN_USC_t.book Page 43
Page 46 of 396

44GETTING TO KNOW YOUR VEHICLE
The level of heat selected will stay on until the operator
changes it.
NOTE:The engine must be running for the heated seats to
operate.
VENTILATED SEATS — IF EQUIPPED
Located in the seat cushion and seatback are fans that
draw the air from the passenger compartment and move
air through fine perforations in the seat cover to help keep
the occupant cooler in higher ambient temperatures.
Front Ventilated Seats
The ventilated seats control buttons are
located on the sides of the radio or within the
Uconnect system. The fans operate at three
speeds: HI, MED and LO.
Press the ventilated seat button once to choose HI.
Press the ventilated seat button a second time to
choose MED.
Press the ventilated seat button a third time to choose
LO.
Press the ventilated seat button a fourth time to turn
the ventilation off.
The fans can be turned on in the seatback only, seat
cushion only, or both. Press the seat image on the
touchscreen or push the seat zone button on the side of
the radio to cycle through these seat zones. An LED will
illuminate next to the selected zone(s). If equipped with
touchscreen buttons, the selected zones will be
highlighted on the seat image.
NOTE:The engine must be running for the ventilated seats to
operate.
For information on use with the Remote Start system, see
Úpage 23.
Rear Ventilated Seats — If Equipped
The two second row outboard seats may be
equipped with ventilated seats. The rear
ventilated seat control switches are located on
the rear of the center console and allow the
rear passengers to operate the seats independently.
If equipped with a Rear Comfort And Convenience Display,
ventilated seat settings can be selected within the display
Úpage 69.
You can choose from HI, MED, LO, or OFF fan speed.
Indicator lights in each switch illuminate indicating the
level of fan speed in use.
Push the ventilated seat switch once to choose HI.
Push the ventilated seat switch a second time to
choose MED.
Push the ventilated seat switch a third time to choose
LO.
Push the ventilated seat switch a fourth time to turn
the ventilation off.
NOTE:The engine must be running for the ventilated seats to
operate.
HEAD RESTRAINTS
Head restraints are designed to reduce the risk of injury by
restricting head movement in the event of a rear impact.
Head restraints should be adjusted so that the top of the
head restraint is located above the top of your ear.
Front Head Restraints
Your vehicle is equipped with front four-way driver and
passenger head restraints.
The Wagoneer is equipped with manual four-way head
restraints, and the Grand Wagoneer is equipped with
power four-way head restraints with adjustable wings.
If your vehicle is equipped with manual front head
restraints, to raise the head restraint, push the
adjustment button, located on the left side of the head
restraint, and pull upward on the head restraint. To lower
the head restraint, push the adjustment button, and push
downward on the head restraint.
WARNING!
All occupants, including the driver, should not
operate a vehicle or sit in a vehicle’s seat until the
head restraints are placed in their proper positions in
order to minimize the risk of neck injury in the event
of a crash.
Head restraints should never be adjusted while the
vehicle is in motion. Driving a vehicle with the head
restraints improperly adjusted or removed could
cause serious injury or death in the event of a
collision.
23_WS_OM_EN_USC_t.book Page 44
Page 51 of 396
GETTING TO KNOW YOUR VEHICLE49
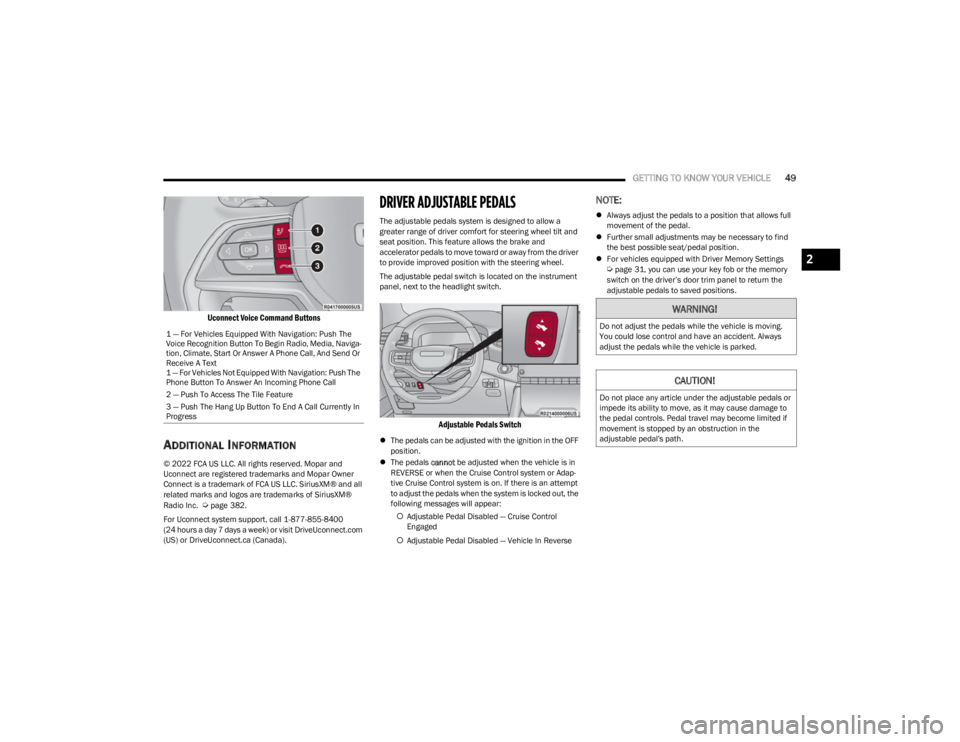
Uconnect Voice Command Buttons
ADDITIONAL INFORMATION
© 2022 FCA US LLC. All rights reserved. Mopar and
Uconnect are registered trademarks and Mopar Owner
Connect is a trademark of FCA US LLC. SiriusXM® and all
related marks and logos are trademarks of SiriusXM®
Radio Inc.
Úpage 382.
For Uconnect system support, call 1-877-855-8400
(24 hours a day 7 days a week) or visit DriveUconnect.com
(US) or DriveUconnect.ca (Canada).
DRIVER ADJUSTABLE PEDALS
The adjustable pedals system is designed to allow a
greater range of driver comfort for steering wheel tilt and
seat position. This feature allows the brake and
accelerator pedals to move toward or away from the driver
to provide improved position with the steering wheel.
The adjustable pedal switch is located on the instrument
panel, next to the headlight switch.
Adjustable Pedals Switch
The pedals can be adjusted with the ignition in the OFF
position.
The pedals cannot be adjusted when the vehicle is in
REVERSE or when the Cruise Control system or Adap -
tive Cruise Control system is on. If there is an attempt
to adjust the pedals when the system is locked out, the
following messages will appear:
Adjustable Pedal Disabled — Cruise Control
Engaged
Adjustable Pedal Disabled — Vehicle In Reverse
NOTE:
Always adjust the pedals to a position that allows full
movement of the pedal.
Further small adjustments may be necessary to find
the best possible seat/pedal position.
For vehicles equipped with Driver Memory Settings
Úpage 31, you can use your key fob or the memory
switch on the driver’s door trim panel to return the
adjustable pedals to saved positions.
1 — For Vehicles Equipped With Navigation: Push The
Voice Recognition Button To Begin Radio, Media, Naviga -
tion, Climate, Start Or Answer A Phone Call, And Send Or
Receive A Text
1 — For Vehicles Not Equipped With Navigation: Push The
Phone Button To Answer An Incoming Phone Call
2 — Push To Access The Tile Feature
3 — Push The Hang Up Button To End A Call Currently In
Progress
WARNING!
Do not adjust the pedals while the vehicle is moving.
You could lose control and have an accident. Always
adjust the pedals while the vehicle is parked.
CAUTION!
Do not place any article under the adjustable pedals or
impede its ability to move, as it may cause damage to
the pedal controls. Pedal travel may become limited if
movement is stopped by an obstruction in the
adjustable pedal's path.
2
23_WS_OM_EN_USC_t.book Page 49
Page 52 of 396
50GETTING TO KNOW YOUR VEHICLE
MIRRORS
INSIDE REARVIEW MIRROR
Automatic Dimming Mirror — If Equipped
The mirror head can be adjusted up, down, left, and right.
The mirror should be adjusted to center on the view
through the rear window.
This mirror automatically adjusts for headlight glare from
vehicles behind you.
NOTE:The Automatic Dimming Mirror feature is disabled when
the vehicle is in REVERSE to improve the driver’s view.
You can turn the feature on or off through the Uconnect
system
Úpage 197.
Automatic Dimming Mirror
Digital Rearview Mirror — If Equipped
The Digital Rearview Mirror provides a high definition,
wide and unobstructed view of the road behind while
driving. Position the mirror in the regular Automatic Dimming
Mirror mode, then activate the Digital Rearview Mirror
mode.
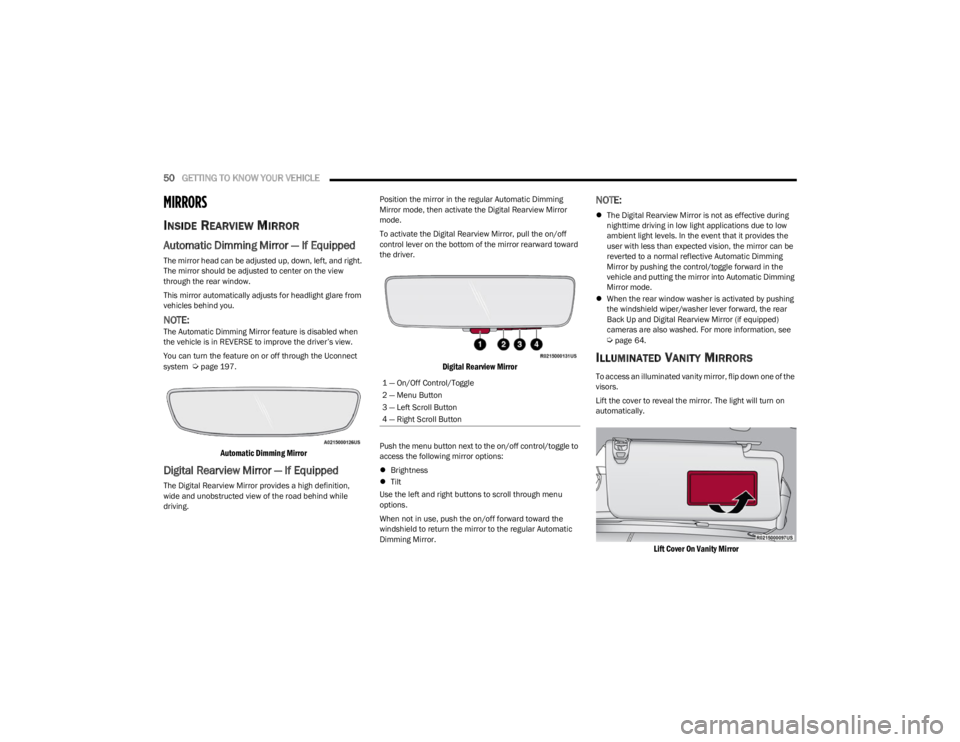
To activate the Digital Rearview Mirror, pull the on/off
control lever on the bottom of the mirror rearward toward
the driver.
Digital Rearview Mirror
Push the menu button next to the on/off control/toggle to
access the following mirror options:
Brightness
Tilt
Use the left and right buttons to scroll through menu
options.
When not in use, push the on/off forward toward the
windshield to return the mirror to the regular Automatic
Dimming Mirror.
NOTE:
The Digital Rearview Mirror is not as effective during
nighttime driving in low light applications due to low
ambient light levels. In the event that it provides the
user with less than expected vision, the mirror can be
reverted to a normal reflective Automatic Dimming
Mirror by pushing the control/toggle forward in the
vehicle and putting the mirror into Automatic Dimming
Mirror mode.
When the rear window washer is activated by pushing
the windshield wiper/washer lever forward, the rear
Back Up and Digital Rearview Mirror (if equipped)
cameras are also washed. For more information, see
Úpage 64.
ILLUMINATED VANITY MIRRORS
To access an illuminated vanity mirror, flip down one of the
visors.
Lift the cover to reveal the mirror. The light will turn on
automatically.
Lift Cover On Vanity Mirror
1 — On/Off Control/Toggle
2 — Menu Button
3 — Left Scroll Button
4 — Right Scroll Button
23_WS_OM_EN_USC_t.book Page 50