warning light JEEP WRANGLER 2004 TJ / 2.G User Guide
[x] Cancel search | Manufacturer: JEEP, Model Year: 2004, Model line: WRANGLER, Model: JEEP WRANGLER 2004 TJ / 2.GPages: 299, PDF Size: 6.82 MB
Page 118 of 299

15. Coolant Temperature Gauge
Indicates engine coolant temperature. The red
zone to the far right indicates possible overheat-
ing. Seek authorized service immediately if the
gauge operates in the red zone. In U.S. vehicles,
temperature is indicated in degrees fahrenheit; in
Canadian vehicles in degrees centigrade.
16. Airbag Warning Light
This indicator lights and remains lit for 6 to
8 seconds when the ignition is first turned
on. If the light does not come on for 6 to 8
seconds, stays on or comes on while driving,
have the airbag system checked by an authorized
dealer.
17. Check Gauges Warning Light
This light monitors the engine coolant tem-
perature, engine oil pressure, and voltage
gauges. If it detects an extreme condition a
chime will sound and the light will come on. If the
light comes on, check the operation of these gauges for
a malfunction condition.18. Malfunction Indicator Light
This light is a part of an Onboard Diagnostic
System called OBD II that monitors engine,
and automatic transmission control systems.
The light will illuminate when the ignition is in the
ON position before engine start. If the bulb does not
come on when turning the key from OFF to ON, have
the condition checked promptly.
Certain conditions such as a loose or missing gas cap,
poor quality fuel, etc. may illuminate the light after
engine start. The vehicle should be serviced if the light
stays on through several typical driving styles. In most
situations, the vehicle will drive normally and will not
require towing.
When the engine is running, the ªMalfunction Indicator
Lightº may flash to alert serious conditions that could
lead to immediate loss of power or severe catalytic
converter damage. The vehicle should be serviced as
soon as possible if this occurs.
118 UNDERSTANDING YOUR INSTRUMENT PANEL
Page 119 of 299

19. Trip Odometer Button
Press and release this button to toggle between the
odometer and trip odometer displays. This button is also
used to reset the trip odometer to 0. While the display is
showing the trip odometer, press and hold the button for
approximately 2 seconds and the display will reset to 0.
20. Odometer/Trip Odometer
The odometer shows the total distance the vehicle has
been driven.
The odometer will ªilluminateº when the driver's door
has been opened, and will remain on for 20 seconds after
exiting the vehicle.
U.S. federal regulations require that upon transfer of
vehicle ownership, the seller certify to the purchaser the
correct mileage that the vehicle has been driven. There-
fore, if the odometer reading is changed during repair or
replacement, be sure to keep a record of the reading
before and after the service so the correct mileage can be
determined.The trip odometer shows individual mileage up to 999.9
miles (1 600 km). To switch from odometer to trip
odometer, press the trip odometer button.
21. Anti-Lock (ABS) Warning Light
After ignition is turned on, illuminates to indi-
cate function check at vehicle start-up. If light
remains on after start-up or comes on and stays on at
road speeds, it may indicate that the ABS has detected
a malfunction or has become inoperative. The system
reverts to standard non-anti-lock brakes.
If both the red BRAKE warning light and the amber ABS
warning light are on, see your dealer immediately. Refer
to ªAnti-Lock Brake Systemº in Section 5 of this manual.
22. Brake Warning Light
After ignition is turned on, illuminates to in-
dicate function check at vehicle start-up. Indi-
cates parking brake is applied. If the light stays
on when the parking brake is off, it indicates a possible
brake system fluid leak or low pressure level,see your
authorized dealer immediately.
UNDERSTANDING YOUR INSTRUMENT PANEL 119
4
Page 120 of 299

If the parking brake is applied and the vehicle is in
motion, the red BRAKE warning light will ªflashº and a
chime will sound.
The operation of the BRAKE warning light can be
checked by turning the ignition switch from the OFF
position to the ON position. The light should illuminate
for approximately two seconds. The light should then
turn off unless the parking brake is applied or a brake
fault is detected. If the light does not illuminate, have the
light inspected by an authorized dealer.
23. Low Fuel Warning Light
When the fuel level reaches approximately 2 U.S.
Gallons (7.6L) this light will come on and remain
on until fuel is added. The ªLow Fuel Warning
Lightº may turn on and off again, especially during
and after hard braking, accelerations, or turns. This
occurs due to the shifting of the fuel in the tank.
24. Fuel Cap Indicator
This symbol indicates the side of the vehicle
where the fuel cap is located.25. Fuel Gauge
The pointer shows the level of fuel in the fuel tank. When
the fuel gauge pointer initially moves to E, for your
safety, approximately 2 U.S. Gallons (7.6L) of fuel remain.
NOTE:When the ignition switch is turned to OFF, the
fuel gauge, voltmeter, oil pressure and temperature
gauges may not show accurate readings. When the
engine is not running, turn the ignition switch to ON to
obtain accurate readings.
ELECTRONIC DIGITAL CLOCK
The clock and radio each use the display panel built into
the radio. A digital readout shows the time in hours and
minutes whenever the ignition switch is in the ON or
ACC position and the time button is pressed.
When the ignition switch is in the OFF position, or when
the radio frequency is being displayed, time keeping is
accurately maintained.
120 UNDERSTANDING YOUR INSTRUMENT PANEL
Page 163 of 299

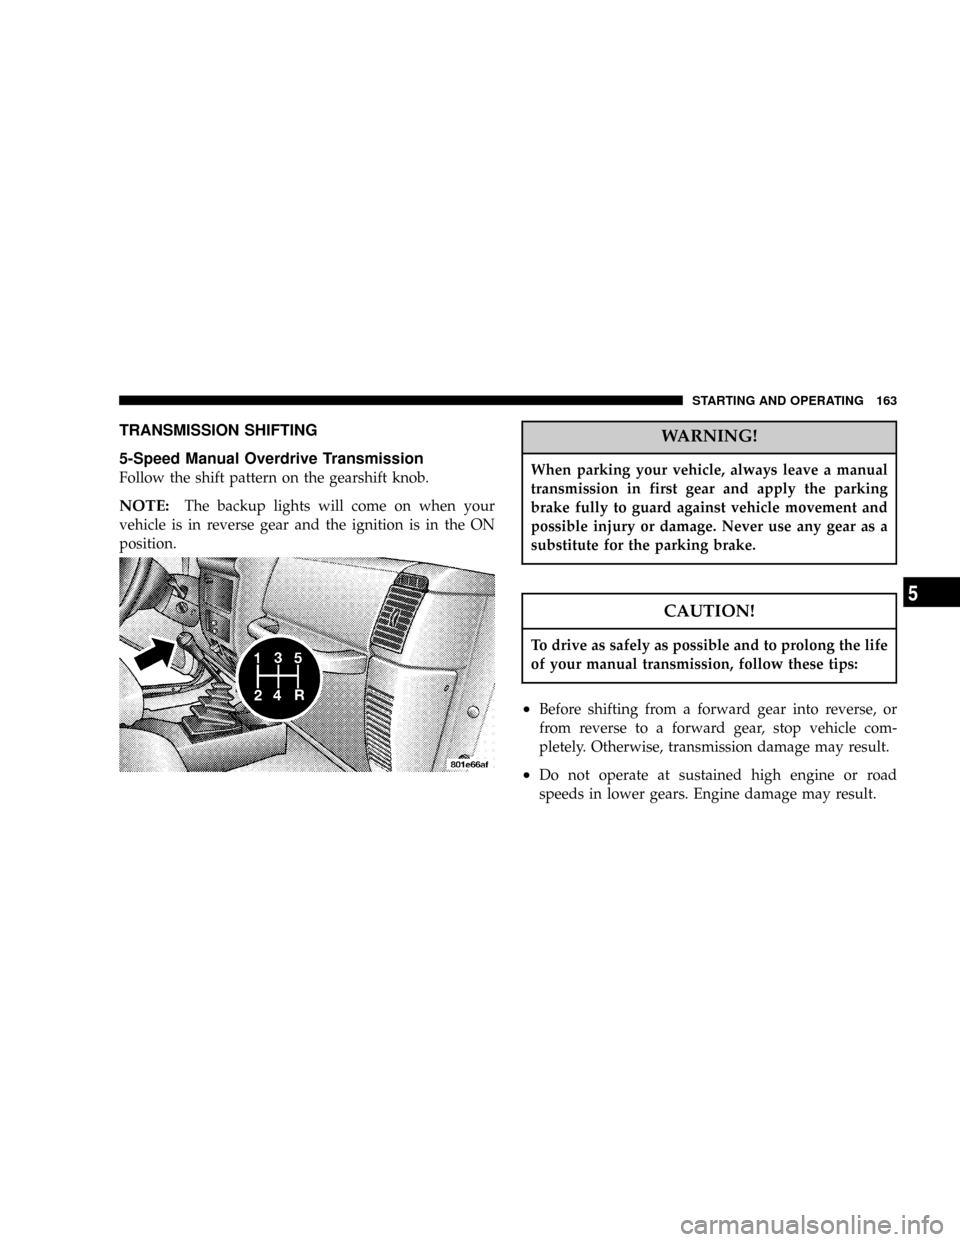
TRANSMISSION SHIFTING
5-Speed Manual Overdrive Transmission
Follow the shift pattern on the gearshift knob.
NOTE:The backup lights will come on when your
vehicle is in reverse gear and the ignition is in the ON
position.
WARNING!
When parking your vehicle, always leave a manual
transmission in first gear and apply the parking
brake fully to guard against vehicle movement and
possible injury or damage. Never use any gear as a
substitute for the parking brake.
CAUTION!
To drive as safely as possible and to prolong the life
of your manual transmission, follow these tips:
²Before shifting from a forward gear into reverse, or
from reverse to a forward gear, stop vehicle com-
pletely. Otherwise, transmission damage may result.
²Do not operate at sustained high engine or road
speeds in lower gears. Engine damage may result.
STARTING AND OPERATING 163
5
Page 168 of 299

WARNING!
Do not coast in N (Neutral) and never turn off the
ignition to coast down a hill. These are unsafe
practices that limit your response to changing traffic
or road conditions. You might lose control of the
vehicle.
Overdrive (O/D)
For most city and highway driving. The transmission
contains an electronically controlled Overdrive, and
will automatically shift from D (Drive) to O/D (Over-
drive) if the following conditions are present:
²
The transmission selector is in D (Drive).
²The O/D OFF switch has not been activated.
²Vehicle speed is above approximately 30 mph (48
km/h).
When frequent transmission shifting occurs while using
Overdrive, such as when operating the vehicle under
heavy load conditions (for example, in hilly terrain,strong head winds, or trailer towing), turning off over-
drive will improve performance and extend transmission
life by reducing excessive shifting and heat buildup.
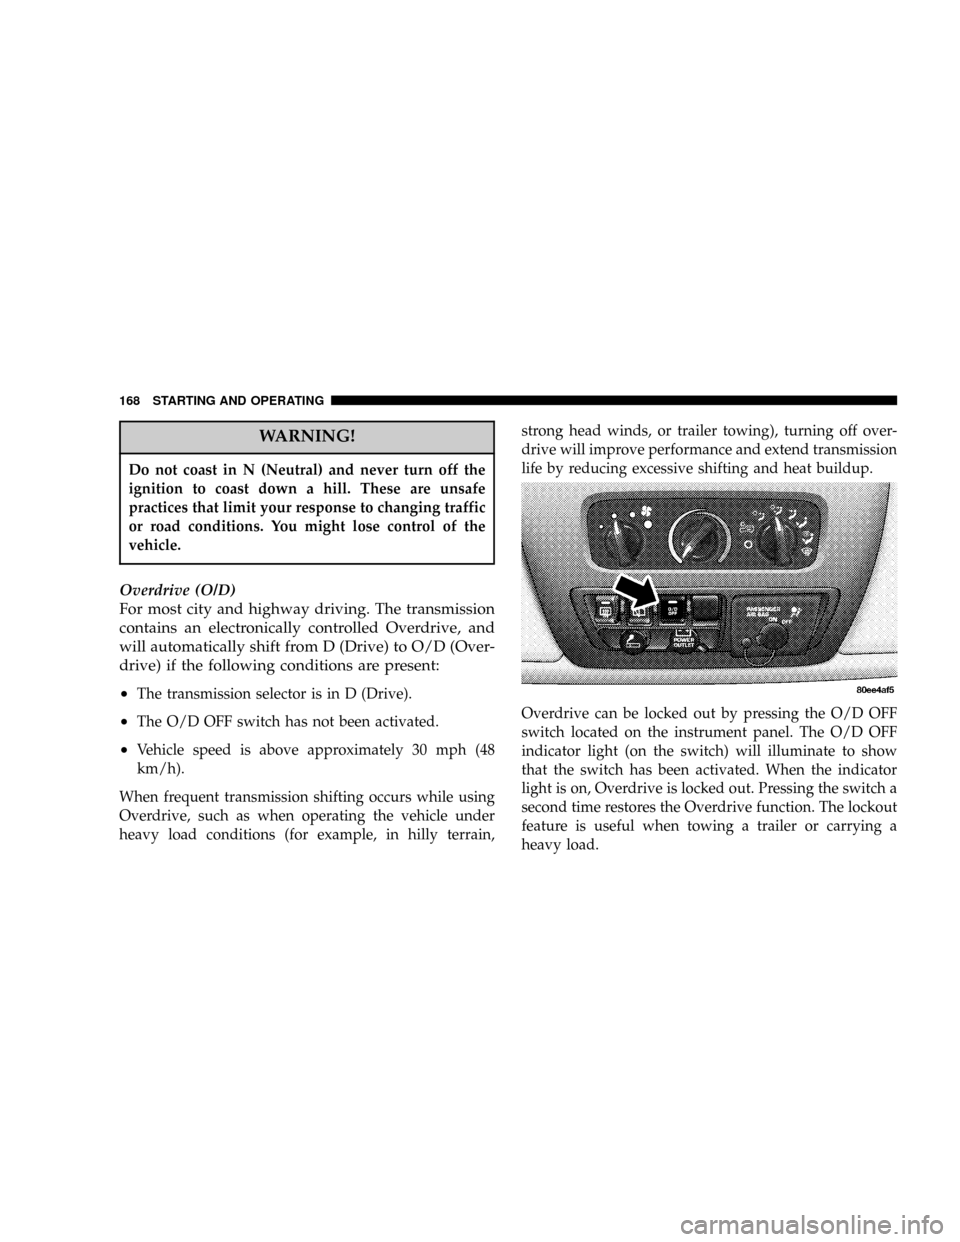
Overdrive can be locked out by pressing the O/D OFF
switch located on the instrument panel. The O/D OFF
indicator light (on the switch) will illuminate to show
that the switch has been activated. When the indicator
light is on, Overdrive is locked out. Pressing the switch a
second time restores the Overdrive function. The lockout
feature is useful when towing a trailer or carrying a
heavy load.
168 STARTING AND OPERATING
Page 173 of 299

NOTE:Shifting into or out of 4L is possible with the
vehicle completely stopped, however, difficulty may oc-
cur due to the mating teeth not being properly aligned.
Several attempts may be required for clutch teeth align-
ment and shift completion to occur. The preferred
method is with the vehicle rolling at 2 to 3 mph (3 to 5
km/h). Avoid attempting to engage or disengage 4L with
the vehicle moving faster than 2 to 3 mph (3 to 5 km/h).
WARNING!
Failure to engage a position completely can cause
transfer case damage or loss of power and vehicle
control. You could have an injury accident. Do not
drive the vehicle unless the transfer case is fully
engaged.
TRAC-LOKŸ REAR AXLE
The Trac-LokŸ rear axle provides a constant driving
force to both rear wheels and reduces wheel spin caused
by the loss of traction at one driving wheel. If traction
differs between the two rear wheels, the differential
automatically proportions the usable torque by providing
more torque to the wheel that has traction.
Trac-LokŸ is especially helpful during slippery driving
conditions. With both rear wheels on a slippery surface, a
slight application of the accelerator will supply maxi-
mum traction. When starting with only one rear wheel on
an excessively slippery surface, slight application of the
parking brake may be necessary to gain maximum trac-
tion.
STARTING AND OPERATING 173
5
Page 174 of 299

WARNING!
On vehicles equipped with a limited-slip differen-
tial, never run the engine with one rear wheel off the
ground. The vehicle may drive through the rear
wheel remaining on the ground and cause you to
lose control of your vehicle.
AXLE LOCK (TRU±LOKŸ) Ð IF EQUIPPED
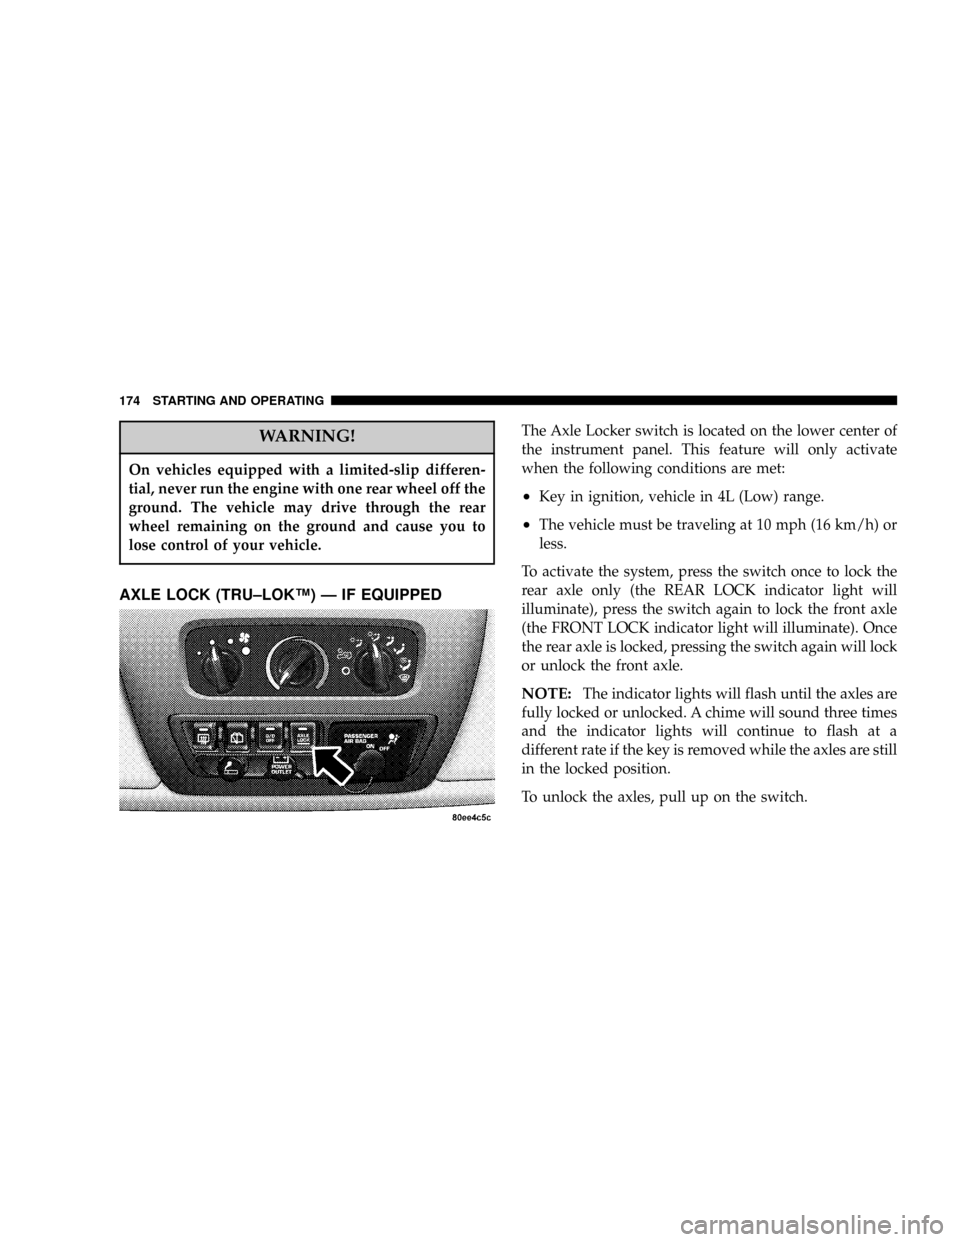
The Axle Locker switch is located on the lower center of
the instrument panel. This feature will only activate
when the following conditions are met:
²Key in ignition, vehicle in 4L (Low) range.
²The vehicle must be traveling at 10 mph (16 km/h) or
less.
To activate the system, press the switch once to lock the
rear axle only (the REAR LOCK indicator light will
illuminate), press the switch again to lock the front axle
(the FRONT LOCK indicator light will illuminate). Once
the rear axle is locked, pressing the switch again will lock
or unlock the front axle.
NOTE:The indicator lights will flash until the axles are
fully locked or unlocked. A chime will sound three times
and the indicator lights will continue to flash at a
different rate if the key is removed while the axles are still
in the locked position.
To unlock the axles, pull up on the switch.
174 STARTING AND OPERATING
Page 175 of 299

PARKING BRAKE
To set the parking brake, pull the lever up as firmly as
possible. When the parking brake is applied with the
ignition ON, the BRAKE warning light in the instrument
cluster will light.
NOTE:The BRAKE warning light indicates only that
the parking brake is applied. It does not indicate the
degree of brake application.
NOTE:If the parking brake is applied and the vehicle is
in motion, the BRAKE warning light will flash and a
chime will sound.
Before leaving the vehicle parked on a hill, you must
make sure the parking brake is fully applied and place
the gear selector in the P (Park) position (automatic
transmission) or first gear (manual transmission). Make
certain the transfer case is in gear. Failure to do so may
cause the vehicle to roll and cause damage or injury.
STARTING AND OPERATING 175
5
Page 176 of 299

WARNING!
²Always fully apply the parking brake when leav-
ing your vehicle, or vehicle may roll and cause
damage or injury. Also be certain to leave a
automatic transmission in P (Park), or a manual
transmission in 1st gear. Make certain the transfer
case is in gear. Failure to do so may cause the
vehicle to roll and cause damage or injury.
²If the parking brake is released, and the BRAKE
warning light glows while the ignition switch is
ON or the engine is running, there may be a brake
system problem. Brake pedal travel, effort and
stopping distances may increase, and you should
obtain corrective service immediately.
When parking on a hill, it is important to set the parking
brake before placing the gear selector in P (Park), other-
wise the load on the transmission locking mechanism
may make it difficult to move the selector out of P (Park).
The parking brake should always be applied when the
driver is not in the vehicle.
WARNING!
²Leaving children unattended in a vehicle is dan-
gerous for a number of reasons. A child or others
could be injured. Children should be warned not
to touch the parking brake or the gear selector
lever. Don't leave the keys in the ignition. A child
could operate controls or move the vehicle.
To release the parking brake, pull up slightly, press center
button, then lower lever completely.
176 STARTING AND OPERATING
Page 177 of 299

If the parking brake is not completely released, the
BRAKE warning light will remain on.
NOTE:Your vehicle has automatically adjusting rear
brakes and we do not recommend any adjustment other
than the maintenance performed by your authorized
dealer.
ABOUT YOUR BRAKES
Your vehicle is equipped with power assisted brakes as
standard equipment. In the event power assist is lost for
any reason (for example, repeated brake applications
with the engine off), the brakes will still function. The
effort required to brake the vehicle will be much greater
than that required with the power system operating.
WARNING!
Riding the brakes can lead to brake failure and
possibly an accident. Driving with your foot resting
or riding on the brake pedal can result in abnormally
high brake temperatures, excessive lining wear, and
possible brake damage. You wouldn't have your full
braking capacity in an emergency.
If either of two hydraulic systems lose normal capability,
the remaining system will still function with some loss of
overall braking effectiveness. This will be evident by
increased pedal travel during application and greater
pedal force required to slow or stop.
STARTING AND OPERATING 177
5