ECO mode JEEP WRANGLER 2010 JK / 3.G User Guide
[x] Cancel search | Manufacturer: JEEP, Model Year: 2010, Model line: WRANGLER, Model: JEEP WRANGLER 2010 JK / 3.GPages: 72, PDF Size: 16.2 MB
Page 32 of 72
Auxiliary Mode
• The auxiliary (AUX) jack allows a portable device, such as an MP3 player or a cassetteplayer, to be plugged into the radio and utilize the vehicle’s audio system to amplify the
source and play through the vehicle speakers.
• Pressing the AUX button will change the mode to auxiliary device if the AUX jack is connected.
• The control of the external device cannot be provided by the radio; use the device controls instead.
Clock Setting
• Press and hold the TIME button until the hours blink; turn the TUNE/SCROLL controlknob to set the hours.
• Press the TUNE/SCROLL control knob until the minutes begin to blink; turn the TUNE/SCROLL control knob to set the minutes.
• Press the TUNE/SCROLL control knob to save the time change.
• To exit, press any button/knob or wait five seconds.
Station Presets
• Press the SET/RND button once and SET 1 will show in the display. Then select the button (1–6).
• A second station may be added to each push button. Press the SET/RND button twice and SET 2 will show in the display, then select button (1–6).
How To Load Multiple CDs/DVDs
REQ Radio Only
• Press the LOAD button and then press the button with the corresponding number (1–6)where the CD is being loaded. The radio will display PLEASE WAIT and prompt when to
INSERT DISC.
• After the radio displays INSERT DISC, insert the CD into the player. The radio display will show LOADING DISC when the disc is loading and “READING DISC” when the radio is
reading the disc.
• Press the eject button and then the corresponding number (1–6) to eject the desired disc.
ELECTRONICS
30
Page 39 of 72
COMMAND-TRAC™/
ROCK-TRAC™
• The transfer case provides four modepositions: 2H (Two-wheel drive high
range), 4H (Four-wheel drive high
range), N (Neutral), and 4L (Four-wheel
drive low range).
• The transfer case is intended to be driven in the 2H position for normal
street and highway conditions such as
hard-surfaced roads.
• Shifting between 2H and 4H can be made with the vehicle stopped or in
motion. Shift the transfer case lever
firmly to 4H at any speed up to 50 mph
(80 km/h).
• Shifting between 4H and 4L can be made with the vehicle rolling at 2 to
3 mph (3 to 5 km/h), shift the automatic
transmission in NEUTRAL or fully
depress the clutch pedal on a manual
transmission. Shift the transfer case
lever firmly to 4L (do not pause with the
transfer case in NEUTRAL).
NOTE: To enhance off-road
performance in 4L mode, manual
transmission vehicles will start
regardless of whether or not the clutch
pedal is depressed.
AXLE LOCK (TRU-LOK™)
RUBICON ONLY
• The AXLE LOCK switch is located on the lower switch bank below the
climate controls.
• This feature will only activate when the following conditions are met:
• Key in ignition, vehicle in 4L (Low) range.
• Vehicle speed at 10 mph (16 km/h) or less. • Press the bottom of the AXLE LOCK
switch once to lock the rear axle only
and a second time to lock the front axle
(the rear and front axle lock indicator
lights will illuminate).
• To unlock the axles, press the top of the AXLE LOCK switch.
• The indicator light will flash until the axles are fully locked or unlocked.
ELECTRONIC SWAY BAR
DISCONNECT – IF
EQUIPPED
Off-Road
• Press the SWAY BAR switch, located onthe lower switch bank, once to
disconnect the Sway Bar.
• The Sway Bar indicator light will illuminate in the instrument cluster.
On-Road
• Press the SWAY BAR switch a secondtime to reconnect the Sway Bar.
• The Sway Bar should remain in on-road mode during normal driving
conditions.
37
OFF-ROAD CAPABILITIES
Page 43 of 72
24 HOUR TOWING ASSISTANCE - U.S. ONLY
• Dial toll-free 1-800-521-2779.
• Provide your name, vehicle identification number and license plate number.
• Provide your location, including telephone number, from which you are calling.
• Briefly describe the nature of the problem and answer a few simple questions.
• You will be given the name of the service provider and an estimated time of arrival. If youfeel you are in an “unsafe situation”, please let us know. With your consent, we will
contact local police or safety authorities.
INSTRUMENT CLUSTER WARNING LIGHTS
- Electronic Stability Control (ESC) Malfunction Indicator Light
• If the “ESC Malfunction Indicator Light” comes on continuously with the engine running, amalfunction has been detected in the ESC system. If this light remains on after several
ignition cycles, and the vehicle has been driven several miles (kilometers) at speeds
greater than 30 mph (48 km/h), we recommend you drive to the nearest service center as
soon as possible to have the problem diagnosed and corrected.
• The “ESC Malfunction Indicator Light” starts to flash as soon as the tires lose traction and the ESC system becomes active. If the light begins to flash during acceleration, ease up
on the accelerator and apply as little throttle as possible. Be sure to adapt your speed
and driving to the prevailing road conditions. The light also flashes when TCS is active. To
improve the vehicle's traction when starting off in deep snow, sand or gravel, it may be
desirable to switch the ESC system to Partial Off mode by momentarily pressing the ESC
Off
switch.
- Tire Pressure Monitoring System (TPMS) Light
• A Tire Pressure Monitoring Light and a “low tire” message will display in your instrumentcluster along with an audible chime if one or more of your vehicle’s four road tires are
significantly under-inflated.
• Check the inflation pressure of each tire and inflate to the recommended pressure for your vehicle. The tire pressures recommended for your vehicle are found on the “Tire and
Loading Information” label located on the driver’s side door opening. The TPMS light
should not be used as a tire pressure gauge when adjusting your tire pressure.
• It is recommended that you check the tire pressure in the morning when tires are cool; inflate each tire to the recommended pressure for your vehicle. The light will turn off
after your vehicle’s tire pressures are properly inflated and the pressure has been
recognized. The vehicle may need to be driven for up to 20 minutes above 15 mph
(25 km/h) before the light will turn off.
• Temperature changes can affect tire pressure, causing the TPMS light to turn on. Tire pressures will also increase as the vehicle is driven – this is normal and you should not
adjust for this increased pressure.
• Driving on under-inflated tires reduces your vehicle’s fuel efficiency and tire tread life. If a spare tire is in use on the vehicle, the TPMS light may turn on.
41
WHAT TO DO IN EMERGENCIES
Page 46 of 72
Fuel Cap/Loose Gas Cap Message
• If a “gas cap” message (shown as gASCAP) appears, tighten the gas cap until a “clicking”sound is heard.
• Press the odometer reset button to turn the message off.
• If the message continues to appear for more than three days after tightening the gas cap, see your authorized dealer.
Oil Change Indicator
Message
• If an “oil change” message (shown as CHAngE OIL) appears and a single chime sounds,it is time for your next required oil change.
Resetting The Light After Servicing
• Turn the ignition switch to the ON/RUN position (do not start engine).
• Fully depress the accelerator pedal three times within 10 seconds.
• Turn the ignition switch to the OFF/LOCK position.
IF YOUR ENGINE OVERHEATS
• In any of the following situations, you can reduce the potential for overheating by takingthe appropriate action.
• On the highways — slow down.
• In city traffic — while stopped, shift transmission into NEUTRAL, but do not increase engine idle speed.
NOTE: There are steps that you can take to slow down an impending overheat condition:
• If your air conditioner (A/C) is on, turn it off. The A/C system adds heat to the engine cooling system and turning the A/C off can help remove this heat.
• You can also turn the Temperature Control to maximum heat, the Mode Control to floor and the Fan Control to high. This allows the heater core to act as a supplement to the
radiator and aids in removing heat from the engine cooling system.
• If the temperature reading does not return to normal, turn the engine off immediately.
• We recommend that you do not operate the vehicle or engine damage will occur. Have the vehicle serviced immediately.
CAUTION!
Driving with a hot cooling system could damage your vehicle. If the temperature
gauge reads HOT (H), pull over and stop the vehicle. Idle the vehicle with the air
conditioner turned off until the pointer drops back into the normal range. If the
pointer remains on HOT (H), and you hear continuous chimes, turn the engine off
immediately and call for service.
WHAT TO DO IN EMERGENCIES
44
Page 57 of 72
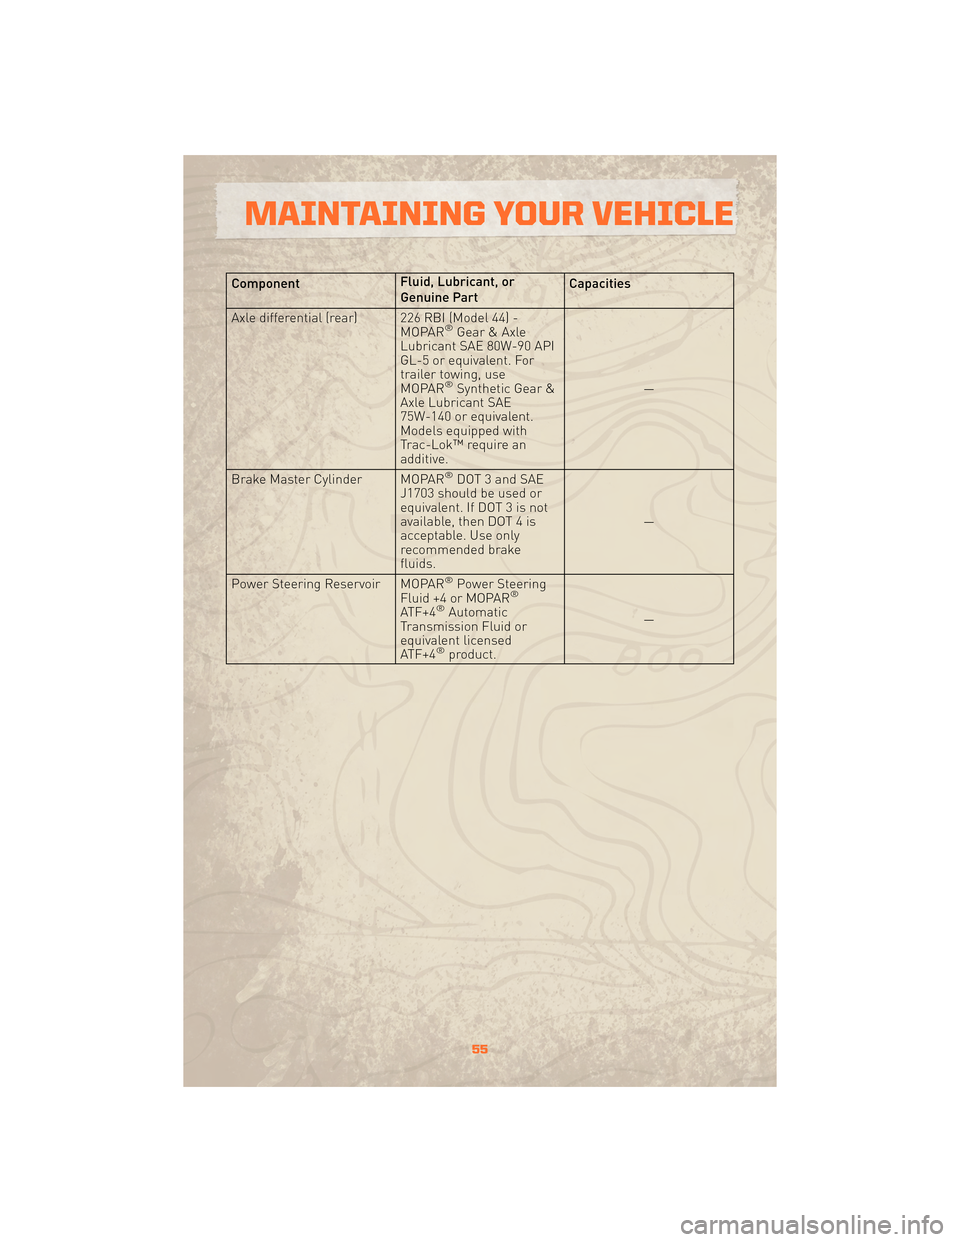
ComponentFluid, Lubricant, or
Genuine PartCapacities
Axle differential (rear) 226 RBI (Model 44) - MOPAR
®Gear & Axle
Lubricant SAE 80W-90 API
GL-5 or equivalent. For
trailer towing, use
MOPAR
®Synthetic Gear &
Axle Lubricant SAE
75W-140 or equivalent.
Models equipped with
Trac-Lok™ require an
additive. —
Brake Master Cylinder MOPAR
®DOT 3 and SAE
J1703 should be used or
equivalent. If DOT 3 is not
available, then DOT 4 is
acceptable. Use only
recommended brake
fluids. —
Power Steering Reservoir MOPAR
®Power Steering
Fluid +4 or MOPAR®
ATF+4®Automatic
Transmission Fluid or
equivalent licensed
ATF+4
®product. —
55
MAINTAINING YOUR VEHICLE
Page 65 of 72
CHRYSLER GROUP LLC
CUSTOMER CENTER
P.O. Box 21–8004
Auburn Hills, MI 48321–8004
Phone: 1–800–992–1997
CHRYSLER CANADA INC.
CUSTOMER CENTER
P.O. Box 1621
Windsor, Ontario N9A 4H6
Phone: 1–800–465–2001
ASSISTANCE FOR THE
HEARING IMPAIRED
• To assist customers who have hearingdifficulties, the manufacturer has
installed special TDD
(Telecommunication Devices for the
Deaf) equipment at its customer center.
Any hearing or speech impaired
customer, who has access to a TDD or
a conventional teletypewriter (TTY) in
the United States, can communicate
with the manufacturer by dialing
1–800–380–CHRY. Canadian residents
with hearing difficulties that require
assistance can use the special needs
relay service offered by Bell Canada.
For TTY teletypewriter users, dial 711
and for Voice callers, dial
1–800–855–0511 to connect with a Bell
Relay Service operator.
WARNING!
Engine exhaust, some of its
constituents, and certain vehicle
components contain, or emit,
chemicals known to the State of
California to cause cancer and birth
defects, or other reproductive harm.
In addition, certain fluids contained
in vehicles and certain products of
component wear contain, or emit,
chemicals known to the State of
California to cause cancer and birth
defects, or other reproductive harm.
PUBLICATIONS
ORDERING
• If you are the first registered retailowner of your vehicle, you may obtain a
free printed copy of the Owner's
Manual, Warranty Booklet or Radio
Manuals on your DVD by calling
1–800–992–1997 (U.S.) or
1–800–387–1143 (Canada) or by
contacting your dealer.
• Replacement User Guides or DVDs or, if you prefer, a printed copy of the
Owner's Manual, Warranty Booklet or
Radio Manuals may be purchased by
visiting www.techauthority.com or by
calling 1–800–890–4038 (U.S.) or
1–800–387–1143 (Canada). Visa, Master
Card, American Express and Discover
orders are accepted. If you prefer
mailing your order, please call the
above numbers for an order form.
NOTE: A street address is required
when ordering manuals (no P.O. Boxes).
NOTE:
• The Owner's Manual and User Guide electronic files are also available on the
Chrysler, Jeep and Dodge websites.
• Click on the "For Owners" tab, select "Owner/Service Manuals", then select
your desired model year and vehicle
from the drop down lists.
63
CONSUMER ASSISTANCE