transmission JEEP WRANGLER 2010 JK / 3.G User Guide
[x] Cancel search | Manufacturer: JEEP, Model Year: 2010, Model line: WRANGLER, Model: JEEP WRANGLER 2010 JK / 3.GPages: 72, PDF Size: 16.2 MB
Page 3 of 72
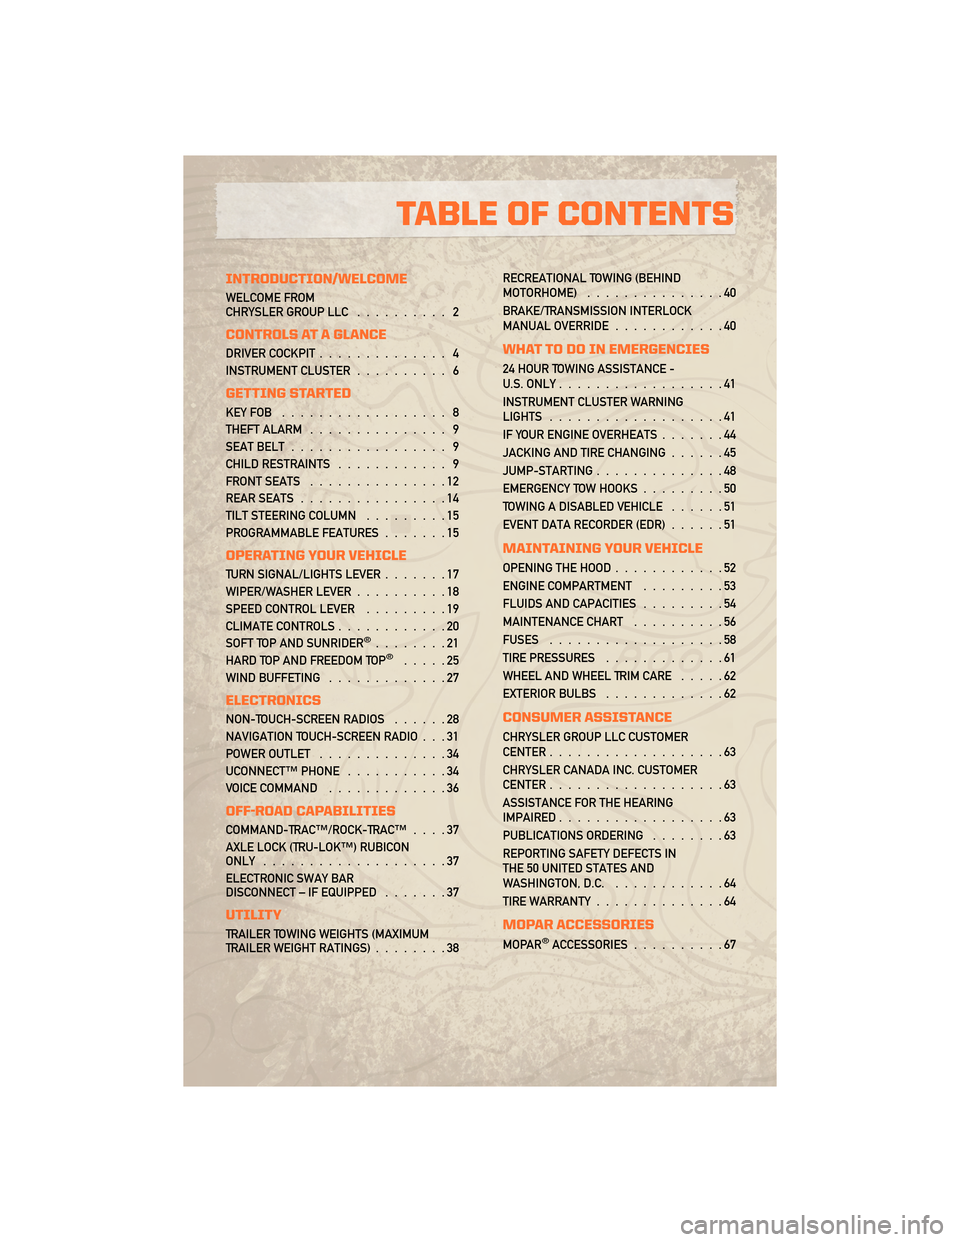
INTRODUCTION/WELCOME
WELCOME FROM
CHRYSLER GROUP LLC.......... 2
CONTROLS AT A GLANCE
DRIVER COCKPIT.............. 4
INSTRUMENT CLUSTER .......... 6
GETTING STARTED
KEYFOB .................. 8
THEFT ALARM............... 9
SEAT BELT ................. 9
CHILD RESTRAINTS ............ 9
FRONT SEATS ...............12
REAR SEATS ................14
TILT STEERING COLUMN .........15
PROGRAMMABLE FEATURES .......15
OPERATING YOUR VEHICLE
TURN SIGNAL/LIGHTS LEVER .......17
WIPER/WASHER LEVER ..........18
SPEED CONTROL LEVER .........19
CLIMATE CONTROLS ............20
SOFT TOP AND SUNRIDER
®........21
HARD TOP AND FREEDOM TOP®.....25
WIND BUFFETING .............27
ELECTRONICS
NON-TOUCH-SCREEN RADIOS ......28
NAVIGATION TOUCH-SCREEN RADIO . . . 31
POWER OUTLET ..............34
UCONNECT™ PHONE ...........34
VOICE COMMAND .............36
OFF-ROAD CAPABILITIES
COMMAND-TRAC™/ROCK-TRAC™ ....37
AXLE LOCK (TRU-LOK™) RUBICON
ONLY ....................37
ELECTRONIC SWAY BAR
DISCONNECT – IF EQUIPPED .......37
UTILITY
TRAILER TOWING WEIGHTS (MAXIMUM
TRAILER WEIGHT RATINGS)........38RECREATIONAL TOWING (BEHIND
MOTORHOME)
...............40
BRAKE/TRANSMISSION INTERLOCK
MANUAL OVERRIDE ............40
WHAT TO DO IN EMERGENCIES
24 HOUR TOWING ASSISTANCE -
U.S. ONLY..................41
INSTRUMENT CLUSTER WARNING
LIGHTS ...................41
IF YOUR ENGINE OVERHEATS .......44
JACKING AND TIRE CHANGING ......45
JUMP-STARTING ..............48
EMERGENCY TOW HOOKS .........50
TOWING A DISABLED VEHICLE ......51
EVENT DATA RECORDER (EDR) ......51
MAINTAINING YOUR VEHICLE
OPENING THE HOOD............52
ENGINE COMPARTMENT .........53
FLUIDS AND CAPACITIES .........54
MAINTENANCE CHART ..........56
FUSES ...................58
TIRE PRESSURES .............61
WHEEL AND WHEEL TRIM CARE .....62
EXTERIOR BULBS .............62
CONSUMER ASSISTANCE
CHRYSLER GROUP LLC CUSTOMER
CENTER...................63
CHRYSLER CANADA INC. CUSTOMER
CENTER ...................63
ASSISTANCE FOR THE HEARING
IMPAIRED ..................63
PUBLICATIONS ORDERING ........63
REPORTING SAFETY DEFECTS IN
THE 50 UNITED STATES AND
WASHINGTON, D.C. ............64
TIRE WARRANTY ..............64
MOPAR ACCESSORIES
MOPAR®ACCESSORIES..........67
TABLE OF CONTENTS
Page 9 of 72
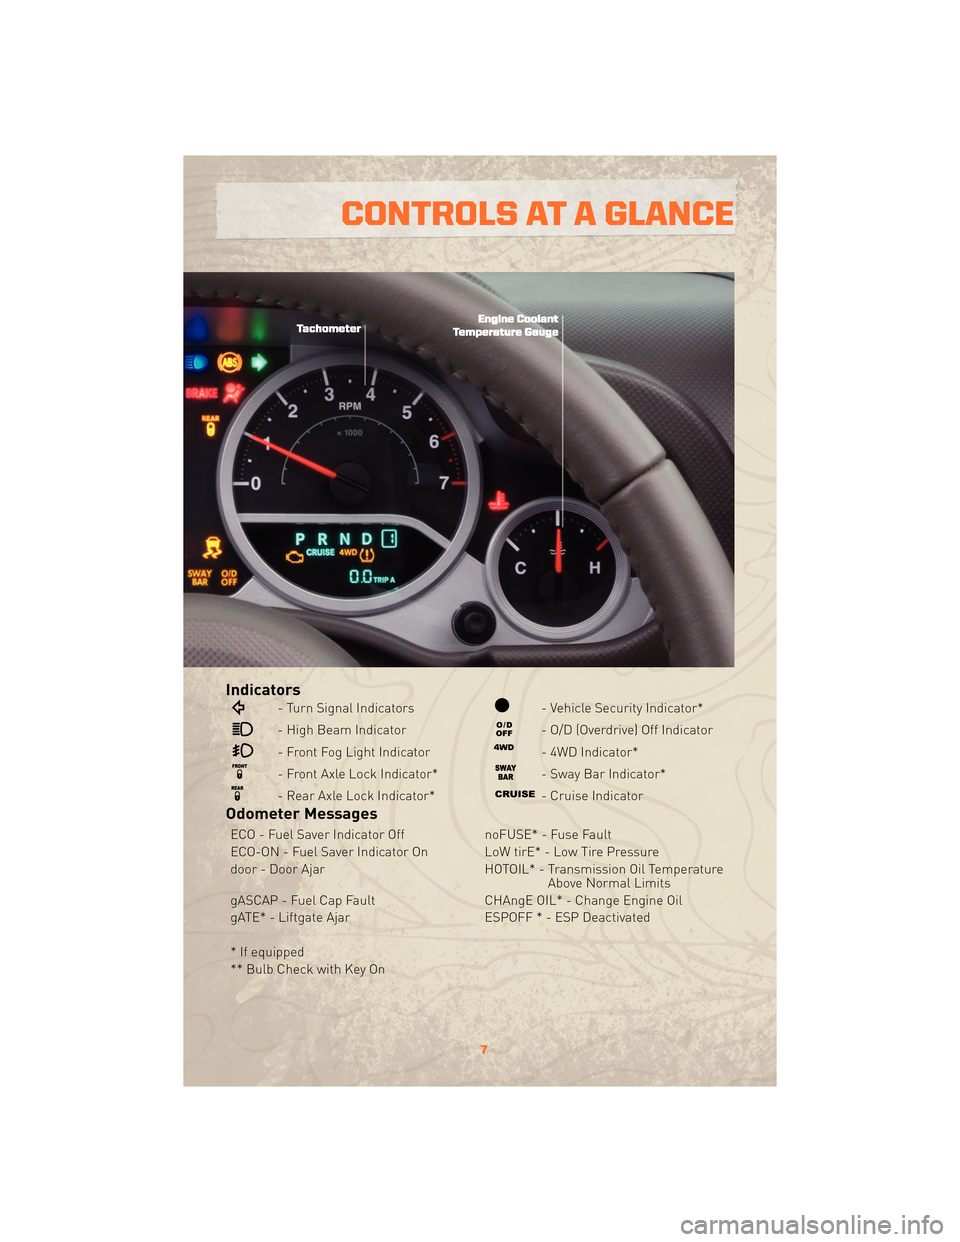
Indicators
- Turn Signal Indicators
- High Beam Indicator
- Front Fog Light Indicator
- Front Axle Lock Indicator*
- Rear Axle Lock Indicator*
- Vehicle Security Indicator*
- O/D (Overdrive) Off Indicator
- 4WD Indicator*
- Sway Bar Indicator*
- Cruise Indicator
Odometer Messages
ECO - Fuel Saver Indicator OffnoFUSE* - Fuse Fault
ECO-ON - Fuel Saver Indicator On LoW tirE* - Low Tire Pressure
door - Door Ajar HOTOIL* - Transmission Oil Temperature
Above Normal Limits
gASCAP - Fuel Cap Fault CHAngE OIL* - Change Engine Oil
gATE* - Liftgate Ajar ESPOFF * - ESP Deactivated
* If equipped
** Bulb Check with Key On
7
CONTROLS AT A GLANCE
Page 39 of 72
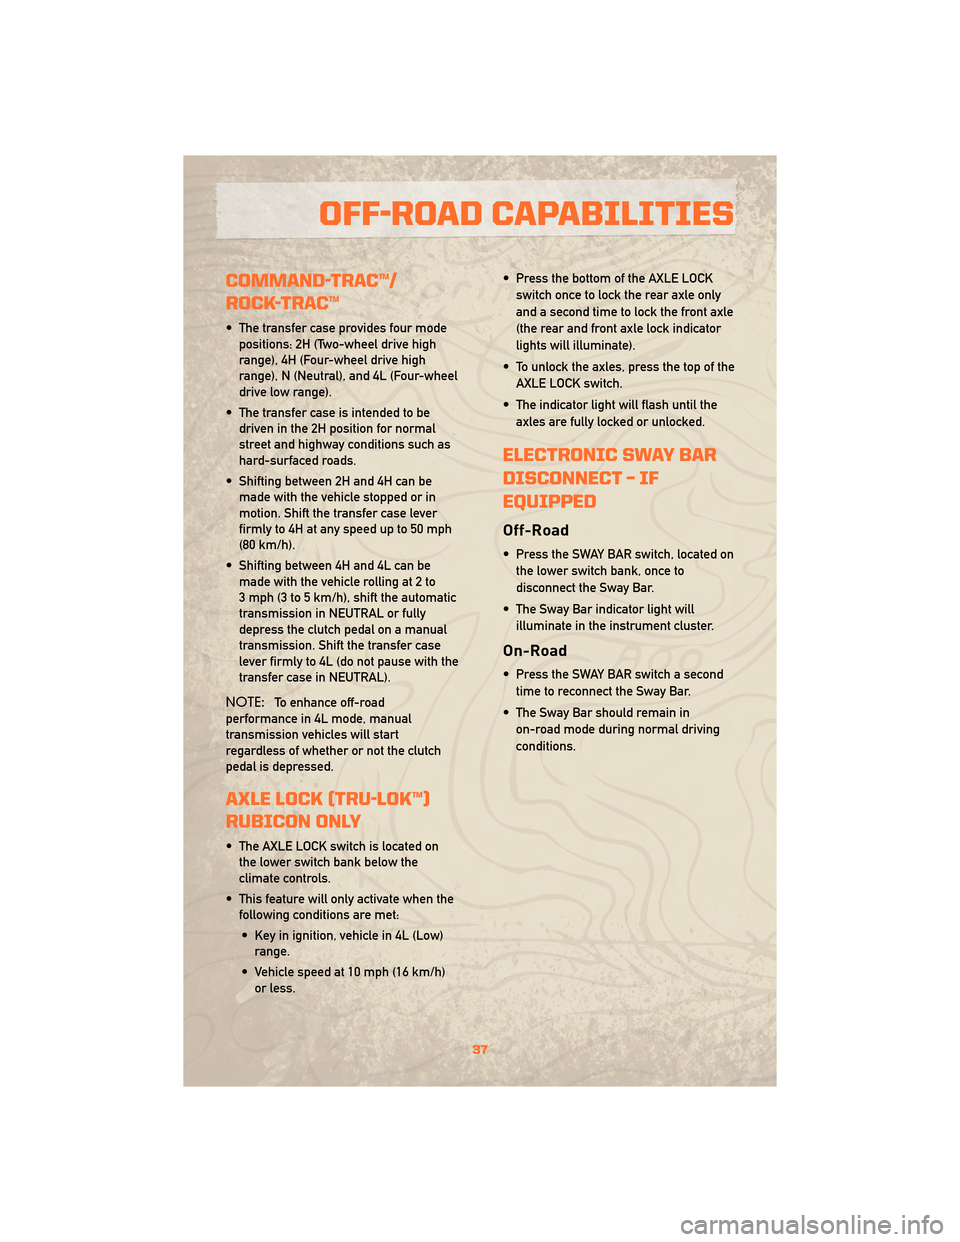
COMMAND-TRAC™/
ROCK-TRAC™
• The transfer case provides four modepositions: 2H (Two-wheel drive high
range), 4H (Four-wheel drive high
range), N (Neutral), and 4L (Four-wheel
drive low range).
• The transfer case is intended to be driven in the 2H position for normal
street and highway conditions such as
hard-surfaced roads.
• Shifting between 2H and 4H can be made with the vehicle stopped or in
motion. Shift the transfer case lever
firmly to 4H at any speed up to 50 mph
(80 km/h).
• Shifting between 4H and 4L can be made with the vehicle rolling at 2 to
3 mph (3 to 5 km/h), shift the automatic
transmission in NEUTRAL or fully
depress the clutch pedal on a manual
transmission. Shift the transfer case
lever firmly to 4L (do not pause with the
transfer case in NEUTRAL).
NOTE: To enhance off-road
performance in 4L mode, manual
transmission vehicles will start
regardless of whether or not the clutch
pedal is depressed.
AXLE LOCK (TRU-LOK™)
RUBICON ONLY
• The AXLE LOCK switch is located on the lower switch bank below the
climate controls.
• This feature will only activate when the following conditions are met:
• Key in ignition, vehicle in 4L (Low) range.
• Vehicle speed at 10 mph (16 km/h) or less. • Press the bottom of the AXLE LOCK
switch once to lock the rear axle only
and a second time to lock the front axle
(the rear and front axle lock indicator
lights will illuminate).
• To unlock the axles, press the top of the AXLE LOCK switch.
• The indicator light will flash until the axles are fully locked or unlocked.
ELECTRONIC SWAY BAR
DISCONNECT – IF
EQUIPPED
Off-Road
• Press the SWAY BAR switch, located onthe lower switch bank, once to
disconnect the Sway Bar.
• The Sway Bar indicator light will illuminate in the instrument cluster.
On-Road
• Press the SWAY BAR switch a secondtime to reconnect the Sway Bar.
• The Sway Bar should remain in on-road mode during normal driving
conditions.
37
OFF-ROAD CAPABILITIES
Page 40 of 72
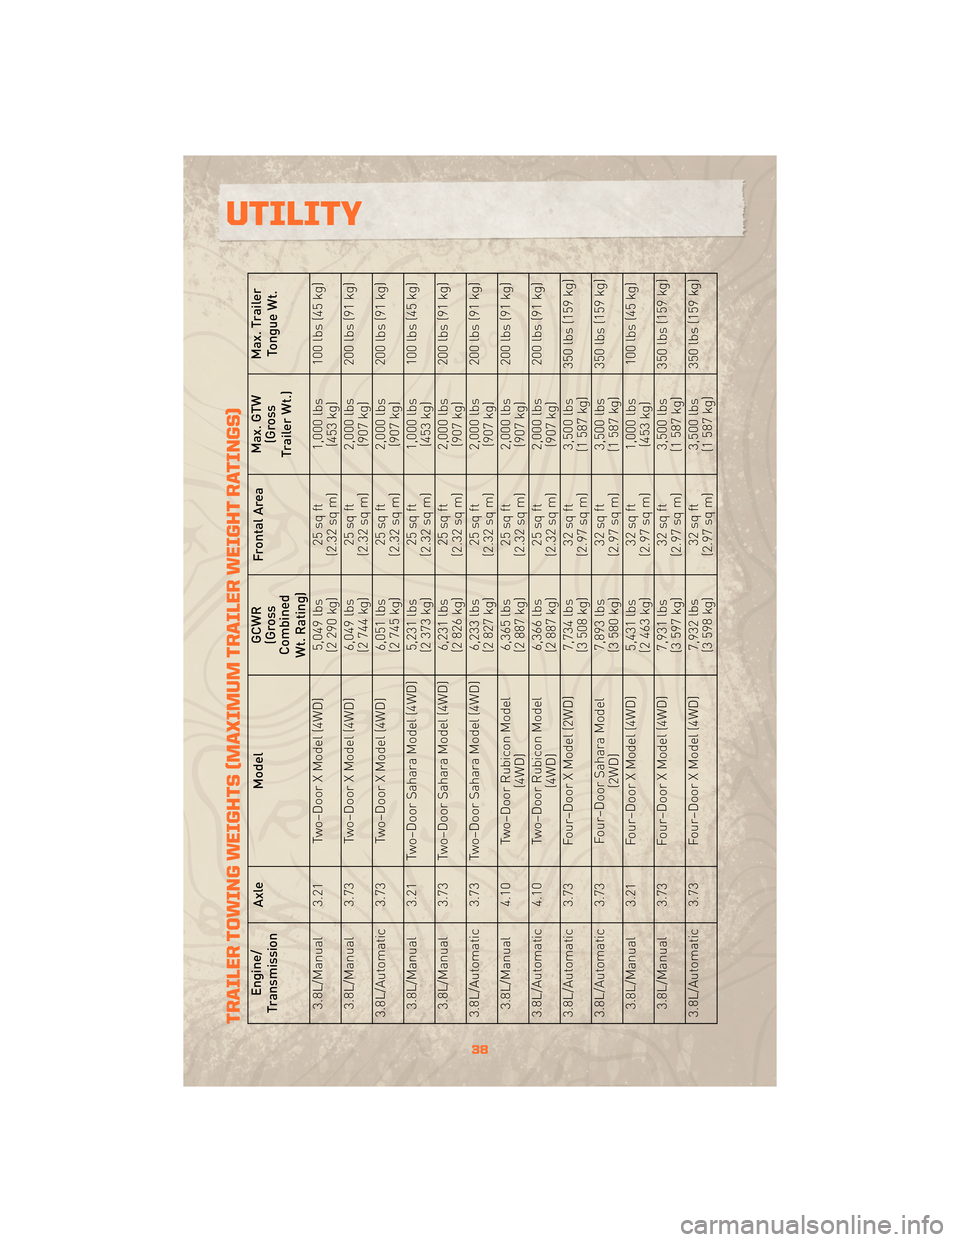
TRAILER TOWING WEIGHTS (MAXIMUM TRAILER WEIGHT RATINGS)
Engine/
Transmission Axle
Model GCWR
(Gross
Combined
Wt. Rating) Frontal Area
Max. GTW
(Gross
Trailer Wt.) Max. Trailer
Tongue Wt.
3.8L/Manual 3.21 Two–Door X Model (4WD) 5,049 lbs (2 290 kg)25 sq ft
(2.32 sq m) 1,000 lbs
(453 kg) 100 lbs (45 kg)
3.8L/Manual 3.73 Two–Door X Model (4WD) 6,049 lbs (2 744 kg)25 sq ft
(2.32 sq m) 2,000 lbs
(907 kg) 200 lbs (91 kg)
3.8L/Automatic 3.73 Two–Door X Model (4WD) 6,051 lbs (2 745 kg)25 sq ft
(2.32 sq m) 2,000 lbs
(907 kg) 200 lbs (91 kg)
3.8L/Manual 3.21 Two–Door Sahara Model (4WD) 5,231 lbs (2 373 kg)25 sq ft
(2.32 sq m) 1,000 lbs
(453 kg) 100 lbs (45 kg)
3.8L/Manual 3.73 Two–Door Sahara Model (4WD) 6,231 lbs (2 826 kg)25 sq ft
(2.32 sq m) 2,000 lbs
(907 kg) 200 lbs (91 kg)
3.8L/Automatic 3.73 Two–Door Sahara Model (4WD) 6,233 lbs (2 827 kg)25 sq ft
(2.32 sq m) 2,000 lbs
(907 kg) 200 lbs (91 kg)
3.8L/Manual 4.10 Two–Door Rubicon Model (4WD)6,365 lbs
(2 887 kg) 25 sq ft
(2.32 sq m) 2,000 lbs
(907 kg) 200 lbs (91 kg)
3.8L/Automatic 4.10 Two–Door Rubicon Model (4WD)6,366 lbs
(2 887 kg) 25 sq ft
(2.32 sq m) 2,000 lbs
(907 kg) 200 lbs (91 kg)
3.8L/Automatic 3.73 Four–Door X Model (2WD) 7,734 lbs (3 508 kg)32 sq ft
(2.97 sq m) 3,500 lbs
(1 587 kg) 350 lbs (159 kg)
3.8L/Automatic 3.73 Four–Door Sahara Model (2WD)7,893 lbs
(3 580 kg) 32 sq ft
(2.97 sq m) 3,500 lbs
(1 587 kg) 350 lbs (159 kg)
3.8L/Manual 3.21 Four–Door X Model (4WD) 5,431 lbs (2 463 kg)32 sq ft
(2.97 sq m) 1,000 lbs
(453 kg) 100 lbs (45 kg)
3.8L/Manual 3.73 Four–Door X Model (4WD) 7,931 lbs (3 597 kg)32 sq ft
(2.97 sq m) 3,500 lbs
(1 587 kg) 350
lbs (159 kg)
3.8L/Automatic 3.73 Four–Door X Model (4WD) 7,932 lbs (3 598 kg)32 sq ft
(2.97 sq m) 3,500 lbs
(1 587 kg) 350 lbs (159 kg)
38
UTILITY
Page 41 of 72
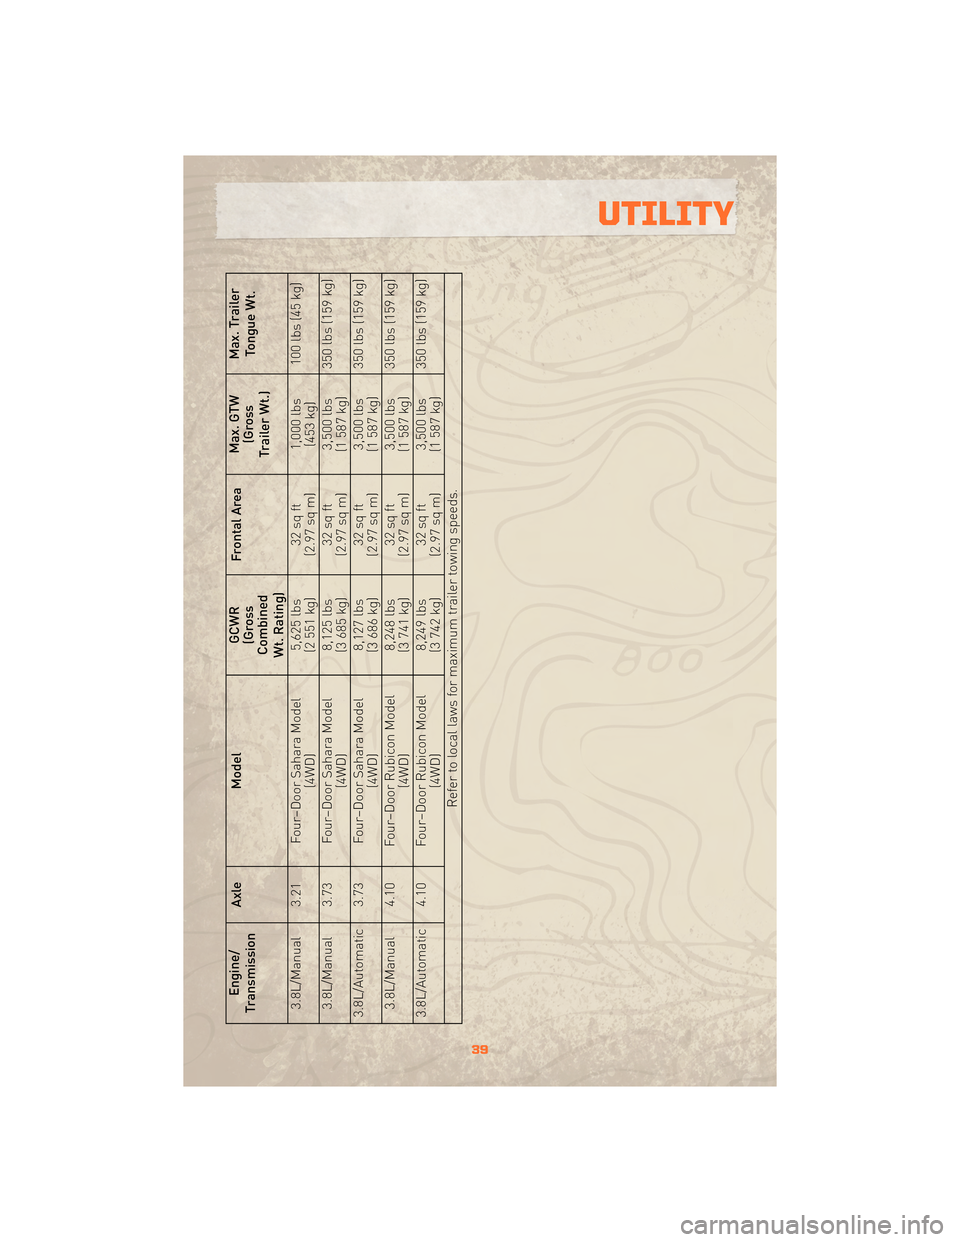
Engine/
Transmission Axle
Model GCWR
(Gross
Combined
Wt. Rating) Frontal Area
Max. GTW
(Gross
Trailer Wt.) Max. Trailer
Tongue Wt.
3.8L/Manual 3.21 Four–Door Sahara Model (4WD)5,625 lbs
(2 551 kg) 32 sq ft
(2.97 sq m) 1,000 lbs
(453 kg) 100 lbs (45 kg)
3.8L/Manual 3.73 Four–Door Sahara Model (4WD)8,125 lbs
(3 685 kg) 32 sq ft
(2.97 sq m) 3,500 lbs
(1 587 kg) 350 lbs (159 kg)
3.8L/Automatic 3.73 Four–Door Sahara Model (4WD)8,127 lbs
(3 686 kg) 32 sq ft
(2.97 sq m) 3,500 lbs
(1 587 kg) 350 lbs (159 kg)
3.8L/Manual 4.10 Four–Door Rubicon Model (4WD)8,248 lbs
(3 741 kg) 32 sq ft
(2.97 sq m) 3,500 lbs
(1 587 kg) 350 lbs (159 kg)
3.8L/Automatic 4.10 Four–Door Rubicon Model (4WD)8,249 lbs
(3 742 kg) 32 sq ft
(2.97 sq m) 3,500 lbs
(1 587 kg) 350 lbs (159 kg)
Refer to local laws for maximum trailer towing speeds.
39
UTILITY
Page 42 of 72
RECREATIONAL TOWING
(BEHIND MOTORHOME)
Towing - Two-Wheel Drive
Models
• Recreational towing with all fourwheels on the ground is allowed ONLY
if the rear driveshaft is removed. See
your authorized dealer or refer to the
Service Manual. Towing with the rear
wheels on the ground while the
driveshaft is connected can result in
severe transmission damage.
WARNING!
If the driveshaft is removed, the
vehicle can roll even if the
transmission is in PARK, which could
cause serious injury or death.
• The parking brake must be firmly engaged and the wheels chocked
during driveshaft removal and
installation. The parking brake must
remain engaged unless the vehicle is
securely and properly connected to the
tow vehicle, or the driveshaft is
completely reinstalled. See your
authorized dealer for proper driveshaft
removal and reinstallation procedures,
including flange orientation/alignment,
use of thread-locking compound,
proper bolt torque specifications, etc.
Towing - Four-Wheel Drive
Models
• Turn off engine and depress brakepedal.
• Shift automatic transmission into NEUTRAL or depress clutch pedal on
manual transmission.
• Shift transfer case to N (Neutral).
• Start the engine, shift into drive or 1st gear and ensure there is no vehicle
movement. • Shut off the engine, place ignition into
ACC position and shift automatic
transmission into PARK, manual
transmission into NEUTRAL.
• Apply the parking brake, attach vehicle to tow vehicle and release the parking
brake.
• Disconnect negative battery cable.
• Refer to your Owner's Manual on the DVD for further details.
BRAKE/TRANSMISSION
INTERLOCK MANUAL
OVERRIDE
• Your vehicle may be equipped with ashift lock manual override.
• The manual override may be used in the event that the shift lever should fail
to move from PARK with the Key Fob in
the ON position and the brake pedal
pressed.
• To operate the shift lock manual override, perform the following steps:
• Turn the Key Fob to the ON position but do not start the engine.
• Firmly set the parking brake.
• Using a flat-bladed screwdriver, carefully remove the shift lock
manual override cover which is
located on the PRNDL bezel.
• Press and maintain firm pressure on the brake pedal.
• Using a screwdriver, reach into the manual override opening. Press and
hold the shift lock lever down.
• Move the shift lever into the NEUTRAL position and start the
vehicle.
• Reinstall the override cover.
• Have your vehicle inspected by your local authorized dealer if the shift lock
manual override has been used.
UTILITY
40
Page 44 of 72
- Engine Temperature Warning Light
• This light warns of an overheated engine condition.
• If the light turns on and a warning chime sounds while driving, safely pull over and stopthe vehicle. If the A/C system is on, turn it off. Also, shift the transmission into NEUTRAL
and idle the vehicle. If the temperature reading does not return to normal, turn the
engine off immediately.
• We recommend that you do not operate the vehicle or engine damage will occur. Have the vehicle serviced immediately.
WARNING!
A hot engine cooling system is dangerous. You or others could be badly burned by
steam or boiling coolant. You may want to call an authorized dealership for service if
your vehicle overheats.
- Brake Warning Light
• The Brake Warning light illuminates when there is either a system malfunction or theparking brake is applied. If the light is on and the parking brake is not applied, it
indicates a possible brake hydraulic malfunction, brake booster problem or an Anti-Lock
Brake System problem.
• We recommend you drive to the nearest Service Center and have the vehicle serviced immediately.
WARNING!
Driving a vehicle with the red brake light on is dangerous. Part of the brake system
may have failed. It will take longer to stop the vehicle. You could have an accident.
Have the vehicle checked immediately.
- Malfunction Indicator Light (MIL)
• Certain conditions, such as a loose or missing gas cap, poor fuel quality, etc., mayilluminate the MIL after engine start. The vehicle should be serviced if the light stays on
through several typical driving cycles. In most situations, the vehicle will drive normally
and not require towing.
• If the MIL flashes when the engine is running, serious conditions may exist that could lead to immediate loss of power or severe catalytic converter damage. We recommend
you do not operate the vehicle. Have the vehicle serviced as soon as possible if this
occurs.
WHAT TO DO IN EMERGENCIES
42
Page 46 of 72
Fuel Cap/Loose Gas Cap Message
• If a “gas cap” message (shown as gASCAP) appears, tighten the gas cap until a “clicking”sound is heard.
• Press the odometer reset button to turn the message off.
• If the message continues to appear for more than three days after tightening the gas cap, see your authorized dealer.
Oil Change Indicator
Message
• If an “oil change” message (shown as CHAngE OIL) appears and a single chime sounds,it is time for your next required oil change.
Resetting The Light After Servicing
• Turn the ignition switch to the ON/RUN position (do not start engine).
• Fully depress the accelerator pedal three times within 10 seconds.
• Turn the ignition switch to the OFF/LOCK position.
IF YOUR ENGINE OVERHEATS
• In any of the following situations, you can reduce the potential for overheating by takingthe appropriate action.
• On the highways — slow down.
• In city traffic — while stopped, shift transmission into NEUTRAL, but do not increase engine idle speed.
NOTE: There are steps that you can take to slow down an impending overheat condition:
• If your air conditioner (A/C) is on, turn it off. The A/C system adds heat to the engine cooling system and turning the A/C off can help remove this heat.
• You can also turn the Temperature Control to maximum heat, the Mode Control to floor and the Fan Control to high. This allows the heater core to act as a supplement to the
radiator and aids in removing heat from the engine cooling system.
• If the temperature reading does not return to normal, turn the engine off immediately.
• We recommend that you do not operate the vehicle or engine damage will occur. Have the vehicle serviced immediately.
CAUTION!
Driving with a hot cooling system could damage your vehicle. If the temperature
gauge reads HOT (H), pull over and stop the vehicle. Idle the vehicle with the air
conditioner turned off until the pointer drops back into the normal range. If the
pointer remains on HOT (H), and you hear continuous chimes, turn the engine off
immediately and call for service.
WHAT TO DO IN EMERGENCIES
44
Page 48 of 72
Preparations For Jacking
• Park on a firm, level surface. Avoid ice or slippery areas.
• Set the parking brake and shift the automatic transmission into PARK, or a manualtransmission into REVERSE.
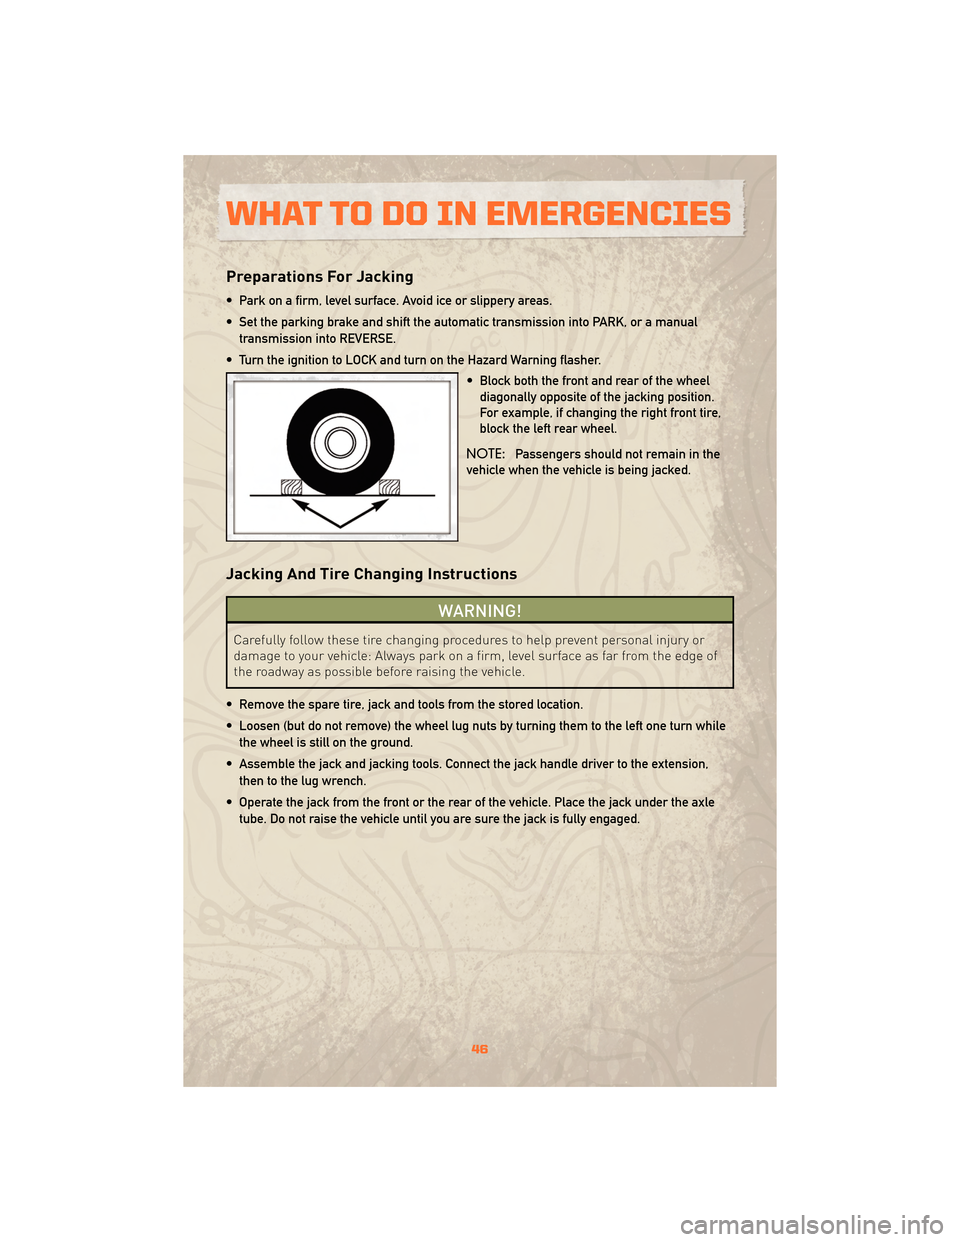
• Turn the ignition to LOCK and turn on the Hazard Warning flasher. • Block both the front and rear of the wheeldiagonally opposite of the jacking position.
For example, if changing the right front tire,
block the left rear wheel.
NOTE: Passengers should not remain in the
vehicle when the vehicle is being jacked.
Jacking And Tire Changing Instructions
WARNING!
Carefully follow these tire changing procedures to help prevent personal injury or
damage to your vehicle: Always park on a firm, level surface as far from the edge of
the roadway as possible before raising the vehicle.
• Remove the spare tire, jack and tools from the stored location.
• Loosen (but do not remove) the wheel lug nuts by turning them to the left one turn while the wheel is still on the ground.
• Assemble the jack and jacking tools. Connect the jack handle driver to the extension, then to the lug wrench.
• Operate the jack from the front or the rear of the vehicle. Place the jack under the axle tube. Do not raise the vehicle until you are sure the jack is fully engaged.
WHAT TO DO IN EMERGENCIES
46
Page 51 of 72
WARNING!
• Take care to avoid the radiator cooling fan whenever the hood is raised. It can startanytime the ignition switch is on. You can be injured by moving fan blades.
• Remove any metal jewelry such as watch bands or bracelets that might make an inadvertent electrical contact. You could be seriously injured.
• Batteries contain sulfuric acid that can burn your skin or eyes and generate hydrogen gas which is flammable and explosive. Keep open flames or sparks
away from the battery.
• Set the parking brake, shift the automatic transmission into PARK and turn the ignition to LOCK.
• Turn off the heater, radio, and all unnecessary electrical accessories.
• If using a another vehicle to jump-start the battery, park the vehicle within the jumper cables reach, set the parking brake and make sure the ignition is OFF.
WARNING!
Do not allow vehicles to touch each other as this could establish a ground
connection and personal injury could result.
Jump-Starting Procedure
WARNING!
Failure to follow this procedure could result in personal injury or property damage
due to battery explosion.
CAUTION!
Failure to follow these procedures could result in damage to the charging system of
the booster vehicle or the discharged vehicle.
• Connect the positive (+) end of the jumper cable to the positive (+) post of the discharged vehicle.
• Connect the opposite end of the positive (+) jumper cable to the positive (+) post of the booster battery.
• Connect the negative end (-) of the jumper cable to the negative (-) post of the booster battery.
• Connect the opposite end of the negative (-) jumper cable to a good engine ground (exposed metal part of the discharged vehicle’s engine) away from the battery and the
fuel injection system.
49
WHAT TO DO IN EMERGENCIES