radio JEEP WRANGLER 2011 JK / 3.G Owner's Manual
[x] Cancel search | Manufacturer: JEEP, Model Year: 2011, Model line: WRANGLER, Model: JEEP WRANGLER 2011 JK / 3.GPages: 88, PDF Size: 3.52 MB
Page 41 of 88
Change Stored Home Address• Press the MENU hard-key, then touch the MY FILES soft-key.
• Touch the MY ADDRESS BOOK soft-key, then touch the HOME soft-key.
• In the Home Address Information screen, touch the EDIT CONTACT soft-key, then touch the CHANGE ADDRESS soft-key in the next screen.
• Touch the INPUT STREET NAME soft-key and enter your street name into the speller.
• Touch the CONTINUE soft-key and enter your address into the speller; touch the CONTINUE soft-key again.
• Touch the city name and touch the SAVE soft-key to complete programming.
Guide Me Home • Press the NAV hard-key to access the Navigation Main Menu.
• Touch the GUIDE ME HOME soft-key to route you back to your home destination from your current location. Touch the GO soft-key to start your trip.
Local Address Book Features • Your navigation-equipped radio can store destinations into its local address book so that you can recall them later.
• To save your current location to the local address book, touch the cursor on the screen, next touch SELECT, then touch CURSOR POINT, next touch OPTIONS,
then touch SAVE DESTINATION, and lastly touch ADDRESS BOOK.
• To add or delete destinations from your local address book stored on the radio, press the MENU hard key, then touch MY FILES, next touch ADDRESS BOOK, and
last touch DEFAULT FOLDER (or any added folder).
• To route to a destination that is saved in your local address book, press the MENU hard key, then touch MY FILES, next touch ADDRESS BOOK, and last touch
DEFAULT FOLDER and select the contact you want to route to.
Navigation – Media Center 430N (Sales Code RHB) Only
• For software updates, visit http://www.garmin.com/chrysler website, or contact yourauthorized dealer for the latest available software.
• The Navigation system receives GPS signals from satellites to display the position of your vehicle. You may experience interruptions or delays in receiving navigation
information in garages, tunnels, large cities, or other situations where the vehicle
does not have a direct line of sight to the sky.
• Voice Command is not available for navigation commands on this radio (although Voice Command functions for all other radio functions).
Map • Touch the NAV soft-key in the upper-right corner of your radio screen, to access the Navigation system.
• Touch the View Mapsoft-key to display a map of your current position.
ELECTRONICS
39
Page 42 of 88
Entering a Destination/Finding a Point of Interest• Touch the NAV soft-key in the upper-right corner of your radio screen, to access the Navigation system.
• Touch the Where To?soft-key to program a destination.
• Next touch one of the subcategories to search for your destination. Address, Points of Interest, Recently Found, Favorites and Intersection are a few of the options.
• After touching one of the subcategories, follow the on-screen steps to complete the process and be routed to your destination.
Setting a Home Location • Touch the NAV soft-key in the upper-right corner of your radio screen, to access the Navigation system.
• Touch the Where To?soft-key, then touch Go Home.
• Next, select from: • Enter My Address – enter an address for the location using the on-screenkeyboard.
• Use my current location – sets your current location as your Home Location.
• Choose from Recently Found – select a location from your recently found locations.
• After you set your Home Location, touch Where To?, then touch Go Home.
Editing Home Location • Touch the NAV soft-key in the upper-right corner of your radio screen, to access the Navigation system.
• Touch the Where To?soft-key, then touch Favorites.
• Touch the location you want to edit.
• Next, touch Press for More.
• Touch Edit.
• Follow the on-screen steps for editing the Home Location.
Go Home • Touch the NAV soft-key in the upper-right corner of your radio screen, to access the Navigation system.
• Touch Where To? , then touch Go Home.
SIRIUS Travel Link
• To access SIRIUS Travel Link, press the MENU hard-key, then touch the Travel Link
soft-key.
NOTE: SIRIUS Travel Link requires a subscription, sold separately after trial subscription
included with vehicle purchase.
• SIRIUS Travel Link brings a wealth of useful information into your vehicle and right toyour fingertips:
• Weather
ELECTRONICS
40
Page 43 of 88
• View detailed weather conditions at your current location.
• Ski Info
• View ski and snowboarding conditions at ski resorts.
• Fuel Prices
• Check detailed price information for fuel stations near your current location.
• Movie Listings
• Check which movies (includes start times, ratings, run lengths and summaries) are
playing at theaters near your current location.
• Sports Scores
• View scores and upcoming events for all major sports.
• Your favorite location, theater and sports teams can be stored for quick access.
• Refer to your Media Center 730N (RHR) User's Manual or Media Center 430/430N (RBZ/RHB) User's Manual for more details.
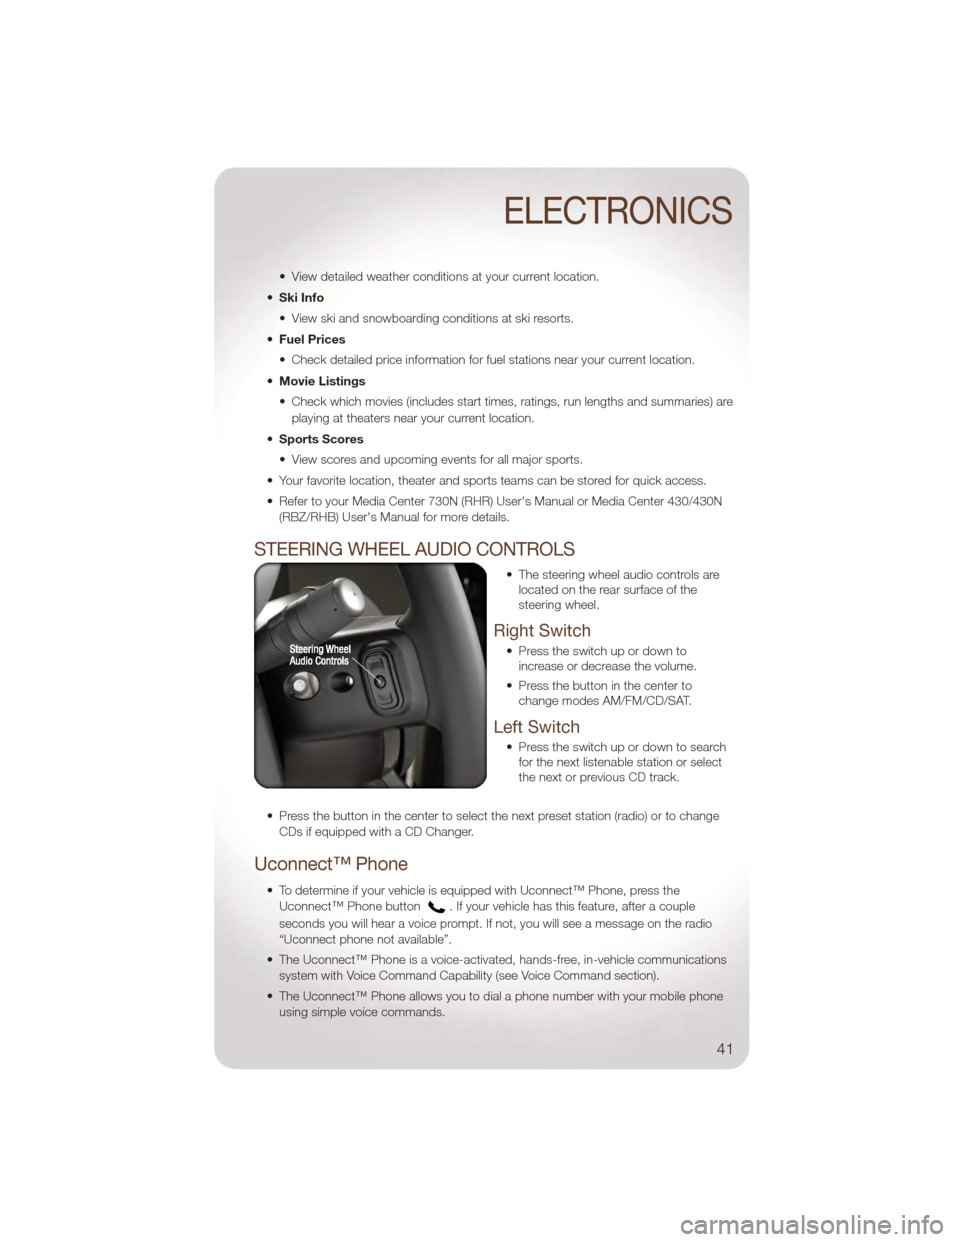
STEERING WHEEL AUDIO CONTROLS
• The steering wheel audio controls arelocated on the rear surface of the
steering wheel.
Right Switch
• Press the switch up or down toincrease or decrease the volume.
• Press the button in the center to change modes AM/FM/CD/SAT.
Left Switch
• Press the switch up or down to searchfor the next listenable station or select
the next or previous CD track.
• Press the button in the center to select the next preset station (radio) or to change CDs if equipped with a CD Changer.
Uconnect™ Phone
• To determine if your vehicle is equipped with Uconnect™ Phone, press theUconnect™ Phone button
. If your vehicle has this feature, after a couple
seconds you will hear a voice prompt. If not, you will see a message on the radio
“Uconnect phone not available”.
• The Uconnect™ Phone is a voice-activated, hands-free, in-vehicle communications system with Voice Command Capability (see Voice Command section).
• The Uconnect™ Phone allows you to dial a phone number with your mobile phone using simple voice commands.
ELECTRONICS
41
Page 45 of 88
Mute (Or Unmute) Microphone During Call
• During a call, press the Voice Command button.
• (After the BEEP), say “mute” (or “mute off”).
Transfer Ongoing Call Between Handset And Vehicle
• During a call, press the Voice Command button.
• (After the BEEP), say “transfer call”.
Changing The Volume
• Start a dialogue by pressing the Phone button, then adjust the volume during a
normal call.
• Use the radio ON/OFF VOLUME rotary knob to adjust the volume to a comfortable level while the Uconnect™ system is speaking. Please note the volume setting for
Uconnect™ is different than the audio system.
NOTE: To access the tutorial, press the Uconnect™ hard-key. After the BEEP, say
“tutorial”. Press any hard-key/button or touch the display (Touch-Screen radio) to cancel
the tutorial.
WARNING!
• Any voice commanded system should be used only in safe driving conditions following local laws and phone use. All attention should be kept on the
roadway ahead. Failure to do so may result in a collision causing you and
others to be severely injured or killed.
• In an emergency, to use Uconnect™ Phone, your mobile phone must be: • turned on,
• paired to Uconnect™ Phone,
• and have network coverage.
Uconnect™ VOICE COMMAND
• The Uconnect™ Voice Command system allows you to control your AM, FM radio,satellite radio, disc player, Uconnect™ Phone, a memo recorder, and supported
portable media devices. The Voice Command system also provides limited capability
to select and play music by artist, song, album, music, genre, or playlist from your
compatible iPod
®device (this capability is available for Media Center 430/430N
when connected to the USB port).
• When you press the Voice Command button
located on the radio faceplate
or steering wheel, you will hear a beep. The beep is your signal to give a command.
If you do not say a command within a few seconds, the system will present you with
a list of options. If you ever wish to interrupt the system while it lists options, press
the Voice Command button
, listen for the BEEP, and say your command.
ELECTRONICS
43
Page 46 of 88
Voice Command for Text Messaging
• If equipped with Uconnect™ Voice Command, your Media Center 430N radio maybe able to play incoming SMS messages through the vehicle sound system.
• It also allows you to respond by selecting from various pre-defined phrases.
• Not all phones are compatible with this feature. Refer to the phone compatibility list at www.jeep.com/uconnect. Connected mobile phones must be bluetooth-
compatible, and paired with your radio.
Changing The Volume
• Start a dialogue by pressing the Voice Command button,thensaya
command (for example, “tutorial”).
• Use the radio ON/OFF VOLUME rotary knob to adjust the volume to a comfortable level while the Voice Command system is speaking. The volume setting for Voice
Command is different than the audio system.
• For vehicles equipped with Video Entertainment System (VES)™, refer to the Uconnect™ Voice Command section of the Uconnect™ User's Manual on the DVD
for further details.
• For vehicles not equipped with VES™, refer to your vehicle Owner's Manual on the DVD for Uconnect™ Voice Command information.
NOTE: To access the tutorial, press the Voice Command button
. After the
BEEP, say “tutorial”. Press any hard-key/button or touch the display (Touch-Screen radio)
to cancel the tutorial.
WARNING!
Any voice commanded system should be used only in safe driving conditions
following local laws and phone use. All attention should be kept on the roadway
ahead. Failure to do so may result in a collision causing you and others to be
severely injured or killed.
iPod®/USB/MP3 CONTROL
• There are many ways to play music from iPod®players or other portable devices
through your vehicle's speakers. Your choices depend on what radio your vehicle is
equipped with.
• The radio sales code is located on the lower right side of the radio faceplate.
If Equipped with Media Center 130 with Satellite Radio (Sales
Code RES + RSC) or Media Center 430/430N (Sales Code
RBZ/RHB)
• The USB port located within the center console, allows you to plug an iPod®into the
vehicle's sound system.
• To hear audio from devices connected to this port from a non-touch-screen radio, press the AUX button on the radio faceplate. From a touch-screen radio, press the
MEDIA hard-key, then touch the AUX or iPod
®soft-key.
ELECTRONICS
44
Page 47 of 88
• When connected to this feature:• The iPod®can be controlled using the radio buttons to Play, Browse, and List the
iPod®or external devices contents. Refer to the Owner's Manual on the DVD for
details.
• The iPod
®battery charges when plugged into the USB port (if supported by the
specific audio device).
• Compatible iPod
®devices may also be controllable using voice commands
(Media Center 430/430N with Uconnect™ Phone required). Refer to the Owner's
Manual on the DVD for details.
NOTE:
• The USB port supports certain Mini, Classic, Nano, Touch, and iPhone
®devices. The
USB port also supports playing music from compatible external USB Mass Storage
Class memory devices. For supported audio file formats, refer to the USB Port section
in the Owner's Manual on the DVD. Refer to www.jeep.com/uconnect website for a list
of tested iPod
®s. Some iPod®software versions may not fully support the USB port
features. Please visit Apple’s website for iPod®software updates.
Bluetooth®Streaming Audio
If equipped with Uconnect™ Voice Command, your bluetooth-equipped iPod®devices,
cellphones or other media players, may also be able to stream music to your vehicle's
speakers. Your connected device must be bluetooth-compatible, and paired with your
Media Center radio (see Uconnect™ Phone for pairing instructions). Press the AUX
button on the radio faceplate until "BT" is displayed on the radio screen.
WARNING!
Do not plug in or remove the iPod®or external device while driving. Failure to
follow this warning could result in a collision.
ELECTRONIC VEHICLE INFORMATION CENTER (EVIC)
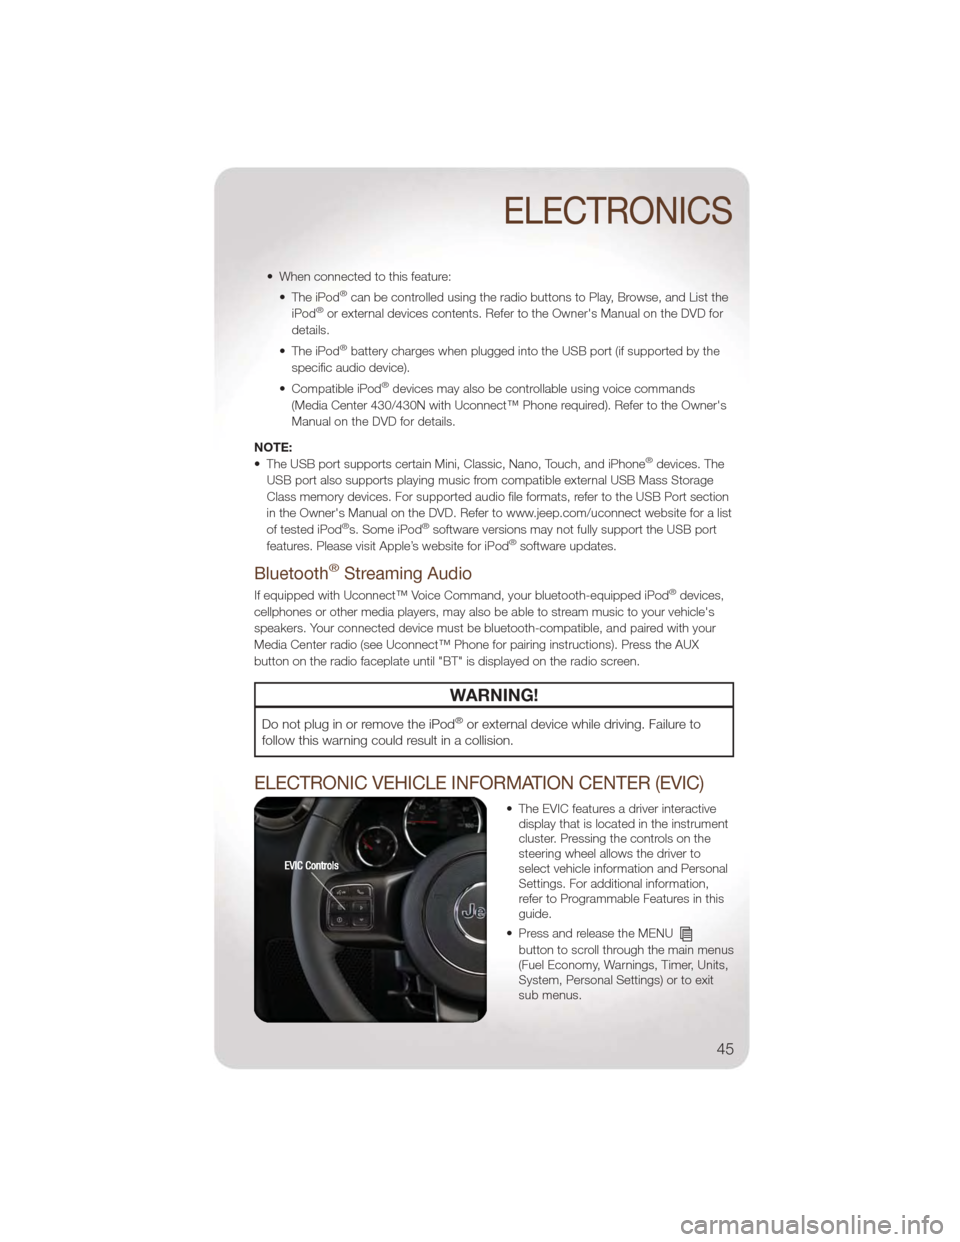
• The EVIC features a driver interactive display that is located in the instrument
cluster. Pressing the controls on the
steering wheel allows the driver to
select vehicle information and Personal
Settings. For additional information,
refer to Programmable Features in this
guide.
• Press and release the MENU
button to scroll through the main menus
(Fuel Economy, Warnings, Timer, Units,
System, Personal Settings) or to exit
sub menus.
ELECTRONICS
45
Page 64 of 88
JUMP-STARTING
• If your vehicle has a discharged battery it can be jump-started using a set of jumpercables and a battery in another vehicle or by using a portable battery booster pack.
• Jump-starting can be dangerous if done improperly so please follow the procedures in this section carefully.
NOTE: When using a portable battery booster pack follow the manufacturer’s operating
instructions and precautions.
Preparations for Jump-Start
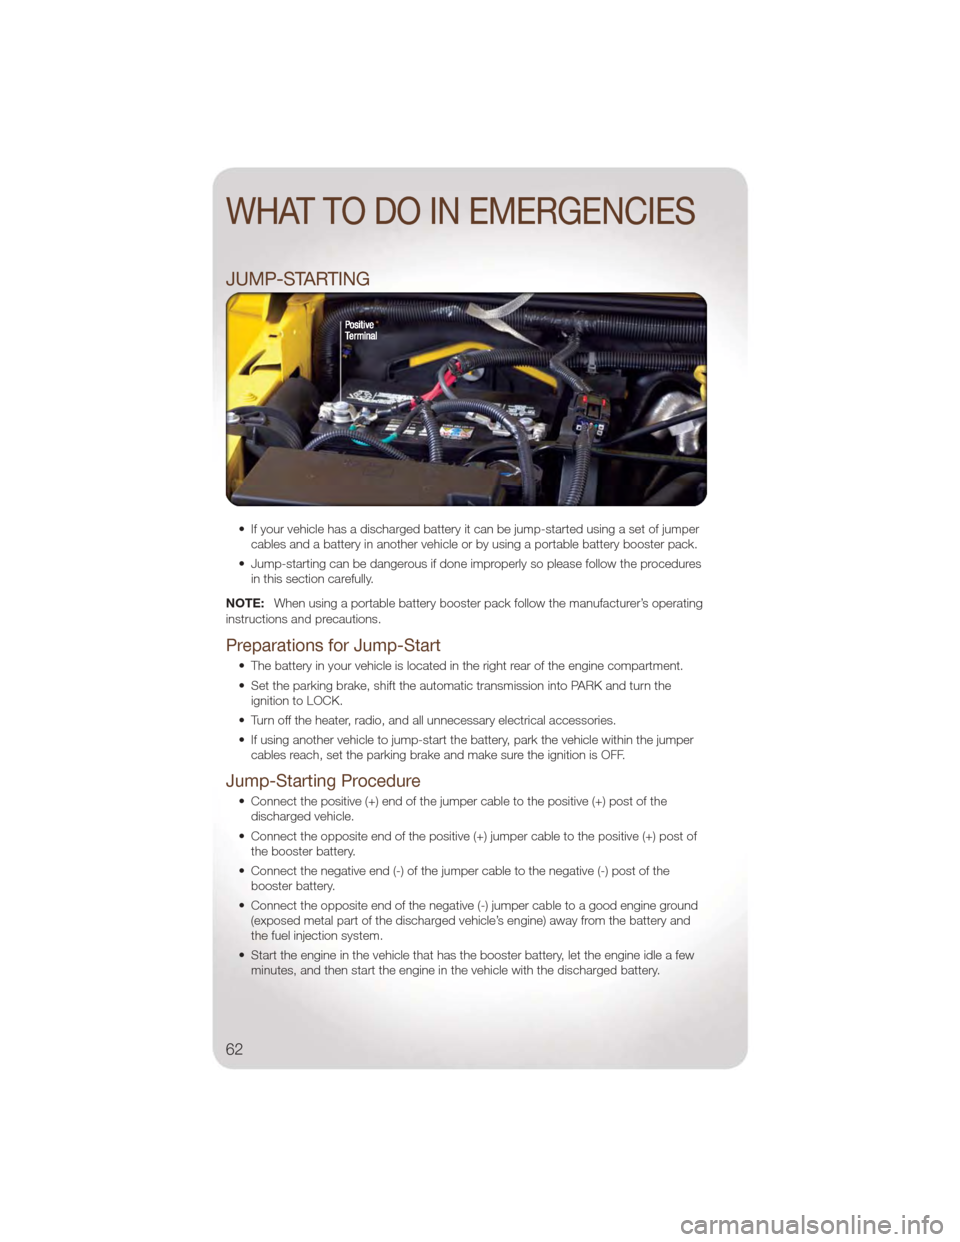
• The battery in your vehicle is located in the right rear of the engine compartment.
• Set the parking brake, shift the automatic transmission into PARK and turn the ignition to LOCK.
• Turn off the heater, radio, and all unnecessary electrical accessories.
• If using another vehicle to jump-start the battery, park the vehicle within the jumper cables reach, set the parking brake and make sure the ignition is OFF.
Jump-Starting Procedure
• Connect the positive (+) end of the jumper cable to the positive (+) post of thedischarged vehicle.
• Connect the opposite end of the positive (+) jumper cable to the positive (+) post of the booster battery.
• Connect the negative end (-) of the jumper cable to the negative (-) post of the booster battery.
• Connect the opposite end of the negative (-) jumper cable to a good engine ground (exposed metal part of the discharged vehicle’s engine) away from the battery and
the fuel injection system.
• Start the engine in the vehicle that has the booster battery, let the engine idle a few minutes, and then start the engine in the vehicle with the discharged battery.
WHAT TO DO IN EMERGENCIES
62
Page 76 of 88
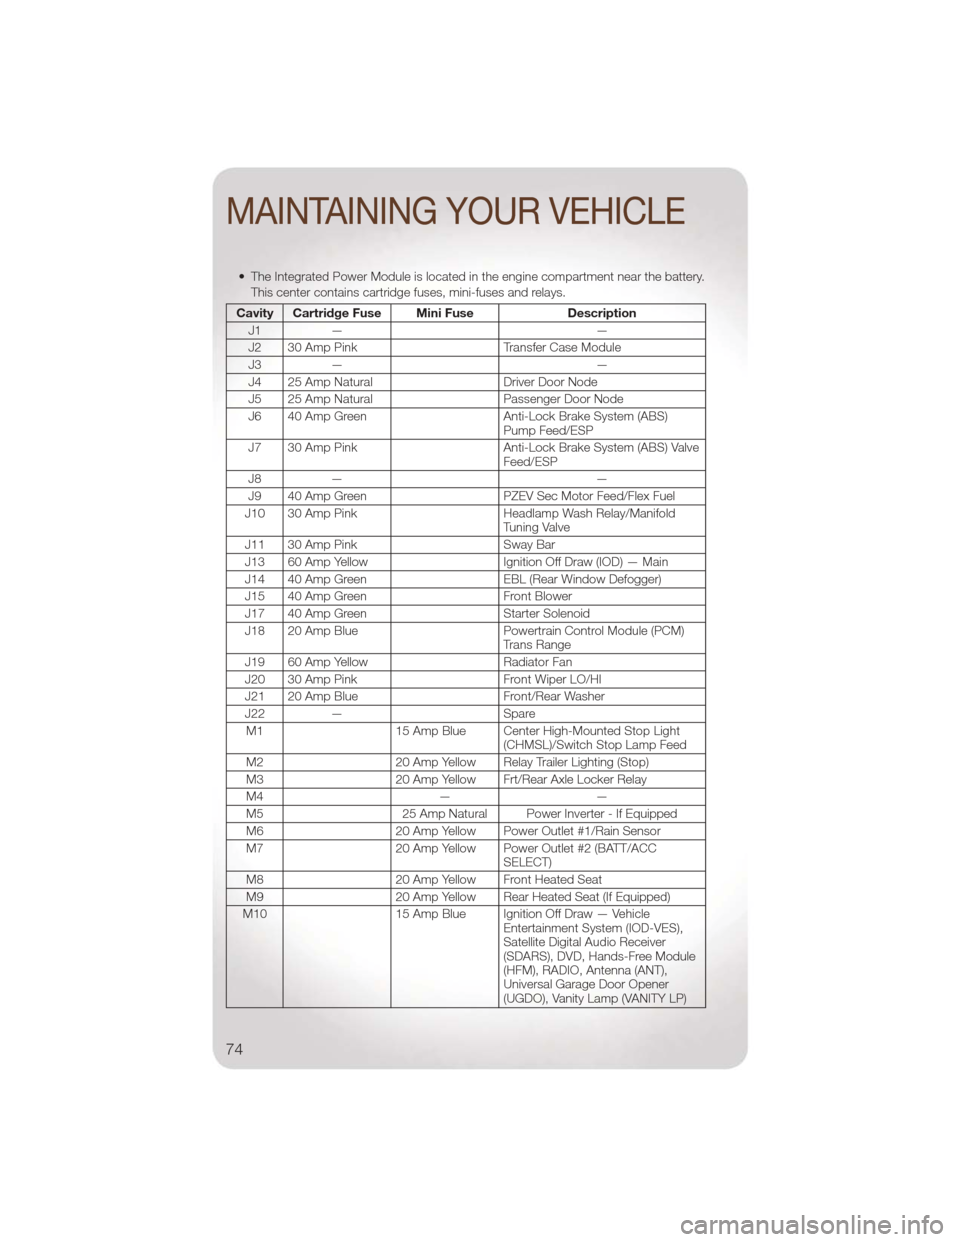
• The Integrated Power Module is located in the engine compartment near the battery.This center contains cartridge fuses, mini-fuses and relays.
Cavity Cartridge Fuse Mini Fuse Description
J1 — —
J2 30 Amp Pink Transfer Case Module
J3 — —
J4 25 Amp Natural Driver Door Node
J5 25 Amp Natural Passenger Door Node
J6 40 Amp Green Anti-Lock Brake System (ABS)
Pump Feed/ESP
J7 30 Amp Pink Anti-Lock Brake System (ABS) Valve
Feed/ESP
J8 — —
J9 40 Amp Green PZEV Sec Motor Feed/Flex Fuel
J10 30 Amp Pink Headlamp Wash Relay/Manifold
Tuning Valve
J11 30 Amp Pink Sway Bar
J13 60 Amp Yellow Ignition Off Draw (IOD) — Main
J14 40 Amp Green EBL (Rear Window Defogger)
J15 40 Amp Green Front Blower
J17 40 Amp Green Starter Solenoid
J18 20 Amp Blue Powertrain Control Module (PCM)
Trans Range
J19 60 Amp Yellow Radiator Fan
J20 30 Amp Pink Front Wiper LO/HI
J21 20 Amp Blue Front/Rear Washer
J22 — Spare
M1 15 Amp Blue Center High-Mounted Stop Light
(CHMSL)/Switch Stop Lamp Feed
M2 20 Amp Yellow Relay Trailer Lighting (Stop)
M3 20 Amp Yellow Frt/Rear Axle Locker Relay
M4 ——
M5 25 Amp Natural Power Inverter - If Equipped
M6 20 Amp Yellow Power Outlet #1/Rain Sensor
M7 20 Amp Yellow Power Outlet #2 (BATT/ACC
SELECT)
M8 20 Amp Yellow Front Heated Seat
M9 20 Amp Yellow Rear Heated Seat (If Equipped)
M10 15 Amp Blue Ignition Off Draw — Vehicle
Entertainment System (IOD-VES),
Satellite Digital Audio Receiver
(SDARS), DVD, Hands-Free Module
(HFM), RADIO, Antenna (ANT),
Universal Garage Door Opener
(UGDO), Vanity Lamp (VANITY LP)
MAINTAINING YOUR VEHICLE
74
Page 80 of 88
CHRYSLER GROUP LLC
CUSTOMER CENTER
P.O. Box 21–8004
Auburn Hills, MI 48321–8004
Phone: 1–877–426–5337
CHRYSLER CANADA INC.
CUSTOMER CENTER
P.O. Box 1621
Windsor, Ontario N9A 4H6
Phone: 1–800–465–2001 (English)
Phone: 1–800–387–9983 (French)
ASSISTANCE FOR THE
HEARING IMPAIRED
• To assist customers who havehearing difficulties, the manufacturer
has installed special TDD
(Telecommunication Devices for the
Deaf) equipment at its customer
center. Any hearing or speech
impaired customer, who has access
to a TDD or a conventional
teletypewriter (TTY) in the United
States, can communicate with the
manufacturer by dialing
1–800–380–CHRY. Canadian
residents with hearing difficulties that
require assistance can use the special
needs relay service offered by Bell
Canada. For TTY teletypewriter users,
dial 711 and for Voice callers, dial
1–800–855–0511 to connect with a
Bell Relay Service operator.
WARNING!
Engine exhaust, some of its
constituents, and certain vehicle
components contain, or emit,
chemicals known to the State of
California to cause cancer and birth
defects, or other reproductive harm.
In addition, certain fluids contained in
vehicles and certain products of
component wear contain, or emit,
chemicals known to the State of
California to cause cancer and birth
defects, or other reproductive harm.
PUBLICATIONS ORDERING
•If you are the first registered retail
owner of your vehicle, you may
obtain one free printed copy of the
Owner's Manual, Warranty Booklet or
Radio Manuals on your DVD by
calling 1–877–426–5337 (U.S.) or
1–800–387–1143 (Canada) or by
contacting your dealer.
• Replacement User Guide kits or DVDs or, if you prefer, additional
printed copies of the Owner's
Manual, Warranty Booklet or Radio
Manuals may be purchased by
visiting www.techauthority.com or by
calling 1–800–890–4038 (U.S.) or
1–800–387–1143 (Canada). Visa,
Master Card, American Express and
Discover orders are accepted. If you
prefer mailing your order, please call
the above numbers for an order form.
NOTE: A street address is required when
ordering manuals (no P.O. Boxes).
NOTE:
• The Owner's Manual and User Guide electronic files are also available on the
Chrysler, Jeep, Ram Truck and Dodge
websites.
• Click on the "For Owners" tab, select "Owner/Service Manuals", then select
your desired model year and vehicle
from the drop-down lists.
CONSUMER ASSISTANCE
78
Page 82 of 88
AUTHENTIC ACCESSORIES BY MOPAR®
• The following highlights just some of the many Authentic Jeep Accessories byMopar featuring a fit, finish, and functionality specifically for your Jeep Wrangler.
• In choosing Authentic Accessories you gain far more than expressive style, premium protection, or extreme entertainment, you also benefit from enhancing your vehicle
with accessories that have been thoroughly tested and factory-approved.
• For the full line of Authentic Jeep Accessories by Mopar, visit your local Jeep dealership or online at mopar.com.
Chrome:
• Grille • Tubular Side Steps • Tubular Bumper
• Mirror Covers • Fuel Door • Tail Lamp Guards
Off Road:
• Off Road Bumpers • Rock Rails • Skid Plates
• Winches • Lift Kits • Off Road Lights
Exterior:
• Black Tubular Side Steps • Black Tubular Bumpers • Running Boards
• Front End Cover • Cab Covers • Spare Tire Covers
• Air Deflectors • Wheels • Hard Tops
• Soft Tops • Splash Guards • Fender Flares
Interior:
• Premium Carpet Floor Mats • Slush Floor Mats • Door Sill Guards
• Seat Covers
Electronics:
• Portable Navigation Systems • Uconnect™ Web (WiFi) • Sirius Satellite Radio
• Heated Seats • Ambient Footwell Lighting • iPod
®Adapter
• Fog Lights
Carriers:
• Hitch-mount Bike Carrier • Spare Tire-mount Ski and Freedom Top Carriers• Hitch Receivers and
Trailering Accessories
iPod
®is a registered trademark of Apple, Inc.
MOPAR ACCESSORIES
80