lock JEEP WRANGLER 2011 JK / 3.G User Guide
[x] Cancel search | Manufacturer: JEEP, Model Year: 2011, Model line: WRANGLER, Model: JEEP WRANGLER 2011 JK / 3.GPages: 88, PDF Size: 3.52 MB
Page 3 of 88
INTRODUCTION/WELCOME
Welcome From Chrysler Group LLC....2
CONTROLS AT A GLANCE
Driver Cockpit................4
Instrument Cluster .............6
GETTING STARTED
KeyFOB ..................8
Remote Start................8
Theft Alarm .................9
Seat Belt ..................9
Supplemental Restraint System (SRS) —
Airbags .................. 10
Child Restraints .............. 11
Front Seats ................ 13
Rear Seats ................ 15
Tilt Steering Column ........... 16
Heated Seats ............... 16
OPERATING YOUR VEHICLETurn Signal/Lights Lever ......... 18
Wiper/Washer Lever ........... 19
Speed Control .............. 19
Manual Climate Controls ......... 21
Automatic Temperature Controls (ATC) . . 21
Soft Top And Sunrider
®.......... 23
Hard Top And Freedom Top®....... 27
Wind Buffeting .............. 29
ELECTRONICSYour Vehicle's Sound System ...... 30
Non-Touch-Screen Radios ........ 32
Touch-Screen Radio ........... 35
Steering Wheel Audio Controls ...... 41
Uconnect™ Phone ............ 41
Uconnect™ Voice Command ...... 43
iPod
®/USB/MP3 Control ......... 44
Electronic Vehicle Information Center
(EVIC) ................... 45
Programmable Features ......... 46
Power Inverter .............. 47
Power Outlets ............... 48
OFF-ROAD CAPABILITIESCommand-Trac®/Rock-Trac®...... 49 Axle Lock (Tru-Lok
®) Rubicon Only
.... 49
Electronic Sway Bar Disconnect –
Rubicon Only ............... 49
UTILITYTrailer Towing Weights (Maximum Trailer
Weight Ratings) .............. 50
Overdrive Off Switch ........... 52
Recreational Towing (Behind
Motorhome) ................ 52
WHAT TO DO IN EMERGENCIES24-Hour Towing Assistance ....... 54
Instrument Cluster Warning Lights .... 54
If Your Engine Overheats ......... 58
Jacking And Tire Changing ........ 59
Jump-Starting .............. 62
Emergency Tow Hooks .......... 64
Shift Lever Override ............ 64
Towing A Disabled Vehicle ........ 65
Freeing A Stuck Vehicle .......... 65
Event Data Recorder (EDR) ........ 66
MAINTAINING YOUR VEHICLEOpening The Hood............ 67
Engine Compartment ........... 68
Fluids And Capacities ........... 69
Maintenance Chart ............ 70
Fuses ................... 73
Tire Pressures ............... 76
Wheel And Wheel Trim Care ....... 77
Exterior Bulbs ............... 77
CONSUMER ASSISTANCEChrysler Group LLC Customer Center . . 78
Chrysler Canada Inc. Customer
Center................... 78
Assistance For The Hearing Impaired . . 78
Publications Ordering ........... 78
Reporting Safety Defects In The
50 United States And
Washington, D.C. ............. 79
MOPAR ACCESSORIESAuthentic Accessories By MOPAR®... 80
INDEX.................. 81
TABLE OF CONTENTS
Page 8 of 88
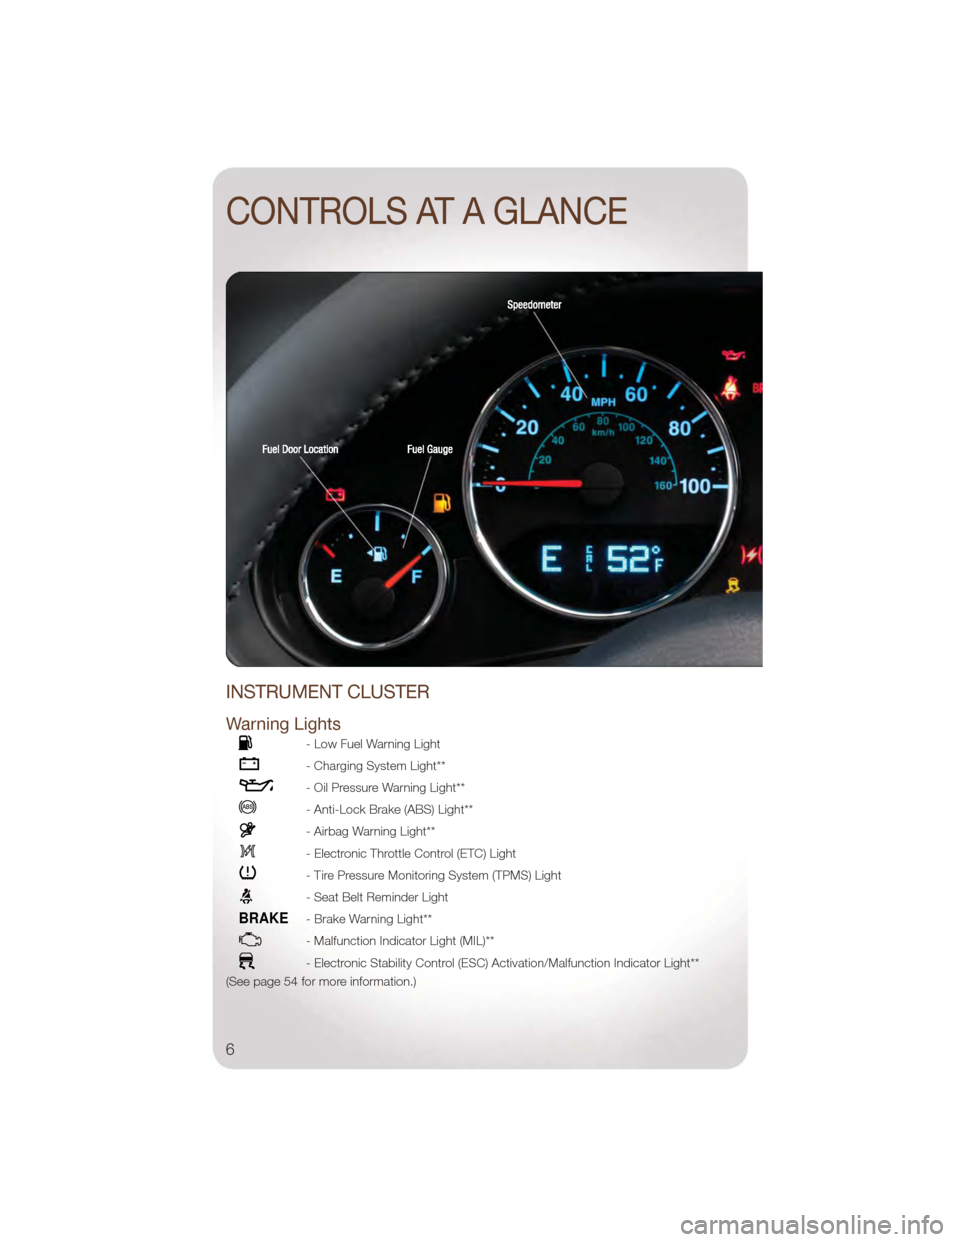
INSTRUMENT CLUSTER
Warning Lights
- Low Fuel Warning Light
- Charging System Light**
- Oil Pressure Warning Light**
- Anti-Lock Brake (ABS) Light**
- Airbag Warning Light**
- Electronic Throttle Control (ETC) Light
- Tire Pressure Monitoring System (TPMS) Light
- Seat Belt Reminder Light
BRAKE- Brake Warning Light**
- Malfunction Indicator Light (MIL)**
- Electronic Stability Control (ESC) Activation/Malfunction Indicator Light**
(See page 54 for more information.)
CONTROLS AT A GLANCE
6
Page 9 of 88
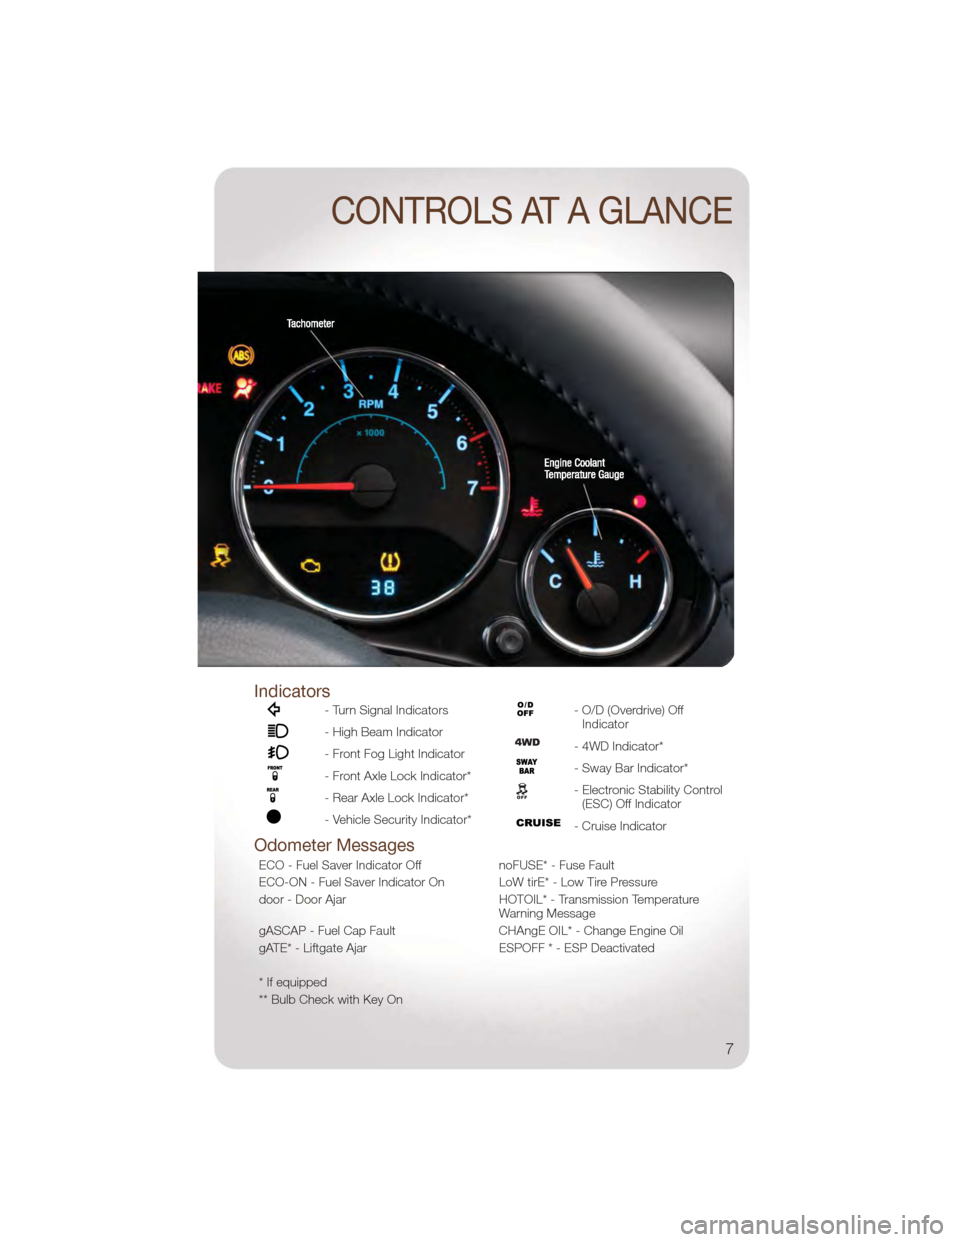
Indicators
- Turn Signal Indicators
- High Beam Indicator
- Front Fog Light Indicator
- Front Axle Lock Indicator*
- Rear Axle Lock Indicator*
- Vehicle Security Indicator*
- O/D (Overdrive) OffIndicator
- 4WD Indicator*
- Sway Bar Indicator*
- Electronic Stability Control(ESC) Off Indicator
- Cruise Indicator
Odometer Messages
ECO - Fuel Saver Indicator Off noFUSE* - Fuse Fault
ECO-ON - Fuel Saver Indicator On LoW tirE* - Low Tire Pressure
door - Door Ajar HOTOIL* - Transmission Temperature
Warning Message
gASCAP - Fuel Cap Fault CHAngE OIL* - Change Engine Oil
gATE* - Liftgate Ajar ESPOFF * - ESP Deactivated
* If equipped
** Bulb Check with Key On
CONTROLS AT A GLANCE
7
Page 10 of 88
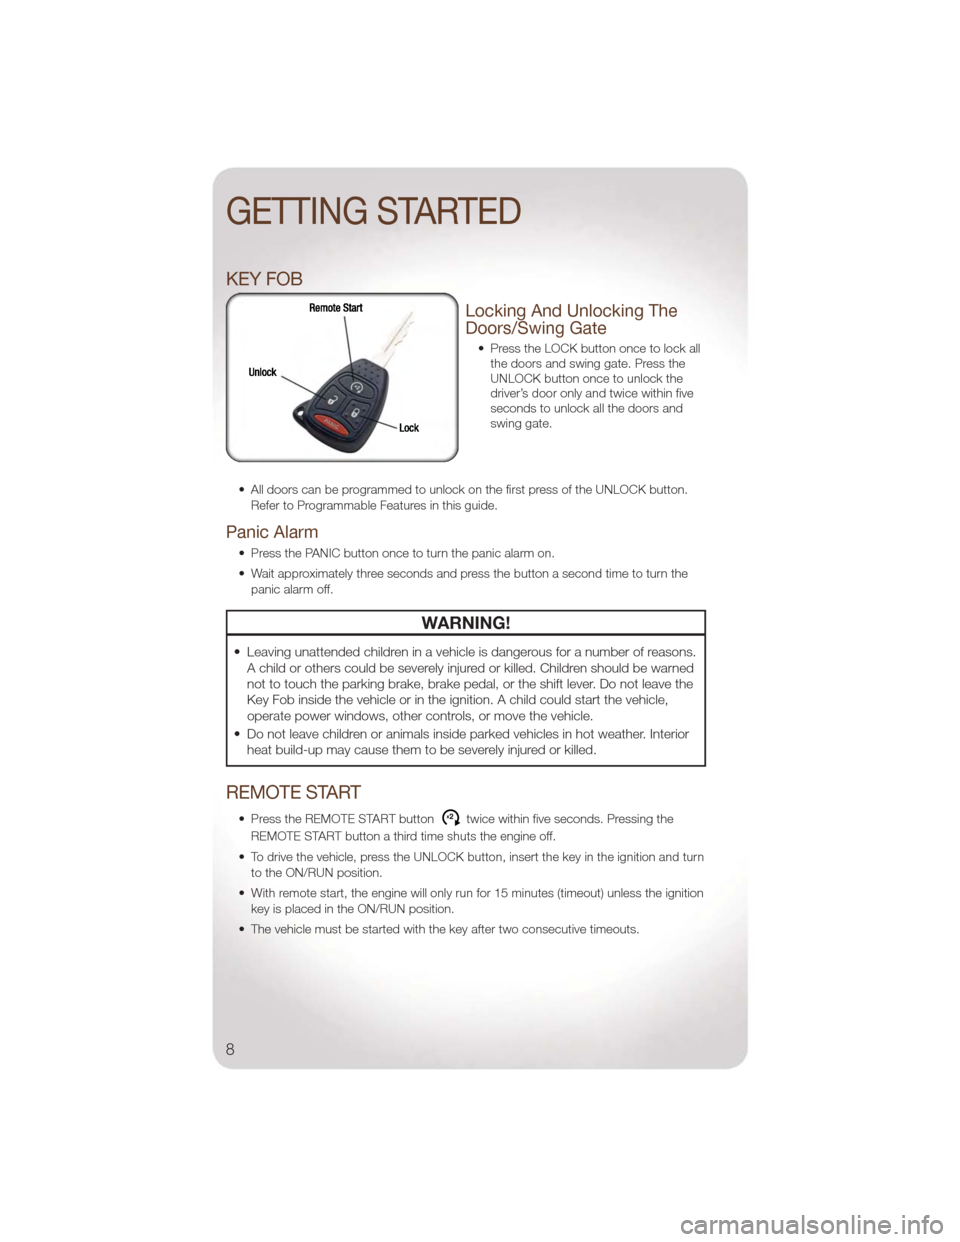
KEY FOB
Locking And Unlocking The
Doors/Swing Gate
• Press the LOCK button once to lock allthe doors and swing gate. Press the
UNLOCK button once to unlock the
driver’s door only and twice within five
seconds to unlock all the doors and
swing gate.
• All doors can be programmed to unlock on the first press of the UNLOCK button. Refer to Programmable Features in this guide.
Panic Alarm
• Press the PANIC button once to turn the panic alarm on.
• Wait approximately three seconds and press the button a second time to turn thepanic alarm off.
WARNING!
• Leaving unattended children in a vehicle is dangerous for a number of reasons.A child or others could be severely injured or killed. Children should be warned
not to touch the parking brake, brake pedal, or the shift lever. Do not leave the
Key Fob inside the vehicle or in the ignition. A child could start the vehicle,
operate power windows, other controls, or move the vehicle.
• Do not leave children or animals inside parked vehicles in hot weather. Interior heat build-up may cause them to be severely injured or killed.
REMOTE START
• Press the REMOTE START buttonx2twice within five seconds. Pressing the
REMOTE START button a third time shuts the engine off.
• To drive the vehicle, press the UNLOCK button, insert the key in the ignition and turn to the ON/RUN position.
• With remote start, the engine will only run for 15 minutes (timeout) unless the ignition key is placed in the ON/RUN position.
• The vehicle must be started with the key after two consecutive timeouts.
GETTING STARTED
8
Page 11 of 88
WARNING!
• Do not start or run an engine in a closed garage or confined area. Exhaust gascontains Carbon Monoxide (CO) which is odorless and colorless. Carbon
Monoxide is poisonous and can cause you or others to be severely injured or
killed when inhaled.
• Keep Key Fob transmitters away from children. Operation of the Remote Start System, windows, door locks or other controls could cause you and others to
be severely injured or killed.
THEFT ALARM
To Arm
• Press the Key Fob LOCK button or the power door lock switch while the door is
open.
To Disarm
• Press the Key Fob UNLOCK button and turn the ignition to the ON/RUN position.
SEAT BELT
• Be sure everyone in your vehicle is in a seat and using a seat belt properly.
• Position the lap belt across your thighs, below your abdomen. To remove slack inthe lap portion, pull up a bit on the shoulder belt. To loosen the lap belt if it is too
tight, tilt the latch plate and pull on the lap belt. A snug belt reduces the risk of
sliding under the belt in a collision.
• Position the shoulder belt on your chest so that it is comfortable and not resting on your neck. The retractor will withdraw any slack in the belt.
• A shoulder belt placed behind you will not protect you from injury during a collision. You are more likely to hit your head in a collision if you do not wear your shoulder
belt. The lap and shoulder belt are meant to be used together.
• A belt that is too loose will not protect you properly. In a sudden stop you could move too far forward, increasing the possibility of injury. Wear your seat belt snugly.
• A frayed or torn belt could rip apart in a collision and leave you with no protection. Inspect the belt system periodically, checking for cuts, frays, or loose parts.
Damaged parts must be replaced immediately. Do not disassemble or modify the
system. Seat belt assemblies must be replaced after a collision if they have been
damaged (bent retractor, torn webbing, etc.).
• The seat belts for both front seating positions are equipped with pretensioning devices that are designed to remove slack from the seat belt in the event of a
collision.
• A deployed pretensioner or a deployed airbag must be replaced immediately.
GETTING STARTED
9
Page 16 of 88
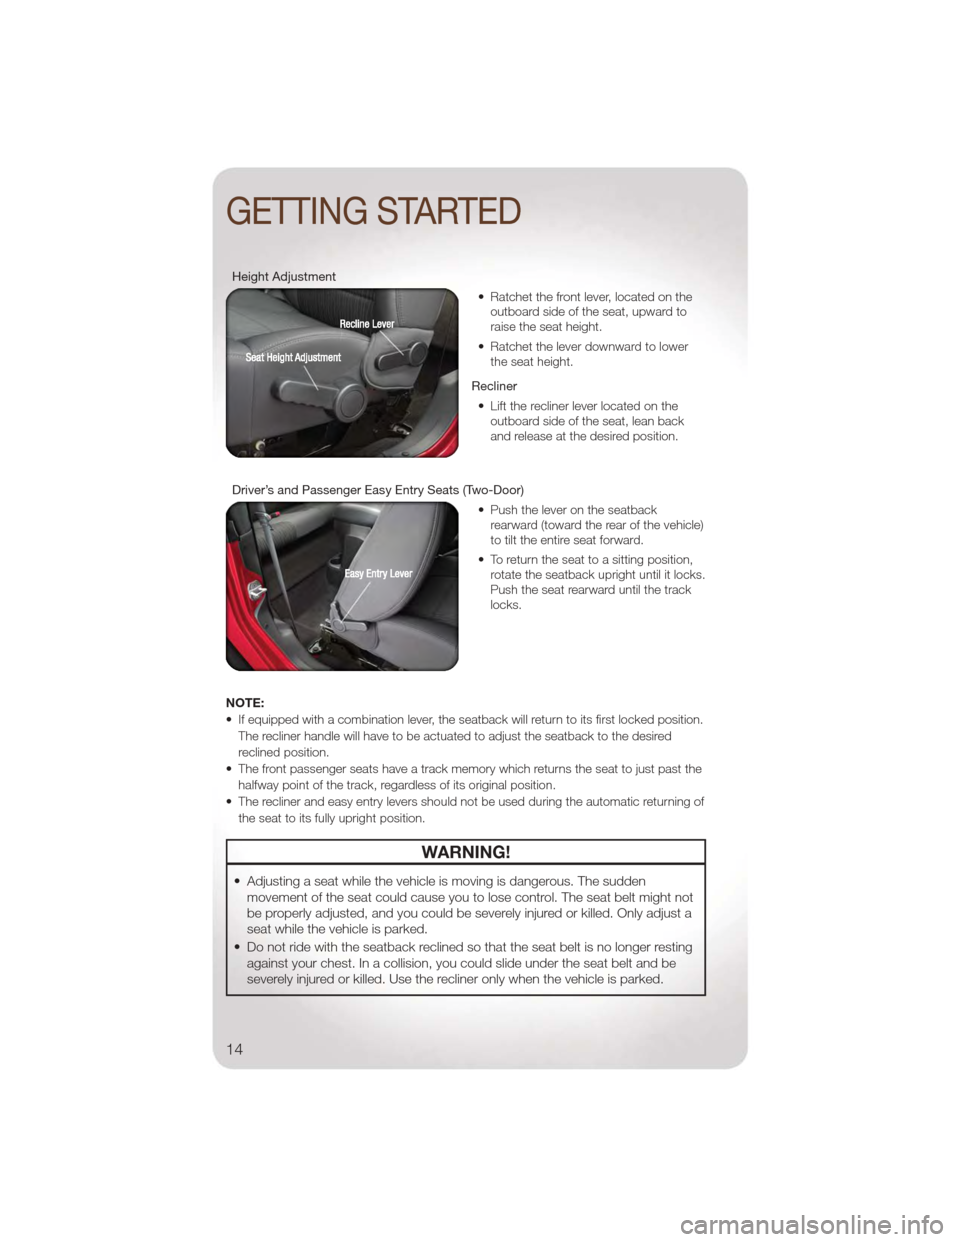
Height Adjustment• Ratchet the front lever, located on theoutboard side of the seat, upward to
raise the seat height.
• Ratchet the lever downward to lower the seat height.
Recliner • Lift the recliner lever located on the outboard side of the seat, lean back
and release at the desired position.
Driver’s and Passenger Easy Entry Seats (Two-Door) • Push the lever on the seatbackrearward (toward the rear of the vehicle)
to tilt the entire seat forward.
• To return the seat to a sitting position, rotate the seatback upright until it locks.
Push the seat rearward until the track
locks.
NOTE:
• If equipped with a combination lever, the seatback will return to its first locked position. The recliner handle will have to be actuated to adjust the seatback to the desired
reclined position.
• The front passenger seats have a track memory which returns the seat to just past the halfway point of the track, regardless of its original position.
• The recliner and easy entry levers should not be used during the automatic returning of the seat to its fully upright position.
WARNING!
• Adjusting a seat while the vehicle is moving is dangerous. The suddenmovement of the seat could cause you to lose control. The seat belt might not
be properly adjusted, and you could be severely injured or killed. Only adjust a
seat while the vehicle is parked.
• Do not ride with the seatback reclined so that the seat belt is no longer resting against your chest. In a collision, you could slide under the seat belt and be
severely injured or killed. Use the recliner only when the vehicle is parked.
GETTING STARTED
14
Page 17 of 88
REAR SEATS
Folding Rear Seat
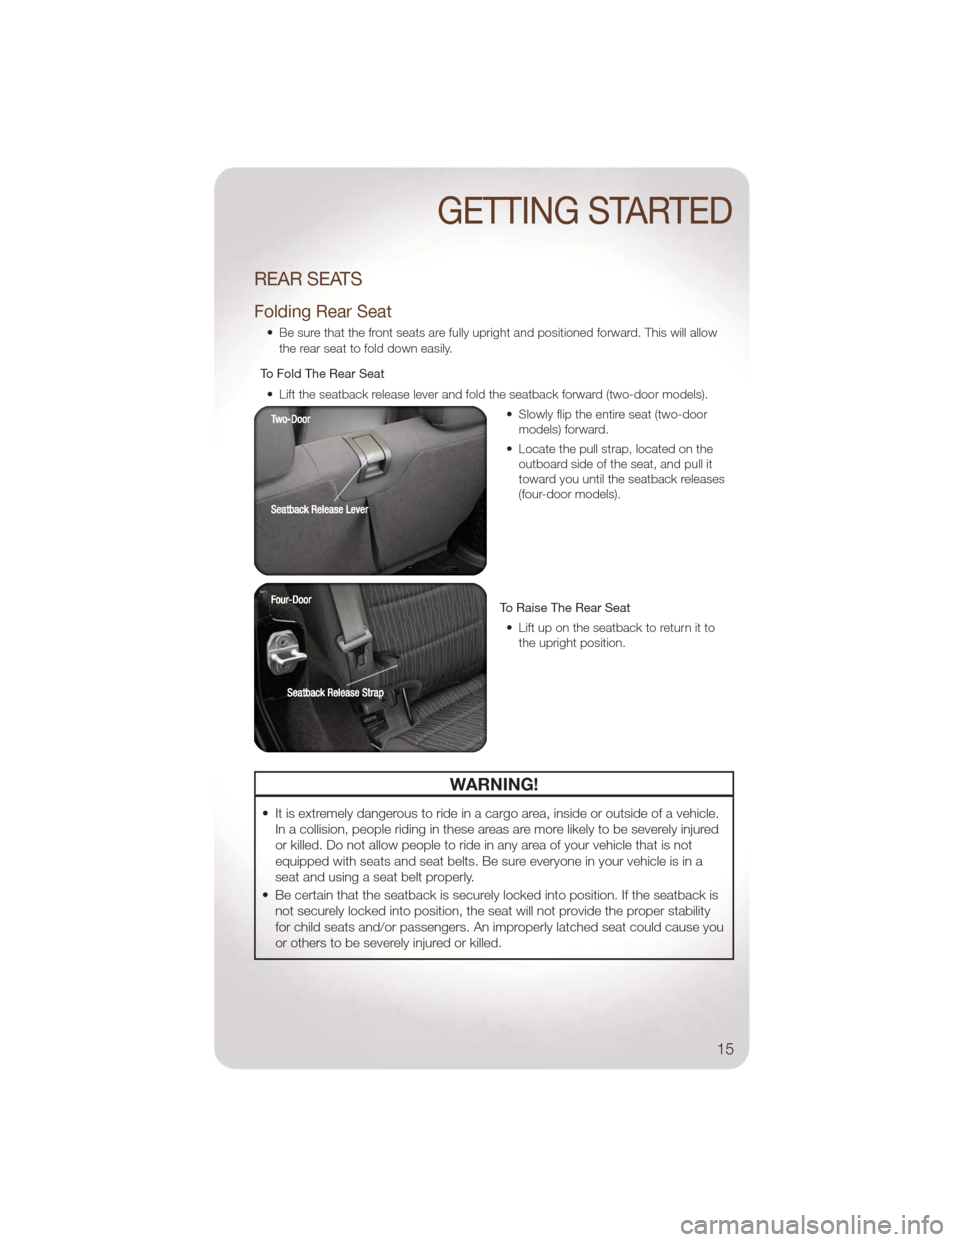
• Be sure that the front seats are fully upright and positioned forward. This will allowthe rear seat to fold down easily.
To Fold The Rear Seat • Lift the seatback release lever and fold the seatback forward (two-door models). • Slowly flip the entire seat (two-doormodels) forward.
• Locate the pull strap, located on the outboard side of the seat, and pull it
toward you until the seatback releases
(four-door models).
To Raise The Rear Seat • Lift up on the seatback to return it to the upright position.
WARNING!
• It is extremely dangerous to ride in a cargo area, inside or outside of a vehicle.In a collision, people riding in these areas are more likely to be severely injured
or killed. Do not allow people to ride in any area of your vehicle that is not
equipped with seats and seat belts. Be sure everyone in your vehicle is in a
seat and using a seat belt properly.
• Be certain that the seatback is securely locked into position. If the seatback is not securely locked into position, the seat will not provide the proper stability
for child seats and/or passengers. An improperly latched seat could cause you
or others to be severely injured or killed.
GETTING STARTED
15
Page 18 of 88
TILT STEERING COLUMN
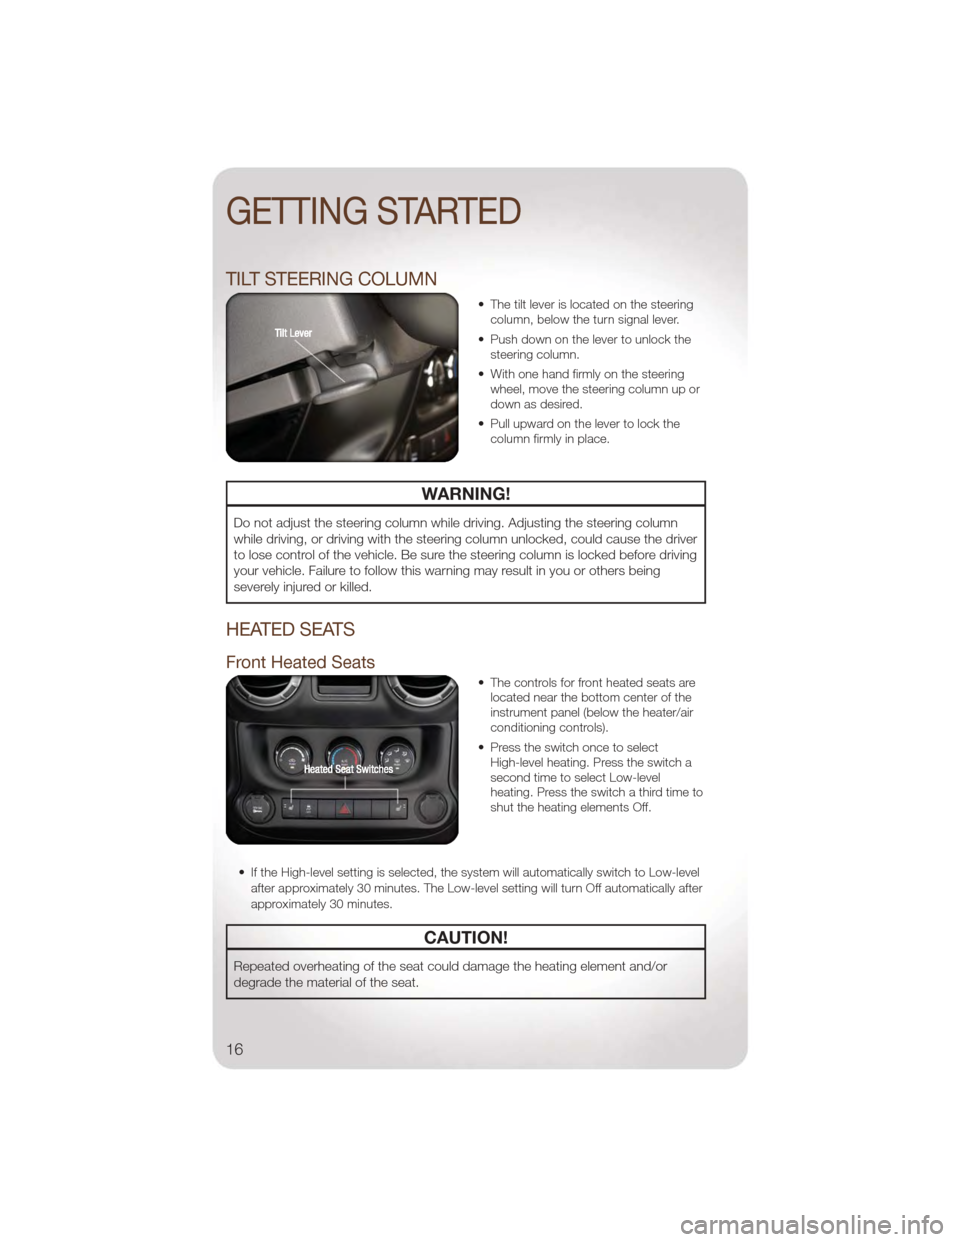
• The tilt lever is located on the steeringcolumn, below the turn signal lever.
• Push down on the lever to unlock the steering column.
• With one hand firmly on the steering wheel, move the steering column up or
down as desired.
• Pull upward on the lever to lock the column firmly in place.
WARNING!
Do not adjust the steering column while driving. Adjusting the steering column
while driving, or driving with the steering column unlocked, could cause the driver
to lose control of the vehicle. Be sure the steering column is locked before driving
your vehicle. Failure to follow this warning may result in you or others being
severely injured or killed.
HEATED SEATS
Front Heated Seats
• The controls for front heated seats arelocated near the bottom center of the
instrument panel (below the heater/air
conditioning controls).
• Press the switch once to select High-level heating. Press the switch a
second time to select Low-level
heating. Press the switch a third time to
shut the heating elements Off.
• If the High-level setting is selected, the system will automatically switch to Low-level after approximately 30 minutes. The Low-level setting will turn Off automatically after
approximately 30 minutes.
CAUTION!
Repeated overheating of the seat could damage the heating element and/or
degrade the material of the seat.
GETTING STARTED
16
Page 36 of 88
Audio Jack
• The Audio Jack allows a portable device, such as an MP3 player or a cassetteplayer, to be plugged into the radio and utilize the vehicle’s audio system, using a
3.5 mm audio cable, to amplify the source and play through the vehicle speakers.
• Pressing the AUX button will change the mode to auxiliary device if the Audio Jack is connected, allowing the music from your portable device to play through the
vehicle's speakers.
• The functions of the portable device are controlled using the device buttons. The volume may be controlled using the radio or portable device.
Clock Setting
• Press and hold the TIME button until the hours blink; turn the TUNE/SCROLL controlknob to set the hours.
• Press the TUNE/SCROLL control knob until the minutes begin to blink; turn the TUNE/SCROLL control knob to set the minutes.
• Press the TUNE/SCROLL control knob to save the time change.
• To exit, press any button/knob or wait five seconds.
Store Radio Presets
• Press the SET/RND button once and SET 1 will show in the display. Then select button (1–6).
• A second station may be added to each push button. Press the SET/RND button twice and SET 2 will show in the display, then select button (1–6).
How To Load Multiple CDs/DVDs
Media Center 230 (Sales Code REQ) Only
• Press the LOAD button and then press the button with the corresponding number (1–6) where the CD is being loaded. The radio will display PLEASE WAIT and prompt
when to INSERT DISC.
• After the radio displays INSERT DISC, insert the CD into the player. The radio display will show LOADING DISC when the disc is loading and “READING DISC” when the
radio is reading the disc.
• Press the eject button and then the corresponding number (1–6) to eject the desired disc.
ELECTRONICS
34
Page 38 of 88
NOTE:Your radio may not be equipped with the Uconnect™ Voice Command and
Uconnect™ Phone features. To determine if your radio has these features, press the
Voice Command button on the radio. You will hear a voice prompt if you have the feature,
or see a message on the radio stating “Uconnect Phone not available” if you do not.
• Your radio has many features that add to the comfort and convenience of you andyour passengers. Some of these radio features should not be used when driving
because they take your eyes from the road or your attention from driving.
• The radio sales code is located on the lower right side of the radio faceplate.
Seek Up/Down
• Media Center 730N: Press the SEEK hard-key to seek through radio stations in AM, FM, or SAT bands. Seek through tracks in CD or iPod®modes or through songs in
the HDD playlist.
• Media Center 430/430N: Press the SEEK up/down arrow soft-keys to change the currently playing station in AM, FM or SAT bands. Seek through tracks in CD or
iPod
®modes or through songs in the HDD playlist.
Audio Jack
• The Audio Jack allows a portable device, such as an MP3 player or a cassetteplayer, to be plugged into the radio and utilize the vehicle’s audio system, using a
3.5 mm audio cable, to amplify the source and play through the vehicle speakers.
• Pressing the AUX button will change the mode to auxiliary device if the Audio Jack is connected, allowing the music from your portable device to be heard through the
vehicle's speakers.
• The functions of the portable device are controlled using the device buttons. The volume may be controlled using the radio or portable device.
Clock Setting
• Turn the radio on, then touch the screen where the time is displayed.
• Touch the USER CLOCK soft-key (Navigation radio only).
• To adjust the hours, touch either the HOUR FORWARD or HOUR BACKWARDsoft-key.
• To adjust the minutes, touch either the MINUTE FORWARD or MINUTE BACKWARD soft-key.
• To save the new time setting, touch the screen where the word “Save” is displayed.
Store Radio Presets
• Media Center 730N: Press the RADIO/MEDIA hard-key until AM FM SAT is displayed in the upper left corner of the screen.
• Media Center 430/430N: Press the RADIO hard-key to display AM FM SAT in the upper left corner of the screen.
• Select the radio band by touching either the AM, FM, or SAT soft-key.
• Find the station to store by either pressing the SEEK UP/DOWN hard-keys (Media Center 730N), touching the right and left arrow soft-keys (Media Center 430/430N),
touching the SCAN soft-key, or by using the DIRECT TUNE soft-key.
ELECTRONICS
36