ignition JEEP WRANGLER 2013 JK / 3.G Owner's Manual
[x] Cancel search | Manufacturer: JEEP, Model Year: 2013, Model line: WRANGLER, Model: JEEP WRANGLER 2013 JK / 3.GPages: 132, PDF Size: 3.32 MB
Page 103 of 132
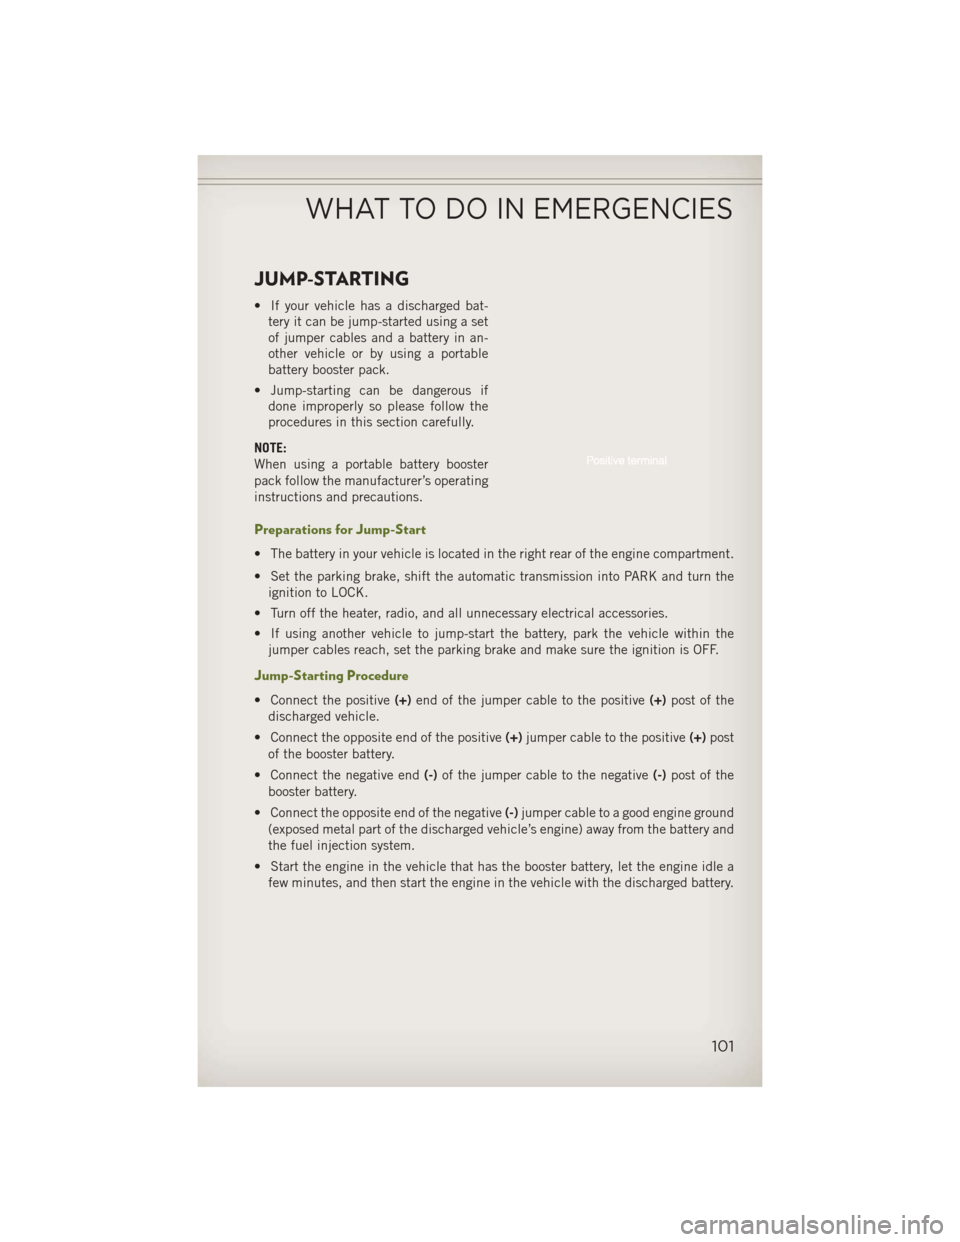
JUMP-STARTING
• If your vehicle has a discharged bat-tery it can be jump-started using a set
of jumper cables and a battery in an-
other vehicle or by using a portable
battery booster pack.
• Jump-starting can be dangerous if done improperly so please follow the
procedures in this section carefully.
NOTE:
When using a portable battery booster
pack follow the manufacturer’s operating
instructions and precautions.
Preparations for Jump-Start
• The battery in your vehicle is located in the right rear of the engine compartment.
• Set the parking brake, shift the automatic transmission into PARK and turn the ignition to LOCK.
• Turn off the heater, radio, and all unnecessary electrical accessories.
• If using another vehicle to jump-start the battery, park the vehicle within the jumper cables reach, set the parking brake and make sure the ignition is OFF.
Jump-Starting Procedure
• Connect the positive (+)end of the jumper cable to the positive (+)post of the
discharged vehicle.
• Connect the opposite end of the positive (+)jumper cable to the positive (+)post
of the booster battery.
• Connect the negative end (-)of the jumper cable to the negative (-)post of the
booster battery.
• Connect the opposite end of the negative (-)jumper cable to a good engine ground
(exposed metal part of the discharged vehicle’s engine) away from the battery and
the fuel injection system.
• Start the engine in the vehicle that has the booster battery, let the engine idle a few minutes, and then start the engine in the vehicle with the discharged battery.
WHAT TO DO IN EMERGENCIES
101
Page 104 of 132
Once the engine is started, remove the jumper cables in the reverse sequence:
• Disconnect the negative(-)jumper cable from the engine ground of the vehicle
with the discharged battery.
• Disconnect the negative end (-)of the jumper cable from the negative (-)post of
the booster battery.
• Disconnect the opposite end of the positive (+)jumper cable from the positive (+)
post of the booster battery.
• Disconnect the positive (+)end of the jumper cable from the positive (+)post of
the discharged vehicle.
• If frequent jump-starting is required to start your vehicle you should have the battery and charging system inspected at your authorized dealer.
CAUTION!
• Do not use a portable battery booster pack or any other booster source with a system voltage greater than 12 Volts or damage to the battery, starter motor,
alternator or electrical system may occur.
• Failure to follow these procedures could result in damage to the charging
system of the booster vehicle or the discharged vehicle.
•
Accessories that can be plugged into the vehicle power outlets draw power from
the vehicle’s battery, even when not in use (i.e., cellular phones, etc.). Eventually,
if plugged in long enough, the vehicle’s battery will discharge sufficiently to
degrade battery life and/or prevent the engine from starting.
WARNING!
•When temperatures are below the freezing point, electrolyte in a discharged
battery may freeze. Do not attempt jump-starting because the battery could
rupture or explode and cause personal injury. Battery temperature must be
brought above the freezing point before attempting a jump-start.
•Take care to avoid the radiator cooling fan whenever the hood is raised. It can start
anytime the ignition switch is on. You can be injured by moving fan blades.
• Remove any metal jewelry, such as watch bands or bracelets, that might make
an inadvertent electrical contact. You could be severely injured.
• Batteries contain sulfuric acid that can burn your skin or eyes and generate
hydrogen gas which is flammable and explosive. Keep open flames or sparks
away from the battery.
• Do not allow vehicles to touch each other as this could establish a ground
connection and personal injury could result.
• Failure to follow this procedure could result in personal injury or property
damage due to battery explosion.
• Do not connect the cable to the negative post (-) of the discharged battery.
The resulting electrical spark could cause the battery to explode and could
result in personal injury.
WHAT TO DO IN EMERGENCIES
102
Page 105 of 132
EMERGENCY TOW HOOKS
•If your vehicle is equipped with tow hooks, they are mounted in the front and the rear.
NOTE:
For off-road recovery, it is recommended to use both of the front tow hooks to minimize
the risk of damage to the vehicle.
CAUTION!
Tow hooks are for emergency use only, to rescue a vehicle stranded off-road. Do not
use tow hooks for tow truck hookup or highway towing. You could damage your
vehicle. Tow straps are recommended when towing the vehicle; chains may cause
vehicle damage.
WARNING!
• Chains are not recommended for freeing a stuck vehicle. Chains may break,causing serious injury or death.
• Stand clear of vehicles when pulling with tow hooks. Tow straps may become
disengaged, causing serious injury.
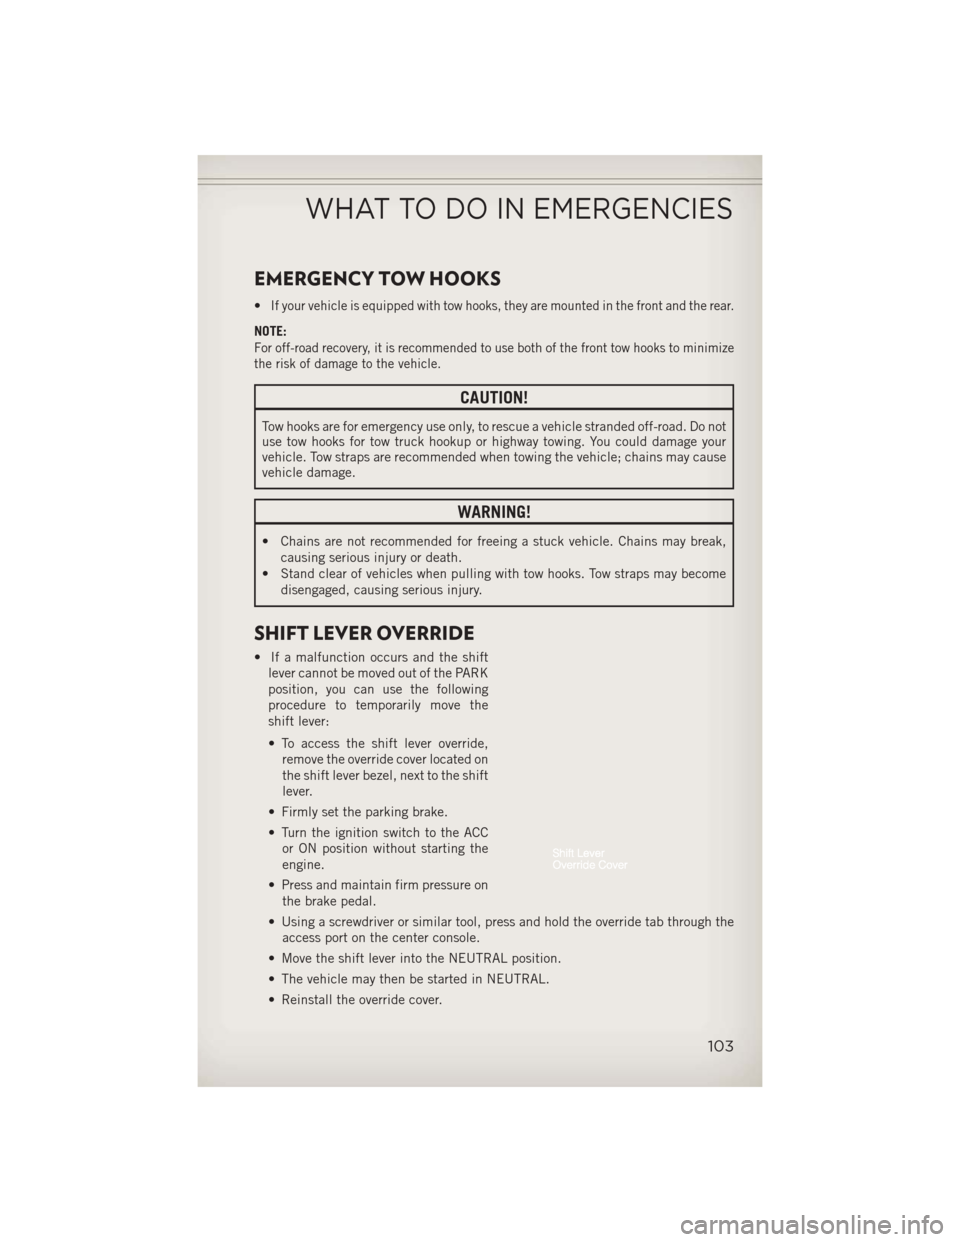
SHIFT LEVER OVERRIDE
• If a malfunction occurs and the shiftlever cannot be moved out of the PARK
position, you can use the following
procedure to temporarily move the
shift lever:
• To access the shift lever override,remove the override cover located on
the shift lever bezel, next to the shift
lever.
• Firmly set the parking brake.
• Turn the ignition switch to the ACC or ON position without starting the
engine.
• Press and maintain firm pressure on the brake pedal.
• Using a screwdriver or similar tool, press and hold the override tab through the access port on the center console.
• Move the shift lever into the NEUTRAL position.
• The vehicle may then be started in NEUTRAL.
• Reinstall the override cover.
WHAT TO DO IN EMERGENCIES
103
Page 114 of 132
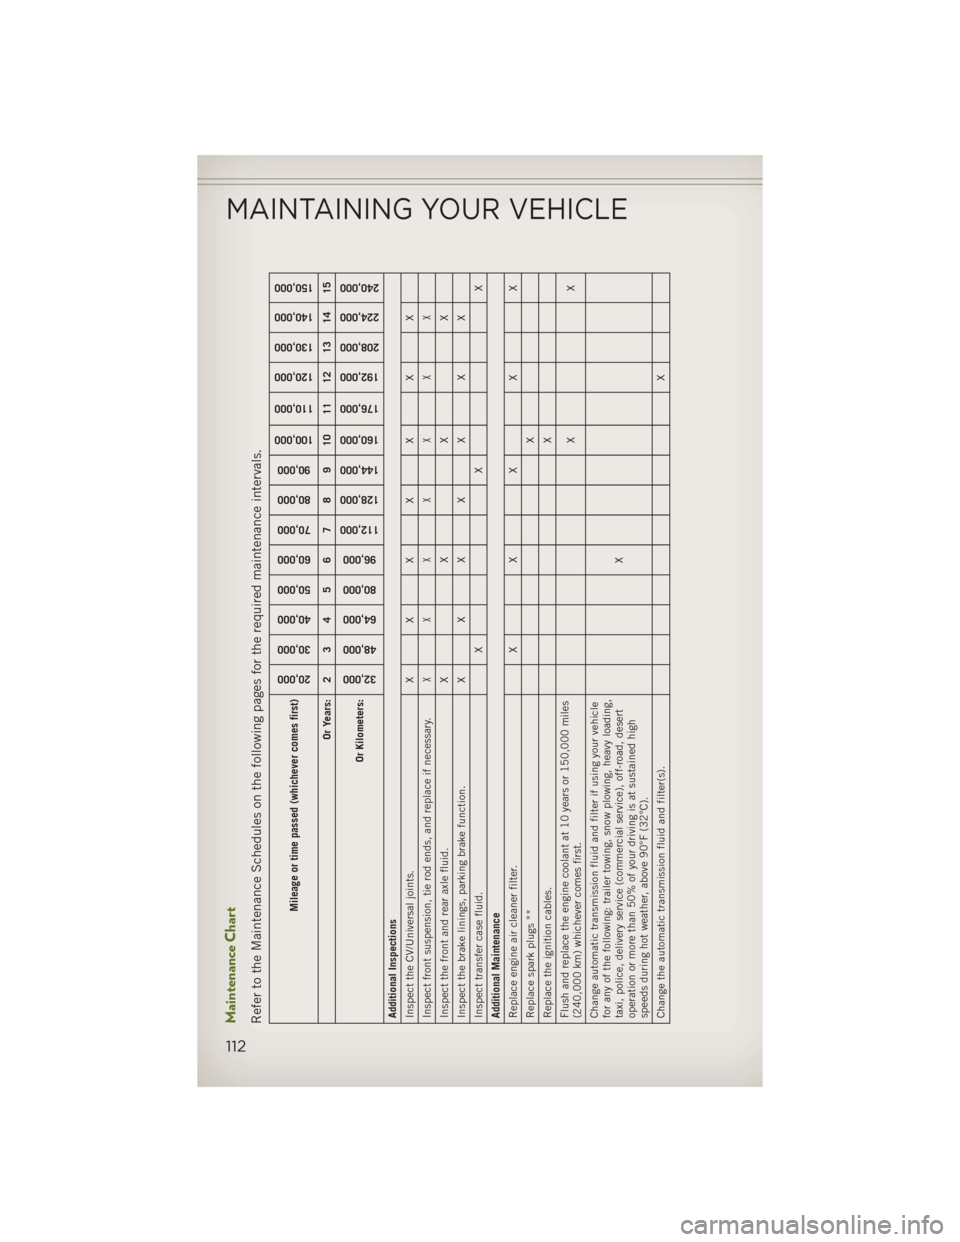
Maintenance ChartRefer to the Maintenance Schedules on the following pages for the required maintenance intervals.
Mileage or time passed (whichever comes first)
20,000
30,000
40,000
50,000
60,000
70,000
80,000
90,000
100,000
110,000
120,000
130,000
140,000
150,000
Or Years: 23456789101112131415
Or Kilometers:
32,000
48,000
64,000
80,000
96,000
112,000
128,000
144,000
160,000
176,000
192,000
208,000
224,000
240,000
Additional Inspections
Inspect the CV/Universal joints. X X X X X X X
Inspect front suspension, tie rod ends, and replace if necessary.
XXXXX XX
Inspect the front and rear axle fluid. XXX X
Inspect the brake linings, parking brake function. X X X X XX X
Inspect transfer case fluid. XX X
Additional Maintenance
Replace engine air cleaner filter. XXX XX
Replace spark plugs ** X
Replace the ignition cables. X
Flush and replace the engine coolant at 10 years or 150,000 miles
(240,000 km) whichever comes first. XX
Change automatic transmission fluid and filter if using your vehicle
for any of the following: trailer towing, snow plowing, heavy loading,
taxi, police, delivery service (commercial service), off-road, desert
operation or more than 50% of your driving is at sustained high
speeds during hot weather, above 90°F (32°C). X
Change the automatic transmission fluid and filter(s). X
MAINTAINING YOUR VEHICLE
112
Page 118 of 132
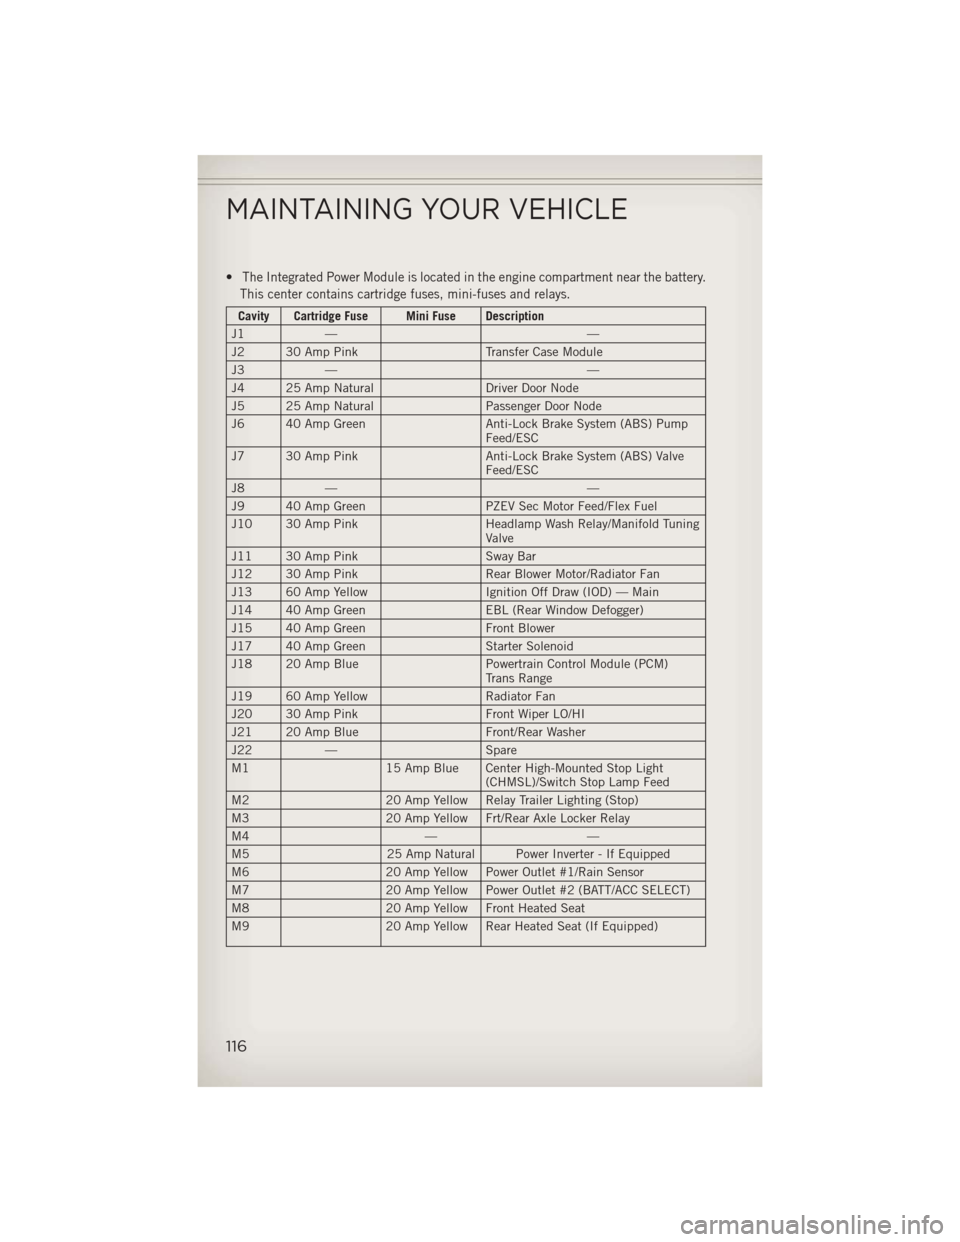
•The Integrated Power Module is located in the engine compartment near the battery.
This center contains cartridge fuses, mini-fuses and relays.
Cavity Cartridge Fuse Mini Fuse Description
J1 — —
J2 30 Amp Pink Transfer Case Module
J3 — —
J4 25 Amp Natural Driver Door Node
J5 25 Amp Natural Passenger Door Node
J6 40 Amp Green Anti-Lock Brake System (ABS) Pump
Feed/ESC
J7 30 Amp Pink Anti-Lock Brake System (ABS) Valve
Feed/ESC
J8 — —
J9 40 Amp Green PZEV Sec Motor Feed/Flex Fuel
J10 30 Amp Pink Headlamp Wash Relay/Manifold Tuning
Valve
J11 30 Amp Pink Sway Bar
J12 30 Amp Pink Rear Blower Motor/Radiator Fan
J13 60 Amp Yellow Ignition Off Draw (IOD) — Main
J14 40 Amp Green EBL (Rear Window Defogger)
J15 40 Amp Green Front Blower
J17 40 Amp Green Starter Solenoid
J18 20 Amp Blue Powertrain Control Module (PCM)
Trans Range
J19 60 Amp Yellow Radiator Fan
J20 30 Amp Pink Front Wiper LO/HI
J21 20 Amp Blue Front/Rear Washer
J22 — Spare
M1 15 Amp Blue Center High-Mounted Stop Light
(CHMSL)/Switch Stop Lamp Feed
M2 20 Amp Yellow Relay Trailer Lighting (Stop)
M3 20 Amp Yellow Frt/Rear Axle Locker Relay
M4 ——
M5 25 Amp Natural Power Inverter - If Equipped
M6 20 Amp Yellow Power Outlet #1/Rain Sensor
M7 20 Amp Yellow Power Outlet #2 (BATT/ACC SELECT)
M8 20 Amp Yellow Front Heated Seat
M9 20 Amp Yellow Rear Heated Seat (If Equipped)
MAINTAINING YOUR VEHICLE
116
Page 119 of 132
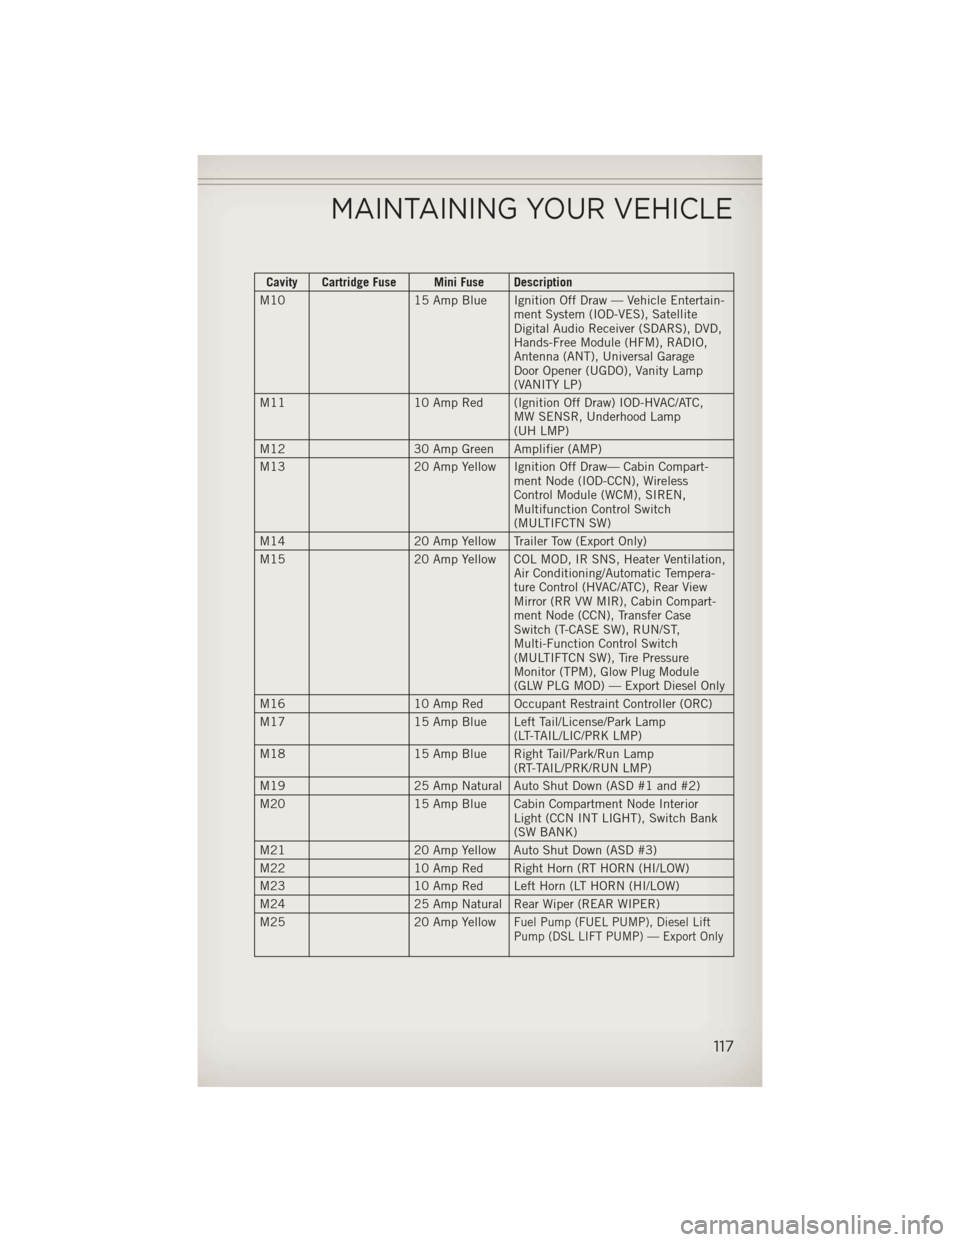
Cavity Cartridge Fuse Mini Fuse Description
M10 15 Amp Blue Ignition Off Draw — Vehicle Entertain-
ment System (IOD-VES), Satellite
Digital Audio Receiver (SDARS), DVD,
Hands-Free Module (HFM), RADIO,
Antenna (ANT), Universal Garage
Door Opener (UGDO), Vanity Lamp
(VANITY LP)
M11 10 Amp Red (Ignition Off Draw) IOD-HVAC/ATC,
MW SENSR, Underhood Lamp
(UH LMP)
M12 30 Amp Green Amplifier (AMP)
M13 20 Amp Yellow Ignition Off Draw— Cabin Compart-
ment Node (IOD-CCN), Wireless
Control Module (WCM), SIREN,
Multifunction Control Switch
(MULTIFCTN SW)
M14 20 Amp Yellow Trailer Tow (Export Only)
M15 20 Amp Yellow COL MOD, IR SNS, Heater Ventilation,
Air Conditioning/Automatic Tempera-
ture Control (HVAC/ATC), Rear View
Mirror (RR VW MIR), Cabin Compart-
ment Node (CCN), Transfer Case
Switch (T-CASE SW), RUN/ST,
Multi-Function Control Switch
(MULTIFTCN SW), Tire Pressure
Monitor (TPM), Glow Plug Module
(GLW PLG MOD) — Export Diesel Only
M16 10 Amp Red Occupant Restraint Controller (ORC)
M17 15 Amp Blue Left Tail/License/Park Lamp
(LT-TAIL/LIC/PRK LMP)
M18 15 Amp Blue Right Tail/Park/Run Lamp
(RT-TAIL/PRK/RUN LMP)
M19 25 Amp Natural Auto Shut Down (ASD #1 and #2)
M20 15 Amp Blue Cabin Compartment Node Interior
Light (CCN INT LIGHT), Switch Bank
(SW BANK)
M21 20 Amp Yellow Auto Shut Down (ASD #3)
M22 10 Amp Red Right Horn (RT HORN (HI/LOW)
M23 10 Amp Red Left Horn (LT HORN (HI/LOW)
M24 25 Amp Natural Rear Wiper (REAR WIPER)
M25 20 Amp Yellow
Fuel Pump (FUEL PUMP), Diesel Lift
Pump (DSL LIFT PUMP) — Export Only
MAINTAINING YOUR VEHICLE
117
Page 120 of 132
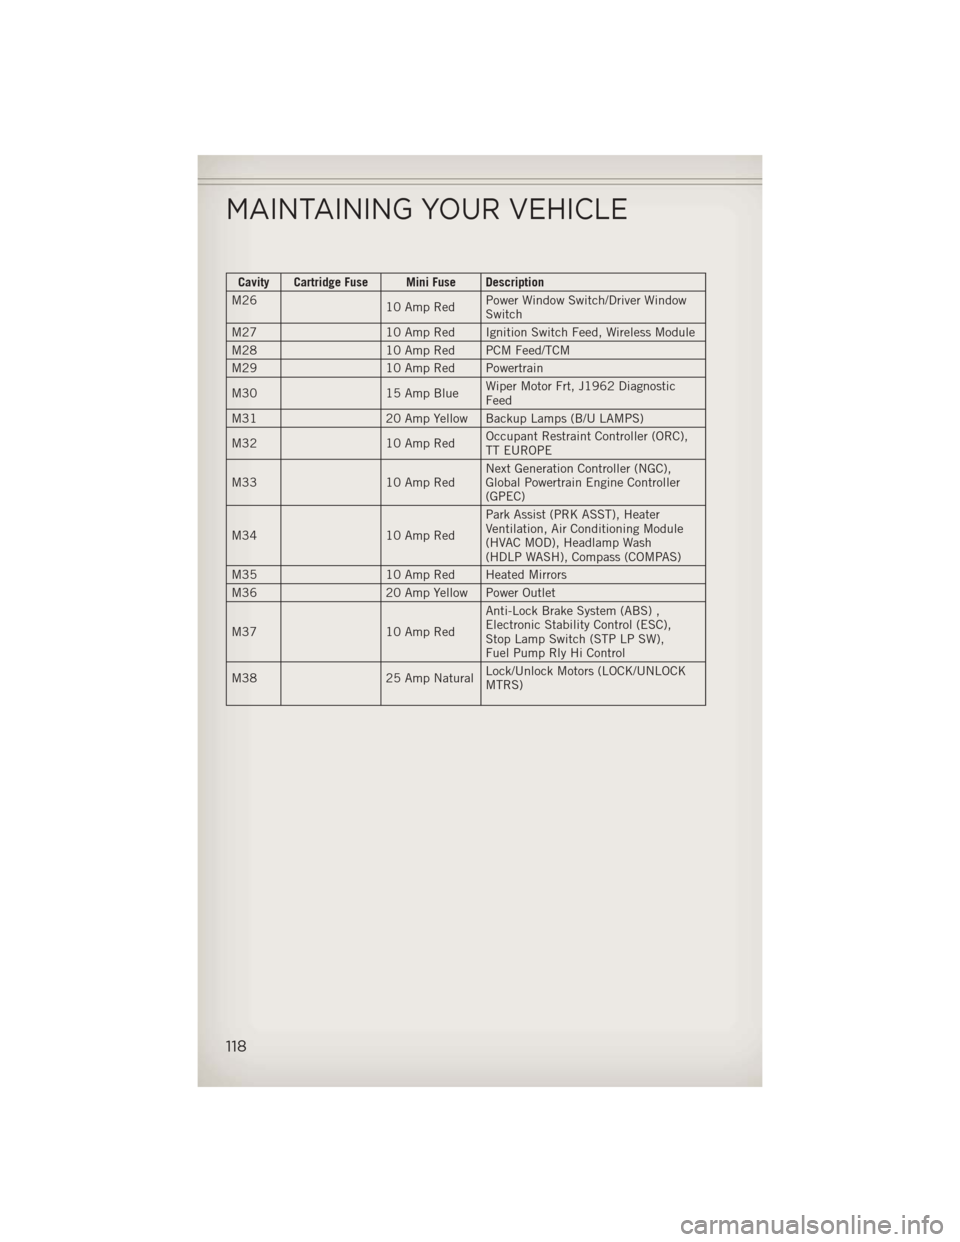
Cavity Cartridge Fuse Mini Fuse Description
M26 10 Amp RedPower Window Switch/Driver Window
Switch
M27 10 Amp Red Ignition Switch Feed, Wireless Module
M28 10 Amp Red PCM Feed/TCM
M29 10 Amp Red Powertrain
M30 15 Amp Blue Wiper Motor Frt, J1962 Diagnostic
Feed
M31 20 Amp Yellow Backup Lamps (B/U LAMPS)
M32 10 Amp Red Occupant Restraint Controller (ORC),
TT EUROPE
M33 10 Amp Red Next Generation Controller (NGC),
Global Powertrain Engine Controller
(GPEC)
M34 10 Amp Red Park Assist (PRK ASST), Heater
Ventilation, Air Conditioning Module
(HVAC MOD), Headlamp Wash
(HDLP WASH), Compass (COMPAS)
M35 10 Amp Red Heated Mirrors
M36 20 Amp Yellow Power Outlet
M37 10 Amp Red Anti-Lock Brake System (ABS) ,
Electronic Stability Control (ESC),
Stop Lamp Switch (STP LP SW),
Fuel Pump Rly Hi Control
M38 25 Amp Natural Lock/Unlock Motors (LOCK/UNLOCK
MTRS)
MAINTAINING YOUR VEHICLE
118