tow JEEP WRANGLER 2013 JK / 3.G User Guide
[x] Cancel search | Manufacturer: JEEP, Model Year: 2013, Model line: WRANGLER, Model: JEEP WRANGLER 2013 JK / 3.GPages: 132, PDF Size: 3.32 MB
Page 3 of 132
INTRODUCTION/WELCOME
WELCOME FROM CHRYSLER
GROUP LLC.................. 2
CONTROLS AT A GLANCE
DRIVER COCKPIT .............. 6
INSTRUMENT CLUSTER .......... 8
GETTING STARTED
KEYFOB ................... 10
REMOTE START.............. 10
THEFT ALARM ................ 11
SEATBELT .................. 11
SUPPLEMENTAL RESTRAINT
SYSTEM (SRS) — AIR BAGS ....... 12
CHILD RESTRAINTS ............ 13
FRONT SEATS ................ 15
REAR SEATS ................. 17
TILT STEERING COLUMN ......... 18
HEATEDSEATS ............... 19
OPERATING YOUR VEHICLE
ENGINE BREAK-IN
RECOMMENDATIONS ........... 20
TURN SIGNAL/LIGHTS LEVER ...... 20
WIPER/WASHER LEVER .......... 22
SPEED CONTROL .............. 23
MANUAL CLIMATE CONTROLS ...... 24
AUTOMATIC TEMPERATURE
CONTROLS (ATC) .............. 25
SUNRIDER
®AND SOFT TOP ....... 26
HARD TOP AND FREEDOM TOP®.... 34
DUAL TOP — IF EQUIPPED ........ 37
WIND BUFFETING ............. 37
ELECTRONICS
YOUR VEHICLE'S SOUND SYSTEM . . . 38
Uconnect®130 ............... 40
Uconnect®130 WITH SiriusXM
SATELLITE RADIO .............. 42
Uconnect
®230 ............... 45
Uconnect®430/430N ........... 48
Uconnect®730N .............. 58
SiriusXM SATELLITE RADIO/TRAVEL
LINK ...................... 69
STEERING WHEEL AUDIO CONTROLS.. 72
iPod®/USB/MP3 CONTROL ........ 72
Uconnect®Phone .............. 73
Uconnect®VOICE COMMAND ....... 76
Bluetooth®STREAMING AUDIO ..... 79ELECTRONIC VEHICLE INFORMATION
CENTER (EVIC)............... 79
PROGRAMMABLE FEATURES ....... 80
POWER INVERTER ............. 81
POWER OUTLETS ............. 82
OFF-ROAD CAPABILITIES
COMMAND-TRAC®/ROCK-TRAC®..... 83
AXLE LOCK (TRU-LOK®)
RUBICON ONLY ............... 83
ELECTRONIC SWAY BAR DISCONNECT –
RUBICON ONLY............... 84
UTILITY
TRAILER TOWING WEIGHTS
(MAXIMUM TRAILER WEIGHT
RATINGS).................. 85
RECREATIONAL TOWING
(BEHIND MOTORHOME, ETC.) ..... 87
WHAT TO DO IN EMERGENCIES
ROADSIDE ASSISTANCE.......... 91
INSTRUMENT CLUSTER WARNING
LIGHTS .................... 91
IF YOUR ENGINE OVERHEATS ...... 96
JACKING AND TIRE CHANGING ..... 97
JUMP-STARTING ............. 101
EMERGENCY TOW HOOKS ....... 103
SHIFT LEVER OVERRIDE ........ 103
TOWING A DISABLED VEHICLE .... 104
FREEING A STUCK VEHICLE ...... 104
EVENT DATA RECORDER (EDR) .... 105
MAINTAINING YOUR VEHICLE
OPENING THE HOOD.......... 106
ENGINE COMPARTMENT ........ 107
FLUIDS AND CAPACITIES ........ 108
MAINTENANCE SCHEDULE ...... 110
MAINTENANCE RECORD ........ 114
FUSES .................... 115
TIRE PRESSURES ............ 119
WHEEL AND WHEEL TRIM CARE . . . 120
EXTERIOR BULBS ............ 120
CONSUMER ASSISTANCE
CHRYSLER GROUP LLC
CUSTOMER CENTER ........... 121
CHRYSLER CANADA INC.
CUSTOMER CENTER ........... 121
ASSISTANCE FOR THE HEARING
IMPAIRED ................. 121
PUBLICATIONS ORDERING ....... 121
REPORTING SAFETY DEFECTS IN
THEUNITEDSTATES ........... 122
MOPAR ACCESSORIES
AUTHENTIC ACCESSORIES
BY MOPAR®................ 123
INDEX.................. 124
FAQ(HowTo?)
FREQUENTLY ASKED QUESTIONS . . . 127
TABLE OF CONTENTS
Page 18 of 132
Driver’s and Passenger Easy Entry Seats (Two-Door)
• Push the lever on the seatback rear-ward (toward the rear of the vehicle) to
tilt the entire seat forward.
•
To return the seat to a sitting position,
rotate the seatback upright until it
locks. Push the seat rearward until the
track locks.
NOTE:
• If equipped with a combination lever, the seatback will return to its first
locked position. The recliner handle
will have to be actuated to adjust the seatback to the desired reclined position.
• The front passenger seats have a track memory which returns the seat to just past the halfway point of the track, regardless of its original position.
• The recliner and easy entry levers should not be used during the automatic returning of the seat to its fully upright position.
WARNING!
• Adjusting a seat while the vehicle is moving is dangerous. The sudden
movement of the seat could cause you to lose control. The seat belt might not
be properly adjusted, and you could be severely injured or killed. Only adjust a
seat while the vehicle is parked.
• Do not ride with the seatback reclined so that the seat belt is no longer resting
against your chest. In a collision, you could slide under the seat belt and be
severely injured or killed. Use the recliner only when the vehicle is parked.
GETTING STARTED
16
Page 19 of 132
REAR SEATS
Folding Rear Seat
• Be sure that the front seats are fully upright and positioned forward. This will allowthe rear seat to fold down easily.
To Fold The Rear Seat
• Lift the seatback release lever and fold the seatback forward (two-door models).
• Slowly flip the entire seat (two-doormodels) forward.
• Locate the pull strap, located on the outboard side of the seat, and pull it
toward you until the seatback releases
(four-door models).
To Raise The Rear Seat
• Lift up on the seatback to return it tothe upright position.
WARNING!
• It is extremely dangerous to ride in a cargo area, inside or outside of a vehicle.
In a collision, people riding in these areas are more likely to be severely injured
or killed. Do not allow people to ride in any area of your vehicle that is not
equipped with seats and seat belts. Be sure everyone in your vehicle is in a seat
and using a seat belt properly.
• Be certain that the seatback is securely locked into position. If the seatback is
not securely locked into position, the seat will not provide the proper stability
for child seats and/or passengers. An improperly latched seat could cause you
or others to be severely injured or killed.
GETTING STARTED
17
Page 23 of 132
Headlights/Parking Lights/Automatic Headlights
• Rotate the end of the lever to the first detent for parking lights, the second
detent for headlights
, and the third detent for AUTO.
• When set to AUTO, the system automatically turns the headlights on or off based on ambient light levels.
Instrument Panel Dimmer
• Rotate the center portion of the lever to the extreme bottom position to fully dimthe instrument panel lights and prevent the interior lights from illuminating when
a door is opened.
•
Rotate the center portion of the lever up to increase the brightness of the instrument
panel lights when the parking lights or headlights are on.
•Rotate the center portion of the lever upward to the next detent position to brighten
the odometer and radio controls when the parking lights or headlights are on.
• Rotate the center portion of the lever upward to the last detent to turn on the interior lighting.
Flash To Pass
• Pull the lever toward you to activate the high beams. The high beams will remainon until the lever is released.
High Beam Operation
• Push the lever forward to activate the high beams.
NOTE:
For safe driving, turn off the high beams when oncoming traffic is present to prevent
headlight glare and as a courtesy to other motorists.
Fog Lights
• Turn on the parking lights or low beam headlights and pull out the end of the lever.
Turn Signals/Lane Change Assist
• Tap the lever up or down once and the turn signal (right or left) will flash threetimes and automatically turn off.
OPERATING YOUR VEHICLE
21
Page 24 of 132
WIPER/WASHER LEVER
Front Wipers
Intermittent, Low And High Operation
• Rotate the end of the lever to the first detent position for one of five intermittentsettings, the second detent for low wiper operation and the third detent for high
wiper operation.
Washer Operation
• Pull the lever toward you and hold for as long as spray is desired.
Mist
• Pull down on the lever and release when a single wipe is desired.
NOTE:
The mist feature does not activate the washer pump; therefore, no washer fluid will
be sprayed on the windshield. The wash function must be activated in order to spray
the windshield with washer fluid.
Rear Wiper
Wiper Operation
• Rotate the center portion of the lever forward to the first detent for rear wiper operation.
Washer Operation
• Rotate the center portion of the lever past the first detent to activate the rear washer.
OPERATING YOUR VEHICLE
22
Page 87 of 132
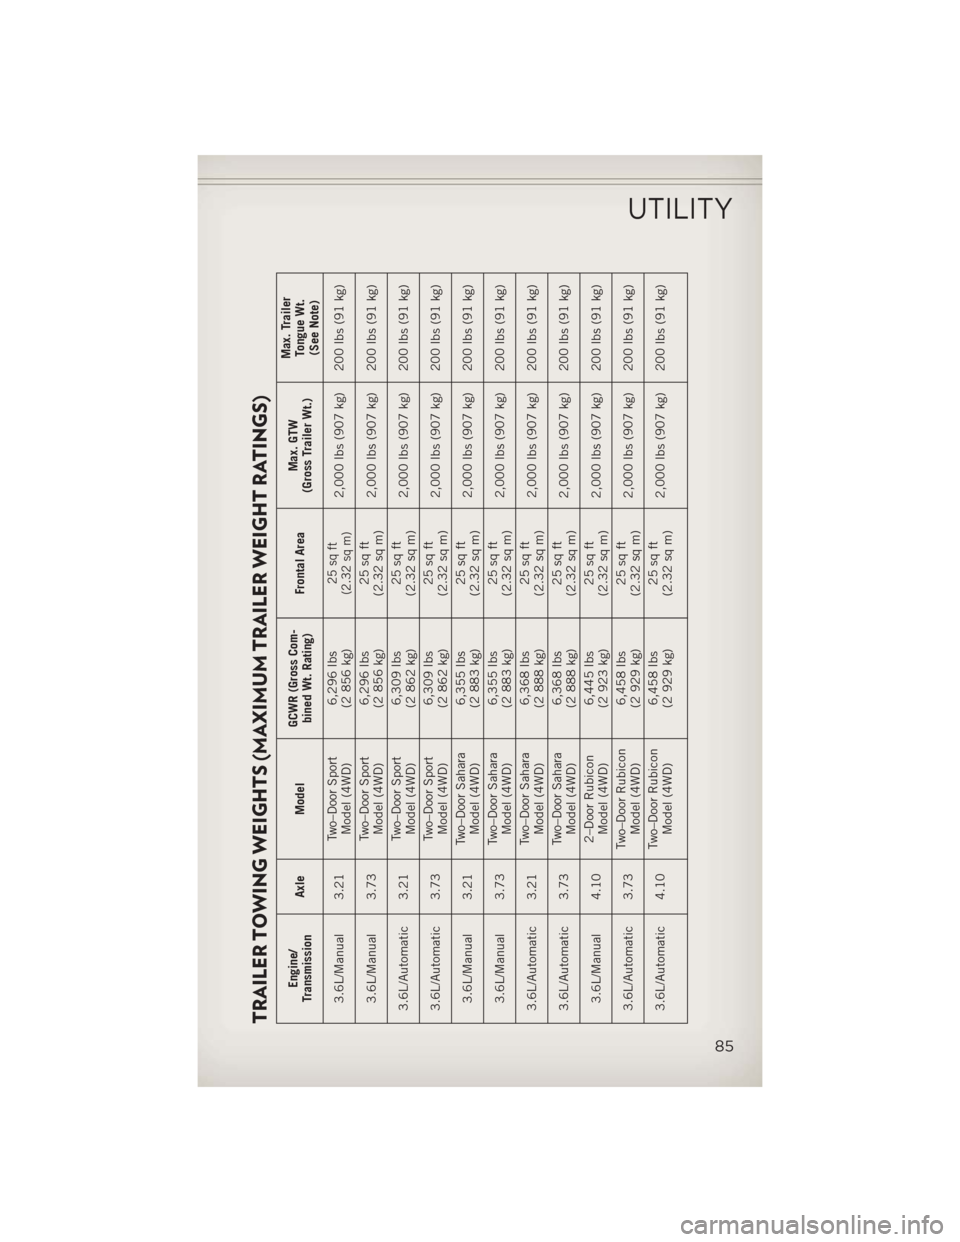
TRAILER TOWING WEIGHTS (MAXIMUM TRAILER WEIGHT RATINGS)
Engine/
Transmission Axle Model GCWR (Gross Com-
bined Wt. Rating) Frontal AreaMax. GTW
(Gross Trailer Wt.) Max. Trailer
Tongue Wt.(See Note)
3.6L/Manual 3.21 Two–Door Sport
Model (4WD) 6,296 lbs
(2 856 kg)
25 sq ft
(2.32 sq m)
2,000 lbs (907 kg) 200 lbs (91 kg)
3.6L/Manual 3.73 Two–Door Sport
Model (4WD) 6,296 lbs
(2 856 kg) 25 sq ft
(2.32 sq m) 2,000 lbs (907 kg) 200 lbs (91 kg)
3.6L/Automatic 3.21 Two–Door Sport
Model (4WD) 6,309 lbs
(2 862 kg) 25 sq ft
(2.32 sq m) 2,000 lbs (907 kg) 200 lbs (91 kg)
3.6L/Automatic 3.73 Two–Door Sport
Model (4WD) 6,309 lbs
(2 862 kg) 25 sq ft
(2.32 sq m) 2,000 lbs (907 kg) 200 lbs (91 kg)
3.6L/Manual 3.21 Two–Door Sahara
Model (4WD) 6,355 lbs
(2 883 kg) 25 sq ft
(2.32 sq m) 2,000 lbs (907 kg) 200 lbs (91 kg)
3.6L/Manual 3.73 Two–Door Sahara
Model (4WD) 6,355 lbs
(2 883 kg) 25 sq ft
(2.32 sq m) 2,000 lbs (907 kg) 200 lbs (91 kg)
3.6L/Automatic 3.21 Two–Door Sahara
Model (4WD) 6,368 lbs
(2 888 kg) 25 sq ft
(2.32 sq m) 2,000 lbs (907 kg) 200 lbs (91 kg)
3.6L/Automatic 3.73 Two–Door Sahara
Model (4WD) 6,368 lbs
(2 888 kg) 25 sq ft
(2.32 sq m) 2,000 lbs (907 kg) 200 lbs (91 kg)
3.6L/Manual 4.10 2–Door Rubicon
Model (4WD) 6,445 lbs
(2 923 kg) 25 sq ft
(2.32 sq m) 2,000 lbs (907 kg) 200 lbs (91 kg)
3.6L/Automatic 3.73 Two–Door Rubicon
Model (4WD) 6,458 lbs
(2 929 kg) 25 sq ft
(2.32 sq m) 2,000 lbs (907 kg) 200 lbs (91 kg)
3.6L/Automatic 4.10 Two–Door Rubicon
Model (4WD) 6,458 lbs
(2 929 kg) 25 sq ft
(2.32 sq m) 2,000 lbs (907 kg) 200 lbs (91 kg)
UTILITY
85
Page 88 of 132
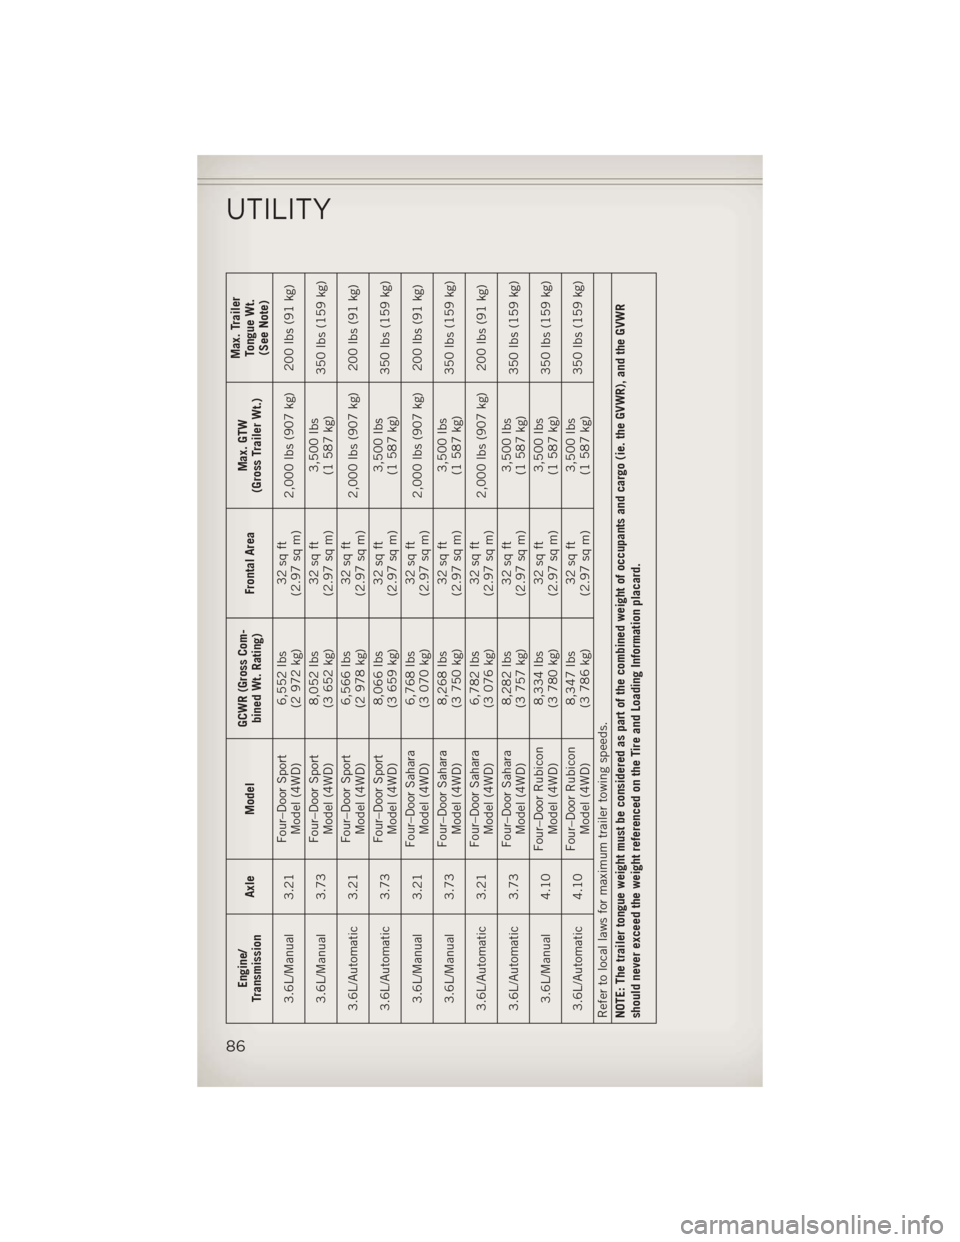
Engine/
Transmission Axle Model GCWR (Gross Com-
bined Wt. Rating) Frontal AreaMax. GTW
(Gross Trailer Wt.) Max. Trailer
Tongue Wt.(See Note)
3.6L/Manual 3.21 Four–Door Sport
Model (4WD) 6,552 lbs
(2 972 kg) 32 sq ft
(2.97 sq m) 2,000 lbs (907 kg) 200 lbs (91 kg)
3.6L/Manual 3.73 Four–Door Sport
Model (4WD) 8,052 lbs
(3 652 kg) 32 sq ft
(2.97 sq m) 3,500 lbs
(1 587 kg) 350 lbs (159 kg)
3.6L/Automatic 3.21 Four–Door Sport
Model (4WD) 6,566 lbs
(2 978 kg) 32 sq ft
(2.97 sq m) 2,000 lbs (907 kg) 200 lbs (91 kg)
3.6L/Automatic 3.73 Four–Door Sport
Model (4WD) 8,066 lbs
(3 659 kg) 32 sq ft
(2.97 sq m) 3,500 lbs
(1 587 kg) 350 lbs (159 kg)
3.6L/Manual 3.21 Four–Door Sahara
Model (4WD) 6,768 lbs
(3 070 kg) 32 sq ft
(2.97 sq m) 2,000 lbs (907 kg) 200 lbs (91 kg)
3.6L/Manual 3.73 Four–Door Sahara
Model (4WD) 8,268 lbs
(3 750 kg) 32 sq ft
(2.97 sq m) 3,500 lbs
(1 587 kg) 350 lbs (159 kg)
3.6L/Automatic 3.21 Four–Door Sahara
Model (4WD) 6,782 lbs
(3 076 kg) 32 sq ft
(2.97 sq m) 2,000 lbs (907 kg) 200 lbs (91 kg)
3.6L/Automatic 3.73 Four–Door Sahara
Model (4WD) 8,282 lbs
(3 757 kg) 32 sq ft
(2.97 sq m) 3,500 lbs
(1 587 kg) 350 lbs (159 kg)
3.6L/Manual 4.10 Four–Door Rubicon
Model (4WD) 8,334 lbs
(3 780 kg) 32 sq ft
(2.97 sq m) 3,500 lbs
(1 587 kg) 350 lbs (159 kg)
3.6L/Automatic 4.10 Four–Door Rubicon
Model (4WD) 8,347 lbs
(3 786 kg) 32 sq ft
(2.97 sq m) 3,500 lbs
(1 587 kg) 350
lbs (159 kg)
Refer to local laws for maximum trailer towing speeds.
NOTE: The trailer tongue weight must be considered as part of the combined weight of occupants and cargo (ie. the GVWR), and the GVWR
should never exceed the weight referenced on the Tire and Loading Information placard.
UTILITY
86
Page 89 of 132
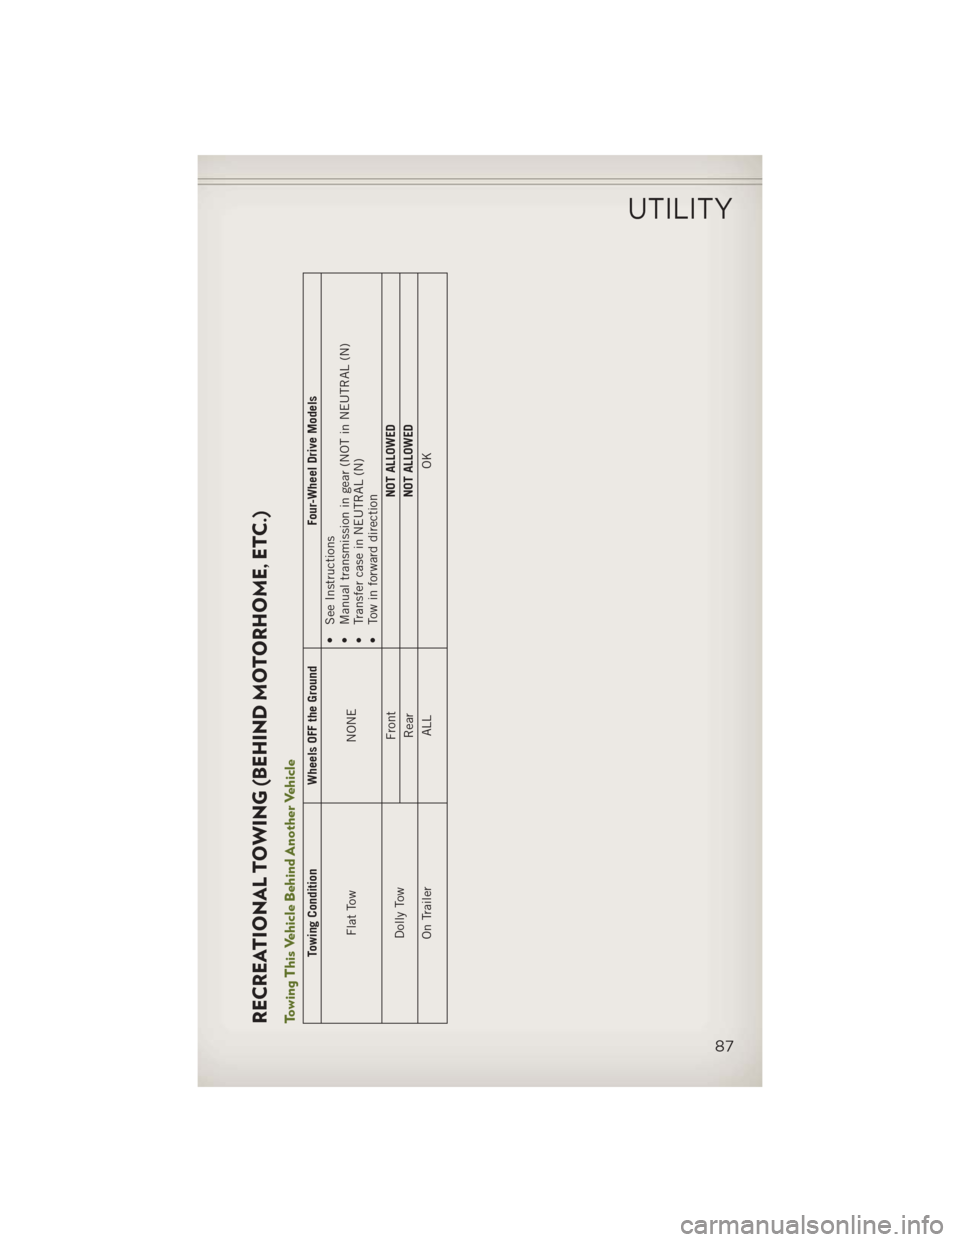
RECREATIONAL TOWING (BEHIND MOTORHOME, ETC.)Towing This Vehicle Behind Another Vehicle
Towing ConditionWheels OFF the Ground Four-Wheel Drive Models
Flat Tow NONE•
See Instructions
• Manual transmission in gear (NOT in NEUTRAL (N)
• Transfer case in NEUTRAL (N)
• Tow in forward direction
Dolly Tow Front
NOT ALLOWED
Rear NOT ALLOWED
On Trailer ALL OK
UTILITY
87
Page 90 of 132
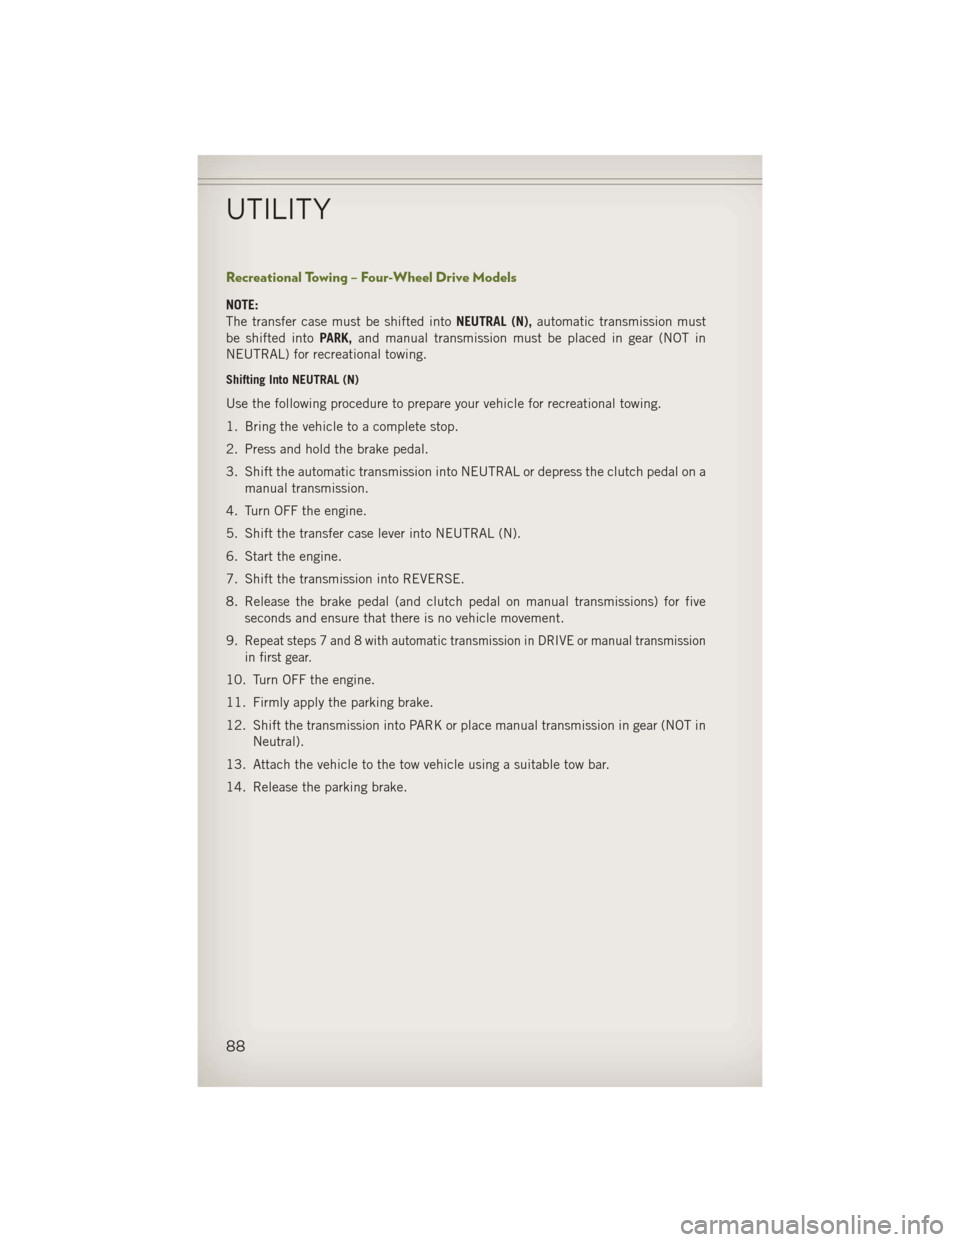
Recreational Towing – Four-Wheel Drive Models
NOTE:
The transfer case must be shifted intoNEUTRAL (N),automatic transmission must
be shifted into PARK,and manual transmission must be placed in gear (NOT in
NEUTRAL) for recreational towing.
Shifting Into NEUTRAL (N)
Use the following procedure to prepare your vehicle for recreational towing.
1. Bring the vehicle to a complete stop.
2. Press and hold the brake pedal.
3. Shift the automatic transmission into NEUTRAL or depress the clutch pedal on a manual transmission.
4. Turn OFF the engine.
5. Shift the transfer case lever into NEUTRAL (N).
6. Start the engine.
7. Shift the transmission into REVERSE.
8. Release the brake pedal (and clutch pedal on manual transmissions) for five seconds and ensure that there is no vehicle movement.
9.
Repeat steps 7 and 8 with automatic transmission in DRIVE or manual transmission
in first gear.
10. Turn OFF the engine.
11. Firmly apply the parking brake.
12. Shift the transmission into PARK or place manual transmission in gear (NOT in Neutral).
13. Attach the vehicle to the tow vehicle using a suitable tow bar.
14. Release the parking brake.
UTILITY
88
Page 91 of 132
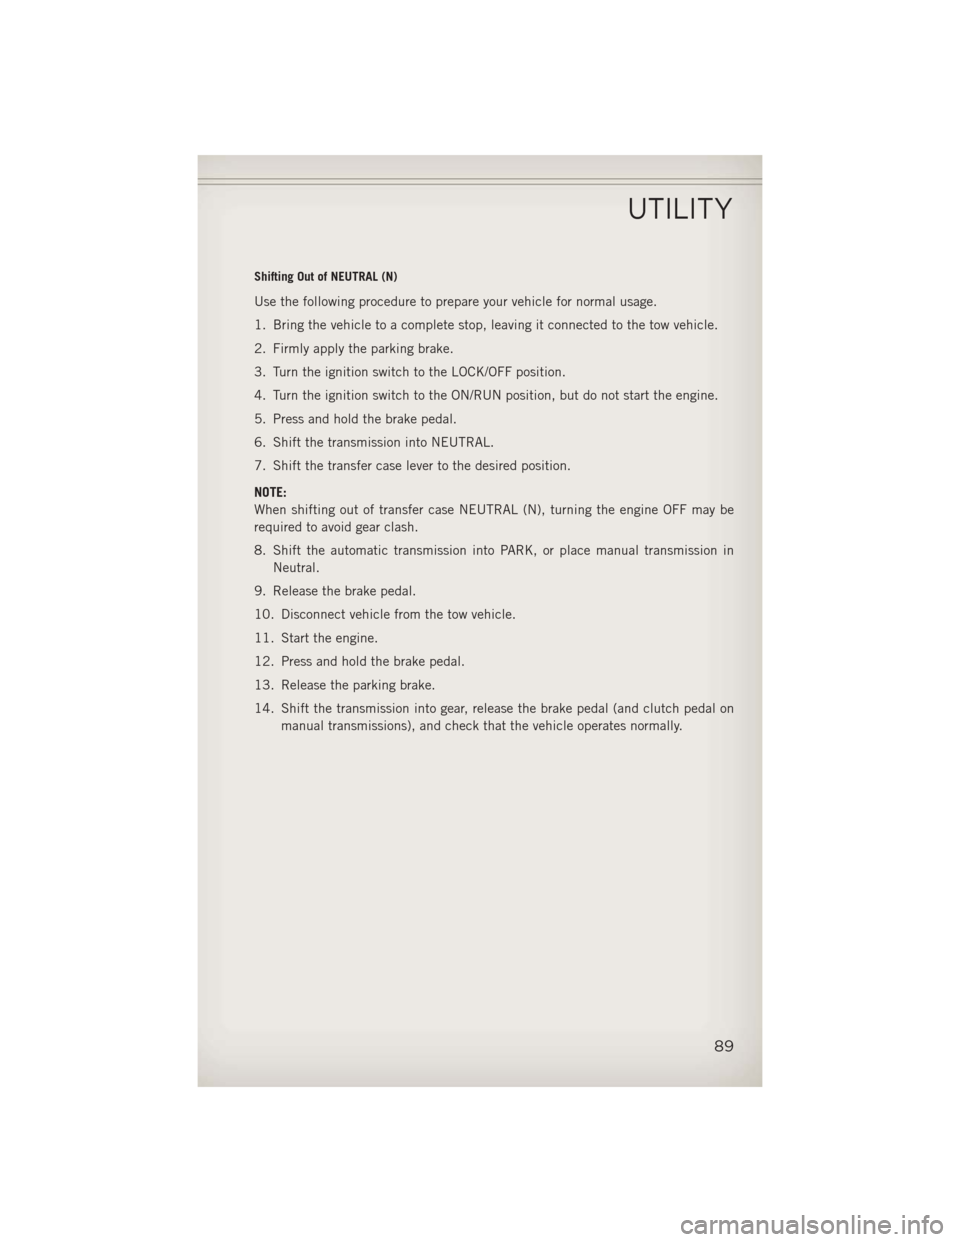
Shifting Out of NEUTRAL (N)
Use the following procedure to prepare your vehicle for normal usage.
1. Bring the vehicle to a complete stop, leaving it connected to the tow vehicle.
2. Firmly apply the parking brake.
3. Turn the ignition switch to the LOCK/OFF position.
4. Turn the ignition switch to the ON/RUN position, but do not start the engine.
5. Press and hold the brake pedal.
6. Shift the transmission into NEUTRAL.
7. Shift the transfer case lever to the desired position.
NOTE:
When shifting out of transfer case NEUTRAL (N), turning the engine OFF may be
required to avoid gear clash.
8. Shift the automatic transmission into PARK, or place manual transmission inNeutral.
9. Release the brake pedal.
10. Disconnect vehicle from the tow vehicle.
11. Start the engine.
12. Press and hold the brake pedal.
13. Release the parking brake.
14. Shift the transmission into gear, release the brake pedal (and clutch pedal on manual transmissions), and check that the vehicle operates normally.
UTILITY
89