reset JEEP WRANGLER 2014 JK / 3.G User Guide
[x] Cancel search | Manufacturer: JEEP, Model Year: 2014, Model line: WRANGLER, Model: JEEP WRANGLER 2014 JK / 3.GPages: 148, PDF Size: 12.93 MB
Page 51 of 148
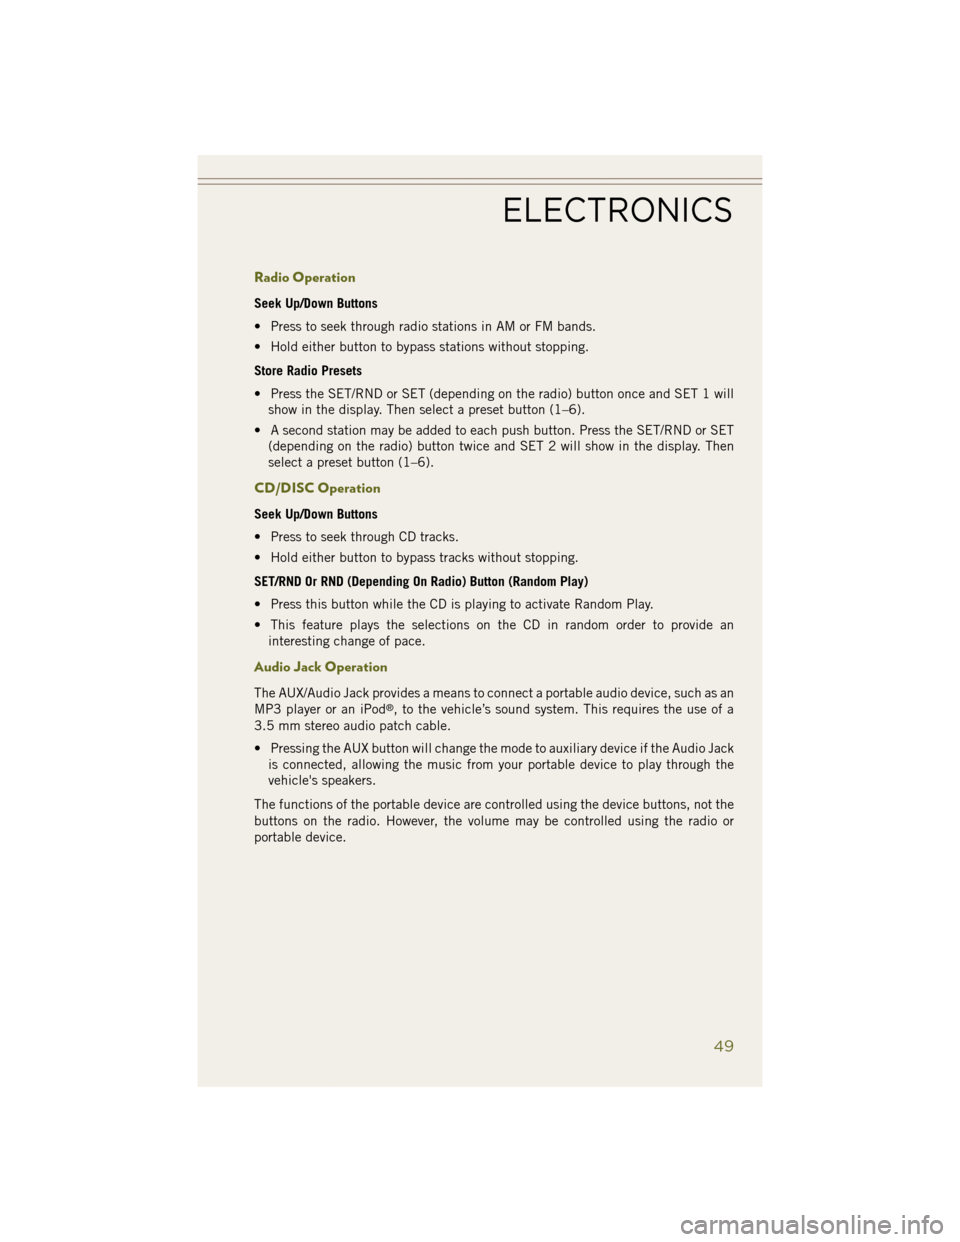
Radio Operation
Seek Up/Down Buttons
• Press to seek through radio stations in AM or FM bands.
• Hold either button to bypass stations without stopping.
Store Radio Presets
• Press the SET/RND or SET (depending on the radio) button once and SET 1 willshow in the display. Then select a preset button (1–6).
• A second station may be added to each push button. Press the SET/RND or SET (depending on the radio) button twice and SET 2 will show in the display. Then
select a preset button (1–6).
CD/DISC Operation
Seek Up/Down Buttons
• Press to seek through CD tracks.
• Hold either button to bypass tracks without stopping.
SET/RND Or RND (Depending On Radio) Button (Random Play)
• Press this button while the CD is playing to activate Random Play.
• This feature plays the selections on the CD in random order to provide aninteresting change of pace.
Audio Jack Operation
The AUX/Audio Jack provides a means to connect a portable audio device, such as an
MP3 player or an iPod®, to the vehicle’s sound system. This requires the use of a
3.5 mm stereo audio patch cable.
• Pressing the AUX button will change the mode to auxiliary device if the Audio Jack is connected, allowing the music from your portable device to play through the
vehicle's speakers.
The functions of the portable device are controlled using the device buttons, not the
buttons on the radio. However, the volume may be controlled using the radio or
portable device.
ELECTRONICS
49
Page 53 of 148
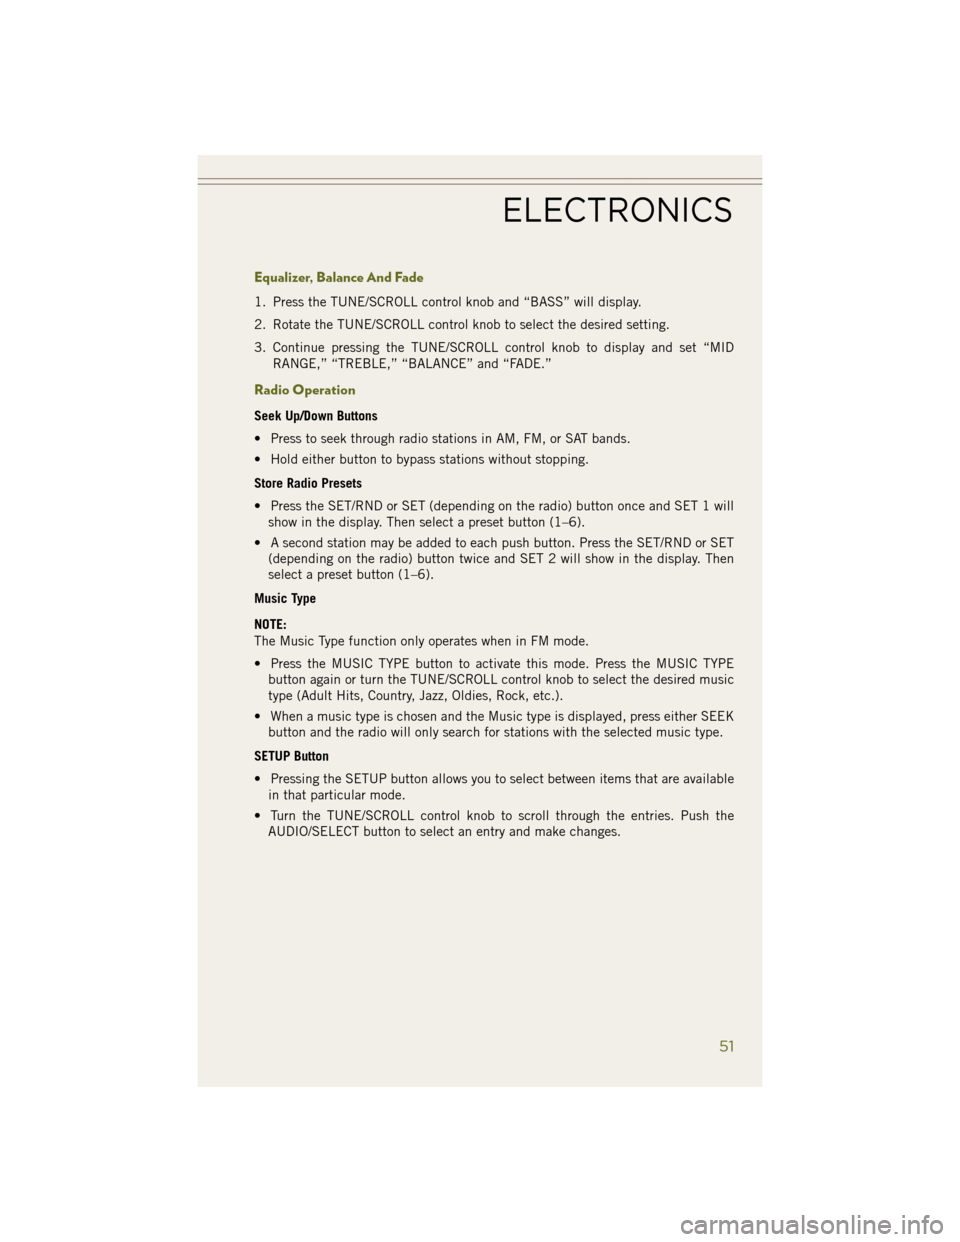
Equalizer, Balance And Fade
1. Press the TUNE/SCROLL control knob and “BASS” will display.
2. Rotate the TUNE/SCROLL control knob to select the desired setting.
3. Continue pressing the TUNE/SCROLL control knob to display and set “MIDRANGE,” “TREBLE,” “BALANCE” and “FADE.”
Radio Operation
Seek Up/Down Buttons
• Press to seek through radio stations in AM, FM, or SAT bands.
• Hold either button to bypass stations without stopping.
Store Radio Presets
• Press the SET/RND or SET (depending on the radio) button once and SET 1 willshow in the display. Then select a preset button (1–6).
• A second station may be added to each push button. Press the SET/RND or SET (depending on the radio) button twice and SET 2 will show in the display. Then
select a preset button (1–6).
Music Type
NOTE:
The Music Type function only operates when in FM mode.
• Press the MUSIC TYPE button to activate this mode. Press the MUSIC TYPE button again or turn the TUNE/SCROLL control knob to select the desired music
type (Adult Hits, Country, Jazz, Oldies, Rock, etc.).
• When a music type is chosen and the Music type is displayed, press either SEEK button and the radio will only search for stations with the selected music type.
SETUP Button
• Pressing the SETUP button allows you to select between items that are available in that particular mode.
• Turn the TUNE/SCROLL control knob to scroll through the entries. Push the AUDIO/SELECT button to select an entry and make changes.
ELECTRONICS
51
Page 56 of 148
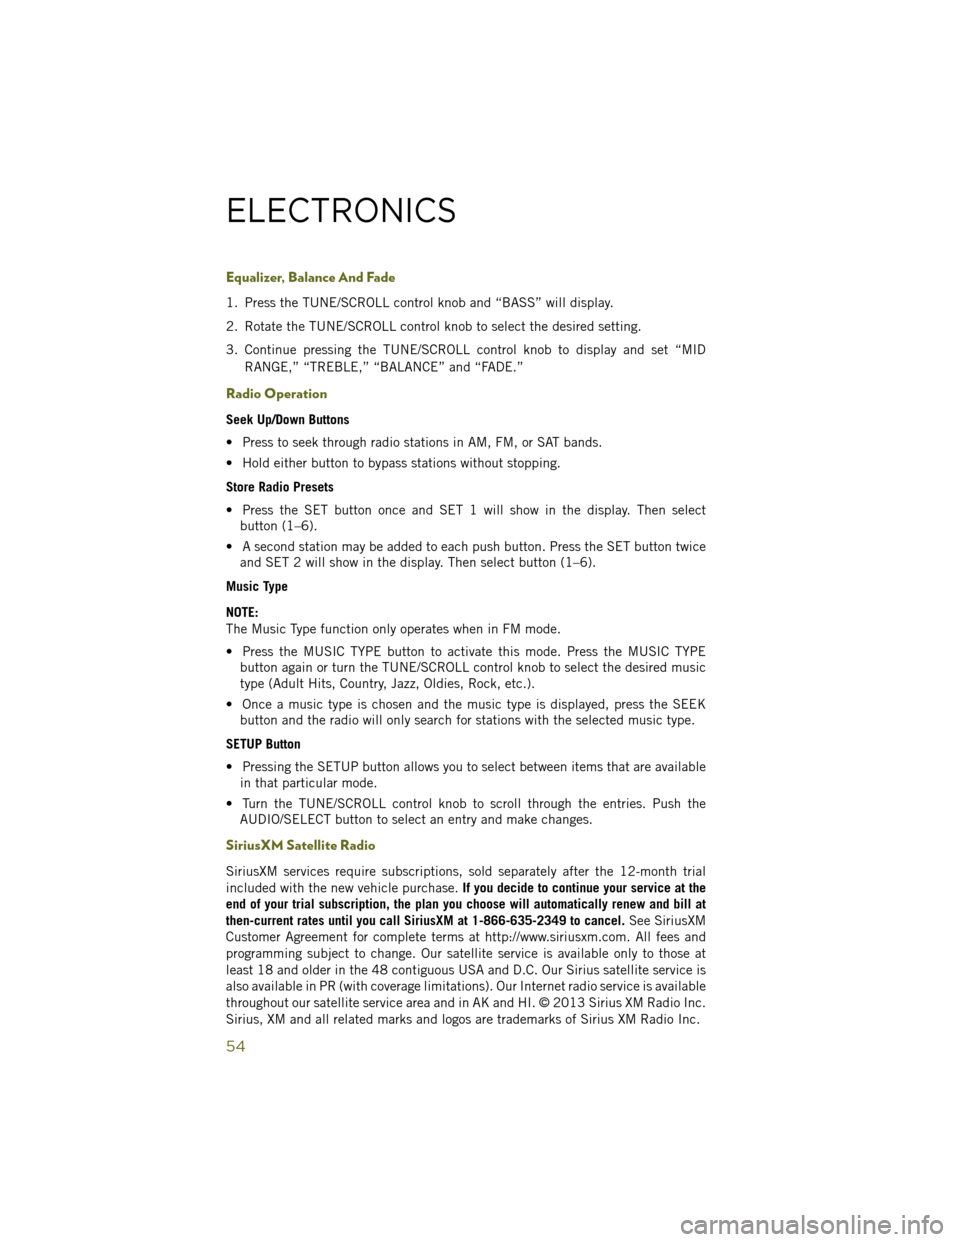
Equalizer, Balance And Fade
1. Press the TUNE/SCROLL control knob and “BASS” will display.
2. Rotate the TUNE/SCROLL control knob to select the desired setting.
3. Continue pressing the TUNE/SCROLL control knob to display and set “MIDRANGE,” “TREBLE,” “BALANCE” and “FADE.”
Radio Operation
Seek Up/Down Buttons
• Press to seek through radio stations in AM, FM, or SAT bands.
• Hold either button to bypass stations without stopping.
Store Radio Presets
• Press the SET button once and SET 1 will show in the display. Then selectbutton (1–6).
• A second station may be added to each push button. Press the SET button twice and SET 2 will show in the display. Then select button (1–6).
Music Type
NOTE:
The Music Type function only operates when in FM mode.
• Press the MUSIC TYPE button to activate this mode. Press the MUSIC TYPE button again or turn the TUNE/SCROLL control knob to select the desired music
type (Adult Hits, Country, Jazz, Oldies, Rock, etc.).
• Once a music type is chosen and the music type is displayed, press the SEEK button and the radio will only search for stations with the selected music type.
SETUP Button
• Pressing the SETUP button allows you to select between items that are available in that particular mode.
• Turn the TUNE/SCROLL control knob to scroll through the entries. Push the AUDIO/SELECT button to select an entry and make changes.
SiriusXM Satellite Radio
SiriusXM services require subscriptions, sold separately after the 12-month trial
included with the new vehicle purchase. If you decide to continue your service at the
end of your trial subscription, the plan you choose will automatically renew and bill at
then-current rates until you call SiriusXM at 1-866-635-2349 to cancel. See SiriusXM
Customer Agreement for complete terms at http://www.siriusxm.com. All fees and
programming subject to change. Our satellite service is available only to those at
least 18 and older in the 48 contiguous USA and D.C. Our Sirius satellite service is
also available in PR (with coverage limitations). Our Internet radio service is available
throughout our satellite service area and in AK and HI. © 2013 Sirius XM Radio Inc.
Sirius, XM and all related marks and logos are trademarks of Sirius XM Radio Inc.
ELECTRONICS
54
Page 59 of 148
Menu
• Press the MENU hard-key to access the System Setup menu and the My Filesmenu.
• Press the MENU hard-key in an active mode (SAT, CD, AUX, etc.) to change mode specific settings.
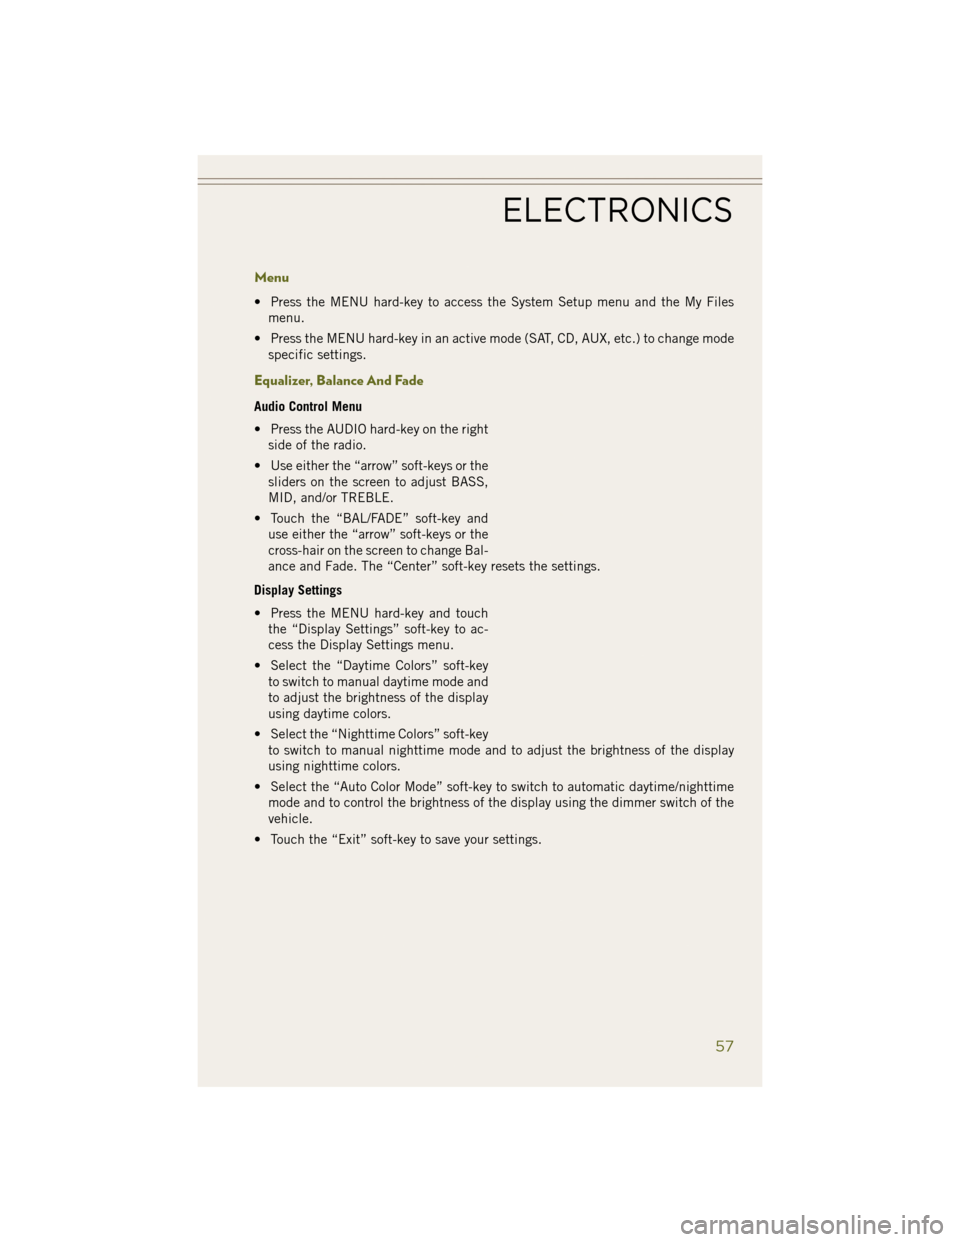
Equalizer, Balance And Fade
Audio Control Menu
• Press the AUDIO hard-key on the rightside of the radio.
• Use either the “arrow” soft-keys or the sliders on the screen to adjust BASS,
MID, and/or TREBLE.
• Touch the “BAL/FADE” soft-key and use either the “arrow” soft-keys or the
cross-hair on the screen to change Bal-
ance and Fade. The “Center” soft-key resets the settings.
Display Settings
• Press the MENU hard-key and touch the “Display Settings” soft-key to ac-
cess the Display Settings menu.
• Select the “Daytime Colors” soft-key to switch to manual daytime mode and
to adjust the brightness of the display
using daytime colors.
• Select the “Nighttime Colors” soft-key to switch to manual nighttime mode and to adjust the brightness of the display
using nighttime colors.
• Select the “Auto Color Mode” soft-key to switch to automatic daytime/nighttime mode and to control the brightness of the display using the dimmer switch of the
vehicle.
• Touch the “Exit” soft-key to save your settings.
ELECTRONICS
57
Page 60 of 148
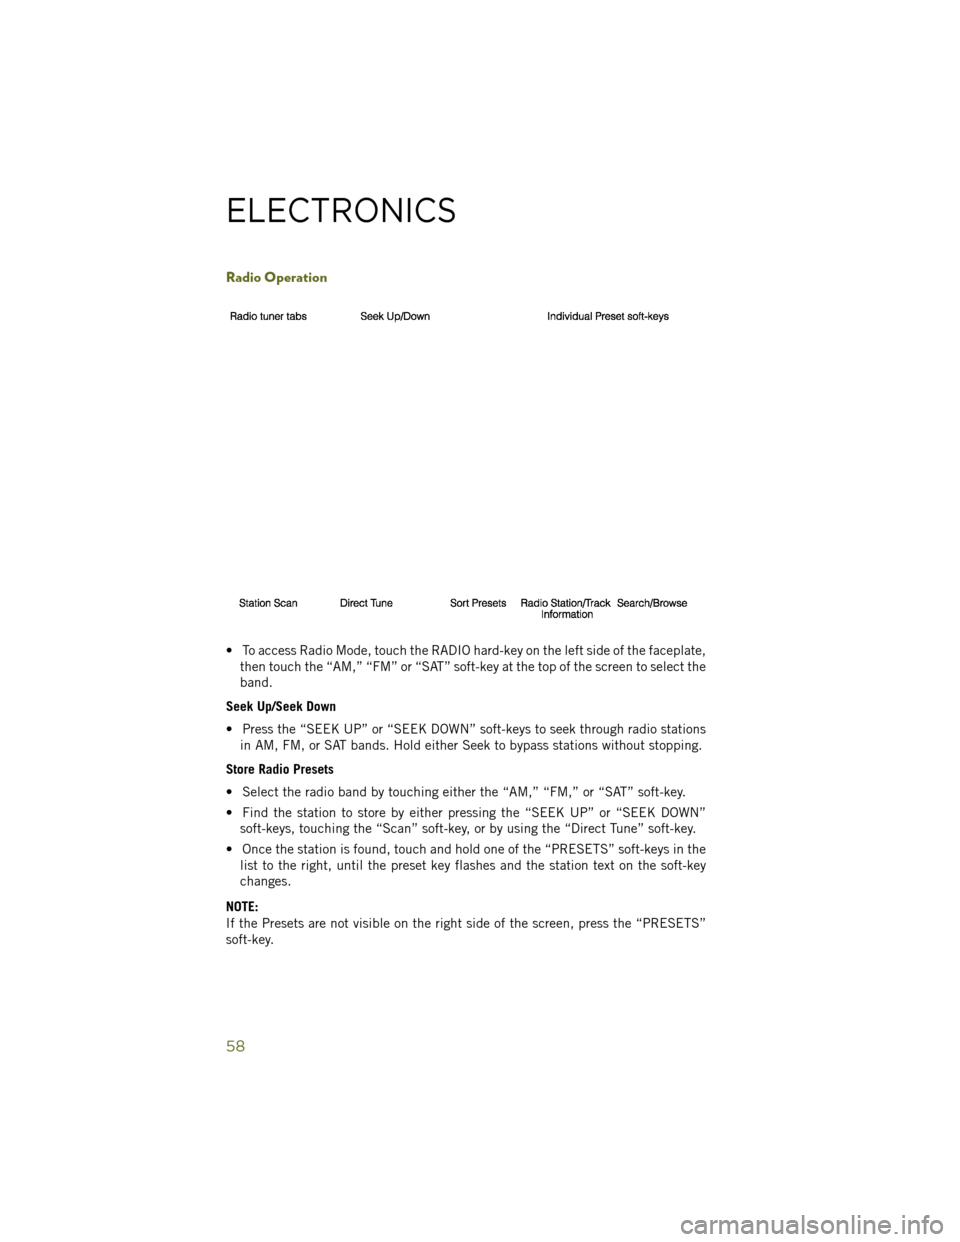
Radio Operation
• To access Radio Mode, touch the RADIO hard-key on the left side of the faceplate,then touch the “AM,” “FM” or “SAT” soft-key at the top of the screen to select the
band.
Seek Up/Seek Down
• Press the “SEEK UP” or “SEEK DOWN” soft-keys to seek through radio stations in AM, FM, or SAT bands. Hold either Seek to bypass stations without stopping.
Store Radio Presets
• Select the radio band by touching either the “AM,” “FM,” or “SAT” soft-key.
• Find the station to store by either pressing the “SEEK UP” or “SEEK DOWN” soft-keys, touching the “Scan” soft-key, or by using the “Direct Tune” soft-key.
• Once the station is found, touch and hold one of the “PRESETS” soft-keys in the list to the right, until the preset key flashes and the station text on the soft-key
changes.
NOTE:
If the Presets are not visible on the right side of the screen, press the “PRESETS”
soft-key.
ELECTRONICS
58
Page 69 of 148
Clock Setting
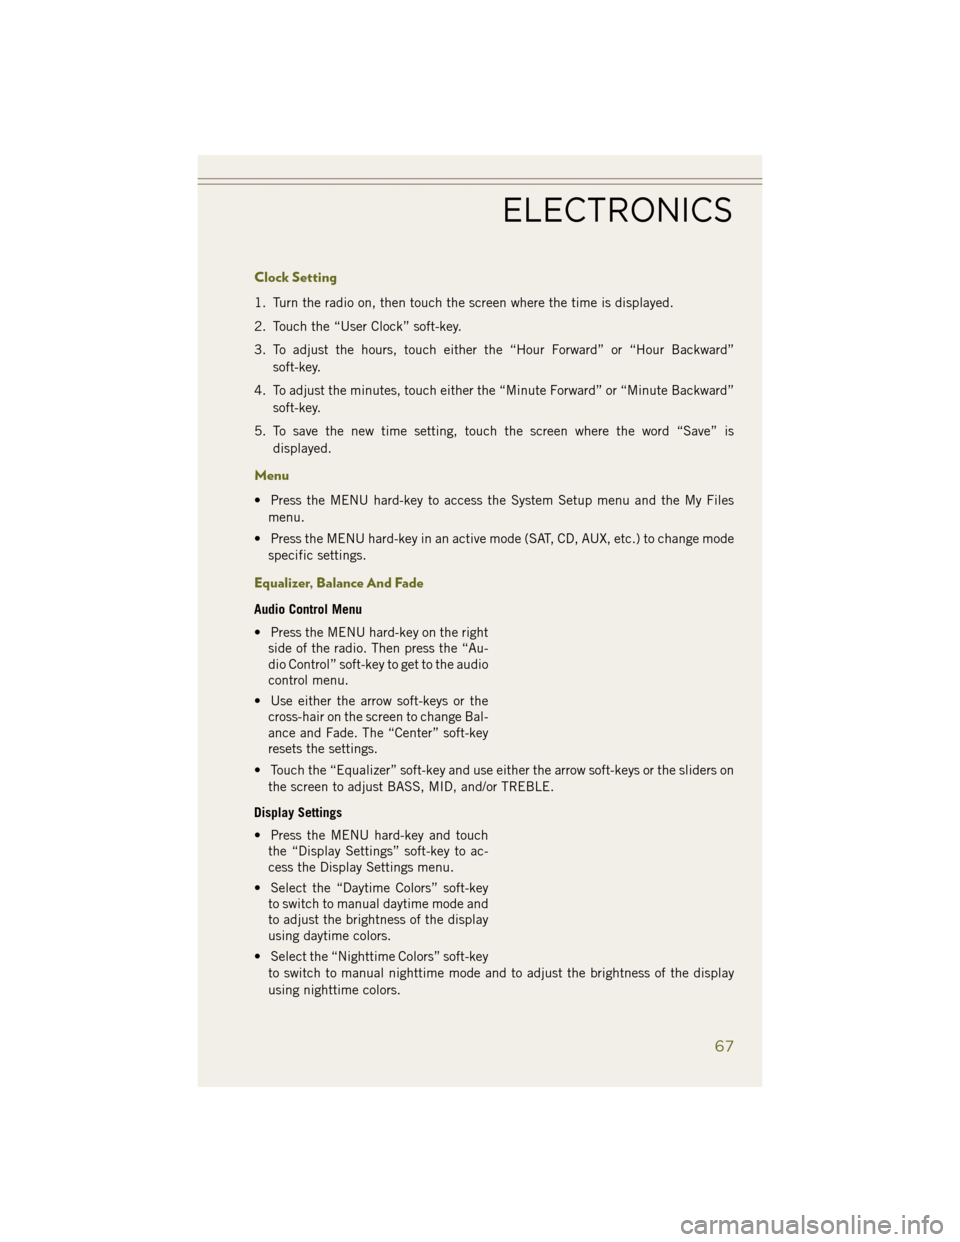
1. Turn the radio on, then touch the screen where the time is displayed.
2. Touch the “User Clock” soft-key.
3. To adjust the hours, touch either the “Hour Forward” or “Hour Backward”soft-key.
4. To adjust the minutes, touch either the “Minute Forward” or “Minute Backward” soft-key.
5. To save the new time setting, touch the screen where the word “Save” is displayed.
Menu
• Press the MENU hard-key to access the System Setup menu and the My Filesmenu.
• Press the MENU hard-key in an active mode (SAT, CD, AUX, etc.) to change mode specific settings.
Equalizer, Balance And Fade
Audio Control Menu
• Press the MENU hard-key on the rightside of the radio. Then press the “Au-
dio Control” soft-key to get to the audio
control menu.
• Use either the arrow soft-keys or the cross-hair on the screen to change Bal-
ance and Fade. The “Center” soft-key
resets the settings.
• Touch the “Equalizer” soft-key and use either the arrow soft-keys or the sliders on the screen to adjust BASS, MID, and/or TREBLE.
Display Settings
• Press the MENU hard-key and touch the “Display Settings” soft-key to ac-
cess the Display Settings menu.
• Select the “Daytime Colors” soft-key to switch to manual daytime mode and
to adjust the brightness of the display
using daytime colors.
• Select the “Nighttime Colors” soft-key to switch to manual nighttime mode and to adjust the brightness of the display
using nighttime colors.
ELECTRONICS
67
Page 70 of 148
• Select the “Auto Color Mode” soft-key to switch to automatic daytime/nighttimemode and to control the brightness of the display using the dimmer switch of the
vehicle.
• Touch the “EXIT” soft-key to save your settings.
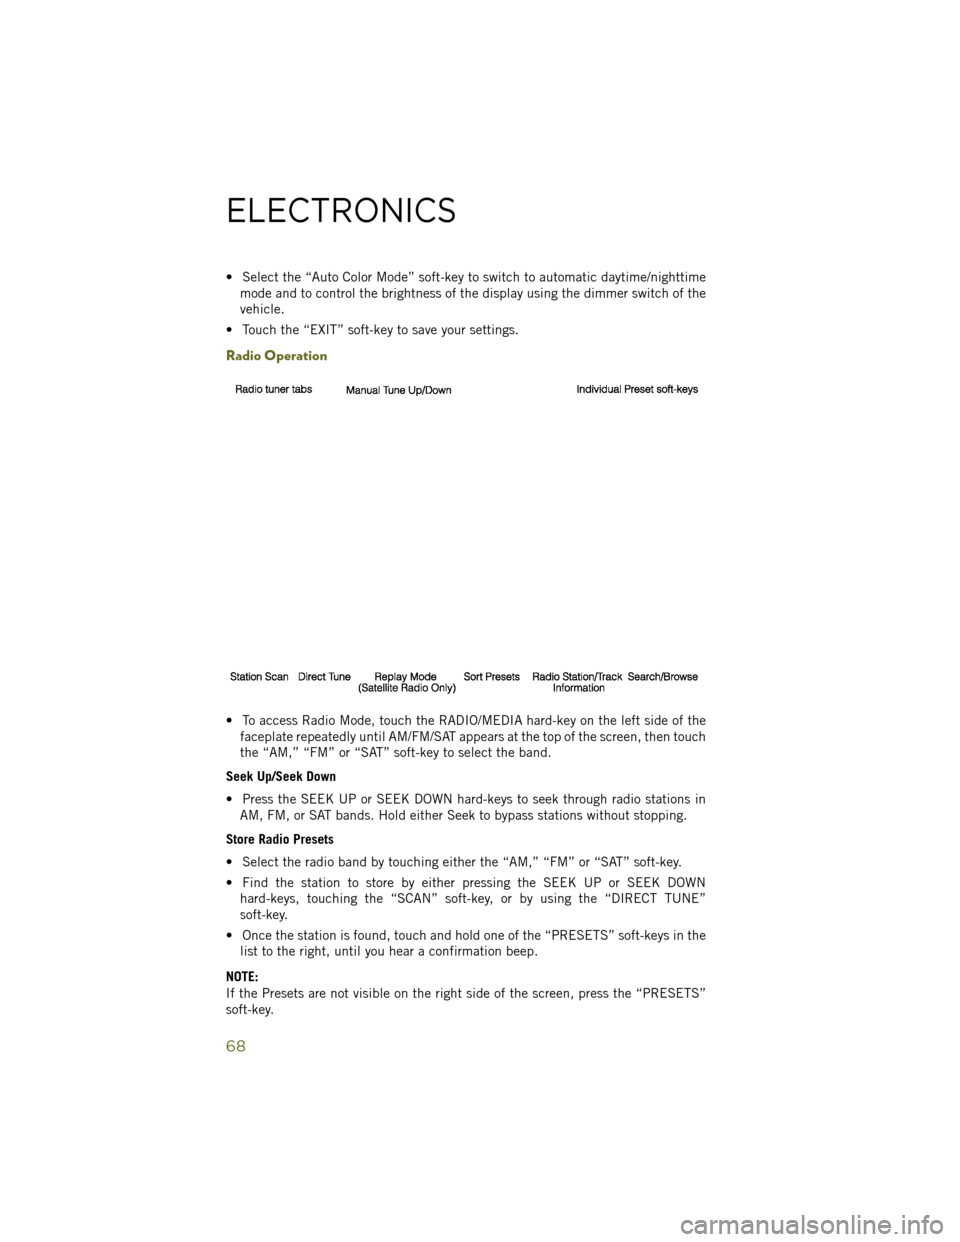
Radio Operation
• To access Radio Mode, touch the RADIO/MEDIA hard-key on the left side of the faceplate repeatedly until AM/FM/SAT appears at the top of the screen, then touch
the “AM,” “FM” or “SAT” soft-key to select the band.
Seek Up/Seek Down
• Press the SEEK UP or SEEK DOWN hard-keys to seek through radio stations in AM, FM, or SAT bands. Hold either Seek to bypass stations without stopping.
Store Radio Presets
• Select the radio band by touching either the “AM,” “FM” or “SAT” soft-key.
• Find the station to store by either pressing the SEEK UP or SEEK DOWN hard-keys, touching the “SCAN” soft-key, or by using the “DIRECT TUNE”
soft-key.
• Once the station is found, touch and hold one of the “PRESETS” soft-keys in the list to the right, until you hear a confirmation beep.
NOTE:
If the Presets are not visible on the right side of the screen, press the “PRESETS”
soft-key.
ELECTRONICS
68
Page 83 of 148
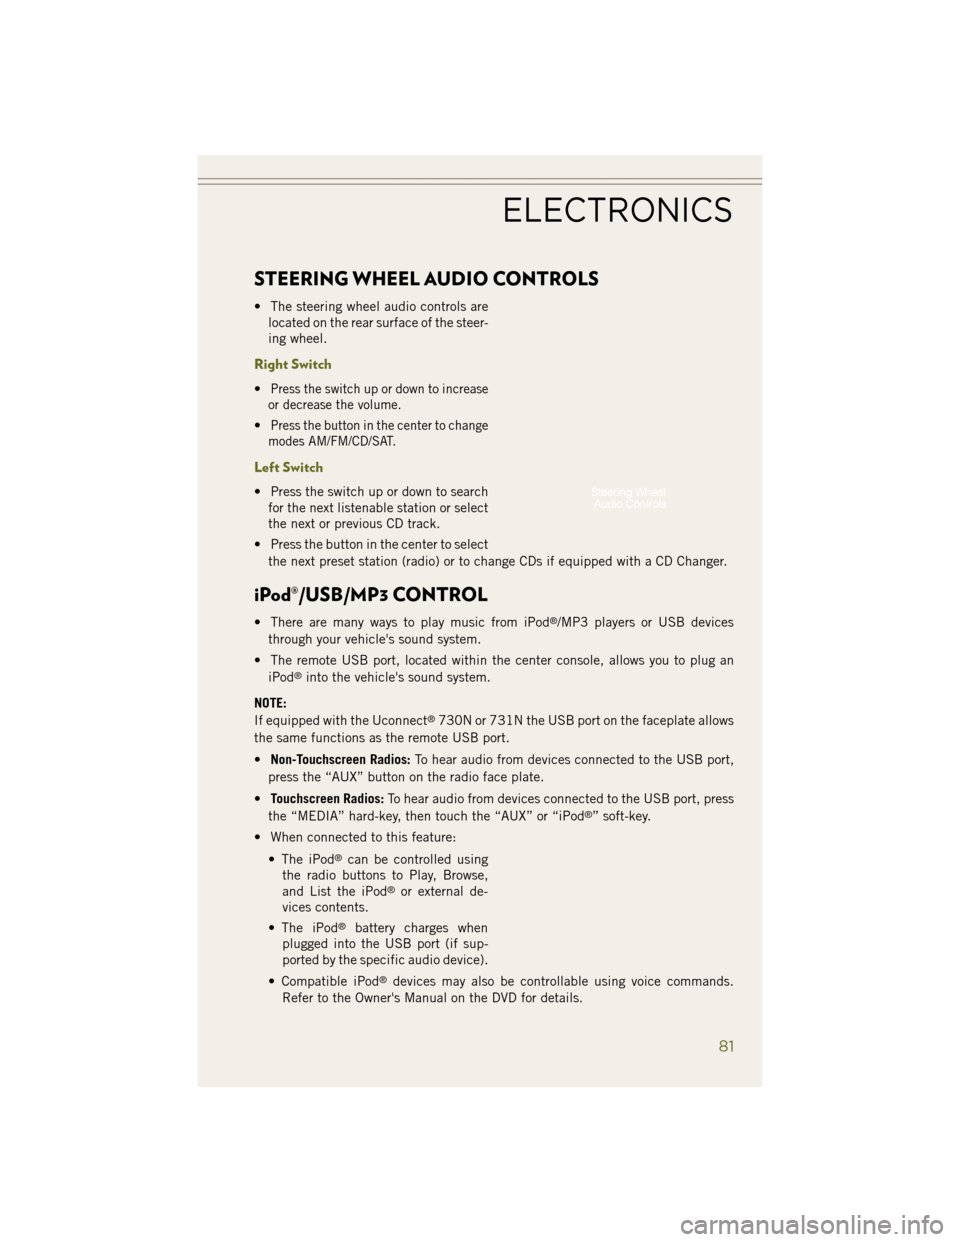
STEERING WHEEL AUDIO CONTROLS
• The steering wheel audio controls arelocated on the rear surface of the steer-
ing wheel.
Right Switch
•Press the switch up or down to increase
or decrease the volume.
•Press the button in the center to change
modes AM/FM/CD/SAT.
Left Switch
• Press the switch up or down to search for the next listenable station or select
the next or previous CD track.
• Press the button in the center to select the next preset station (radio) or to change CDs if equipped with a CD Changer.
iPod®/USB/MP3 CONTROL
• There are many ways to play music from iPod®/MP3 players or USB devices
through your vehicle's sound system.
• The remote USB port, located within the center console, allows you to plug an iPod
®into the vehicle's sound system.
NOTE:
If equipped with the Uconnect
®730N or 731N the USB port on the faceplate allows
the same functions as the remote USB port.
• Non-Touchscreen Radios: To hear audio from devices connected to the USB port,
press the “AUX” button on the radio face plate.
• Touchscreen Radios: To hear audio from devices connected to the USB port, press
the “MEDIA” hard-key, then touch the “AUX” or “iPod
®” soft-key.
• When connected to this feature:
• The iPod
®can be controlled using
the radio buttons to Play, Browse,
and List the iPod
®or external de-
vices contents.
• The iPod
®battery charges when
plugged into the USB port (if sup-
ported by the specific audio device).
• Compatible iPod
®devices may also be controllable using voice commands.
Refer to the Owner's Manual on the DVD for details.
ELECTRONICS
81
Page 93 of 148
POWER INVERTER
• A 115 Volt, 150 Watt AC power in-verter is located on the front of the
center console.
• This outlet can power cellular phones, electronics and other low power de-
vices requiring power up to 150 Watts.
• The power inverter switch is located on the instrument panel below the cli-
mate controls. To turn on the power
outlet, press the switch once. The in-
dicator light will illuminate. Press the
switch a second time to turn the power
inverter outlet off.
NOTE:
The power inverter is designed with built-in overload protection. If the power rating
of 150 Watts is exceeded, the power inverter will automatically shut down. Once the
electrical device has been removed from the outlet, the inverter should automatically
reset. If the power rating exceeds approximately 170 Watts, the power inverter may
have to be reset manually. To reset the inverter manually, unplug the device and plug
it in again. To avoid overloading the circuit, check the power ratings on electrical
devices prior to using the inverter.
WARNING!
To Avoid Serious Injury or Death DO NOT:
• insert any objects into the receptacles
• touch with wet hands
Close the lid when not in use. If this outlet is mishandled, it may cause an electric
shock and failure.
ELECTRONICS
91
Page 106 of 148
- Air Bag Warning Light
• If the light is not on during starting, stays on, or turns on while driving, have thevehicle serviced by an authorized service center immediately.
Fuel Cap/Loose Gas Cap Message
• If a “gas cap” message (shown as Check Fuel Cap) appears, tighten the gas capuntil a “clicking” sound is heard.
• Press the odometer reset button to turn the message off.
• If the message continues to appear for more than three days after tightening the gas cap, see your authorized service center.
Oil Change EVIC Indicator
Message
If an “oil change” message (shown as “Change Oil Soon” and “Oil Change Needed”)
appears and a single chime sounds, it is time for your next required oil change.
Resetting The Light After Servicing
1. Turn the ignition switch to the ON/RUN position (do not start engine).
2. Fully depress the accelerator pedal three times within 10 seconds.
3. Turn the ignition switch to the OFF/LOCK position.
HOTOIL – Transmission Temperature Warning Message
• The HOTOIL cluster message will appear in the odometer accompanied with achime to indicate that there is excessive transmission fluid temperature that might
occur with severe usage such as trailer towing.
• It may also occur when operating the vehicle in a high torque converter slip condition, such as 4-wheel-drive operation (e.g., snow plowing, off-road opera-
tion).
• If this HOTOIL message turns on, stop the vehicle and run the engine at idle or faster, with the transmission in NEUTRAL until the message turns off.
CAUTION!
Continuous driving with the Transmission Temperature HOTOIL Warning message
illuminated will eventually cause severe transmission damage and transmission
failure.
WARNING!
Continued operation with the Transmission Temperature HOTOIL Warning mes-
sage illuminated could cause the fluid to boil over, come into contact with the hot
engine or exhaust components causing a fire that may result in personal injury.
WHAT TO DO IN EMERGENCIES
104