ECU JEEP WRANGLER 2015 JK / 3.G Service Manual
[x] Cancel search | Manufacturer: JEEP, Model Year: 2015, Model line: WRANGLER, Model: JEEP WRANGLER 2015 JK / 3.GPages: 695, PDF Size: 20.64 MB
Page 294 of 695
WARNING!
Carefully follow these warnings to help protect
against personal injury:
•Do not drive your vehicle on-road with the wind-
shield down.
•Do not drive your vehicle unless the windshield is
securely fastened, either up or down.
•Eye protection, such as goggles, should be worn at
all times when the windshield is down.
•Be sure that you carefully follow the instructions
for raising the windshield. Make sure that the
folding windshield, windshield wipers, side bars,
and all associated hardware and fasteners are cor-
rectly and tightly assembled before driving your
vehicle. Failure to follow these instructions may
prevent your vehicle from providing you and your
passengers protection in some accidents.
(Continued)
WARNING!(Continued)
•If you remove the doors, store them outside the
vehicle. In the event of an accident, a loose door
may cause personal injury.
Lowering The Windshield And Removing Side
Bars
1. Lower the fabric top or remove the hard top following
the instructions in this manual.
NOTE:To assist in properly reinstalling side bars, mark
the original locations prior to removing.
292 UNDERSTANDING THE FEATURES OF YOUR VEHICLE
Page 296 of 695
CAUTION!
Do not remove the head impact foam from the side
bars, as damage to the foam may result.
NOTE:Store all of the mounting bolts in their original
threaded holes and tighten for safekeeping.
8. Remove the side bar assembly, and reattach the sport
bar Velcro® covering.
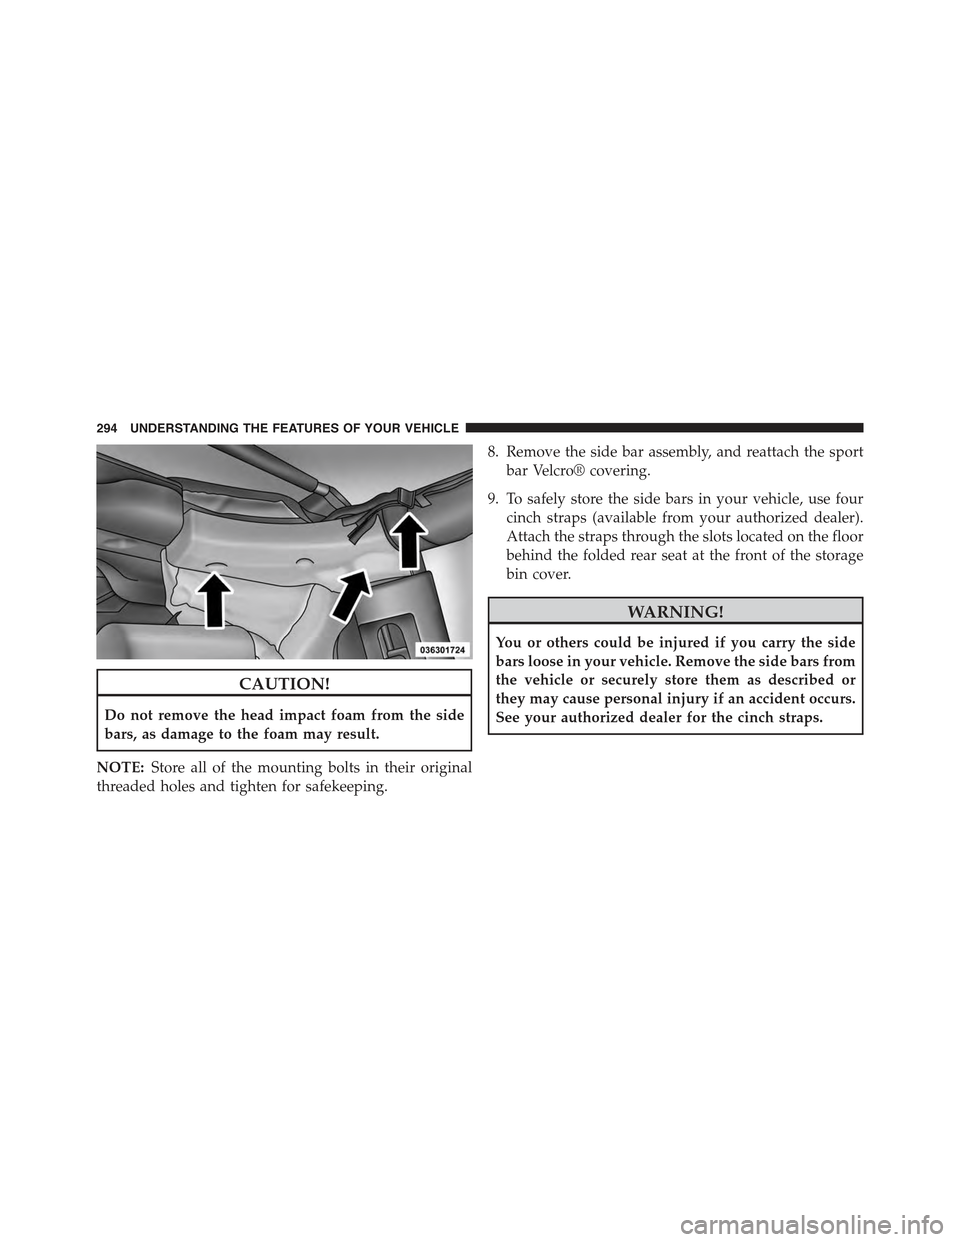
9. To safely store the side bars in your vehicle, use four
cinch straps (available from your authorized dealer).
Attach the straps through the slots located on the floor
behind the folded rear seat at the front of the storage
bin cover.
WARNING!
You or others could be injured if you carry the side
bars loose in your vehicle. Remove the side bars from
the vehicle or securely store them as described or
they may cause personal injury if an accident occurs.
See your authorized dealer for the cinch straps.
294 UNDERSTANDING THE FEATURES OF YOUR VEHICLE
Page 297 of 695
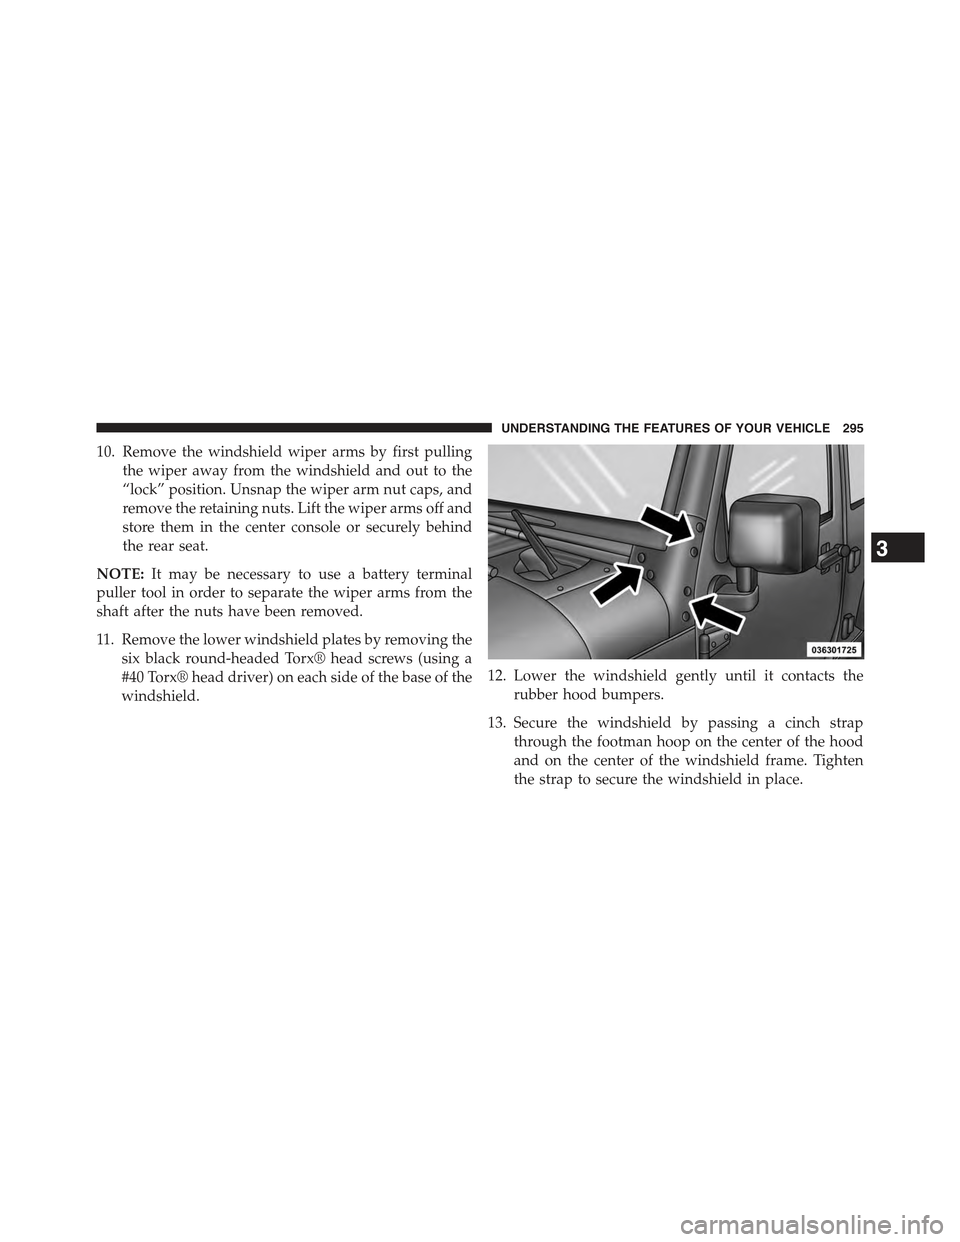
10. Remove the windshield wiper arms by first pulling
the wiper away from the windshield and out to the
“lock” position. Unsnap the wiper arm nut caps, and
remove the retaining nuts. Lift the wiper arms off and
store them in the center console or securely behind
the rear seat.
NOTE:It may be necessary to use a battery terminal
puller tool in order to separate the wiper arms from the
shaft after the nuts have been removed.
11. Remove the lower windshield plates by removing the
six black round-headed Torx® head screws (using a
#40 Torx® head driver) on each side of the base of the
windshield.
12. Lower the windshield gently until it contacts the
rubber hood bumpers.
13. Secure the windshield by passing a cinch strap
through the footman hoop on the center of the hood
and on the center of the windshield frame. Tighten
the strap to secure the windshield in place.
3
UNDERSTANDING THE FEATURES OF YOUR VEHICLE 295
Page 314 of 695
NOTE:As the coolant temperature gauge approaches
#H,#this indicator will illuminate and a single chime will
sound. Further overheating will cause the temperature
gauge to pass#H.#In this case, a continuous chime will
sound, until the engine is allowed to cool or the 4 minutes
duration is expired, whichever come first.
18. Front Fog Light Indicator — If Equipped
This indicator will illuminate when the front fog
lights are on.
19. 4WD Indicator Light — If Equipped
This light alerts the driver that the vehicle is in
the four-wheel drive mode, and the front and
rear driveshafts are mechanically locked to-
gether forcing the front and rear wheels to
rotate at the same speed.
20. Vehicle Security Light — If Equipped
This light will flash at a fast rate for approxi-
mately 15 seconds, when the vehicle security
alarm is arming, and then will flash slowly
until the vehicle is disarmed.
21. Temperature Gauge
The temperature gauge shows engine coolant tempera-
ture. Any reading within the normal range indicates that
the engine cooling system is operating satisfactorily.
The gauge pointer will likely indicate a higher tempera-
ture when driving in hot weather, up mountain grades,
or when towing a trailer. It should not be allowed to
exceed the upper limits of the normal operating range.
312 UNDERSTANDING YOUR INSTRUMENT PANEL
Page 432 of 695
WARNING!(Continued)
•Unintended movement of a vehicle could injure
those in or near the vehicle. As with all vehicles,
you should never exit a vehicle while the engine is
running. Before exiting a vehicle, always apply the
parking brake, shift the transmission into PARK,
turn the engine OFF, and remove the ignition key.
Once the key is removed, the transmission is
locked in PARK, securing the vehicle against un-
wanted movement.
•When leaving the vehicle, always remove the igni-
tion key from the vehicle and lock the vehicle.
(Continued)
WARNING!(Continued)
•Never leave children alone in a vehicle, or with
access to an unlocked vehicle. Allowing children to
be in a vehicle unattended is dangerous for a
number of reasons. A child or others could be
seriously or fatally injured. Children should be
warned not to touch the parking brake, brake pedal
or the transmission gear selector.
•Do not leave the ignition key in or near the vehicle
(or in a location accessible to children). A child
could operate power windows, other controls, or
move the vehicle.
430 STARTING AND OPERATING
Page 437 of 695
WARNING!(Continued)
•Unintended movement of a vehicle could injure
those in or near the vehicle. As with all vehicles,
you should never exit a vehicle while the engine is
running. Before exiting a vehicle, always apply the
parking brake, shift the transmission into PARK,
turn the engine OFF, and remove the ignition key.
Once the key is removed, the transmission is
locked in PARK, securing the vehicle against un-
wanted movement.
•When leaving the vehicle, always remove the igni-
tion key from the vehicle and lock the vehicle.
(Continued)
WARNING!(Continued)
•Never leave children alone in a vehicle, or with
access to an unlocked vehicle. Allowing children to
be in a vehicle unattended is dangerous for a
number of reasons. A child or others could be
seriously or fatally injured. Children should be
warned not to touch the parking brake, brake pedal
or the shift lever.
•Do not leave the ignition key in or near the vehicle
(or in a location accessible to children). A child
could operate power windows, other controls, or
move the vehicle.
5
STARTING AND OPERATING 435
Page 440 of 695
Transmission Limp Home Mode
Transmission function is monitored electronically for
abnormal conditions. If a condition is detected that could
result in transmission damage, Transmission Limp Home
Mode is activated. In this mode, the transmission remains
in the current gear until the vehicle is brought to a stop.
After the vehicle has stopped, the transmission will
remain in second gear regardless of which forward gear
is selected. PARK, REVERSE, and NEUTRAL will con-
tinue to operate. The Malfunction Indicator Light (MIL)
may be illuminated. Limp Home Mode allows the vehicle
to be driven to an authorized dealer for service without
damaging the transmission.
In the event of a momentary problem, the transmission
can be reset to regain all forward gears by performing the
following steps:
1. Stop the vehicle.
2. Shift the transmission into PARK.
3. Turn the ignition switch to the LOCK/OFF position.
4. Wait approximately 10 seconds.
5. Restart the engine.
6. Shift into the desired gear range. If the problem is no
longer detected, the transmission will return to normal
operation.
NOTE:Even if the transmission can be reset, we recom-
mend that you visit your authorized dealer at your
earliest possible convenience. Your authorized dealer has
diagnostic equipment to determine if the problem could
recur. If the transmission cannot be reset, authorized
dealer service is required.
438 STARTING AND OPERATING
Page 454 of 695
CAUTION!
Never park your vehicle over dry grass or other
combustible materials. The heat from your vehicle
exhaust system could cause a fire.
WARNING!
Always wear your seat belt and firmly tie down
cargo. Unsecured cargo can become projectiles in an
off-road situation.
When To Use 4L (Low) Range
When off-road driving, shift into 4L (Low) for additional
traction and control on slippery or difficult terrain,
ascending or descending steep hills, and to increase low
speed pulling power. This range should be limited to
extreme situations such as deep snow, mud, steep in-
clines, or sand where additional low speed pulling power
is needed. Vehicle speeds in excess of 25 mph (40 km/h)
should be avoided when in 4L (Low) range.
CAUTION!
Do not use 4L (Low) range when operating the
vehicle on dry pavement. Driveline hardware dam-
age can result.
Simultaneous Brake And Throttle Operation
Many off-road driving conditions require the simultane-
ous use of the brake and throttle (two-footed driving).
When climbing rocks, logs, or other stepped objects,
using light brake pressure with light throttle will keep the
vehicle from jerking or lurching. This technique is also
used when you need to stop and restart a vehicle on a
steep incline.
452 STARTING AND OPERATING
Page 535 of 695
Tire Size
The tire size on the Vehicle Certification Label represents
the actual tire size on your vehicle. Replacement tires
must be equal to the load capacity of this tire size.
Rim Size
This is the rim size that is appropriate for the tire size
listed.
Inflation Pressure
This is the cold tire inflation pressure for your vehicle for
all loading conditions up to full GAWR.
Curb Weight
The curb weight of a vehicle is defined as the total weight
of the vehicle with all fluids, including vehicle fuel, at full
capacity conditions, and with no occupants or cargo loaded
into the vehicle. The front and rear curb weight values are
determined by weighing your vehicle on a commercial
scale before any occupants or cargo are added.
Loading
The actual total weight and the weight of the front and
rear of your vehicle at the ground can best be determined
by weighing it when it is loaded and ready for operation.
The entire vehicle should first be weighed on a commer-
cial scale to insure that the GVWR has not been exceeded.
The weight on the front and rear of the vehicle should
then be determined separately to be sure that the load is
properly distributed over the front and rear axle. Weigh-
ing the vehicle may show that the GAWR of either the
front or rear axles has been exceeded but the total load is
within the specified GVWR. If so, weight must be shifted
from front to rear or rear to front as appropriate until the
specified weight limitations are met. Store the heavier
items down low and be sure that the weight is distributed
equally. Stow all loose items securely before driving.
5
STARTING AND OPERATING 533
Page 549 of 695
WARNING!
Improper towing can lead to a collision. Follow these
guidelines to make your trailer towing as safe as
possible:
•Make certain that the load is secured in the trailer
and will not shift during travel. When trailering
cargo that is not fully secured, dynamic load shifts
can occur that may be difficult for the driver to
control. You could lose control of your vehicle and
have a collision.
•When hauling cargo or towing a trailer, do not
overload your vehicle or trailer. Overloading can
cause a loss of control, poor performance or dam-
age to the brakes, axle, engine, transmission, steer-
ing, suspension, chassis structure or tires.
(Continued)
WARNING!(Continued)
•Safety chains must always be used between your
vehicle and trailer. Always connect the chains to
the frame or hook retainers of the vehicle hitch.
Cross the chains under the trailer tongue and allow
enough slack for turning corners.
•Vehicles with trailers should not be parked on a
grade. When parking, apply the parking brake on
the tow vehicle. Put the tow vehicle automatic
transmission in PARK. With a manual transmis-
sion, shift the transmission into first gear. And
with four-wheel-drive vehicles, make sure the
transfer case is not in NEUTRAL (N). Always,
block or%chock%the trailer wheels.
•GCWR must not be exceeded.
(Continued)
5
STARTING AND OPERATING 547