tow JEEP WRANGLER 2015 JK / 3.G Manual Online
[x] Cancel search | Manufacturer: JEEP, Model Year: 2015, Model line: WRANGLER, Model: JEEP WRANGLER 2015 JK / 3.GPages: 695, PDF Size: 20.64 MB
Page 611 of 695
some washer fluid and apply it to a cloth or towel and
wipe clean the wiper blades; this will help blade perfor-
mance.
To prevent freeze-up of your windshield washer system
in cold weather, select a solution or mixture that meets or
exceeds the temperature range of your climate. This
rating information can be found on most washer fluid
containers.
WARNING!
Commercial windshield washer solvents are flam-
mable. They could ignite and burn you. Care must be
exercised when filling or working around the washer
solution.
Exhaust System
The best protection against carbon monoxide entry into
the vehicle body is a properly maintained engine exhaust
system.
If you notice a change in the sound of the exhaust system;
or if the exhaust fumes can be detected inside the vehicle;
or when the underside or rear of the vehicle is damaged;
have an authorized technician inspect the complete ex-
haust system and adjacent body areas for broken, dam-
aged, deteriorated, or mispositioned parts. Open seams
or loose connections could permit exhaust fumes to seep
into the passenger compartment. In addition, have the
exhaust system inspected each time the vehicle is raised
for lubrication or oil change. Replace as required.
7
MAINTAINING YOUR VEHICLE 609
Page 613 of 695
Under normal operating conditions, the catalytic con-
verter will not require maintenance. However, it is im-
portant to keep the engine properly tuned to assure
proper catalyst operation and prevent possible catalyst
damage.
NOTE:Intentional tampering with emissions control
systems can result in civil penalties being assessed
against you.
In unusual situations involving grossly malfunctioning
engine operation, a scorching odor may suggest severe
and abnormal catalyst overheating. If this occurs, stop
the vehicle, turn off the engine and allow it to cool.
Service, including a tune-up to manufacturer’s specifica-
tions, should be obtained immediately.
To minimize the possibility of catalytic converter dam-
age:
•Do not shut off the engine or interrupt the ignition, when
the transmission is in gear and the vehicle is in motion.
•Do not try to start the engine by pushing or towing the
vehicle.
•Do not idle the engine with any spark plug wires
disconnected or removed, such as when diagnostic
testing, or for prolonged periods during very rough
idle or malfunctioning operating conditions.
Cooling System
WARNING!
You or others can be badly burned by hot engine
coolant (antifreeze) or steam from your radiator. If
you see or hear steam coming from under the hood,
do not open the hood until the radiator has had time
to cool. Never try to open a cooling system pressure
cap when the radiator or coolant bottle is hot.
7
MAINTAINING YOUR VEHICLE 611
Page 631 of 695
CAUTION!
When installing hanging air fresheners in your ve-
hicle, read the installation instructions carefully.
Some air fresheners will damage the finish of
painted or decorated parts if allowed to directly
contact any surface.
Glass Surfaces
All glass surfaces should be cleaned on a regular basis
with MOPAR® Glass Cleaner, or any commercial
household-type glass cleaner. Never use an abrasive type
cleaner. Use caution when cleaning the inside rear win-
dow equipped with electric defrosters or the right rear
quarter window equipped with the radio antenna. Do
not use scrapers or other sharp instrument that may
scratch the elements.
When cleaning the rear view mirror, spray cleaner on the
towel or rag that you are using. Do not spray cleaner
directly on the mirror.
Cleaning Plastic Instrument Cluster Lenses
The lenses in front of the instruments in this vehicle are
molded in clear plastic. When cleaning the lenses, care
must be taken to avoid scratching the plastic.
1. Clean with a wet soft rag. A mild soap solution may be
used, but do not use high alcohol content or abrasive
cleaners. If soap is used, wipe clean with a clean damp
rag.
2. Dry with a soft cloth.
Seat Belt Maintenance
Do not bleach, dye, or clean the belts with chemical
solvents or abrasive cleaners. This will weaken the fabric.
Sun damage can also weaken the fabric.
7
MAINTAINING YOUR VEHICLE 629
Page 634 of 695
Care Of Fabric Top Windows
CAUTION!
Your vehicle’s fabric top has pliable plastic windows
which can be scratched unless special care is taken by
following these directions:
1. Never use a dry cloth to remove dust. Instead,use a
microfiber towel or soft cotton cloth moistened with
cold or warm, clean water, and wipe across the
window, not up and down.MOPAR® Jeep Soft Glass
Window Cleaner or equivalent will safely clean all
plastic windows without scratching. It removes fine
scratches to improve visibility and provides UV pro-
tection to help prevent yellowing.
2. When washing,never use hot wateror anything
stronger than a mild soap. Never use solvents such as
alcohol or harsh cleaning agents.
3. Always rinse thoroughly with cold water, then wipe
with a soft and slightly moist, clean cloth.
4. When removing frost, snow or ice,never use a scraper
or de-icing chemicals.Use warm water only if you
must clean the window quickly.
5.Debris (sand, mud/dirt, dust, or salt) from off-road
driving will have a major impact on zipper operation.
Even normal on-road driving and vehicle washing will
eventually impact window zipper operation. To main-
tain ease of use of the window zippers, each window
zipper should be cleaned and lubricated regularly. Use
MOPAR® Soft Top Zipper Cleaner and Lubricant or
equivalent to ease zipper operation. Before applying,
make sure the zipper teeth are clear of sand, mud, and
other materials. Clean both sides of the zipper, not just
one side. Rinse both zipper halves with fresh water and
allow to dry. Aggressively work the MOPAR® Soft Top
Zipper Cleaner and Lubricant or equivalent into the
zipper teeth. If a stuck zipper slide is experienced, work
632 MAINTAINING YOUR VEHICLE
Page 639 of 695

Cavity Cartridge FuseMini FuseDescription
M10–15 Amp BlueIgnition Off Draw – Vehicle Entertainment Sys-
tem, Satellite Digital Audio Receiver (SDARS),
DVD, Hands-Free Module, RADIO, Antenna,
Universal Garage Door Opener, Vanity Lamp
M11–10 Amp Red (Ignition Off Draw) Climate Control System,
Underhood Lamp
M12–30 Amp GreenAmplifier
M13–20 Amp Yellow Ignition Off Draw – Cabin Compartment
Node, Wireless Control Module, SIREN,
Multifunction Control Switch
M14–20 Amp YellowTrailer Tow (Export Only)
M15–20 Amp Yellow Climate Control System, Rear View Mirror,
Cabin Compartment Node, Transfer Case
Switch, Multi-Function Control Switch, Tire
Pressure Monitor, Glow Plug Module –
Export Diesel Only
7
MAINTAINING YOUR VEHICLE 637
Page 644 of 695
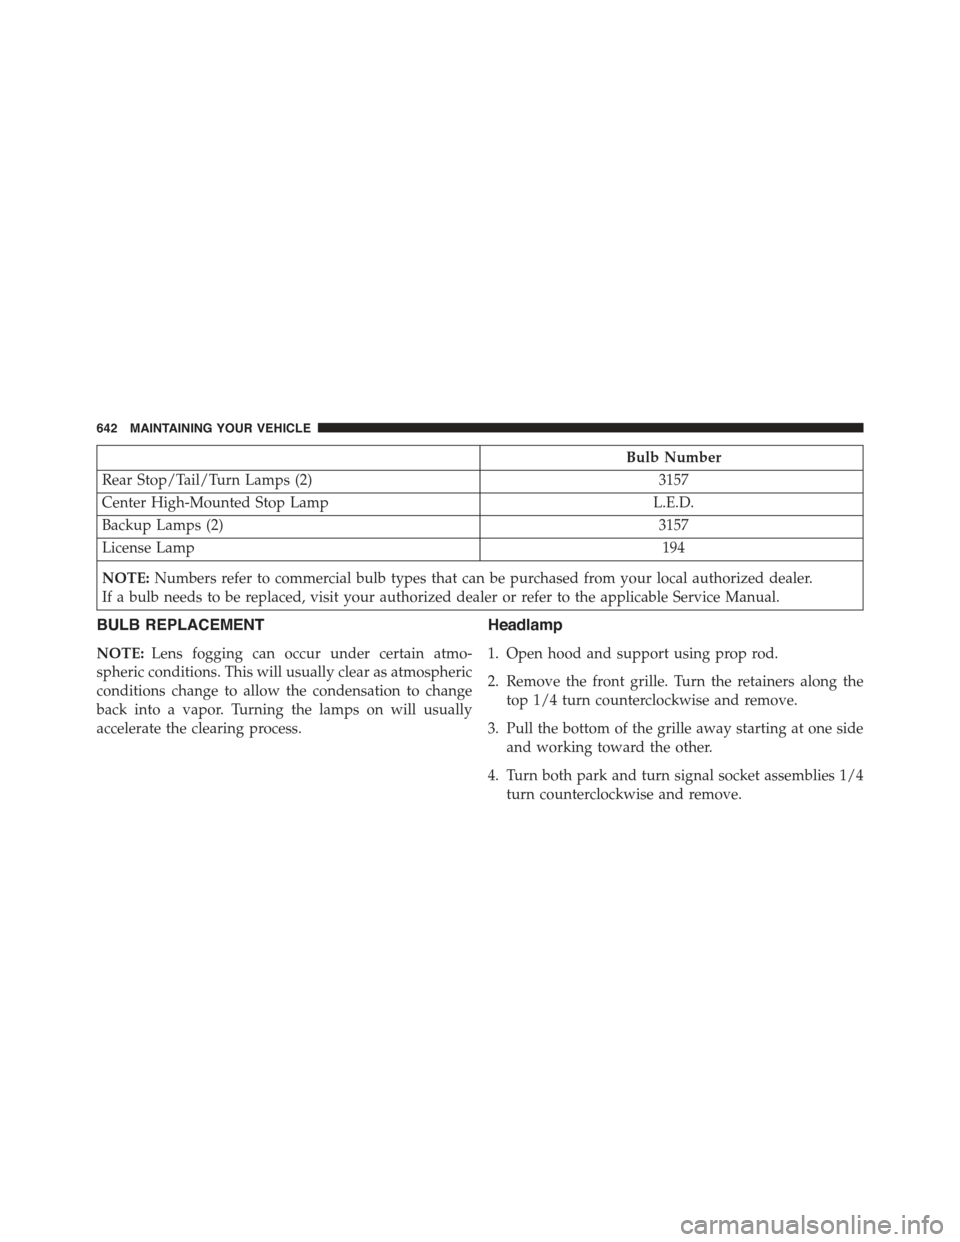
Bulb Number
Rear Stop/Tail/Turn Lamps (2)3157
Center High-Mounted Stop LampL.E.D.
Backup Lamps (2)3157
License Lamp194
NOTE:Numbers refer to commercial bulb types that can be purchased from your local authorized dealer.
If a bulb needs to be replaced, visit your authorized dealer or refer to the applicable Service Manual.
BULB REPLACEMENT
NOTE:Lens fogging can occur under certain atmo-
spheric conditions. This will usually clear as atmospheric
conditions change to allow the condensation to change
back into a vapor. Turning the lamps on will usually
accelerate the clearing process.
Headlamp
1. Open hood and support using prop rod.
2. Remove the front grille. Turn the retainers along the
top 1/4 turn counterclockwise and remove.
3. Pull the bottom of the grille away starting at one side
and working toward the other.
4. Turn both park and turn signal socket assemblies 1/4
turn counterclockwise and remove.
642 MAINTAINING YOUR VEHICLE
Page 645 of 695
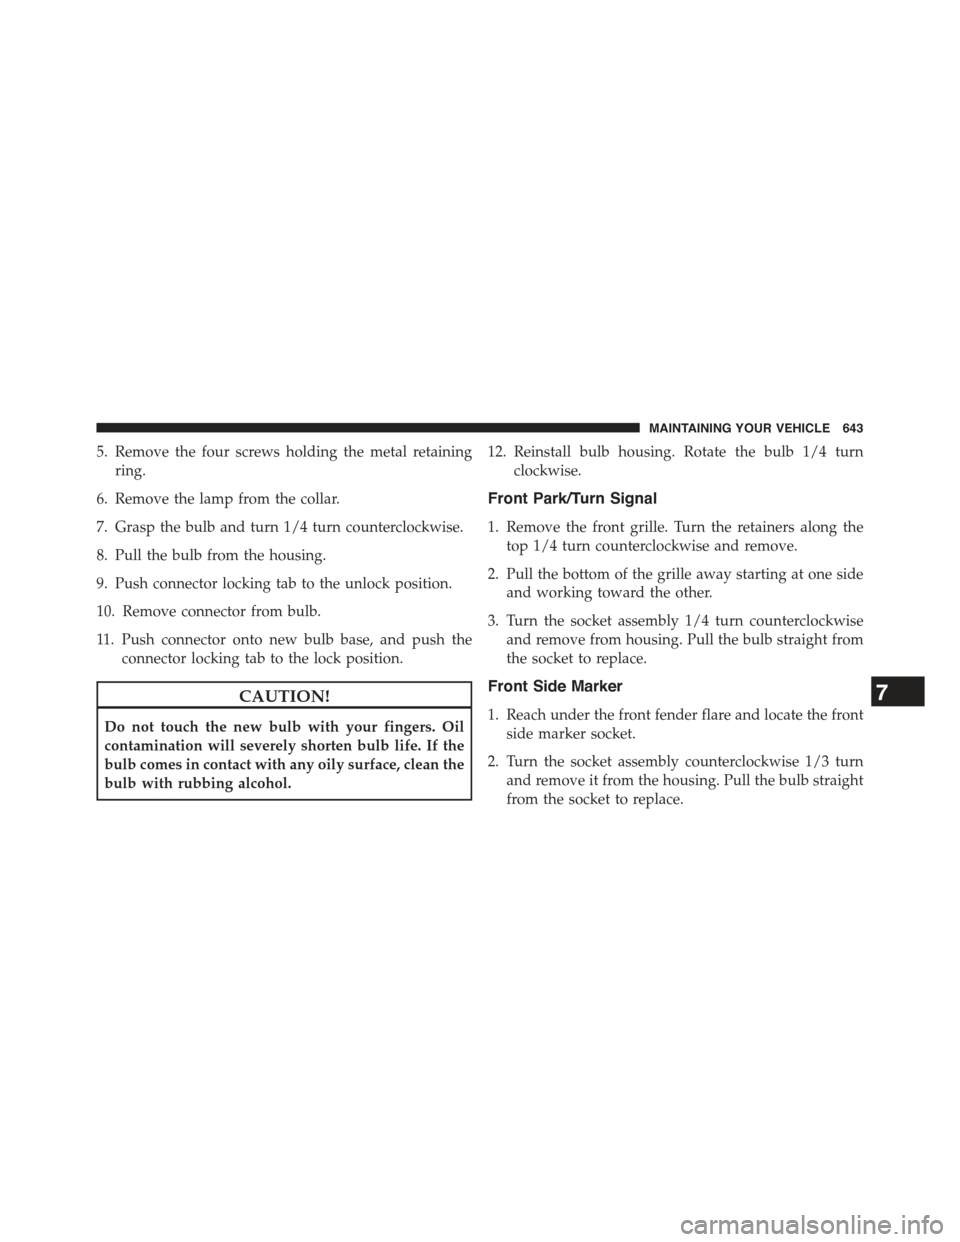
5. Remove the four screws holding the metal retaining
ring.
6. Remove the lamp from the collar.
7. Grasp the bulb and turn 1/4 turn counterclockwise.
8. Pull the bulb from the housing.
9. Push connector locking tab to the unlock position.
10. Remove connector from bulb.
11. Push connector onto new bulb base, and push the
connector locking tab to the lock position.
CAUTION!
Do not touch the new bulb with your fingers. Oil
contamination will severely shorten bulb life. If the
bulb comes in contact with any oily surface, clean the
bulb with rubbing alcohol.
12. Reinstall bulb housing. Rotate the bulb 1/4 turn
clockwise.
Front Park/Turn Signal
1. Remove the front grille. Turn the retainers along the
top 1/4 turn counterclockwise and remove.
2. Pull the bottom of the grille away starting at one side
and working toward the other.
3. Turn the socket assembly 1/4 turn counterclockwise
and remove from housing. Pull the bulb straight from
the socket to replace.
Front Side Marker
1. Reach under the front fender flare and locate the front
side marker socket.
2. Turn the socket assembly counterclockwise 1/3 turn
and remove it from the housing. Pull the bulb straight
from the socket to replace.
7
MAINTAINING YOUR VEHICLE 643
Page 652 of 695
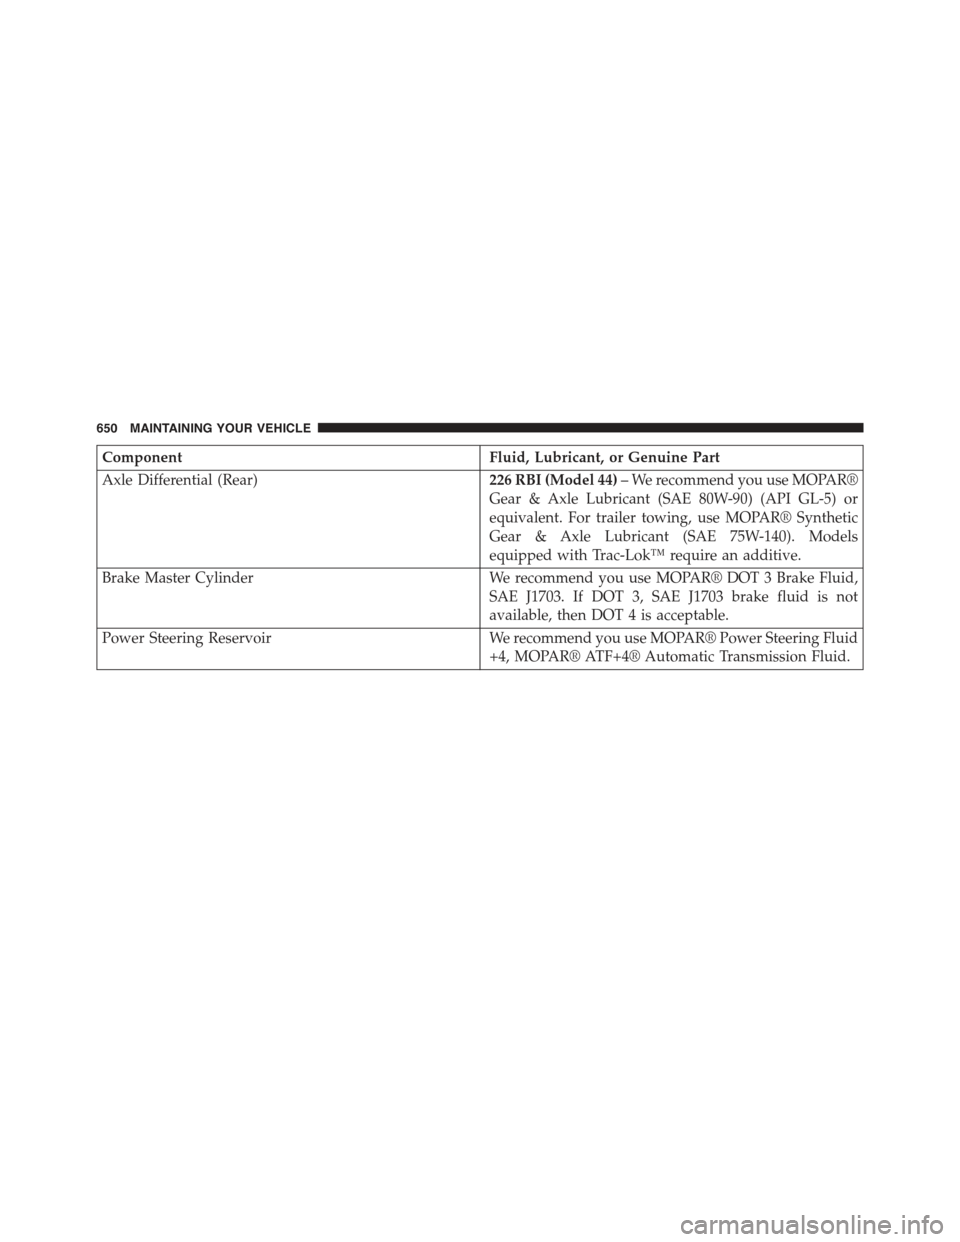
ComponentFluid, Lubricant, or Genuine Part
Axle Differential (Rear)226 RBI (Model 44)– We recommend you use MOPAR®
Gear & Axle Lubricant (SAE 80W-90) (API GL-5) or
equivalent. For trailer towing, use MOPAR® Synthetic
Gear & Axle Lubricant (SAE 75W-140). Models
equipped with Trac-Lok™ require an additive.
Brake Master CylinderWe recommend you use MOPAR® DOT 3 Brake Fluid,
SAE J1703. If DOT 3, SAE J1703 brake fluid is not
available, then DOT 4 is acceptable.
Power Steering ReservoirWe recommend you use MOPAR® Power Steering Fluid
+4, MOPAR® ATF+4® Automatic Transmission Fluid.
650 MAINTAINING YOUR VEHICLE
Page 654 of 695
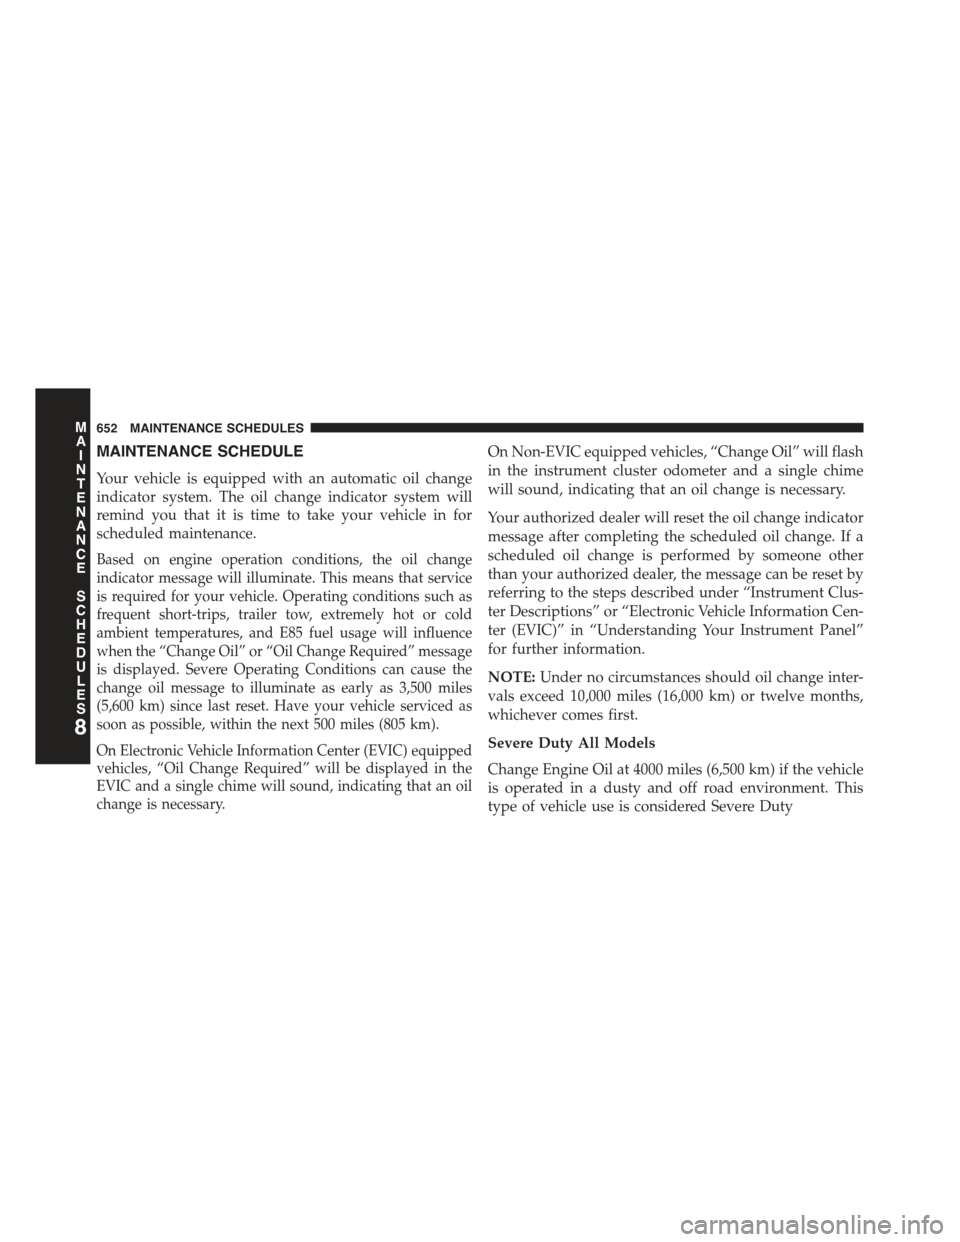
MAINTENANCE SCHEDULE
Your vehicle is equipped with an automatic oil change
indicator system. The oil change indicator system will
remind you that it is time to take your vehicle in for
scheduled maintenance.
Based on engine operation conditions, the oil change
indicator message will illuminate. This means that service
is required for your vehicle. Operating conditions such as
frequent short-trips, trailer tow, extremely hot or cold
ambient temperatures, and E85 fuel usage will influence
when the “Change Oil” or “Oil Change Required” message
is displayed. Severe Operating Conditions can cause the
change oil message to illuminate as early as 3,500 miles
(5,600 km) since last reset. Have your vehicle serviced as
soon as possible, within the next 500 miles (805 km).
On Electronic Vehicle Information Center (EVIC) equipped
vehicles, “Oil Change Required” will be displayed in the
EVIC and a single chime will sound, indicating that an oil
change is necessary.
On Non-EVIC equipped vehicles, “Change Oil” will flash
in the instrument cluster odometer and a single chime
will sound, indicating that an oil change is necessary.
Your authorized dealer will reset the oil change indicator
message after completing the scheduled oil change. If a
scheduled oil change is performed by someone other
than your authorized dealer, the message can be reset by
referring to the steps described under “Instrument Clus-
ter Descriptions” or “Electronic Vehicle Information Cen-
ter (EVIC)” in “Understanding Your Instrument Panel”
for further information.
NOTE:Under no circumstances should oil change inter-
vals exceed 10,000 miles (16,000 km) or twelve months,
whichever comes first.
Severe Duty All Models
Change Engine Oil at 4000 miles (6,500 km) if the vehicle
is operated in a dusty and off road environment. This
type of vehicle use is considered Severe Duty
8
MAINTENANCE
SCHEDULES
652 MAINTENANCE SCHEDULES
Page 658 of 695
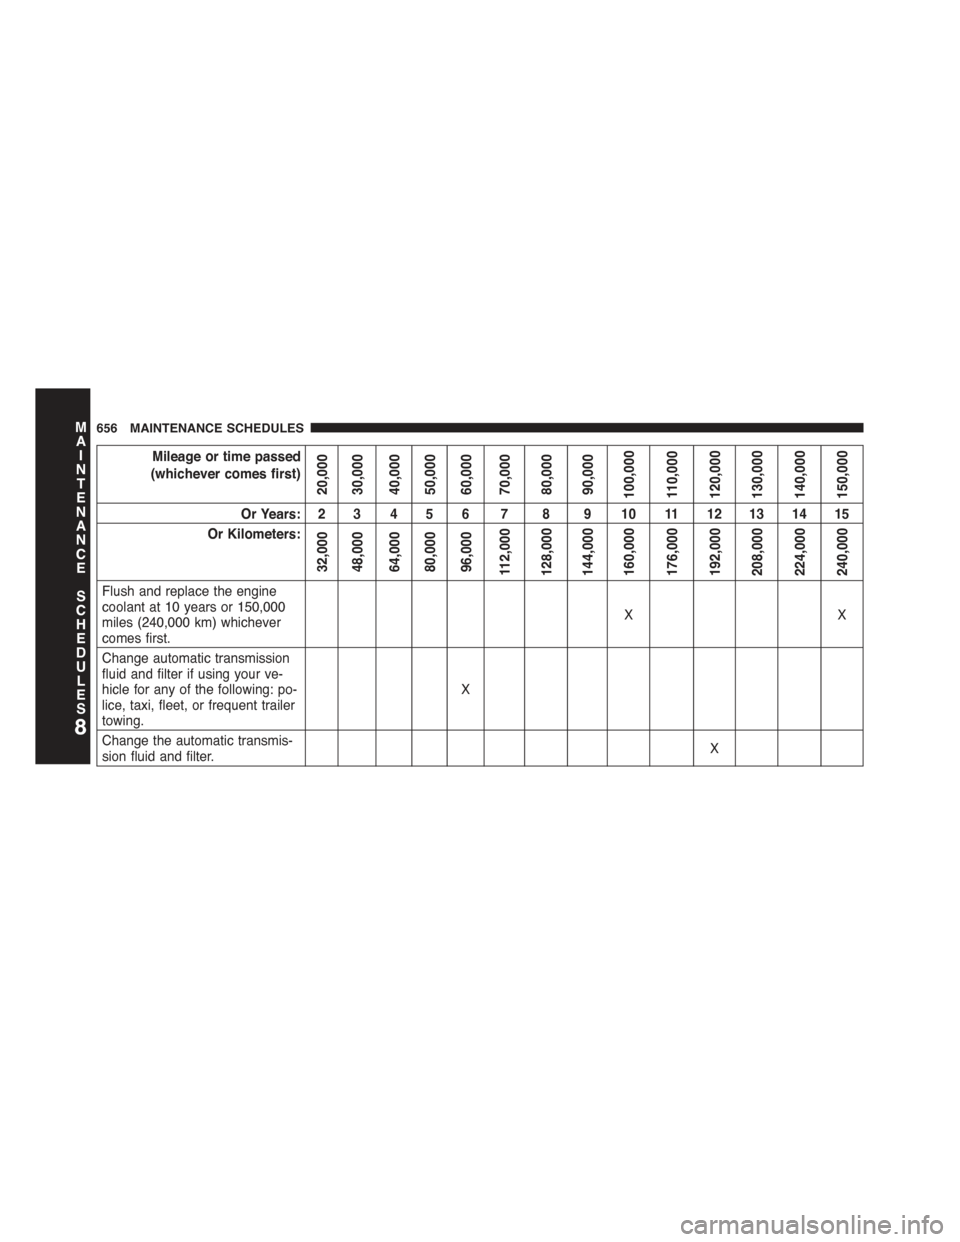
Mileage or time passed
(whichever comes first)
20,00030,00040,00050,00060,00070,00080,00090,000100,000110,000120,000130,000140,000150,000
Or Years: 2 3 4 5 6 7 8 9 10 11 12 13 14 15
Or Kilometers:
32,00048,00064,00080,00096,000112,000128,000144,000160,000176,000192,000208,000224,000240,000
Flush and replace the enginecoolant at 10 years or 150,000miles (240,000 km) whichevercomes first.
XX
Change automatic transmissionfluid and filter if using your ve-hicle for any of the following: po-lice, taxi, fleet, or frequent trailertowing.
X
Change the automatic transmis-sion fluid and filter.X
8
MAINTENANCE
SCHEDULES
656 MAINTENANCE SCHEDULES