lock JEEP WRANGLER 2015 JK / 3.G Owner's Manual
[x] Cancel search | Manufacturer: JEEP, Model Year: 2015, Model line: WRANGLER, Model: JEEP WRANGLER 2015 JK / 3.GPages: 156, PDF Size: 23.54 MB
Page 34 of 156
SUNRIDER® AND SOFT TOP
Two Door Sunrider® Open
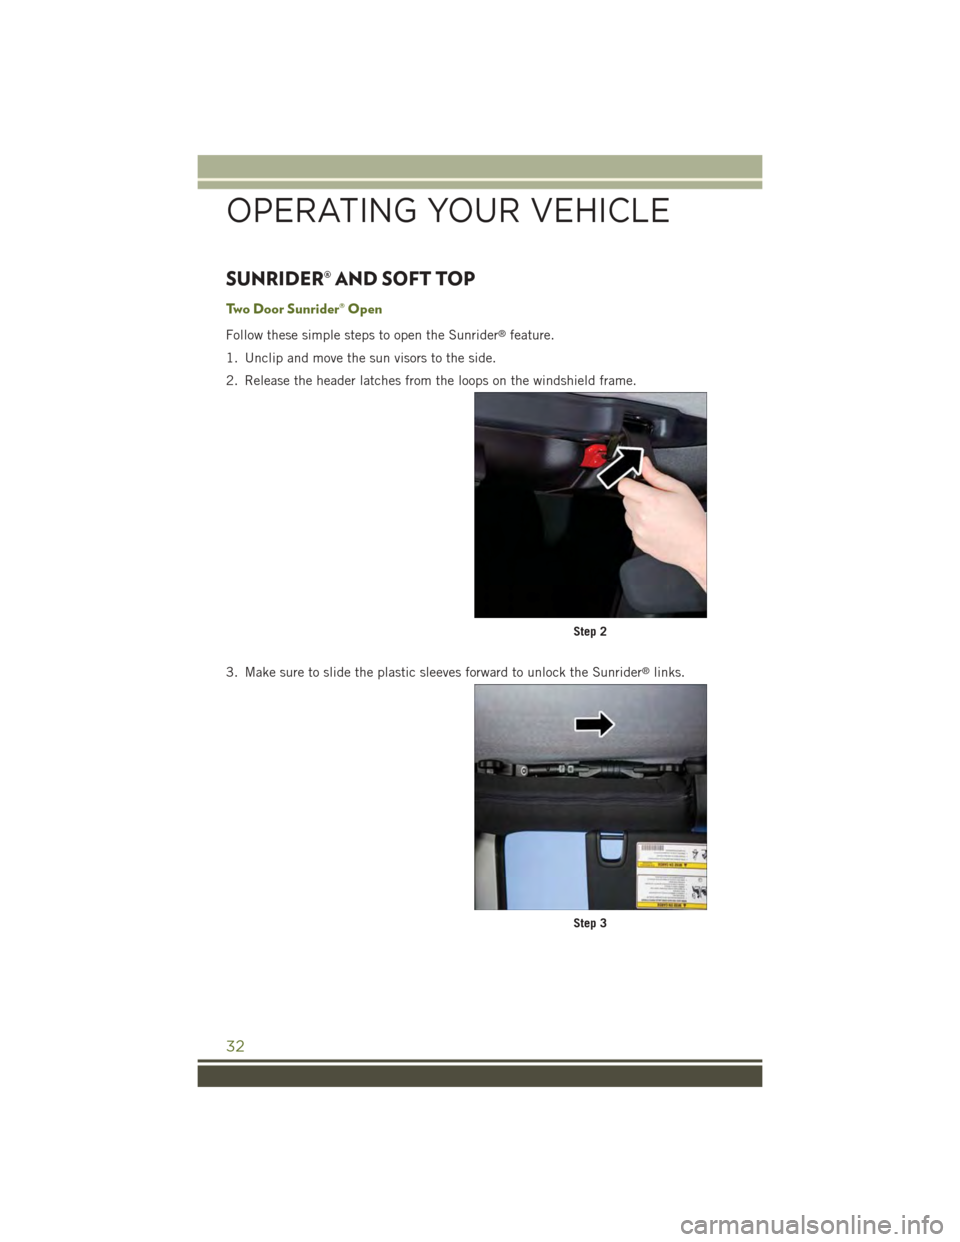
Follow these simple steps to open the Sunrider®feature.
1. Unclip and move the sun visors to the side.
2. Release the header latches from the loops on the windshield frame.
3. Make sure to slide the plastic sleeves forward to unlock the Sunrider®links.
Step 2
Step 3
OPERATING YOUR VEHICLE
32
Page 37 of 156
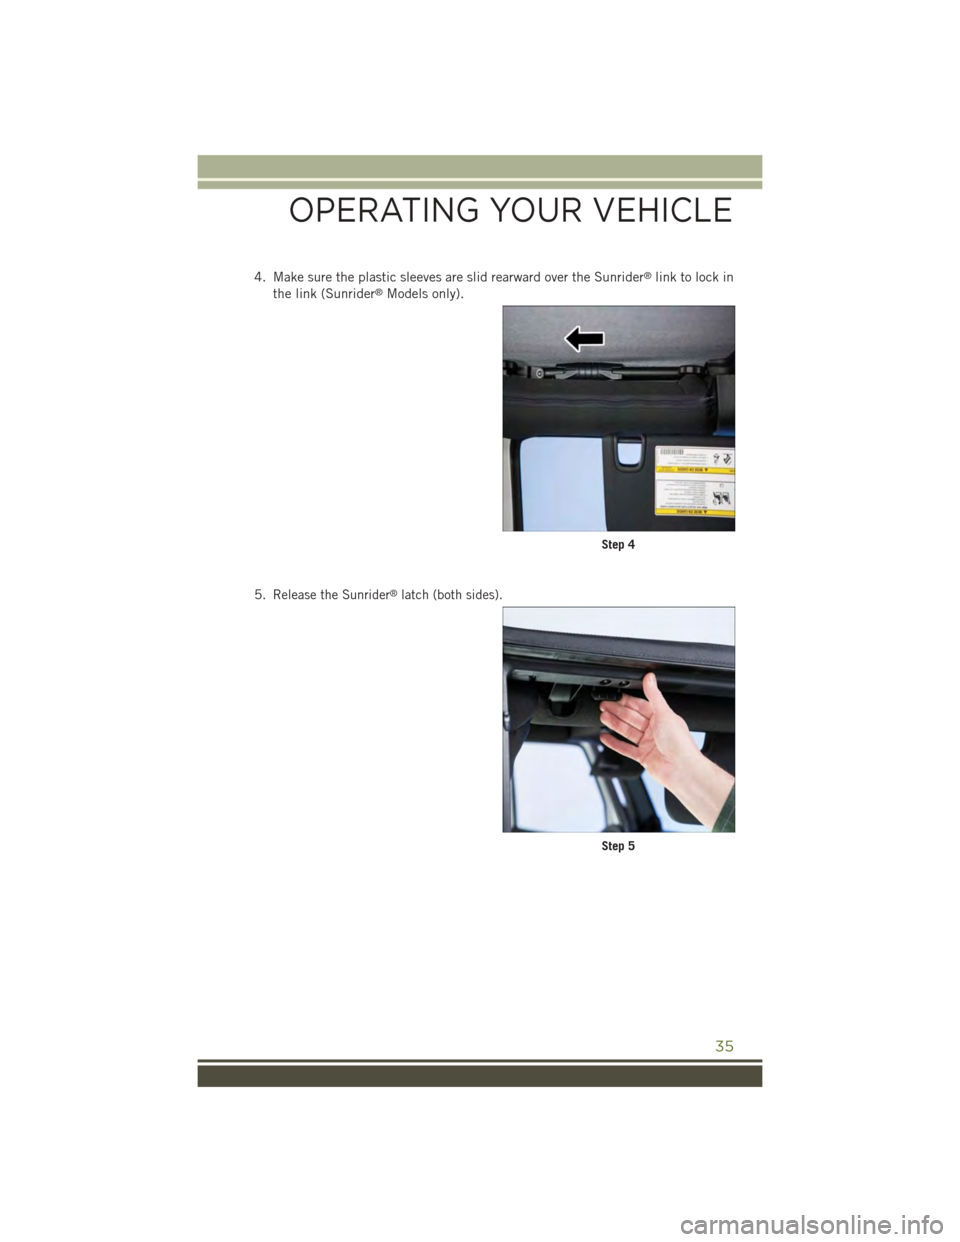
4. Make sure the plastic sleeves are slid rearward over the Sunrider®link to lock in
the link (Sunrider®Models only).
5.Release the Sunrider®latch (both sides).
Step 4
Step 5
OPERATING YOUR VEHICLE
35
Page 40 of 156
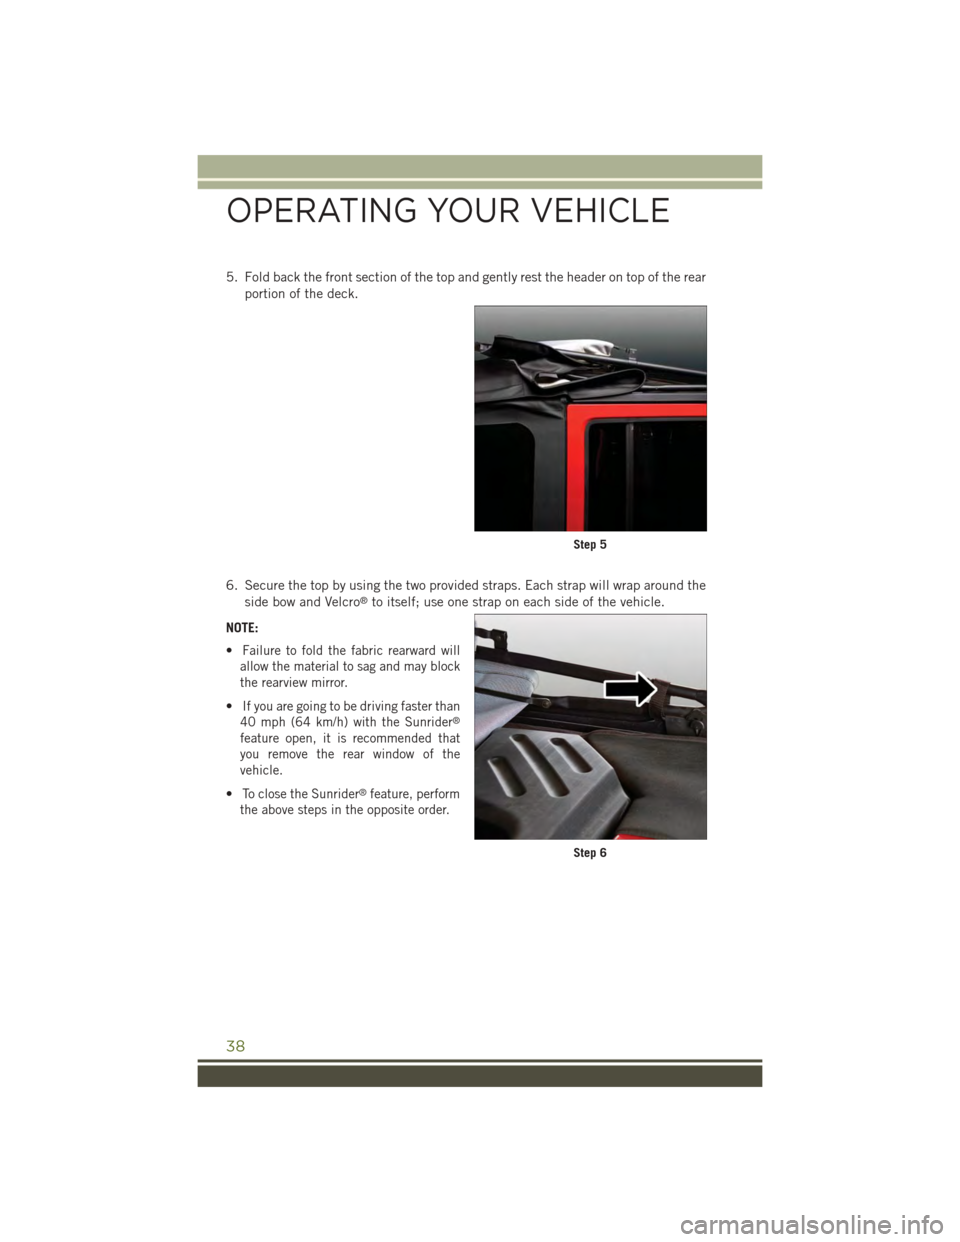
5. Fold back the front section of the top and gently rest the header on top of the rear
portion of the deck.
6. Secure the top by using the two provided straps. Each strap will wrap around the
side bow and Velcro®to itself; use one strap on each side of the vehicle.
NOTE:
•Failure to fold the fabric rearward will
allow the material to sag and may block
the rearview mirror.
•If you are going to be driving faster than
40 mph (64 km/h) with the Sunrider®
feature open, it is recommended that
you remove the rear window of the
vehicle.
•To close the Sunrider®feature, perform
the above steps in the opposite order.
Step 5
Step 6
OPERATING YOUR VEHICLE
38
Page 45 of 156
HARD TOP AND FREEDOM TOP®
Freedom Top® Removal
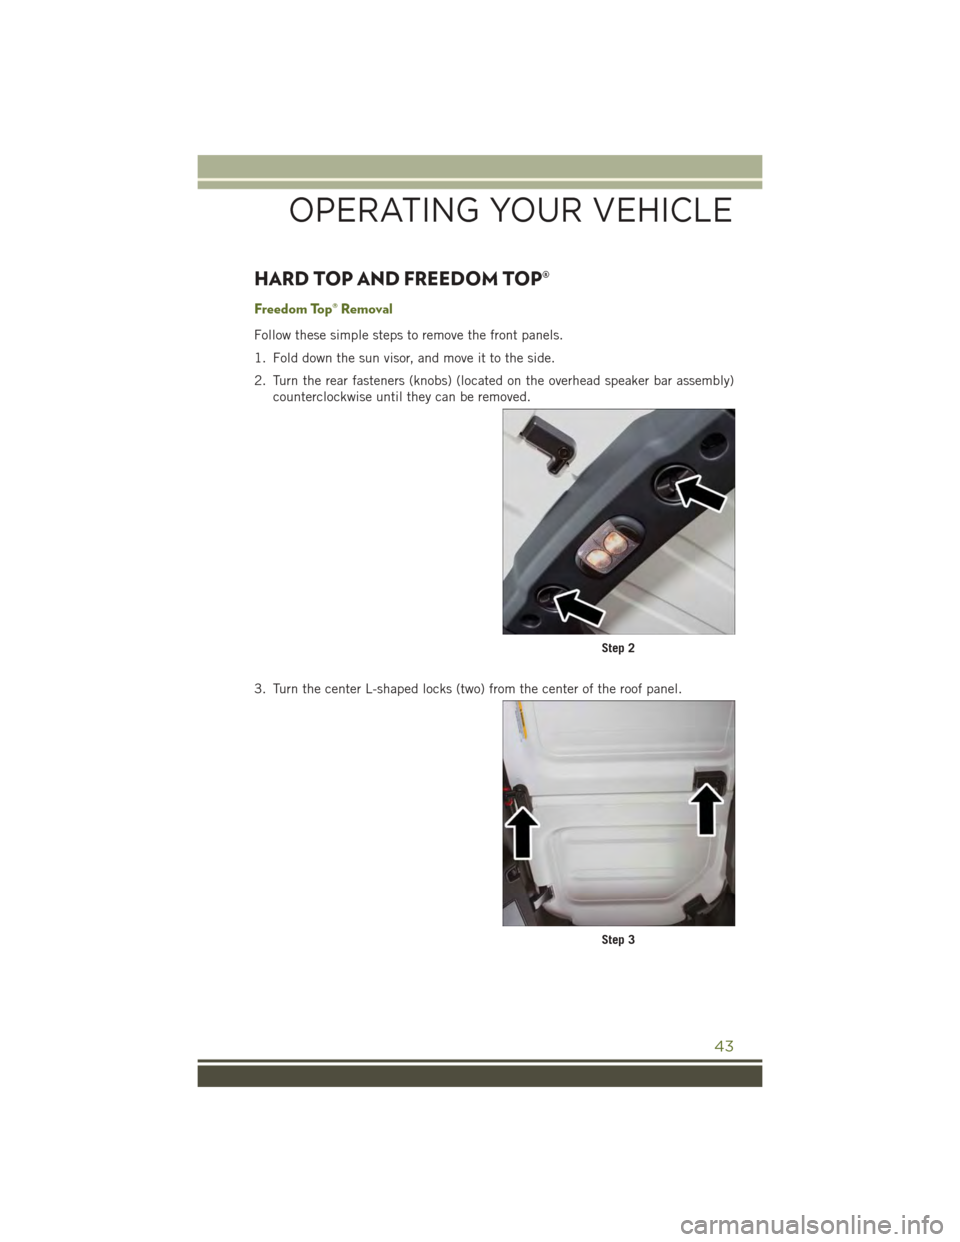
Follow these simple steps to remove the front panels.
1. Fold down the sun visor, and move it to the side.
2. Turn the rear fasteners (knobs) (located on the overhead speaker bar assembly)
counterclockwise until they can be removed.
3. Turn the center L-shaped locks (two) from the center of the roof panel.
Step 2
Step 3
OPERATING YOUR VEHICLE
43
Page 46 of 156
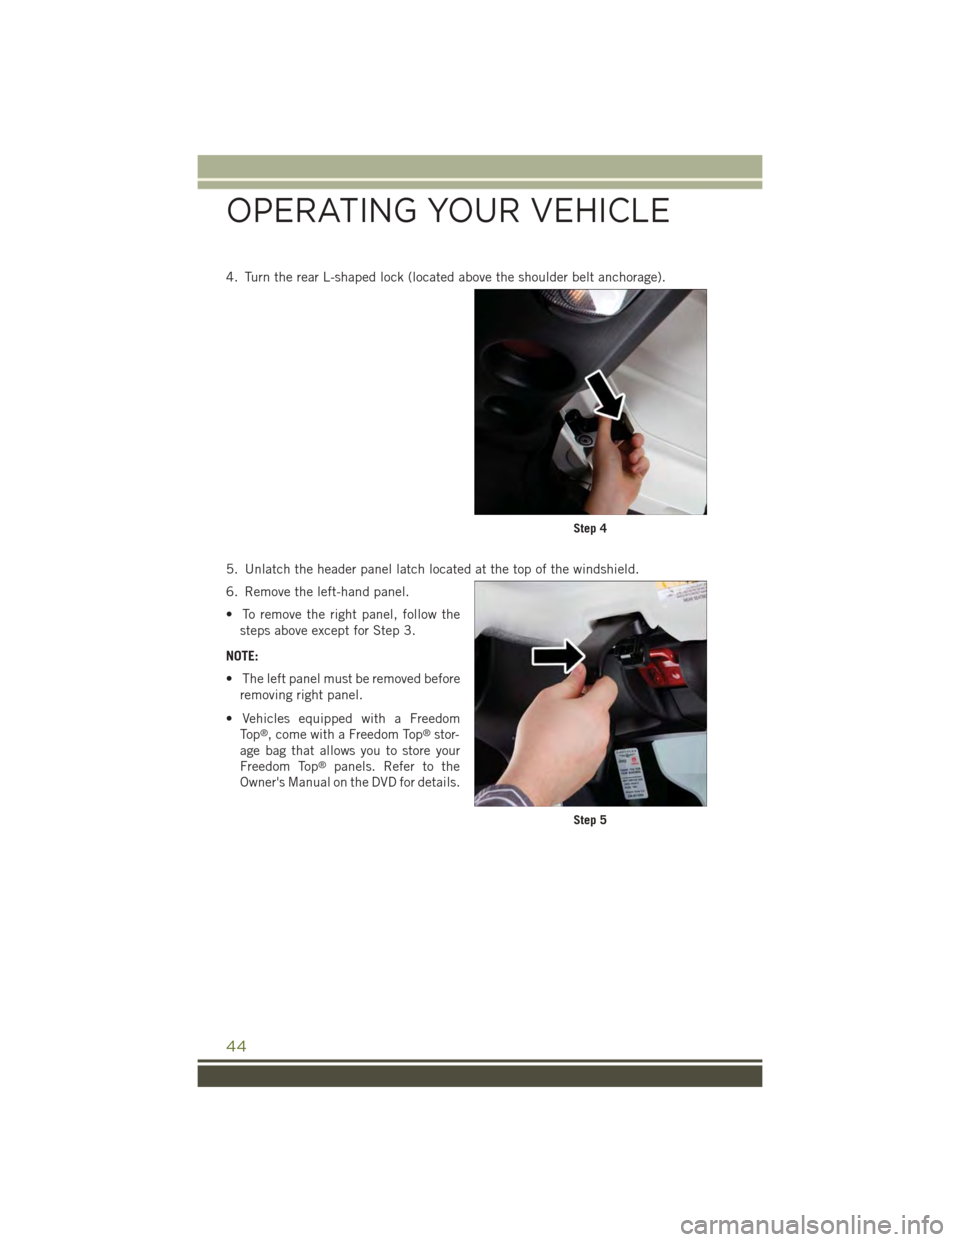
4. Turn the rear L-shaped lock (located above the shoulder belt anchorage).
5. Unlatch the header panel latch located at the top of the windshield.
6. Remove the left-hand panel.
• To remove the right panel, follow the
steps above except for Step 3.
NOTE:
• The left panel must be removed before
removing right panel.
• Vehicles equipped with a Freedom
To p®, come with a Freedom Top®stor-
age bag that allows you to store your
Freedom Top®panels. Refer to the
Owner's Manual on the DVD for details.
Step 4
Step 5
OPERATING YOUR VEHICLE
44
Page 52 of 156
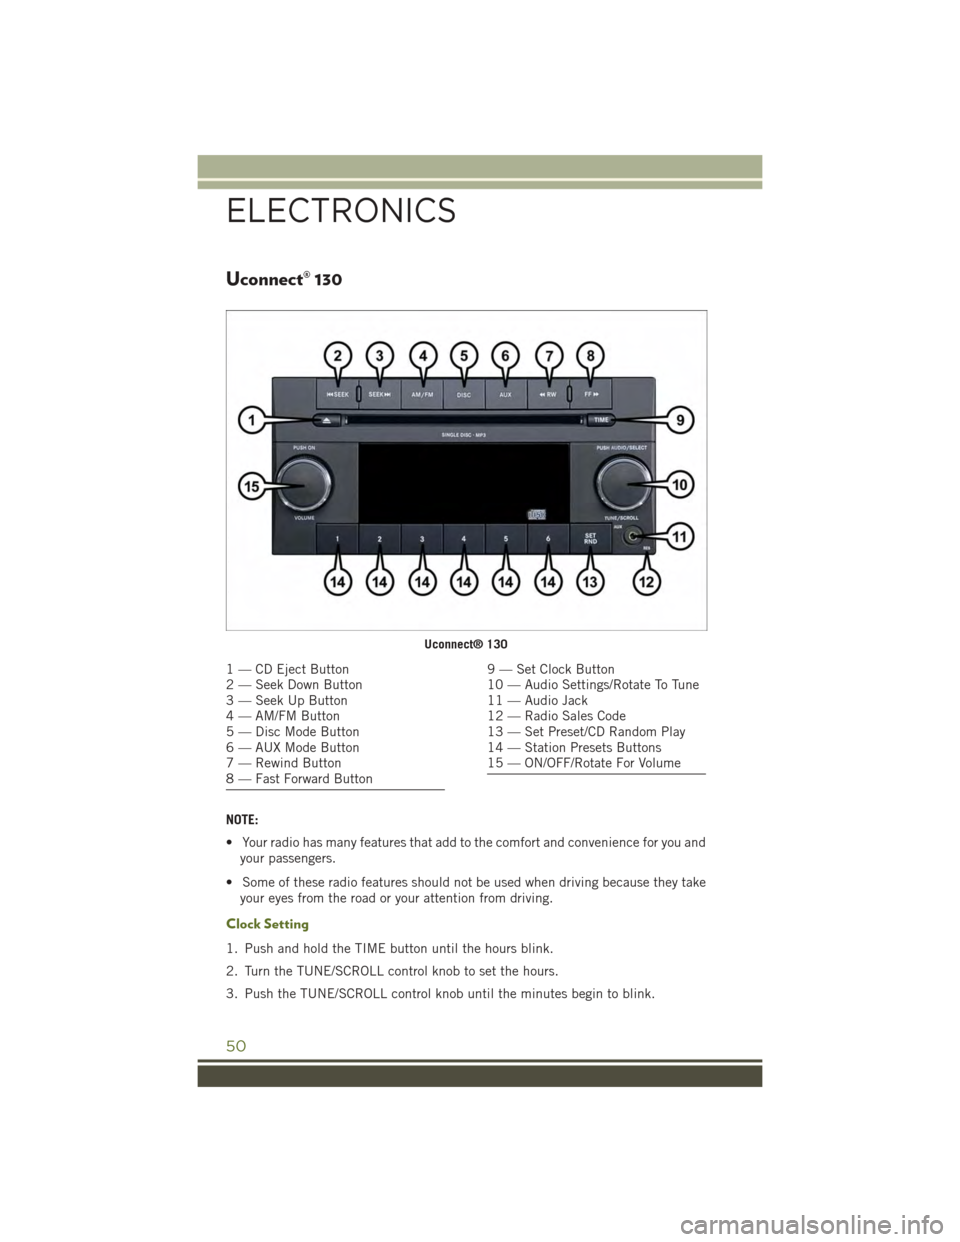
Uconnect® 130
NOTE:
• Your radio has many features that add to the comfort and convenience for you and
your passengers.
• Some of these radio features should not be used when driving because they take
your eyes from the road or your attention from driving.
Clock Setting
1. Push and hold the TIME button until the hours blink.
2. Turn the TUNE/SCROLL control knob to set the hours.
3. Push the TUNE/SCROLL control knob until the minutes begin to blink.
Uconnect® 130
1 — CD Eject Button2 — Seek Down Button3 — Seek Up Button4 — AM/FM Button5 — Disc Mode Button6 — AUX Mode Button7 — Rewind Button8 — Fast Forward Button
9 — Set Clock Button10 — Audio Settings/Rotate To Tune11 — Audio Jack12 — Radio Sales Code13 — Set Preset/CD Random Play14 — Station Presets Buttons15 — ON/OFF/Rotate For Volume
ELECTRONICS
50
Page 54 of 156
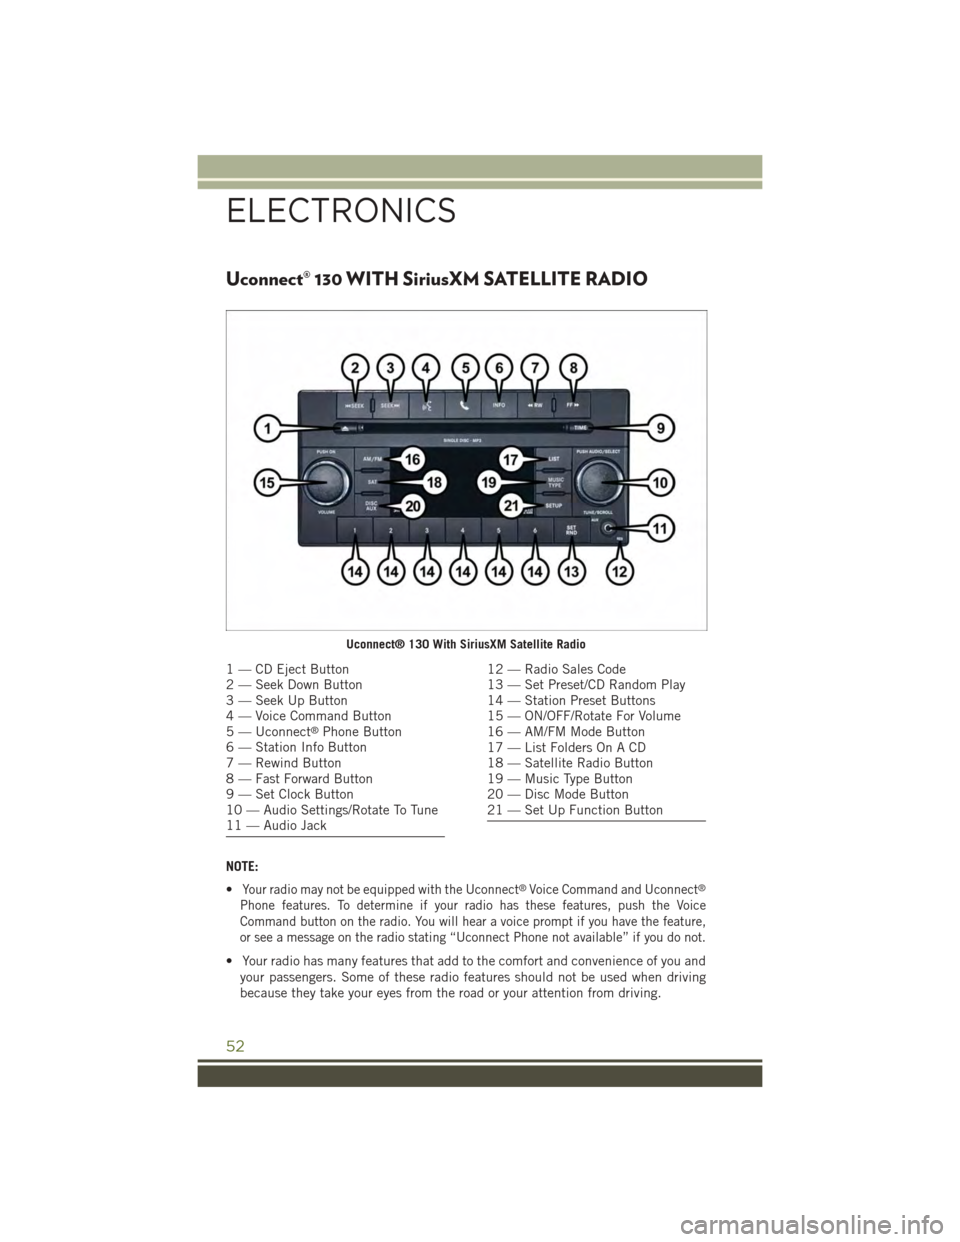
Uconnect® 130 WITH SiriusXM SATELLITE RADIO
NOTE:
•Your radio may not be equipped with the Uconnect®Voice Command and Uconnect®
Phone features. To determine if your radio has these features, push the Voice
Command button on the radio. You will hear a voice prompt if you have the feature,
or see a message on the radio stating “Uconnect Phone not available” if you do not.
• Your radio has many features that add to the comfort and convenience of you and
your passengers. Some of these radio features should not be used when driving
because they take your eyes from the road or your attention from driving.
Uconnect® 130 With SiriusXM Satellite Radio
1 — CD Eject Button2 — Seek Down Button3 — Seek Up Button4 — Voice Command Button5 — Uconnect®Phone Button6 — Station Info Button7 — Rewind Button8 — Fast Forward Button9 — Set Clock Button10 — Audio Settings/Rotate To Tune11 — Audio Jack
12 — Radio Sales Code13 — Set Preset/CD Random Play14 — Station Preset Buttons15 — ON/OFF/Rotate For Volume16 — AM/FM Mode Button17 — List Folders On A CD18 — Satellite Radio Button19 — Music Type Button20 — Disc Mode Button21 — Set Up Function Button
ELECTRONICS
52
Page 55 of 156
Clock Setting
1. Push and hold the TIME button until the hours blink.
2. Turn the TUNE/SCROLL control knob to set the hours.
3. Push the TUNE/SCROLL control knob until the minutes begin to blink.
4. Turn the TUNE/SCROLL control knob to set the minutes.
5. Push the TUNE/SCROLL control knob to save the changes.
6. Push any button/knob or wait five seconds to exit.
Equalizer, Balance And Fade
1. Push the TUNE/SCROLL control knob and “BASS” will display.
2. Rotate the TUNE/SCROLL control knob to select the desired setting.
3.Continue pushing the TUNE/SCROLL control knob to display and set “MID RANGE,”
“TREBLE,” “BALANCE” and “FADE.”
Radio Operation
Seek Up/Down Buttons
• Push to seek through radio stations in AM, FM, or SAT bands.
• Hold either button to bypass stations without stopping.
Store Radio Presets
• Push the SET/RND or SET (depending on the radio) button once and SET 1 will
show in the display. Then select a preset button (1–6).
• A second station may be added to each push button. Push the SET/RND or SET
(depending on the radio) button twice and SET 2 will show in the display. Then
select a preset button (1–6).
Music Type
NOTE:
The Music Type function only operates when in FM mode.
• Push the MUSIC TYPE button to activate this mode. Push the MUSIC TYPE button
again or turn the TUNE/SCROLL control knob to select the desired music type
(Adult Hits, Country, Jazz, Oldies, Rock, etc.).
• When a music type is chosen and the Music type is displayed, Push either SEEK
button and the radio will only search for stations with the selected music type.
SETUP Button
• Pushing the SETUP button allows you to select between items that are available
in that particular mode.
• Turn the TUNE/SCROLL control knob to scroll through the entries. Push the
AUDIO/SELECT button to select an entry and make changes.
ELECTRONICS
53
Page 57 of 156
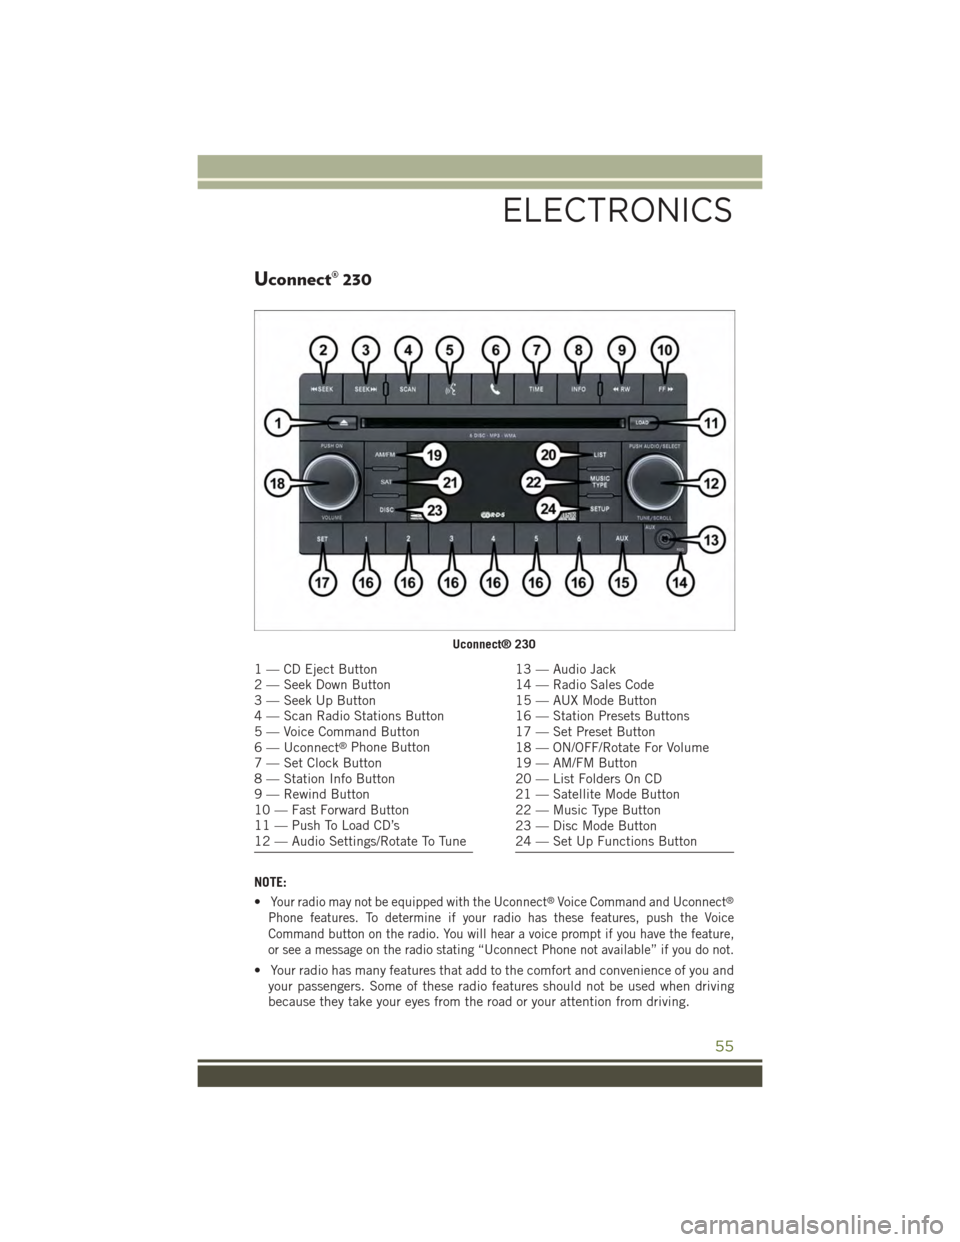
Uconnect® 230
NOTE:
•Your radio may not be equipped with the Uconnect®Voice Command and Uconnect®
Phone features. To determine if your radio has these features, push the Voice
Command button on the radio. You will hear a voice prompt if you have the feature,
or see a message on the radio stating “Uconnect Phone not available” if you do not.
• Your radio has many features that add to the comfort and convenience of you andyour passengers. Some of these radio features should not be used when drivingbecause they take your eyes from the road or your attention from driving.
Uconnect® 230
1 — CD Eject Button2 — Seek Down Button3 — Seek Up Button4 — Scan Radio Stations Button5 — Voice Command Button6 — Uconnect®Phone Button7 — Set Clock Button8 — Station Info Button9 — Rewind Button10 — Fast Forward Button11 — Push To Load CD’s12 — Audio Settings/Rotate To Tune
13 — Audio Jack14 — Radio Sales Code15 — AUX Mode Button16 — Station Presets Buttons17 — Set Preset Button18 — ON/OFF/Rotate For Volume19 — AM/FM Button20 — List Folders On CD21 — Satellite Mode Button22 — Music Type Button23 — Disc Mode Button24 — Set Up Functions Button
ELECTRONICS
55
Page 58 of 156
Clock Setting
1. Push and hold the TIME button until the hours blink.
2. Turn the TUNE/SCROLL control knob to set the hours.
3. Push the TUNE/SCROLL control knob until the minutes begin to blink.
4. Turn the TUNE/SCROLL control knob to set the minutes.
5. Push the TUNE/SCROLL control knob to save the changes.
6. Push any button/knob or wait five seconds to exit.
Equalizer, Balance And Fade
1. Push the TUNE/SCROLL control knob and “BASS” will display.
2. Rotate the TUNE/SCROLL control knob to select the desired setting.
3.Continue pushing the TUNE/SCROLL control knob to display and set “MID RANGE,”
“TREBLE,” “BALANCE” and “FADE.”
Radio Operation
Seek Up/Down Buttons
• Push to seek through radio stations in AM, FM, or SAT bands.
• Hold either button to bypass stations without stopping.
Store Radio Presets
•Push the SET button once and SET 1 will show in the display. Then select button (1–6).
• A second station may be added to each push button. Push the SET button twice
and SET 2 will show in the display. Then select button (1–6).
Music Type
NOTE:
The Music Type function only operates when in FM mode.
• Push the MUSIC TYPE button to activate this mode. Push the MUSIC TYPE buttonagain or turn the TUNE/SCROLL control knob to select the desired music type(Adult Hits, Country, Jazz, Oldies, Rock, etc.).
• Once a music type is chosen and the music type is displayed, push the SEEKbutton and the radio will only search for stations with the selected music type.
SETUP Button
• Pushing the SETUP button allows you to select between items that are available
in that particular mode.
• Turn the TUNE/SCROLL control knob to scroll through the entries. Push the
AUDIO/SELECT button to select an entry and make changes.
SiriusXM Satellite Radio
SiriusXM services require subscriptions, sold separately after the 12-month trial
included with the new vehicle purchase.If you decide to continue your service at the
end of your trial subscription, the plan you choose will automatically renew and bill at
ELECTRONICS
56