tow JEEP WRANGLER 2015 JK / 3.G Owner's Manual
[x] Cancel search | Manufacturer: JEEP, Model Year: 2015, Model line: WRANGLER, Model: JEEP WRANGLER 2015 JK / 3.GPages: 156, PDF Size: 23.54 MB
Page 111 of 156
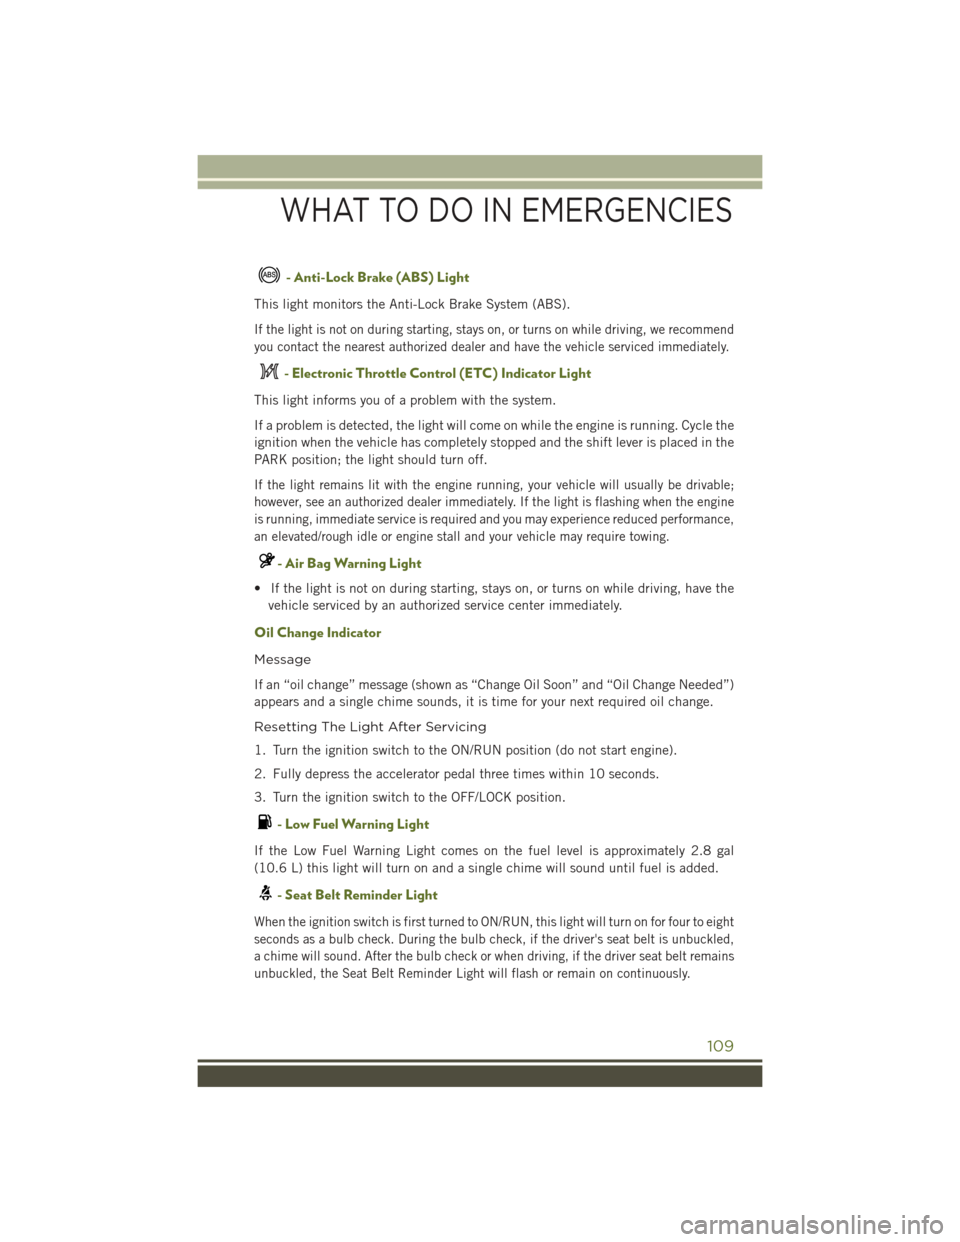
- Anti-Lock Brake (ABS) Light
This light monitors the Anti-Lock Brake System (ABS).
If the light is not on during starting, stays on, or turns on while driving, we recommend
you contact the nearest authorized dealer and have the vehicle serviced immediately.
- Electronic Throttle Control (ETC) Indicator Light
This light informs you of a problem with the system.
If a problem is detected, the light will come on while the engine is running. Cycle the
ignition when the vehicle has completely stopped and the shift lever is placed in the
PARK position; the light should turn off.
If the light remains lit with the engine running, your vehicle will usually be drivable;
however, see an authorized dealer immediately. If the light is flashing when the engine
is running, immediate service is required and you may experience reduced performance,
an elevated/rough idle or engine stall and your vehicle may require towing.
- Air Bag Warning Light
• If the light is not on during starting, stays on, or turns on while driving, have the
vehicle serviced by an authorized service center immediately.
Oil Change Indicator
Message
If an “oil change” message (shown as “Change Oil Soon” and “Oil Change Needed”)
appears and a single chime sounds, it is time for your next required oil change.
Resetting The Light After Servicing
1. Turn the ignition switch to the ON/RUN position (do not start engine).
2. Fully depress the accelerator pedal three times within 10 seconds.
3. Turn the ignition switch to the OFF/LOCK position.
- Low Fuel Warning Light
If the Low Fuel Warning Light comes on the fuel level is approximately 2.8 gal
(10.6 L) this light will turn on and a single chime will sound until fuel is added.
- Seat Belt Reminder Light
When the ignition switch is first turned to ON/RUN, this light will turn on for four to eight
seconds as a bulb check. During the bulb check, if the driver's seat belt is unbuckled,
a chime will sound. After the bulb check or when driving, if the driver seat belt remains
unbuckled, the Seat Belt Reminder Light will flash or remain on continuously.
WHAT TO DO IN EMERGENCIES
109
Page 114 of 156
JACKING AND TIRE CHANGING
Jack Location
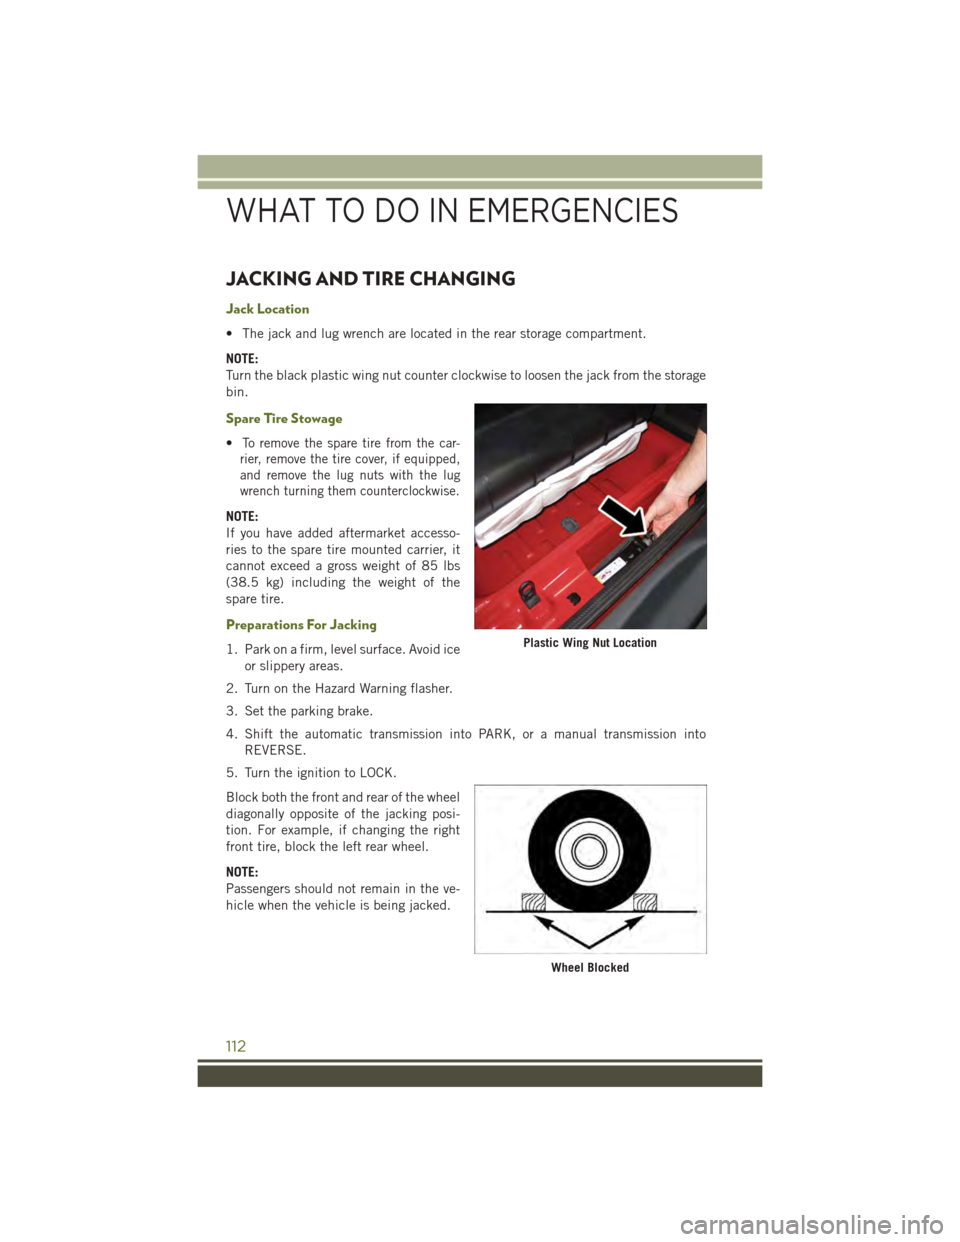
• The jack and lug wrench are located in the rear storage compartment.
NOTE:
Turn the black plastic wing nut counter clockwise to loosen the jack from the storage
bin.
Spare Tire Stowage
•To remove the spare tire from the car-
rier, remove the tire cover, if equipped,
and remove the lug nuts with the lug
wrench turning them counterclockwise.
NOTE:
If you have added aftermarket accesso-
ries to the spare tire mounted carrier, it
cannot exceed a gross weight of 85 lbs
(38.5 kg) including the weight of the
spare tire.
Preparations For Jacking
1. Park on a firm, level surface. Avoid ice
or slippery areas.
2. Turn on the Hazard Warning flasher.
3. Set the parking brake.
4. Shift the automatic transmission into PARK, or a manual transmission into
REVERSE.
5. Turn the ignition to LOCK.
Block both the front and rear of the wheel
diagonally opposite of the jacking posi-
tion. For example, if changing the right
front tire, block the left rear wheel.
NOTE:
Passengers should not remain in the ve-
hicle when the vehicle is being jacked.
Plastic Wing Nut Location
Wheel Blocked
WHAT TO DO IN EMERGENCIES
112
Page 115 of 156
Jacking Instructions
1. Remove the spare tire, jack and tools
from the stored location.
2. Loosen (but do not remove) the wheel
lug nuts by turning them to the left
one turn while the wheel is still on the
ground.
3. Assemble the jack and jacking tools.
Connect the jack handle driver to the
extension, then to the lug wrench.
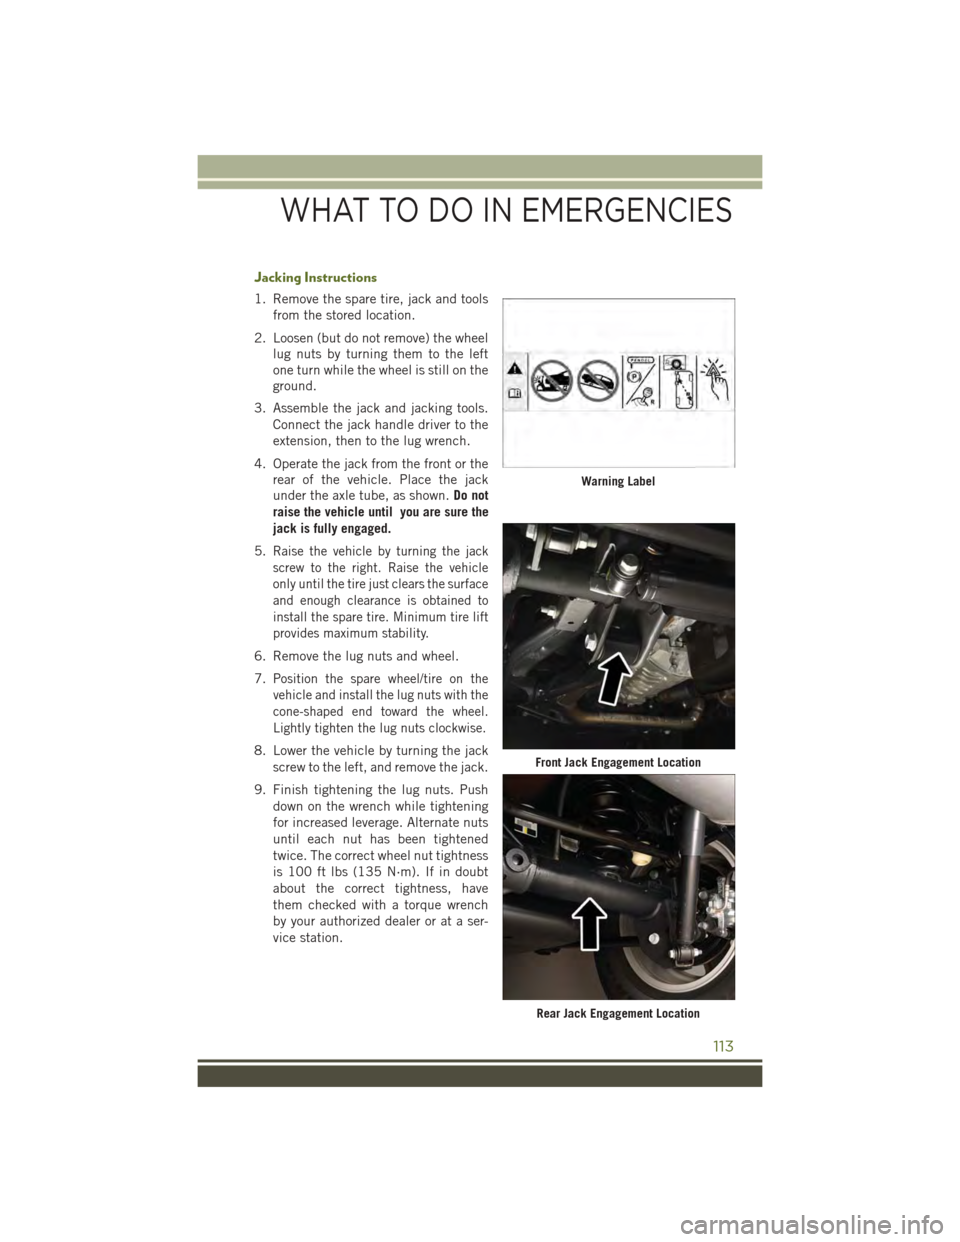
4. Operate the jack from the front or the
rear of the vehicle. Place the jack
under the axle tube, as shown.Do not
raise the vehicle until you are sure the
jack is fully engaged.
5.Raise the vehicle by turning the jack
screw to the right. Raise the vehicle
only until the tire just clears the surface
and enough clearance is obtained to
install the spare tire. Minimum tire lift
provides maximum stability.
6. Remove the lug nuts and wheel.
7.Position the spare wheel/tire on the
vehicle and install the lug nuts with the
cone-shaped end toward the wheel.
Lightly tighten the lug nuts clockwise.
8. Lower the vehicle by turning the jack
screw to the left, and remove the jack.
9. Finish tightening the lug nuts. Push
down on the wrench while tightening
for increased leverage. Alternate nuts
until each nut has been tightened
twice. The correct wheel nut tightness
is 100 ft lbs (135 N·m). If in doubt
about the correct tightness, have
them checked with a torque wrench
by your authorized dealer or at a ser-
vice station.
Warning Label
Front Jack Engagement Location
Rear Jack Engagement Location
WHAT TO DO IN EMERGENCIES
113
Page 116 of 156
10.Remove the jack assembly and wheel blocks.
11. Secure the tire, jack, and tools in their proper locations.
12. Remove blocks from wheels.
Road Tire Installation
1. Mount the road tire on the axle.
2. Install the remaining lug nuts with the cone shaped end of the nut toward the
wheel. Lightly tighten the lug nuts.
3. Lower the vehicle to the ground by turning the jack handle counterclockwise.
4. Finish tightening the lug nuts. Push down on the wrench while at the end of the
handle for increased leverage. Tighten the lug nuts in a star pattern until each nut
has been tightened twice. The correct tightness of each lug nut is 100 ft/lbs
(135 N·m). If in doubt about the correct tightness, have them checked with a
torque wrench by your authorized dealer or service station.
5. After 25 miles (40 km) check the lug nut torque with a torque wrench to ensure
that all lug nuts are properly seated against the wheel.
CAUTION!
Do not attempt to raise the vehicle by jacking on locations other than those
indicated in the Jacking Instructions for this vehicle.
WHAT TO DO IN EMERGENCIES
114
Page 117 of 156
WARNING!
• Do not attempt to change a tire on the side of the vehicle close to moving
traffic. Pull far enough off the road to avoid the danger of being hit when
operating the jack or changing the wheel.
• Being under a jacked-up vehicle is dangerous. The vehicle could slip off the
jack and fall on you. You could be crushed. Never put any part of your body
under a vehicle that is on a jack. If you need to get under a raised vehicle, take
it to a service center where it can be raised on a lift.
• Never start or run the engine while the vehicle is on a jack.
• The jack is designed to be used as a tool for changing tires only. The jack
should not be used to lift the vehicle for service purposes. The vehicle should
be jacked on a firm level surface only. Avoid ice or slippery areas.
• Carefully follow these tire changing warnings to help prevent personal injury or
damage to your vehicle:
• Always park on a firm, level surface as far from the edge of the roadway
as possible before raising the vehicle.
• Turn on the Hazard Warning flasher.
• Block the wheel diagonally opposite the wheel to be raised.
• Set the parking brake firmly and set an automatic transmission in PARK;
a manual transmission in REVERSE.
• Do not let anyone sit in the vehicle when it is on a jack.
• Do not get under the vehicle when it is on a jack.
• Only use the jack in the positions indicated and for lifting this vehicle
during a tire change.
• If working on or near a roadway, be extremely careful of motor traffic.
• To assure that spare tires, flat or inflated, are securely stowed, spares
must be stowed with the valve stem facing the ground.
• Raising the vehicle higher than necessary can make the vehicle less
stable and cause a collision. It could slip off the jack and hurt someone
near it. Raise the vehicle only enough to remove the tire.
• To avoid the risk of forcing the vehicle off the jack, do not tighten the
wheel nuts fully until the vehicle has been lowered.
• A loose tire or jack, thrown forward in a collision or hard stop, could en-
danger the occupants of the vehicle. Always stow the jack parts and the
spare tire in the places provided.
• To avoid the risk of forcing the vehicle off the jack, do not tighten the lug
nuts fully until the vehicle is lowered to the ground.
WHAT TO DO IN EMERGENCIES
115
Page 120 of 156
EMERGENCY TOW HOOKS
If your vehicle is equipped with tow hooks, they are mounted in the front and the rear.
NOTE:
For off-road recovery, it is recommended to use both of the front tow hooks to
minimize the risk of damage to the vehicle.
CAUTION!
Tow hooks are for emergency use only, to rescue a vehicle stranded off-road. Do not
use tow hooks for tow truck hookup or highway towing. You could damage your
vehicle. Tow straps are recommended when towing the vehicle; chains may cause
vehicle damage.
WARNING!
• Chains are not recommended for freeing a stuck vehicle. Chains may break,
causing serious injury or death.
• Stand clear of vehicles when pulling with tow hooks. Tow straps may become
disengaged, causing serious injury.
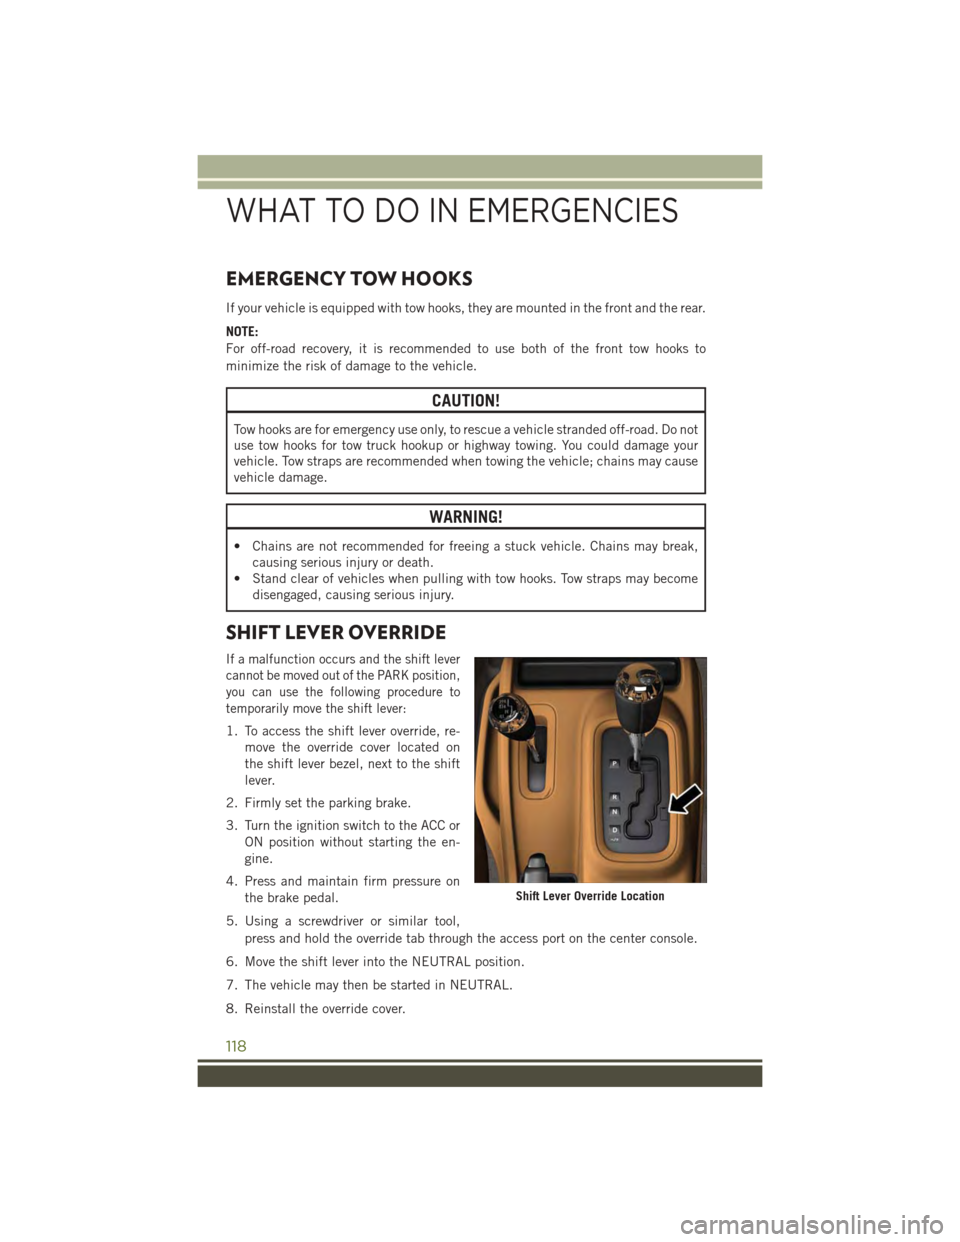
SHIFT LEVER OVERRIDE
If a malfunction occurs and the shift lever
cannot be moved out of the PARK position,
you can use the following procedure to
temporarily move the shift lever:
1. To access the shift lever override, re-
move the override cover located on
the shift lever bezel, next to the shift
lever.
2. Firmly set the parking brake.
3. Turn the ignition switch to the ACC or
ON position without starting the en-
gine.
4. Press and maintain firm pressure on
the brake pedal.
5. Using a screwdriver or similar tool,
press and hold the override tab through the access port on the center console.
6. Move the shift lever into the NEUTRAL position.
7. The vehicle may then be started in NEUTRAL.
8. Reinstall the override cover.
Shift Lever Override Location
WHAT TO DO IN EMERGENCIES
118
Page 121 of 156
TOWING A DISABLED VEHICLE
• The manufacturer requires towing your vehicle with all four wheelsOFFthe ground
using a flatbed.
CAUTION!
Towing this vehicle using any other method could result in extensive damage to the
transfer case and/or transmission.
FREEING A STUCK VEHICLE
• If your vehicle becomes stuck in mud, sand or snow, it can often be moved by a
rocking motion. Turn your steering wheel right and left to clear the area around the
front wheels. Then shift back and forth between DRIVE/1st gear and REVERSE.
Using minimal accelerator pedal pressure to maintain the rocking motion, without
spinning the wheels, is most effective.
NOTE:
If your vehicle is equipped with Traction Control or Electronic Stability Control (ESC),
turn the system OFF before attempting to “rock” the vehicle.
CAUTION!
• Racing the engine or spinning the wheels may lead to transmission overheating
and failure. Allow the engine to idle with the shift lever in NEUTRAL for at least
one minute after every five rocking-motion cycles. This will minimize overheat-
ing and reduce the risk of transmission failure during prolonged efforts to free
a stuck vehicle.
• When “rocking” a stuck vehicle by moving between DRIVE/1st gear and
REVERSE, do not spin the wheels faster than 15 mph (24 km/h), or drivetrain
damage may result.
• Revving the engine or spinning the wheels too fast may lead to transmission
overheating and failure. It can also damage the tires. Do not spin the wheels
above 30 mph (48 km/h) while in gear (no transmission shifting occurring).
WARNING!
Fast spinning tires can be dangerous. Forces generated by excessive wheel speeds
may cause damage, or even failure, of the axle and tires. A tire could explode and
injure someone. Do not spin your vehicle's wheels faster than 30 mph (48 km/h)
or for longer than 30 seconds continuously without stopping when you are stuck
and do not let anyone near a spinning wheel, no matter what the speed.
WHAT TO DO IN EMERGENCIES
119
Page 127 of 156

CAUTION!
• Mixing of engine coolant (antifreeze) other than specified Organic Additive
Technology (OAT) engine coolant (antifreeze), may result in engine damage and
may decrease corrosion protection. Organic Additive Technology (OAT) engine
coolant is different and should not be mixed with Hybrid Organic Additive
Technology (HOAT) engine coolant (antifreeze) or any “globally compatible”
coolant (antifreeze). If a non-OAT engine coolant (antifreeze) is introduced into
the cooling system in an emergency, the cooling system will need to be drained,
flushed, and refilled with fresh OAT coolant (conforming to MS-12106), by an
authorized dealer as soon as possible.
• Do not use water alone or alcohol-based engine coolant (antifreeze) products.
Do not use additional rust inhibitors or antirust products, as they may not be
compatible with the radiator engine coolant and may plug the radiator.
• This vehicle has not been designed for use with propylene glycol-based engine
coolant (antifreeze). Use of propylene glycol-based engine coolant (antifreeze)
is not recommended.
Chassis
ComponentFluid, Lubricant, or Genuine Part
Automatic Transmission –If EquippedUse only ATF+4®Automatic Transmission Fluid. Failure touse ATF+4®fluid may affect the function or performance ofyour transmission. We recommend MOPAR®AT F + 4®fluid.
Manual Transmission –If EquippedWe recommend you use MOPAR®Manual Transmission Lubri-cant meeting the requirements of Chrysler Material StandardMS-9224.
Transfer CaseWe recommend you use MOPAR®AT F + 4®Automatic Trans-mission Fluid.
Axle Differential (Front) We recommend you use MOPAR®Gear & Axle Lubricant(SAE 80W-90) (API GL-5).
Axle Differential (Rear)226 RBI (Model 44)–We recommend you use MOPAR®Gear& Axle Lubricant (SAE 80W-90) (API GL-5) or equivalent. Fortrailer towing, use MOPAR®Synthetic Gear & Axle Lubricant(SAE 75W-140). Models equipped with Trac-Lok™ require anadditive.
Brake Master Cylinder We recommend you use MOPAR®DOT 3 Brake Fluid, SAEJ1703. If DOT 3, SAE J1703 brake fluid is not available,then DOT 4 is acceptable.
Power Steering Reservoir We recommend you use MOPAR®Power Steering Fluid +4,MOPAR®AT F + 4®Automatic Transmission Fluid.
MAINTAINING YOUR VEHICLE
125
Page 128 of 156
MAINTENANCE PROCEDURES
For information on the maintenance procedures for your vehicle, please refer to
“Maintenance Procedures” in “Maintaining Your Vehicle” in your Owner’s Manual or
applicable supplement on the DVD for further details.
MAINTENANCE SCHEDULE
Your vehicle is equipped with an automatic oil change indicator system. The oil
change indicator system will remind you that it is time to take your vehicle in for
scheduled maintenance.
Based on engine operation conditions, the oil change indicator message will
illuminate. This means that service is required for your vehicle. Operating conditions
such as frequent short-trips, trailer tow, extremely hot or cold ambient temperatures,
and E85 fuel usage will influence when the “Change Oil” or “Oil Change Required”
message is displayed. Severe Operating Conditions can cause the change oil
message to illuminate as early as 3,500 miles (5,600 km) since last reset. Have your
vehicle serviced as soon as possible, within the next 500 miles (805 km).
On Electronic Vehicle Information Center (EVIC) equipped vehicles, “Oil Change
Required” will be displayed in the EVIC and a single chime will sound, indicating that
an oil change is necessary.
On Non-EVIC equipped vehicles, “Change Oil” will flash in the instrument cluster
odometer and a single chime will sound, indicating that an oil change is necessary.
Your authorized dealer will reset the oil change indicator message after completing the
scheduled oil change. If a scheduled oil change is performed by someone other than
your authorized dealer, the message can be reset by referring to the steps described
under “Instrument Cluster Warning Lights” in “What To Do In Emergencies” in this
guide or “Instrument Cluster Descriptions” or “Electronic Vehicle Information Center
(EVIC)” in “Understanding Your Instrument Panel” in the Owner’s Manual on your DVD
for further information.
NOTE:
Under no circumstances should oil change intervals exceed 10,000 miles (16,000 km)
or twelve months, whichever comes first.
MAINTAINING YOUR VEHICLE
126
Page 130 of 156
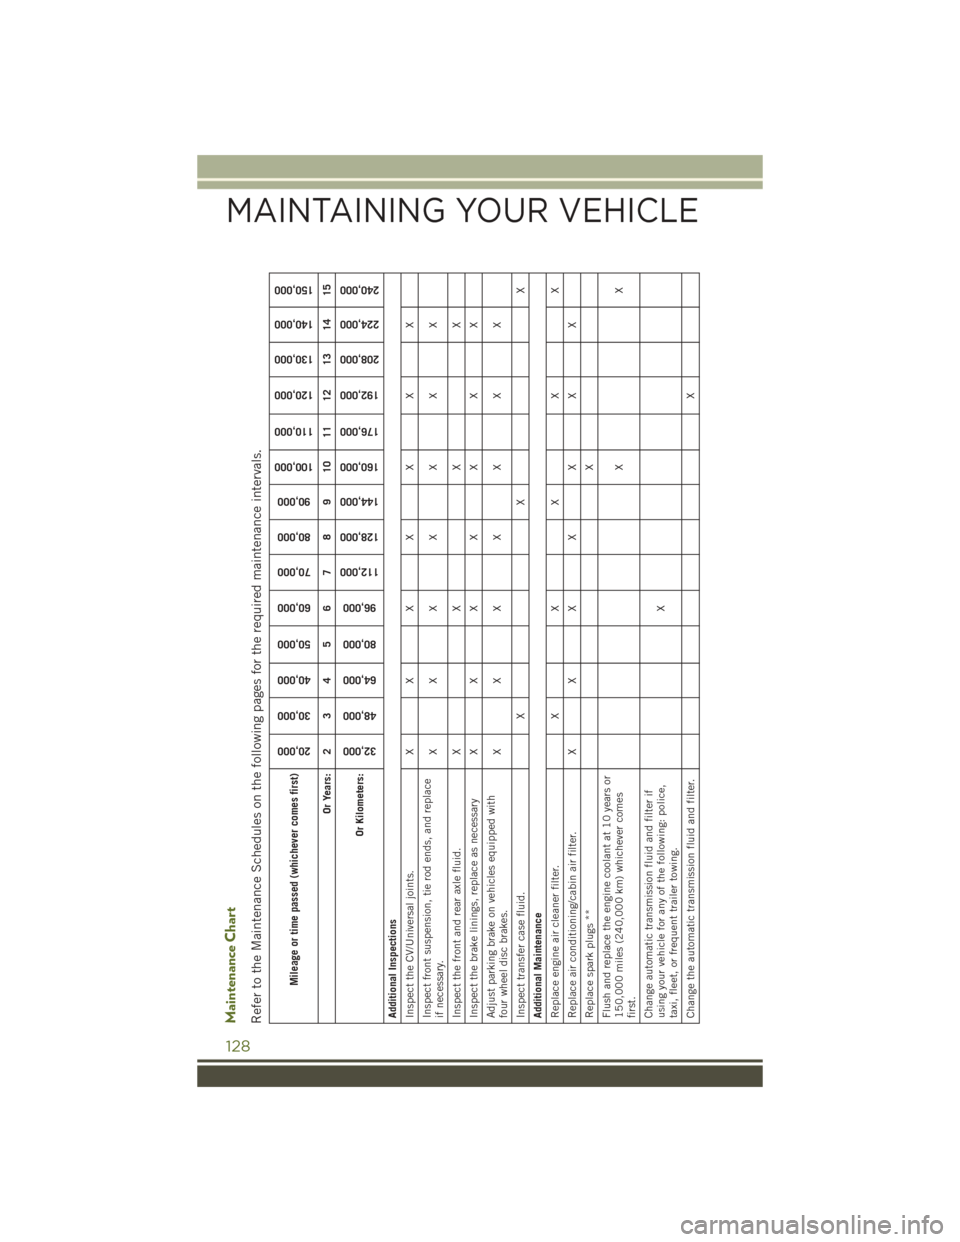
Maintenance ChartRefer to the Maintenance Schedules on the following pages for the required maintenance intervals.
Mileage or time passed (whichever comes first)
20,000
30,000
40,000
50,000
60,000
70,000
80,000
90,000
100,000
110,000
120,000
130,000
140,000
150,000
Or Years: 2 3 4 5 6 7 8 9 10 11 12 13 14 15
Or Kilometers:
32,000
48,000
64,000
80,000
96,000
112,000
128,000
144,000
160,000
176,000
192,000
208,000
224,000
240,000
Additional InspectionsInspect the CV/Universal joints. X X X X X X XInspect front suspension, tie rod ends, and replaceif necessary.
XX XXX XX
Inspect the front and rear axle fluid.
X
X
X
X
Inspect the brake linings, replace as necessary X
X
X
X
X
X
X
Adjust parking brake on vehicles equipped withfour wheel disc brakes.
XX XXX XX
Inspect transfer case fluid.
X
X
X
Additional MaintenanceReplace engine air cleaner filter.
X
X
X
X
X
Replace air conditioning/cabin air filter.
X
X
X
X
X
X
X
Replace spark plugs **
X
Flush and replace the engine coolant at 10 years or150,000 miles (240,000 km) whichever comesfirst.
XX
Change automatic transmission fluid and filter ifusing your vehicle for any of the following: police,taxi, fleet, or frequent trailer towing.
X
Change the automatic transmission fluid and filter.
X
MAINTAINING YOUR VEHICLE
128