JEEP WRANGLER 2015 JK / 3.G Owner's Guide
WRANGLER 2015 JK / 3.G
JEEP
JEEP
https://www.carmanualsonline.info/img/16/7171/w960_7171-0.png
JEEP WRANGLER 2015 JK / 3.G Owner's Guide
Trending: 4WD, roof rack, overheating, ground clearance, ad blue, towing, sport mode
Page 31 of 156
Metric Speed (km/h)
• Pushing the RES+button once will result in a 1 km/h increase in set speed. Each
subsequent tap of the button results in an increase of 1 km/h.
• If the button is continually pushed, the set speed will continue to increase until
the button is released, then the new set speed will be established.
To Decrease Speed
• When the Electronic Speed Control is set, you can decrease speed by pushing the
SET-button.
The speed decrement shown is dependant on the chosen speed unit of U.S. (mph) or
Metric (km/h):
U.S. Speed (mph)
• Pushing the SET-button once will result in a 1 mph decrease in set speed. Each
subsequent tap of the button results in a decrease of 1 mph.
• If the button is continually pushed, the set speed will continue to decrease until
the button is released, then the new set speed will be established.
Metric Speed (km/h)
• Pushing the SET-button once will result in a 1 km/h decrease in set speed. Each
subsequent tap of the button results in a decrease of 1 km/h.
• If the button is continually pushed, the set speed will continue to decrease until
the button is released, then the new set speed will be established.
Resume
• To resume a previously selected set speed in memory, push the RES + button and
release.
Cancel
• Push the CANCEL switch, or apply the brakes or clutch, to cancel the set speed
and maintain the set speed memory.
• Push the ON/OFF switch to turn the system off and erase the set speed memory.
OPERATING YOUR VEHICLE
29
Page 32 of 156
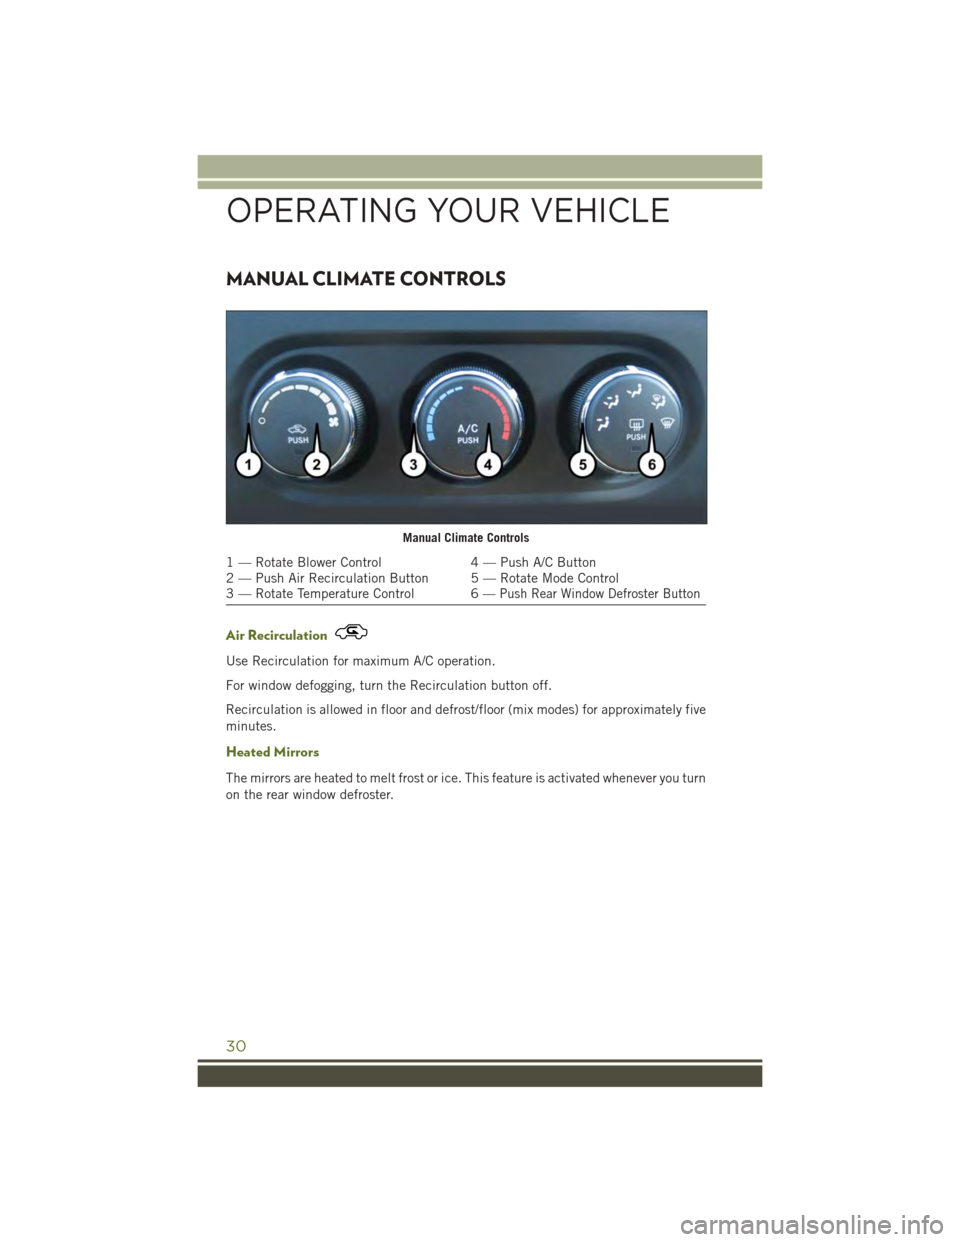
MANUAL CLIMATE CONTROLS
Air Recirculation
Use Recirculation for maximum A/C operation.
For window defogging, turn the Recirculation button off.
Recirculation is allowed in floor and defrost/floor (mix modes) for approximately five
minutes.
Heated Mirrors
The mirrors are heated to melt frost or ice. This feature is activated whenever you turn
on the rear window defroster.
Manual Climate Controls
1 — Rotate Blower Control4 — Push A/C Button2 — Push Air Recirculation Button 5 — Rotate Mode Control3 — Rotate Temperature Control 6— Push Rear Window Defroster Button
OPERATING YOUR VEHICLE
30
Page 33 of 156
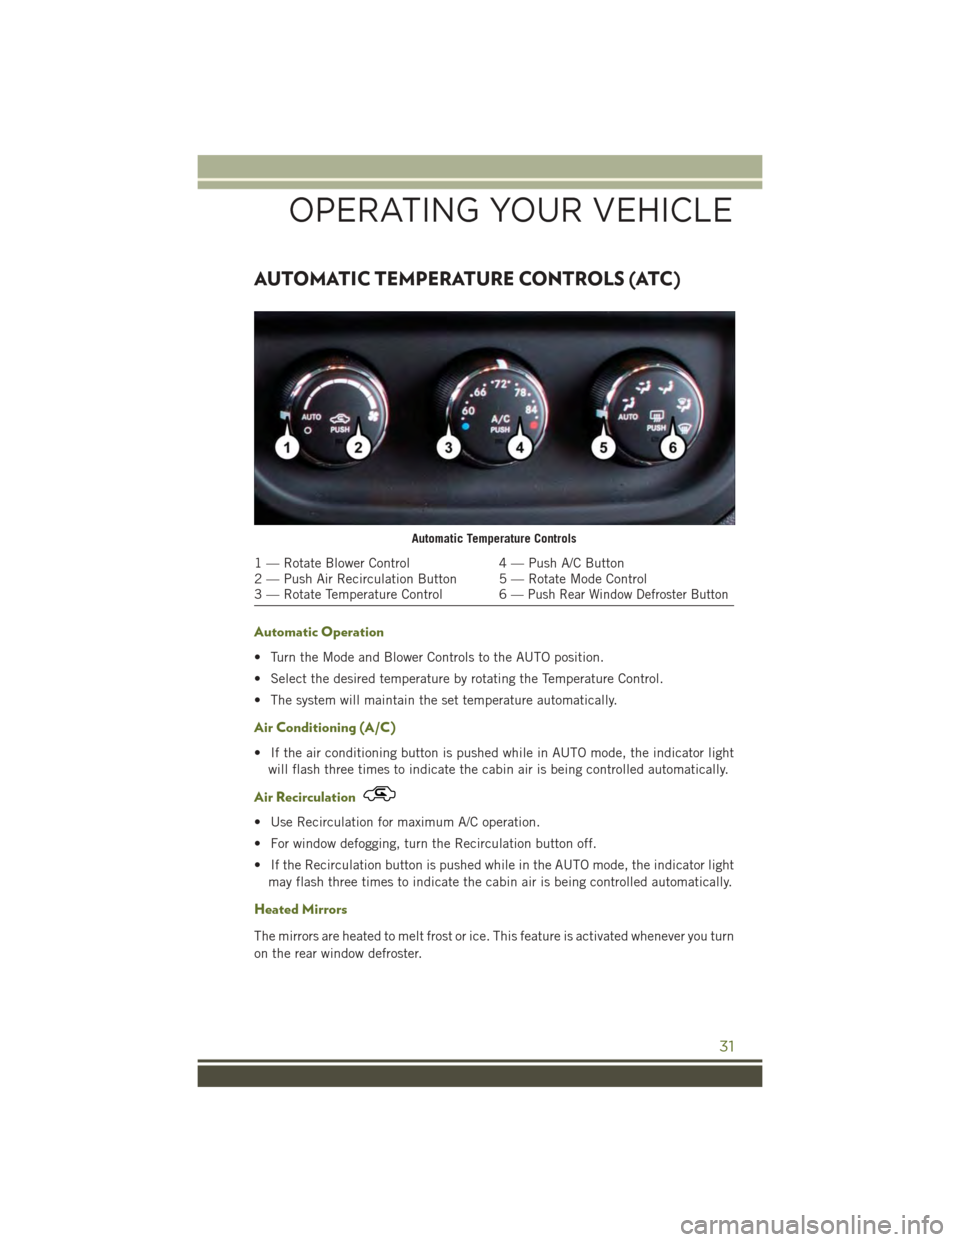
AUTOMATIC TEMPERATURE CONTROLS (ATC)
Automatic Operation
• Turn the Mode and Blower Controls to the AUTO position.
• Select the desired temperature by rotating the Temperature Control.
• The system will maintain the set temperature automatically.
Air Conditioning (A/C)
• If the air conditioning button is pushed while in AUTO mode, the indicator light
will flash three times to indicate the cabin air is being controlled automatically.
Air Recirculation
• Use Recirculation for maximum A/C operation.
• For window defogging, turn the Recirculation button off.
• If the Recirculation button is pushed while in the AUTO mode, the indicator light
may flash three times to indicate the cabin air is being controlled automatically.
Heated Mirrors
The mirrors are heated to melt frost or ice. This feature is activated whenever you turn
on the rear window defroster.
Automatic Temperature Controls
1 — Rotate Blower Control4 — Push A/C Button2 — Push Air Recirculation Button 5 — Rotate Mode Control3 — Rotate Temperature Control 6— Push Rear Window Defroster Button
OPERATING YOUR VEHICLE
31
Page 34 of 156
SUNRIDER® AND SOFT TOP
Two Door Sunrider® Open
Follow these simple steps to open the Sunrider®feature.
1. Unclip and move the sun visors to the side.
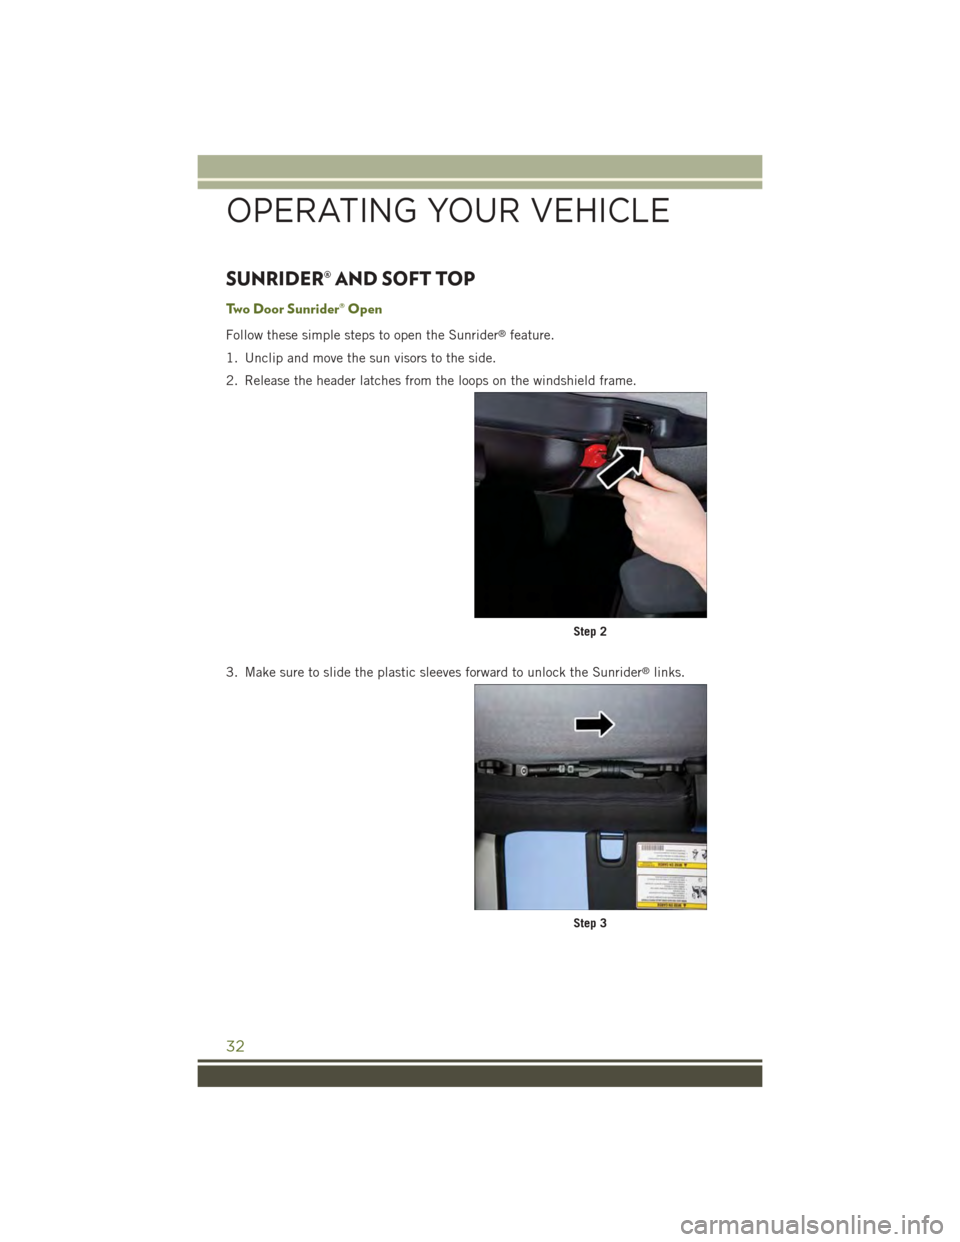
2. Release the header latches from the loops on the windshield frame.
3. Make sure to slide the plastic sleeves forward to unlock the Sunrider®links.
Step 2
Step 3
OPERATING YOUR VEHICLE
32
Page 35 of 156
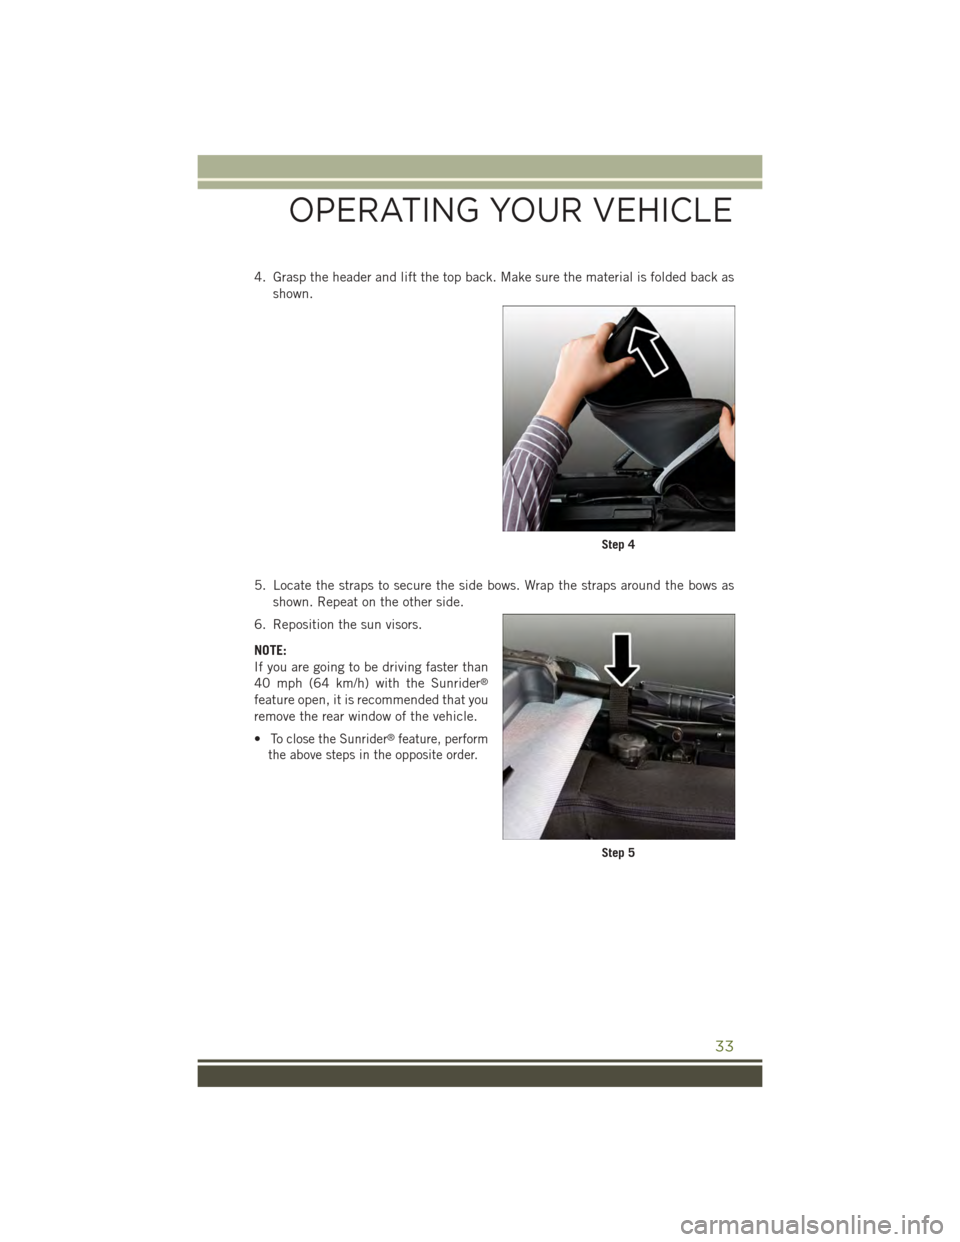
4. Grasp the header and lift the top back. Make sure the material is folded back as
shown.
5. Locate the straps to secure the side bows. Wrap the straps around the bows as
shown. Repeat on the other side.
6. Reposition the sun visors.
NOTE:
If you are going to be driving faster than
40 mph (64 km/h) with the Sunrider®
feature open, it is recommended that you
remove the rear window of the vehicle.
•To close the Sunrider®feature, perform
the above steps in the opposite order.
Step 4
Step 5
OPERATING YOUR VEHICLE
33
Page 36 of 156
Two Door Soft Top Down
Follow these simple steps to lower the Two Door soft top.
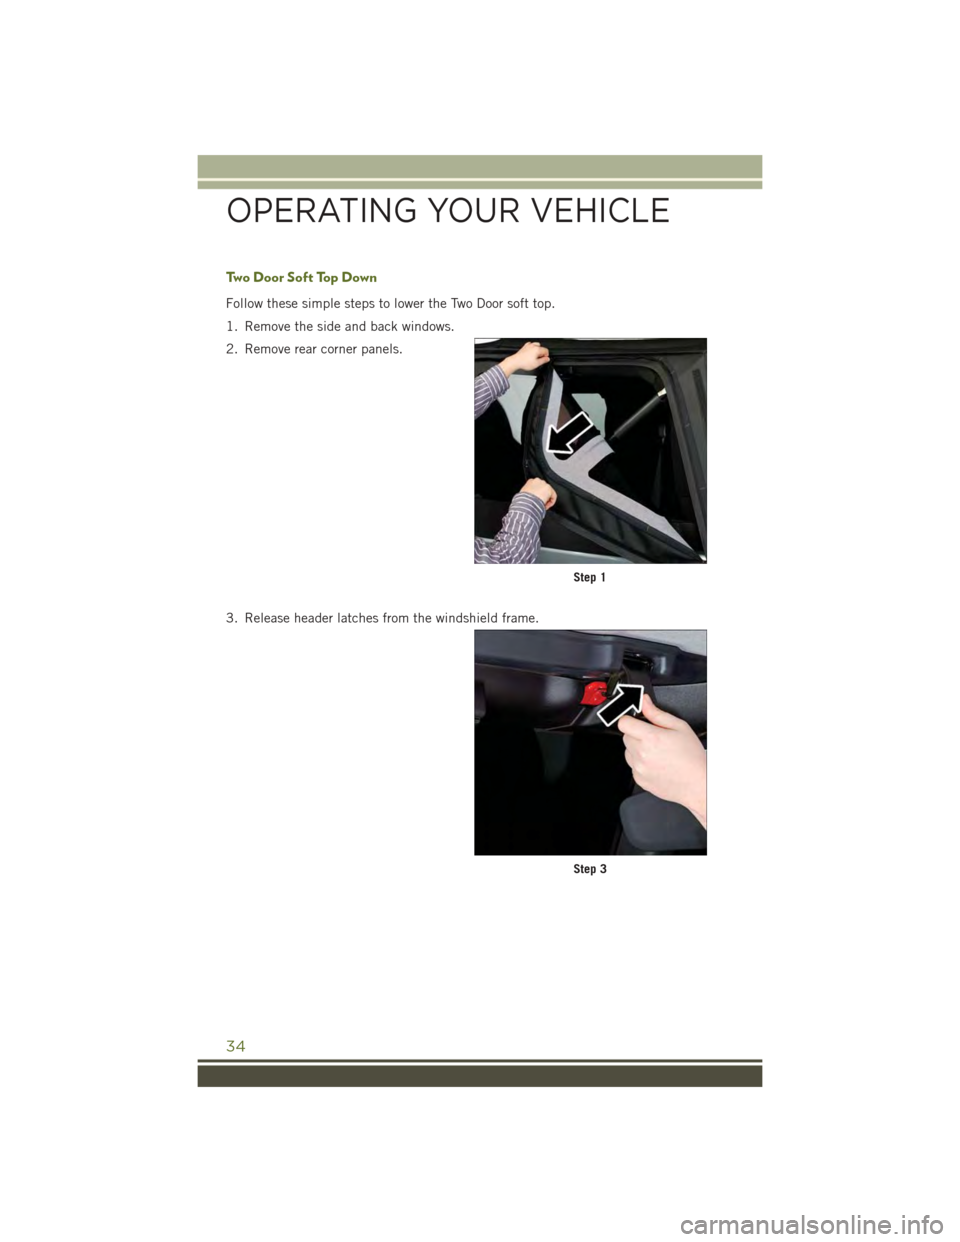
1. Remove the side and back windows.
2. Remove rear corner panels.
3. Release header latches from the windshield frame.
Step 1
Step 3
OPERATING YOUR VEHICLE
34
Page 37 of 156
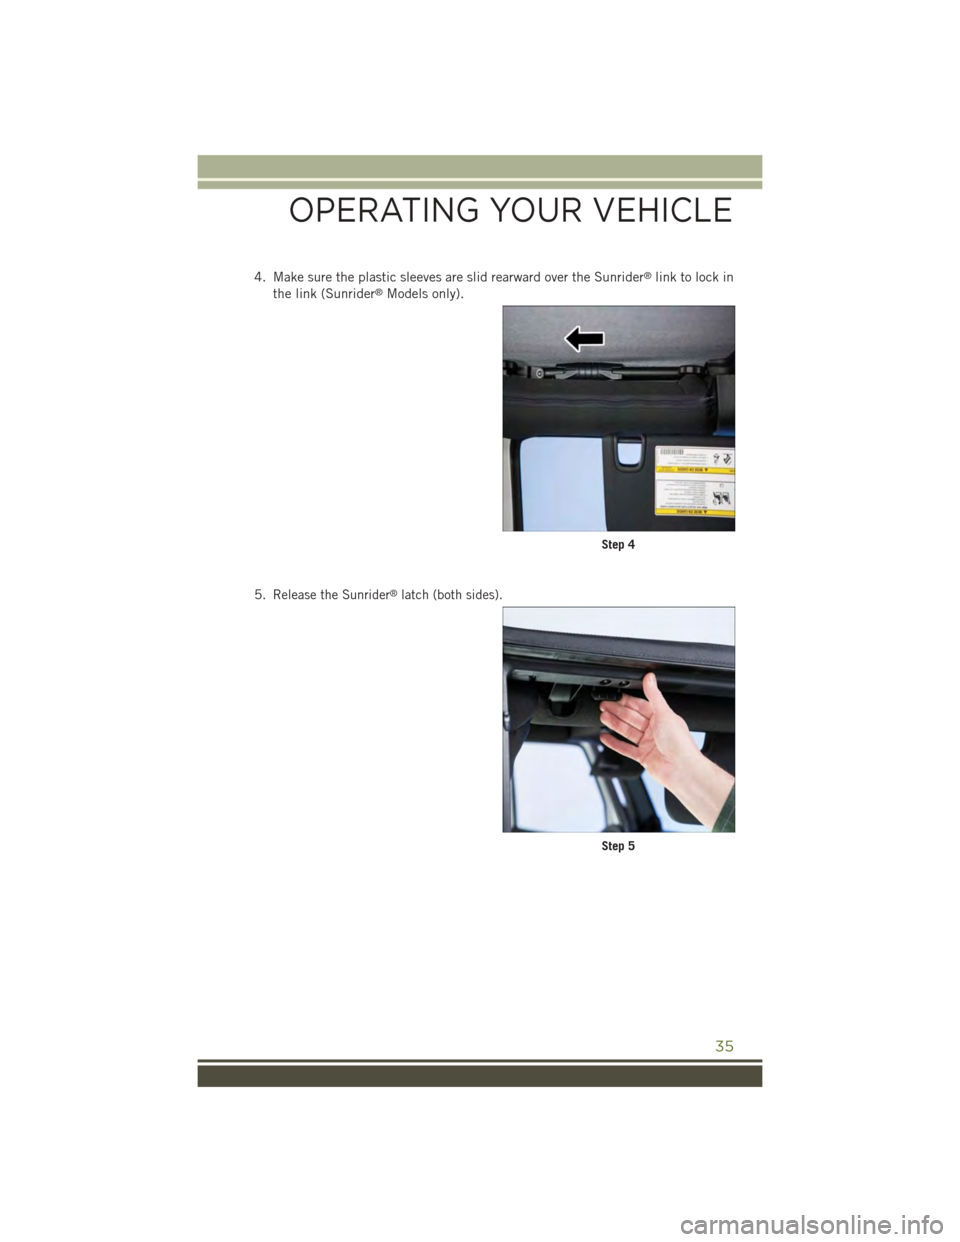
4. Make sure the plastic sleeves are slid rearward over the Sunrider®link to lock in
the link (Sunrider®Models only).
5.Release the Sunrider®latch (both sides).
Step 4
Step 5
OPERATING YOUR VEHICLE
35
Page 38 of 156
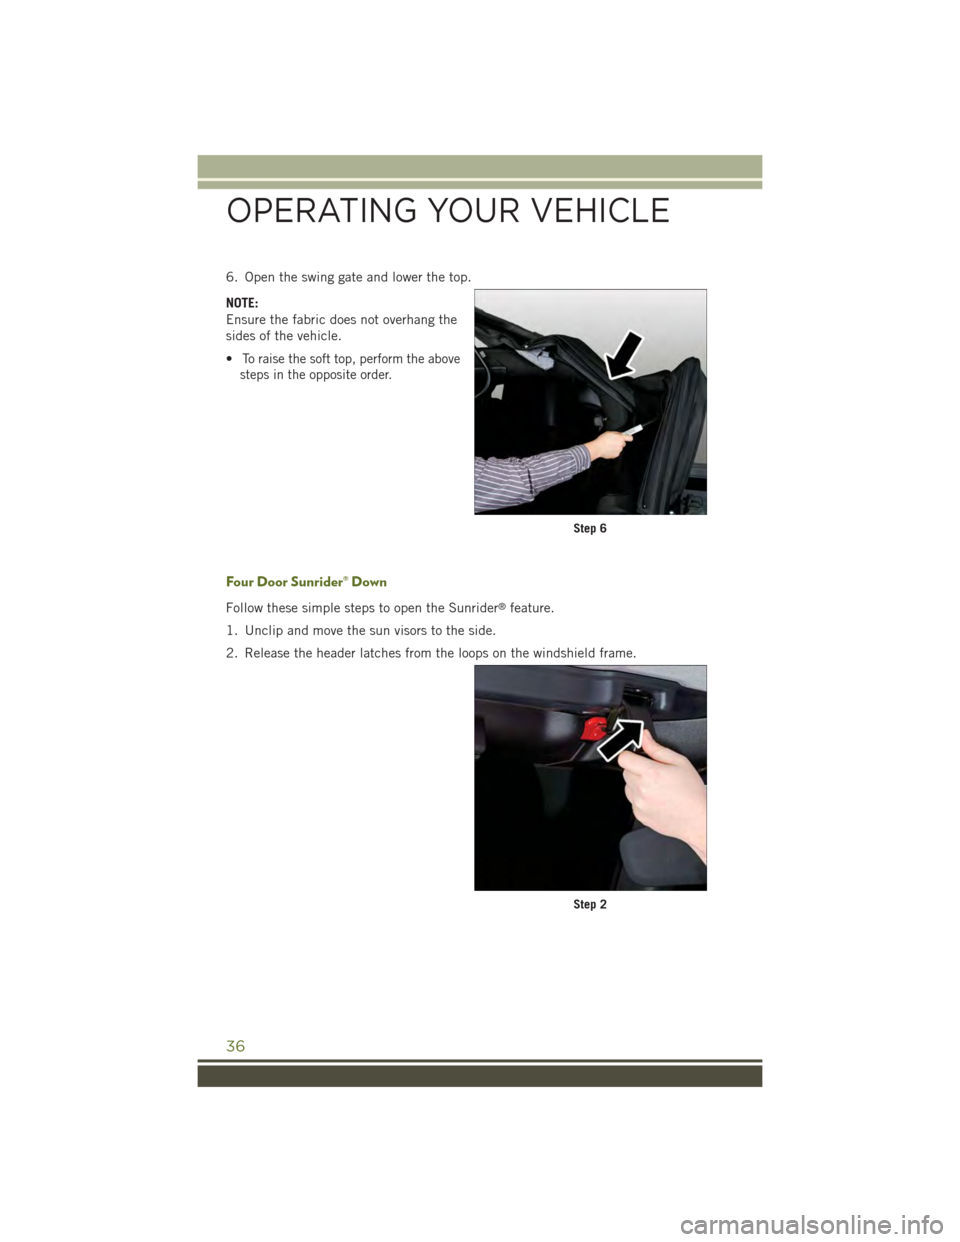
6. Open the swing gate and lower the top.
NOTE:
Ensure the fabric does not overhang the
sides of the vehicle.
•To raise the soft top, perform the above
steps in the opposite order.
Four Door Sunrider® Down
Follow these simple steps to open the Sunrider®feature.
1. Unclip and move the sun visors to the side.
2. Release the header latches from the loops on the windshield frame.
Step 6
Step 2
OPERATING YOUR VEHICLE
36
Page 39 of 156
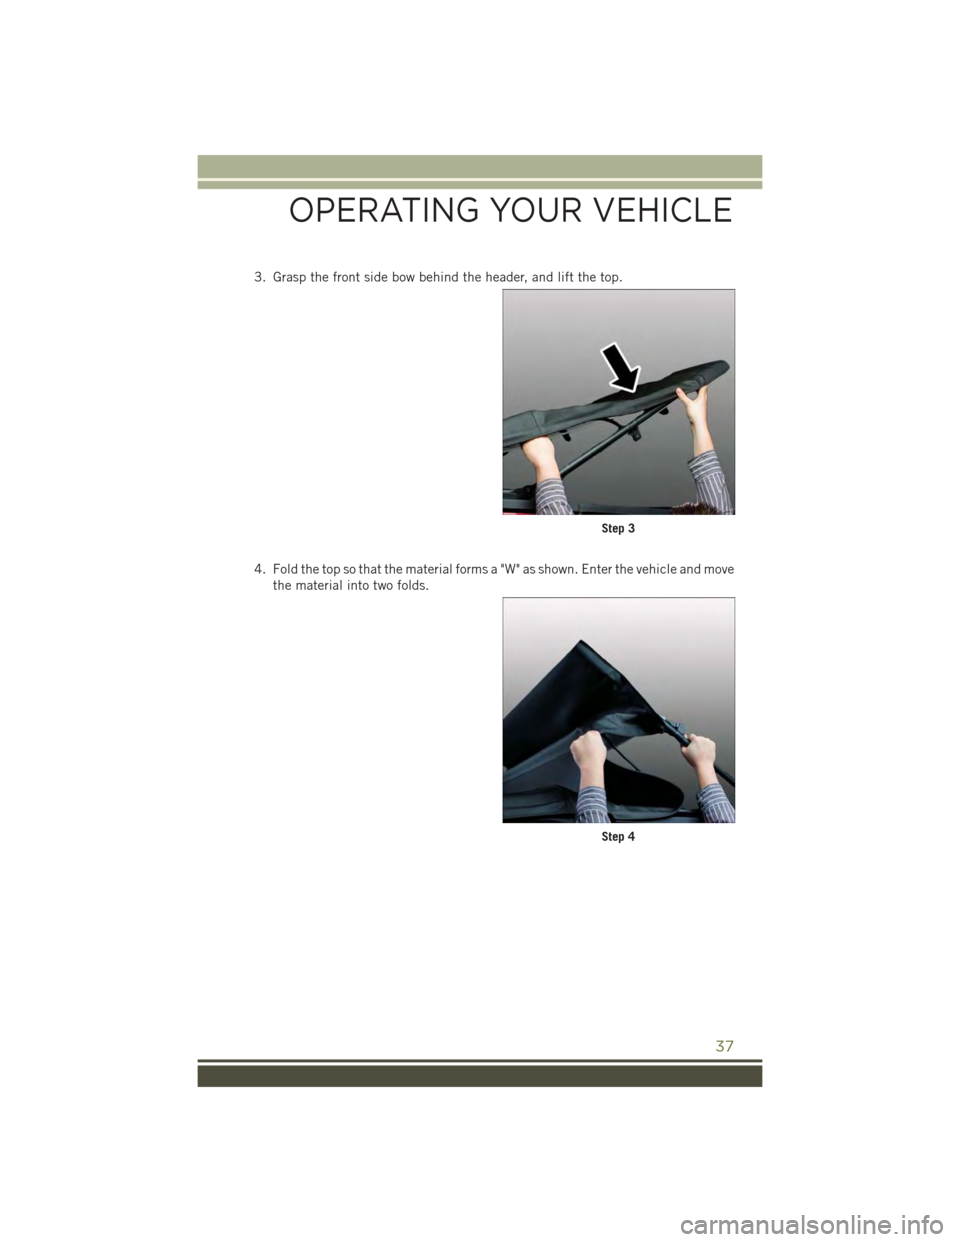
3. Grasp the front side bow behind the header, and lift the top.
4. Fold the top so that the material forms a "W" as shown. Enter the vehicle and move
the material into two folds.
Step 3
Step 4
OPERATING YOUR VEHICLE
37
Page 40 of 156
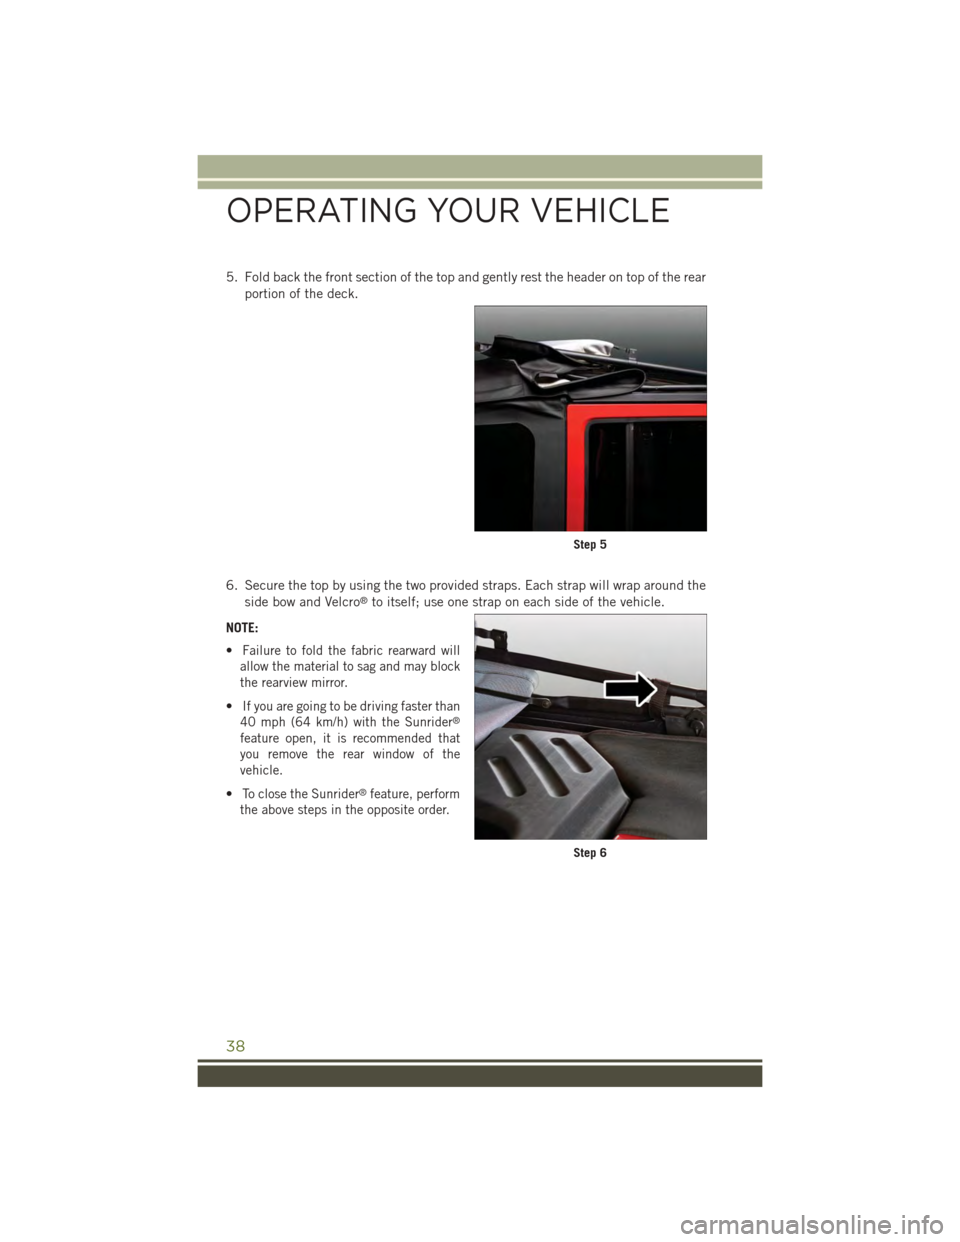
5. Fold back the front section of the top and gently rest the header on top of the rear
portion of the deck.
6. Secure the top by using the two provided straps. Each strap will wrap around the
side bow and Velcro®to itself; use one strap on each side of the vehicle.
NOTE:
•Failure to fold the fabric rearward will
allow the material to sag and may block
the rearview mirror.
•If you are going to be driving faster than
40 mph (64 km/h) with the Sunrider®
feature open, it is recommended that
you remove the rear window of the
vehicle.
•To close the Sunrider®feature, perform
the above steps in the opposite order.
Step 5
Step 6
OPERATING YOUR VEHICLE
38
Trending: recommended oil, seat memory, open hood, coolant level, audio, jacking points, differential

