ABS JEEP WRANGLER 2015 JK / 3.G User Guide
[x] Cancel search | Manufacturer: JEEP, Model Year: 2015, Model line: WRANGLER, Model: JEEP WRANGLER 2015 JK / 3.GPages: 156, PDF Size: 23.54 MB
Page 17 of 156
Supplemental Side Air Bags
• This vehicle is equipped with Supplemental Seat-Mounted Side Air Bags (SABs)
that are located in the outboard side of the front seats. The SABs are marked with
a SRS AIRBAG or AIRBAG label sewn into the outboard side of the seats.
•SABs are designed to activate in certain side impacts. The Occupant Restraint
Controller (“ORC”) determines whether the deployment of the SAB in a particular
impact event is appropriate, based on the severity and type of collision. Vehicle
damage by itself is not a good indicator of whether or not SABs should have deployed.
WARNING!
• SABs need room to inflate. Do not lean against the door or window. Sit upright
in the center of the seat.
• Being too close to the SABs during deployment could cause you to be severely
injured or killed.
• Relying on the SABs alone could lead to more severe injuries in a collision. The
SABs work with your seat belt to restrain you properly. In some collisions, SABs
won’t deploy at all. Always wear your seat belt even though you have SABs.
• Do not use accessory seat covers or place objects between you and the SABs;
the performance could be adversely affected and/or objects could be pushed
into you, causing serious injury.
CHILD RESTRAINTS
Children 12 years or younger should ride properly buckled up in a rear seat, if
available. According to crash statistics, children are safer when properly restrained in
the rear seats rather than in the front.
Every state in the United States and all Canadian provinces require that small
children ride in proper restraint systems. This is the law, and you can be prosecuted
for ignoring it.
NOTE:
•For additional information, refer towww.Seatcheck.org or call 1-866-SEATCHECK.
• Canadian residents should refer to Transport Canada’s website for additional
information:
http://www.tc.gc.ca/eng/motorvehiclesafety/safedrivers-childsafety-index-53.htm
GETTING STARTED
15
Page 62 of 156
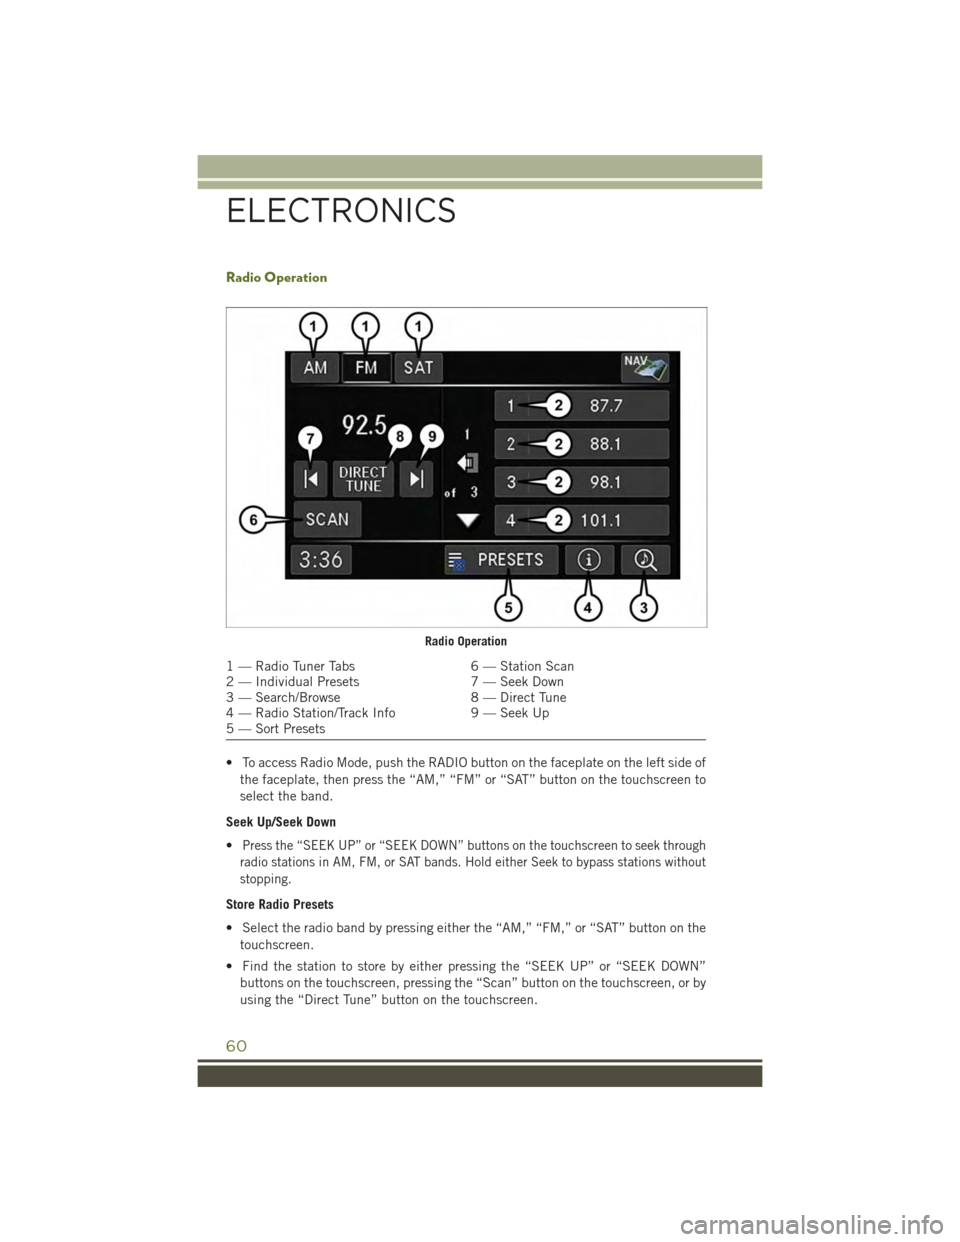
Radio Operation
• To access Radio Mode, push the RADIO button on the faceplate on the left side of
the faceplate, then press the “AM,” “FM” or “SAT” button on the touchscreen to
select the band.
Seek Up/Seek Down
•Press the “SEEK UP” or “SEEK DOWN” buttons on the touchscreen to seek through
radio stations in AM, FM, or SAT bands. Hold either Seek to bypass stations without
stopping.
Store Radio Presets
• Select the radio band by pressing either the “AM,” “FM,” or “SAT” button on the
touchscreen.
• Find the station to store by either pressing the “SEEK UP” or “SEEK DOWN”
buttons on the touchscreen, pressing the “Scan” button on the touchscreen, or by
using the “Direct Tune” button on the touchscreen.
Radio Operation
1 — Radio Tuner Tabs6 — Station Scan2 — Individual Presets7 — Seek Down3 — Search/Browse8 — Direct Tune4 — Radio Station/Track Info9 — Seek Up5 — Sort Presets
ELECTRONICS
60
Page 63 of 156
• Once the station is found, press and hold one of the “PRESETS” buttons on the
touchscreen in the list to the right, until the preset key flashes and the station text
on the button on the touchscreen changes.
NOTE:
If the Presets are not visible on the right side of the screen, press the “PRESETS”
button on the touchscreen.
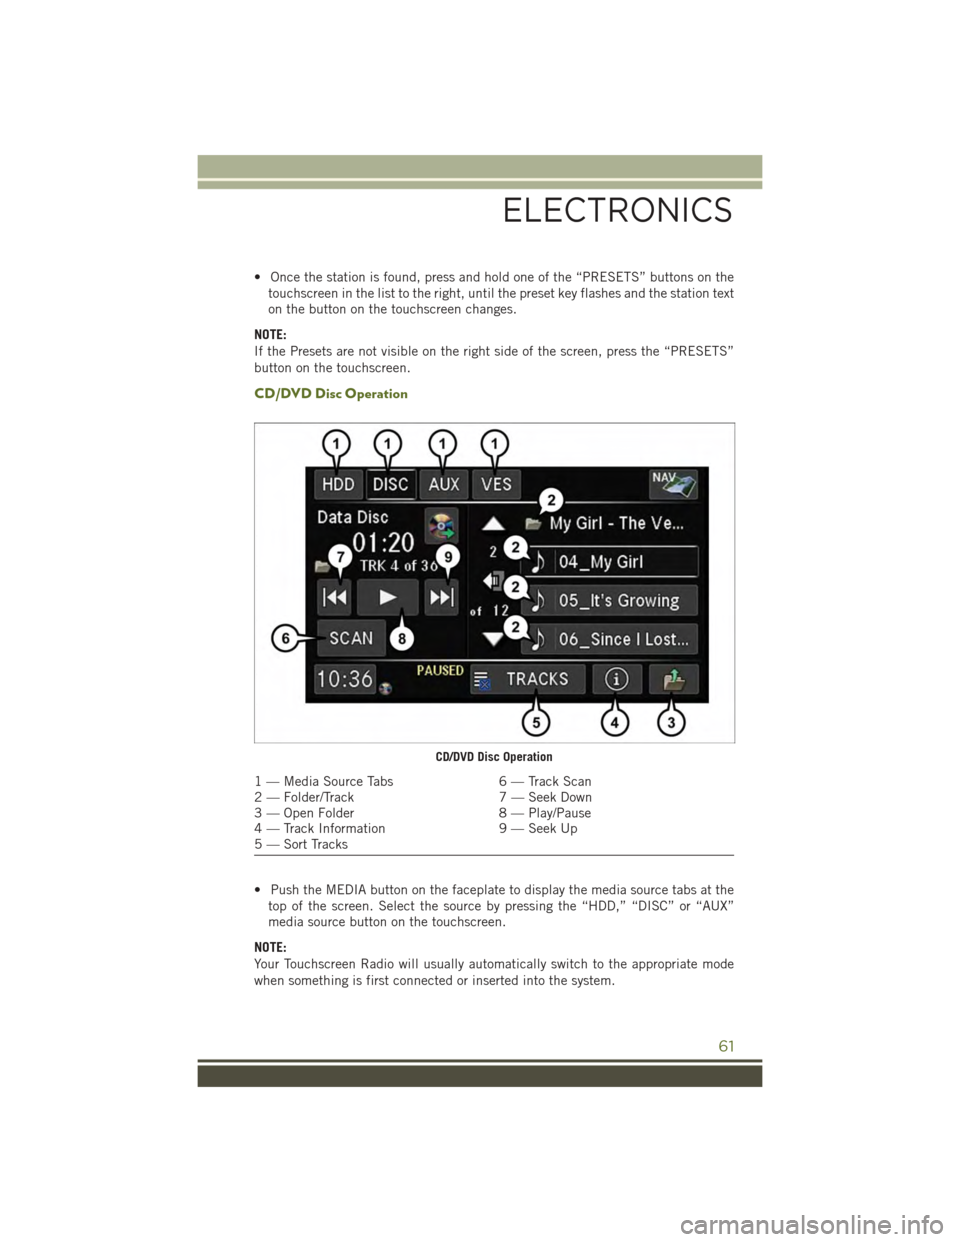
CD/DVD Disc Operation
• Push the MEDIA button on the faceplate to display the media source tabs at the
top of the screen. Select the source by pressing the “HDD,” “DISC” or “AUX”
media source button on the touchscreen.
NOTE:
Your Touchscreen Radio will usually automatically switch to the appropriate mode
when something is first connected or inserted into the system.
CD/DVD Disc Operation
1 — Media Source Tabs6 — Track Scan2 — Folder/Track7 — Seek Down3 — Open Folder8 — Play/Pause4 — Track Information9 — Seek Up5 — Sort Tracks
ELECTRONICS
61
Page 66 of 156
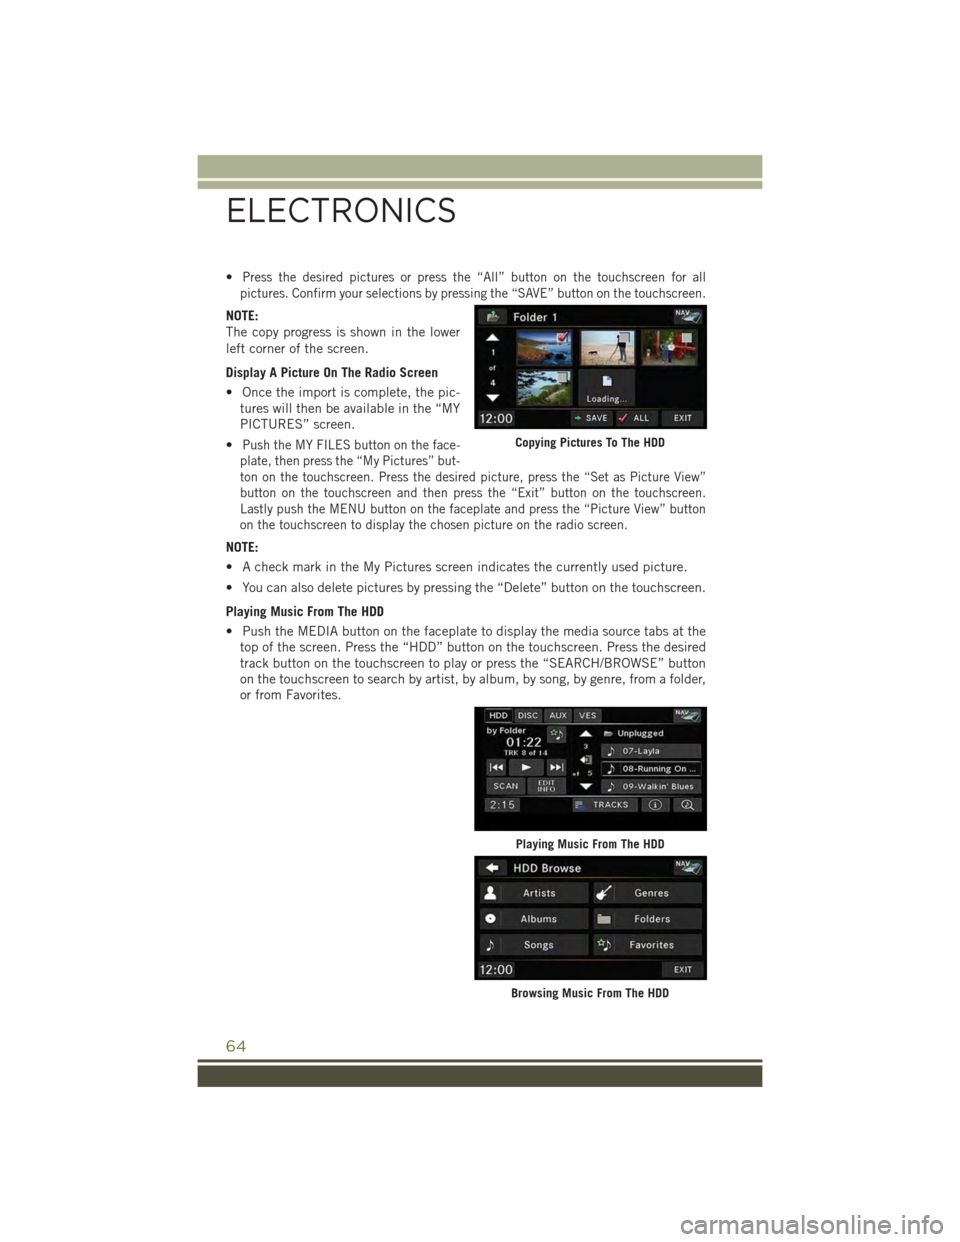
•Press the desired pictures or press the “All” button on the touchscreen for all
pictures. Confirm your selections by pressing the “SAVE” button on the touchscreen.
NOTE:
The copy progress is shown in the lower
left corner of the screen.
Display A Picture On The Radio Screen
• Once the import is complete, the pic-
tures will then be available in the “MY
PICTURES” screen.
•Push the MY FILES button on the face-
plate, then press the “My Pictures” but-
ton on the touchscreen. Press the desired picture, press the “Set as Picture View”
button on the touchscreen and then press the “Exit” button on the touchscreen.
Lastly push the MENU button on the faceplate and press the “Picture View” button
on the touchscreen to display the chosen picture on the radio screen.
NOTE:
• A check mark in the My Pictures screen indicates the currently used picture.
• You can also delete pictures by pressing the “Delete” button on the touchscreen.
Playing Music From The HDD
• Push the MEDIA button on the faceplate to display the media source tabs at the
top of the screen. Press the “HDD” button on the touchscreen. Press the desired
track button on the touchscreen to play or press the “SEARCH/BROWSE” button
on the touchscreen to search by artist, by album, by song, by genre, from a folder,
or from Favorites.
Copying Pictures To The HDD
Playing Music From The HDD
Browsing Music From The HDD
ELECTRONICS
64
Page 73 of 156
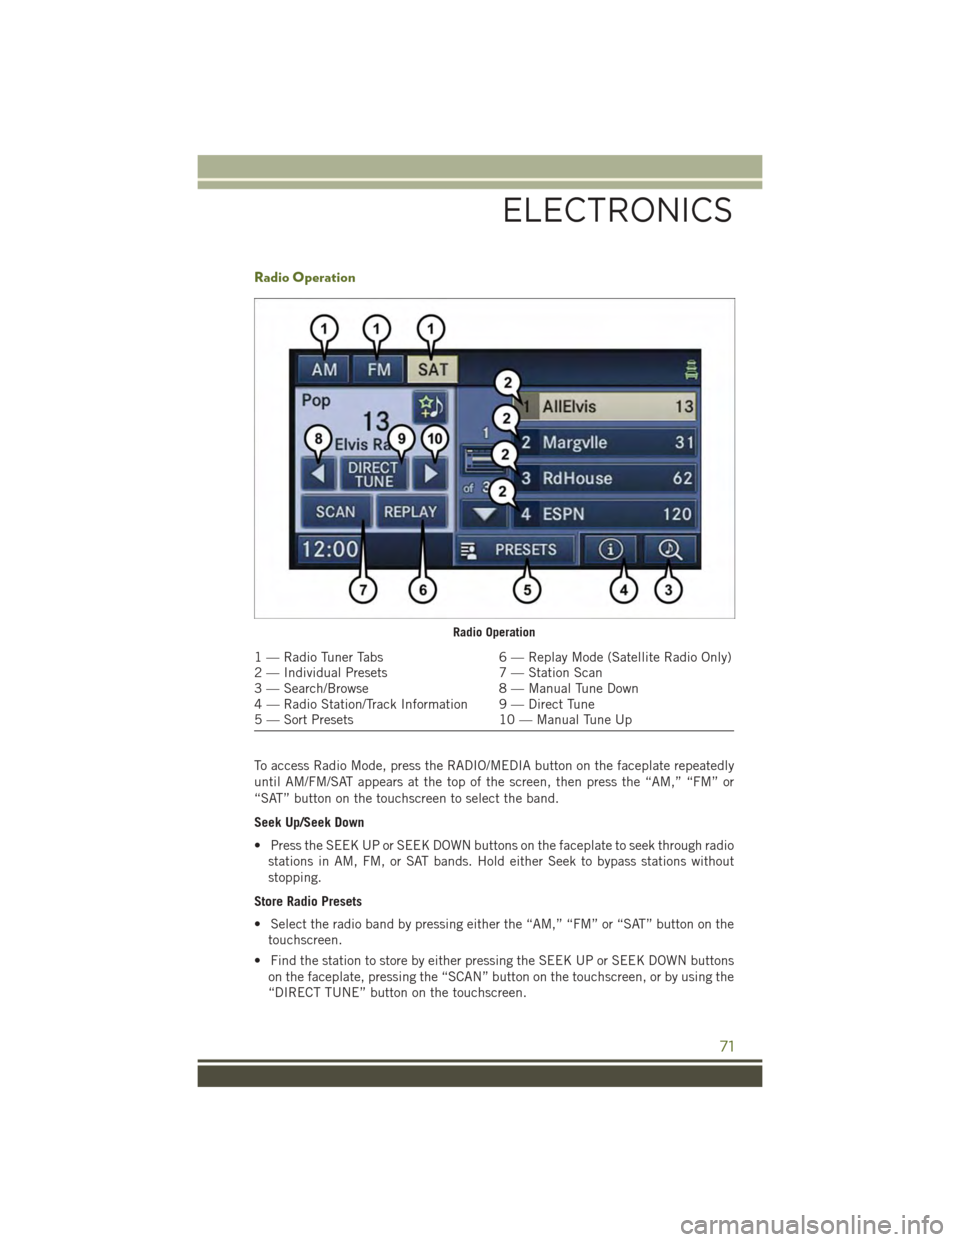
Radio Operation
To access Radio Mode, press the RADIO/MEDIA button on the faceplate repeatedly
until AM/FM/SAT appears at the top of the screen, then press the “AM,” “FM” or
“SAT” button on the touchscreen to select the band.
Seek Up/Seek Down
• Press the SEEK UP or SEEK DOWN buttons on the faceplate to seek through radio
stations in AM, FM, or SAT bands. Hold either Seek to bypass stations without
stopping.
Store Radio Presets
• Select the radio band by pressing either the “AM,” “FM” or “SAT” button on the
touchscreen.
• Find the station to store by either pressing the SEEK UP or SEEK DOWN buttons
on the faceplate, pressing the “SCAN” button on the touchscreen, or by using the
“DIRECT TUNE” button on the touchscreen.
Radio Operation
1 — Radio Tuner Tabs6 — Replay Mode (Satellite Radio Only)2 — Individual Presets7 — Station Scan3 — Search/Browse8 — Manual Tune Down4 — Radio Station/Track Information 9 — Direct Tune5 — Sort Presets10 — Manual Tune Up
ELECTRONICS
71
Page 74 of 156
• Once the station is found, press and hold one of the “PRESETS” buttons on the
touchscreen in the list to the right, until you hear a confirmation beep.
NOTE:
If the Presets are not visible on the right side of the screen, press the “PRESETS”
button on the touchscreen.
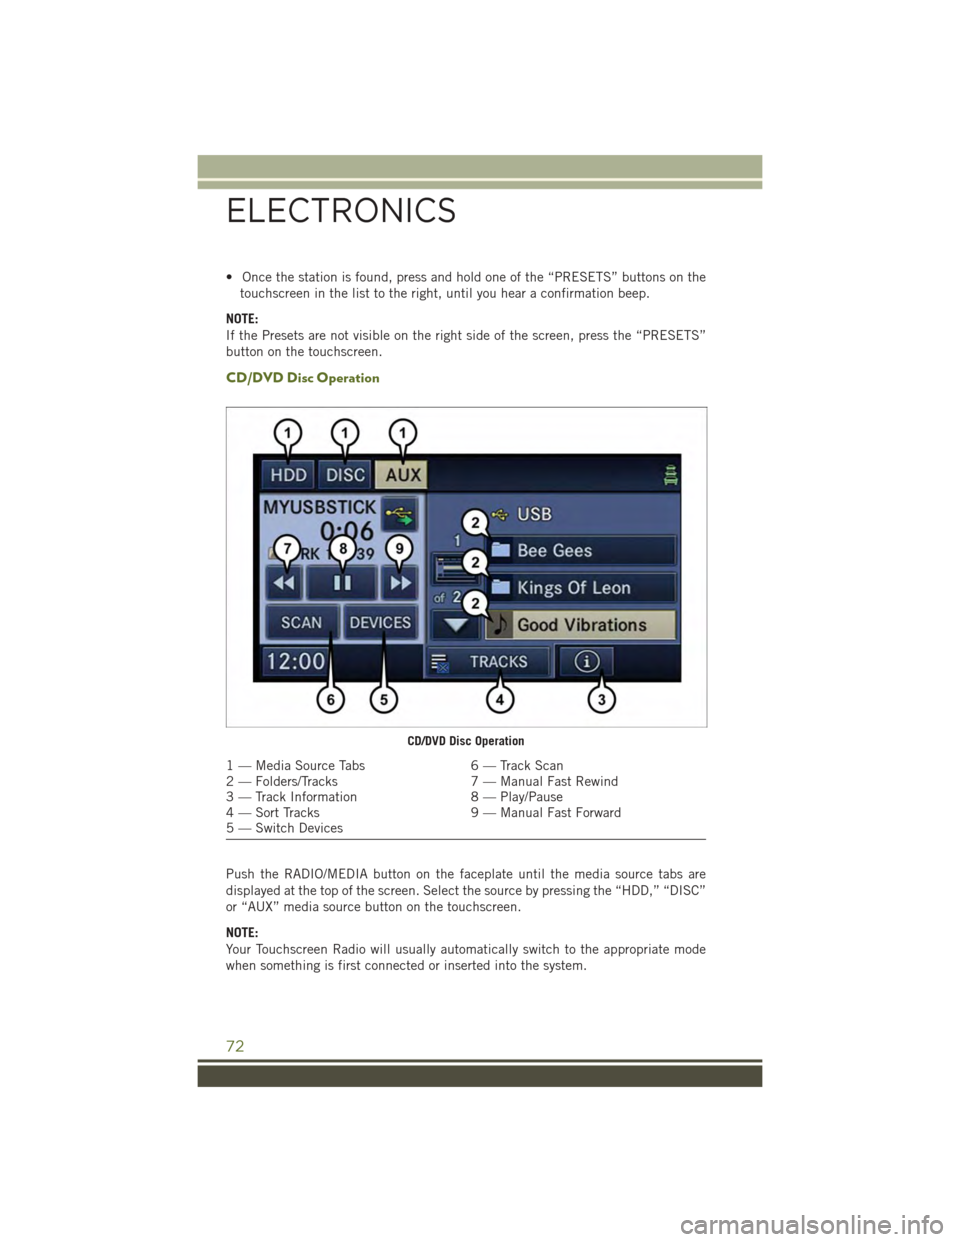
CD/DVD Disc Operation
Push the RADIO/MEDIA button on the faceplate until the media source tabs are
displayed at the top of the screen. Select the source by pressing the “HDD,” “DISC”
or “AUX” media source button on the touchscreen.
NOTE:
Your Touchscreen Radio will usually automatically switch to the appropriate mode
when something is first connected or inserted into the system.
CD/DVD Disc Operation
1 — Media Source Tabs6 — Track Scan2 — Folders/Tracks7 — Manual Fast Rewind3 — Track Information8 — Play/Pause4 — Sort Tracks9 — Manual Fast Forward5 — Switch Devices
ELECTRONICS
72
Page 78 of 156
Playing Music From The HDD
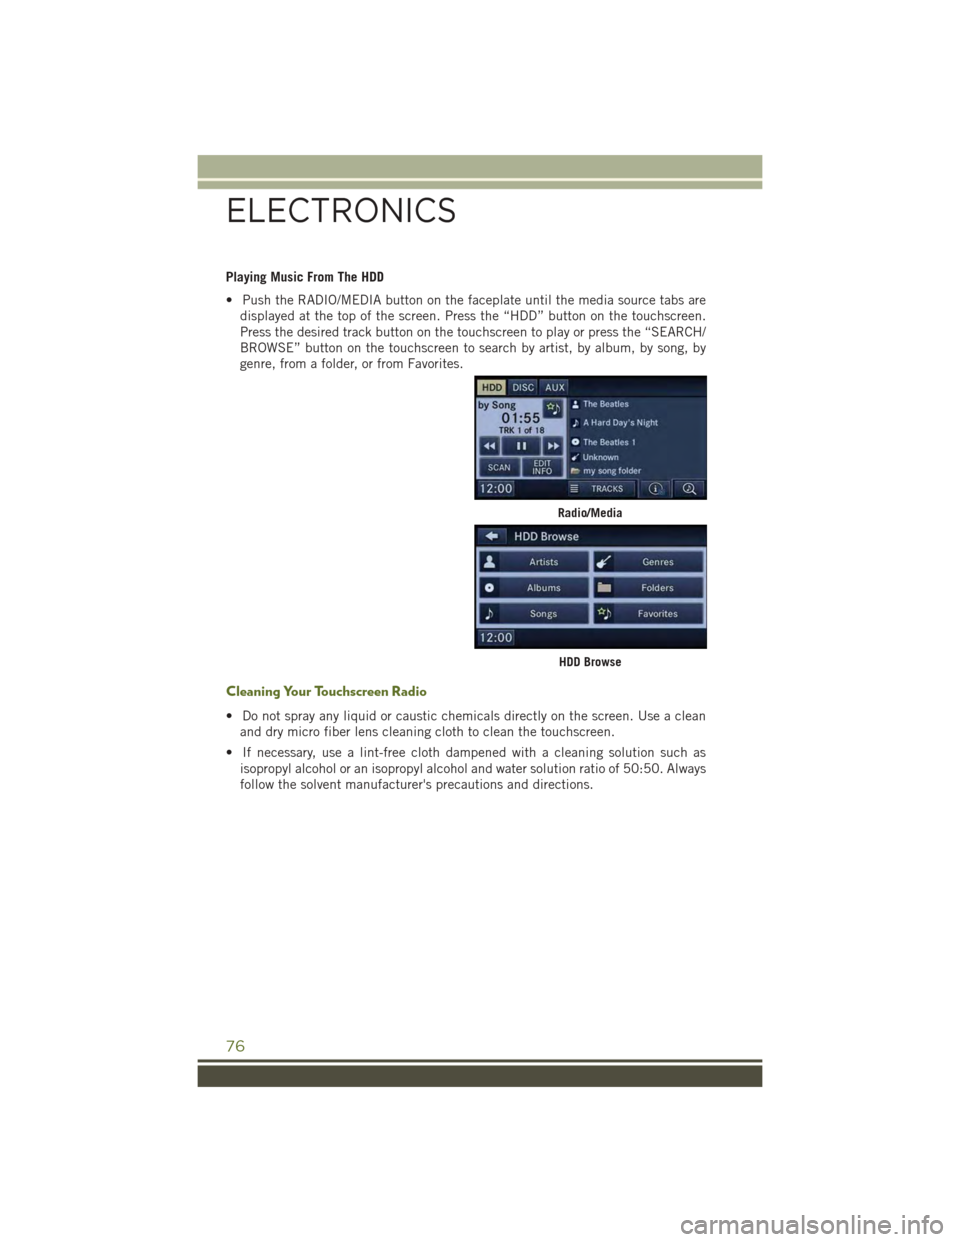
• Push the RADIO/MEDIA button on the faceplate until the media source tabs are
displayed at the top of the screen. Press the “HDD” button on the touchscreen.
Press the desired track button on the touchscreen to play or press the “SEARCH/
BROWSE” button on the touchscreen to search by artist, by album, by song, by
genre, from a folder, or from Favorites.
Cleaning Your Touchscreen Radio
• Do not spray any liquid or caustic chemicals directly on the screen. Use a clean
and dry micro fiber lens cleaning cloth to clean the touchscreen.
• If necessary, use a lint-free cloth dampened with a cleaning solution such as
isopropyl alcohol or an isopropyl alcohol and water solution ratio of 50:50. Always
follow the solvent manufacturer's precautions and directions.
Radio/Media
HDD Browse
ELECTRONICS
76
Page 109 of 156
- Engine Temperature Warning Light
This light warns of an overheated engine condition.
If the light turns on and a warning chime sounds while driving, safely pull over and
stop the vehicle. If the A/C system is on, turn it off. Also, shift the transmission into
NEUTRAL and idle the vehicle. If the temperature reading does not return to normal,
turn the engine off immediately.
We recommend that you do not operate the vehicle or engine damage will occur. Have
the vehicle serviced immediately.
WARNING!
A hot engine cooling system is dangerous. You or others could be badly burned by
steam or boiling coolant.
- Brake Warning Light
This light monitors various brake functions, including brake fluid level and parking
brake application. If the brake light turns on it may indicate that the parking brake is
applied, that the brake fluid level is low, or that there is a problem with the anti-lock
brake system reservoir.
If the light remains on when the parking brake has been disengaged, and the fluid
level is at the full mark on the master cylinder reservoir, it indicates a possible brake
hydraulic system malfunction or that a problem with the Brake Booster has been
detected by the Anti-Lock Brake System (ABS)/Electronic Stability Control (ESC)
system. In this case, the light will remain on until the condition has been corrected.
If the problem is related to the brake booster, the ABS pump will run when applying
the brake and a brake pedal pulsation may be felt during each stop.
The dual brake system provides a reserve braking capacity in the event of a failure to
a portion of the hydraulic system. A leak in either half of the dual brake system is
indicated by the Brake Warning Light, which will turn on when the brake fluid level
in the master cylinder has dropped below a specified level. The light will remain on
until the cause is corrected.
Vehicles equipped with the Anti-Lock Brake System (ABS), are also equipped with
Electronic Brake Force Distribution (EBD). In the event of an EBD failure, the Brake
Warning Light will turn on along with the ABS Light. Immediate repair to the ABS
system is required.
Operation of the Brake Warning Light can be checked by turning the ignition switch
from the OFF position to the ON/RUN position. The light should illuminate for
approximately two seconds. The light should then turn off unless the parking brake
is applied or a brake fault is detected. If the light does not illuminate, have the light
inspected by an authorized dealer.
WHAT TO DO IN EMERGENCIES
107
Page 111 of 156
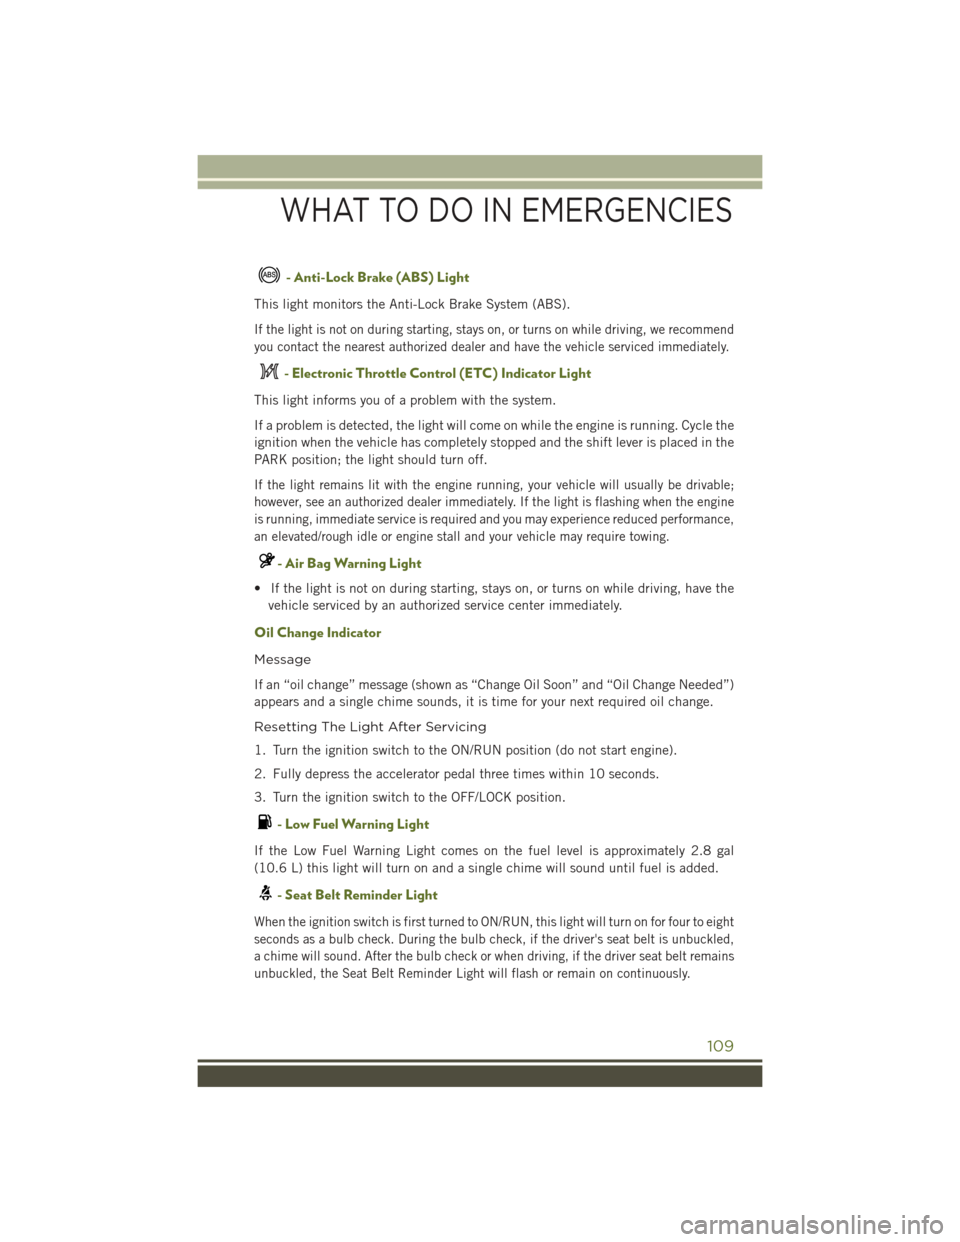
- Anti-Lock Brake (ABS) Light
This light monitors the Anti-Lock Brake System (ABS).
If the light is not on during starting, stays on, or turns on while driving, we recommend
you contact the nearest authorized dealer and have the vehicle serviced immediately.
- Electronic Throttle Control (ETC) Indicator Light
This light informs you of a problem with the system.
If a problem is detected, the light will come on while the engine is running. Cycle the
ignition when the vehicle has completely stopped and the shift lever is placed in the
PARK position; the light should turn off.
If the light remains lit with the engine running, your vehicle will usually be drivable;
however, see an authorized dealer immediately. If the light is flashing when the engine
is running, immediate service is required and you may experience reduced performance,
an elevated/rough idle or engine stall and your vehicle may require towing.
- Air Bag Warning Light
• If the light is not on during starting, stays on, or turns on while driving, have the
vehicle serviced by an authorized service center immediately.
Oil Change Indicator
Message
If an “oil change” message (shown as “Change Oil Soon” and “Oil Change Needed”)
appears and a single chime sounds, it is time for your next required oil change.
Resetting The Light After Servicing
1. Turn the ignition switch to the ON/RUN position (do not start engine).
2. Fully depress the accelerator pedal three times within 10 seconds.
3. Turn the ignition switch to the OFF/LOCK position.
- Low Fuel Warning Light
If the Low Fuel Warning Light comes on the fuel level is approximately 2.8 gal
(10.6 L) this light will turn on and a single chime will sound until fuel is added.
- Seat Belt Reminder Light
When the ignition switch is first turned to ON/RUN, this light will turn on for four to eight
seconds as a bulb check. During the bulb check, if the driver's seat belt is unbuckled,
a chime will sound. After the bulb check or when driving, if the driver seat belt remains
unbuckled, the Seat Belt Reminder Light will flash or remain on continuously.
WHAT TO DO IN EMERGENCIES
109
Page 133 of 156
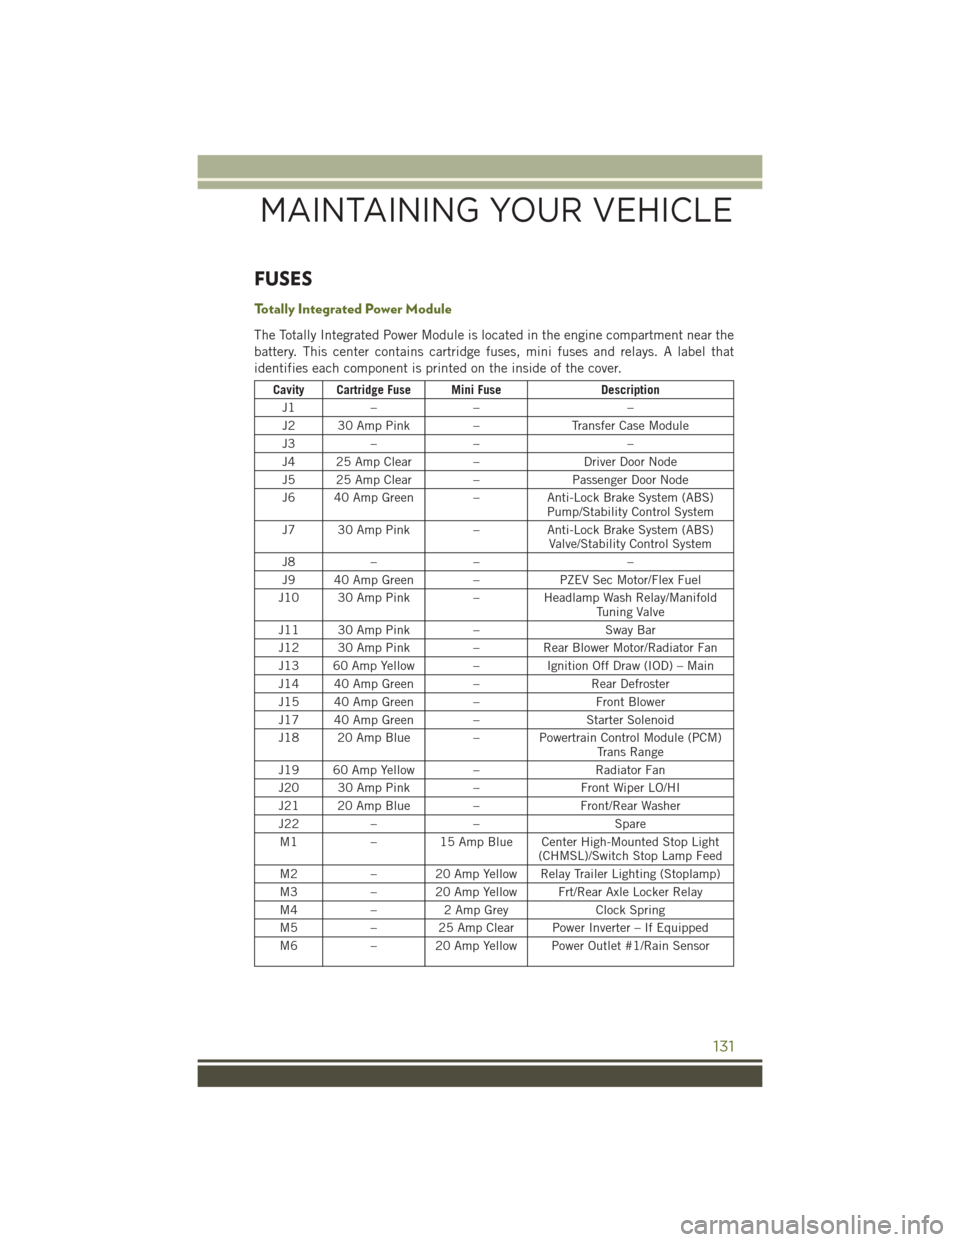
FUSES
To t a l l y I n t e g r a t e d P o w e r M o d u l e
The Totally Integrated Power Module is located in the engine compartment near the
battery. This center contains cartridge fuses, mini fuses and relays. A label that
identifies each component is printed on the inside of the cover.
Cavity Cartridge Fuse Mini FuseDescription
J1–––
J2 30 Amp Pink–Tr a n s f e r C a s e M o d u l e
J3–––
J4 25 Amp Clear –Driver Door Node
J5 25 Amp Clear –Passenger Door Node
J6 40 Amp Green –Anti-Lock Brake System (ABS)Pump/Stability Control System
J7 30 Amp Pink–Anti-Lock Brake System (ABS)Valve/Stability Control System
J8–––
J9 40 Amp Green –PZEV Sec Motor/Flex Fuel
J10 30 Amp Pink–Headlamp Wash Relay/ManifoldTu n i n g V a l v e
J11 30 Amp Pink–Sway Bar
J12 30 Amp Pink–Rear Blower Motor/Radiator Fan
J13 60 Amp Yellow –Ignition Off Draw (IOD) – Main
J14 40 Amp Green –Rear Defroster
J15 40 Amp Green –Front Blower
J17 40 Amp Green –Starter Solenoid
J18 20 Amp Blue– Powertrain Control Module (PCM)Trans Range
J19 60 Amp Yellow –Radiator Fan
J20 30 Amp Pink–Front Wiper LO/HI
J21 20 Amp Blue–Front/Rear Washer
J22––Spare
M1–15 Amp Blue Center High-Mounted Stop Light(CHMSL)/Switch Stop Lamp Feed
M2– 20 Amp Yellow Relay Trailer Lighting (Stoplamp)
M3– 20 Amp Yellow Frt/Rear Axle Locker Relay
M4–2AmpGreyClock Spring
M5–25AmpClearPowerInverter–IfEquipped
M6– 20 Amp Yellow Power Outlet #1/Rain Sensor
MAINTAINING YOUR VEHICLE
131