radio JEEP WRANGLER 2015 JK / 3.G User Guide
[x] Cancel search | Manufacturer: JEEP, Model Year: 2015, Model line: WRANGLER, Model: JEEP WRANGLER 2015 JK / 3.GPages: 156, PDF Size: 23.54 MB
Page 2 of 156
This guide has been prepared to help you get quickly
acquainted with your new Jeep and to provide a convenient
reference source for common questions. However, it is not
a substitute for your Owner’s Manual.
For complete operational instructions, maintenance
procedures and important safety messages, please consult
your Owner’s Manual, Navigation/Uconnect® Manuals and
other Warning Labels in your vehicle.
Not all features shown in this guide may apply to your
vehicle. For additional information on accessories to help
personalize your vehicle, visit www.mopar.com (U.S.),
www.mopar.ca (Canada) or your local Jeep dealer.
If you are the first registered retail owner of
your vehicle, you may obtain a complimentary
printed copy of the Owner’s Manual, Navigation/
Uconnect® Manuals or Warranty Booklet by calling
1-877-426-5337 (U.S.) or 1-800-387-1143 (Canada)
or by contacting your dealer.
The driver’s primary responsibility is the safe operation of the vehicle. Driving while distracted can result in loss of vehicle control, resulting in a collision and personal injury. Chrysler Group LLC strongly recommends that the driver use extreme caution when using any device or feature that may take their attention o! the road. Use of any electrical devices, such as cellular telephones, computers, portable radios, vehicle navigation or other devices, by the driver while the vehicle is moving is dangerous and could lead to a serious collision. Texting while driving is also dangerous and should never be done while the vehicle is moving. If you find yourself unable to devote your full attention to vehicle operation, pull o! the road to a safe location and stop your vehicle. Some states or provinces prohibit the use of cellular telephones or texting while driving. It is always the driver’s responsibility to comply with all local laws.
Impor tant:
This User Guide is intended to familiarize you with the important features of your vehicle. The DVD enclosed contains your Owner’s Manual, Navigation/Uconnect® Manuals, Warranty Booklets, Tire Warranty and Roadside Assistance (new vehicles purchased in the U.S.) or Roadside Assistance (new vehicles purchased in Canada) in electronic format. We hope you find it useful. Replacement DVD kits may be purchased by visiting www.techauthority.com. Jeep® is a registered trademark of Chrysler Group LLC. © 2014 Chrysler Group LLC.
Driving and Alcohol:
Drunken driving is one of the most frequent causes of collisions. Your driving ability can be seriously impaired with blood alcohol levels far below the legal minimum. If you are drinking, don’t drive. Ride with a designated non-drinking driver, call a cab, a friend, or use public transportation.
Driving after drinking can lead to a collision. Your perceptions are less sharp, your reflexes are slower, and your judgment is impaired when you have been drinking. Never drink and then drive.
WAR N I NG !
1601461_15b_Wrangler_UG_071714.indd 27/17/14 4:23 PM
Page 3 of 156
INTRODUCTION/WELCOME
WELCOME FROM CHRYSLERGROUP LLC.................. 3
CONTROLS AT A GLANCE
DRIVER COCKPIT.............. 6INSTRUMENT CLUSTER.......... 8
GETTING STARTED
KEY FOB . . . . . . . . . . . . . . . . . . . 10REMOTE START.............. 10VEHICLE SECURITY ALARM....... 11SEAT BELT SYSTEMS........... 12SUPPLEMENTAL RESTRAINTSYSTEM (SRS) — AIR BAGS....... 13CHILD RESTRAINTS............ 15HEAD RESTRAINTS............. 20FRONT SEATS................ 21REAR SEATS................. 23TILT STEERING COLUMN......... 24HEATED SEATS . . . . . . . . . . . . . . . 25
OPERATING YOUR VEHICLE
ENGINE BREAK-INRECOMMENDATIONS........... 26TURN SIGNAL/LIGHTS LEVER...... 26WIPER/WASHER LEVER.......... 27ELECTRONIC SPEED CONTROL..... 28MANUAL CLIMATE CONTROLS...... 30AUTOMATIC TEMPERATURECONTROLS (ATC).............. 31SUNRIDER®AND SOFT TOP....... 32HARD TOP AND FREEDOM TOP®.... 43DUAL TOP – IF EQUIPPED........ 46WIND BUFFETING............. 47
ELECTRONICS
YOUR VEHICLE'S SOUND SYSTEM . . . 48Uconnect®130 . . . . . . . . . . . . . . . 50Uconnect®130 WITH SiriusXMSATELLITE RADIO.............. 52Uconnect®230 . . . . . . . . . . . . . . . 55Uconnect®430/430N........... 58Uconnect®730N.............. 69SiriusXM SATELLITE RADIO/TRAVELLINK . . . . . . . . . . . . . . . . . . . . . . 81STEERING WHEEL AUDIO CONTROLS.. 85iPod®/USB/MP3 CONTROL........ 85Uconnect®PHONE............. 86Uconnect®VOICE COMMAND....... 89
Bluetooth®STREAMING AUDIO..... 92ELECTRONIC VEHICLE INFORMATIONCENTER (EVIC)............... 92PROGRAMMABLE FEATURES....... 94POWER INVERTER............. 95POWER OUTLETS............. 96
OFF-ROAD CAPABILITIES
(4WD OPERATION)
COMMAND-TRAC®/ROCK-TRAC®..... 98AXLE LOCK (TRU-LOK®)RUBICONONLY . . . . . . . . . . . . . . . . . . . . . . 99ELECTRONIC SWAY BAR DISCONNECT –RUBICON ONLY............... 99
UTILITY
TRAILER TOWING WEIGHTS(MAXIMUM TRAILER WEIGHTRATINGS)................. 100RECREATIONAL TOWING(BEHIND MOTORHOME, ETC.)..... 102
WHAT TO DO IN EMERGENCIES
ROADSIDE ASSISTANCE......... 105INSTRUMENT CLUSTERWARNING LIGHTS............ 105INSTRUMENT CLUSTERINDICATOR LIGHTS........... 110IF YOUR ENGINE OVERHEATS..... 111JACKING AND TIRE CHANGING.... 112JUMP-STARTING............. 116EMERGENCY TOW HOOKS....... 118SHIFT LEVER OVERRIDE........ 118TOWING A DISABLED VEHICLE.... 119FREEING A STUCK VEHICLE...... 119EVENT DATA RECORDER (EDR).... 120
MAINTAINING YOUR VEHICLE
OPENING THE HOOD.......... 121ENGINE COMPARTMENT........ 122FLUID CAPACITIES............ 124FLUIDS, LUBRICANTS ANDGENUINE PARTS............. 124MAINTENANCE PROCEDURES..... 126MAINTENANCE SCHEDULE...... 126MAINTENANCE RECORD........ 130FUSES.................... 131TIRE PRESSURES............ 134SPARE TIRES — IF EQUIPPED..... 135WHEEL AND WHEEL TRIM CARE . . . 137REPLACEMENT BULBS......... 137
TABLE OF CONTENTS
Page 5 of 156
WELCOME FROM CHRYSLER GROUP LLC
Congratulations on selecting your new Chrysler Group LLC vehicle. Be assured that it
represents precision workmanship, distinctive styling, and high quality - all essentials
that are traditional to our vehicles.
Your new Chrysler Group LLC vehicle has characteristics to enhance the driver's control
under some driving conditions. These are to assist the driver and are never a substitute
for attentive driving. They can never take the driver's place. Always drive carefully.
Your new vehicle has many features for the comfort and convenience of you and your
passengers. Some of these should not be used when driving because they take your
eyes from the road or your attention from driving. Never text while driving or take your
eyes more than momentarily off the road.
This guide illustrates and describes the operation of features and equipment that are
either standard or optional on this vehicle. This guide may also include a description of
features and equipment that are no longer available or were not ordered on this vehicle.
Please disregard any features and equipment described in this guide that are not
available on this vehicle. Chrysler Group LLC reserves the right to make changes in design
and specifications and/or make additions to or improvements to its products without
imposing any obligation upon itself to install them on products previously manufactured.
This User Guide has been prepared to help you quickly become acquainted with the
important features of your vehicle. It contains most things you will need to operate
and maintain the vehicle, including emergency information.
The DVD includes a computer application containing detailed owner's information
which can be viewed on a personal computer or MAC computer. The multimedia DVD
also includes videos which can be played on any standard DVD player (Uconnect®
Touchscreen Radios if equipped with DVD player capabilities). Additional DVD
operational information is located on the back of the DVD sleeve.
For complete owner information, refer to your Owner's Manual on the DVD in the owner’s
kit provided at the time of new vehicle purchase.For your convenience, the information
contained on the DVD may also be printed and saved for future reference.
Chrysler Group LLC is committed to protecting our environment and natural resources.
By converting from paper to electronic delivery for the majority of the user information
for your vehicle, together we greatly reduce the demand for tree-based products and
lessen the stress on our environment.
This is a specialized utility vehicle designed for both on-road and off-road use. It can go
places and perform tasks for which conventional two-wheel drive enclosed vehicles were
not intended. It handles and maneuvers differently from many passenger cars both
on-road and off-road, so take time to become familiar with your vehicle.
INTRODUCTION/WELCOME
3
Page 29 of 156
•Rotate the center portion of the lever upward to the next detent position to brighten
the odometer and radio controls when the parking lights or headlights are on.
• Rotate the center portion of the lever upward to the last detent to turn on the
interior lighting.
Flash To Pass
• Pull the lever toward you to activate the high beams. The high beams will remain
on until the lever is released.
High Beam Operation
• Push the lever forward to activate the high beams.
NOTE:
For safe driving, turn off the high beams when oncoming traffic is present to prevent
headlight glare and as a courtesy to other motorists.
Fog Lights
• Turn on the parking lights or low beam headlights and pull out the end of the lever.
Turn Signals/Lane Change Assist
Tap the lever up or down once and the turn signal (right or left) will flash three times
and automatically turn off.
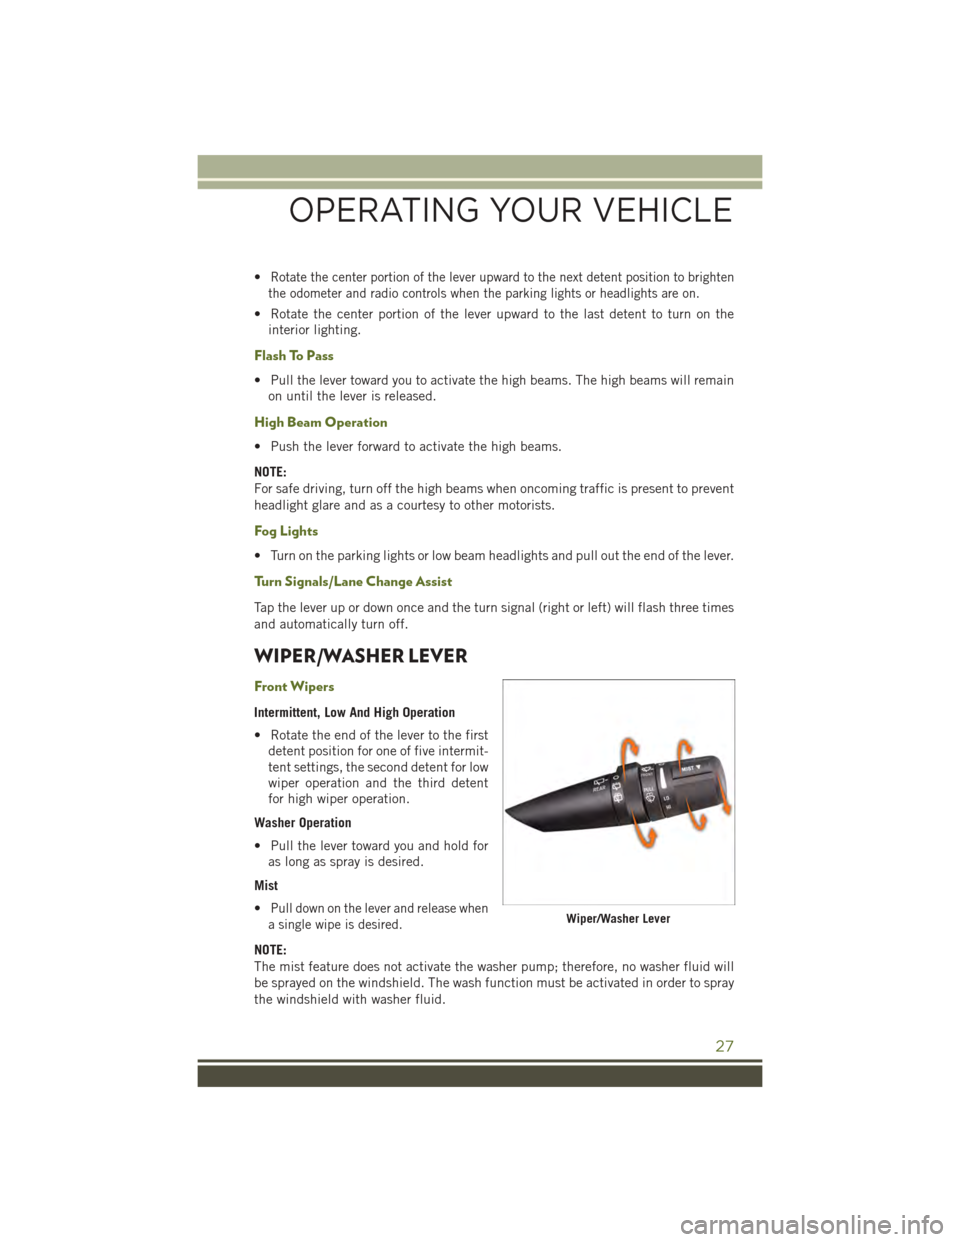
WIPER/WASHER LEVER
Front Wipers
Intermittent, Low And High Operation
• Rotate the end of the lever to the first
detent position for one of five intermit-
tent settings, the second detent for low
wiper operation and the third detent
for high wiper operation.
Washer Operation
• Pull the lever toward you and hold for
as long as spray is desired.
Mist
•Pull down on the lever and release when
a single wipe is desired.
NOTE:
The mist feature does not activate the washer pump; therefore, no washer fluid will
be sprayed on the windshield. The wash function must be activated in order to spray
the windshield with washer fluid.
Wiper/Washer Lever
OPERATING YOUR VEHICLE
27
Page 51 of 156
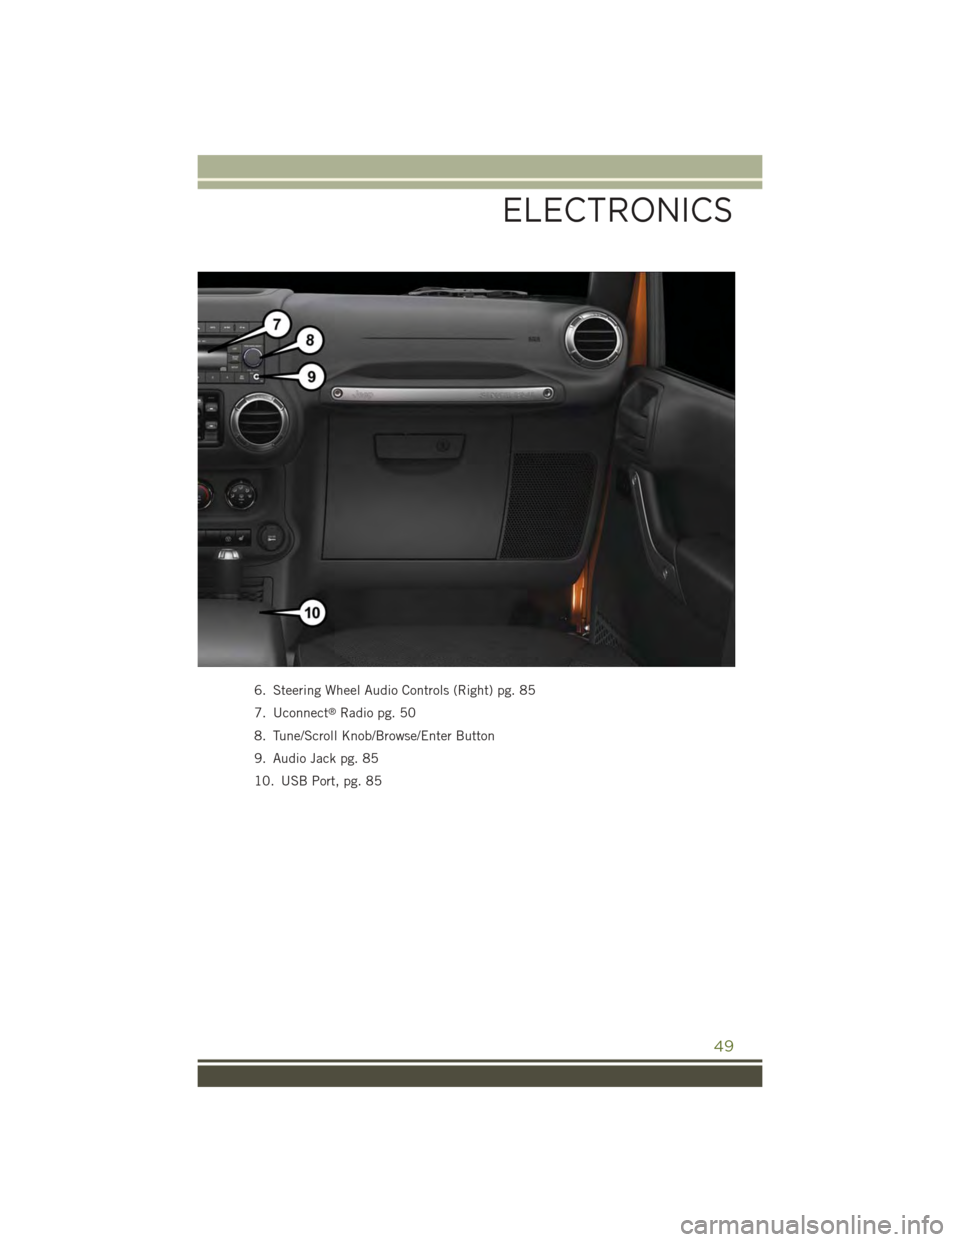
6. Steering Wheel Audio Controls (Right) pg. 85
7. Uconnect®Radio pg. 50
8. Tune/Scroll Knob/Browse/Enter Button
9. Audio Jack pg. 85
10. USB Port, pg. 85
ELECTRONICS
49
Page 52 of 156
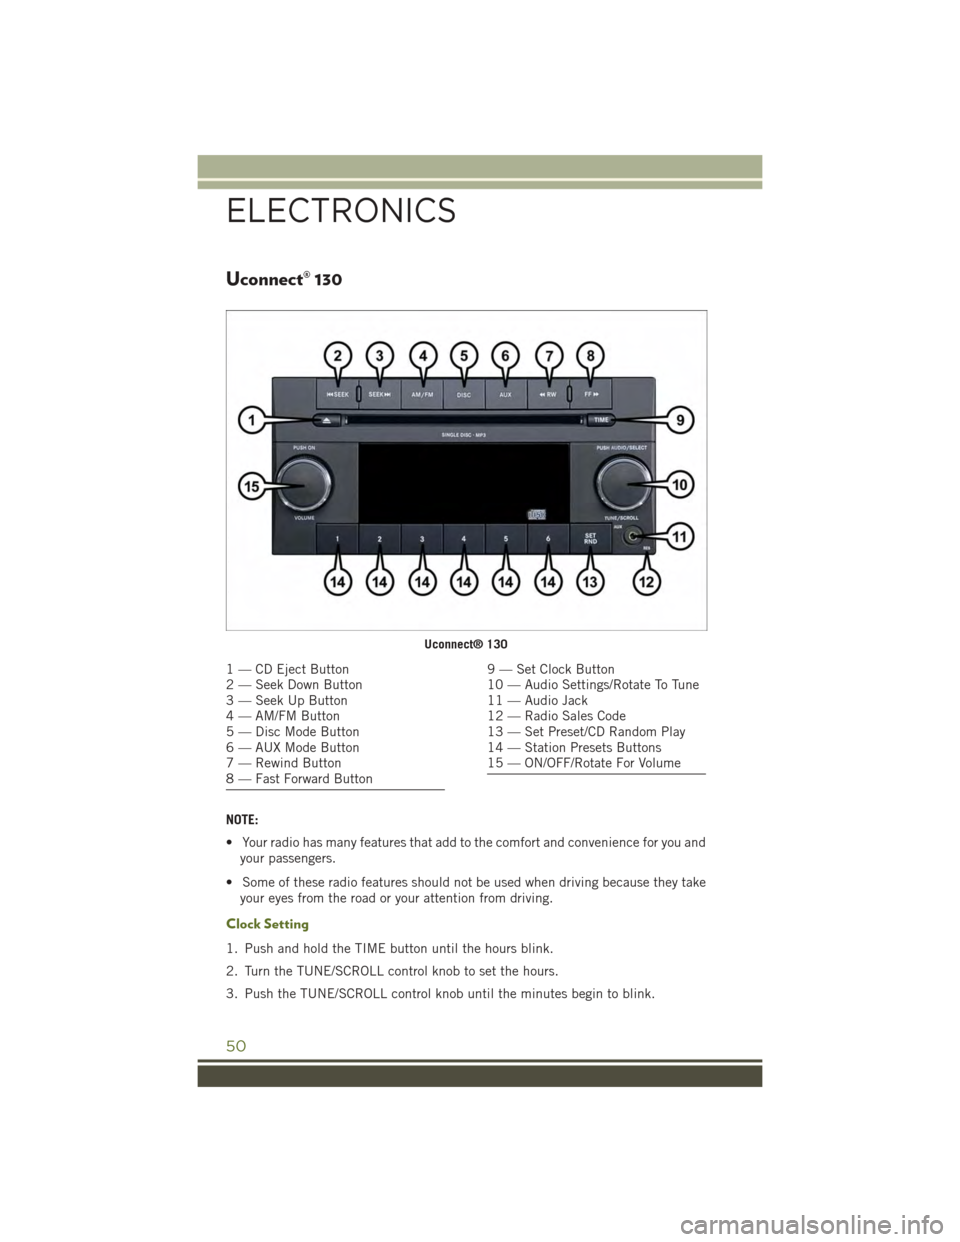
Uconnect® 130
NOTE:
• Your radio has many features that add to the comfort and convenience for you and
your passengers.
• Some of these radio features should not be used when driving because they take
your eyes from the road or your attention from driving.
Clock Setting
1. Push and hold the TIME button until the hours blink.
2. Turn the TUNE/SCROLL control knob to set the hours.
3. Push the TUNE/SCROLL control knob until the minutes begin to blink.
Uconnect® 130
1 — CD Eject Button2 — Seek Down Button3 — Seek Up Button4 — AM/FM Button5 — Disc Mode Button6 — AUX Mode Button7 — Rewind Button8 — Fast Forward Button
9 — Set Clock Button10 — Audio Settings/Rotate To Tune11 — Audio Jack12 — Radio Sales Code13 — Set Preset/CD Random Play14 — Station Presets Buttons15 — ON/OFF/Rotate For Volume
ELECTRONICS
50
Page 53 of 156
4. Turn the TUNE/SCROLL control knob to set the minutes.
5. Push the TUNE/SCROLL control knob to save the changes.
6. Push any button/knob or wait five seconds to exit.
Equalizer, Balance And Fade
1. Push the TUNE/SCROLL control knob and “BASS” will display.
2. Rotate the TUNE/SCROLL control knob to select the desired setting.
3.Continue pushing the TUNE/SCROLL control knob to display and set “MID RANGE,”
“TREBLE,” “BALANCE” and “FADE.”
Radio Operation
Seek Up/Down Buttons
• Push to seek through radio stations in AM or FM bands.
• Hold either button to bypass stations without stopping.
Store Radio Presets
• Push the SET/RND or SET (depending on the radio) button once and SET 1 willshow in the display. Then select a preset button (1–6).
• A second station may be added to each push button. Push the SET/RND or SET(depending on the radio) button twice and SET 2 will show in the display. Thenselect a preset button (1–6).
CD/DISC Operation
Seek Up/Down Buttons
• Push to seek through CD tracks.
• Hold either button to bypass tracks without stopping.
SET/RND Or RND (Depending On Radio) Button (Random Play)
• Push this button while the CD is playing to activate Random Play.
• This feature plays the selections on the CD in random order to provide an
interesting change of pace.
Audio Jack Operation
The AUX/Audio Jack provides a means to connect a portable audio device, such as an
MP3 player or an iPod®, to the vehicle’s sound system. This requires the use of a 3.5 mm
stereo audio patch cable.
• Pushing the AUX button will change the mode to auxiliary device if the Audio Jackis connected, allowing the music from your portable device to play through thevehicle's speakers.
The functions of the portable device are controlled using the device buttons, not the
buttons on the radio. However, the volume may be controlled using the radio or portable
device.
ELECTRONICS
51
Page 54 of 156
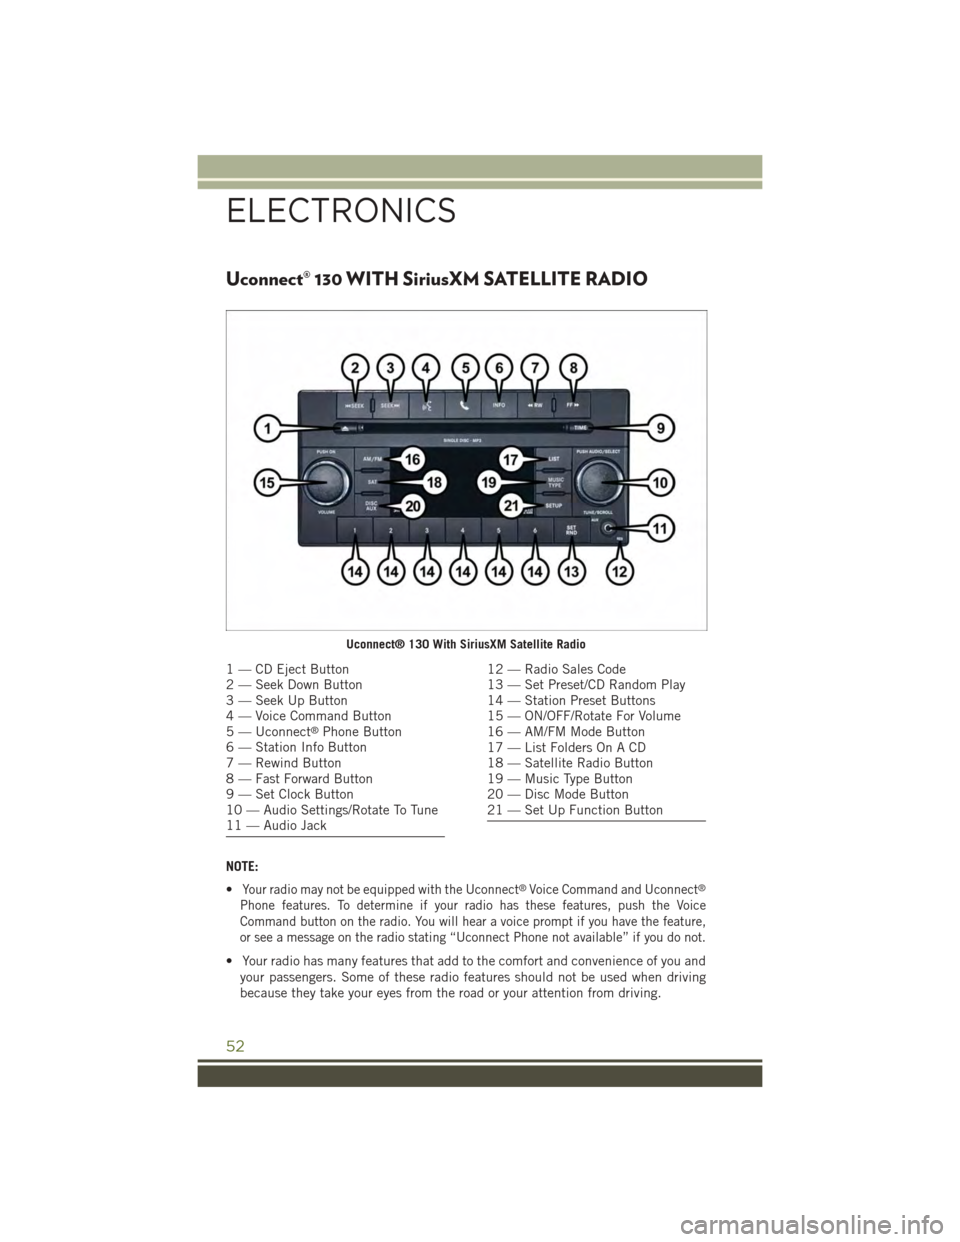
Uconnect® 130 WITH SiriusXM SATELLITE RADIO
NOTE:
•Your radio may not be equipped with the Uconnect®Voice Command and Uconnect®
Phone features. To determine if your radio has these features, push the Voice
Command button on the radio. You will hear a voice prompt if you have the feature,
or see a message on the radio stating “Uconnect Phone not available” if you do not.
• Your radio has many features that add to the comfort and convenience of you and
your passengers. Some of these radio features should not be used when driving
because they take your eyes from the road or your attention from driving.
Uconnect® 130 With SiriusXM Satellite Radio
1 — CD Eject Button2 — Seek Down Button3 — Seek Up Button4 — Voice Command Button5 — Uconnect®Phone Button6 — Station Info Button7 — Rewind Button8 — Fast Forward Button9 — Set Clock Button10 — Audio Settings/Rotate To Tune11 — Audio Jack
12 — Radio Sales Code13 — Set Preset/CD Random Play14 — Station Preset Buttons15 — ON/OFF/Rotate For Volume16 — AM/FM Mode Button17 — List Folders On A CD18 — Satellite Radio Button19 — Music Type Button20 — Disc Mode Button21 — Set Up Function Button
ELECTRONICS
52
Page 55 of 156
Clock Setting
1. Push and hold the TIME button until the hours blink.
2. Turn the TUNE/SCROLL control knob to set the hours.
3. Push the TUNE/SCROLL control knob until the minutes begin to blink.
4. Turn the TUNE/SCROLL control knob to set the minutes.
5. Push the TUNE/SCROLL control knob to save the changes.
6. Push any button/knob or wait five seconds to exit.
Equalizer, Balance And Fade
1. Push the TUNE/SCROLL control knob and “BASS” will display.
2. Rotate the TUNE/SCROLL control knob to select the desired setting.
3.Continue pushing the TUNE/SCROLL control knob to display and set “MID RANGE,”
“TREBLE,” “BALANCE” and “FADE.”
Radio Operation
Seek Up/Down Buttons
• Push to seek through radio stations in AM, FM, or SAT bands.
• Hold either button to bypass stations without stopping.
Store Radio Presets
• Push the SET/RND or SET (depending on the radio) button once and SET 1 will
show in the display. Then select a preset button (1–6).
• A second station may be added to each push button. Push the SET/RND or SET
(depending on the radio) button twice and SET 2 will show in the display. Then
select a preset button (1–6).
Music Type
NOTE:
The Music Type function only operates when in FM mode.
• Push the MUSIC TYPE button to activate this mode. Push the MUSIC TYPE button
again or turn the TUNE/SCROLL control knob to select the desired music type
(Adult Hits, Country, Jazz, Oldies, Rock, etc.).
• When a music type is chosen and the Music type is displayed, Push either SEEK
button and the radio will only search for stations with the selected music type.
SETUP Button
• Pushing the SETUP button allows you to select between items that are available
in that particular mode.
• Turn the TUNE/SCROLL control knob to scroll through the entries. Push the
AUDIO/SELECT button to select an entry and make changes.
ELECTRONICS
53
Page 56 of 156
SiriusXM Satellite Radio
SiriusXM services require subscriptions, sold separately after the 12-month trial
included with the new vehicle purchase.If you decide to continue your service at the
end of your trial subscription, the plan you choose will automatically renew and bill at
then-current rates until you call SiriusXM at 1-866-635-2349 to cancel.See SiriusXM
Customer Agreement for complete terms at www.siriusxm.com. All fees and program-
ming subject to change. Our satellite service is available only to those at least 18 and
older in the 48 contiguous USA and D.C. Our Sirius satellite service is also available
in PR (with coverage limitations). Our Internet radio service is available throughout
our satellite service area and in AK and HI. ©2014 Sirius XM Radio Inc. Sirius, XM
and all related marks and logos are trademarks of Sirius XM Radio Inc.
SiriusXM Satellite Radio gives you over 130 channels, including 100% commercial-
free music from nearly every genre, plus all your favorite sports, news, talk and
entertainment channels – all with crystal clear, coast-to-coast coverage, all in one
place and all at your fingertips.
• To access SiriusXM Satellite Radio, push the SAT button on the faceplate.
CD/DISC Operation
Seek Up/Down Buttons
• Push to seek through CD tracks.
• Hold either button to bypass tracks without stopping.
SET/RND or RND (Depending On Radio) Button (Random Play)
• Push this button while the CD is playing to activate Random Play.
• This feature plays the selections on the CD in random order to provide an
interesting change of pace.
LIST Button
• Push the LIST button to bring up a list of all folders on the CD. Scroll up or down
the list by turning the TUNE/SCROLL control knob.
• To select a folder from the list, push the TUNE/SCROLL control knob and the radio
will begin playing the files contained in that folder.
Audio Jack Operation
The AUX/Audio Jack provides a means to connect a portable audio device, such as an
MP3 player or an iPod®, to the vehicle’s sound system. This requires the use of a 3.5 mm
stereo audio patch cable.
• Pushing the AUX button will change the mode to auxiliary device if the Audio Jack
is connected, allowing the music from your portable device to play through the
vehicle's speakers.
The functions of the portable device are controlled using the device buttons, not the
buttons on the radio. However, the volume may be controlled using the radio or
portable device.
ELECTRONICS
54