ECO mode JEEP WRANGLER 2015 JK / 3.G User Guide
[x] Cancel search | Manufacturer: JEEP, Model Year: 2015, Model line: WRANGLER, Model: JEEP WRANGLER 2015 JK / 3.GPages: 156, PDF Size: 23.54 MB
Page 6 of 156
VEHICLES SOLD IN CANADA
With respect to any vehicles sold in Canada, the name Chrysler Group LLC shall be
deemed to be deleted and the name Chrysler Canada Inc. used in substitution (excluding
legal lines).
WARNING!
• Pedals that cannot move freely can cause loss of vehicle control and increase
the risk of serious personal injury.
• Always make sure that objects cannot fall into the driver foot well while the
vehicle is moving. Objects can become trapped under the brake pedal and
accelerator pedal causing a loss of vehicle control.
• Failure to properly follow floor mat installation or mounting can cause inter-
ference with the brake pedal and accelerator pedal operation causing loss of
control of the vehicle.
• Never leave children alone in a vehicle, or with access to an unlocked vehicle.
Allowing children to be in a vehicle unattended is dangerous for a number of
reasons. A child or others could be seriously or fatally injured. Children should
be warned not to touch the parking brake, brake pedal or the shift lever/
transmission gear selector.
• Do not leave the key fob in or near the vehicle, or in a location accessible to
children, and do not leave the ignition of a vehicle equipped with Keyless
Enter-N-Go in the ACC or ON/RUN mode. A child could operate power
windows, other controls, or move the vehicle.
• Never use the “PARK” position as a substitute for the parking brake. Always
apply the parking brake fully when parked to guard against vehicle movement
and possible injury or damage.
• Refer to your Owner's Manual on the DVD for further details.
INTRODUCTION/WELCOME
4
Page 28 of 156
ENGINE BREAK-IN RECOMMENDATIONS
A long break-in period is not required for the engine and drivetrain (transmission and
axle) in your vehicle.
Drive moderately during the first 300 miles (500 km). After the initial 60 miles (100 km),
speeds up to 50 or 55 mph (80 or 90 km/h) are desirable.
While cruising, brief full-throttle acceleration within the limits of local traffic laws
contributes to a good break-in. Wide-open throttle acceleration in low gear can be
detrimental and should be avoided.
The engine oil installed in the engine at the factory is a high-quality energy
conserving type lubricant. Oil changes should be consistent with anticipated climate
conditions under which vehicle operations will occur. For the recommended viscosity
and quality grades, refer to “Maintaining Your Vehicle.”
NOTE:
A new engine may consume some oil during its first few thousand miles (kilometers) of
operation. This should be considered a normal part of the break-in and not interpreted
as an indication of an engine problem or malfunction.
CAUTION!
Never use Non-Detergent Oil or Straight Mineral Oil in the engine or damage may
result.
TURN SIGNAL/LIGHTS LEVER
Headlights/Parking Lights/Automatic
Headlights
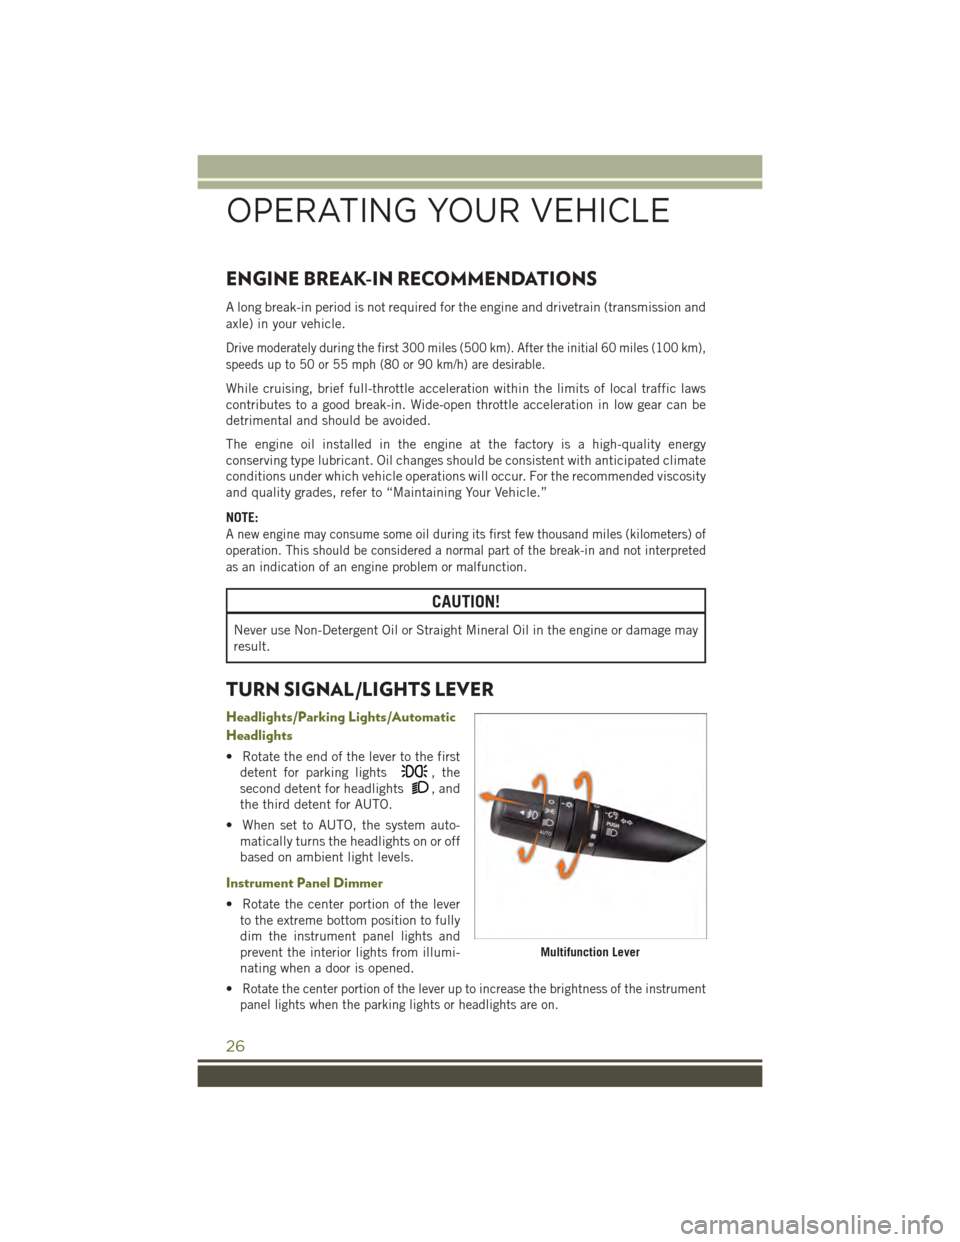
• Rotate the end of the lever to the first
detent for parking lights, the
second detent for headlights, and
the third detent for AUTO.
• When set to AUTO, the system auto-
matically turns the headlights on or off
based on ambient light levels.
Instrument Panel Dimmer
• Rotate the center portion of the lever
to the extreme bottom position to fully
dim the instrument panel lights and
prevent the interior lights from illumi-
nating when a door is opened.
•Rotate the center portion of the lever up to increase the brightness of the instrument
panel lights when the parking lights or headlights are on.
Multifunction Lever
OPERATING YOUR VEHICLE
26
Page 53 of 156
4. Turn the TUNE/SCROLL control knob to set the minutes.
5. Push the TUNE/SCROLL control knob to save the changes.
6. Push any button/knob or wait five seconds to exit.
Equalizer, Balance And Fade
1. Push the TUNE/SCROLL control knob and “BASS” will display.
2. Rotate the TUNE/SCROLL control knob to select the desired setting.
3.Continue pushing the TUNE/SCROLL control knob to display and set “MID RANGE,”
“TREBLE,” “BALANCE” and “FADE.”
Radio Operation
Seek Up/Down Buttons
• Push to seek through radio stations in AM or FM bands.
• Hold either button to bypass stations without stopping.
Store Radio Presets
• Push the SET/RND or SET (depending on the radio) button once and SET 1 willshow in the display. Then select a preset button (1–6).
• A second station may be added to each push button. Push the SET/RND or SET(depending on the radio) button twice and SET 2 will show in the display. Thenselect a preset button (1–6).
CD/DISC Operation
Seek Up/Down Buttons
• Push to seek through CD tracks.
• Hold either button to bypass tracks without stopping.
SET/RND Or RND (Depending On Radio) Button (Random Play)
• Push this button while the CD is playing to activate Random Play.
• This feature plays the selections on the CD in random order to provide an
interesting change of pace.
Audio Jack Operation
The AUX/Audio Jack provides a means to connect a portable audio device, such as an
MP3 player or an iPod®, to the vehicle’s sound system. This requires the use of a 3.5 mm
stereo audio patch cable.
• Pushing the AUX button will change the mode to auxiliary device if the Audio Jackis connected, allowing the music from your portable device to play through thevehicle's speakers.
The functions of the portable device are controlled using the device buttons, not the
buttons on the radio. However, the volume may be controlled using the radio or portable
device.
ELECTRONICS
51
Page 55 of 156
Clock Setting
1. Push and hold the TIME button until the hours blink.
2. Turn the TUNE/SCROLL control knob to set the hours.
3. Push the TUNE/SCROLL control knob until the minutes begin to blink.
4. Turn the TUNE/SCROLL control knob to set the minutes.
5. Push the TUNE/SCROLL control knob to save the changes.
6. Push any button/knob or wait five seconds to exit.
Equalizer, Balance And Fade
1. Push the TUNE/SCROLL control knob and “BASS” will display.
2. Rotate the TUNE/SCROLL control knob to select the desired setting.
3.Continue pushing the TUNE/SCROLL control knob to display and set “MID RANGE,”
“TREBLE,” “BALANCE” and “FADE.”
Radio Operation
Seek Up/Down Buttons
• Push to seek through radio stations in AM, FM, or SAT bands.
• Hold either button to bypass stations without stopping.
Store Radio Presets
• Push the SET/RND or SET (depending on the radio) button once and SET 1 will
show in the display. Then select a preset button (1–6).
• A second station may be added to each push button. Push the SET/RND or SET
(depending on the radio) button twice and SET 2 will show in the display. Then
select a preset button (1–6).
Music Type
NOTE:
The Music Type function only operates when in FM mode.
• Push the MUSIC TYPE button to activate this mode. Push the MUSIC TYPE button
again or turn the TUNE/SCROLL control knob to select the desired music type
(Adult Hits, Country, Jazz, Oldies, Rock, etc.).
• When a music type is chosen and the Music type is displayed, Push either SEEK
button and the radio will only search for stations with the selected music type.
SETUP Button
• Pushing the SETUP button allows you to select between items that are available
in that particular mode.
• Turn the TUNE/SCROLL control knob to scroll through the entries. Push the
AUDIO/SELECT button to select an entry and make changes.
ELECTRONICS
53
Page 58 of 156
Clock Setting
1. Push and hold the TIME button until the hours blink.
2. Turn the TUNE/SCROLL control knob to set the hours.
3. Push the TUNE/SCROLL control knob until the minutes begin to blink.
4. Turn the TUNE/SCROLL control knob to set the minutes.
5. Push the TUNE/SCROLL control knob to save the changes.
6. Push any button/knob or wait five seconds to exit.
Equalizer, Balance And Fade
1. Push the TUNE/SCROLL control knob and “BASS” will display.
2. Rotate the TUNE/SCROLL control knob to select the desired setting.
3.Continue pushing the TUNE/SCROLL control knob to display and set “MID RANGE,”
“TREBLE,” “BALANCE” and “FADE.”
Radio Operation
Seek Up/Down Buttons
• Push to seek through radio stations in AM, FM, or SAT bands.
• Hold either button to bypass stations without stopping.
Store Radio Presets
•Push the SET button once and SET 1 will show in the display. Then select button (1–6).
• A second station may be added to each push button. Push the SET button twice
and SET 2 will show in the display. Then select button (1–6).
Music Type
NOTE:
The Music Type function only operates when in FM mode.
• Push the MUSIC TYPE button to activate this mode. Push the MUSIC TYPE buttonagain or turn the TUNE/SCROLL control knob to select the desired music type(Adult Hits, Country, Jazz, Oldies, Rock, etc.).
• Once a music type is chosen and the music type is displayed, push the SEEKbutton and the radio will only search for stations with the selected music type.
SETUP Button
• Pushing the SETUP button allows you to select between items that are available
in that particular mode.
• Turn the TUNE/SCROLL control knob to scroll through the entries. Push the
AUDIO/SELECT button to select an entry and make changes.
SiriusXM Satellite Radio
SiriusXM services require subscriptions, sold separately after the 12-month trial
included with the new vehicle purchase.If you decide to continue your service at the
end of your trial subscription, the plan you choose will automatically renew and bill at
ELECTRONICS
56
Page 64 of 156
Insert A CD/DVD Disc
• To insert a disc, push the LOAD button on the faceplate.
• With the printed side upwards, insert the disc into the disc slot of the radio. The
radio pulls the disc in automatically and closes the flip screen. The radio selects
the appropriate mode after the disc is recognized, and starts playing the first track.
The display shows “Reading...” during this process.
Seek Up/Seek Down
• Push the SEEK UP or SEEK DOWN buttons on the faceplate to seek through
tracks in Disc Mode. Holding the SEEK UP button on the touchscreen will fast
forward through the track until the beginning of the track is reached; if still held it
will fast-forward through the next sequential track(s) (if random play node is not
active) until released. Holding the SEEK DOWN button on the touchscreen will
fast-reverse through the track until the beginning of the track is reached; if still
held it will fast-reverse through the next sequential track(s) (if random play node
is not active) until released.
Audio Jack Operation
The AUX/Audio Jack provides a means to connect a portable audio device, such as an
MP3 player or an iPod®, to the vehicle’s sound system. This requires the use of a 3.5 mm
stereo audio patch cable.
•Push the MEDIA button on the faceplate then the “AUX” button on the touchscreen
to change the mode to auxiliary device if the Audio Jack is connected, allowing the
music from your portable device to play through the vehicle's speakers.
NOTE:
The functions of the portable device are controlled using the device itself, not the
buttons on the radio. However, the volume may be controlled using the radio or portable
device.
Hard Disk Drive (HDD) Operation
• The Hard Disk Drive (HDD) mode gives you access to the audio files on the internal
hard disk drive. It functions similar to a CD player, with the exception that the
internal HDD can hold more tracks.
• It is also possible to import display pictures to the internal hard disk drive. The
pictures can be displayed on the right half of the radio screen.
• Before using the HDD mode, you will need to copy songs and pictures to the
internal hard drive. Songs and pictures can be added to the hard drive by using a
CD or USB device (e.g. thumb drive or memory stick).
NOTE:
• HDD supports only .jpg/JPEG formats for photos.
• WMA/MP3 Files and Selective Songs from a CD can also be added to the HDD.
See the Uconnect®430/430N User's Manual for more information.
ELECTRONICS
62
Page 75 of 156
Insert A CD/DVD Disc
• To insert a disc, push the OPEN/CLOSE button on the faceplate.
• With the printed side upwards, insert the disc into the disc slot of the radio. The
radio pulls the disc in automatically and closes the flip screen. The radio selects
the appropriate mode after the disc is recognized, and starts playing the first track.
The display shows “Reading...” during this process.
Seek Up/Seek Down
• Push the SEEK UP or SEEK DOWN buttons on the faceplate to seek through
tracks in Disc Mode. Hold either SEEK to bypass tracks without stopping.
Audio Jack Operation
The AUX/Audio Jack provides a means to connect a portable audio device, such as an
MP3 player or an iPod®, to the vehicle’s sound system. This requires the use of a 3.5 mm
stereo audio patch cable.
•Push the RADIO/MEDIA button on the faceplate, then the “AUX” button on the
touchscreen to change the mode to auxiliary device if the Audio Jack is connected,
allowing the music from your portable device to play through the vehicle's speakers.
NOTE:
The functions of the portable device are controlled using the device itself, not the
buttons on the radio. The volume may be controlled using the radio or portable
device.
Hard Disk Drive (HDD) Operation
• The Hard Disk Drive (HDD) mode gives you access to the audio files on the internal
hard disk drive. It functions similar to a CD player, with the exception that the
internal HDD can hold more tracks.
• It is also possible to import display pictures to the internal hard disk drive. The
pictures can be displayed on the right half of the radio screen.
• Before using the HDD mode, you will need to copy songs and pictures to the
internal hard drive. Songs and pictures can be added to the hard drive by using a
CD or USB device (e.g. thumb drive or memory stick).
NOTE:
• HDD supports only .jpg/JPEG formats for photos.
• WMA/MP3 Files and selective Songs from a CD can also be added to the HDD. See
the Uconnect®730N Supplement Manual for more information.
ELECTRONICS
73
Page 85 of 156
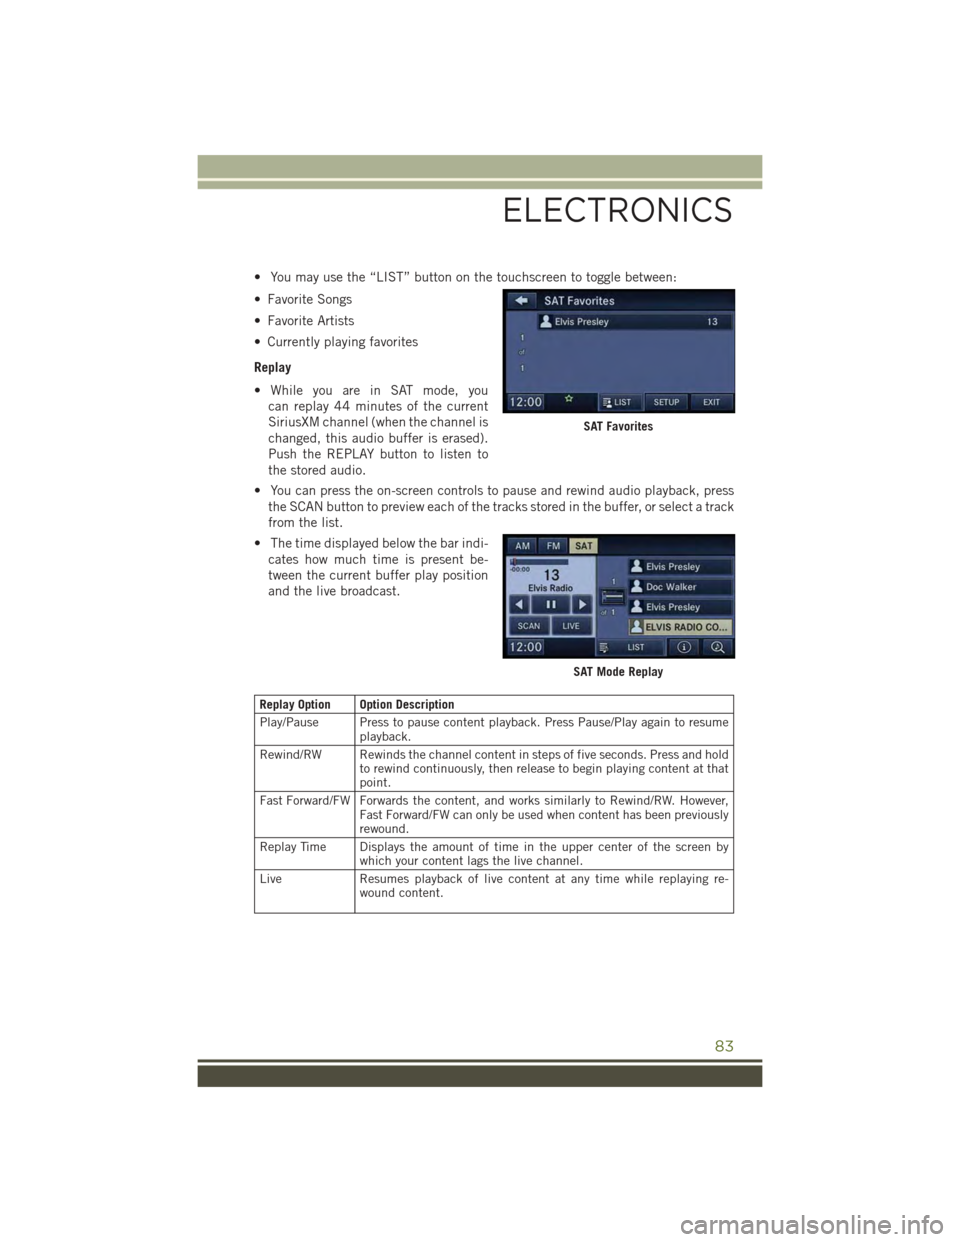
• You may use the “LIST” button on the touchscreen to toggle between:
• Favorite Songs
• Favorite Artists
• Currently playing favorites
Replay
• While you are in SAT mode, you
can replay 44 minutes of the current
SiriusXM channel (when the channel is
changed, this audio buffer is erased).
Push the REPLAY button to listen to
the stored audio.
• You can press the on-screen controls to pause and rewind audio playback, press
the SCAN button to preview each of the tracks stored in the buffer, or select a track
from the list.
• The time displayed below the bar indi-
cates how much time is present be-
tween the current buffer play position
and the live broadcast.
Replay Option Option Description
Play/Pause Press to pause content playback. Press Pause/Play again to resumeplayback.
Rewind/RW Rewinds the channel content in steps of five seconds. Press and holdto rewind continuously, then release to begin playing content at thatpoint.
Fast Forward/FW Forwards the content, and works similarly to Rewind/RW. However,Fast Forward/FW can only be used when content has been previouslyrewound.
Replay Time Displays the amount of time in the upper center of the screen bywhich your content lags the live channel.
Live Resumes playback of live content at any time while replaying re-wound content.
SAT Favorites
SAT Mode Replay
ELECTRONICS
83
Page 87 of 156
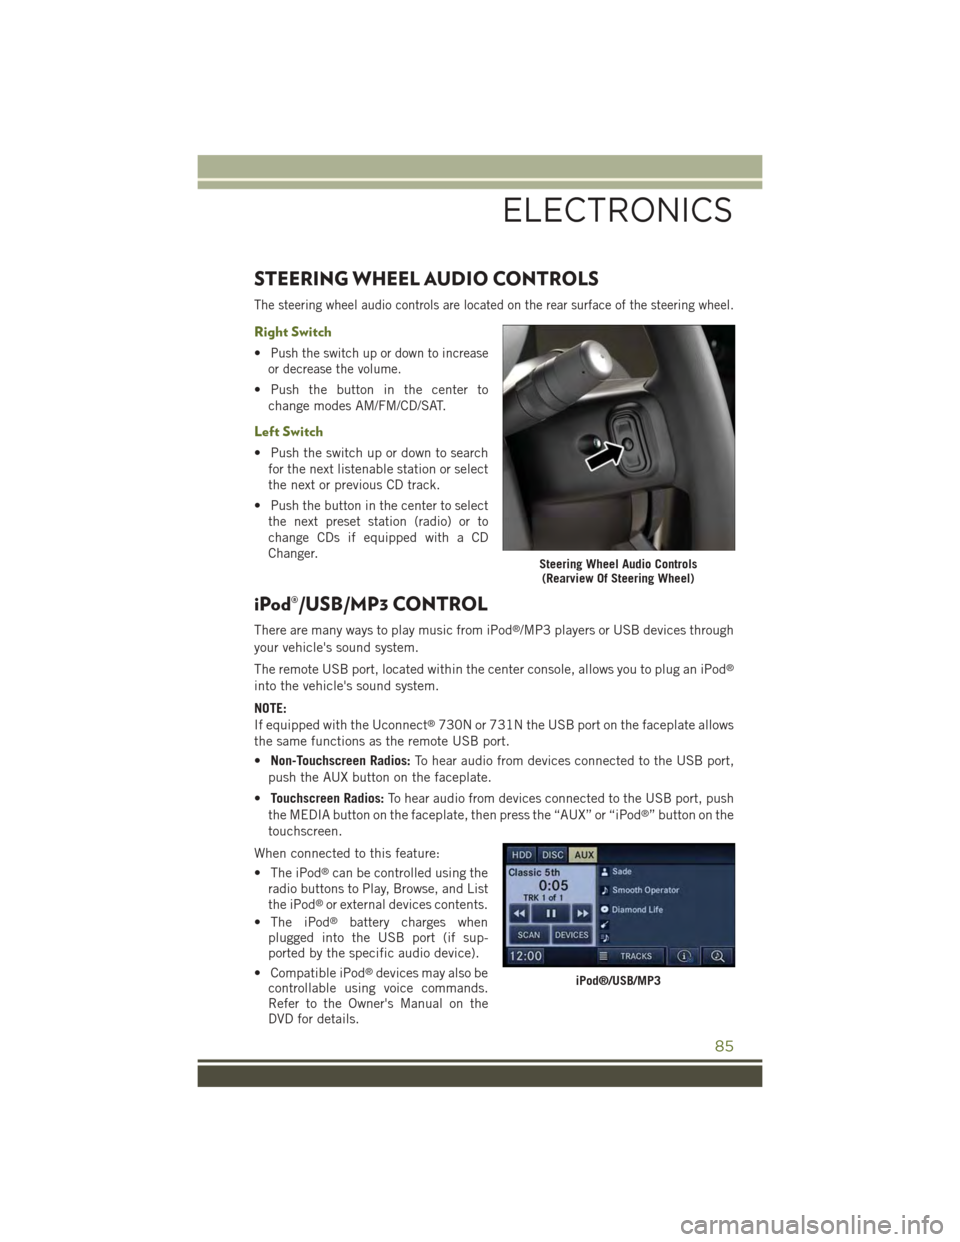
STEERING WHEEL AUDIO CONTROLS
The steering wheel audio controls are located on the rear surface of the steering wheel.
Right Switch
•Push the switch up or down to increase
or decrease the volume.
• Push the button in the center to
change modes AM/FM/CD/SAT.
Left Switch
• Push the switch up or down to search
for the next listenable station or select
the next or previous CD track.
•Push the button in the center to select
the next preset station (radio) or to
change CDs if equipped with a CD
Changer.
iPod®/USB/MP3 CONTROL
There are many ways to play music from iPod®/MP3 players or USB devices through
your vehicle's sound system.
The remote USB port, located within the center console, allows you to plug an iPod®
into the vehicle's sound system.
NOTE:
If equipped with the Uconnect®730N or 731N the USB port on the faceplate allows
the same functions as the remote USB port.
•Non-Touchscreen Radios:To hear audio from devices connected to the USB port,
push the AUX button on the faceplate.
•Touchscreen Radios:To hear audio from devices connected to the USB port, push
the MEDIA button on the faceplate, then press the “AUX” or “iPod®” button on the
touchscreen.
When connected to this feature:
• The iPod®can be controlled using the
radio buttons to Play, Browse, and List
the iPod®or external devices contents.
• The iPod®battery charges whenplugged into the USB port (if sup-ported by the specific audio device).
• Compatible iPod®devices may also becontrollable using voice commands.Refer to the Owner's Manual on theDVD for details.
Steering Wheel Audio Controls(Rearview Of Steering Wheel)
iPod®/USB/MP3
ELECTRONICS
85
Page 91 of 156
WARNING!
• Any voice commanded system should be used only in safe driving conditions
following applicable laws regarding phone use. Your attention should be
focused on safely operating the vehicle. Failure to do so may result in a
collision causing you and others to be severely injured or killed.
• In an emergency, to use Uconnect®Phone, your mobile phone must be:
• turned on,
• paired to Uconnect®Phone,
• and have network coverage.
Uconnect® VOICE COMMAND
Voice Command Operation
•The Uconnect®Voice Command system allows you to control your AM, FM radio,
satellite radio, disc player, HDD, Uconnect®Phone, a memo recorder, and supported
portable media devices.
• When you press the “Voice Command” buttonlocated on the radio
faceplate or steering wheel, you will hear a beep. The beep is your signal to give a
command. If you do not say a command within a few seconds, the system will
present you with a list of options. If you ever want to interrupt the system while it
lists options, press the “Voice Command” button, listen for the BEEP, and
say your command.
NOTE:
U.S. residents visit driveuconnect.com for more info on which voice command
features apply to your vehicle. Canadian residents visit driveuconnect.ca for more
info on which voice command features apply to your vehicle.
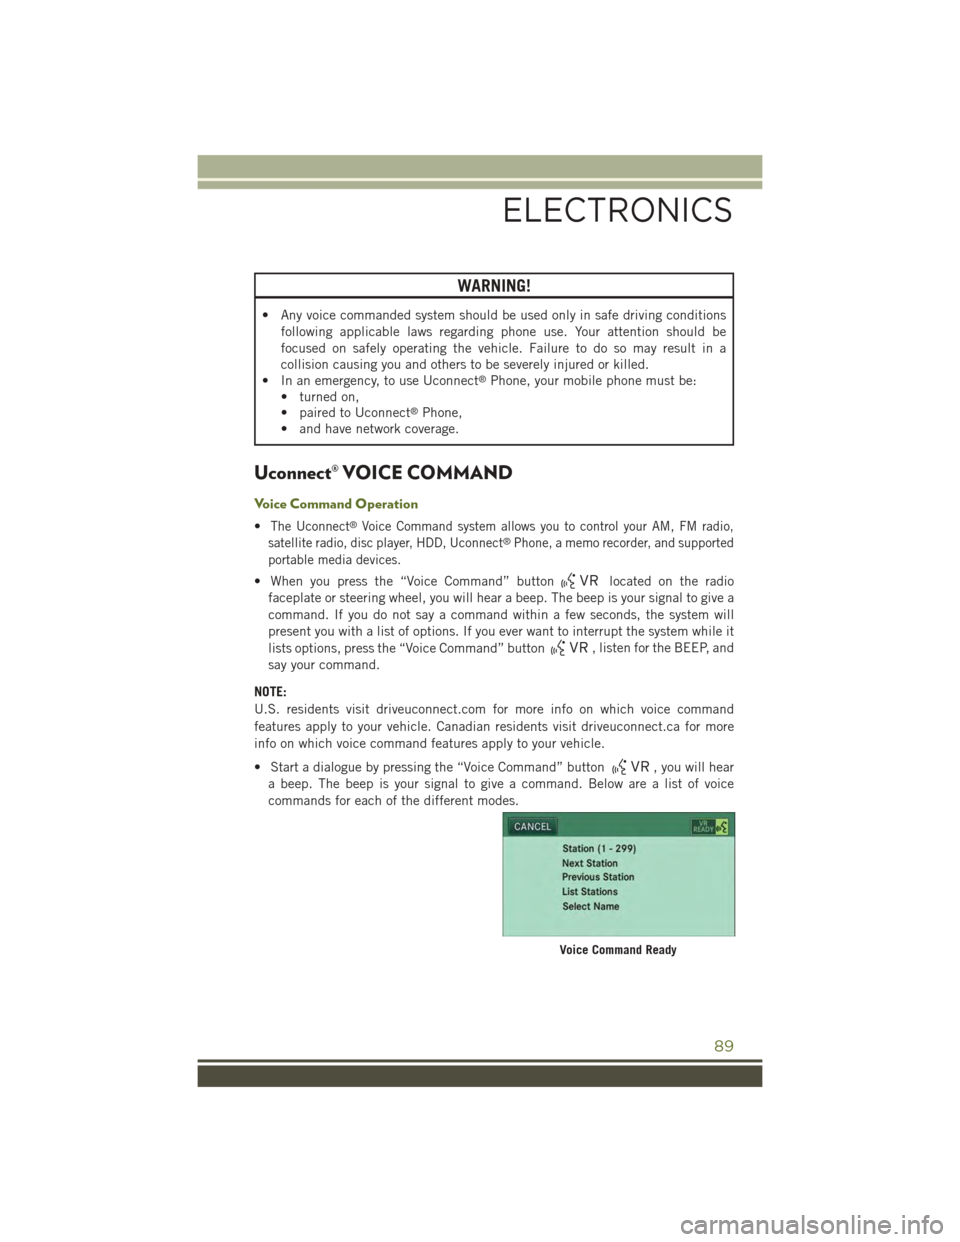
• Start a dialogue by pressing the “Voice Command” button, you will hear
a beep. The beep is your signal to give a command. Below are a list of voice
commands for each of the different modes.
Voice Command Ready
ELECTRONICS
89