transmission JEEP WRANGLER 2015 JK / 3.G User Guide
[x] Cancel search | Manufacturer: JEEP, Model Year: 2015, Model line: WRANGLER, Model: JEEP WRANGLER 2015 JK / 3.GPages: 156, PDF Size: 23.54 MB
Page 6 of 156
VEHICLES SOLD IN CANADA
With respect to any vehicles sold in Canada, the name Chrysler Group LLC shall be
deemed to be deleted and the name Chrysler Canada Inc. used in substitution (excluding
legal lines).
WARNING!
• Pedals that cannot move freely can cause loss of vehicle control and increase
the risk of serious personal injury.
• Always make sure that objects cannot fall into the driver foot well while the
vehicle is moving. Objects can become trapped under the brake pedal and
accelerator pedal causing a loss of vehicle control.
• Failure to properly follow floor mat installation or mounting can cause inter-
ference with the brake pedal and accelerator pedal operation causing loss of
control of the vehicle.
• Never leave children alone in a vehicle, or with access to an unlocked vehicle.
Allowing children to be in a vehicle unattended is dangerous for a number of
reasons. A child or others could be seriously or fatally injured. Children should
be warned not to touch the parking brake, brake pedal or the shift lever/
transmission gear selector.
• Do not leave the key fob in or near the vehicle, or in a location accessible to
children, and do not leave the ignition of a vehicle equipped with Keyless
Enter-N-Go in the ACC or ON/RUN mode. A child could operate power
windows, other controls, or move the vehicle.
• Never use the “PARK” position as a substitute for the parking brake. Always
apply the parking brake fully when parked to guard against vehicle movement
and possible injury or damage.
• Refer to your Owner's Manual on the DVD for further details.
INTRODUCTION/WELCOME
4
Page 12 of 156
KEY FOB
Locking And Unlocking The
Doors/Swing Gate
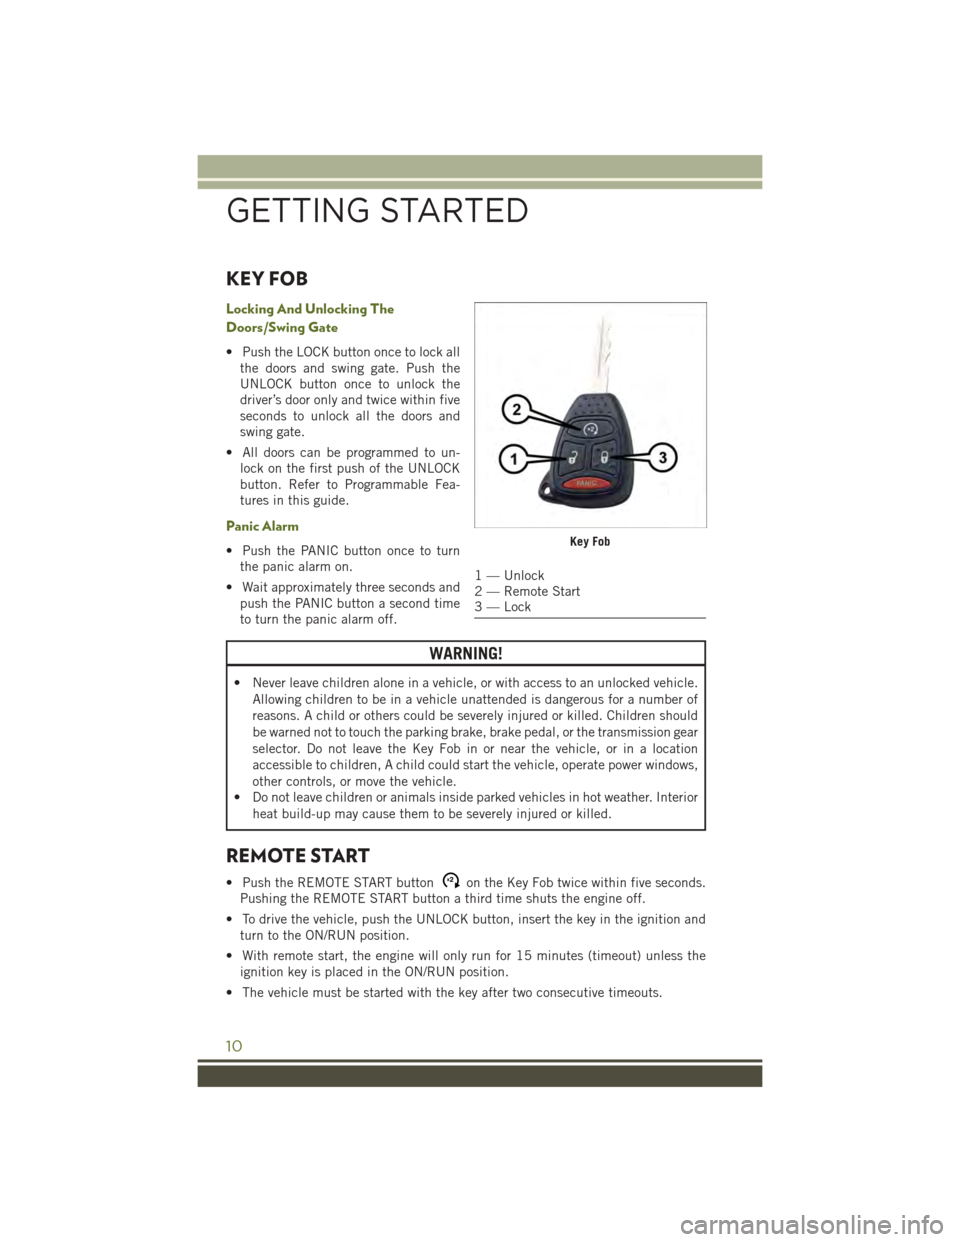
• Push the LOCK button once to lock all
the doors and swing gate. Push the
UNLOCK button once to unlock the
driver’s door only and twice within five
seconds to unlock all the doors and
swing gate.
• All doors can be programmed to un-
lock on the first push of the UNLOCK
button. Refer to Programmable Fea-
tures in this guide.
Panic Alarm
• Push the PANIC button once to turn
the panic alarm on.
• Wait approximately three seconds and
push the PANIC button a second time
to turn the panic alarm off.
WARNING!
• Never leave children alone in a vehicle, or with access to an unlocked vehicle.
Allowing children to be in a vehicle unattended is dangerous for a number of
reasons. A child or others could be severely injured or killed. Children should
be warned not to touch the parking brake, brake pedal, or the transmission gear
selector. Do not leave the Key Fob in or near the vehicle, or in a location
accessible to children, A child could start the vehicle, operate power windows,
other controls, or move the vehicle.
• Do not leave children or animals inside parked vehicles in hot weather. Interior
heat build-up may cause them to be severely injured or killed.
REMOTE START
• Push the REMOTE START buttonx2on the Key Fob twice within five seconds.
Pushing the REMOTE START button a third time shuts the engine off.
• To drive the vehicle, push the UNLOCK button, insert the key in the ignition and
turn to the ON/RUN position.
• With remote start, the engine will only run for 15 minutes (timeout) unless the
ignition key is placed in the ON/RUN position.
• The vehicle must be started with the key after two consecutive timeouts.
Key Fob
1 — Unlock2 — Remote Start3 — Lock
GETTING STARTED
10
Page 28 of 156
ENGINE BREAK-IN RECOMMENDATIONS
A long break-in period is not required for the engine and drivetrain (transmission and
axle) in your vehicle.
Drive moderately during the first 300 miles (500 km). After the initial 60 miles (100 km),
speeds up to 50 or 55 mph (80 or 90 km/h) are desirable.
While cruising, brief full-throttle acceleration within the limits of local traffic laws
contributes to a good break-in. Wide-open throttle acceleration in low gear can be
detrimental and should be avoided.
The engine oil installed in the engine at the factory is a high-quality energy
conserving type lubricant. Oil changes should be consistent with anticipated climate
conditions under which vehicle operations will occur. For the recommended viscosity
and quality grades, refer to “Maintaining Your Vehicle.”
NOTE:
A new engine may consume some oil during its first few thousand miles (kilometers) of
operation. This should be considered a normal part of the break-in and not interpreted
as an indication of an engine problem or malfunction.
CAUTION!
Never use Non-Detergent Oil or Straight Mineral Oil in the engine or damage may
result.
TURN SIGNAL/LIGHTS LEVER
Headlights/Parking Lights/Automatic
Headlights
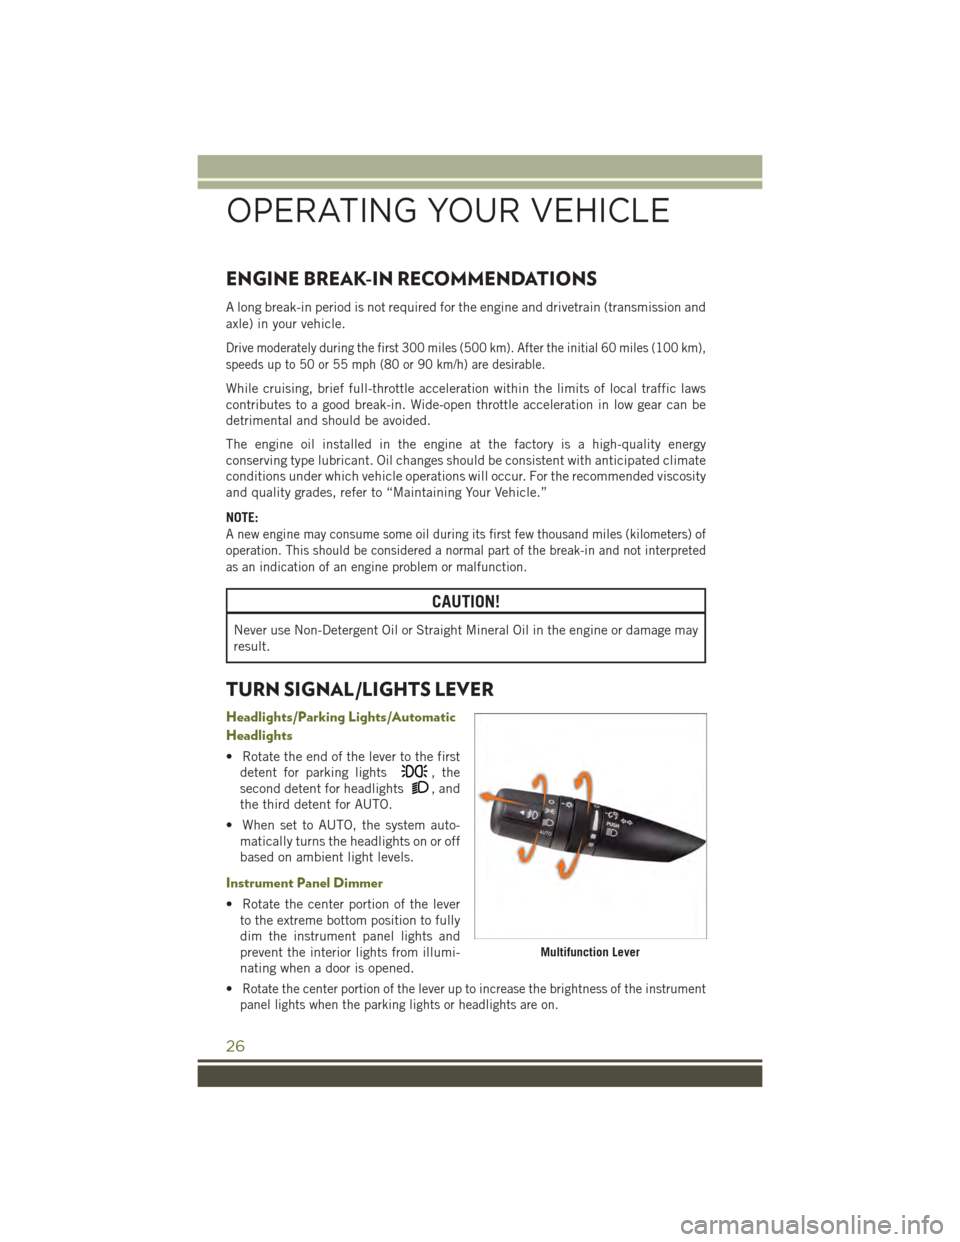
• Rotate the end of the lever to the first
detent for parking lights, the
second detent for headlights, and
the third detent for AUTO.
• When set to AUTO, the system auto-
matically turns the headlights on or off
based on ambient light levels.
Instrument Panel Dimmer
• Rotate the center portion of the lever
to the extreme bottom position to fully
dim the instrument panel lights and
prevent the interior lights from illumi-
nating when a door is opened.
•Rotate the center portion of the lever up to increase the brightness of the instrument
panel lights when the parking lights or headlights are on.
Multifunction Lever
OPERATING YOUR VEHICLE
26
Page 95 of 156
EVIC Main Menu
To step to each main menu feature push the MENU button once for each step. A step
from the last item in the list will cause the first item in the feature list to be displayed.
The following features are in the Main menu:
• Compass, Outside Temperature, and ECO display
• Digital Speedometer
• Average Fuel Economy
• Distance to Empty
• Elapsed Time
• Vehicle Information
• Coolant Temp
• Oil Pressure
• Transmission Temp
• Oil Life Remaining (Automatic Oil Change Indicator)
• EVIC Units Selection
• System Status
• Personal Settings
• Tire PSI
Compass Calibration
This compass is self-calibrating, which eliminates the need to set the compass
manually. When the vehicle is new, the compass may appear erratic and the EVIC will
display “CAL” until the compass is calibrated.
You may also calibrate the compass by completing one or more 360 degree turns
(in an area free from large metal or metallic objects) until the “CAL” message
displayed in the EVIC turns off. The compass will now function normally.
ECO
The ECO message will appear in your EVIC display whenever you are driving in a fuel
efficient manner.
This feature allows you to monitor when you are driving in a fuel efficient manner, and
it can be used to modify driving habits in order to increase fuel economy.
ELECTRONICS
93
Page 100 of 156
COMMAND-TRAC®/ROCK-TRAC®
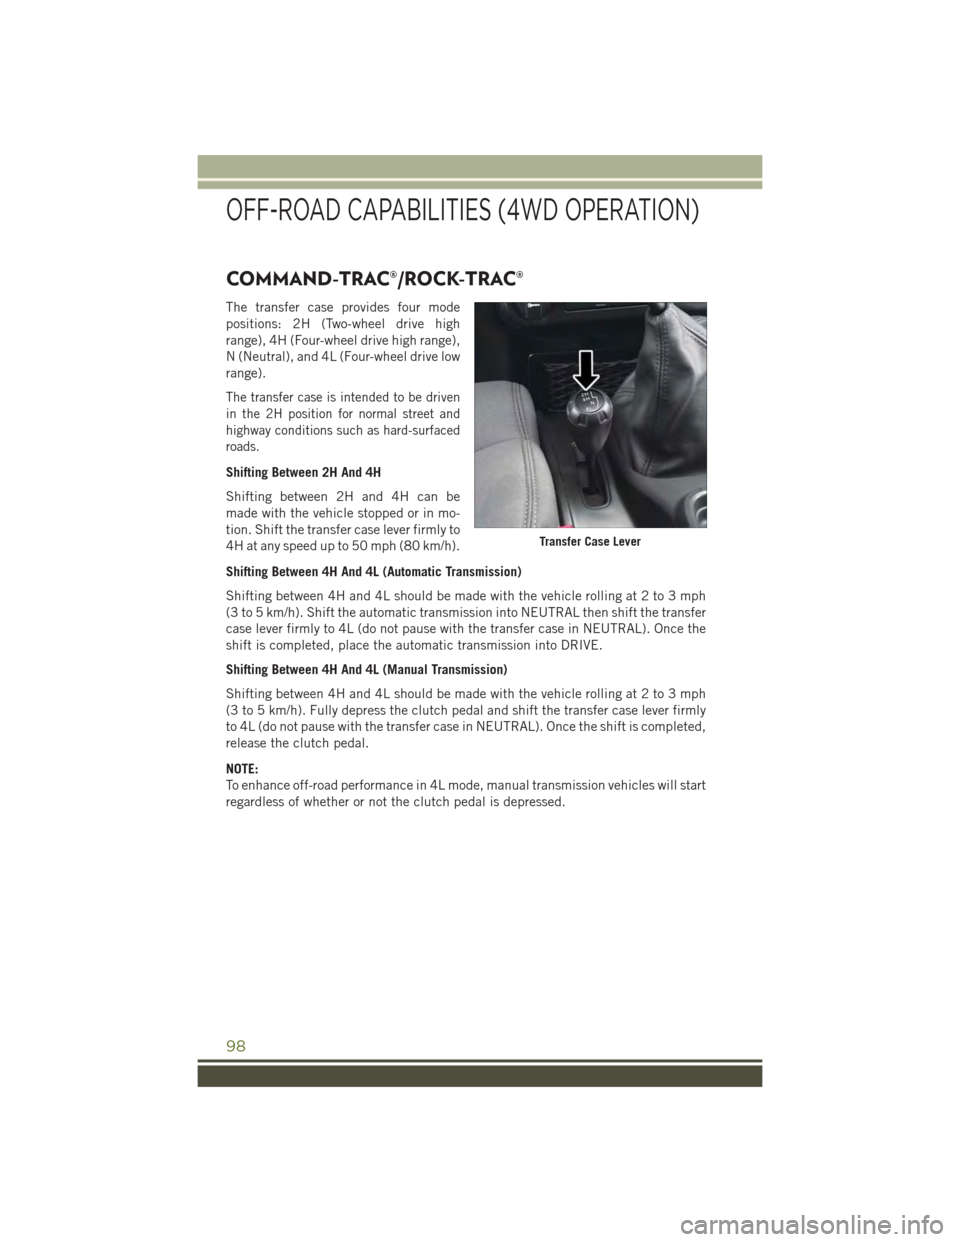
The transfer case provides four mode
positions: 2H (Two-wheel drive high
range), 4H (Four-wheel drive high range),
N (Neutral), and 4L (Four-wheel drive low
range).
The transfer case is intended to be driven
in the 2H position for normal street and
highway conditions such as hard-surfaced
roads.
Shifting Between 2H And 4H
Shifting between 2H and 4H can be
made with the vehicle stopped or in mo-
tion. Shift the transfer case lever firmly to
4H at any speed up to 50 mph (80 km/h).
Shifting Between 4H And 4L (Automatic Transmission)
Shifting between 4H and 4L should be made with the vehicle rolling at 2 to 3 mph
(3 to 5 km/h). Shift the automatic transmission into NEUTRAL then shift the transfer
case lever firmly to 4L (do not pause with the transfer case in NEUTRAL). Once the
shift is completed, place the automatic transmission into DRIVE.
Shifting Between 4H And 4L (Manual Transmission)
Shifting between 4H and 4L should be made with the vehicle rolling at 2 to 3 mph
(3 to 5 km/h). Fully depress the clutch pedal and shift the transfer case lever firmly
to 4L (do not pause with the transfer case in NEUTRAL). Once the shift is completed,
release the clutch pedal.
NOTE:
To enhance off-road performance in 4L mode, manual transmission vehicles will start
regardless of whether or not the clutch pedal is depressed.
Transfer Case Lever
OFF-ROAD CAPABILITIES (4WD OPERATION)
98
Page 102 of 156
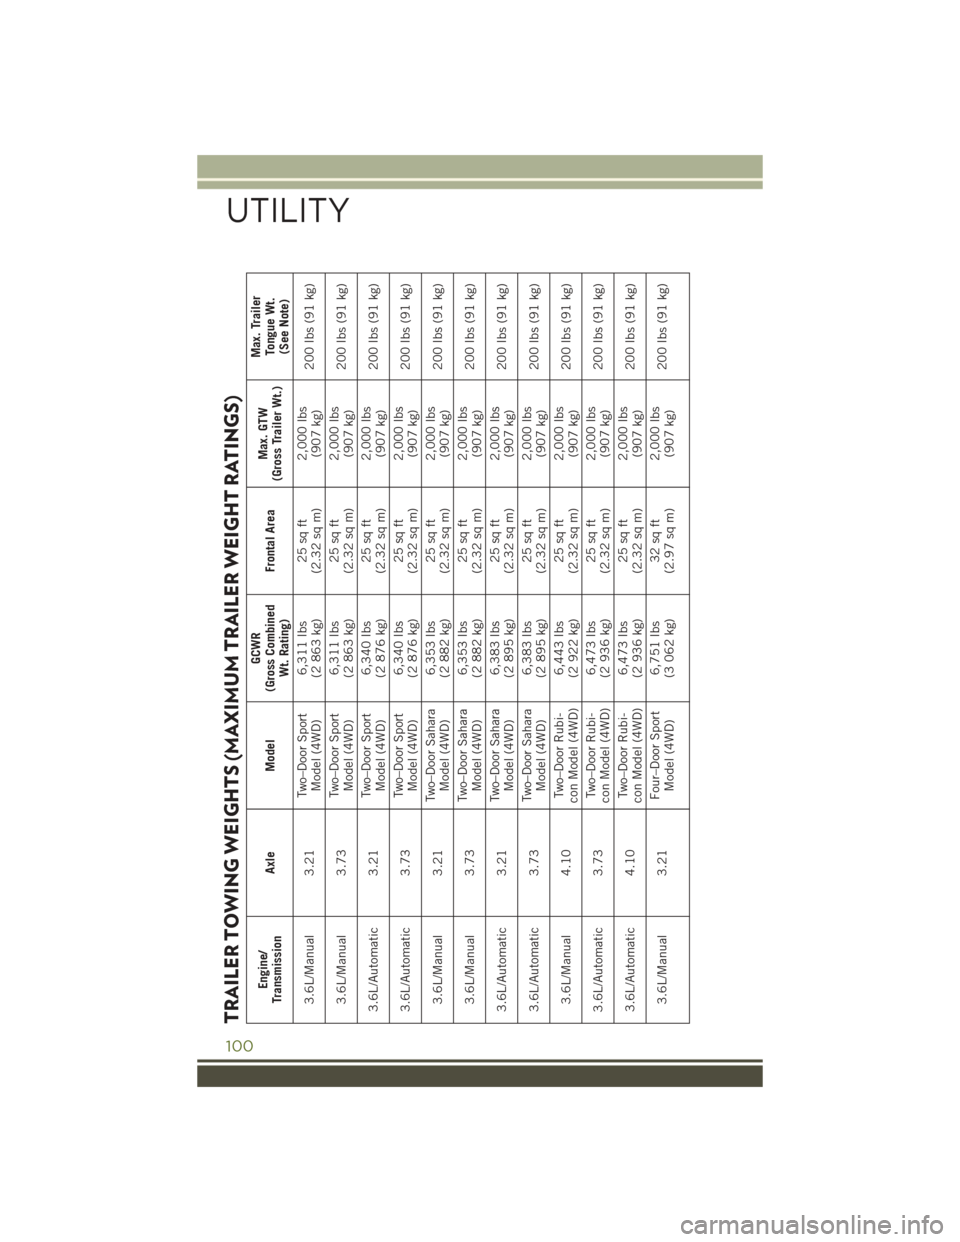
TRAILER TOWING WEIGHTS (MAXIMUM TRAILER WEIGHT RATINGS)
Engine/Transmission
Axle Model
GCWR
(Gross CombinedWt. Rating)
Frontal Area
Max. GTW
(Gross Trailer Wt.)
Max. TrailerTongue Wt.(See Note)
3.6L/Manual 3.21
Two–Door SportModel (4WD)
6,311 lbs(2 863 kg)
25 sq ft(2.32 sq m)
2,000 lbs(907 kg)
200 lbs (91 kg)
3.6L/Manual 3.73
Two–Door SportModel (4WD)
6,311 lbs(2 863 kg)
25 sq ft(2.32 sq m)
2,000 lbs(907 kg)
200 lbs (91 kg)
3.6L/Automatic 3.21
Two–Door SportModel (4WD)
6,340 lbs(2 876 kg)
25 sq ft(2.32 sq m)
2,000 lbs(907 kg)
200 lbs (91 kg)
3.6L/Automatic 3.73
Two–Door SportModel (4WD)
6,340 lbs(2 876 kg)
25 sq ft(2.32 sq m)
2,000 lbs(907 kg)
200 lbs (91 kg)
3.6L/Manual 3.21
Two–Door SaharaModel (4WD)
6,353 lbs(2 882 kg)
25 sq ft(2.32 sq m)
2,000 lbs(907 kg)
200 lbs (91 kg)
3.6L/Manual 3.73
Two–Door SaharaModel (4WD)
6,353 lbs(2 882 kg)
25 sq ft(2.32 sq m)
2,000 lbs(907 kg)
200 lbs (91 kg)
3.6L/Automatic 3.21
Two–Door SaharaModel (4WD)
6,383 lbs(2 895 kg)
25 sq ft(2.32 sq m)
2,000 lbs(907 kg)
200 lbs (91 kg)
3.6L/Automatic 3.73
Two–Door SaharaModel (4WD)
6,383 lbs(2 895 kg)
25 sq ft(2.32 sq m)
2,000 lbs(907 kg)
200 lbs (91 kg)
3.6L/Manual 4.10
Tw o – D o o r R u b i -con Model (4WD)
6,443 lbs(2 922 kg)
25 sq ft(2.32 sq m)
2,000 lbs(907 kg)
200 lbs (91 kg)
3.6L/Automatic
3.73
Two–Door Rubi-con Model (4WD)
6,473 lbs(2 936 kg)
25 sq ft(2.32 sq m)
2,000 lbs(907 kg)
200 lbs (91 kg)
3.6L/Automatic 4.10
Tw o – D o o r R u b i -con Model (4WD)
6,473 lbs(2 936 kg)
25 sq ft(2.32 sq m)
2,000 lbs(907 kg)
200 lbs (91 kg)
3.6L/Manual 3.21
Four–Door SportModel (4WD)
6,751 lbs(3 062 kg)
32 sq ft(2.97 sq m)
2,000 lbs(907 kg)
200 lbs (91 kg)
UTILITY
100
Page 103 of 156
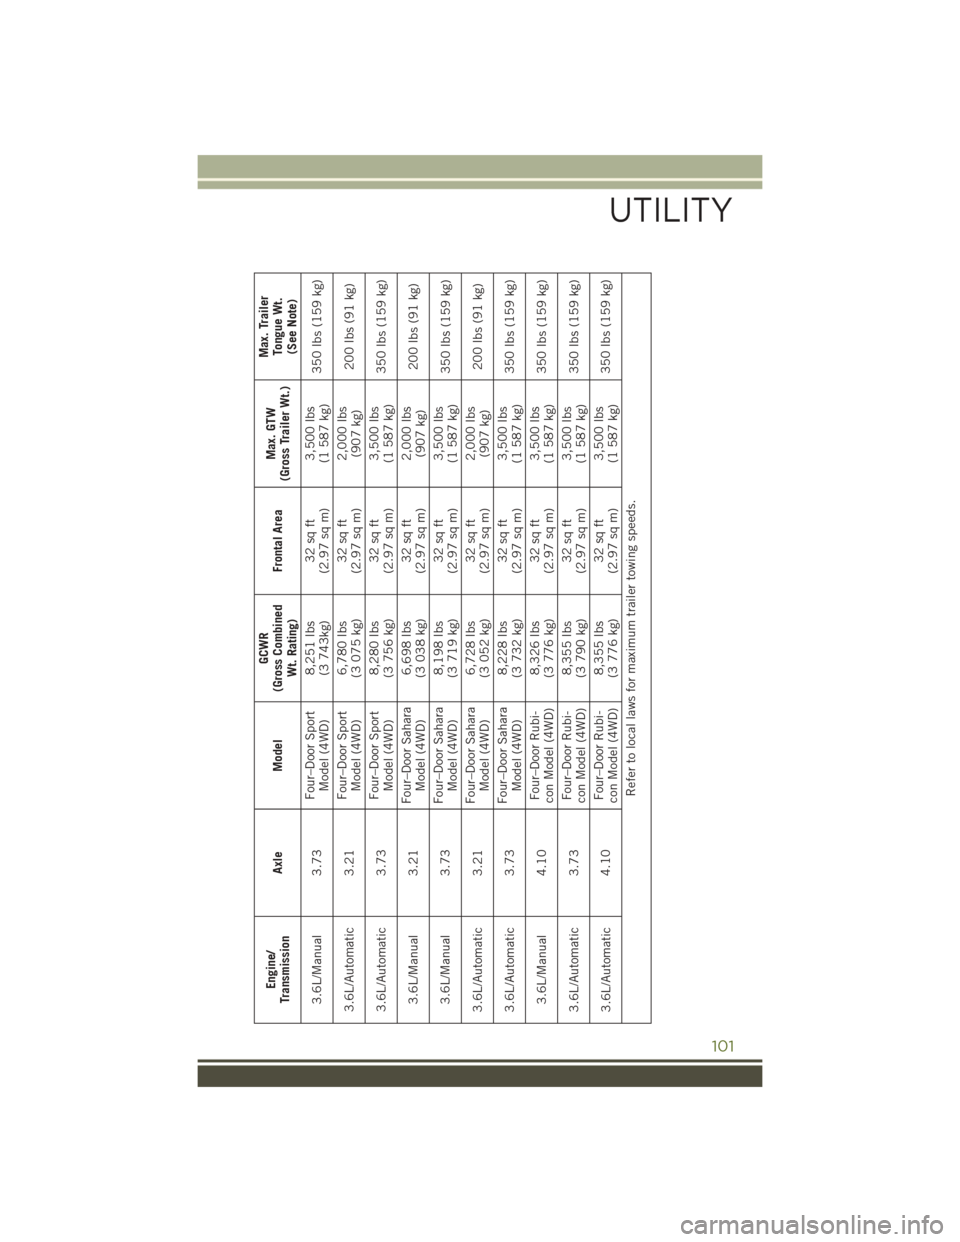
Engine/Transmission
Axle Model
GCWR
(Gross CombinedWt. Rating)
Frontal Area
Max. GTW
(Gross Trailer Wt.)
Max. TrailerTo n g u e W t .(See Note)
3.6L/Manual 3.73
Four–Door SportModel (4WD)
8,251 lbs(3 743kg)
32 sq ft(2.97 sq m)
3,500 lbs(1 587 kg)
350 lbs (159 kg)
3.6L/Automatic 3.21
Four–Door SportModel (4WD)
6,780 lbs(3 075 kg)
32 sq ft(2.97 sq m)
2,000 lbs(907 kg)
200 lbs (91 kg)
3.6L/Automatic 3.73
Four–Door SportModel (4WD)
8,280 lbs(3 756 kg)
32 sq ft(2.97 sq m)
3,500 lbs(1 587 kg)
350 lbs (159 kg)
3.6L/Manual 3.21
Four–Door SaharaModel (4WD)
6,698 lbs(3 038 kg)
32 sq ft(2.97 sq m)
2,000 lbs(907 kg)
200 lbs (91 kg)
3.6L/Manual 3.73
Four–Door SaharaModel (4WD)
8,198 lbs(3 719 kg)
32 sq ft(2.97 sq m)
3,500 lbs(1 587 kg)
350 lbs (159 kg)
3.6L/Automatic 3.21
Four–Door SaharaModel (4WD)
6,728 lbs(3 052 kg)
32 sq ft(2.97 sq m)
2,000 lbs(907 kg)
200 lbs (91 kg)
3.6L/Automatic 3.73
Four–Door SaharaModel (4WD)
8,228 lbs(3 732 kg)
32 sq ft(2.97 sq m)
3,500 lbs(1 587 kg)
350 lbs (159 kg)
3.6L/Manual 4.10
Four–Door Rubi-con Model (4WD)
8,326 lbs(3 776 kg)
32 sq ft(2.97 sq m)
3,500 lbs(1 587 kg)
350 lbs (159 kg)
3.6L/Automatic 3.73
Four–Door Rubi-con Model (4WD)
8,355 lbs(3 790 kg)
32 sq ft(2.97 sq m)
3,500 lbs(1 587 kg)
350 lbs (159 kg)
3.6L/Automatic
4.10
Four–Door
Rubi-
con Model (4WD)
8,355 lbs(3 776 kg)
32 sq ft(2.97 sq m)
3,500 lbs(1 587 kg)
350 lbs (159 kg)
Refer to local laws for maximum trailer towing speeds.
UTILITY
101
Page 104 of 156
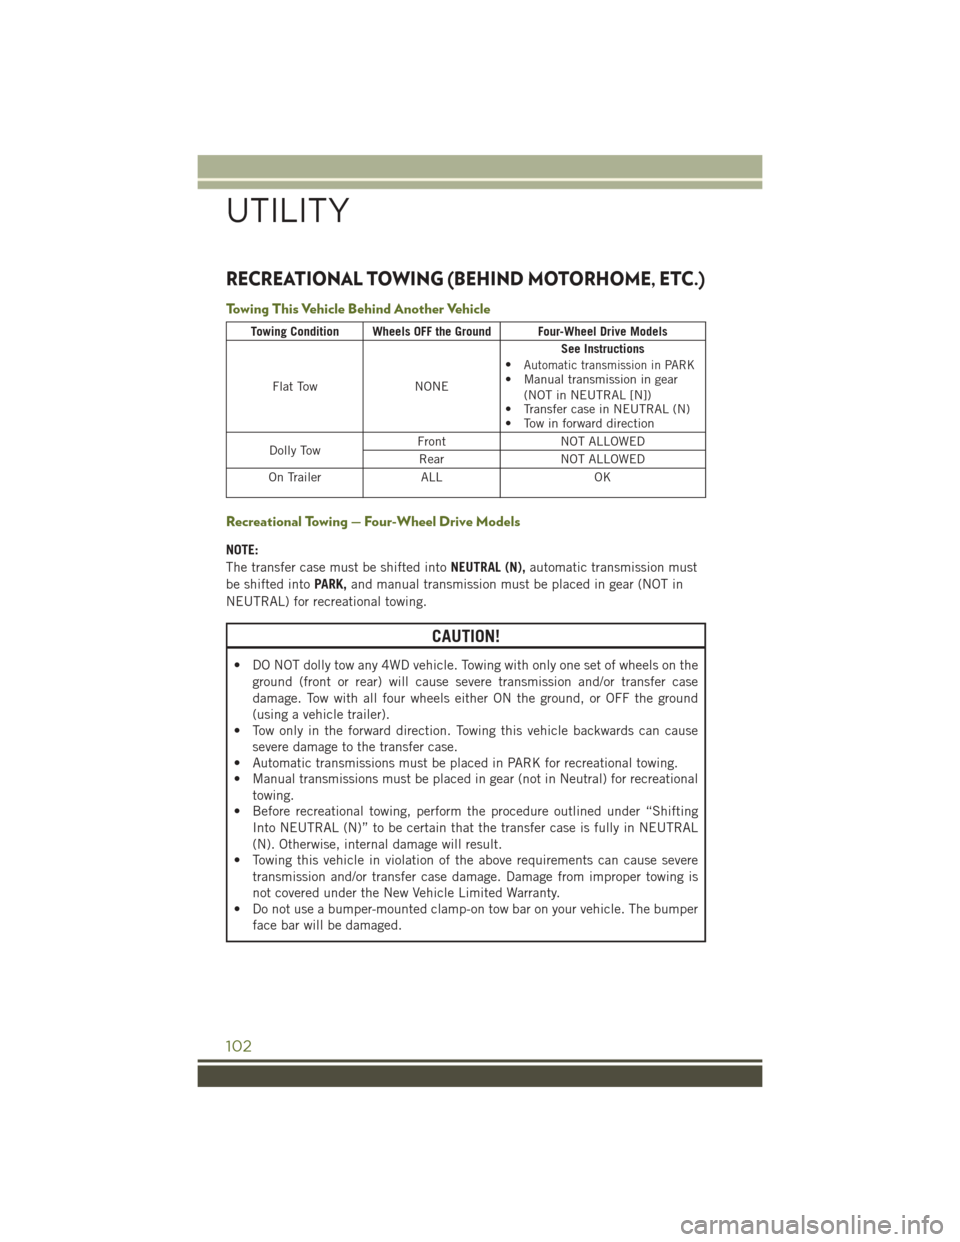
RECREATIONAL TOWING (BEHIND MOTORHOME, ETC.)
Towing This Vehicle Behind Another Vehicle
Towing Condition Wheels OFF the Ground Four-Wheel Drive Models
Flat TowNONE
See Instructions•Automatic transmission in PARK• Manual transmission in gear(NOT in NEUTRAL [N])• Transfer case in NEUTRAL (N)• Tow in forward direction
Dolly TowFrontNOT ALLOWED
RearNOT ALLOWED
On TrailerALLOK
Recreational Towing — Four-Wheel Drive Models
NOTE:
The transfer case must be shifted intoNEUTRAL (N),automatic transmission must
be shifted intoPARK,and manual transmission must be placed in gear (NOT in
NEUTRAL) for recreational towing.
CAUTION!
• DO NOT dolly tow any 4WD vehicle. Towing with only one set of wheels on the
ground (front or rear) will cause severe transmission and/or transfer case
damage. Tow with all four wheels either ON the ground, or OFF the ground
(using a vehicle trailer).
• Tow only in the forward direction. Towing this vehicle backwards can cause
severe damage to the transfer case.
• Automatic transmissions must be placed in PARK for recreational towing.
• Manual transmissions must be placed in gear (not in Neutral) for recreational
towing.
• Before recreational towing, perform the procedure outlined under “Shifting
Into NEUTRAL (N)” to be certain that the transfer case is fully in NEUTRAL
(N). Otherwise, internal damage will result.
• Towing this vehicle in violation of the above requirements can cause severe
transmission and/or transfer case damage. Damage from improper towing is
not covered under the New Vehicle Limited Warranty.
• Do not use a bumper-mounted clamp-on tow bar on your vehicle. The bumper
face bar will be damaged.
UTILITY
102
Page 105 of 156
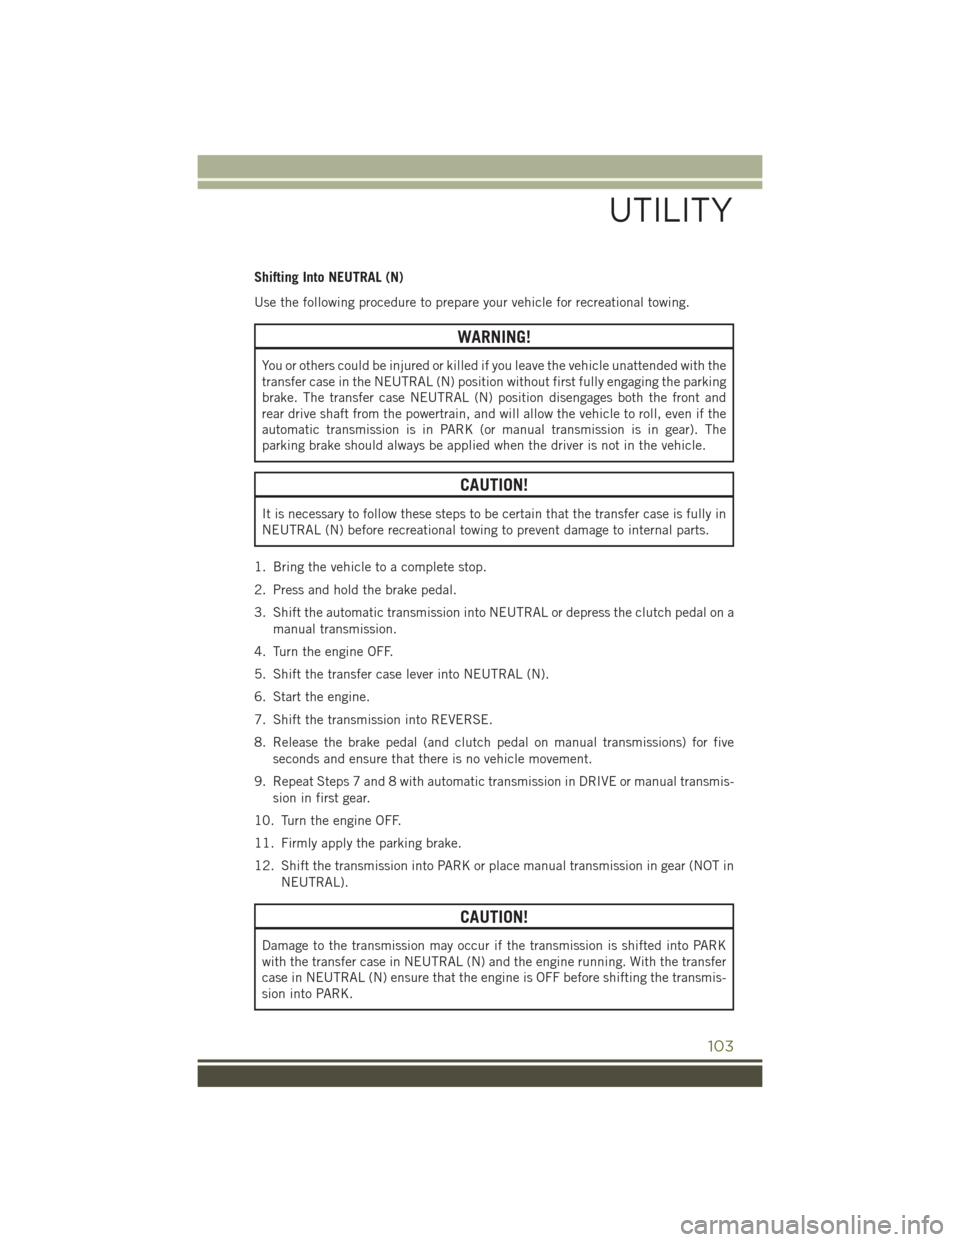
Shifting Into NEUTRAL (N)
Use the following procedure to prepare your vehicle for recreational towing.
WARNING!
You or others could be injured or killed if you leave the vehicle unattended with the
transfer case in the NEUTRAL (N) position without first fully engaging the parking
brake. The transfer case NEUTRAL (N) position disengages both the front and
rear drive shaft from the powertrain, and will allow the vehicle to roll, even if the
automatic transmission is in PARK (or manual transmission is in gear). The
parking brake should always be applied when the driver is not in the vehicle.
CAUTION!
It is necessary to follow these steps to be certain that the transfer case is fully in
NEUTRAL (N) before recreational towing to prevent damage to internal parts.
1. Bring the vehicle to a complete stop.
2. Press and hold the brake pedal.
3. Shift the automatic transmission into NEUTRAL or depress the clutch pedal on a
manual transmission.
4. Turn the engine OFF.
5. Shift the transfer case lever into NEUTRAL (N).
6. Start the engine.
7. Shift the transmission into REVERSE.
8. Release the brake pedal (and clutch pedal on manual transmissions) for five
seconds and ensure that there is no vehicle movement.
9. Repeat Steps 7 and 8 with automatic transmission in DRIVE or manual transmis-
sion in first gear.
10. Turn the engine OFF.
11. Firmly apply the parking brake.
12. Shift the transmission into PARK or place manual transmission in gear (NOT in
NEUTRAL).
CAUTION!
Damage to the transmission may occur if the transmission is shifted into PARK
with the transfer case in NEUTRAL (N) and the engine running. With the transfer
case in NEUTRAL (N) ensure that the engine is OFF before shifting the transmis-
sion into PARK.
UTILITY
103
Page 106 of 156
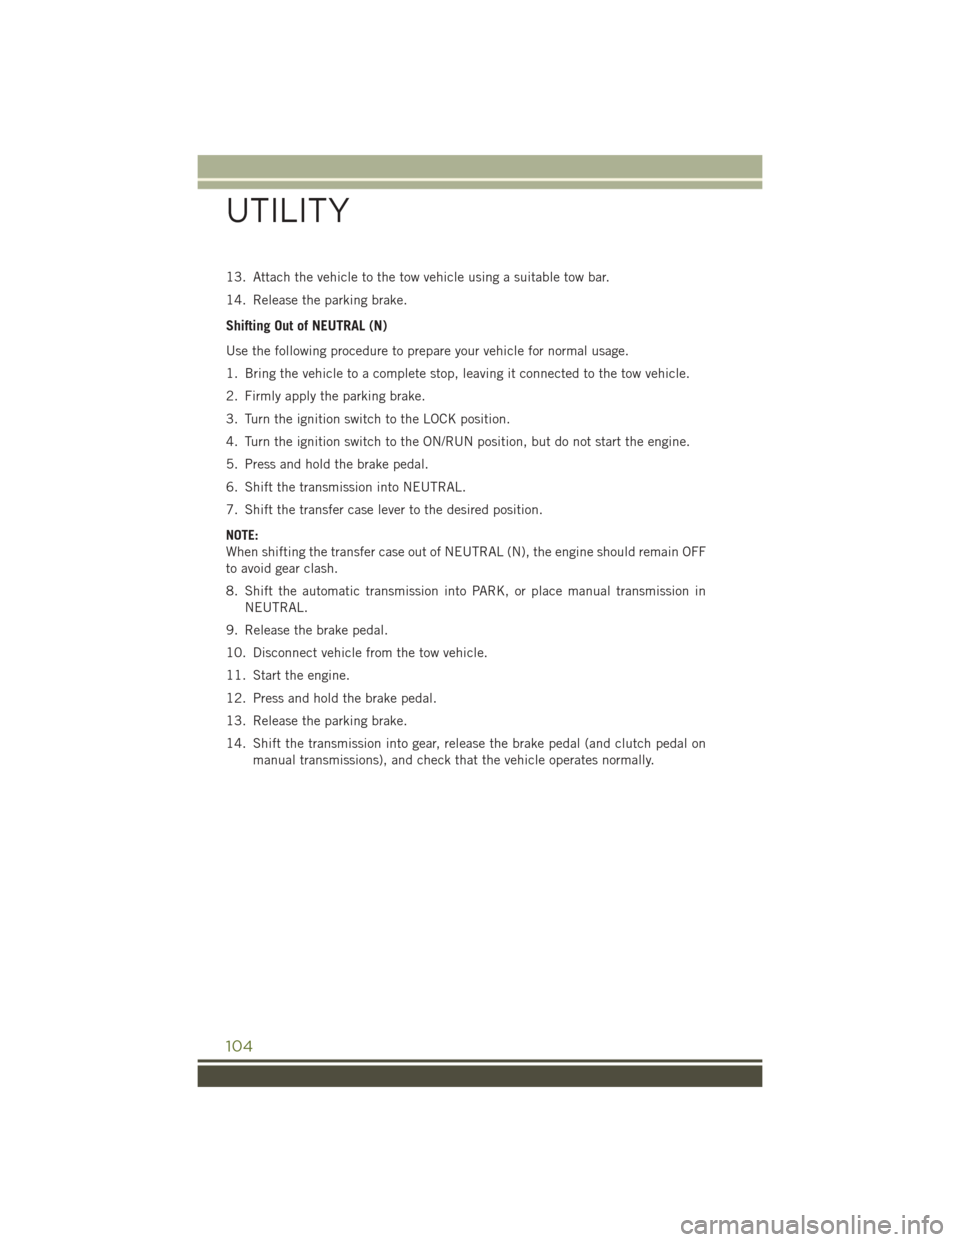
13. Attach the vehicle to the tow vehicle using a suitable tow bar.
14. Release the parking brake.
Shifting Out of NEUTRAL (N)
Use the following procedure to prepare your vehicle for normal usage.
1. Bring the vehicle to a complete stop, leaving it connected to the tow vehicle.
2. Firmly apply the parking brake.
3. Turn the ignition switch to the LOCK position.
4. Turn the ignition switch to the ON/RUN position, but do not start the engine.
5. Press and hold the brake pedal.
6. Shift the transmission into NEUTRAL.
7. Shift the transfer case lever to the desired position.
NOTE:
When shifting the transfer case out of NEUTRAL (N), the engine should remain OFF
to avoid gear clash.
8. Shift the automatic transmission into PARK, or place manual transmission in
NEUTRAL.
9. Release the brake pedal.
10. Disconnect vehicle from the tow vehicle.
11. Start the engine.
12. Press and hold the brake pedal.
13. Release the parking brake.
14. Shift the transmission into gear, release the brake pedal (and clutch pedal on
manual transmissions), and check that the vehicle operates normally.
UTILITY
104