lock JEEP WRANGLER 2016 JK / 3.G Owner's Manual
[x] Cancel search | Manufacturer: JEEP, Model Year: 2016, Model line: WRANGLER, Model: JEEP WRANGLER 2016 JK / 3.GPages: 156, PDF Size: 8.82 MB
Page 27 of 156
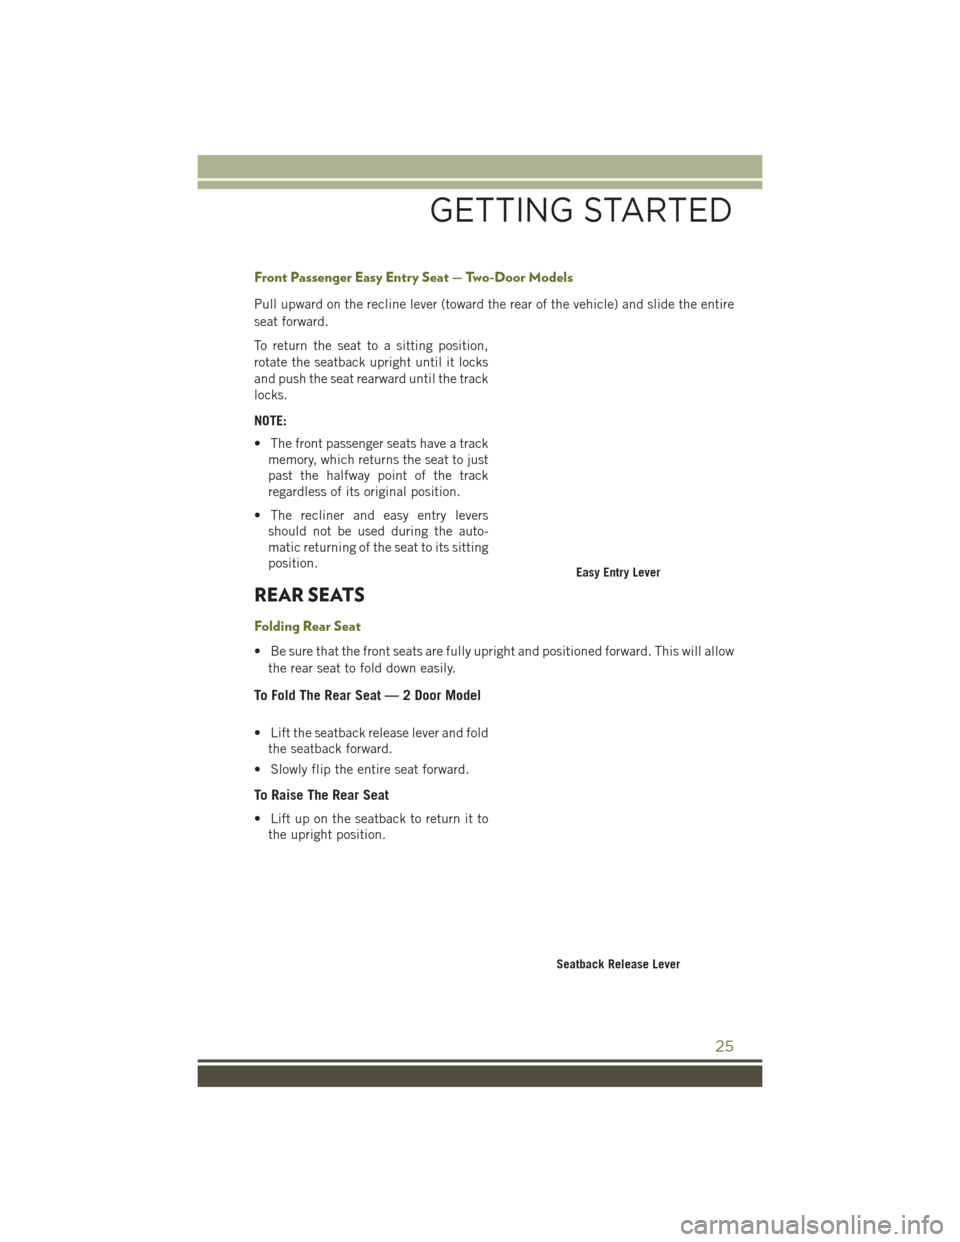
Front Passenger Easy Entry Seat — Two-Door Models
Pull upward on the recline lever (toward the rear of the vehicle) and slide the entire
seat forward.
To return the seat to a sitting position,
rotate the seatback upright until it locks
and push the seat rearward until the track
locks.
NOTE:
• The front passenger seats have a trackmemory, which returns the seat to just
past the halfway point of the track
regardless of its original position.
• The recliner and easy entry levers should not be used during the auto-
matic returning of the seat to its sitting
position.
REAR SEATS
Folding Rear Seat
• Be sure that the front seats are fully upright and positioned forward. This will allow
the rear seat to fold down easily.
To Fold The Rear Seat — 2 Door Model
• Lift the seatback release lever and foldthe seatback forward.
• Slowly flip the entire seat forward.
To Raise The Rear Seat
• Lift up on the seatback to return it to the upright position.
Easy Entry Lever
Seatback Release Lever
GETTING STARTED
25
Page 28 of 156
WARNING!
• It is extremely dangerous to ride in a cargo area, inside or outside of a vehicle.In a collision, people riding in these areas are more likely to be severely injured
or killed. Do not allow people to ride in any area of your vehicle that is not
equipped with seats and seat belts. Be sure everyone in your vehicle is in a seat
and using a seat belt properly.
• Be certain that the seatback is securely locked into position. If the seatback is
not securely locked into position, the seat will not provide the proper stability
for child seats and/or passengers. An improperly latched seat could cause you
or others to be severely injured or killed.
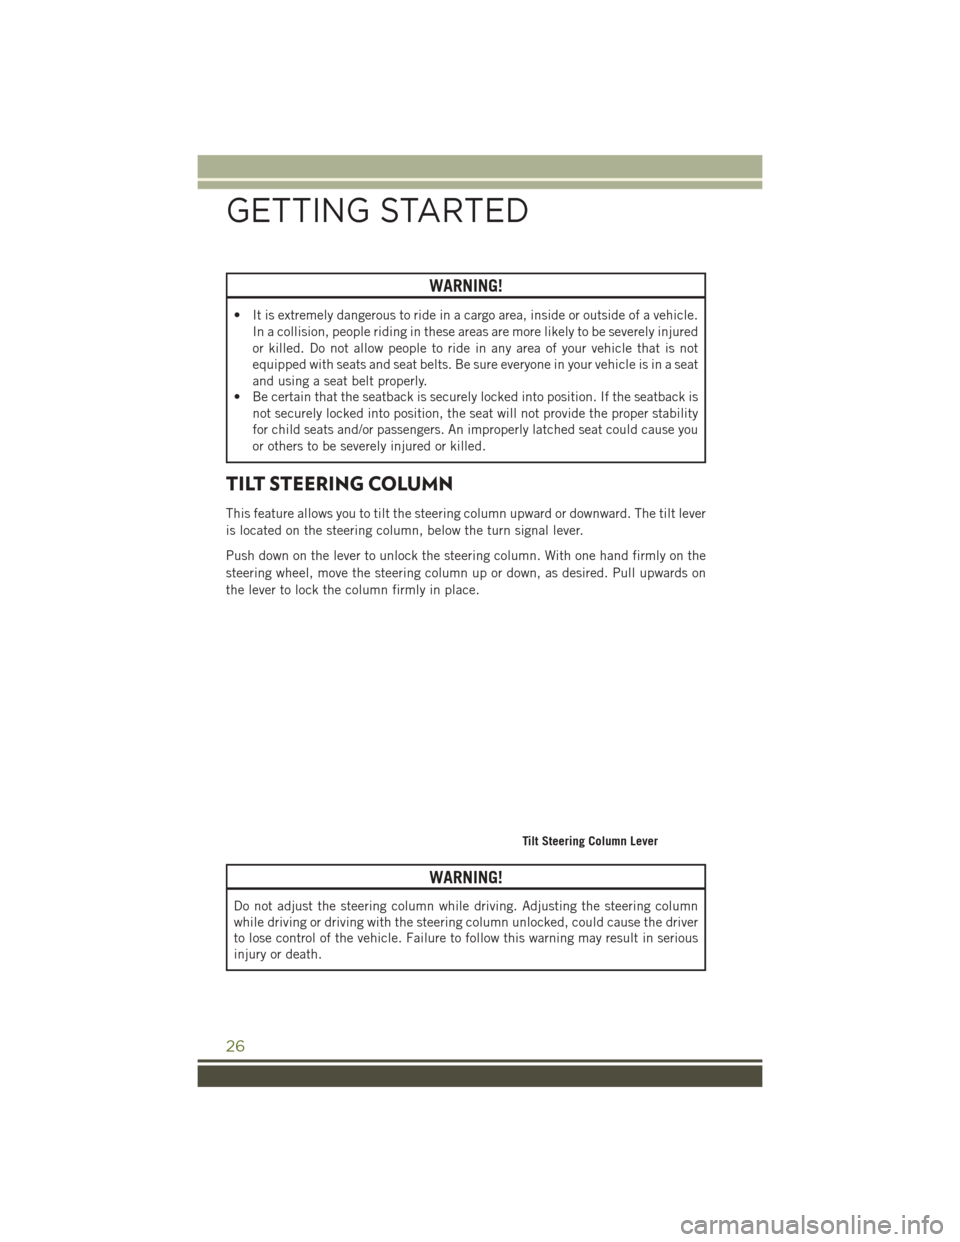
TILT STEERING COLUMN
This feature allows you to tilt the steering column upward or downward. The tilt lever
is located on the steering column, below the turn signal lever.
Push down on the lever to unlock the steering column. With one hand firmly on the
steering wheel, move the steering column up or down, as desired. Pull upwards on
the lever to lock the column firmly in place.
WARNING!
Do not adjust the steering column while driving. Adjusting the steering column
while driving or driving with the steering column unlocked, could cause the driver
to lose control of the vehicle. Failure to follow this warning may result in serious
injury or death.
Tilt Steering Column Lever
GETTING STARTED
26
Page 33 of 156
WARNING!
Sudden loss of visibility through the windshield could lead to a collision. You
might not see other vehicles or other obstacles. To avoid sudden icing of the
windshield during freezing weather, warm the windshield with defroster before
and during windshield washer use.
Mist Feature
Push down on the wiper lever to activate a single wipe to clear off road mist or spray
from a passing vehicle. As long as the lever is held down, the wipers will continue to
operate.
NOTE:
The mist feature does not activate the washer pump; therefore, no washer fluid will
be sprayed on the windshield. The wash function must be used in order to spray the
windshield with washer fluid.
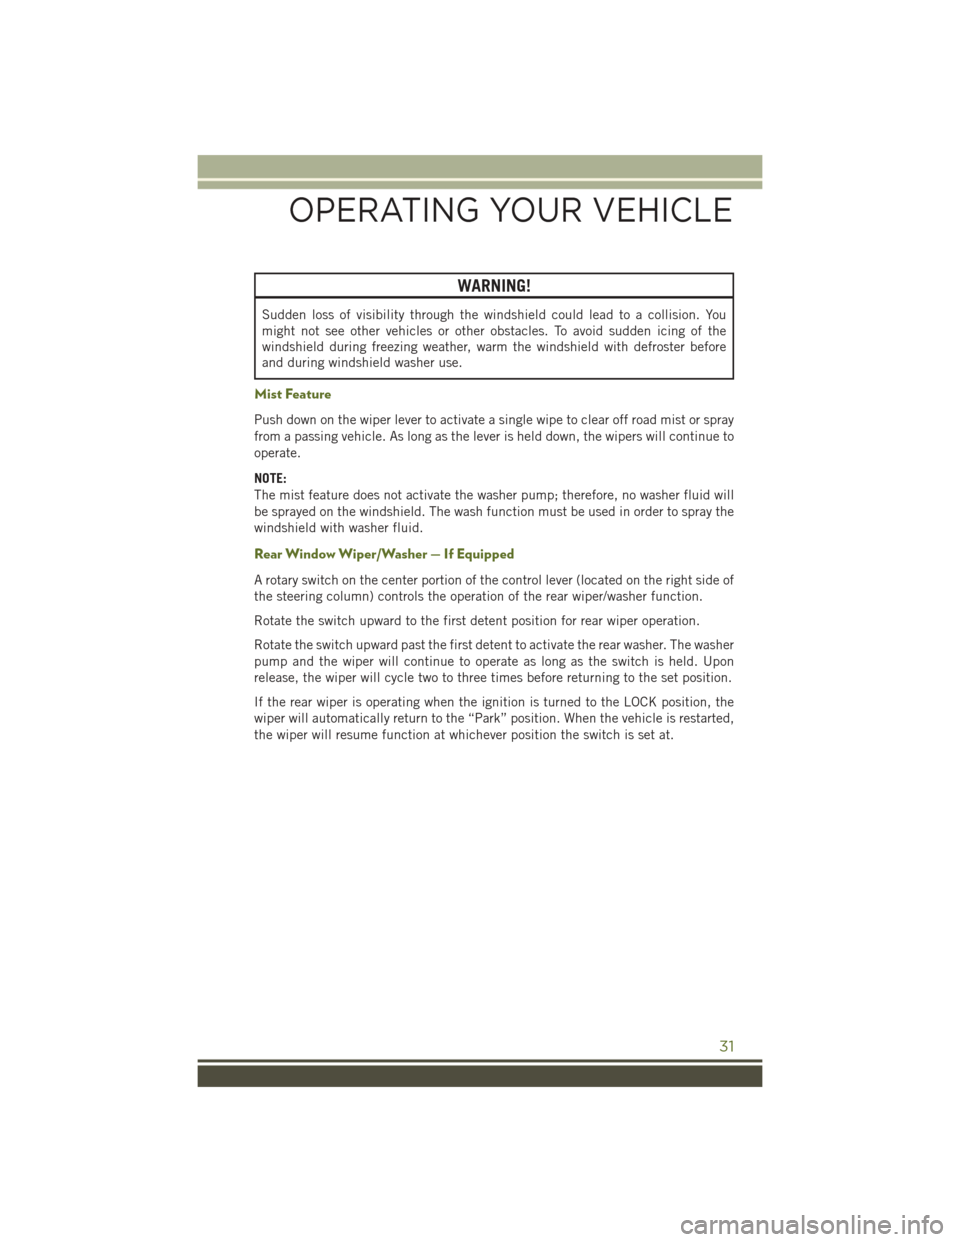
Rear Window Wiper/Washer — If Equipped
A rotary switch on the center portion of the control lever (located on the right side of
the steering column) controls the operation of the rear wiper/washer function.
Rotate the switch upward to the first detent position for rear wiper operation.
Rotate the switch upward past the first detent to activate the rear washer. The washer
pump and the wiper will continue to operate as long as the switch is held. Upon
release, the wiper will cycle two to three times before returning to the set position.
If the rear wiper is operating when the ignition is turned to the LOCK position, the
wiper will automatically return to the “Park” position. When the vehicle is restarted,
the wiper will resume function at whichever position the switch is set at.
OPERATING YOUR VEHICLE
31
Page 39 of 156
SUNRIDER AND SOFT TOP
Two Door Sunrider Open
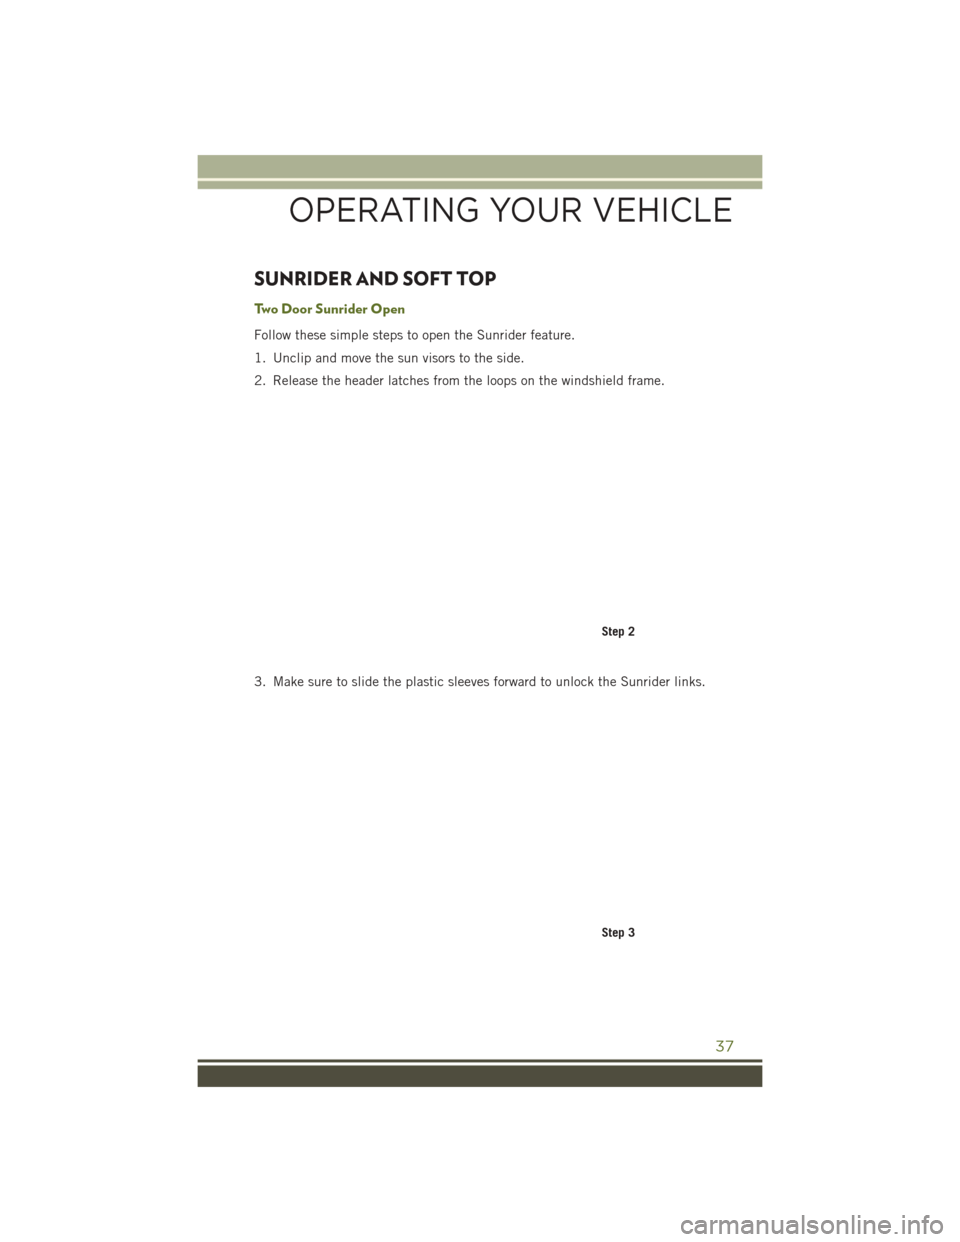
Follow these simple steps to open the Sunrider feature.
1. Unclip and move the sun visors to the side.
2. Release the header latches from the loops on the windshield frame.
3. Make sure to slide the plastic sleeves forward to unlock the Sunrider links.
Step 2
Step 3
OPERATING YOUR VEHICLE
37
Page 42 of 156
3. Release header latches from the windshield frame.
4. Make sure the plastic sleeves are slid rearward over the Sunrider link to lock in thelink (Sunrider Models only).
Step 3
Step 4
OPERATING YOUR VEHICLE
40
Page 46 of 156
6. Secure the top by using the two provided straps. Each strap will wrap around theside bow and Velcro to itself; use one strap on each side of the vehicle.
NOTE:
• Failure to fold the fabric rearward will allow the material to sag and may
block the rearview mirror.
• If you are going to be driving faster than 40 mph (64 km/h) with the Sun-
rider feature open, it is recommended
that you remove the rear window of the
vehicle.
• To close the Sunrider feature, perform the above steps in the opposite order.
Four Door Soft Top Down
Follow these simple steps to lower the Four Door soft top.
1. Remove the side and back windows.
Step 6
Step 1
OPERATING YOUR VEHICLE
44
Page 51 of 156
HARD TOP AND FREEDOM TOP
Freedom Top Removal
Follow these simple steps to remove the front panels.
1. Fold down the sun visor, and move it to the side.
2. Turn the rear fasteners (knobs) (located on the overhead speaker bar assembly)counterclockwise until they can be removed.
3. Turn the center L-shaped locks (two) from the center of the roof panel.
Step 2
Step 3
OPERATING YOUR VEHICLE
49
Page 52 of 156
4. Turn the rear L-shaped lock (located above the shoulder belt anchorage).
5. Unlatch the header panel latch located at the top of the windshield.
6. Remove the left-hand panel.
• To remove the right panel, follow thesteps above except for Step 3.
NOTE:
• The left panel must be removed before removing right panel.
• Vehicles equipped with a Freedom Top, come with a Freedom Top storage
bag that allows you to store your Free-
dom Top panels. Refer to the Owner's
Manual on the DVD for details.
Step 4
Step 5
OPERATING YOUR VEHICLE
50
Page 58 of 156
UCONNECT 130
NOTE:
• Your radio has many features that add to the comfort and convenience for you andyour passengers.
• Some of these radio features should not be used when driving because they take your eyes from the road or your attention from driving.
Clock Setting
1. Push and hold the TIME button until the hours blink.
2. Turn the TUNE/SCROLL control knob to set the hours.
3. Push the TUNE/SCROLL control knob until the minutes begin to blink.
4. Turn the TUNE/SCROLL control knob to set the minutes.
Uconnect 130
1 — CD Eject Button
2 — Seek Down Button
3 — Seek Up Button
4 — AM/FM Button
5 — Disc Mode Button
6 — AUX Mode Button
7 — Rewind Button
8 — Fast Forward Button9 — Set Clock Button
10 — Audio Settings/Rotate To Tune
11 — Radio Sales Code
12 — Audio Jack
13 — Set Preset/CD Random Play
14 — Station Presets Buttons
15 — ON/OFF/Rotate For
Volume
ELECTRONICS
56
Page 60 of 156
UCONNECT 130 WITH SiriusXM SATELLITE RADIO
NOTE:
•
Your radio may not be equipped with the Uconnect Voice Command and Uconnect
Phone features. To determine if your radio has these features, push the Voice Command
button on the radio. You will hear a voice prompt if you have the feature, or see a
message on the radio stating “Uconnect Phone not available” if you do not.
• Your radio has many features that add to the comfort and convenience of you and
your passengers. Some of these radio features should not be used when driving
because they take your eyes from the road or your attention from driving.
Uconnect 130 With SiriusXM Satellite Radio
1 — CD Eject Button
2 — Seek Down Button
3 — Seek Up Button
4 — Voice Command Button
5 — Uconnect Phone Button
6 — Station Info Button
7 — Rewind Button
8 — Fast Forward Button
9 — Set Clock Button
10 — Audio Settings/Rotate To Tune
11 — Radio Sales Code12 — Audio Jack
13 — Set Preset/CD Random Play
14 — Station Preset Buttons
15 — ON/OFF/Rotate For Volume
16 — AM/FM Mode Button
17 — List Folders On A CD
18 — Satellite Radio Button
19 — Music Type Button
20 — Disc Mode Button
21 — Set Up Function
Button
ELECTRONICS
58