steering JEEP WRANGLER 2016 JK / 3.G User Guide
[x] Cancel search | Manufacturer: JEEP, Model Year: 2016, Model line: WRANGLER, Model: JEEP WRANGLER 2016 JK / 3.GPages: 156, PDF Size: 8.82 MB
Page 3 of 156
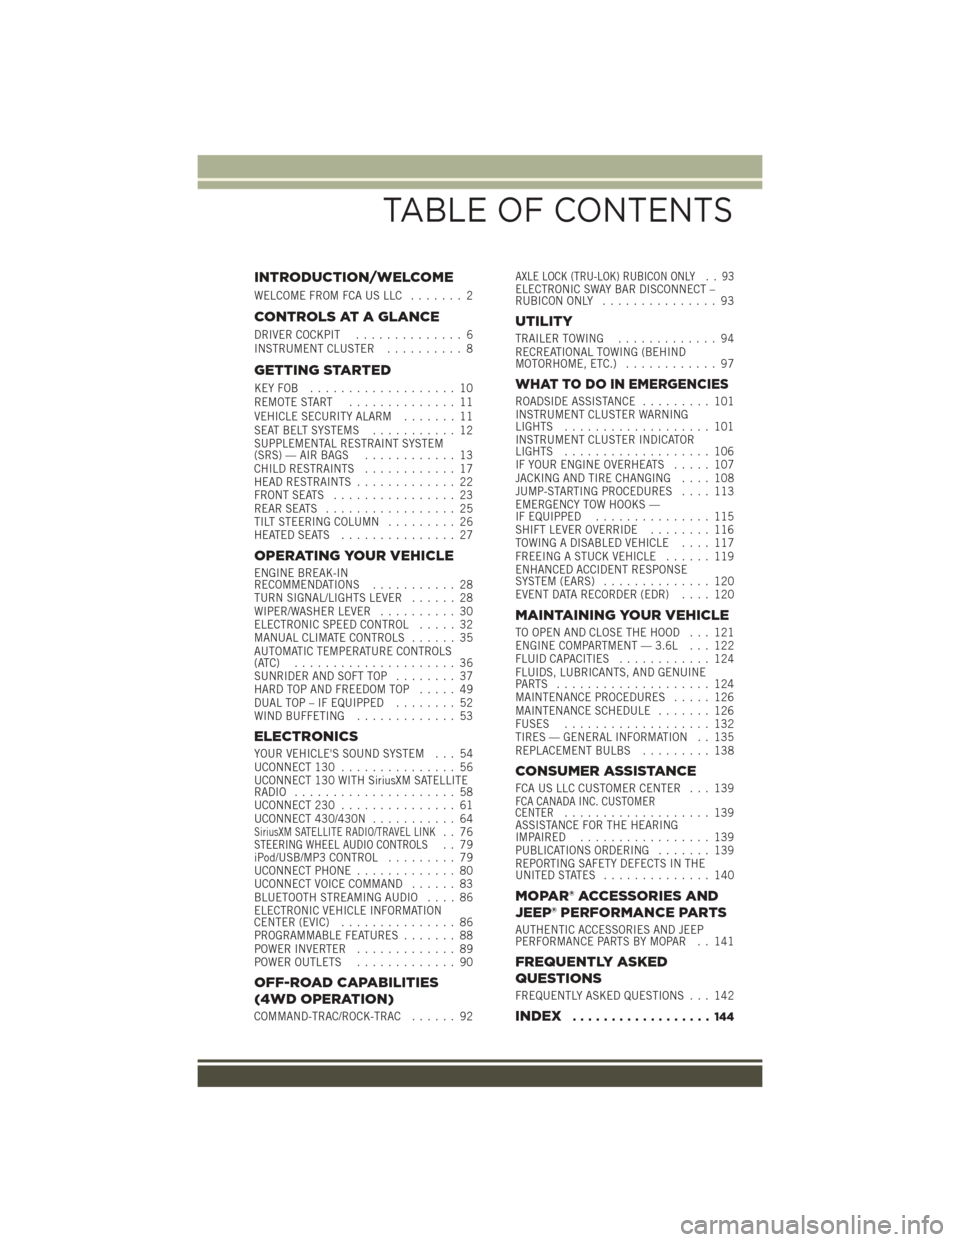
INTRODUCTION/WELCOME
WELCOME FROM FCA US LLC....... 2
CONTROLS AT A GLANCE
DRIVER COCKPIT.............. 6
INSTRUMENT CLUSTER .......... 8
GETTING STARTED
KEYFOB ................... 10
REMOTE START.............. 11
VEHICLE SECURITY ALARM ....... 11
SEAT BELT SYSTEMS ........... 12
SUPPLEMENTAL RESTRAINT SYSTEM
(SRS) — AIR BAGS ............ 13
CHILD RESTRAINTS ............ 17
HEAD RESTRAINTS ............. 22
FRONT SEATS ................ 23
REAR SEATS ................. 25
TILT STEERING COLUMN ......... 26
HEATEDSEATS ............... 27
OPERATING YOUR VEHICLE
ENGINE BREAK-IN
RECOMMENDATIONS ........... 28
TURN SIGNAL/LIGHTS LEVER ...... 28
WIPER/WASHER LEVER .......... 30
ELECTRONIC SPEED CONTROL ..... 32
MANUAL CLIMATE CONTROLS ...... 35
AUTOMATIC TEMPERATURE CONTROLS
(ATC) ..................... 36
SUNRIDER AND SOFT TOP ........ 37
HARD TOP AND FREEDOM TOP ..... 49
DUAL TOP – IF EQUIPPED ........ 52
WIND BUFFETING ............. 53
ELECTRONICS
YOUR VEHICLE'S SOUND SYSTEM . . . 54
UCONNECT 130............... 56
UCONNECT 130 WITH SiriusXM SATELLITE
RADIO ..................... 58
UCONNECT 230 ............... 61
UCONNECT 430/430N ........... 64
SiriusXM SATELLITE RADIO/TRAVEL LINK.. 76STEERING WHEEL AUDIO CONTROLS.. 79
iPod/USB/MP3 CONTROL ......... 79
UCONNECT PHONE ............. 80
UCONNECT VOICE COMMAND ...... 83
BLUETOOTH STREAMING AUDIO .... 86
ELECTRONIC VEHICLE INFORMATION
CENTER (EVIC) ............... 86
PROGRAMMABLE FEATURES ....... 88
POWER INVERTER ............. 89
POWER OUTLETS ............. 90
OFF-ROAD CAPABILITIES
(4WD OPERATION)
COMMAND-TRAC/ROCK-TRAC ...... 92
AXLE LOCK (TRU-LOK) RUBICON ONLY . . 93ELECTRONIC SWAY BAR DISCONNECT –
RUBICON ONLY............... 93
UTILITY
TRAILER TOWING ............. 94
RECREATIONAL TOWING (BEHIND
MOTORHOME, ETC.) ............ 97
WHAT TO DO IN EMERGENCIES
ROADSIDE ASSISTANCE ......... 101
INSTRUMENT CLUSTER WARNING
LIGHTS ................... 101
INSTRUMENT CLUSTER INDICATOR
LIGHTS ................... 106
IF YOUR ENGINE OVERHEATS ..... 107
JACKING AND TIRE CHANGING .... 108
JUMP-STARTING PROCEDURES .... 113
EMERGENCY TOW HOOKS —
IF EQUIPPED ............... 115
SHIFT LEVER OVERRIDE ........ 116
TOWING A DISABLED VEHICLE .... 117
FREEING A STUCK VEHICLE ...... 119
ENHANCED ACCIDENT RESPONSE
SYSTEM (EARS) .............. 120
EVENT DATA RECORDER (EDR) .... 120
MAINTAINING YOUR VEHICLE
TO OPEN AND CLOSE THE HOOD . . . 121
ENGINE COMPARTMENT — 3.6L . . . 122
FLUID CAPACITIES............ 124
FLUIDS, LUBRICANTS, AND GENUINE
PARTS .................... 124
MAINTENANCE PROCEDURES ..... 126
MAINTENANCE SCHEDULE ....... 126
FUSES ................... 132
TIRES — GENERAL INFORMATION . . 135
REPLACEMENT BULBS ......... 138
CONSUMER ASSISTANCE
FCA US LLC CUSTOMER CENTER . . . 139FCA CANADA INC. CUSTOMER
CENTER................... 139
ASSISTANCE FOR THE HEARING
IMPAIRED ................. 139
PUBLICATIONS ORDERING ....... 139
REPORTING SAFETY DEFECTS IN THE
UNITEDSTATES .............. 140
MOPAR® ACCESSORIES AND
JEEP® PERFORMANCE PARTS
AUTHENTIC ACCESSORIES AND JEEP
PERFORMANCE PARTS BY MOPAR . . 141
FREQUENTLY ASKED
QUESTIONS
FREQUENTLY ASKED QUESTIONS . . . 142
INDEX.................. 144
TABLE OF CONTENTS
Page 8 of 156
DRIVER COCKPIT
1. Turn Signal/Lights Lever (behind steering wheel) pg. 28
2. Instrument Cluster pg. 8
3. Wiper/Washer Lever (behind steering wheel) pg. 30
4. Audio System pg. 54
5. Power Windows
6. Glove Compartment
7. Climate Controls pg. 35
CONTROLS AT A GLANCE
6
Page 15 of 156
WARNING!
• In a collision, you and your passengers can suffer much greater injuries if youare not properly buckled up. You can strike the interior of your vehicle or other
passengers, or you can be thrown out of the vehicle. Always be sure you and
others in your vehicle are buckled up properly.
• A shoulder belt placed behind you will not protect you from injury during a
collision. You are more likely to hit your head in a collision if you do not wear
your shoulder belt. The lap and shoulder belt are meant to be used together.
• A seat belt that is too loose will not protect you properly. In a sudden stop, you
could move too far forward, increasing the possibility of injury. Wear your seat
belt snugly.
• A frayed or torn seat belt could rip apart in a collision and leave you with no
protection. Inspect the seat belt system periodically, checking for cuts, frays,
or loose parts. Damaged parts must be replaced immediately. Do not disas-
semble or modify the system. Seat belt assemblies must be replaced after a
collision.
SUPPLEMENTAL RESTRAINT SYSTEM (SRS) — AIR
BAGS
Air Bag System Components
Your vehicle may be equipped with the following air bag system components:
• Occupant Restraint Controller (ORC)
• Air Bag Warning Light
• Steering Wheel and Column
• Instrument Panel
• Knee Impact Bolsters
• Advanced Front Air Bags
• Supplemental Side Air Bags
• Front and Side Impact Sensors
• Seat Belt Pretensioners
• Seat Belt Buckle Switch
• Seat Track Position Sensors
GETTING STARTED
13
Page 16 of 156
Advanced Front Air Bags
• This vehicle has Advanced Front Air Bags for both the driver and front passengeras a supplement to the seat belt restraint systems. The Advanced Front Air Bags
will not deploy in every type of collision.
• Advanced Front Air Bags are designed to provide additional protection by supplementing the seat belts. Advanced Front Air Bags are not expected to reduce
the risk of injury in rear, side, or rollover collisions.
• The Advanced Front Air Bags will not deploy in all frontal collisions, including some that may produce substantial vehicle damage — for example, some pole
collisions, truck underrides, and angle offset collisions.
• On the other hand, depending on the type and location of impact, Advanced Front Air Bags may deploy in crashes with little vehicle front-end damage but that
produce a severe initial deceleration.
• Because air bag sensors measure vehicle deceleration over time, vehicle speed and damage by themselves are not good indicators of whether or not an air bag
should have deployed.
• Seat belts are necessary for your protection in all collisions, and also are needed to help keep you in position, away from an inflating air bag.
• After any collision, the vehicle should be taken to an authorized dealer immedi- ately.
• Do not drive your vehicle after the air bags have deployed. If you are involved in another collision, the air bags will not be in place to protect you.
• If it is necessary to modify the air bag system for persons with disabilities, contact your authorized dealer.
• Refer to the Owner's Manual on the DVD for further details regarding the Supplemental Restraint System (SRS).
WARNING!
• Relying on the air bags alone could lead to more severe injuries in a collision. The air bags work with your seat belt to restrain you properly. In some
collisions, the air bags won't deploy at all. Always wear your seat belts even
though you have air bags.
• Being too close to the steering wheel or instrument panel during Advanced
Front Air Bag deployment could cause serious injury, including death. Air bags
need room to inflate. Sit back, comfortably extending your arms to reach the
steering wheel or instrument panel.
• No objects should be placed over or near the air bag on the instrument panel
or steering wheel because any such objects could cause harm if the vehicle is
in a collision severe enough to cause the air bag to inflate.
GETTING STARTED
14
Page 28 of 156
WARNING!
• It is extremely dangerous to ride in a cargo area, inside or outside of a vehicle.In a collision, people riding in these areas are more likely to be severely injured
or killed. Do not allow people to ride in any area of your vehicle that is not
equipped with seats and seat belts. Be sure everyone in your vehicle is in a seat
and using a seat belt properly.
• Be certain that the seatback is securely locked into position. If the seatback is
not securely locked into position, the seat will not provide the proper stability
for child seats and/or passengers. An improperly latched seat could cause you
or others to be severely injured or killed.
TILT STEERING COLUMN
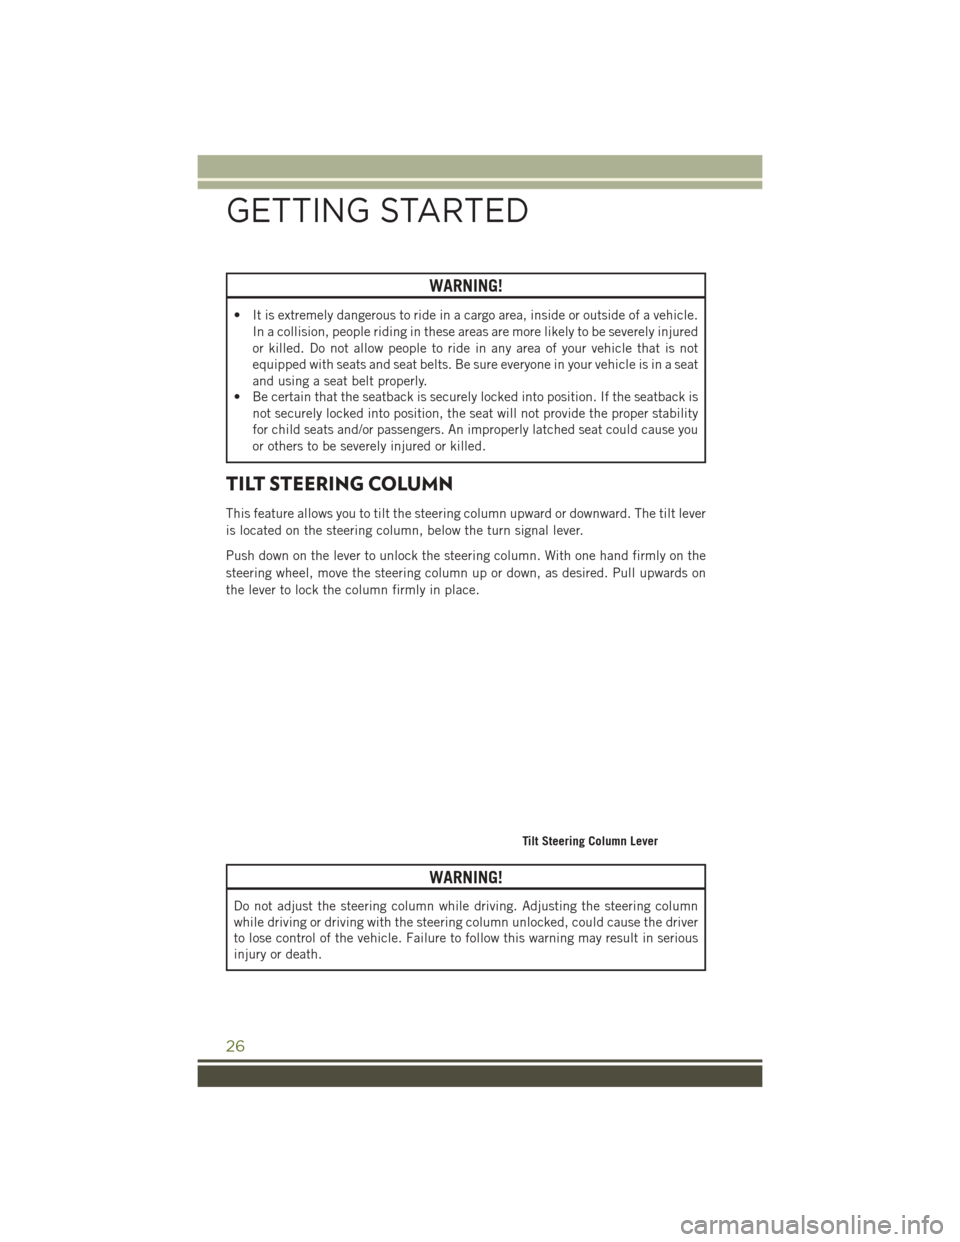
This feature allows you to tilt the steering column upward or downward. The tilt lever
is located on the steering column, below the turn signal lever.
Push down on the lever to unlock the steering column. With one hand firmly on the
steering wheel, move the steering column up or down, as desired. Pull upwards on
the lever to lock the column firmly in place.
WARNING!
Do not adjust the steering column while driving. Adjusting the steering column
while driving or driving with the steering column unlocked, could cause the driver
to lose control of the vehicle. Failure to follow this warning may result in serious
injury or death.
Tilt Steering Column Lever
GETTING STARTED
26
Page 33 of 156
WARNING!
Sudden loss of visibility through the windshield could lead to a collision. You
might not see other vehicles or other obstacles. To avoid sudden icing of the
windshield during freezing weather, warm the windshield with defroster before
and during windshield washer use.
Mist Feature
Push down on the wiper lever to activate a single wipe to clear off road mist or spray
from a passing vehicle. As long as the lever is held down, the wipers will continue to
operate.
NOTE:
The mist feature does not activate the washer pump; therefore, no washer fluid will
be sprayed on the windshield. The wash function must be used in order to spray the
windshield with washer fluid.
Rear Window Wiper/Washer — If Equipped
A rotary switch on the center portion of the control lever (located on the right side of
the steering column) controls the operation of the rear wiper/washer function.
Rotate the switch upward to the first detent position for rear wiper operation.
Rotate the switch upward past the first detent to activate the rear washer. The washer
pump and the wiper will continue to operate as long as the switch is held. Upon
release, the wiper will cycle two to three times before returning to the set position.
If the rear wiper is operating when the ignition is turned to the LOCK position, the
wiper will automatically return to the “Park” position. When the vehicle is restarted,
the wiper will resume function at whichever position the switch is set at.
OPERATING YOUR VEHICLE
31
Page 34 of 156
ELECTRONIC SPEED CONTROL
When engaged, the Electronic Speed Control takes over accelerator operations at
speeds greater than 25 mph (40 km/h).
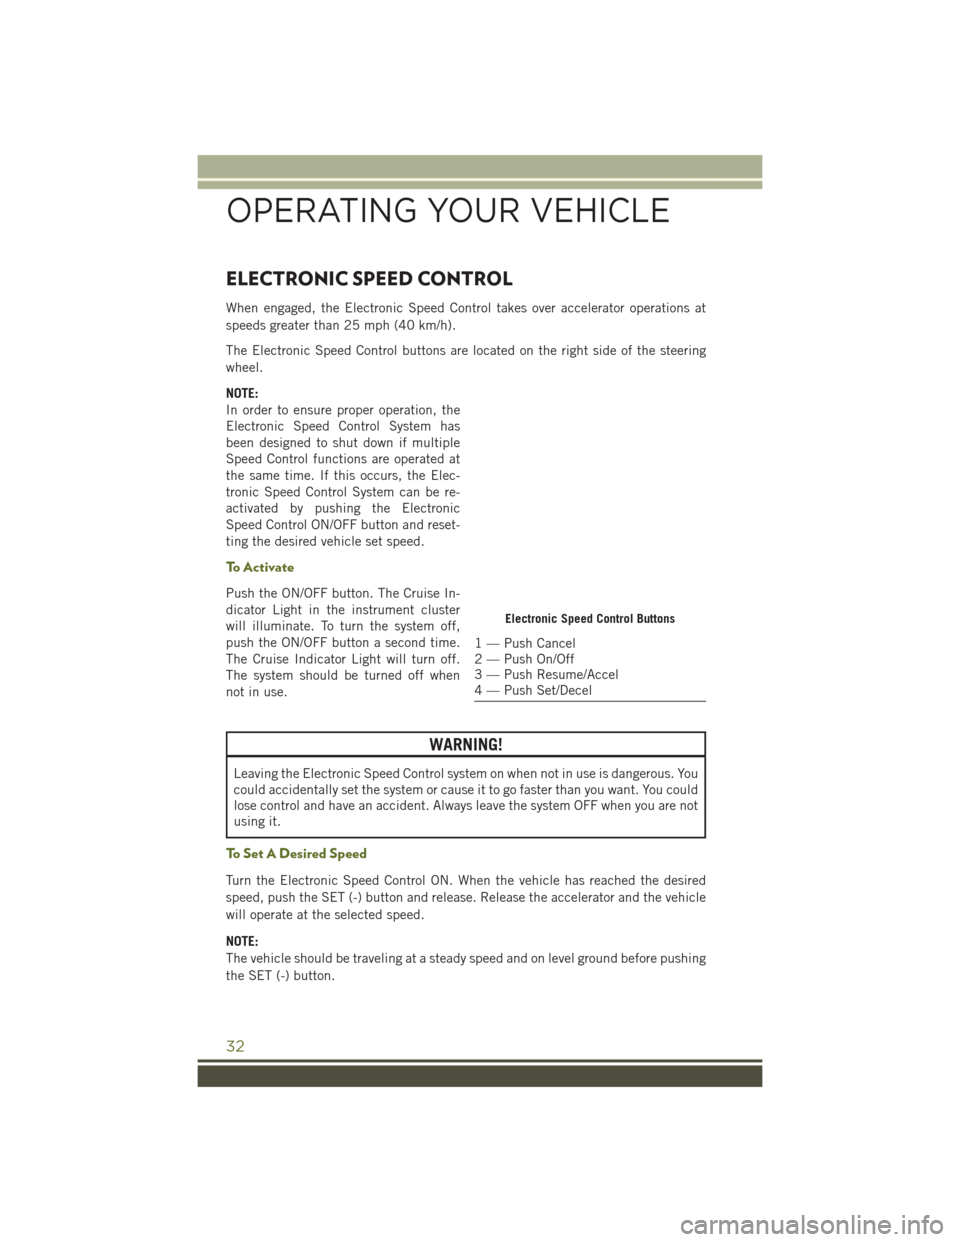
The Electronic Speed Control buttons are located on the right side of the steering
wheel.
NOTE:
In order to ensure proper operation, the
Electronic Speed Control System has
been designed to shut down if multiple
Speed Control functions are operated at
the same time. If this occurs, the Elec-
tronic Speed Control System can be re-
activated by pushing the Electronic
Speed Control ON/OFF button and reset-
ting the desired vehicle set speed.
To Activate
Push the ON/OFF button. The Cruise In-
dicator Light in the instrument cluster
will illuminate. To turn the system off,
push the ON/OFF button a second time.
The Cruise Indicator Light will turn off.
The system should be turned off when
not in use.
WARNING!
Leaving the Electronic Speed Control system on when not in use is dangerous. You
could accidentally set the system or cause it to go faster than you want. You could
lose control and have an accident. Always leave the system OFF when you are not
using it.
To Set A Desired Speed
Turn the Electronic Speed Control ON. When the vehicle has reached the desired
speed, push the SET (-) button and release. Release the accelerator and the vehicle
will operate at the selected speed.
NOTE:
The vehicle should be traveling at a steady speed and on level ground before pushing
the SET (-) button.
Electronic Speed Control Buttons
1 — Push Cancel
2 — Push On/Off
3 — Push Resume/Accel
4 — Push Set/Decel
OPERATING YOUR VEHICLE
32
Page 56 of 156
YOUR VEHICLE'S SOUND SYSTEM
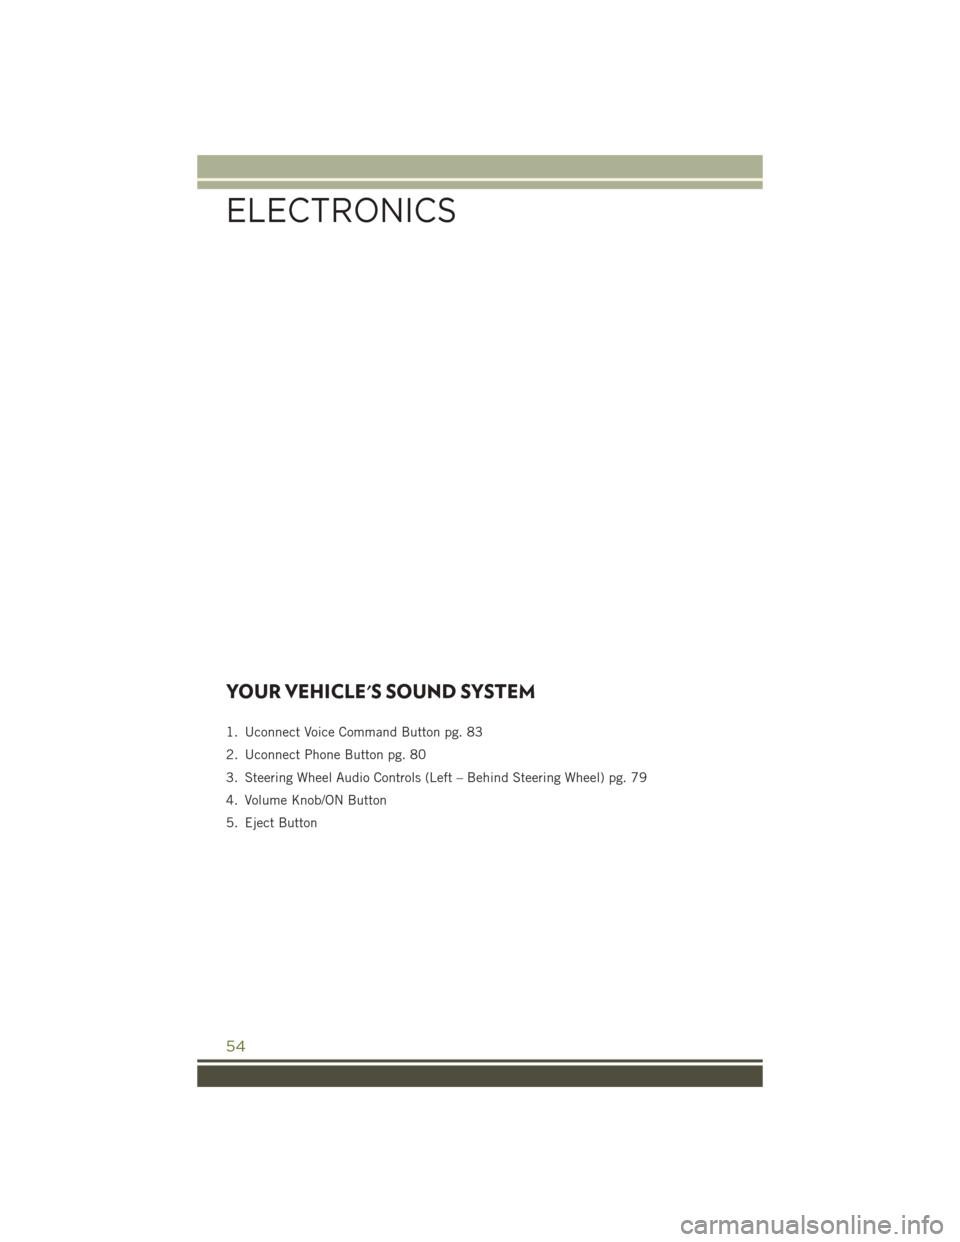
1. Uconnect Voice Command Button pg. 83
2. Uconnect Phone Button pg. 80
3. Steering Wheel Audio Controls (Left – Behind Steering Wheel) pg. 79
4. Volume Knob/ON Button
5. Eject Button
ELECTRONICS
54
Page 57 of 156
6. Steering Wheel Audio Controls (Right – Behind Steering Wheel) pg. 79
7. Uconnect Radio pg. 56
8. Tune/Scroll Knob/Browse/Enter Button
9. Audio Jack pg. 79
10. USB Port (Inside Console) pg. 79
ELECTRONICS
55
Page 81 of 156
Replay Option Option Description
Replay Time Displays the amount of time in the upper center of the screen bywhich your content lags the live channel.
Live Resumes playback of live content at any time while replaying re- wound content.
STEERING WHEEL AUDIO CONTROLS
The steering wheel audio controls are located on the rear surface of the steering
wheel.
Right Switch
• Push the switch up or down to in-
crease or decrease the volume.
• Push the button in the center to change modes AM/FM/CD/SAT.
Left Switch
• Push the switch up or down to searchfor the next listenable station or select
the next or previous CD track.
• Push the button in the center to select the next preset station (radio) or to
change CDs if equipped with a CD
Changer.
iPod/USB/MP3 CONTROL
There are many ways to play music from iPod/MP3 players or USB devices through
your vehicle's sound system.
The remote USB port, located within the center console, allows you to plug an iPod
into the vehicle's sound system.
• Non-Touchscreen Radios: To hear audio
from devices connected to the USB
port, push the AUX button on the face-
plate.
Steering Wheel Audio Controls (Rearview Of Steering Wheel)
Center Console USB
ELECTRONICS
79